

If you want to build a modern, clickable photographic slide that reveals four distinct gradient-styled options on a single slide, you’re in the right place. In this in-depth guide I’ll walk you through every step I use to design and assemble a reusable slide that contains 4 Gradient Fill options in PowerPoint. This tutorial explains the exact shape-building, gradient editing, icon styling, grouping, and finishing touches — plus tips for color harmony, animation, and reuse.
Below you’ll find one clear Table of Contents to navigate the post, followed by a detailed, annotated step-by-step workflow with screenshots at key moments, practical design advice, and a full FAQ to answer common questions about the technique and about using 4 Gradient Fill options in powerpoint.
Keyphrase: This article focuses on how to create 4 Gradient Fill options in powerpoint, and every instruction is written so you can reproduce the slide quickly and reliably.
Table of Contents
- Quick overview of the finished slide
- Materials and PowerPoint features used
- Design plan and layout strategy
- Step-by-step build — create the base shapes
- Adding nested ovals and gradient fills
- Creating the accent bar and applying the format painter
- Inserting and styling text and icons
- Duplicating, changing colors and icons to make 4 Gradient Fill options in powerpoint
- Animation and interaction tips
- Color combination ideas and design best practices
- Export, reuse, and template suggestions
- Troubleshooting common issues
- FAQ
- Conclusion and final checklist
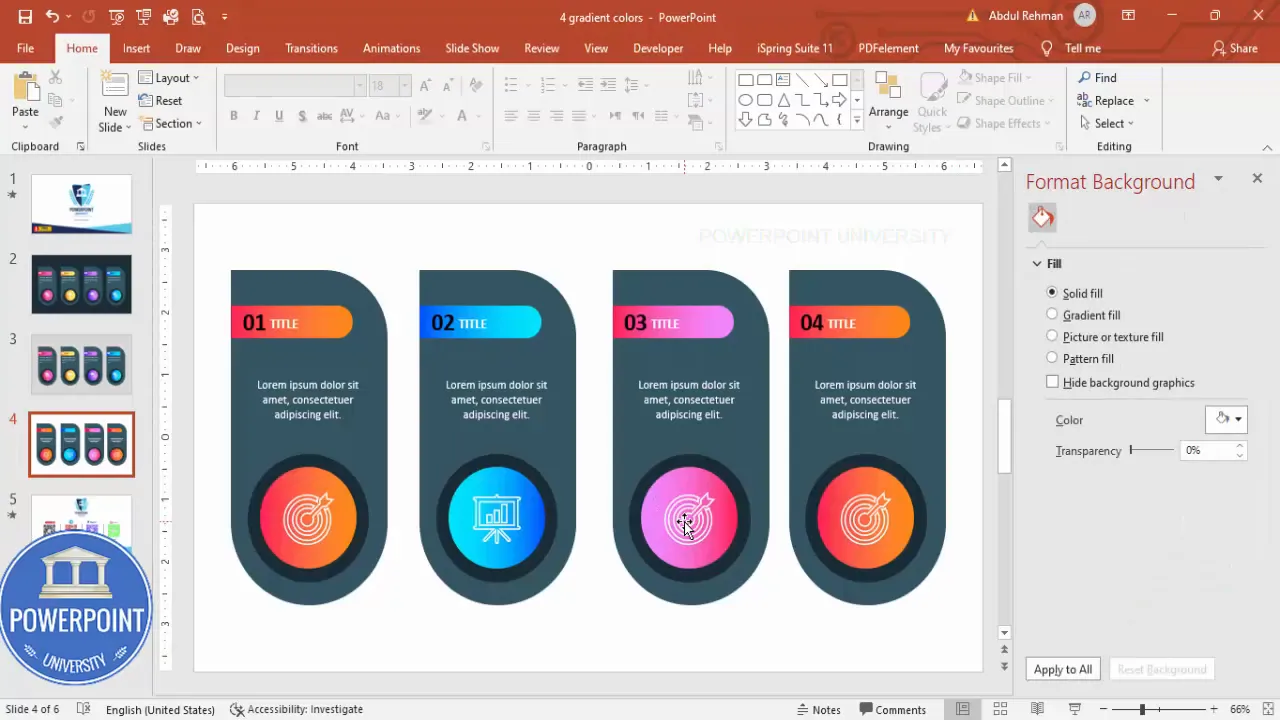
Quick overview of the finished slide
The slide you’ll create has four clickable options that cycle as you click during a presentation. Each option is a compact block that contains:
- A custom rounded shape built by merging two rectangles
- A layered concentric oval with a radial gradient fill
- An accent rounded rectangle bar rotated perpendicular to the oval
- Three text elements: a small step number, a bold title, and a short descriptive line
- An icon with stroked or filled styling to match the color theme
When used in presenter mode, a single click advances through the 4 Gradient Fill options in powerpoint, each showing a different color combination and icon, producing a polished interactive slide suitable for processes, features, or multi-step explanations.
Materials and PowerPoint features used
Before we begin, here’s a short checklist of what you’ll use in PowerPoint for this build:
- Insert > Shapes (rectangle, rounded rectangles, oval)
- Merge Shapes > Union (used to combine custom shapes)
- Format Shape pane > Fill > Gradient fill (edit stops, type, and direction)
- Format Painter (to copy formatting quickly)
- Insert > Icons (or use SVG/PNG icons if offline)
- Grouping (Ctrl+G) and Align tools
- Animation pane (for simple entry animations)
These tools are available in most modern versions of PowerPoint (Office 365, PowerPoint 2019, PowerPoint 2016 with an up-to-date feature set). If your PowerPoint lacks Merge Shapes, ensure you’re using the Shape Format tab and look for Combine Shapes or Merge Shapes in your ribbon.
Design plan and layout strategy
Designing a slide with 4 Gradient Fill options in powerpoint is easier when you break the work into discrete phases:
- Create a single option block precisely (base shape + nested ovals + accent bar + text + icon).
- Group that block and duplicate it to create the four versions so sizes and alignment remain consistent.
- Customize gradient fills and icons for each duplicated block to generate variety.
- Add simple animations or interactive triggers if you want progressive reveal behavior.
By creating one master block and duplicating it, you save time and maintain a consistent visual rhythm across all four options. This is especially useful for presentations where you might later change fonts, spacing, or icon weight — update the master and reapply.
Step-by-step build — create the base shapes
This section walks through building the custom rounded block that forms the visual backbone of each option.
1. Add a new blank slide
Start with an empty content slide. I prefer a blank layout to give precise control over placement and spacing.
2. Draw the first rectangle (single corner rounded)
Go to Insert > Shapes and choose the rectangle with a single rounded corner (often called “Rectangle: Single Corner Rounded” or similar). Click and drag to draw it roughly how large you want your option block to be.
Notice the small orange adjustment point on the shape. Drag that point inward until the corner is fully curved — this yields a stylized single-rounded-corner box.
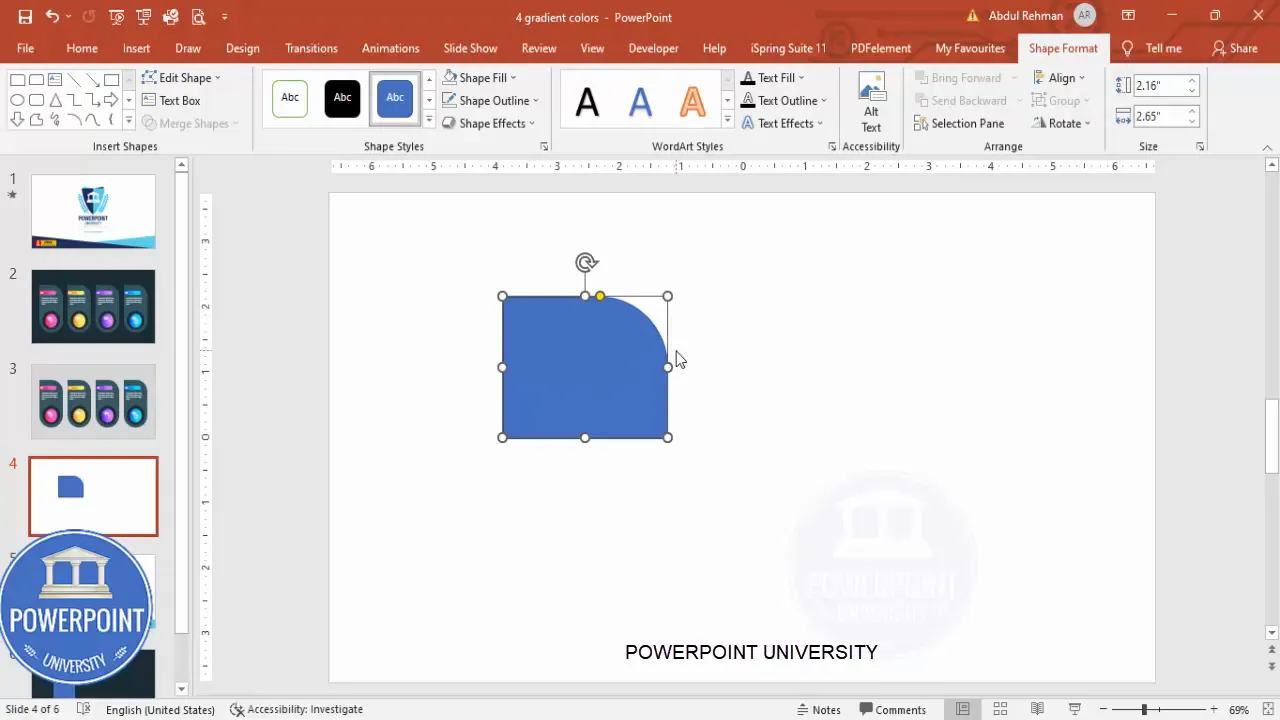
Next, remove the outline: Shape Format > Shape Outline > No Outline.
3. Add the second rectangle (top-corner rounded)
Insert another rectangle: choose the top corner rounded rectangle (sometimes labeled “Rounded Rectangle: Top Corner”). Draw it so it overlaps the first shape. This second shape will help create the asymmetric visual curve on the other side of the base.
Use the orange adjustment points to fine-tune: drag the bottom orange point inward so that corner curves fully; drag the top orange point outward to exaggerate the top curvature. This adds a unique organic look.
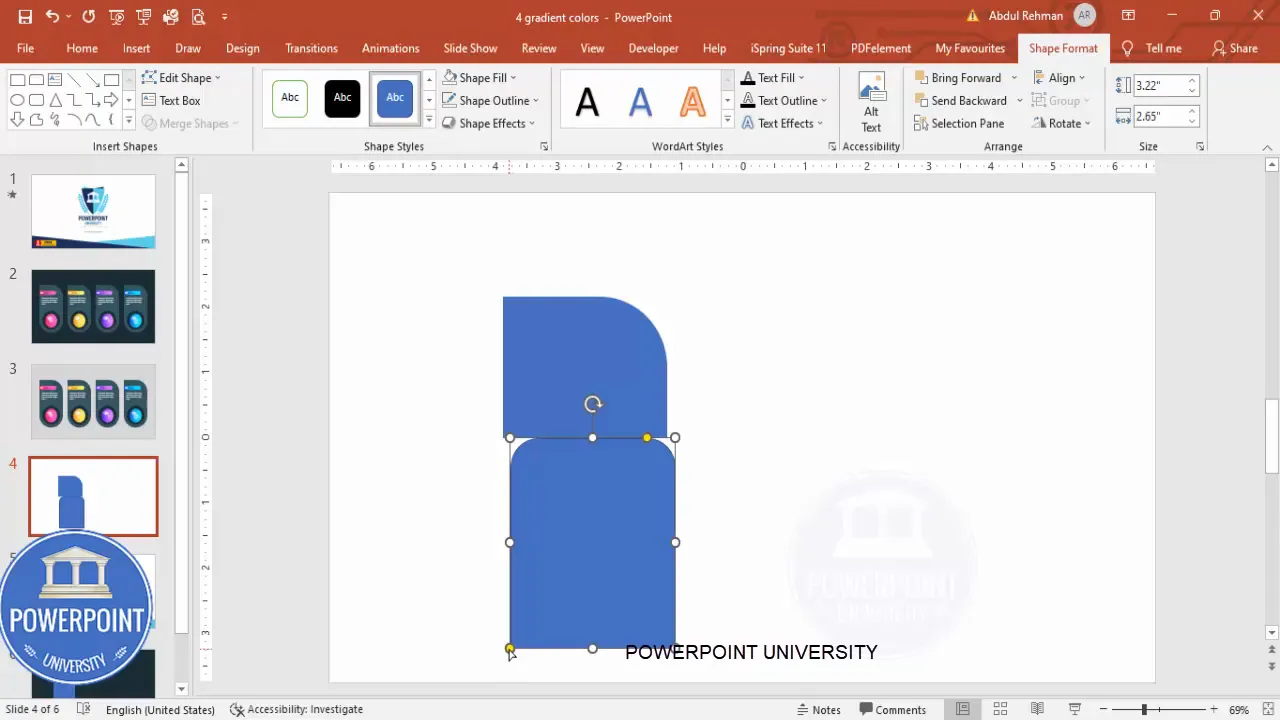
Again, set Shape Outline to No Outline. Align the two shapes visually so they overlap neatly and look like a custom capsule or shield. If sizes are off, nudge them using arrow keys or change sizes numerically in the Format Shape pane.
4. Merge the two shapes into a single custom shape
Select both shapes (hold Shift and click each) then use Merge Shapes > Union. This operation combines the two shapes into one seamless object that you can fill or style as a single base.
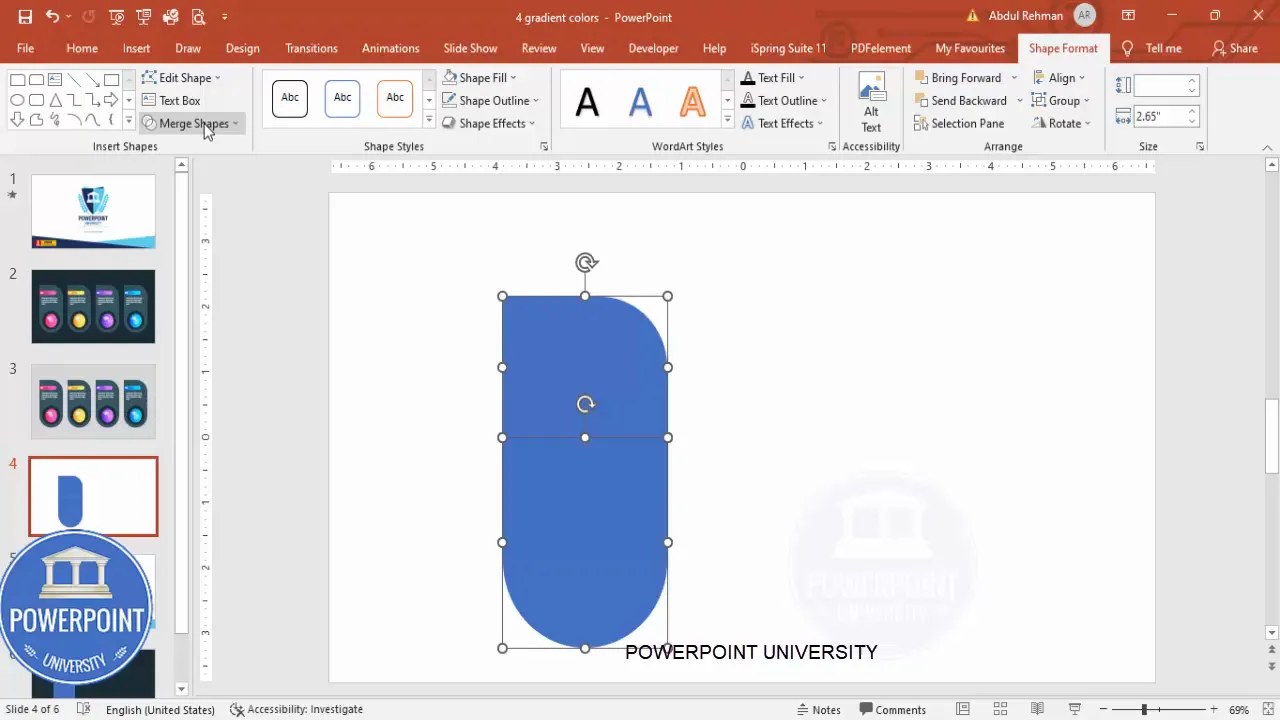
Now apply a base color: Shape Fill > choose any color. We will layer gradients and accents on top shortly.
Adding nested ovals and gradient fills
The concentric ovals create the photographic, lens-like center that receives the gradient fills. This is where most of the visual depth comes from.
1. Insert the outer oval
Go to Insert > Shapes > Oval. Hold the Shift key while drawing to constrain to a perfect circle or to a perfect oval if you prefer. Position this oval centrally over the combined base shape — use Align Center and Align Middle to make sure the nesting is precise.
Set Shape Outline to No Outline. Fill it with a darker color to provide contrast with the inner oval.
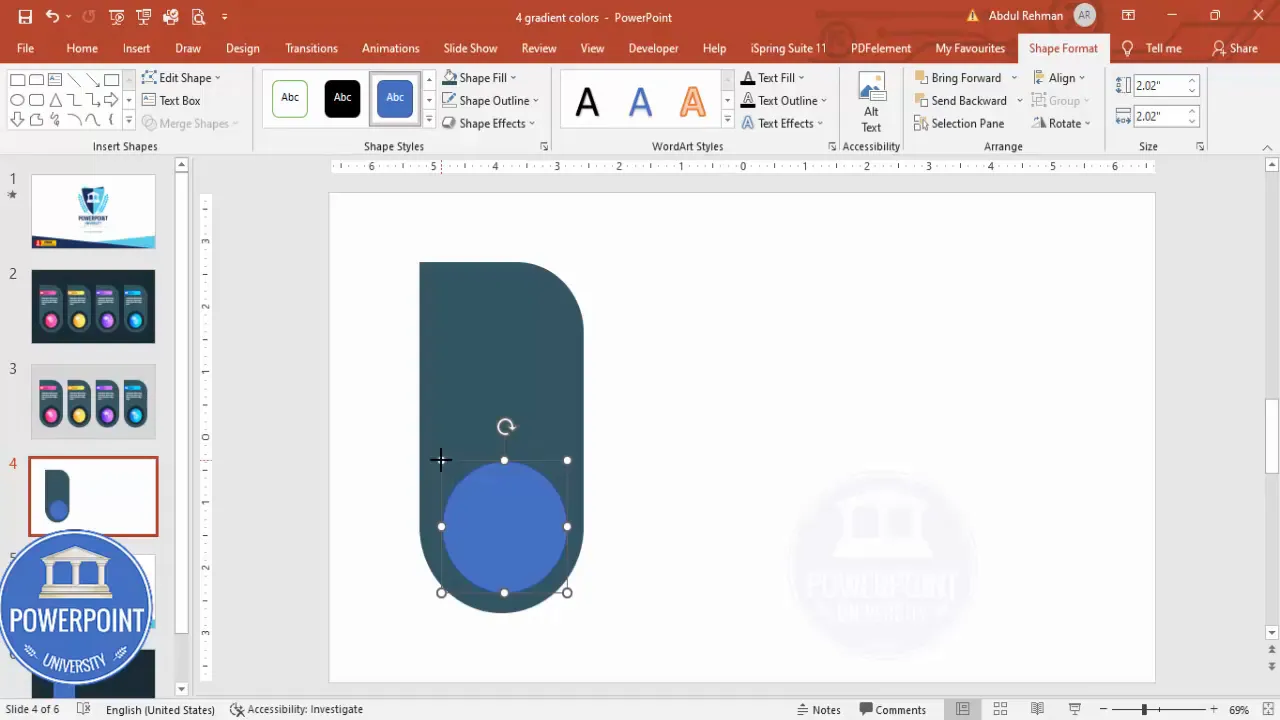
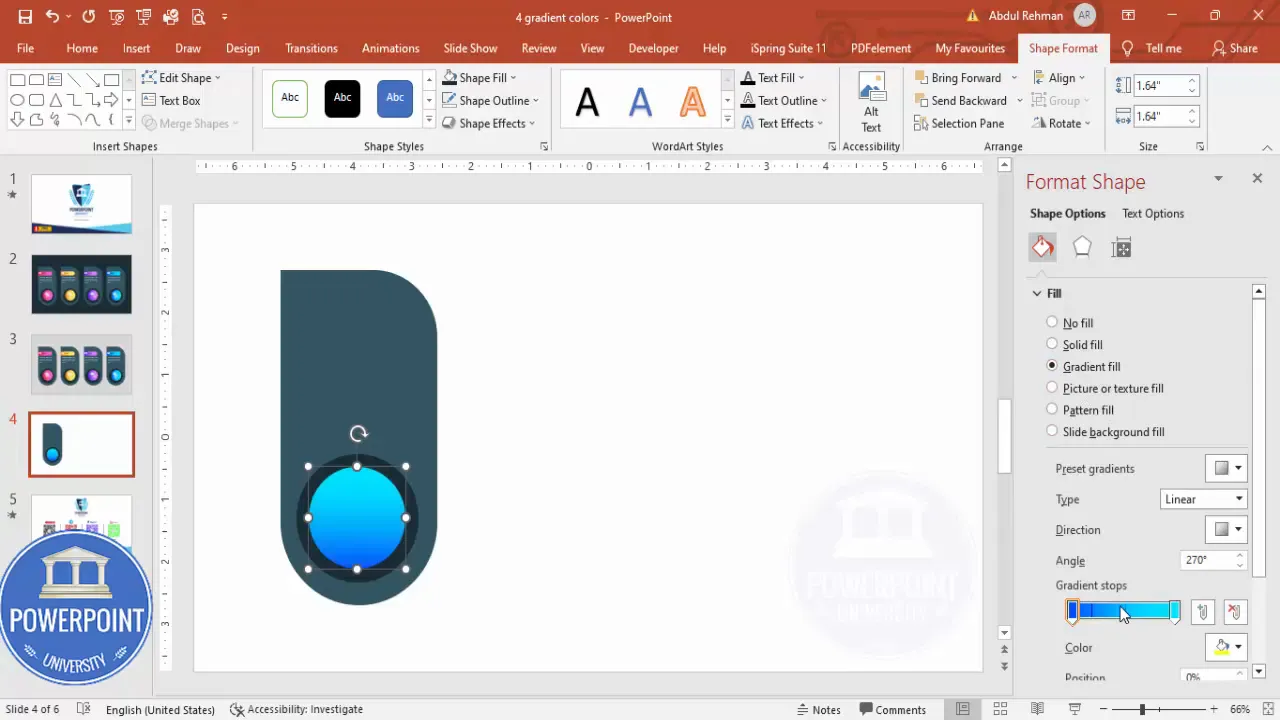
2. Insert the inner oval and apply gradient fill
Add one more oval on top of the darker outer oval. Again, make sure it is perfectly centered (Align Center / Align Middle). This inner oval will receive the gradient fill that defines the option’s color identity.
Right-click the inner oval > Format Shape > Fill > Gradient fill. PowerPoint defaults to four gradient stops. For this design, we only need two gradient stops to create a clean radial or linear blend between two colors. Delete the middle two stops so that just the two end stops remain.
2. Copy formatting using Format Painter
If you’ve already styled one rectangle (for example with a gradient or fill), use the Format Painter on the Home tab to copy those style settings exactly to the accent bar. Click the shaped object with the desired format, click Format Painter, then click the accent bar shape.
If you need to change the accent bar’s direction or size, do so after applying the format. The format painter saves time and ensures consistent stroke weight and fills.
Inserting and styling text and icons
Now that the structural elements are in place, add the typographic and icon elements that communicate content.
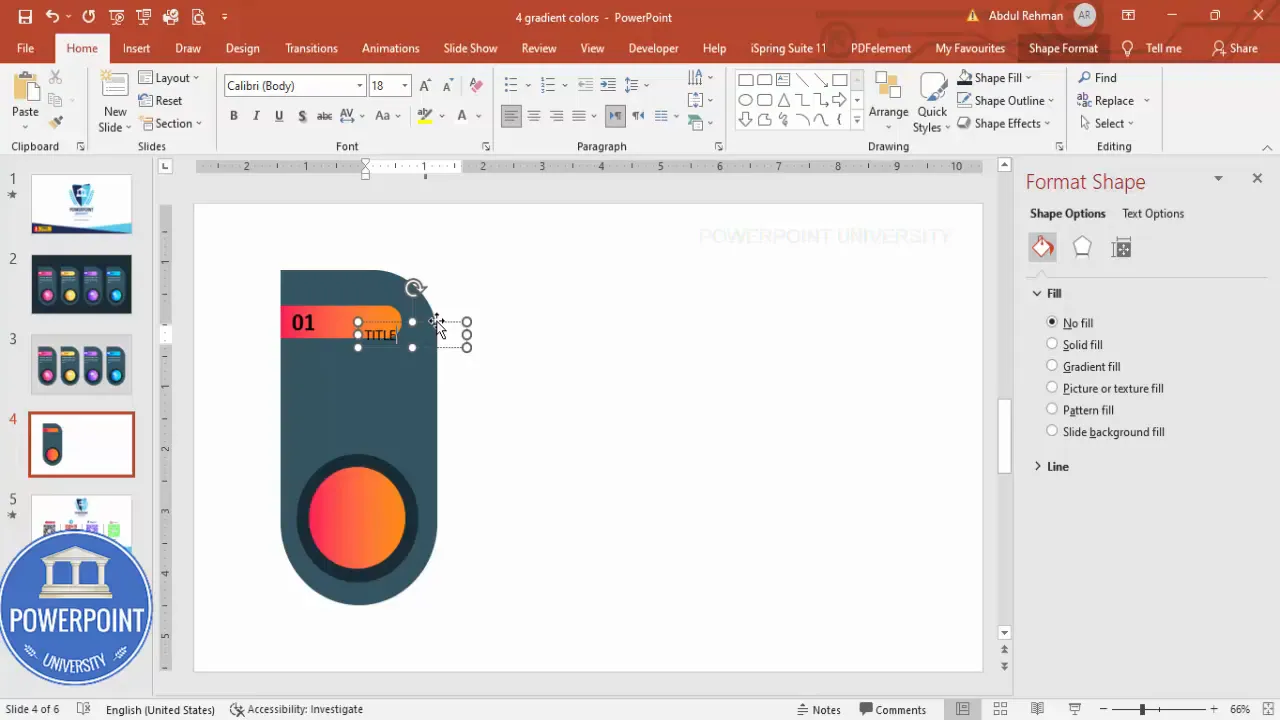
1. Add the step number
Go to Insert > Text Box. Type a short number like “01”, “02”, “03”, or “04” to indicate the step. Set the type to bold and increase the font size so it’s readable but not overpowering. Position it near the accent bar or inside the base shape as a subtle label.

2. Add the title and detail text
Use another text box for the title. Use white text if your gradient background is dark; choose a contrasting color if the background is light. Set the title to bold and adjust size so it is scannable.
For the small descriptive line beneath the title, use placeholder text such as a short 8–12 word description. Keep it concise — slides are for highlights, not long paragraphs. Use center alignment if your layout is symmetric; left-align if the icon anchors the left side.
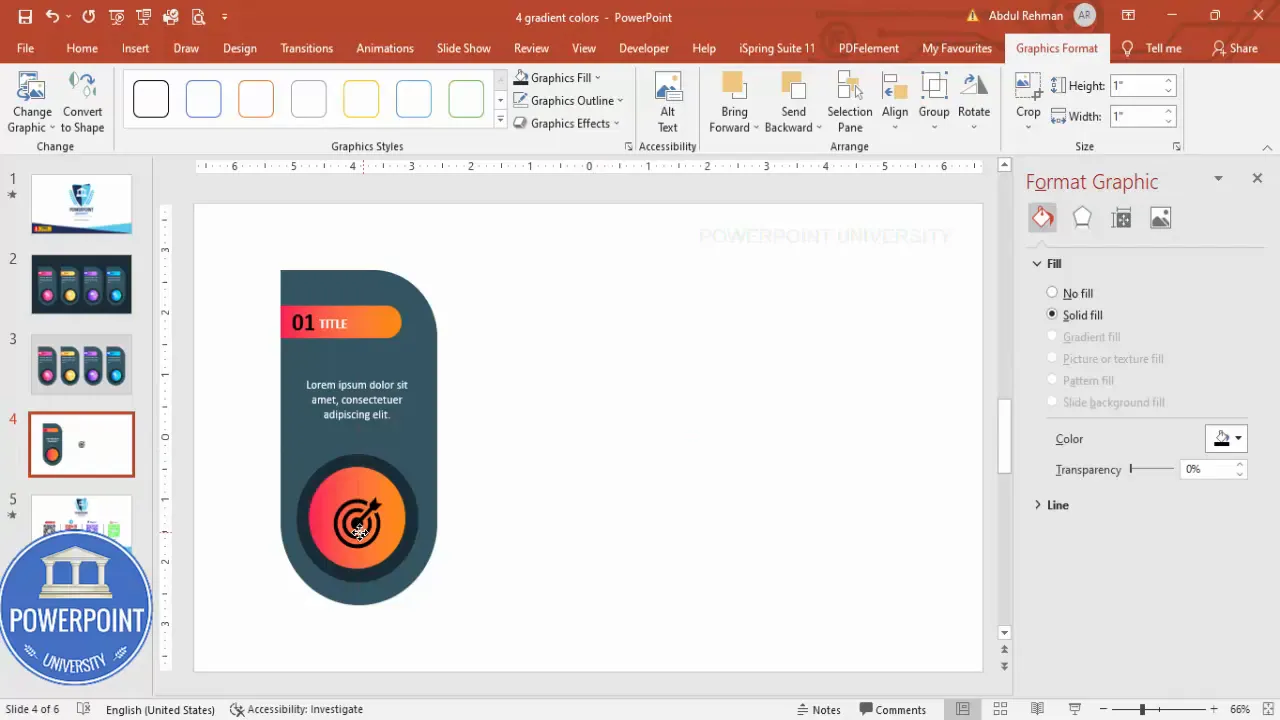
3. Insert and format an icon
Insert > Icons is a quick way to add scalable vector icons. Choose an icon that represents the option’s function or theme. After inserting, position it within or above the circular center so it reads as part of the cluster.
Format the icon: either set a white stroke (Shape Outline) or make it a filled white graphic (Graphic Fill). If using the stroked style, you can increase the line width to make the icon bolder and more legible at a distance.
Create Slides in Seconds with ExpertSlides AI |
|
Generate AI Presentations today: |
| TRY NOW! |
Grouping, duplicating, and arranging multiple options
Once your single option block is complete, it’s time to duplicate it to create the four separate options with distinct gradients and icons.
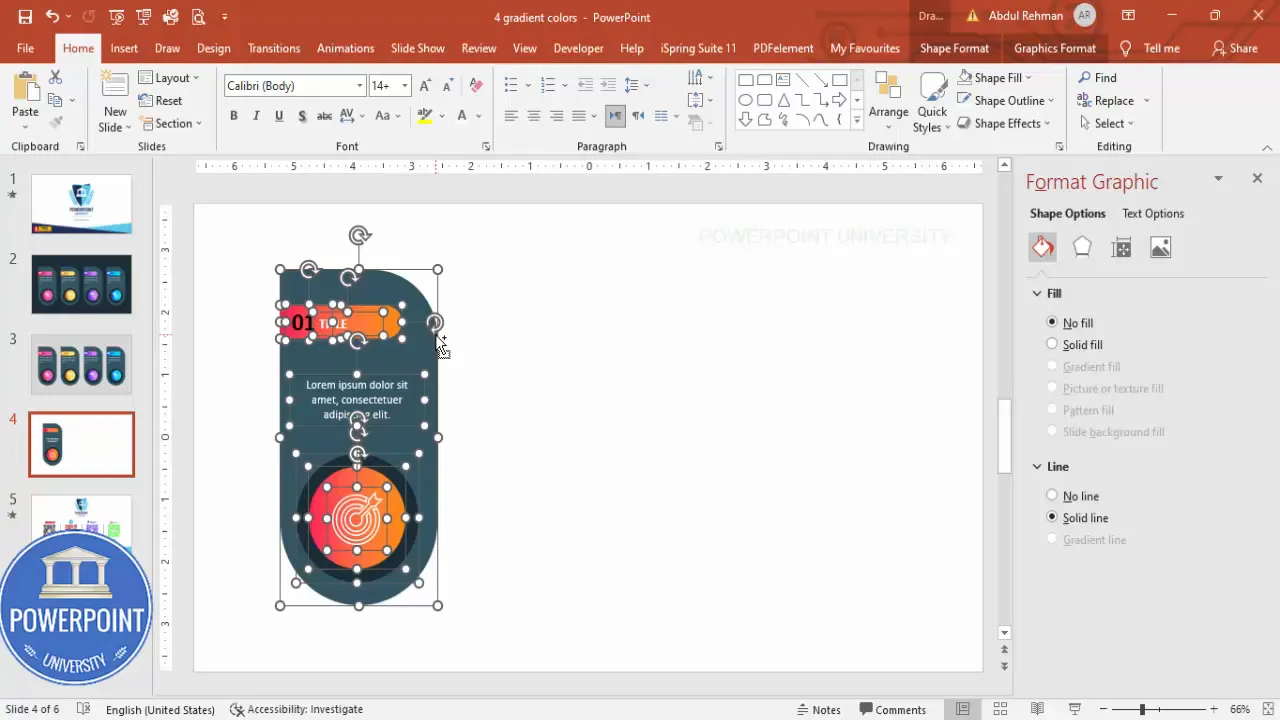
1. Group everything
Select all the elements of the option (base shape, ovals, accent bar, text, icon) and press Ctrl+G to group them. Grouping lets you move and copy the entire block without losing relative spacing.
2. Duplicate to make the four blocks
With the grouped block selected, hold Ctrl+Shift and drag to duplicate it. Repeat this until you have four identical blocks. Use Align > Align Middle and Align > Distribute Horizontally (if available) to distribute them evenly across the slide. Alternatively, use the grid and guides to position them evenly.
Once positioned, you can ungroup the duplicated blocks if you want to change specific elements inside each one. Ungroup, make changes, and group them again if needed.
Customizing each block: create 4 Gradient Fill options in powerpoint
This is where the creative variation happens. The idea is to keep the structure identical but to change colors, gradient directions, and icons so each option feels unique while remaining cohesive.
1. Change the step numbers and titles
Ungroup or edit the text in each block to show the correct step number (01, 02, 03, 04) and the appropriate title for that step. Keep type size and weight consistent across the four blocks for visual harmony.
2. Replace icons
Select an icon, go to Graphic Format, choose Change Graphic > Icons, and choose a different icon. This preserves the icon sizing and strokes while swapping the symbol itself. Doing this keeps appearance consistent while changing meaning.

Repeat the gradient direction changes if you want subtle movement differences. For instance, make one radial (lighter center), another linear (top left to bottom right), and so on. This creates visual texture when the options rotate on click.
Animation and interaction tips
To present the 4 Gradient Fill options in powerpoint as an interactive or progressive reveal, you can use simple animations and slide-click actions.
1. Simple click-to-advance approach
The straightforward method is to keep all four groups on one slide but only reveal one at a time by placing duplicate versions of the slide with different visible blocks. However, a cleaner and more flexible method is to animate the blocks directly on one slide:
- Apply an Entrance animation (Appear or Fade) to each block in the order you want them to appear.
- Set each animation to start On Click (default), so each mouse click advances to the next option.
- Use the Animation Pane to confirm sequence and timing.
This way, when you click during the presentation, the next block appears with its own colors and icon — giving the sense of cycling through 4 Gradient Fill options in powerpoint without switching slides.
2. Use simple emphasis animations for subtlety
Instead of entrance animations, consider using emphasis animations such as Grow/Shrink or a light Glow to indicate the active option while keeping the others lightly visible. This is effective when the slide shows all four at once but you want to direct attention to one at a time.
3. Consider triggers for advanced interactivity
If you want the user to click a specific object (for example, a small dot or the option itself) to reveal content, use Animation > Trigger to launch an animation on click of a specific object. Triggers can make a single slide feel like a small interactive menu.
Color combination ideas and design best practices
Choosing the right gradient combinations is critical when creating 4 Gradient Fill options in powerpoint. Good choices will make the slide feel modern, legible, and accessible.
Color pairing principles
- High contrast: Ensure foreground text and icons contrast strongly with gradient backgrounds. Use white text on dark gradients and very dark text on light gradients.
- Consistent saturation: Keep saturation levels roughly similar across the four options so one block doesn’t overpower the others.
- Gradual change: Using a darker outer ring and a lighter center often reads as a subtle spotlight and helps icons pop.
- Color harmony: Use brand colors or choose palettes that are analogous (neighbors on color wheel) or complementary (opposite on wheel) depending on the tone you want.
Recommended color sets
- Blue family: Navy → Cerulean (professional, trustworthy)
- Teal family: Dark Teal → Aqua (fresh, modern)
- Purple family: Deep Purple → Lavender (creative, premium)
- Warm accent: Maroon → Salmon (energetic, bold)
Applying these four families across the four options gives a harmonious but varied set: pick one color family per option and vary the gradient direction for additional texture.
Export, reuse, and template suggestions
Once your slide is ready, consider these steps to make the asset reusable across presentations.
1. Save as slide template
Save the slide as part of a template (.potx) or copy it into your organization’s master slides. That way, anyone can insert the pre-built slide and update text, icons, and colors quickly.
2. Use Slide Library or Design System
If your team uses a slide library or shared template system, add the finished slide so colleagues can find and reuse it. Document the recommended font sizes, color codes, and icon sets for consistency.
3. Export assets for other tools
If you need the design in other applications (Keynote, Google Slides, Figma), export elements as PNG or SVG files. For crisp icons and shapes, export SVG where supported.
Troubleshooting common issues
Here are some problems you might encounter while creating 4 Gradient Fill options in powerpoint and how to resolve them.
Issue: Merge Shapes or Union is disabled
- Make sure the two shapes are both selected. The Merge Shapes options enable when two or more shapes are selected.
- Ensure you’re not selecting grouped objects or placeholders — ungroup or draw new shapes directly on the slide.
- If Merge Shapes is missing entirely, your PowerPoint build may not support it; update Office or use a manual masking workaround (use an image editor to combine shapes).
Issue: Gradient stops change unexpectedly when you duplicate
- Use Format Painter to copy a specific gradient format to duplicates if the default duplication resets some settings.
- Alternatively, set up a shape style and apply it consistently.
Issue: Icons lose stroke weight or style after change graphic
- After replacing an icon, reapply the stroke width and fill settings. Consider keeping a small hidden copy of a correctly formatted icon to reference and copy formatting from.
Issue: Text is hard to read on gradient
- Increase contrast by darkening the gradient outer color or lightening the inner color.
- Add a subtle drop shadow or translucent overlay behind the text to improve legibility without disrupting the gradient.
Advanced variations and pro tips
Want to push the concept further? Here are advanced ideas to make your four-option slide even more powerful.
- Photographic overlay: Add a soft, clipped photographic texture behind the gradient oval and set the photo transparency to low. The gradient can act as a color wash over a photo to create photographic depth.
- SVG icons for color control: Use SVG icons when possible so you can set fills directly and animate paths for engaging effects.
- Slide Master integration: Create a slide master layout with an empty array of placeholder grouped blocks. Users can insert new data into each block without touching the underlying design.
- Accessibility checks: Use color contrast checkers and ensure font sizes meet accessibility guidelines. Add alt text to images and describe the slide verbally during delivery for screen reader users.
- Micro-interactions: Use entrance animation for the main object and subtle emphasis (pulse or glow) when you click to direct attention.
Checklist before presenting
- All four blocks have consistent font sizes and spacing.
- Gradient colors are set using exact hex/RGB values for brand consistency.
- Icons are clear at the size used and have proper stroke weight or fill.
- Animations are ordered and set to On Click if you want to control reveal flow.
- Slide saved to template or library so you can reuse it easily.
Frequently Asked Questions (FAQ)
Q: What is the easiest way to create and manage 4 Gradient Fill options in powerpoint?
The easiest approach is to design one fully finished option block, group it, duplicate it three times, and then customize the gradient color and icon for each duplicate. This reduces errors and ensures consistent spacing, typography, and alignment across all options.
Q: Which gradient type (radial or linear) works best for these options?
Both are valid depending on the effect you want. Radial gradients often create a soft lens/spotlight effect ideal for icons centered within the oval. Linear gradients can create directional flow and may work better if your layout has a clear left-to-right or top-to-bottom reading direction.
Q: How do I make sure text is readable on top of gradients?
Use high contrast colors (white on dark gradients or dark gray on light gradients), maintain sufficient font size (24 pt or higher for headers), and consider adding a subtle translucent overlay behind text if the gradient is very busy.
Q: Can I use images instead of gradient fills?
Yes. You can fill the inner oval with an image (Format Shape > Picture or texture fill). If you do, consider adding a semi-transparent gradient overlay to unify color and preserve text legibility.
Q: How do I add animation to make the options appear on click?
Select a block, open the Animations tab, choose an Entrance animation (e.g., Fade), and leave Start set to On Click. Repeat for the other blocks in the desired sequence. Use the Animation Pane to verify order and timing.
Q: Can I use this technique in Google Slides?
Google Slides supports many shape and gradient features, but not all the exact Merge Shapes behaviors found in PowerPoint. You can approximate the design using grouped shapes and image exports from PowerPoint if needed.
Q: What file format is best for sharing the finished slide?
For editing, share the .pptx file. For quick sharing where no editing is needed, export as PDF. If you want scalable assets (icons and shapes) for other design tools, export shapes as SVG or PNG as required.
Conclusion and final checklist
Creating a single reusable slide with 4 Gradient Fill options in powerpoint is a highly effective way to present processes, feature lists, or step-by-step information with polish and interactivity. The method focuses on building one high-quality option and then duplicating and customizing it — a workflow that saves time and produces consistent, professional results.
Final checklist before you call it done:
- All grouped blocks are aligned and evenly spaced
- Gradients use consistent stop counts (two stops) and correct hex values
- Icons are readable with appropriate stroke width or fills
- Animations and click sequences are tested in Slide Show mode
- Slide exported to your template library for reuse
Now you have everything you need to build and customize your own 4 Gradient Fill options in powerpoint. Use the structure and tips above to adapt the slide for product roadmaps, training sequences, feature displays, or any multi-step presentation where clarity and visual appeal matter.
Happy designing — and remember: consistent shapes, well-chosen gradients, and clear typography are the three things that make interactive slides feel professional and intentional.

Check out the full video: Create 4 Gradient Fill Options in PowerPoint. Tutorial No.: 980


