

Table of Contents
- Introduction
- What You’ll Need
- Design Overview: What the 5 Rectangular Step Slide Does
- Step-by-Step Build: Create the Base Shapes
- Refining the Shape: Cutouts, Alignment and Merging
- Color, Shadow, and Depth: Make the Slide Pop
- Adding Icons, Headings and Descriptions
- Grouping and Preparing for Animation
- Animation Ideas and How to Trigger Steps
- Design Variations and Use Cases
- Common Mistakes and Troubleshooting
- Accessibility and Presentation Tips
- Downloadable Template and Final Checklist
- Frequently Asked Questions (FAQ)
- Conclusion
Introduction
Hello — I’m from POWERPOINT UNIVERSITY and in this article I’ll walk you through how to build a clean, reusable and highly effective 5 Rectangular Step Slide in PowerPoint. This guide reproduces the exact workflow I use to create this kind of infographic slide and expands on each step with design tips, troubleshooting, and animation ideas so you can adapt it for your projects.
The 5 Rectangular Step Slide is ideal for processes, timelines, multi-step instructions, or any content where you want to reveal one step at a time with a clear visual progression. In this article you’ll get the precise measurements, shape operations, alignment tips, shadow treatments, icon placement, and text formatting I use — plus a few creative variations to make the slide yours.
Throughout the guide I’ll reference specific moments in the build where a screenshot will help — I’ve included image placeholders with timestamps so you can see the exact stage in the walkthrough as you follow along.
The keyword for this article is “5 Rectangular Step Slide”. You’ll see this phrase repeated across sections to keep the focus on the slide you’re creating and to help you find each step of the build quickly.
What You’ll Need
- Microsoft PowerPoint (2016 or later recommended for Merge Shapes and icon features)
- A presentation file to work in (blank slide recommended)
- Basic familiarity with Insert > Shapes, Format Shape options, and the View > Guides
- Optional: icons (Insert > Icons), custom fonts (Open Sans Extra Bold used in the demo), and the provided downloadable template
Pro tip: If your PowerPoint version supports Insert > Icons and Merge Shapes, you’ll be able to replicate every step. If not, you can still follow the logic and use manual cropping or external shapes to get a similar result.
Design Overview: What the 5 Rectangular Step Slide Does
The 5 Rectangular Step Slide is a horizontally spaced set of overlapping rounded rectangles that visually indicate five discrete steps. Each step has a colored background segment with a white inner rectangle, an icon, a step title (e.g., Step 1), and a short description. The slide is designed so that when you click during a presentation, each step appears in turn — allowing you to focus your audience’s attention on one piece of content at a time.
Why this approach works:
- Overlapping rounded rectangles create directional flow from left to right.
- Individual colored backgrounds help the audience separate steps visually.
- White inner shapes with a subtle shadow make icons and text readable regardless of the background color.
- Revealing steps with clicks keeps the audience focused and avoids information overload.
Step-by-Step Build: Create the Base Shapes
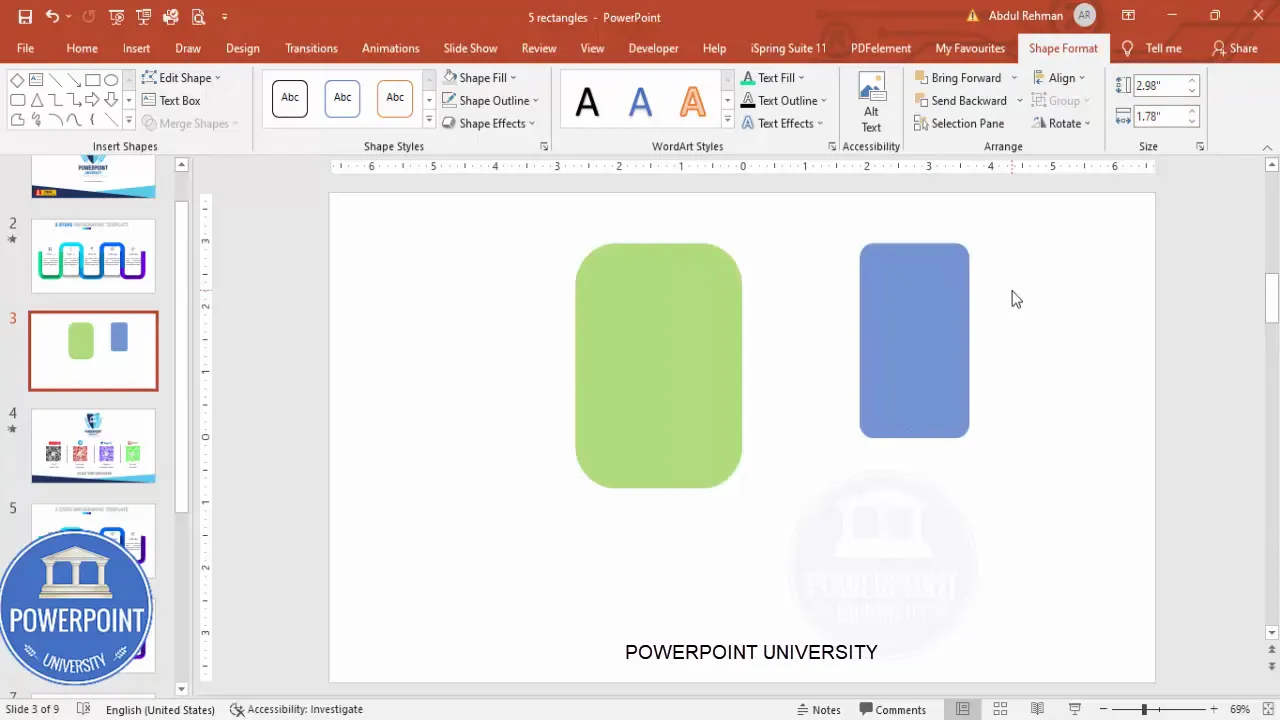
We begin with two rounded rectangles: an outer colored background and a smaller inner white rectangle. The exact sizes I used in the video are precise to get a balanced look — feel free to scale proportionally to your slide size but use these numbers as a guide for a consistent result.
- Insert two rounded corner rectangles (Insert > Shapes > Rounded Rectangle).
- Set sizes:
- Large rounded rectangle: 3.77″ width x 2.69″ height
- Inner rounded rectangle: 2.98″ width x 1.78″ height
- Turn on View > Guides so you can align shapes precisely.
- Select each shape, then use Shape Format > Align > Align Center and Align Middle to stack them perfectly.
Once you have the base pair, press Ctrl+D to duplicate both and put the duplicates aside — you’ll reuse them to build a consistent row of steps.
Quick alignment checklist
- Guides enabled: yes
- Both shapes perfectly centered: yes
- Duplicate saved for reuse: yes
Keeping duplicates ensures you can quickly reproduce the same units without recalculating sizes or corner radii. This consistency is crucial for a visually balanced 5 Rectangular Step Slide.
Refining the Shape: Cutouts, Alignment and Merging
Next we’ll subtract overlapping parts so the steps connect visually and appear as a continuous row with distinct segments.
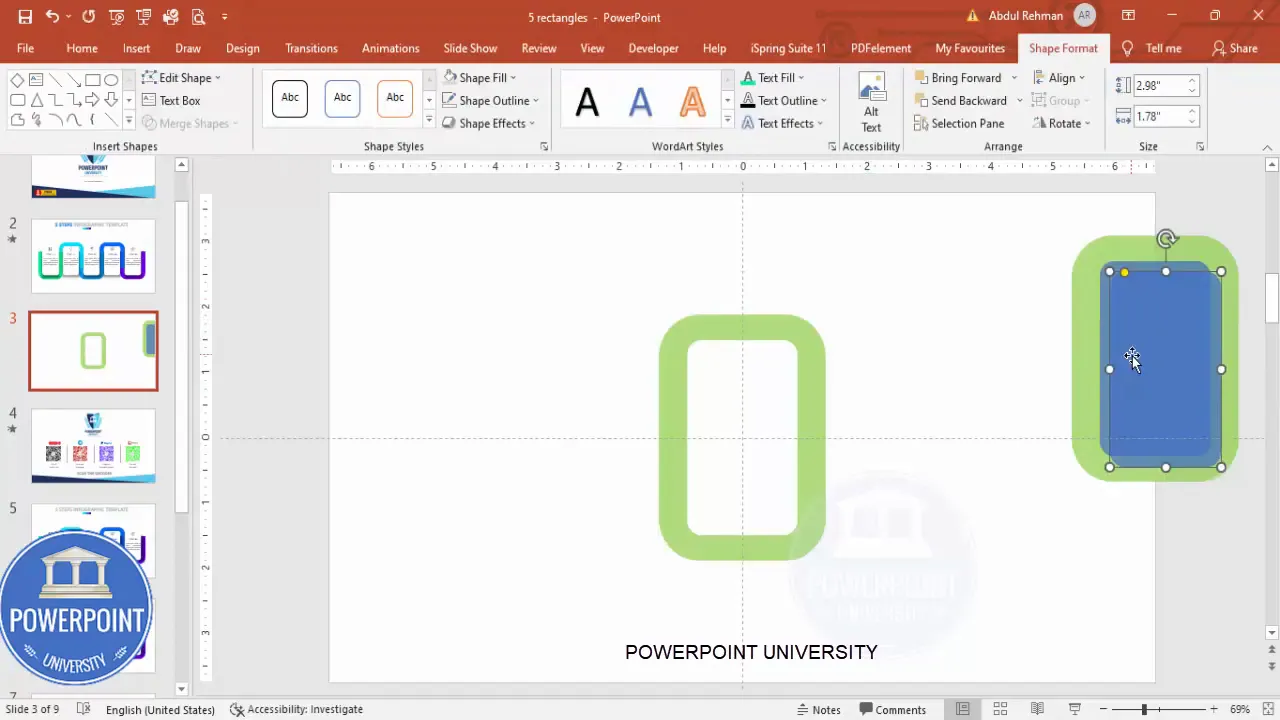
- Select the outer colored shape and the smaller inner shape (the ones you positioned). Hold Shift and use the Merge Shapes > Subtract function. This leaves a shaped outline that visually becomes the colored band with a rounded white inset.
- Duplicate the combined shape (Ctrl+D) and change the color to create variation for the next step. Align center and middle so the duplicate stacks perfectly on top of the first.
- Place the duplicate partially overlapping the previous step to the right. The overlap must be consistent across steps so the visual flow is uniform.
- Repeat: add more duplicates and place them to the right; add one to the left if needed so you have a total of five segments. Use Align to adjust if spacing feels off.
When overlapping shapes, the key is consistent overlap distance. You can use temporary guidelines to measure a consistent offset between segments.
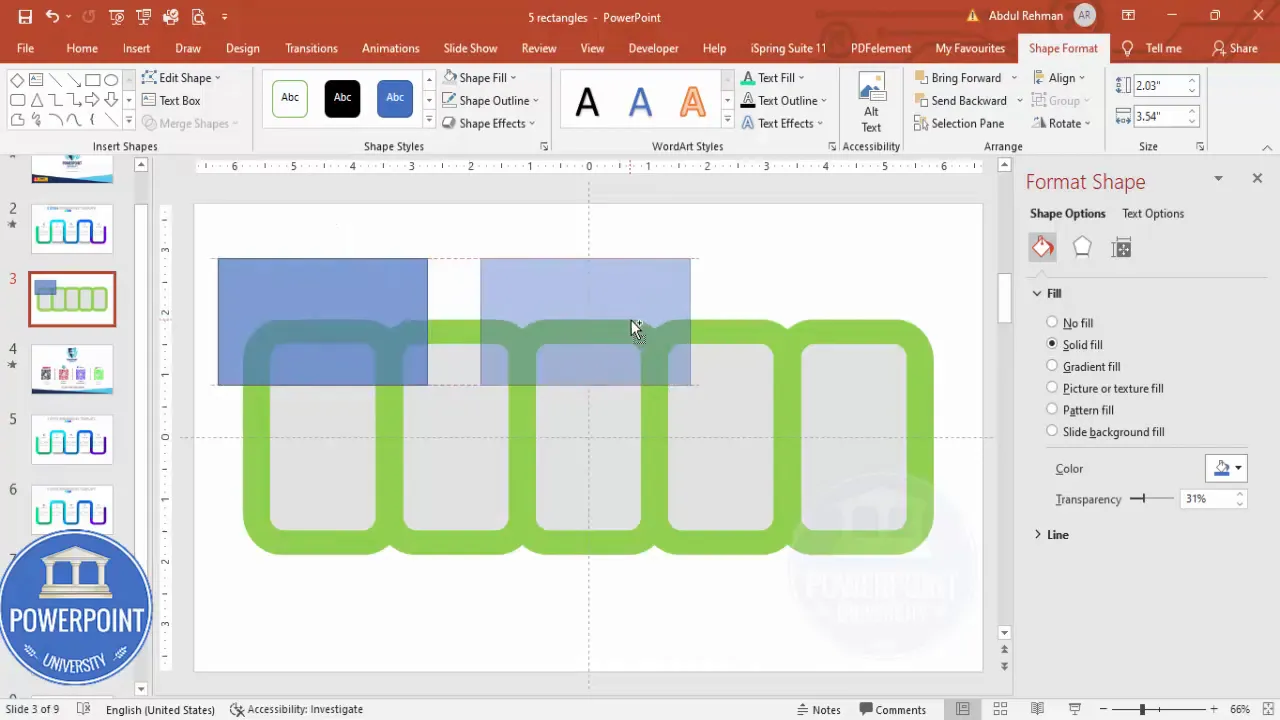
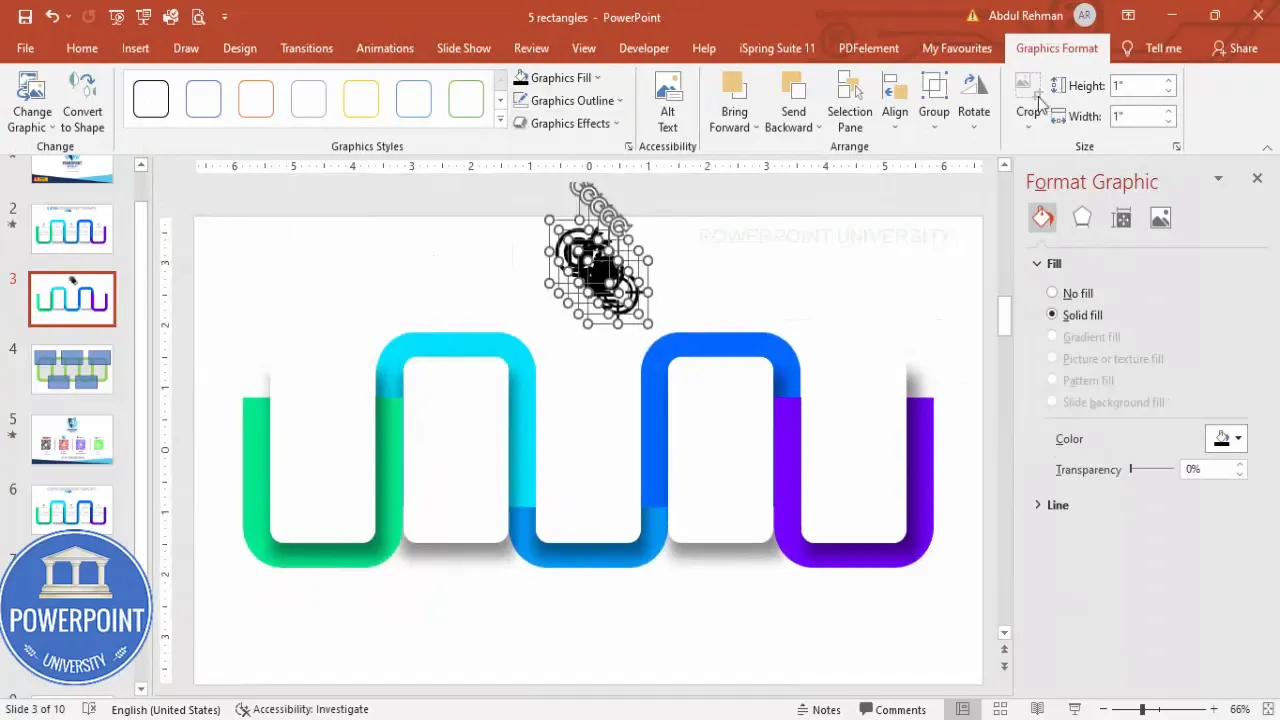
Cut top and bottom to create a flat, ribbon look
To make the row look like a ribbon with a white inset, draw two rectangles (one for the top cut and one for the bottom cut), make them slightly transparent so you can position them visually, and place them where you want the top and bottom edges to be trimmed.
- Insert a rectangle, make it transparent, and place it over the top portion of the shapes where you want the cut.
- Select the colored shape and the rectangle and use Merge Shapes > Subtract.
- Repeat for the bottom side.
After subtracting, you should be left with horizontal bands that form the outer colored area and a centrally aligned inset where the white inner rectangle will sit.
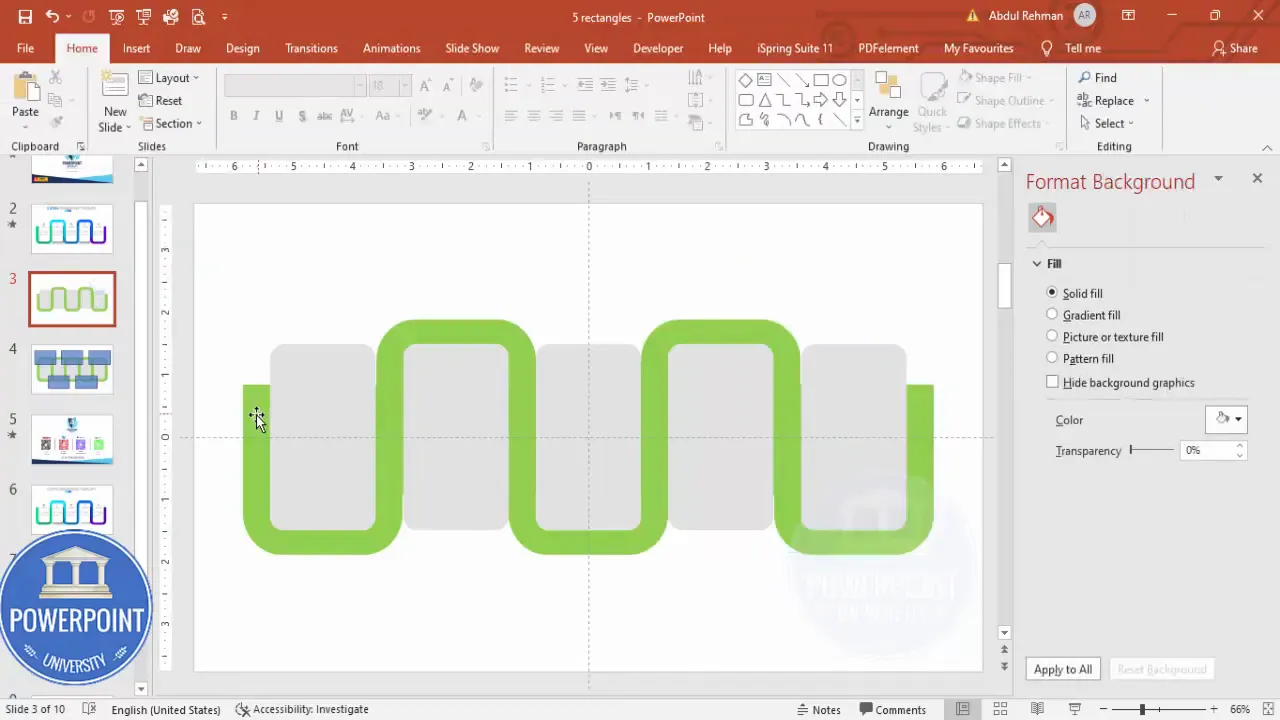
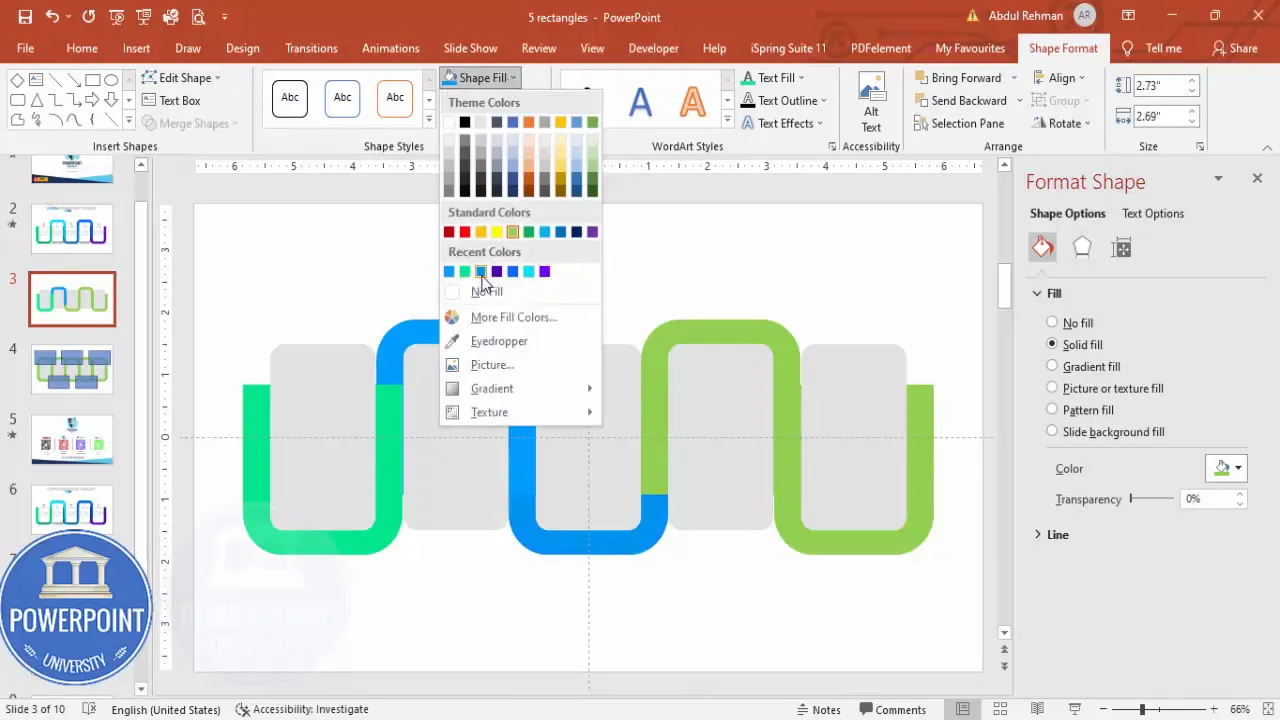
Color, Shadow, and Depth: Make the Slide Pop
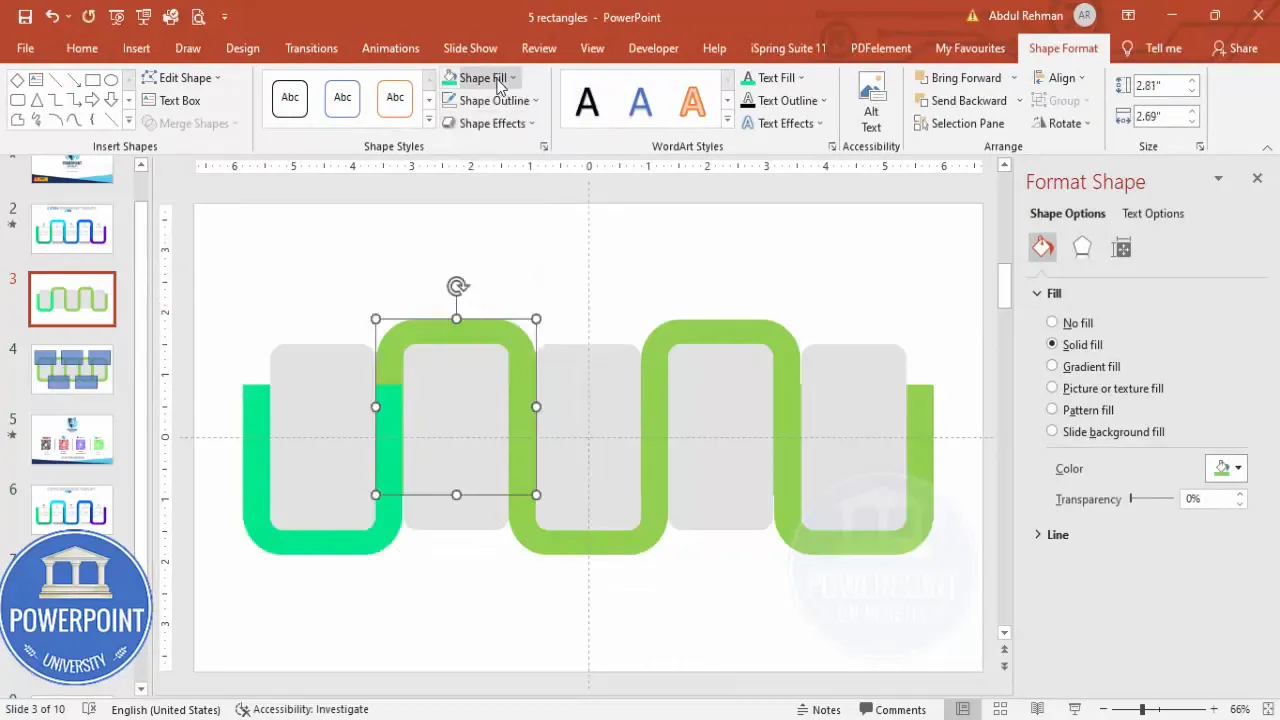
Color and shadow are essential to make the 5 Rectangular Step Slide readable and visually interesting. I typically use a palette of five complementary colors for the background bands — think teal, blue, purple, magenta, and green — but you can adapt to your brand palette.
- Fill each outer band with a unique color using Shape Fill.
- For inner shapes, set Shape Fill to white. Initially, you might not see the white because of transparency settings; prepare a shadow layer first (see below) so the white stands out.
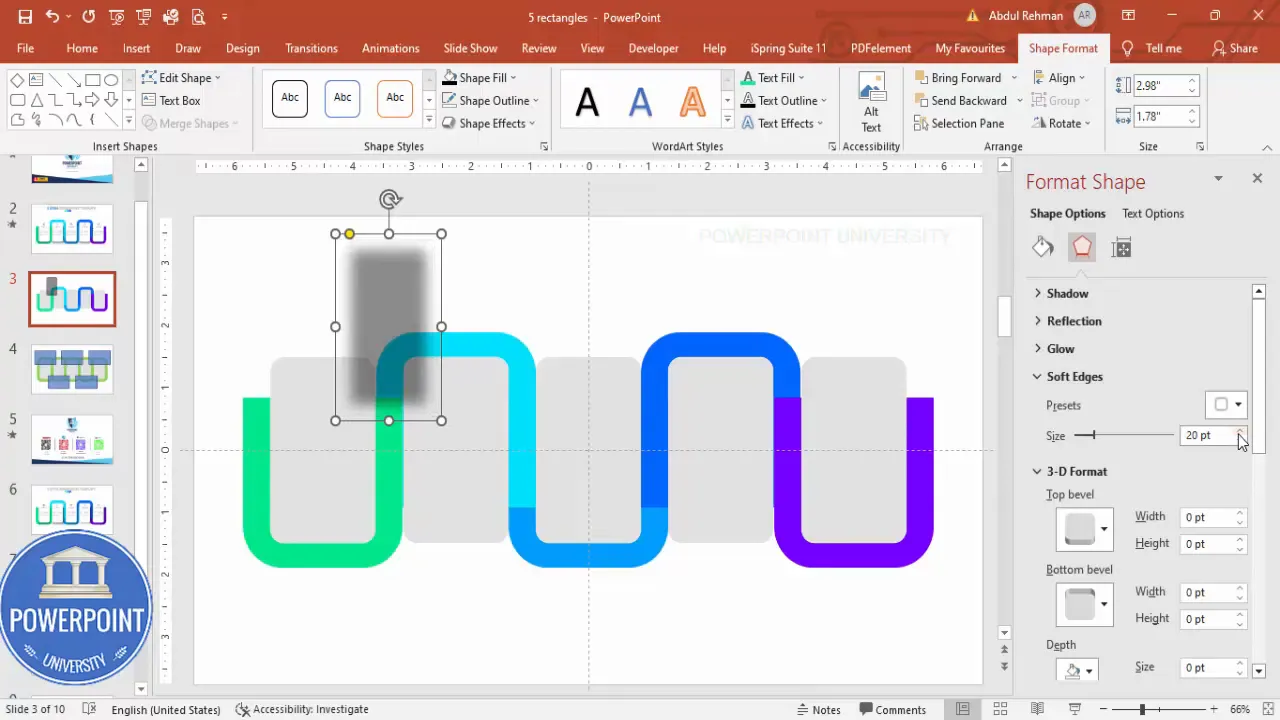
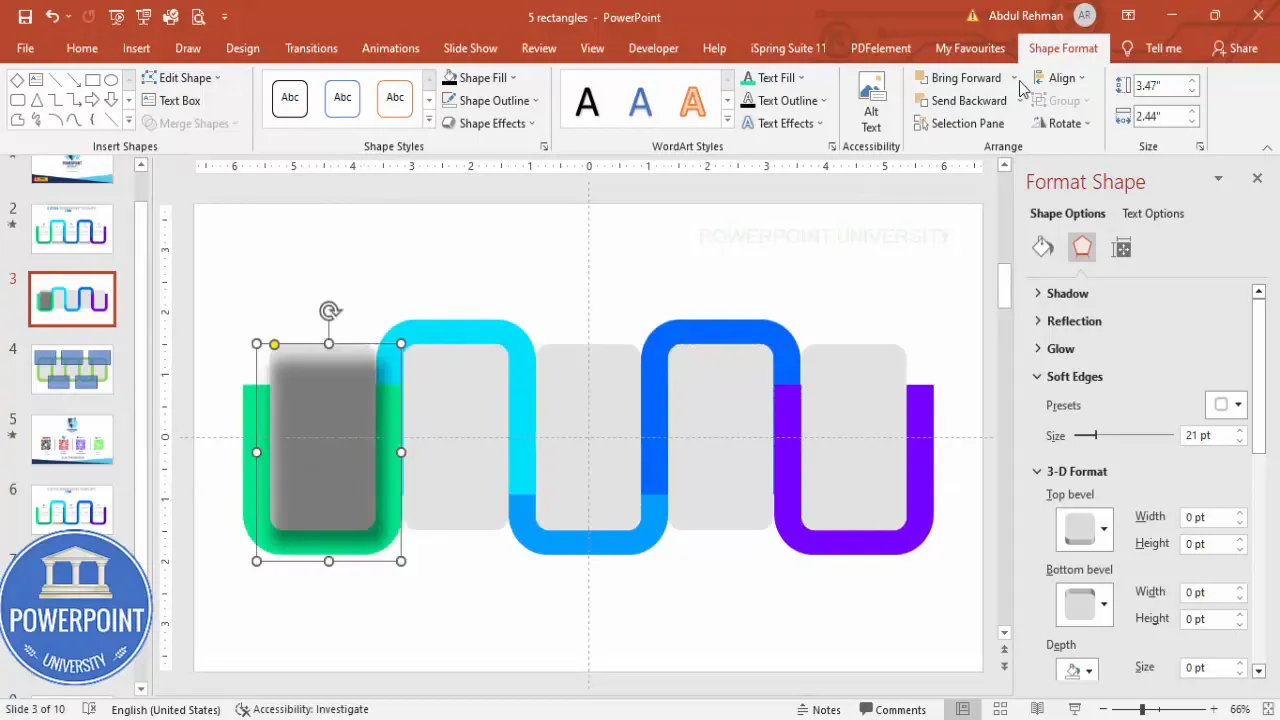
Create a soft shadow for depth
- Select the inner white rectangle and duplicate it (Ctrl+D).
- Change the duplicate to black and increase the transparency substantially (so it becomes a soft, subtle shadow).
- Open Shape Format > Shape Effects > Soft Edges or Blur settings and increase size until it becomes a gentle shadow.
- Position the shadow slightly offset (down-right or down-left depending on light direction) and send it to back (Right-click > Send to Back).
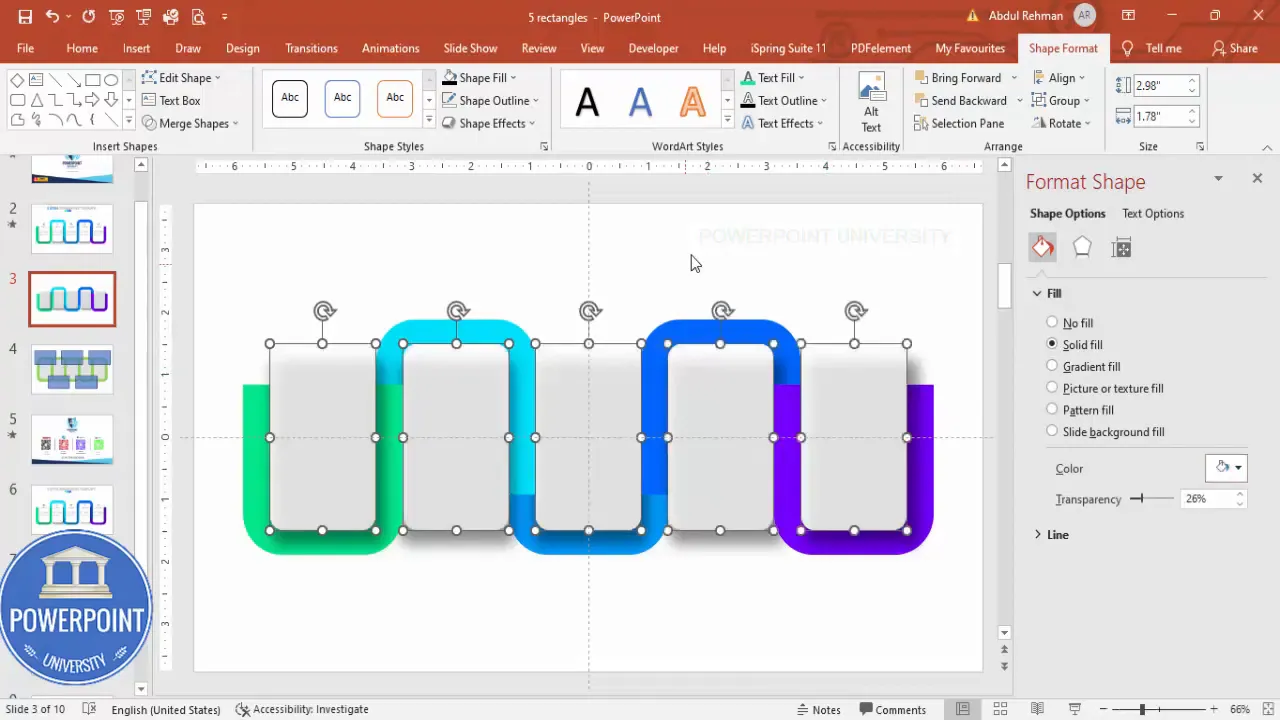
- Duplicate and position shadows for each step.
After shadowing is in place, set the inner rectangles to solid white and remove any extra transparency so they read clearly on top of colorful bands.
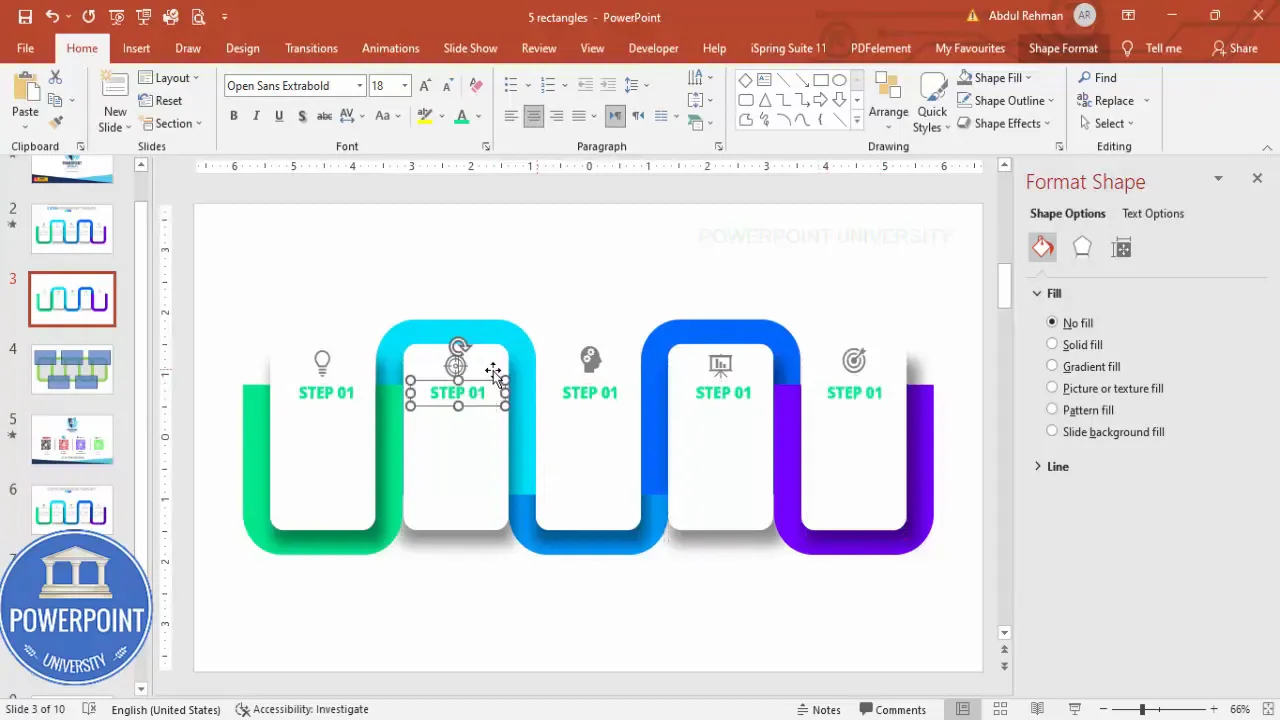
Adding Icons, Headings and Descriptions
Now the 5 Rectangular Step Slide starts to become a functional infographic. Each step needs three things: an icon, a short step heading (e.g., Step 1), and a one- or two-line description.
Icons
- Insert icons via Insert > Icons (or use SVGs/PNG images). Choose simple line icons that read well at small sizes.
- Set icon size to about 0.5″ (or 0.5 in PowerPoint size units) and set color to dark gray for contrast against white.
- Center each icon within the white inset rectangle so it’s visually aligned.
Step Headings
- Insert a text box and type Step 1, Step 2, etc.
- I use Open Sans Extra Bold for the headings in the demo. Choose a bold sans-serif for clarity.
- Consider coloring the step heading to match the outer band color for a subtle accent, or keep it dark gray/black for a neutral look.
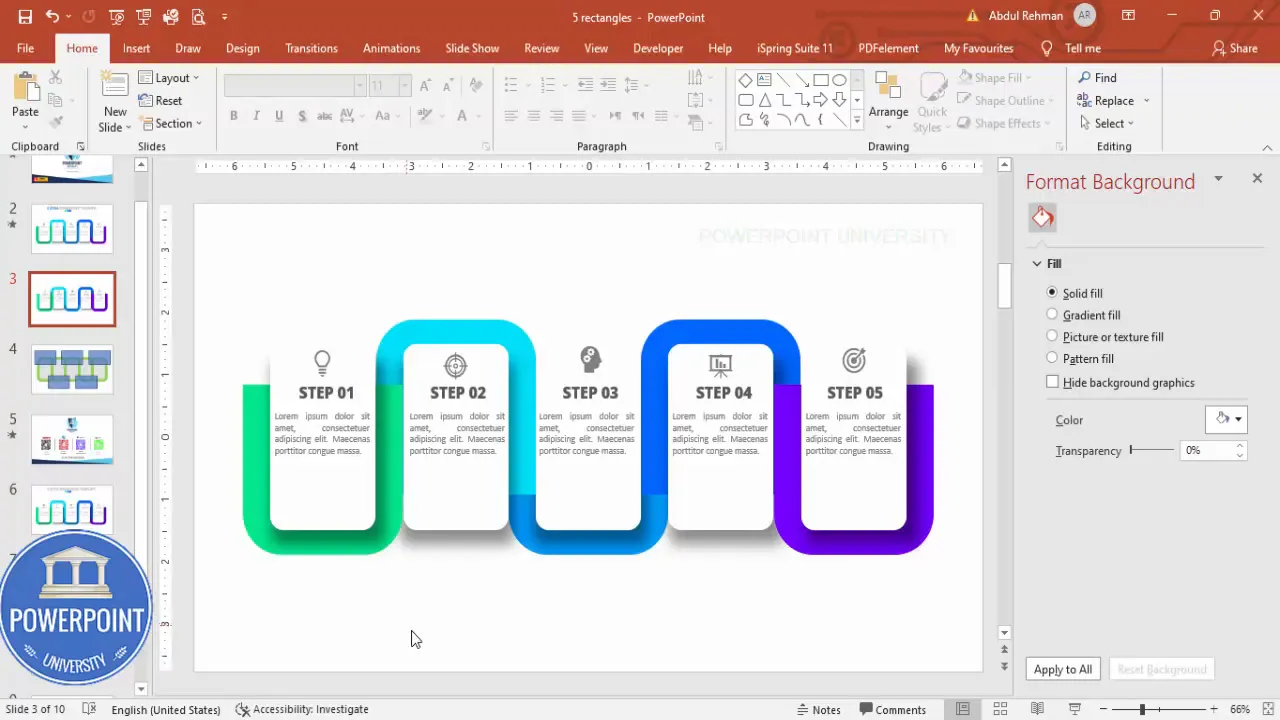
Descriptions
- Insert a small text box beneath the heading and add one short sentence or phrase describing the step.
- Set the paragraph to Justify and reduce font size so the description sits cleanly beneath the heading. Two lines max is ideal for readability.

Tip: Keep copy concise and action-oriented. Replace “Step 1” with a short verb phrase if you want more context, like “Plan” or “Onboard” — this helps audiences scan the slide quickly.
Grouping and Preparing for Animation
Before you animate, group every step’s components so you can animate them as single objects. Each step should be a grouped object that includes:
- Colored outer band segment
- White inner rectangle
- Icon
- Heading and description text
- Shadow shape (optionally grouped with the white inner rectangle)
- Select the objects that belong to Step 1 only and press Ctrl+G to group.
- Repeat for Step 2 through Step 5.
With these groups, you can now animate each step independently — a vital part of creating a step reveal in the 5 Rectangular Step Slide.
Create Slides in Seconds with ExpertSlides AI |
|
Generate AI Presentations today: |
| TRY NOW! |
Animation Ideas and How to Trigger Steps
You have several options to animate the components of your 5 Rectangular Step Slide so they reveal sequentially on mouse clicks.
Basic click-to-reveal
- Animation type: Entrance > Fade or Wipe
- Set each step group to “On Click” (Animation Pane > Start: On Click).
- Order groups from 1 to 5 in the Animation Pane so each click reveals the next step.
Directional Wipe
- Wipe from Left or Right can mimic the visual flow of steps.
- Set Wipe Direction to From Left for left-to-right reveal.
- Adjust speed to 0.4–0.8 seconds for a crisp reveal.
Appear with slight scaling
- Combine Entrance > Zoom (or Grow/Shrink) with Fade to create a gentle pop-in effect.
- Use Animation Painter to apply consistent animation settings across all steps.
Don’t forget to test the sequence in Slide Show mode to ensure the timing feels natural. If your audience is technical, you might add a “previous” control or let the presenter click backwards — but most live presentations are linear and simply use forward clicks.
Design Variations and Use Cases
The 5 Rectangular Step Slide is versatile. Here are a few variations and the contexts where they work best.
- Process Flow: Use arrows or connector lines to indicate direction. Great for operations, onboarding, or product development.
- Timeline: Replace “Step 1” with year markers and descriptions. Good for roadmaps or project milestones.
- Decision Path: Use contrasting colors for alternate tracks and annotate which steps correspond to which outcomes.
- Service Offering: Each rectangle can represent a separate service with an icon and a short benefit statement.
- Training Module: Use each step to represent a module; animate to reveal each training module in sequence.
You can also vary shape radiuses, color palettes, text sizes and icon styles to match your brand. For example, a corporate deck might use monochrome blues while a creative pitch could use vibrant gradients.
Common Mistakes and Troubleshooting
Even experienced designers can run into issues when building a 5 Rectangular Step Slide. Below are typical mistakes and how to fix them.
Shapes don’t align perfectly
- Fix: Use View > Guides and Align > Align Center and Align Middle. If spacing is inconsistent, use temporary guidelines to mark the exact overlap amount.
Merge Shapes > Subtract gives unexpected results
- Fix: Check stacking order — the shape you want to subtract must be on top of the shape you want to cut. Use Bring to Front/Send to Back as needed.
White inner rectangles disappear or look invisible
- Fix: Make sure any transparency setting is removed from the white shapes. Add a soft shadow layer underneath the white shape first so the white reads against colorful bands.
Icons look small or lose detail
- Fix: Use simple line icons and set size no smaller than 0.4″–0.5″ for clarity. If using PNGs, ensure PNG is high enough DPI for projected screens.
Animations aren’t consistent
- Fix: Use Animation Painter to transfer timing and effects between grouped objects. Keep duration consistent (0.3–0.8s depending on style).
Accessibility and Presentation Tips
When you present the 5 Rectangular Step Slide, consider viewers with visual or cognitive accessibility needs.
- High contrast: Ensure text has enough contrast against backgrounds (WCAG guidelines recommend a contrast ratio of at least 4.5:1 for normal text).
- Readable fonts: Use sans-serif fonts like Open Sans, Arial, or Helvetica at sizes that are easily readable in the room (minimum 22–24 pt for body, larger for titles).
- Keyboard navigation: If you expect viewers with different interaction modes, make sure animations can be advanced via keyboard and that slide order is logical.
- Alternative text: If you export the slide deck for distribution, add alt text to images and include a text-only summary for screen readers.
Pro tip: When in doubt, simplify. A cleaner 5 Rectangular Step Slide with clear headings and short descriptions will always communicate better than one with too much copy or noisy visuals.
Downloadable Template and Final Checklist
I provide a free downloadable template for the 5 Rectangular Step Slide so you can skip the setup and jump straight into customizing. Use the template to speed up your workflow or to study the layers and animation settings I used.
Final checklist before presenting:
- Each step grouped and named for clarity in the Selection Pane
- Animation order set to steps 1 through 5 with consistent duration
- Colors checked for contrast and brand compliance
- Fonts embedded or standard fonts used (to avoid substitution on other machines)
- Slide run-through completed in Slide Show mode
- If sharing slides, export a PDF or include alt text for images
Frequently Asked Questions (FAQ)
Q: What is the easiest way to make the 5 Rectangular Step Slide look balanced?
A: Use exact sizes and make duplicates. Start with the recommended sizes (3.77″ x 2.69″ for the outer band and 2.98″ x 1.78″ for the inner white rectangle), align center and middle for each pair, then duplicate. Consistent overlap spacing between duplicates will give you a balanced visual flow.
Q: Can I create a 5 Rectangular Step Slide if my PowerPoint version lacks Merge Shapes?
A: Yes. You can simulate the effect by carefully layering rectangles and using crop and mask techniques. Alternatively, create the shapes in a vector program (e.g., Illustrator) and import them as SVGs or images. However, you’ll lose some in-PowerPoint editability compared to using Merge Shapes.
Q: How do I make each step clickable to reveal extra details on the same slide?
A: You can animate each step to appear on click and then layer a second-level text box or shape that appears after the step is revealed. Use Animation Pane to chain animations: Step Group (On Click) → Detail Box (After Previous or On Click depending on interaction). For more advanced interactivity within PowerPoint, use hyperlinks to jump to a dedicated slide per step and return with a link back to the overview slide.
Q: What fonts and icon styles work best for the 5 Rectangular Step Slide?
A: Use simple sans-serifs for clarity. In my walkthrough I use Open Sans Extra Bold for step headings. For icons, use a flat line icon set or a filled glyph set that matches your brand. Keep icon weight consistent across steps so they read visually uniform.
Q: How many words should I place in each step description?
A: Aim for one short sentence or two lines of text — approximately 7–20 words. This keeps the slide scannable and avoids overwhelming your audience. If you have more content, place it on a follow-up slide or use a click-to-expand interaction.
Q: How do I export the 5 Rectangular Step Slide for sharing?
A: Export as a PPTX for editable distribution. If you need to share a static copy, export as PDF. For online content or images, export a PNG or JPG. If you export as images, ensure the resolution (DPI) is high enough for your intended use — typically 150–300 DPI for printed materials or high-resolution screens.
Conclusion
Creating a professional 5 Rectangular Step Slide in PowerPoint is a matter of following a few precise steps: build consistent base shapes, use Merge Shapes > Subtract for neat insets, add shadow for depth, populate with icons and concise copy, group elements, and apply simple animations for sequential reveals. With careful alignment, a considered color palette, and consistent iconography, your 5 Rectangular Step Slide will be both beautiful and functional.
Remember: consistency and clarity are the two most important design principles here. Use the sizes and workflow described, adapt to your brand palette, and test your slide in presentation mode to ensure everything animates and reads as intended.
If you want a head start, download the template I used to practice and tweak: it contains the grouped shapes, colors, and sample animations so you can focus on content rather than construction. Build, iterate, and make the 5 Rectangular Step Slide your own.
Happy designing — and enjoy using your new 5 Rectangular Step Slide to communicate processes and ideas more effectively.

Check out the full video: Create 5 Rectangular Steps Slide in PowerPoint. Tutorial No.: 986


