

Hi — I’m from POWERPOINT UNIVERSITY, and in this guide I’ll walk you through every step I used to build the 5 Ring options slide in PowerPoint from scratch. If you watched the original tutorial, this article expands on the same process with extra tips, best practices, troubleshooting, and suggestions for variations. By the end you’ll be able to design a polished circular options infographic that animates cleanly in presentation mode and adapts easily for 4, 5, or more segments.
This article covers everything — setup, drawing and merging shapes, gradients and shadows that give an aluminum pipe look, how to cut and align pieces so grouped objects behave predictably, adding icons and text, and finally the animation sequence so each ring reveals on click. I’ll also include design tips, accessibility pointers, and a thorough FAQ to answer common questions.
Keyphrase: I’ll use the phrase “5 Ring options slide in powerpoint” throughout this article so you can quickly find and reuse the exact technique.
Table of Contents
- Why use a 5 Ring options slide in PowerPoint?
- What you’ll build: the visual and interaction goals
- Preparation: files, versions, and layout
- Step-by-step build (detailed)
- 1. Background and guides
- 2. Create the aluminum pipe base (gradient rectangle)
- 3. Create the circular/oval ring pieces
- 4. Cut and merge shapes for clean edges
- 5. Add top rounded caps for 3D effect
- 6. Duplicate and position segments for 4–5 options
- 7. Gradient fills and color choices
- 8. Add icons, titles, and description text
- 9. Grouping rules before animation
- 10. Animations: entry, sequencing and effect options
- Design variations and advanced tips
- Accessibility and presentation tips
- Troubleshooting common issues
- FAQ
- Conclusion and next steps
Why use a 5 Ring options slide in PowerPoint?
The 5 Ring options slide in powerpoint is an effective visual for breaking a linear process into five distinct choices, stages, or features while preserving a strong visual rhythm. Compared to a flat bulleted list, the ring layout:
- Creates a single focal graphic that’s easy for audiences to scan.
- Allows for staged reveals (one ring per click) to control pacing and avoid information overload.
- Is flexible: the same artwork can be reused for 4, 5, or more options by resizing or adjusting spacing.
- Conveys continuity (the “pipe” look) while still highlighting each option independently.
When you build a 5 Ring options slide in powerpoint the right way — with clean merges, accurate alignment, and a small animation library — it becomes a reusable component in your slide deck template.
What you’ll build: the visual and interaction goals
Goal summary for this tutorial:
- Create a horizontal “pipe” composed of five segmented rings (circular-oval shapes) that look like metal/aluminum.
- Design each segment so it can be individually colored, have an icon and label, and a callout for descriptive text beneath or above.
- Apply subtle shadows and a 3D top cap so segments feel tactile.
- Animate segments so one highlights and its description appears on click.
Visually you should aim for a muted background (light gray) so colored rings and icons stand out. The technique of using gradient stops, merge-shape subtract, and small top-caps gives the metallic feel.

Preparation: files, PowerPoint version, and layout
Before you begin building the 5 Ring options slide in powerpoint, prepare the following:
- PowerPoint (Windows recommended for full merge shape and animation compatibility). The steps work in modern Office 365 / Microsoft 365 versions; some older builds may have slightly different menus.
- A blank slide or a slide with a simple content layout. I use a blank slide to control spacing precisely.
- Enable guides: View → Guides (this helps center the pipe and align segments precisely).
- Decide whether you want 4, 5, or more segments before drawing — you can always duplicate, but the spacing depends on size.
Recommendation: work at Slide Size 16:9 unless you need something different.
Quick checklist
- Blank slide ready
- Guides enabled
- Open the Format Shape pane (right click → Format Shape)
- Keep your Icons ready (Insert → Icons) — you’ll need 4 or 5
Step-by-step build (detailed)
Below is a step-by-step breakdown of everything I do to create the 5 Ring options slide in powerpoint. Follow each step in order, and use the screenshots to check your progress.
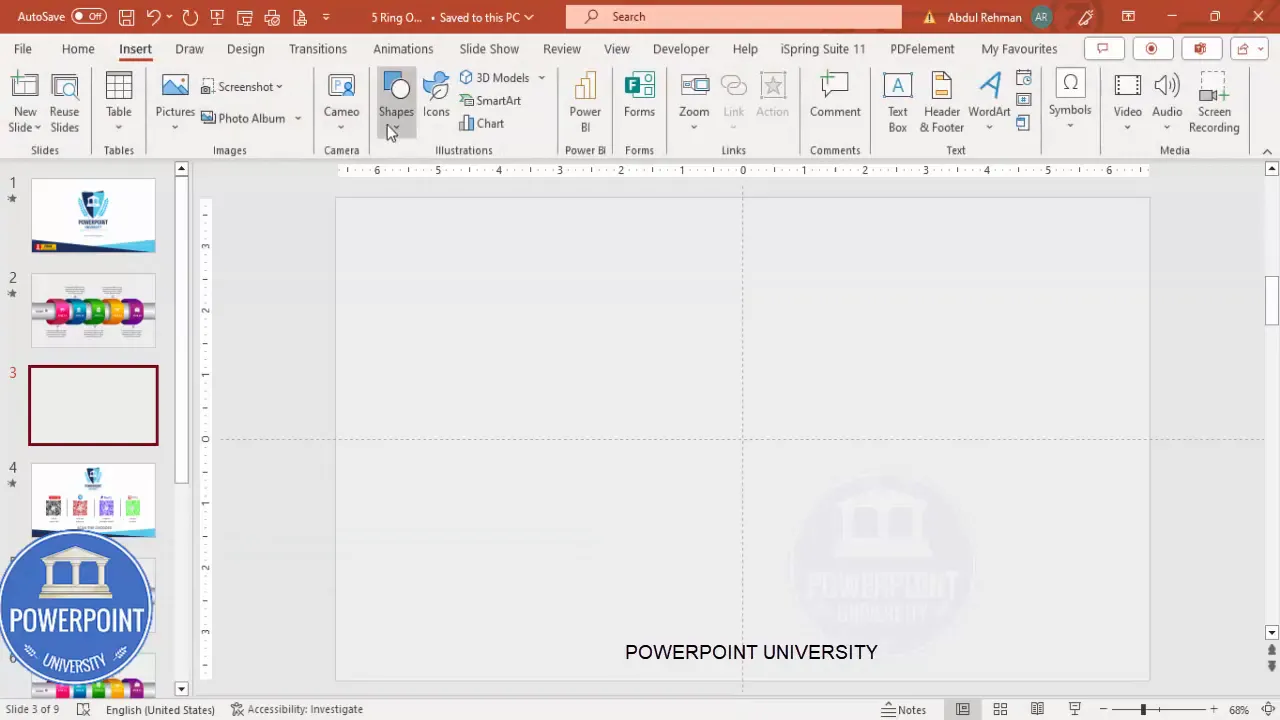
1. Background and guides
- Add a new blank slide.
- Set the background to a light gray color. Right-click the slide background → Format Background → Solid Fill → choose a very light gray. This helps colored rings pop without high contrast.
- Go to View and enable Guides. I typically use the central vertical and horizontal guides so my pipe stays centered on the slide.
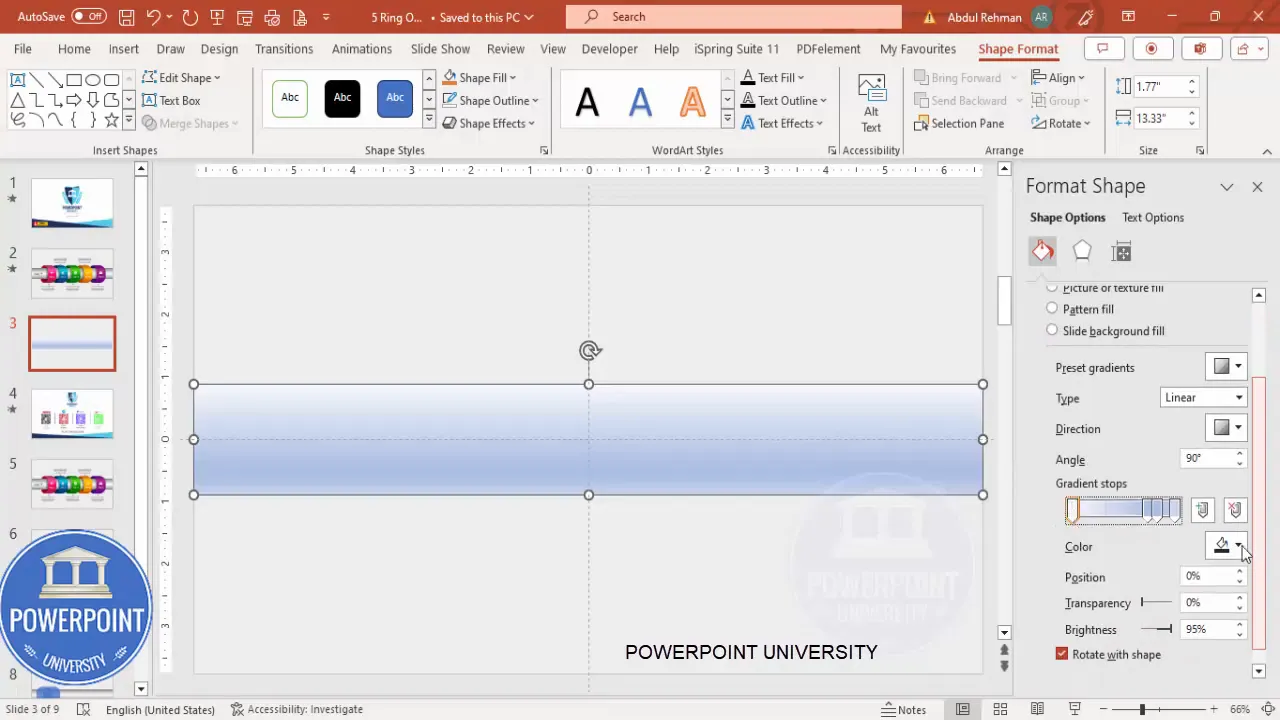
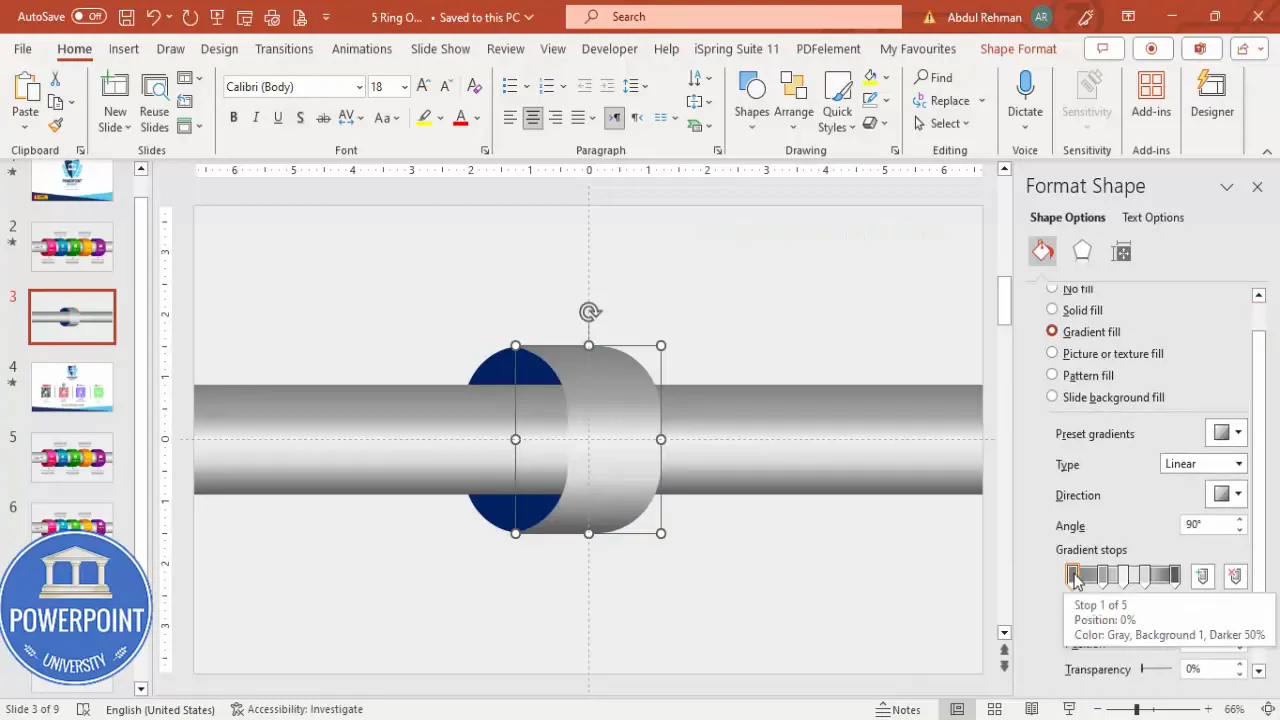
2. Create the aluminum pipe base (gradient rectangle)
- Insert → Shapes → Rectangle. Draw a long, wide rectangle roughly the width where your five rings will sit.
- Shape Outline → No Outline. Align → Align Center and Align Middle to make sure the base is centered on the guides.
- Right-click → Format Shape → Fill → Gradient Fill. By default you’ll see four gradient stops. Use four or five stops to create a metallic gradient.
- Set the left-most and right-most stops to a dark gray; move inner stops to lighter gray so the center looks brighter. This creates an aluminum/metal pipe impression.
- Optionally add a very light stop in the center to emphasize the highlight.
Tip: tweak the position of gradient stops to simulate curvature — subtle changes make a big difference.
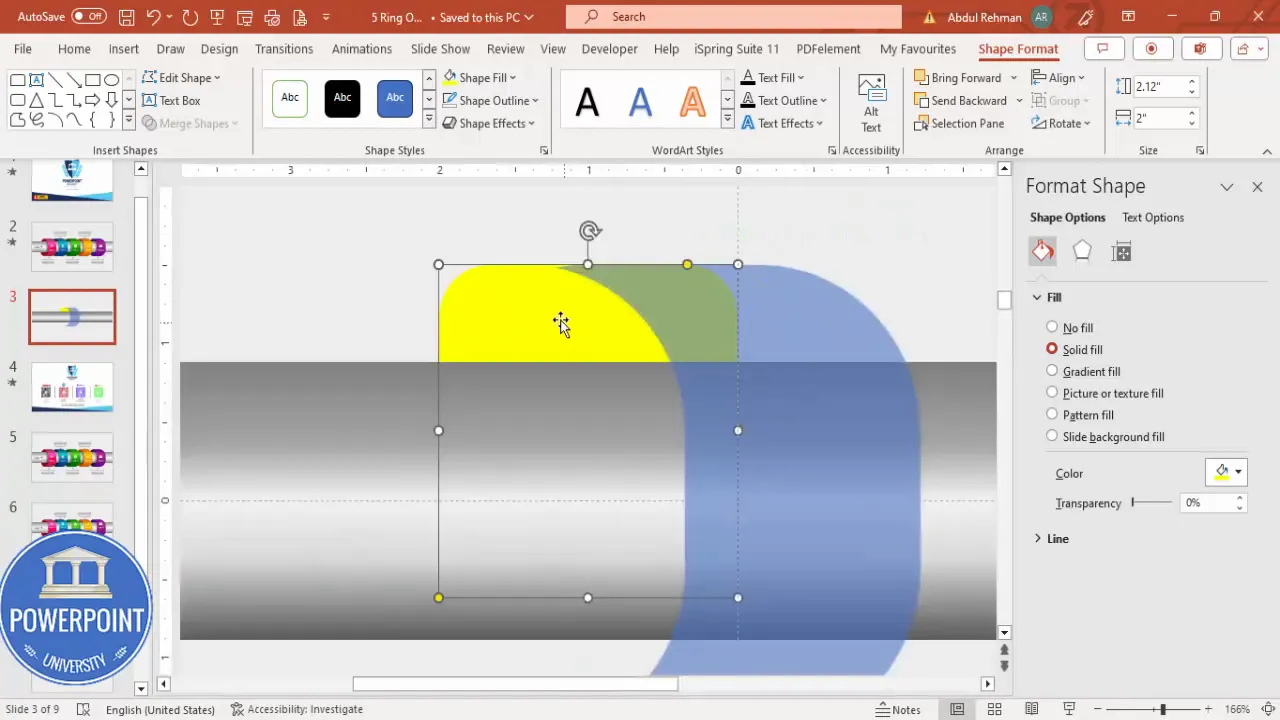
3. Create the circular/oval ring pieces
- Insert → Shapes → Rounded Rectangle. Draw a rounded rectangle (make it fairly wide; it will serve as a ring segment).
- Drag the small orange handle on the shape to increase roundness — not fully to a circle, but enough to create an oval/pipe cross-section.
- Shape Outline → No Outline. Reduce the shape transparency slightly so you can see underlying shapes during alignment.
- Duplicate the rounded rectangle (Ctrl + D) and change the color so you can differentiate the pieces while you work.
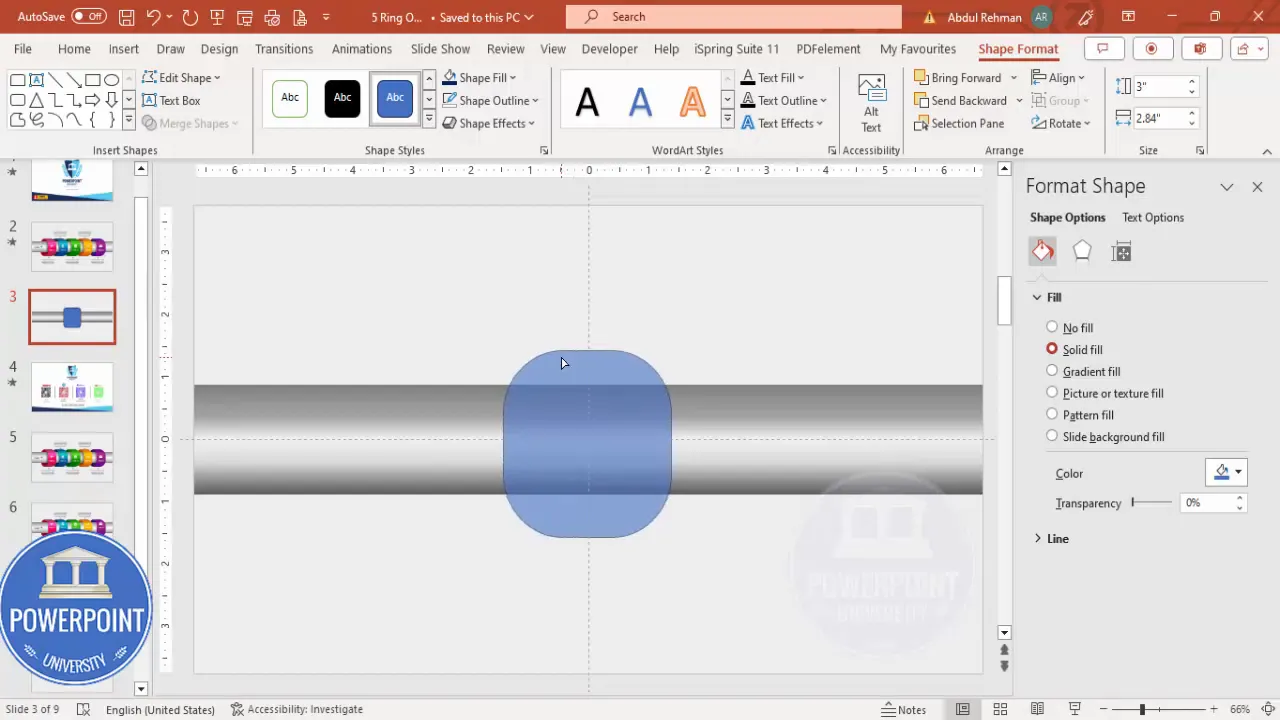
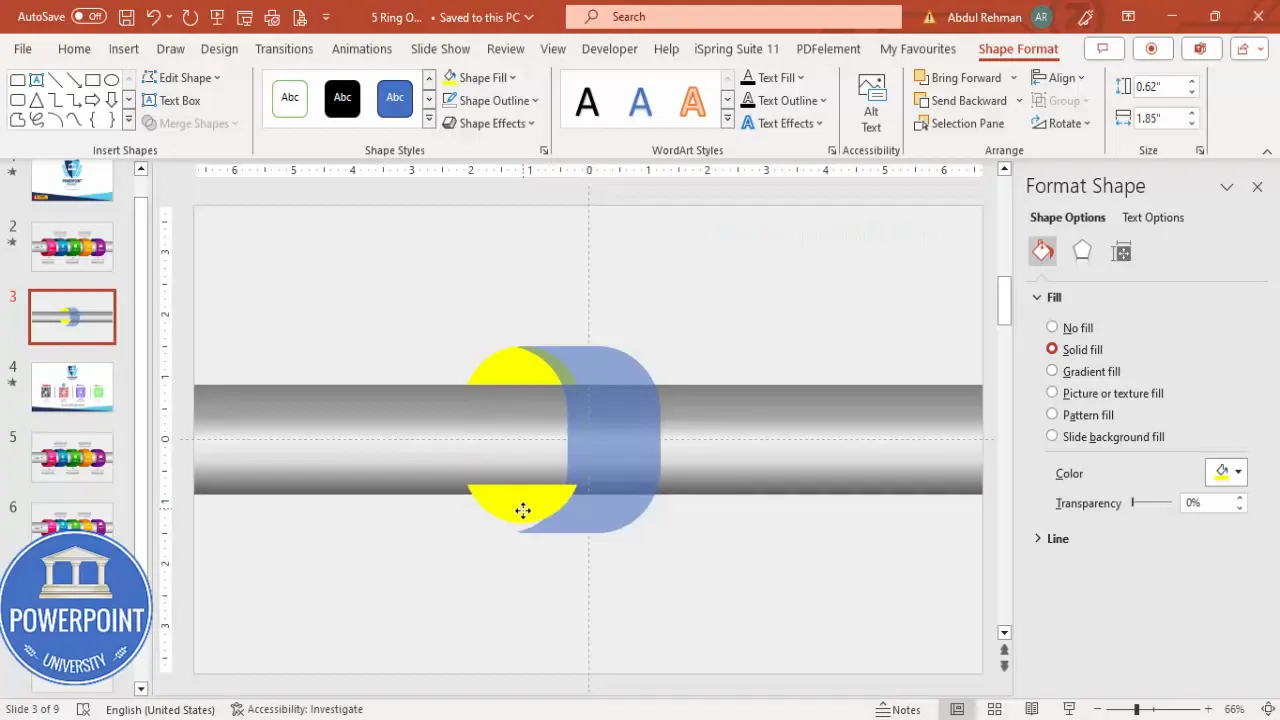
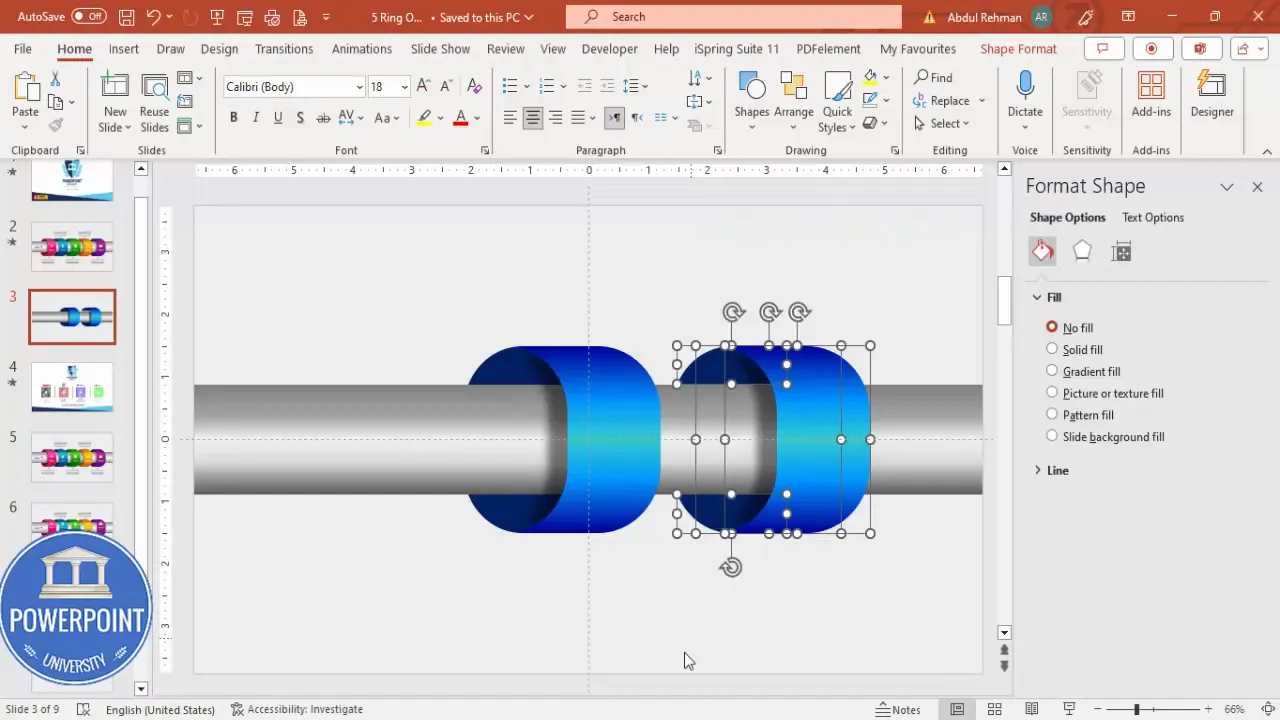
4. Cut and merge shapes for clean edges
To create ring segments that fit within the aluminum pipe (and allow grouping without visual artifacts), perform a subtract merge:
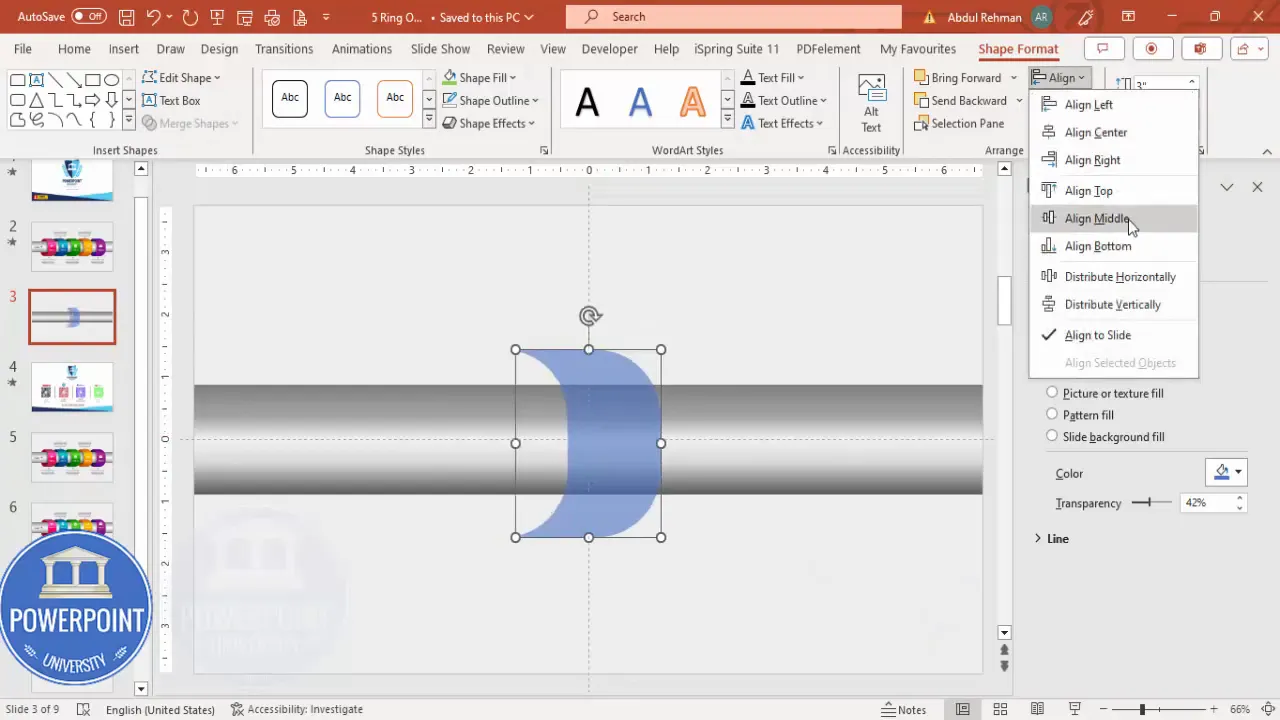
- Select the top rounded rectangle (blue in my example), then hold Shift and select the other rounded rectangle (green), then go to Shape Format → Merge Shapes → Subtract. This trims the overlapping part and gives you a single segment with a clean inner edge.
- Make sure the result is aligned center and middle to the base pipe.
Why subtract? If you leave shapes overlapping and later group them without trimming, grouped objects can shift or reveal unwanted overlaps when you animate or duplicate them. Subtraction ensures that each segment is a clean, single silhouette.
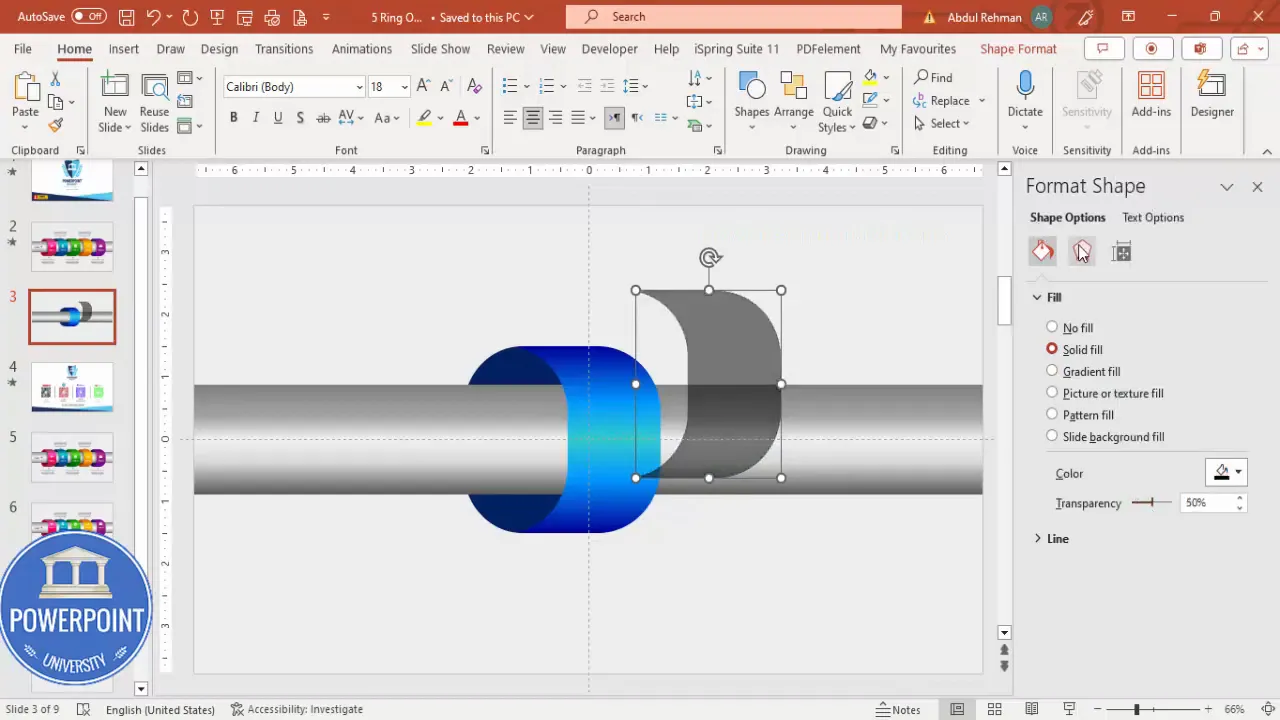
5. Add top rounded caps for a 3D effect
- Insert → Shapes → Rounded rectangle (the top-corners-rounded variant). Draw a slightly taller or wider piece that will act as the top cap to create a 3D visual.
- Shape Outline → No Outline. Fill with a distinct color temporarily to see placement.
- Use the orange adjustment handles to make the top corners fully rounded. Position the cap so it slightly overlaps the top of the segment.
- If the cap extends beyond the pipe boundaries, we’ll cut the overhang in the next step for a clean fit.
6. Cut the cap so it doesn’t extend beyond the pipe
- Insert → Shapes → Rectangle. Draw a rectangle covering the area you want to keep (aligned to the pipe edge) — this will act as a cutter.
- Select the cutter rectangle first, then hold Shift and select the cap. Use Shape Format → Merge Shapes → Subtract. The cap will be trimmed to the pipe boundary.
- Duplicate the trimmed cap, flip vertically for the bottom edge if needed, and align both top and bottom caps to the main pipe to achieve a symmetrical 3D effect.
After subtraction you should have a top cap that nestles perfectly into the pipe without breaking the silhouette.
7. Duplicate and position segments for 4–5 options
- Select the finished segment (body + top cap + bottom cap + shadow, if you added it) and press Ctrl + D to duplicate. Move the duplicate horizontally while holding Ctrl + Shift to keep it in a perfect line.
- Repeat until you have four segments. For a 5 Ring options slide in powerpoint, duplicate once more to reach five segments.
- If your initial shape is too large to fit five comfortably, either: reduce the size of the entire pipe and all segments, or tighten the spacing slightly between segments.
Tip: place the central guide at the center of the middle segment and then distribute left and right to keep the visual balanced.
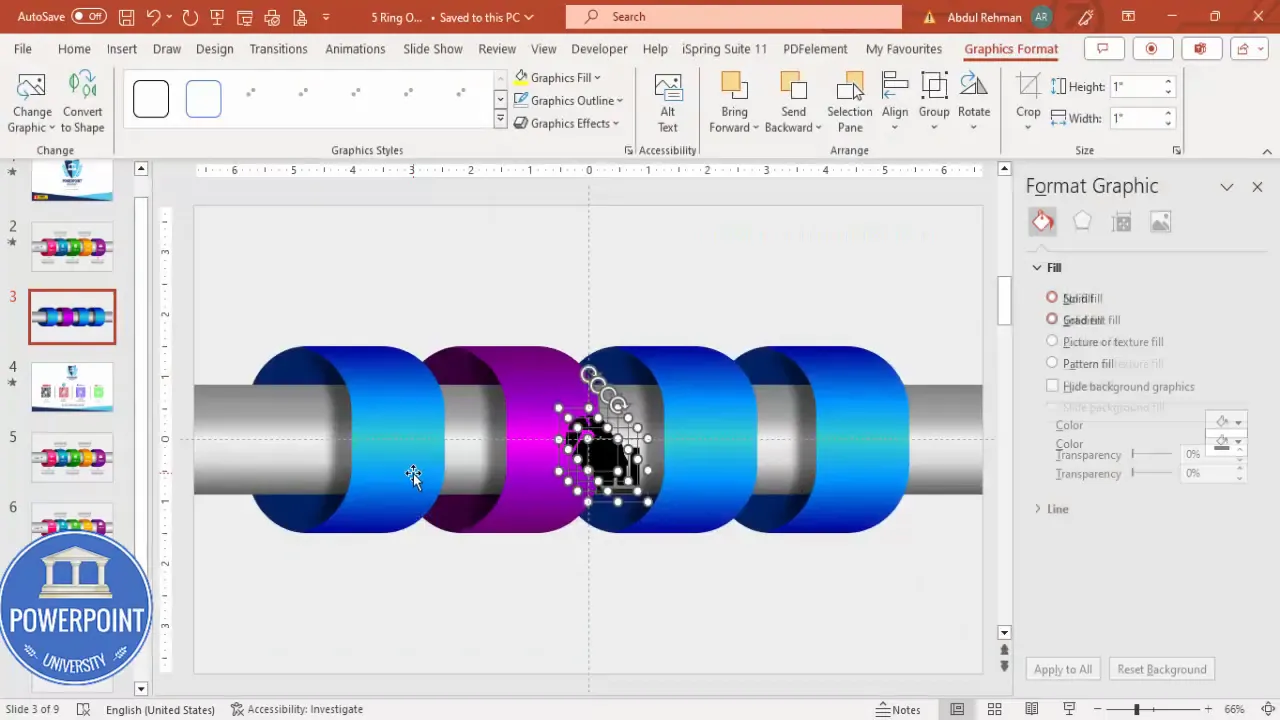
8. Gradient fills and color choices
Each segment should receive its own gradient so it appears to have depth and the highlight reads correctly when we animate. Here’s the approach I use:
- Select a segment’s primary body shape, go to Format Shape → Fill → Gradient Fill.
- Set two outer stops to a darker shade and inner stops to lighter shades — the darker edges frame the colorful center. This gives an embossed effect.
- For color themes, pick a consistent hue family with varying brightness (e.g., dark → medium → light blue), or pick distinct hues for each ring if you want colorful differentiation.
- Apply the same gradient axis to the top/bottom caps but adjust brightness slightly so they look like a single object when grouped.
When you want a metallic gray base with colored segments, make the base neutral and the segment fills saturated. If you prefer subtlety, use muted pastels with higher contrast icons and labels.
9. Add a shadow for depth (optional)
- Duplicate the segment, recolor it to black (or very dark gray), and increase its transparency so it reads like a shadow.
- Format → Effects → Soft Edges / Blur: increase softness to create a gentle shadow blur.
- Send the shadow copy to back and offset slightly down and right relative to the segment. Group shadow with the segment, or keep it separate if you’ll reuse the same shadow layer for multiple segments.
This soft shadow helps the segments feel lifted above the slide surface.
10. Add icons, titles, and description text
- Insert → Icons. Choose one icon per segment that represents the option. Insert them, set Fill to White for maximum contrast, and scale to around 0.6 or appropriate size for your segment.
- Center each icon within the segment using Align Center and Align Middle.
- Insert a text box for the title (e.g., “Option 1”). Use a clean sans-serif font (I prefer Open Sans) in white. Size the text so it sits below the icon but inside the colored segment.
- Add a small triangular callout (Insert → Shapes → Isosceles Triangle) and rotate or flip as needed to serve as a pointer from the pipe to a description area above or below the slide.
- Insert a text box with short descriptive text — keep it concise (20–30 words). Use center alignment and a dark gray font color for the description.
Design principle: the label and icon should be readable at a glance; avoid long sentences. If you need more explanation, place the full content on a separate “details” slide.
11. Grouping rules before animation
Before you animate, group each option (segment + cap + icon + title + descriptor + shadow) into a single object. Important rules:
Create Slides in Seconds with ExpertSlides AI |
|
Generate AI Presentations today: |
| TRY NOW! |
- Group each option individually so you can animate its entrance and exit.
- Do not group the option with the underlying aluminum pipe base. The base should remain a single non-animated object behind the segmented groups.
- If you used subtract operations to cut caps and segments, the grouped object will behave predictably. If you didn’t cut shapes before grouping, grouped objects may not be clipped as expected when moved or duplicated.
To group: select the objects that make one option and press Ctrl + G. Repeat for each option.
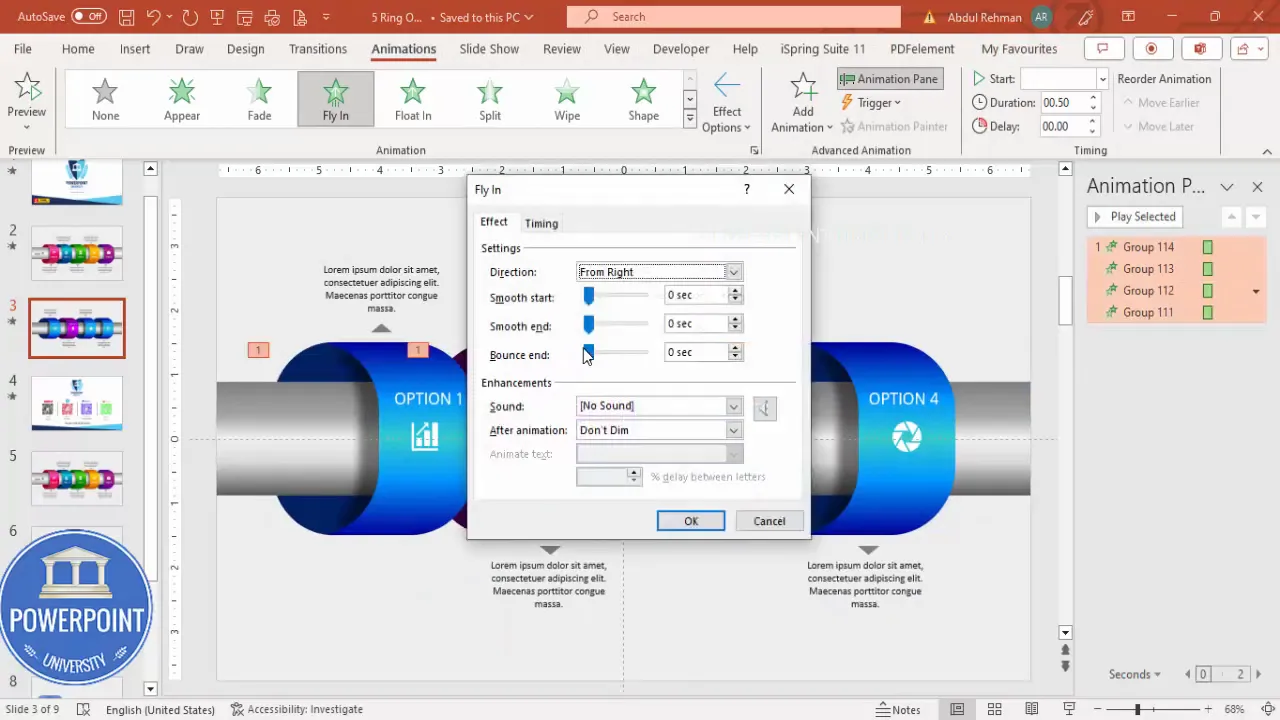
12. Animations: entry, sequencing and effect options
Animation is the last step. The goal is to reveal each option one-by-one on click so the audience can focus on the current item.
- Go to Animations → Animation Pane to see the full sequence.
- Select all four or five option groups (hold Shift and click each). For the first reveal I used Fly In from the right for colored rings. Choose Effect Options → From Right.
- Right-click the animation in the Animation Pane → Effect Options: increase Bounce if you like a little spring to the movement (optional).
- Set each ring’s animation to Start On Click or configure them to Start After Previous if you want a timed auto-play.
- For the descriptions, add a separate entrance (for example, Stretch from Bottom) and sequence it to occur After Previous so the pipe segment appears, then the description expands.
- For the final reveal sequence I typically do: ring (fly in from right) on click → description (stretch from bottom) after previous → next ring on next click, and so on. For the last pieces, I alternate the description stretch to come from top for visual variety if the description sits above the pipe.
Testing: run the slide show and click through each reveal. Make small timing adjustments in the Animation Pane to smooth the choreography.
Design variations and advanced tips
Once you’ve built a working 5 Ring options slide in powerpoint, you can experiment with many design variations:
- Color-coded themes — use one hue family per option (blue, purple, pink, teal, orange) for clean branding.
- Monochrome with accent — keep the pipe grayscale and only spotlight the active segment with a bright accent color.
- Numbered rings — place large numeric labels inside each ring to show sequence (1–5).
- Icons only — for minimalist slides, use only icons inside rings and expand the description in a side panel on click.
- Interactive details — link each ring to another slide in your deck that expands on the selected option (Insert → Action → Hyperlink to Slide).
- SVG and transparency — you can export your segments as SVG for crisp scaling across sizes (Office 365 supports this). Keep working file as PPTX for quick edits.
Advanced animation ideas:
- Use Emphasis animations to highlight the active ring (pulse or glow) after it appears.
- Create looping subtle micro-animations for the background pipe (tiny shimmer) to simulate metallic sheen — but use sparingly.
- Chain animations with delays for a professional sequencing effect.
Accessibility and presentation tips
Good design isn’t just pretty — it’s accessible and practical. For the 5 Ring options slide in powerpoint, follow these steps:
- Use sufficient contrast between text and ring color. White text on saturated color works; otherwise use dark text on light fill.
- Use Alt Text for icons and important shapes: right-click → Edit Alt Text — this helps screen readers.
- Don’t rely only on color to convey meaning — add labels or icons so color-blind viewers can follow along.
- Keep font sizes large enough: titles at least 20–28 pt depending on the screen and audience distance.
- When presenting, use Presenter View so you can see notes and the next animations without exposing them to the audience.
- Run the animations in Presenter View before presenting to confirm timing and sequence.
Troubleshooting common issues
Here are issues I frequently encounter and how to resolve them:
- Shapes don’t clip when grouped: You probably grouped before subtracting. Undo grouping, perform the Merge Shapes → Subtract, then re-group.
- Animation appears jerky: Check object ordering; shadow layers sometimes sit above or between grouped shapes. Ensure each group contains only the objects that should move together.
- Icon alignment feels off: Use Align Center and Align Middle for icons within the segment; then nudge with arrow keys for pixel-perfect placement.
- Not enough space for five rings: Reduce the overall segment scale and center the pipe. Alternatively, reduce spacing and increase slide margins carefully.
- Gradients look different on another PC: Color reproduction differs by monitor. For critical deliveries, test presentation machine and avoid extremely subtle gradients that can disappear on lower-calibrated displays.
Checklist before finalizing the 5 Ring options slide in powerpoint
- All segments are grouped individually (each with icon, title, description, shadow).
- The base aluminum pipe is a separate non-animated object behind the segments.
- Each segment has consistent gradient stops for depth.
- Animation sequence tested in Slide Show and Presenter View.
- Alt text added to important shapes and icons.
- Fonts embedded or commonly available (for external computers embed fonts when saving as PDF or PPTX if necessary).
Example walkthrough: how I animate a single option reveal
Below is my standard micro-flow for a single option reveal. Repeat per option:
- Segment group — Entrance animation: Fly In (From Right), Start: On Click.
- Description text — Entrance animation: Stretch (From Bottom), Start: After Previous, Duration 0.3–0.5s.
- Optional icon emphasis — Emphasis: Grow/Shrink or Color Pulse, Start: After Previous, Delay 0.1s.
Avoid overly long entrance animations; keep them snappy (0.3–0.6 seconds) and consistent across all options to maintain rhythm.

Design resources and template download
If you’d like to skip building this from scratch, I provide a free downloadable template that includes the pre-built 5 Ring options slide in powerpoint with animations pre-configured. Use it as a base to replace icons, colors, and text with your brand content.
Tip: duplicate the template slide to create multiple variations for different parts of your presentation (summary, deep dive, comparison etc.).
Frequently Asked Questions (FAQ)
Q: Can I make more than five rings using this method?
A: Yes. The same technique applies to any number of rings. The main constraints are visual scale and slide width. If you add more rings, reduce each segment’s size proportionally and tighten spacing. Remember that too many rings can overwhelm the audience—consider grouping options or creating multiple slides for clarity.
Q: Will this method work on Mac PowerPoint?
A: Most merge shape operations and animations are available in modern PowerPoint for Mac, but there are occasional differences in menu naming and feature parity in older versions. If Merge Shapes or some animation effects are missing, check your Office version and update to the latest release. Alternatively, create shapes in Windows and export as a grouped SVG for Mac usage.
Q: How do I make the pipe look metallic?
A: Use gradient fills with dark edges and a brighter center. Add one or two inner gradient stops to fine-tune the highlight. Combine this with a subtle soft shadow underneath to emphasize elevation. Avoid high-saturation colors on the pipe; keep the base neutral (grays, cool blues).
Q: What if the shapes misalign after grouping?
A: Ungroup, realign the sub-objects to the guides using Align → Align Center / Align Middle, and then re-group. If you used Merge Shapes → Subtract correctly, the object boundaries will be cleaner and less prone to misalignment after grouping.
Q: How can I ensure the animation runs consistently on all machines?
A: Use standard animation effects (Fly In, Fade, Stretch, Appear) and avoid effects that rely on hardware acceleration or advanced GPU features. Test slides on the machine you’ll present from and in Presenter View. If you must, export as a video (File → Export → Create a Video) for guaranteed playback, noting that interactivity (On Click) will be converted into timed sequences.
Q: Is it better to animate the entire group or animate each sub-object separately?
A: Animate the group if you want the option to appear as a single unit. Animate sub-objects separately when you want richer choreography (e.g., ring enters, then icon pops, then description stretches). Keep in mind that more animations require careful syncing to avoid a cluttered feel.
Q: How should I pick colors for the five rings?
A: Use an accessible color palette. For brand conformity, pick your brand’s primary and secondary colors. If you’re designing for general audiences, select five hues with sufficient contrast. Use a color tool (like Adobe Color or the PowerPoint color picker) to ensure contrast ratios are acceptable for text readability.
Q: What fonts should I use?
A: Choose clean sans-serif fonts such as Open Sans, Calibri, Arial, or Roboto. Use larger sizes for titles and at least 18–24 pt for body text depending on the expected viewing distance. If you use a custom font for design reasons, embed the font into the PPTX (File → Options → Save → Embed fonts in the file) or convert text to shapes if necessary for distribution (note: converting text to shapes prevents editing).
Step-by-step quick reference (cheat sheet)
- Create blank slide and set light gray background.
- Enable guides and set center alignment.
- Draw base rectangle and apply gradient (dark edges, light center).
- Draw rounded rectangle for segment, adjust corner roundness.
- Duplicate segment, align, then Merge Shapes → Subtract to form precise segment.
- Add rounded top caps, subtract excess with a rectangle cutter.
- Duplicate segment across the pipe to form 4 or 5 options.
- Apply gradient fills to each segment (colored center, dark edges).
- Add icon, title, triangle callout, and description text; group per option.
- Create animations: Fly In (From Right) for ring; Stretch for description; sequence appropriately in Animation Pane.
- Test in Slide Show and Presenter View; make final spacing/contrast adjustments.
Additional tips I use every time
- Save incremental versions (v1, v2) — if you change color scheme you can revert quickly.
- Use Ctrl + Shift while dragging duplicates — it constrains movement and maintains alignment.
- Use Align → Distribute Horizontally to ensure equal spacing (after selecting all segments).
- Give each group a clear name in Selection Pane (Home → Arrange → Selection Pane) to avoid confusion during animation setup.
- Consider exporting ring groups as PNG with transparency if you need to insert them into other programs (keep original PPTX for edits).
Conclusion and next steps
Designing a polished 5 Ring options slide in powerpoint is all about precise shape-building, careful gradients, and clean grouping before animation. The steps above reproduce the same approach I used in my tutorial: build the pipe base, create clean subtract-based segments, add subtle 3D caps and shadows, and choreograph simple animations to reveal each option on click.
If you want to iterate further, try: changing the layout to vertical stacked rings, linking each ring to a detail slide, or animating in additional emphasis effects like color shifts on hover in exported interactive formats.
Final checklist before presenting:
- Contrast and font size validated
- Animations tested in Presenter View
- Slide grouped and saved as part of your master deck
- Backup copy exported (PPTX and PDF)
If you’d like the exact template I used, download the pre-built 5 Ring options slide and customize it: replace icons, update colors, and edit text to match your content. This saves time and ensures animations are configured correctly.
Final FAQ additions
How do I share this slide with team members who don’t have the same fonts?
Either embed fonts in the PowerPoint (File → Options → Save → Embed fonts in the file) or convert text to shapes (right-click text → Convert to Shape or use Save As → PDF if you don’t need them to edit the text). Remember converting to shapes makes text uneditable.
Can I convert the slide into a graphic or video?
Yes — export the slide as PNG for a static image or use File → Export → Create a Video to preserve animations. If exporting to video, set timing or allow recorded narration to synchronize with the animation sequence.
Thanks for following this walkthrough for creating a professional 5 Ring options slide in powerpoint. Build the template once and reuse it across decks to keep your slide design consistent and your presentations crisp. If you try this technique, tweak gradients and spacing to match your brand, and remember — small details like shadow softness and icon alignment make a huge difference.
Check out the full video: Create 5 Ring Options Slide in PowerPoint | Tutorial 1018 | Free Template


