

- Table of Contents
- Introduction
- Why use a 6 Options Infographic Slide PowerPoint?
- What you need before you begin
- Quick overview of the process
- Step-by-step build (with screenshots)
- Set up the slide and guides
- Create the base rectangles
- Duplicate and rotate to form the wheel
- Merge and fragment shapes
- Add the center oval and image
- Create a shadow behind the image
- Add icons and text for each option
- Group objects and apply animations
- Design variations and color tips
- Animation recipes and timing best practices
- Common mistakes and troubleshooting
- Exporting, sharing and using the template
- Accessibility and print considerations
- Advanced tweaks and ideas
- FAQ
- Conclusion
Introduction
If you want a clean, professional infographic that presents six related options, the 6 Options Infographic Slide PowerPoint format is one of the most effective layouts you can build. In this guide I’ll walk you through every step, from setting up the slide to polishing animations, so you can recreate a beautiful and functional 6 Options Infographic Slide PowerPoint in minutes.
I created the walkthrough to give you both practical steps and design reasoning so you can adapt the technique to your brand. This tutorial explains how to build the 6 Options Infographic Slide PowerPoint, how to customize colors and icons, and how to add smooth entrance animations to create that “wow” moment during a presentation.

Why use a 6 Options Infographic Slide PowerPoint?
The 6 Options Infographic Slide PowerPoint is ideal for scenarios where you need to present a central concept surrounded by six supporting ideas. Common uses include:
- Product features (six main features)
- Project phases or milestones
- Stakeholder groups or departments
- Service bundles or packages
- Comparisons across six criteria
- Decision frameworks with six options
Visually, the layout draws attention to the center while giving each option a balanced, equal-weight position. The structure of the 6 Options Infographic Slide PowerPoint makes relationships and priorities clear without overwhelming the audience.
What you need before you begin
Before you start building your 6 Options Infographic Slide PowerPoint, gather the following:
- Microsoft PowerPoint (desktop version recommended for full shape merging features)
- One central image (portrait or circular-friendly composition)
- Six icons that represent each option (PowerPoint’s icon library or SVGs)
- A color palette (3–6 colors that work well together)
- Basic familiarity with PowerPoint shortcuts (Ctrl+D, Ctrl+G, Alt + Arrow keys)
Optional but helpful: a support template or a downloadable example. Having the assets ready makes building a 6 Options Infographic Slide PowerPoint seamless.
Quick overview of the process
At a glance, the workflow for the 6 Options Infographic Slide PowerPoint consists of:
- Set guides and add a base rectangle centered on the slide.
- Duplicate, recolor and rotate rectangles so they overlap like a radial wheel.
- Use Merge Shapes → Fragment to split the objects into six wedge-like panels.
- Delete the unwanted fragments and add a centered oval for the main image.
- Apply colors, add the central image, create a shadow layer, and insert icons and text on each wedge.
- Group related objects, then add entrance animations with staggered timing for a polished reveal.
This structured approach keeps each step focused and reduces the chance of accidental misalignment while building the 6 Options Infographic Slide PowerPoint.
Step-by-step build (with screenshots)
Now let’s build the 6 Options Infographic Slide PowerPoint from scratch. Follow each step carefully and use the screenshots to check your progress.
1. Set up the slide and guides
Start with a blank slide. Go to View → Guides to make sure you can snap elements exactly to the center. A centered base will keep everything symmetrical, which is crucial for the 6 Options Infographic Slide PowerPoint.

Tip: If guides aren’t visible, enable them in View. Once enabled, you can drag extra guides for specific layout snapping if needed.
2. Create the base rectangle
Insert a rectangle and set its dimensions to 7.5 inches wide and 7.5 inches high. Then remove the outline and align it to the center both horizontally and vertically. This gives you a balanced canvas to work within for the 6 Options Infographic Slide PowerPoint.
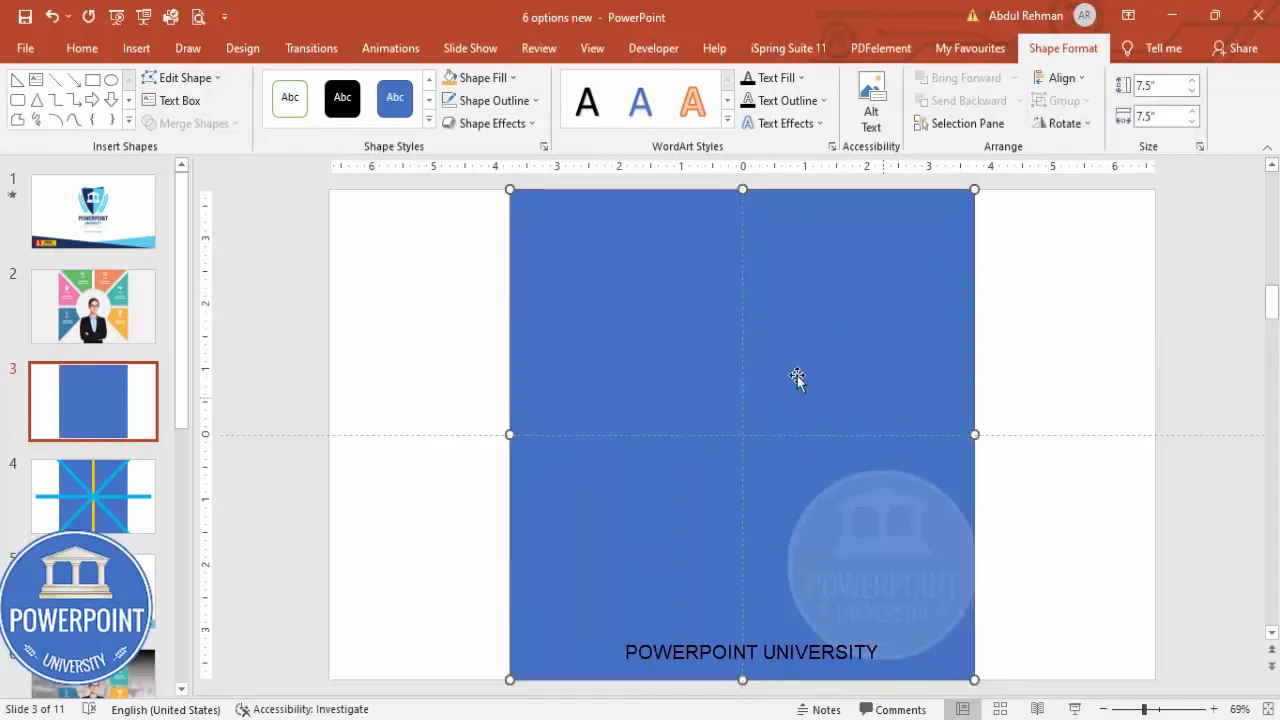
Why a square? A square is easy to rotate duplicates around the center while maintaining the same overlap. A square as the base area ensures the wedge panels will meet evenly after fragmentation.
3. Duplicate and recolor rectangles
Insert another rectangle of the same size and set a different fill color (no outline). Center it exactly over the first rectangle. Duplicate that rectangle with Ctrl+D and change its color to create three base rectangles of varying colors. Each duplicate should be centered on the slide to preserve symmetry for the 6 Options Infographic Slide PowerPoint.
Using varying fills at this stage helps you see the overlapping pattern while rotating. The fills are for construction only; final color choices can be updated later.
4. Rotate duplicates to form a wheel
Select one of your rectangles and rotate it by small steps using Alt + Right Arrow to set the angle precisely. Repeat this rotation and duplication to create three rotated rectangles that overlap and extend past the square base. The goal is to have triangular-like intersections once you fragment the shapes.
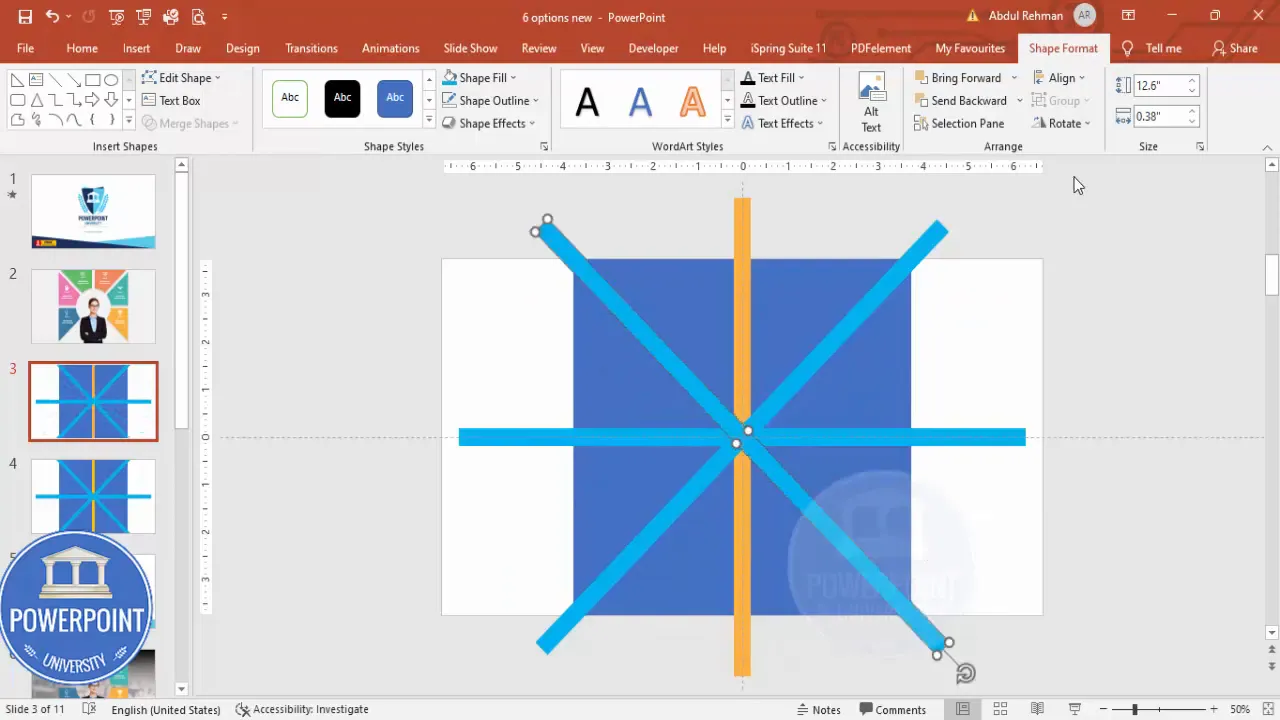
Tip: Use the Alt + Arrow shortcut in combination with consistent step counts so you distribute rotated shapes evenly. This precision is critical for the final wedge shapes in your 6 Options Infographic Slide PowerPoint.
5. Duplicate further to complete all six arms
Continue duplicating and rotating until you have the full star/wheel pattern. Make sure every duplicate remains aligned to center after each rotation. When done you should have multiple rectangles rotated at various angles overlapping the base square.
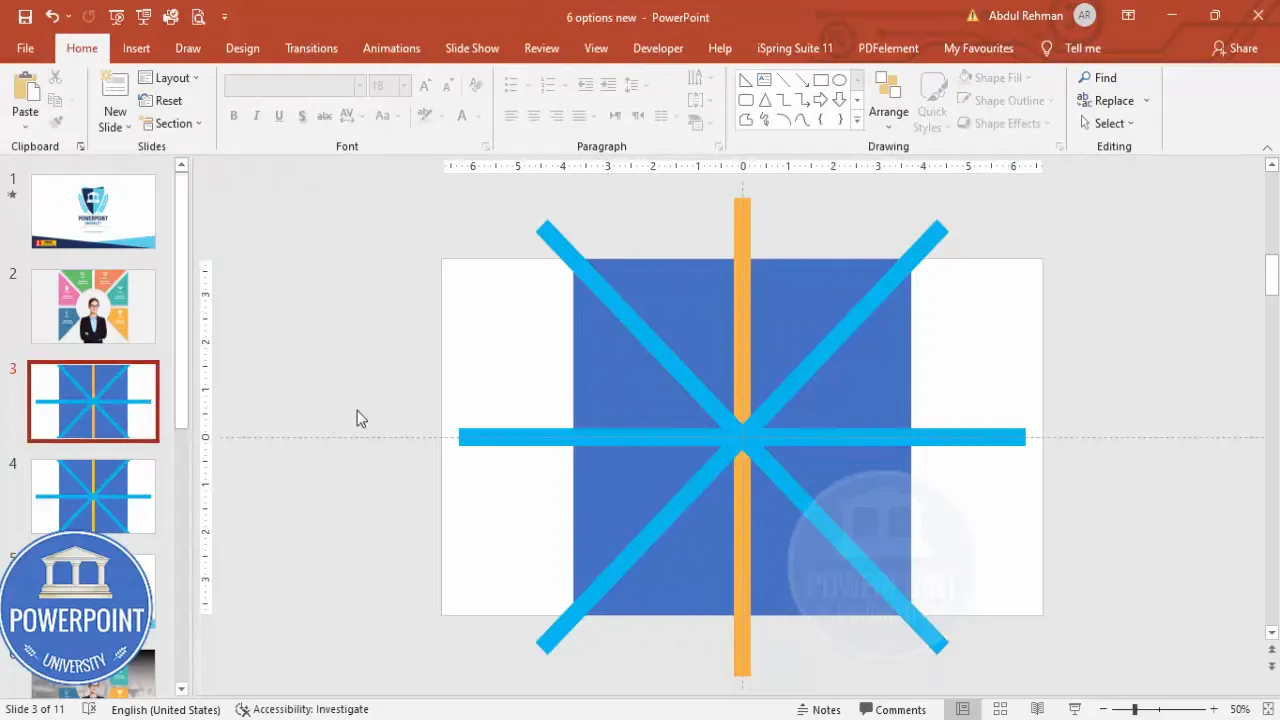
Once the pattern is in place, duplicate the entire slide as a backup. This allows you to revert to the pre-fragmented stage if something goes wrong.
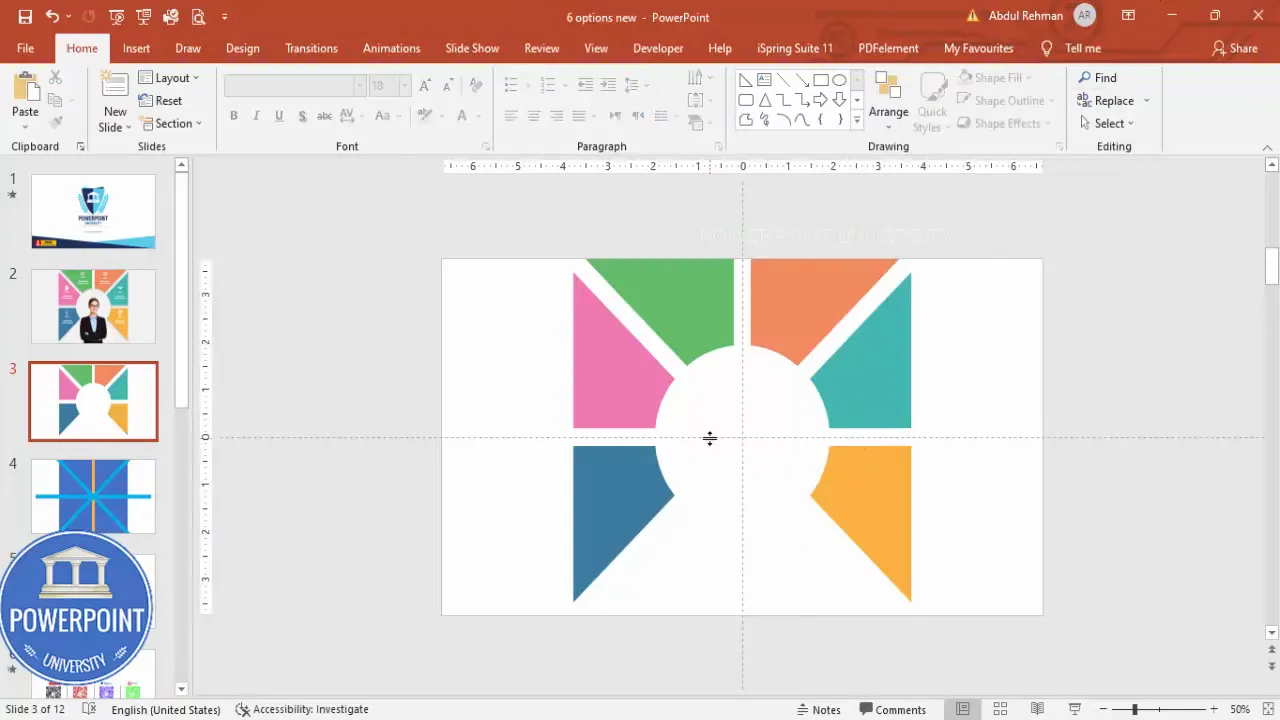
6. Merge shapes and fragment
Select all shapes (Ctrl+A) and go to Shape Format → Merge Shapes → Fragment. Fragment will break the overlapping shapes into separate polygonal pieces that you can delete or color independently, which is the core technique to create the wedge-like options in the 6 Options Infographic Slide PowerPoint.

Once fragmented, remove any unnecessary center fragments and tidy the edges so each wedge has a clean boundary around the oval space.
8. Apply color fills
Fill each wedge with the color scheme of your choice. Use contrasting or harmonious colors depending on whether you want attention-grabbing wedges or a softer corporate palette. At this stage, the structure of the 6 Options Infographic Slide PowerPoint becomes visually obvious.
Design tip: Use the same hue with different tints for a cohesive look, or use distinct hues for each option if you want high visual differentiation — both approaches work well for the 6 Options Infographic Slide PowerPoint.
9. Insert the central image
Insert your chosen image (from device or online) and place it in the center. Resize while holding Ctrl+Shift for a balanced scale relative to the oval. The central image anchors the story and draws the eye first, followed by the six supporting wedges in your 6 Options Infographic Slide PowerPoint.
Tip: Choose an image that remains identifiable when shown at the scale you use. For corporate slides, a product shot or team photo works great.
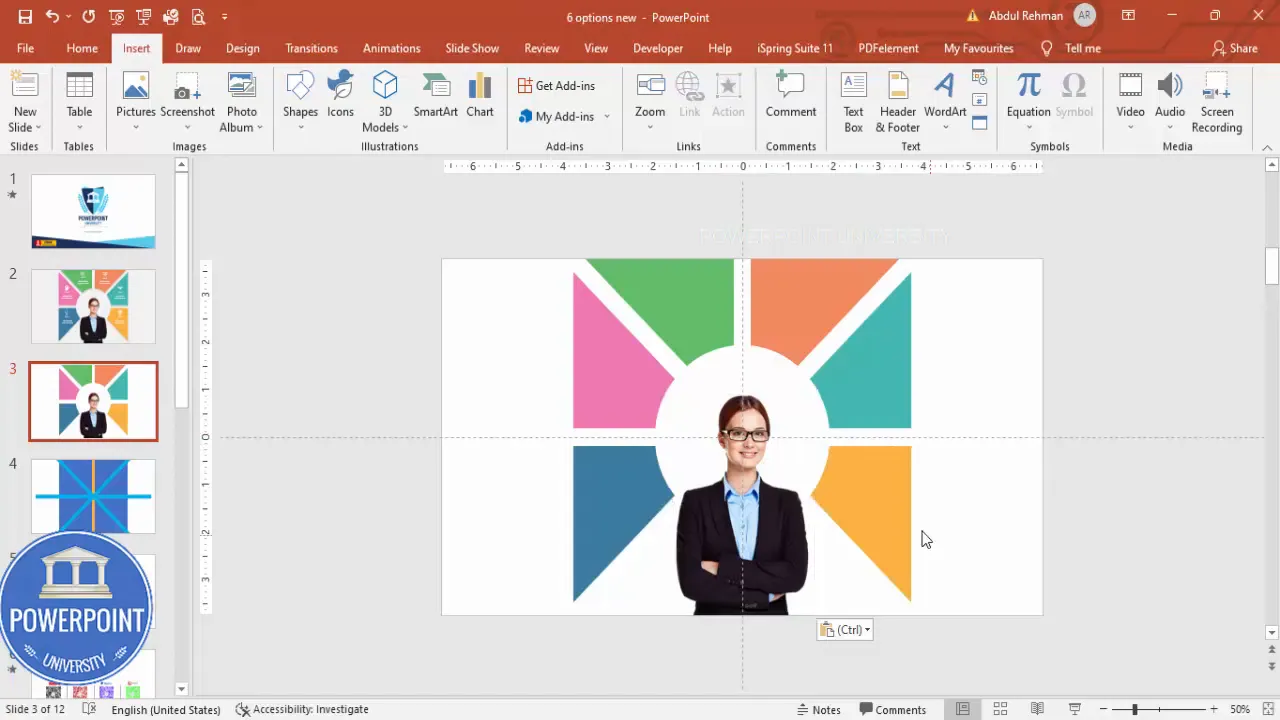
10. Create a soft shadow behind the image
Select the same wedge shapes that border the image, duplicate them (Ctrl+D), group the duplicates (Ctrl+G), fill them with black, and increase transparency to around 40–60% depending on contrast. Send that group to back. This creates a subtle shadow and depth behind the photograph for a professional look in your 6 Options Infographic Slide PowerPoint.
Ungroup the shadow group if you need to fine-tune position. Make sure the shadow is soft and not too heavy — the image should remain the center of attention.
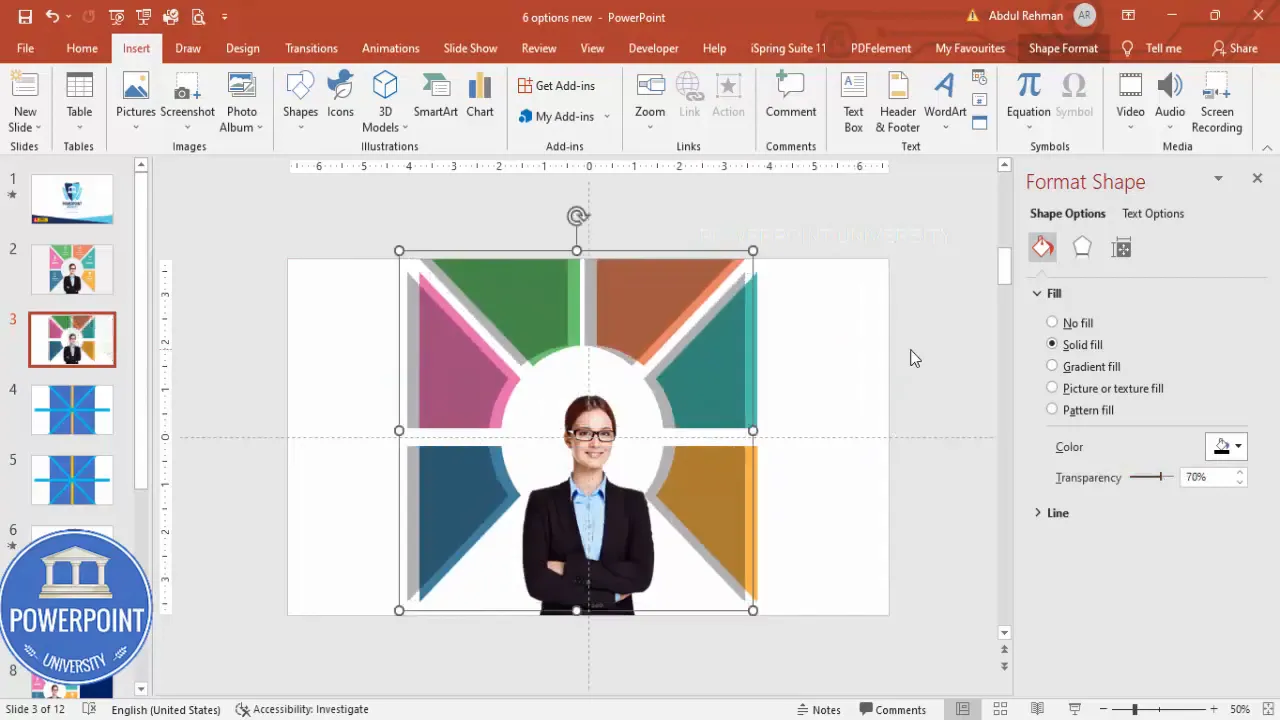
11. Add icons and text for each option
Open Insert → Icons and pick six icons that match your six options. Resize them to around 0.6″ (or your preferred size), set the icon color to white if your wedge fills are colorful, and position one icon on each wedge.
Next, add two text boxes per wedge: a short title and a one-line detail. Keep titles bold and concise; detail text should be a short clarifier. Center-align the text and make sure the color contrasts with the wedge fill (white on dark fills, dark on light fills).
Create Slides in Seconds with ExpertSlides AI |
|
Generate AI Presentations today: |
| TRY NOW! |
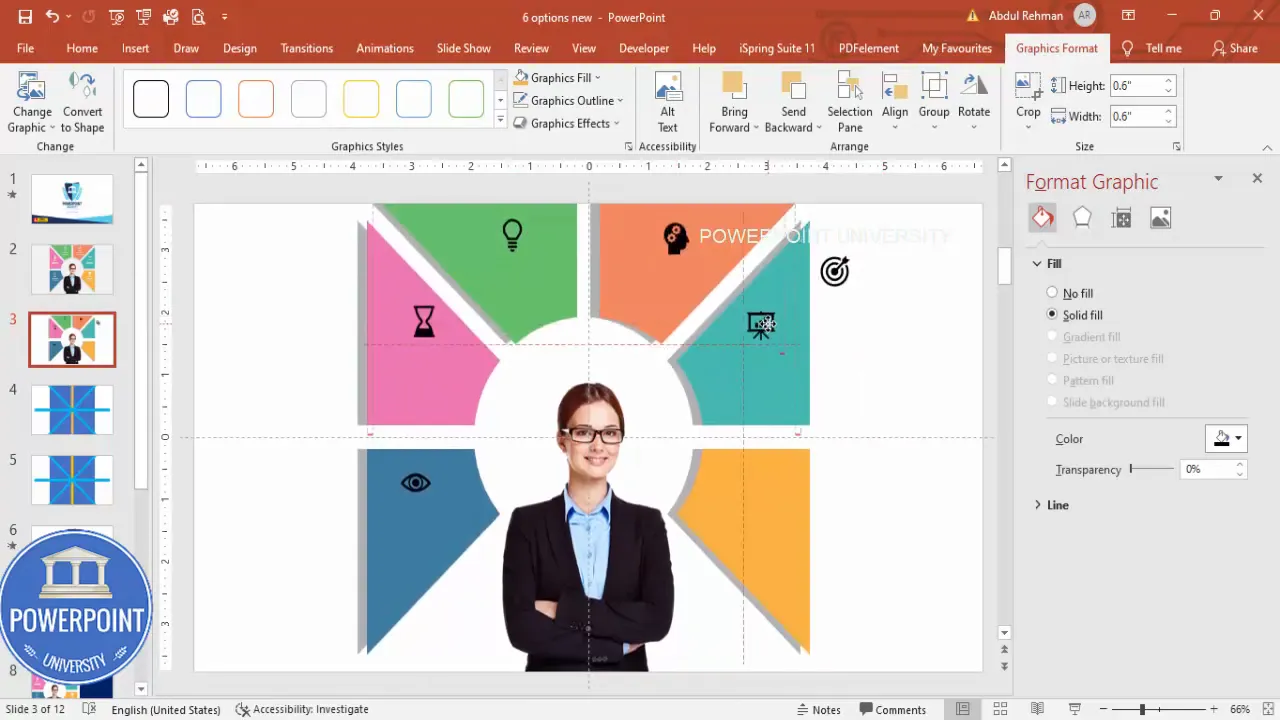
12. Group option elements
Group each wedge’s icon and text with the wedge shape (select elements and press Ctrl+G). You should end up with six grouped option objects. Grouping makes it easier to animate each option as a single unit for the 6 Options Infographic Slide PowerPoint.
Group naming (if you use the selection pane) can help: give each group a clear name such as Option 1, Option 2, etc. This is particularly useful when you’re applying animations.
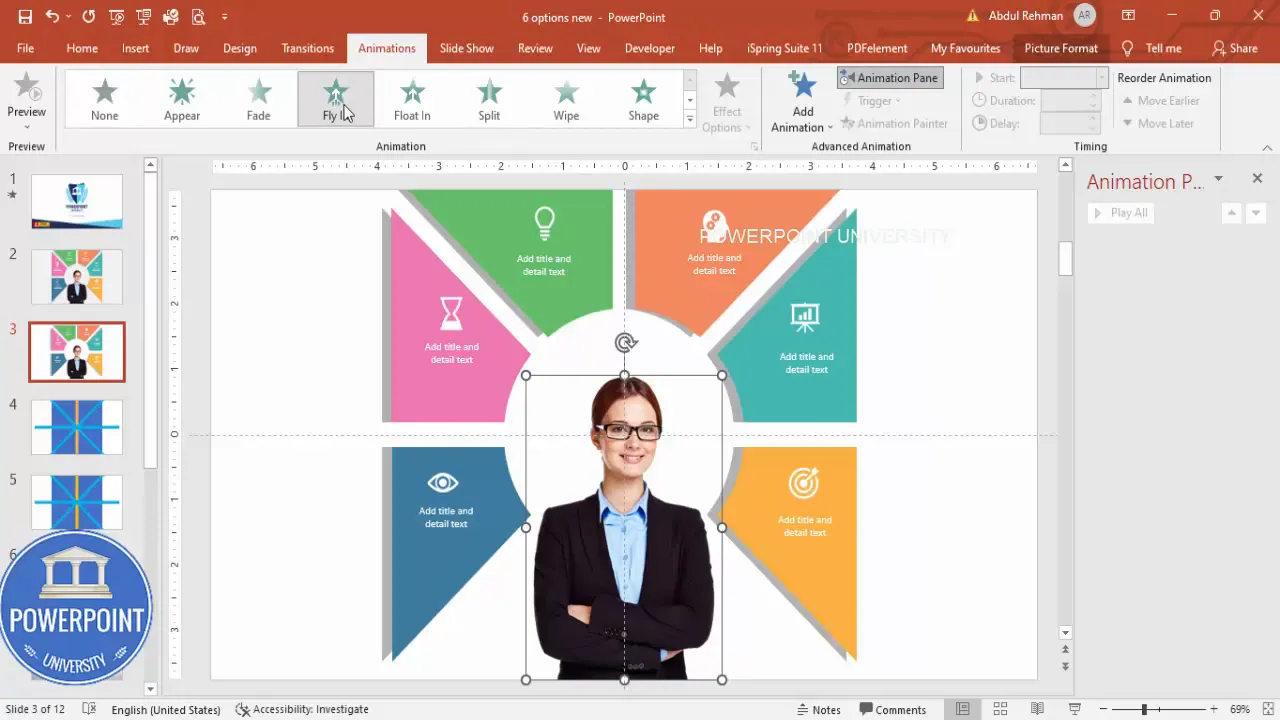
13. Apply entrance animations
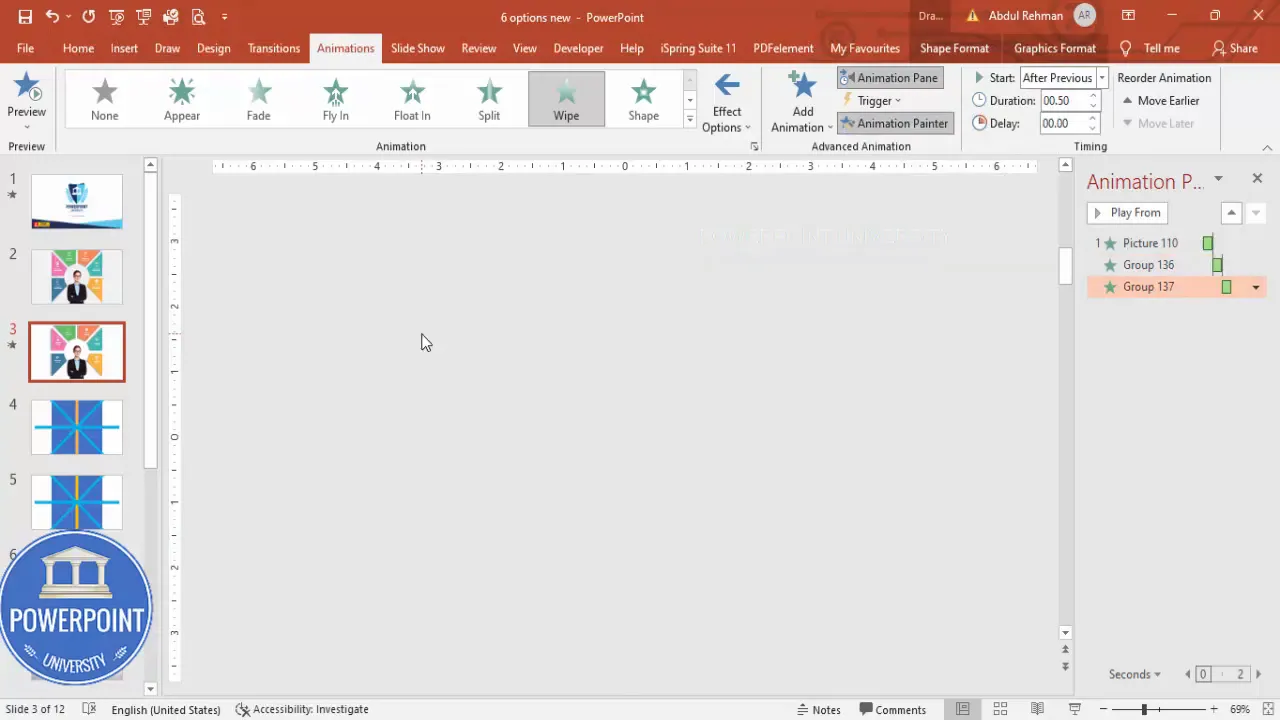
Open Animations → Animation Pane. Choose the main central element to come in first (for example, Fly In from Bottom). Then set each option group to an entrance animation — Wipe from left or Float are good choices. Set each option to occur After Previous and space the timing slightly (e.g., 0.2–0.4 seconds between them) to create a cascading reveal.
Use the Animation Painter to copy an animation effect across multiple groups quickly. Double-click the Animation Painter for multiple uses, then click each grouped option to apply the same timing and effect.
14. Fine-tune timing and sequence
Play the slide (Slide Show) and watch the reveal. If an option appears too early or out of sync, drag the timing bars in the Animation Pane or modify Start options (On Click / With Previous / After Previous) until the sequence feels natural. A well-timed entrance turns your 6 Options Infographic Slide PowerPoint from static to engaging.
Recommended order: central image first, then options in either clockwise or counterclockwise order. Consistency in motion direction helps the audience visually follow the flow.
Design variations and color tips
The basic 6 Options Infographic Slide PowerPoint is very flexible. Here are several variations you can try:
- Monochrome: Use a single hue with graduated tints across wedges. Works well for brand-compliant slides.
- Distinct hues: Use six different hues for high differentiation (useful for comparisons).
- Gradient center: Apply a subtle radial gradient behind the center image to make it pop.
- Icons only: Remove titles and keep concise icons if you’ll explain options verbally.
- Numbered steps: Replace icons with numbers to emphasize sequence over category.
Color accessibility tip: check contrast ratios so text and icons on wedges are readable to all viewers. Dark text on light panels or bright text on dark panels maintain legibility.
Animation recipes and timing best practices
Animations add polish, but overdoing it can distract. For the 6 Options Infographic Slide PowerPoint, consider these animation recipes:
- Subtle cascading reveal: Central image Fly In (0.6s), then each option Wipe (Left) After Previous with 0.2s delay between items.
- Clockwise build: Central image appears, then options appear clockwise with identical animation and equal delays.
- Spotlight effect: Fade in center, then each option Fade + Zoom slightly to suggest emphasis.
Timing tips:
- Keep individual animation durations short (0.4–0.8 seconds).
- Use small delays (0.15–0.4 seconds) between items to create fluid motion.
- Use With Previous sparingly — After Previous gives better controlled sequencing.
Common mistakes and troubleshooting
Even simple builds can go wrong. Here are common pitfalls and fixes for your 6 Options Infographic Slide PowerPoint:
- Misaligned shapes: Re-enable guides and use Align Center / Align Middle on objects. Select multiple items and use the Align tools to distribute evenly.
- Merge Shapes gives unexpected results: Undo and ensure objects are exactly centered; different alignments can result in off-center fragments.
- Icons don’t scale well: Use vector icons (SVG) or PowerPoint’s icon library for crisp scaling.
- Animation jitter: Simplify by using one animation type across options and ensure Start/Delay settings are consistent.
- Unreadable text: Increase font size or change color contrast; keep titles to 2–3 words and details to one short line.
Exporting, sharing and using the template
Once your 6 Options Infographic Slide PowerPoint is ready, consider these export options:
- Standard PPTX: Save for future edits and sharing with collaborators.
- PDF: Export a high-resolution PDF for printing or emailing (animations will be lost).
- PNG/JPEG export: Save each slide as an image for use in reports or web pages.
- Video export: Export to MP4 to preserve animations for platforms that don’t support PowerPoint playback.
When sharing a reusable template, include a simple notes slide that explains how to replace icons, change colors, and update animation timings, so others can adapt the 6 Options Infographic Slide PowerPoint without guessing.
Accessibility and print considerations
Accessibility is often overlooked. For the 6 Options Infographic Slide PowerPoint:
- Ensure text contrast meets standards (WCAG 2.1 AA recommended).
- Provide alternate text for the central image and any icons used.
- Don’t rely solely on color to convey differences — use icons or labels too.
- For print, avoid effects like heavy shadows that may not translate to black-and-white prints.
Adding clear alt text and readable fonts ensures your slide is accessible to assistive technologies and maintains clarity when printed or presented on low-resolution screens.
Advanced tweaks and ideas
Once you have the base 6 Options Infographic Slide PowerPoint mastered, try these advanced techniques to elevate the slide:
- SVG mask graphics: Use custom vector masks for wedges to create unique shapes.
- Custom motion paths: Have icons animate along subtle curved motion paths to match radial layout.
- Interactive triggers: Use triggers to reveal details on click for interactive presentations or kiosks.
- Layered micro-animations: Add small delays and secondary fades for text to make the reveal feel richer.
- Replace wedges with images: Use cropped images inside each wedge for visual storytelling rather than icons.
Pro tip: Duplicate the slide before applying Merge Shapes. Merging is destructive — having a backup slide saves time if you need to change the layout later.
FAQ
Q: What version of PowerPoint do I need to build the 6 Options Infographic Slide PowerPoint?
A: For full functionality of Merge Shapes -> Fragment and the modern icon library, use the desktop version of PowerPoint (Office 2016 or later, preferably Office 365). Some features may be limited on the web or mobile versions.
Q: Can I change the number of options to more or fewer than six?
A: Yes. The same technique works for other counts. For 4, 5, 7, or 8 options, you’ll adjust the number of rotated shapes and the rotation angles before fragmenting. The name “6 Options Infographic Slide PowerPoint” describes this specific layout, but the method scales.
Q: How do I make option text wrap properly on small wedges?
A: Use concise titles and short details — aim for one line of detail. Increase font size rather than decreasing it below 16–18 pt for readability. If the wedge is too narrow, remove details and explain verbally instead.
Q: My Merge Shapes -> Fragment created many tiny fragments. How do I clean them quickly?
A: Use the Selection Pane (Home → Arrange → Selection Pane) to click through and hide or delete multiple fragments. Zoom in to see small pieces and delete them while keeping the main wedge shapes intact.
Q: Do animations affect slide performance?
A: Moderate animations (simple fades, wipes, fly-ins) have negligible performance impact. Heavy or numerous complex animations and motion paths can slightly increase file size and may stutter on very old machines. Test on the presentation device beforehand.
Q: Can I reuse this layout across multiple slides and keep it consistent?
A: Yes. Create a slide master or store the slide as a template slide you duplicate. Keep grouped objects unlocked so you can edit copy-specific icons and text while preserving layout and animations.
Q: What font sizes and icon sizes are recommended?
A: For titles on wedges, 18–28 pt is typical depending on font. For small detail text, 12–16 pt. Icon sizes around 0.5″–0.8″ typically work well — the exact size depends on your slide dimensions and the amount of negative space.
Conclusion
The 6 Options Infographic Slide PowerPoint is a versatile, visually engaging format that helps communicate a central idea and its supporting options clearly. By following the steps above — from setting up centered guides and rotating rectangles, to fragmenting shapes, inserting a central image, and adding polished animations — you can create a professional infographic slide that stands out in any presentation.
Remember these core takeaways for building your own 6 Options Infographic Slide PowerPoint:
- Work with guides and exact alignment for symmetry.
- Use Merge Shapes → Fragment to convert overlapped shapes into wedge panels.
- Keep text concise and ensure strong contrast for legibility.
- Use subtle animations with consistent timing to enhance focus.
- Duplicate slides before destructive steps — backups save time.
Now it’s your turn: open PowerPoint, gather your assets, and build a 6 Options Infographic Slide PowerPoint that tells your story with clarity and impact. If you want to make it reusable, save a clean template and a version with editable assets so future edits are fast and painless.
Happy designing!
Check out the full video: Create 6 Options Infographic Slide in PowerPoint . Tutorial No. 977


