

Delivering a PowerPoint presentation is a common part of many professional and educational experiences. Yet, no matter how often you present, the goal remains the same: to amaze and impress your audience with your content. Creating slides that are engaging, polished, and memorable can elevate your message and keep your audience hooked from start to finish. In this comprehensive guide, I’ll share seven powerful tips that will transform your PowerPoint presentations from ordinary to extraordinary. These strategies are designed to enhance your slides, engage your audience, and ensure your message resonates long after you finish speaking.
These tips are inspired by years of experience and focus on practical, easy-to-implement techniques you can start using right away. Whether you’re a seasoned presenter or just starting out, these insights will help you deliver presentations that look professional, run smoothly, and stand out in your audience’s memory.
Table of Contents
- Tip #1: Upgrade Your Mouse Cursor for Better Focus
- Tip #2: Align All Your Slide Objects for a Professional Look
- Tip #3: Add Subtle Animations to Bring Your Slides to Life
- Tip #4: Use Morph Transitions to Wow Your Audience
- Tip #5: Remove Image Backgrounds for Cleaner, Custom Graphics
- Tip #6: Add a Countdown Timer for Breaks and Exercises
- Tip #7: Engage Your Audience with Live Polling Inside PowerPoint
- Conclusion: Transform Your PowerPoint Presentations Today
- Frequently Asked Questions (FAQ)
Tip #1: Upgrade Your Mouse Cursor for Better Focus
One of the simplest yet most overlooked ways to improve your presentation is by changing how you use your mouse cursor during your slides. How many times have you seen presenters use the standard, boring mouse pointer to try to draw attention to specific parts of their slide? It’s often ineffective and can distract rather than enhance the audience’s focus.
Instead of the default arrow cursor, PowerPoint offers several built-in pointer options that can make your presentation more dynamic and interactive:
- Laser Pointer: This option changes your cursor into a small red laser pointer, mimicking the effect of a physical laser pointer used in live presentations. It’s perfect for highlighting words, images, or diagrams with precision.
- Pen: Use the pen tool to draw or underline key points live during your presentation, helping to emphasize important details with a personal touch.
- Highlighter: This tool lets you highlight text or areas with a bright color. You can even customize the highlighter color to match your slide theme or personal preference.
To access these options, simply right-click anywhere on your slide during presentation mode, and about halfway down the menu, you’ll find the pointer options. Selecting any of these tools instantly upgrades your ability to guide your audience’s attention effectively.
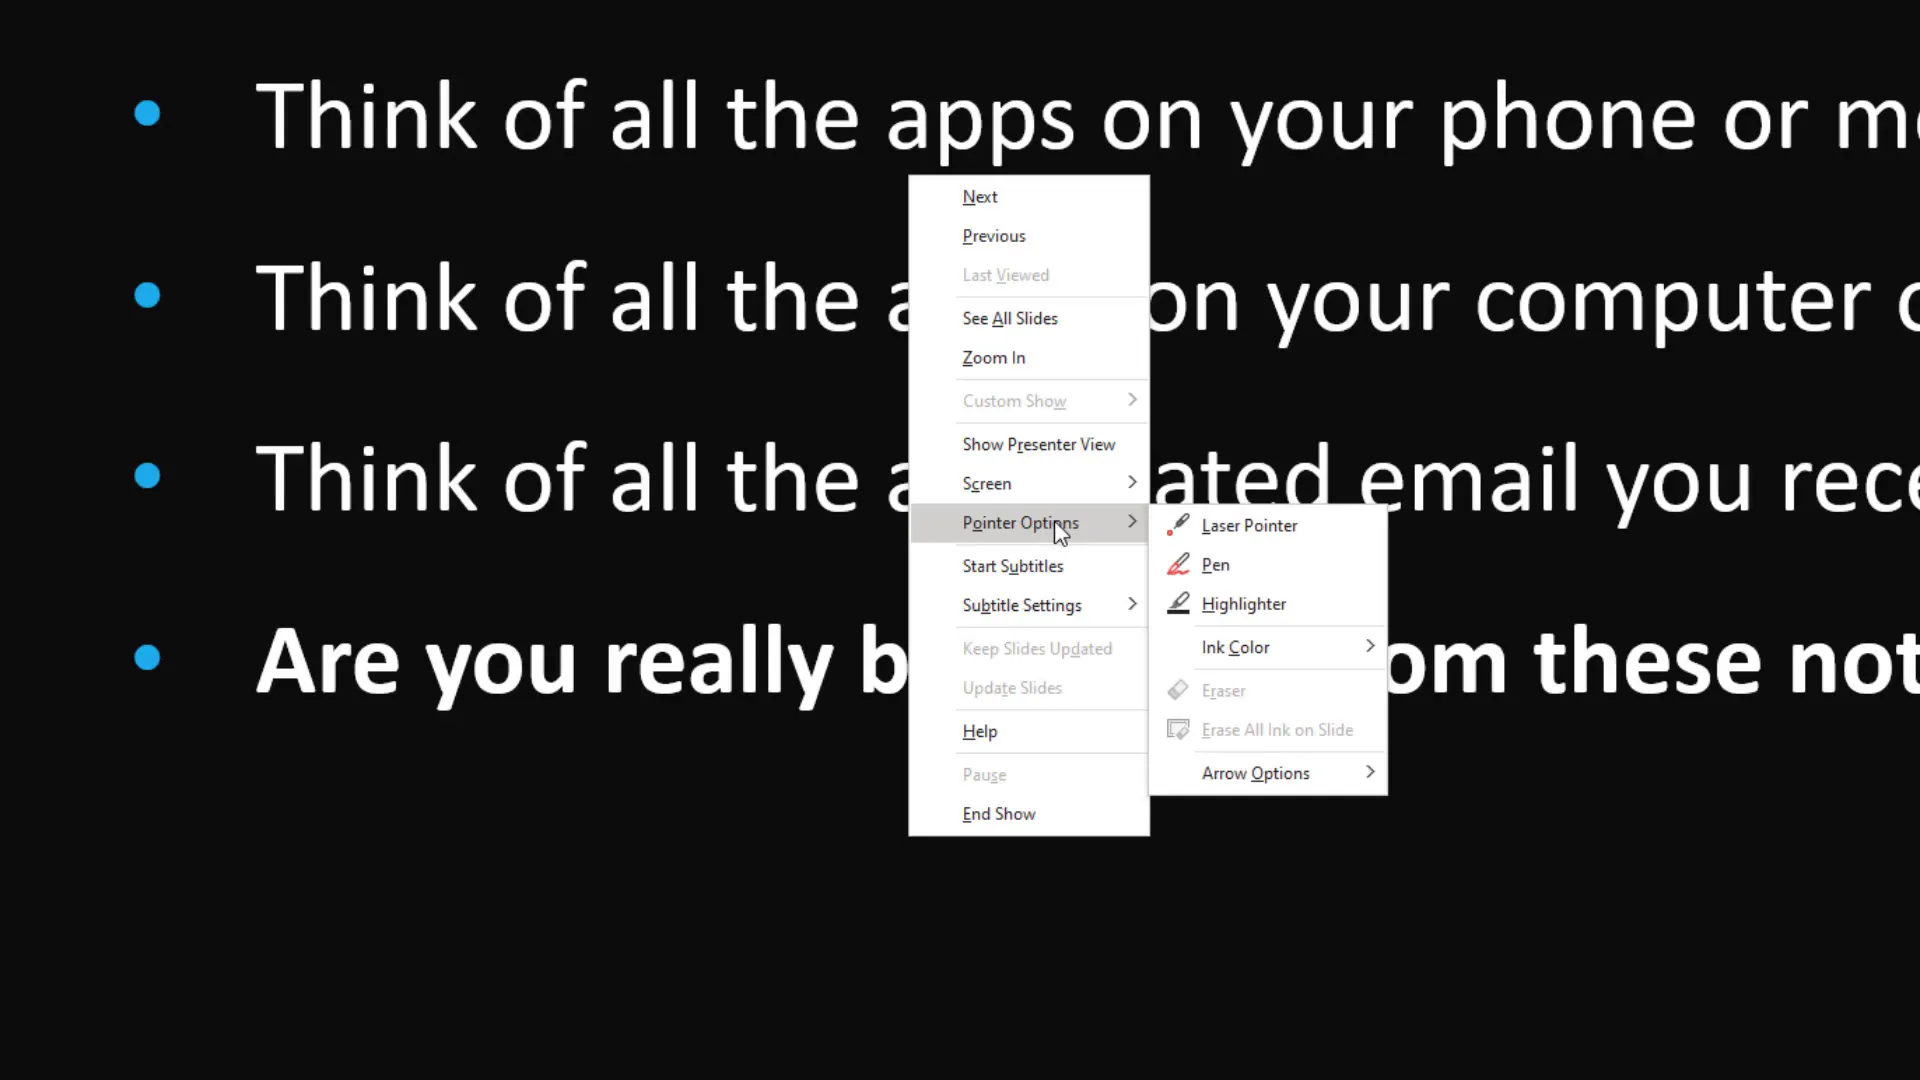
Using these enhanced cursor tools helps your audience follow along more easily and adds a layer of professionalism to your presentation. Instead of aimlessly swirling the mouse pointer, you’re now actively directing attention to the most critical parts of your slide, making your message clearer and more impactful.
Tip #2: Align All Your Slide Objects for a Professional Look
One of my biggest pet peeves when watching presentations is seeing slides with poorly aligned elements. Whether it’s text, images, or shapes, misaligned objects can make your slide look messy and unprofessional. Fortunately, fixing alignment issues in PowerPoint is quick and easy, and it instantly improves the visual quality of your slides.
Here’s how you can align objects perfectly:
- Select all the objects you want to align by holding down the Shift key and clicking each one.
- Go to the Arrange menu on the toolbar.
- Choose Align from the dropdown.
- Select the type of alignment you want, such as Align Middle to center objects vertically.
But alignment goes beyond just lining things up. You can also distribute objects evenly to avoid crowding or awkward spacing. After aligning, go back to Arrange > Align and choose Distribute Horizontally or Distribute Vertically to space your images or text boxes evenly.
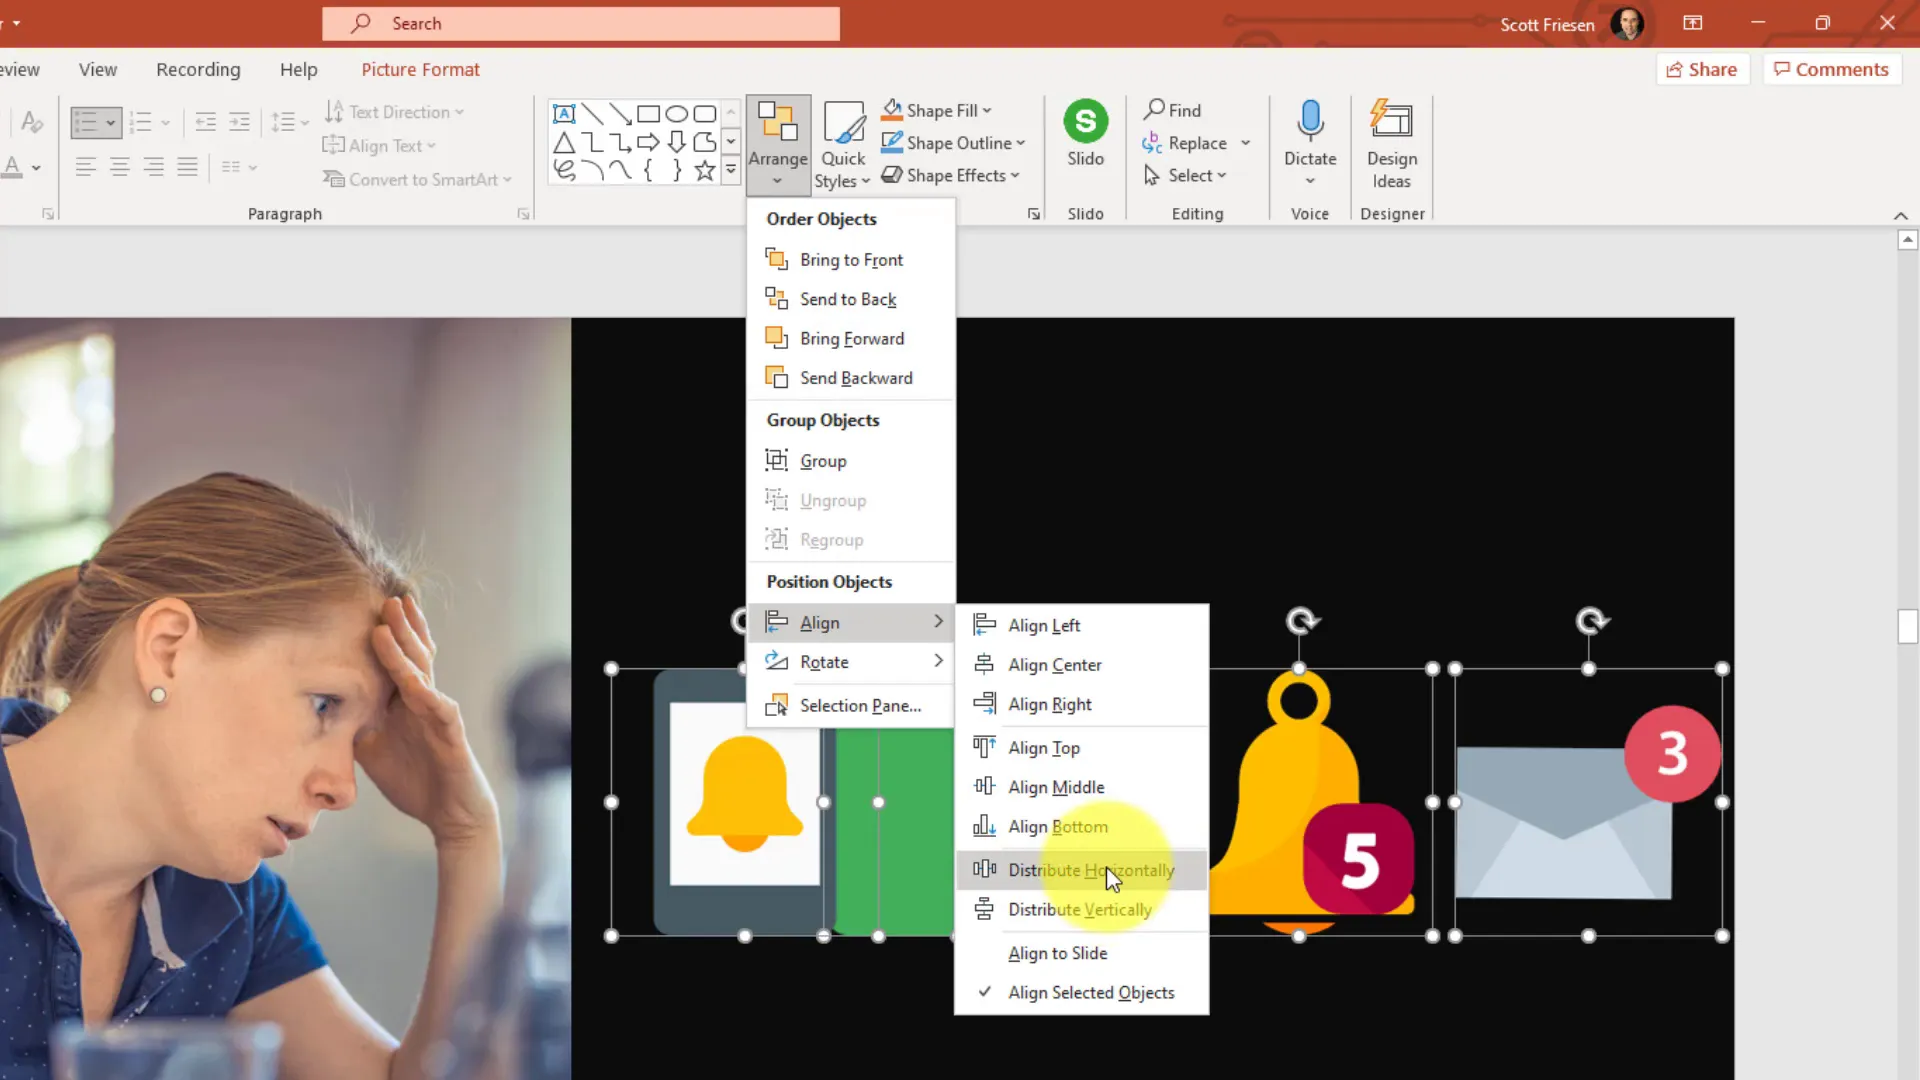
These simple steps ensure your slides look clean, organized, and visually appealing. When your elements are perfectly aligned, your audience focuses on your content instead of being distracted by uneven or cluttered visuals. It’s a small detail that makes a big difference.
Tip #3: Add Subtle Animations to Bring Your Slides to Life
Static slides can sometimes feel dull, especially if you’re speaking for several minutes on the same slide. Adding subtle animations can inject some life into your presentation and keep your audience engaged. The key is to use animations sparingly and purposefully to emphasize key points rather than overwhelm or distract.
For example, you can make an image gently teeter back and forth while you talk about a related concept. This kind of movement draws attention without being too flashy or distracting.
To create such an animation in PowerPoint:
- Select the image or object you want to animate.
- Go to the Animations tab and click More Emphasis Effects to see a wider range of options.
- Choose an effect like Teeter to add a gentle rocking motion.
- Open the Animation Pane to customize timing and repetition.
- Set the animation to Start After Previous so it begins automatically when you arrive on the slide.
- Adjust the duration to slow (around 3 seconds) for a subtle effect.
- Set the animation to repeat until the slide ends, so it continues as long as you’re on that slide.
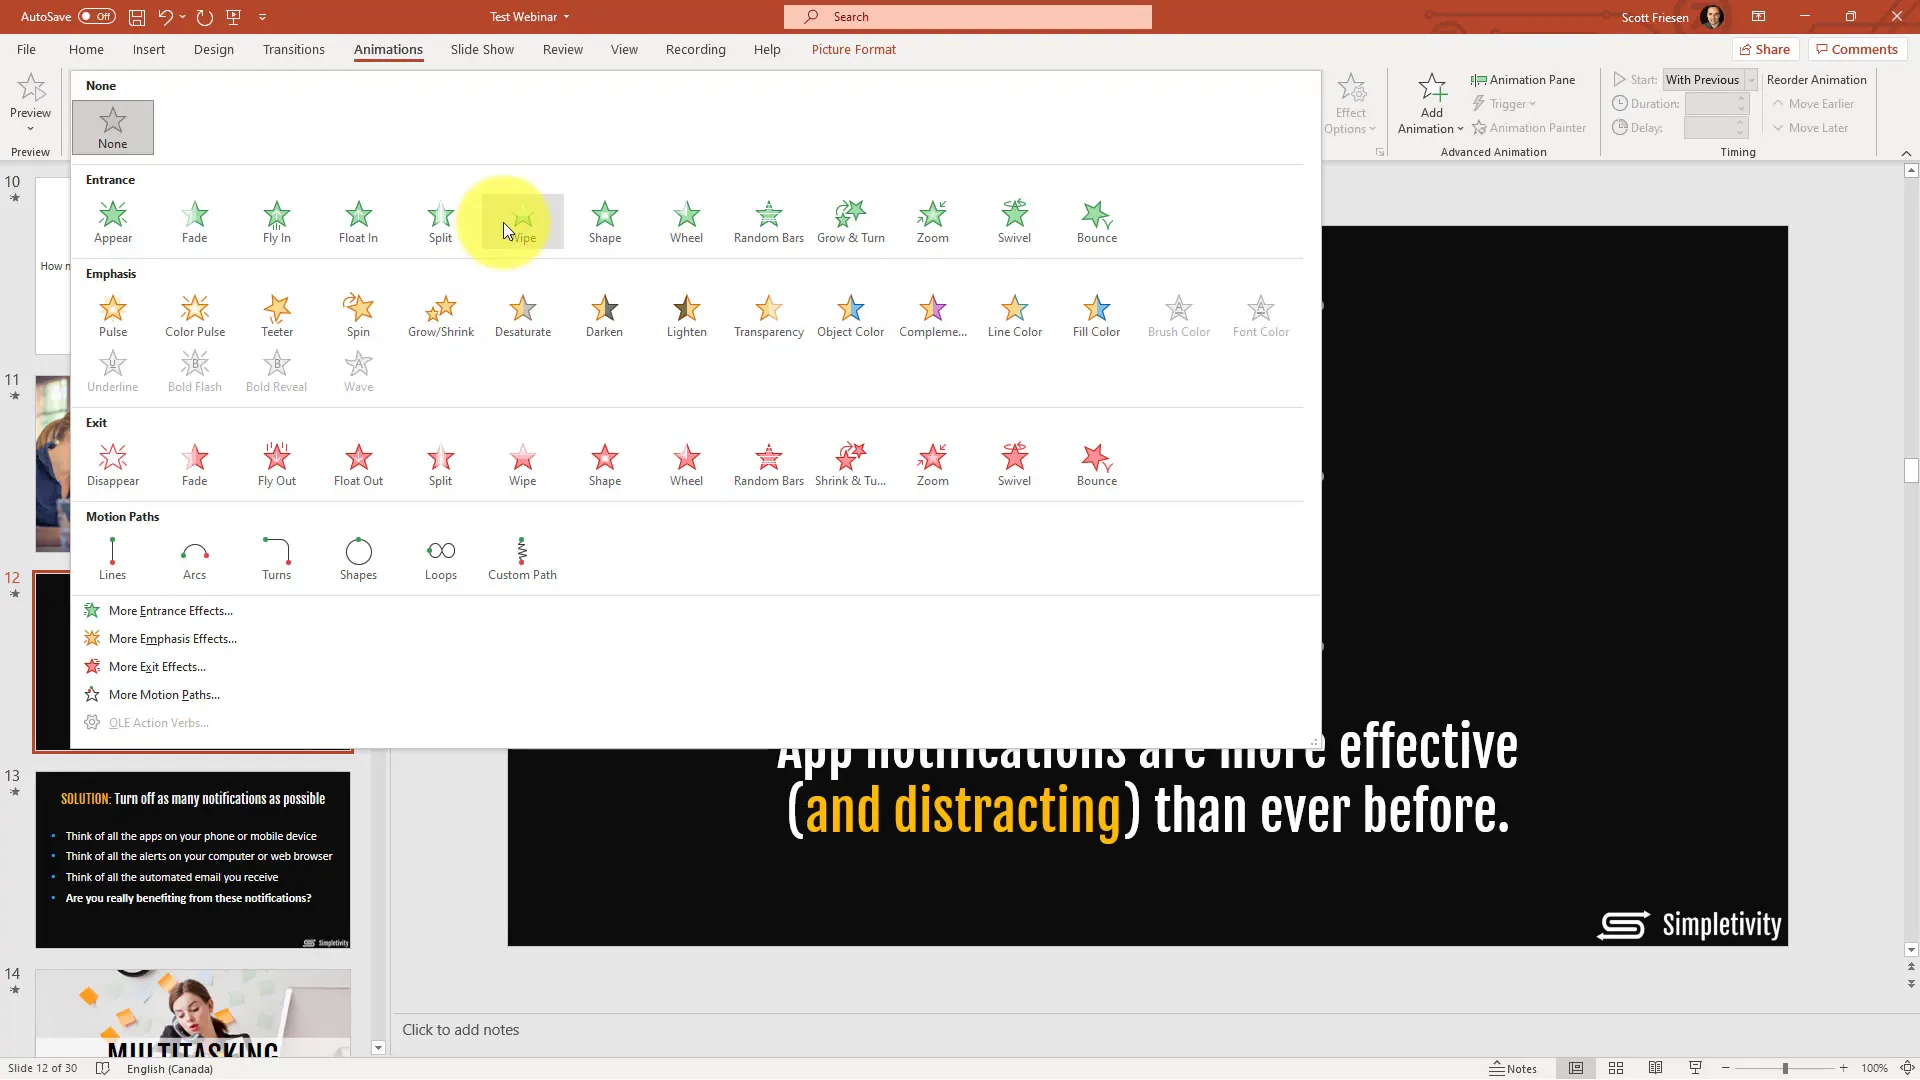
When done well, animations like this add a touch of polish and professionalism to your deck. They make your slides feel more dynamic and help maintain your audience’s attention without requiring you to constantly click or trigger effects.
Tip #4: Use Morph Transitions to Wow Your Audience
If you really want to impress your audience, mastering the Morph transition is a game-changer. Morph allows you to create smooth, cinematic transitions between two slides that have shared objects. Instead of a simple fade or cut, Morph animates the movement, resizing, and transformation of objects from one slide to the next.
Here’s how you can use Morph to emphasize your content:
- Duplicate the slide you want to animate.
- On the second slide, rearrange and resize the objects you want to emphasize. For example, make an icon larger and move it to one side, then move and enlarge text on the opposite side.
- Go to the first slide, select the Transitions tab, and choose Morph as the transition effect.
- Ensure the second slide also has Morph applied if you want to continue the animation smoothly.
- Preview the transition in presentation mode to see the smooth movement and scaling.
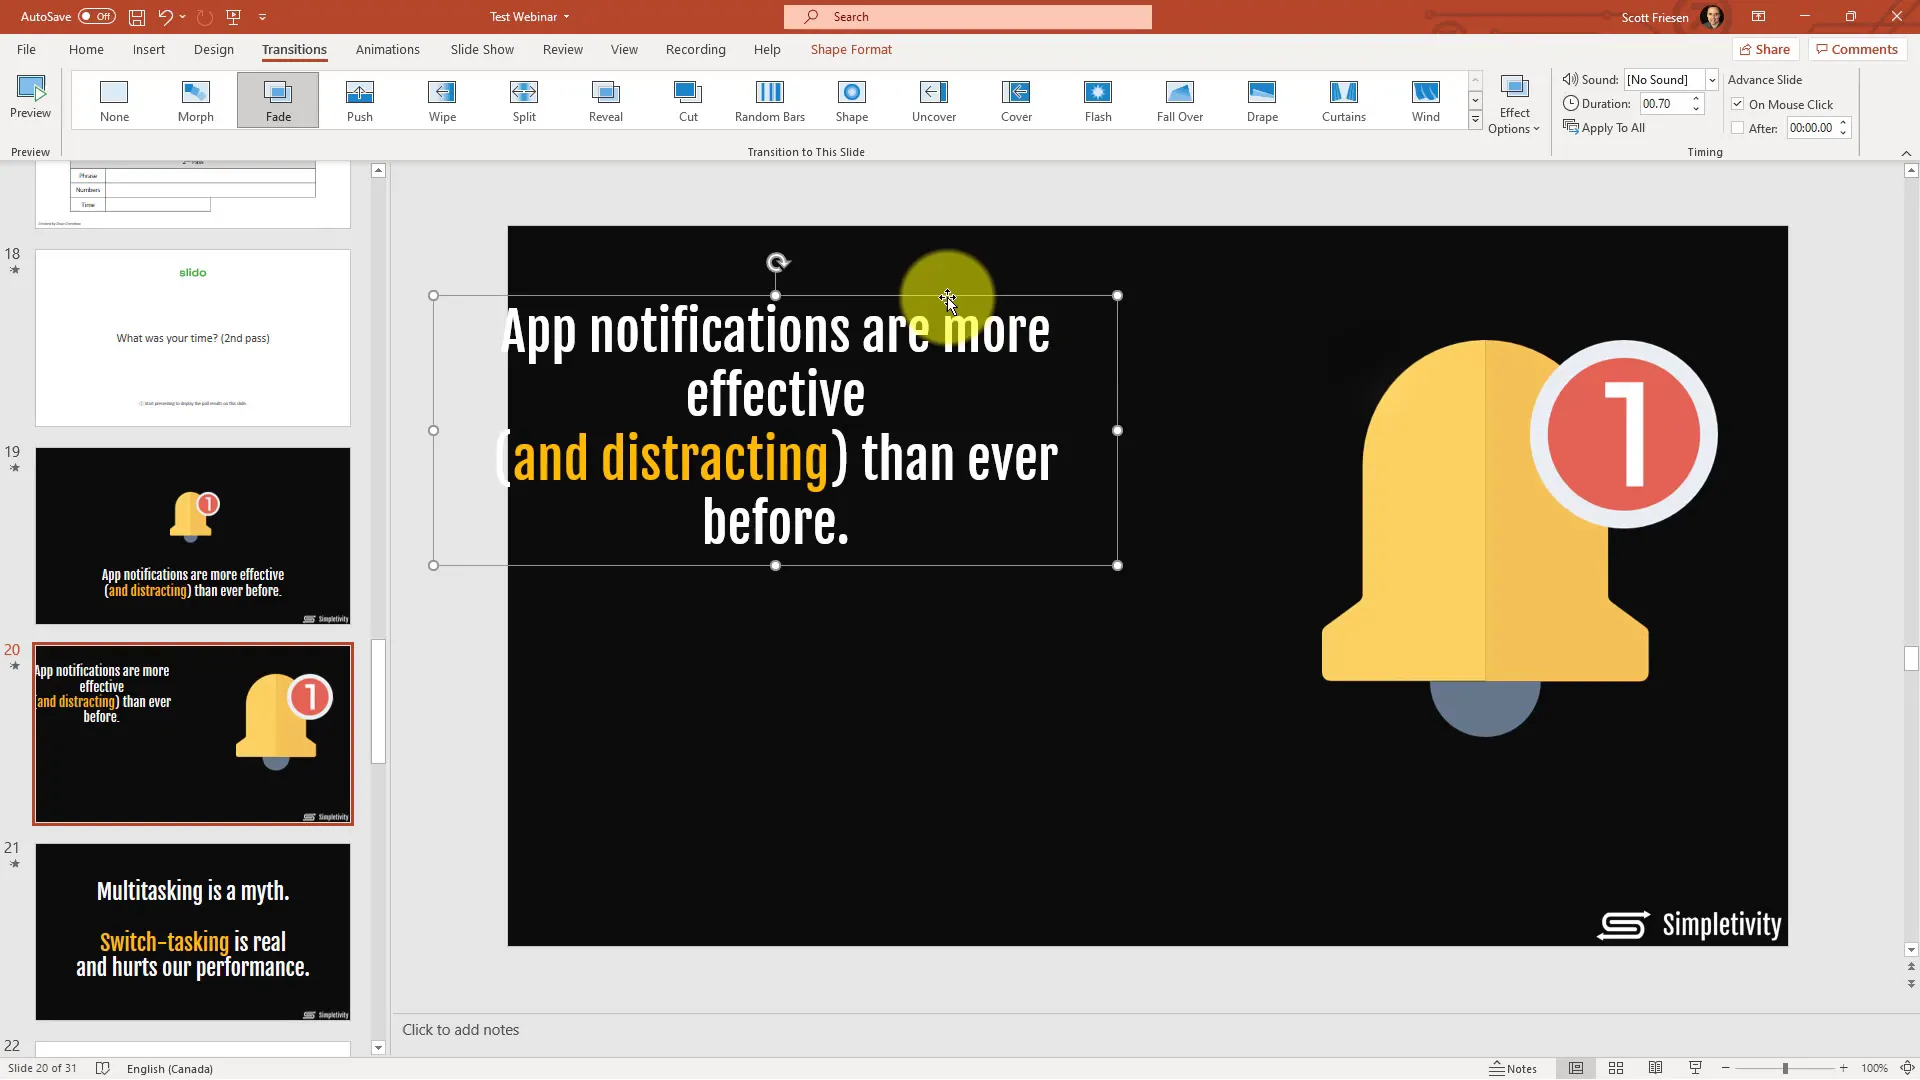
Morph transitions are perfect for highlighting key points or data by drawing attention to specific elements as they grow or move across the screen. It creates a cinematic flow that feels very modern and professional, instantly elevating the quality of your presentation.
Tip #5: Remove Image Backgrounds for Cleaner, Custom Graphics
Images play a crucial role in making your slides visually appealing, but standard rectangular images with backgrounds can sometimes look clunky or clash with your slide design. Removing the background from images helps create cleaner visuals that blend seamlessly into your slides.
PowerPoint includes a powerful Remove Background tool that lets you do this without needing external software. Here’s how:
- Select the image you want to edit.
- Go to the Picture Format tab and click Remove Background.
- PowerPoint will automatically highlight the background in purple for removal.
- If parts of the image are mistakenly removed, use the Mark Areas to Keep tool to restore them.
- Use the Mark Areas to Remove tool to refine the background removal further.
- Once satisfied, click Keep Changes.
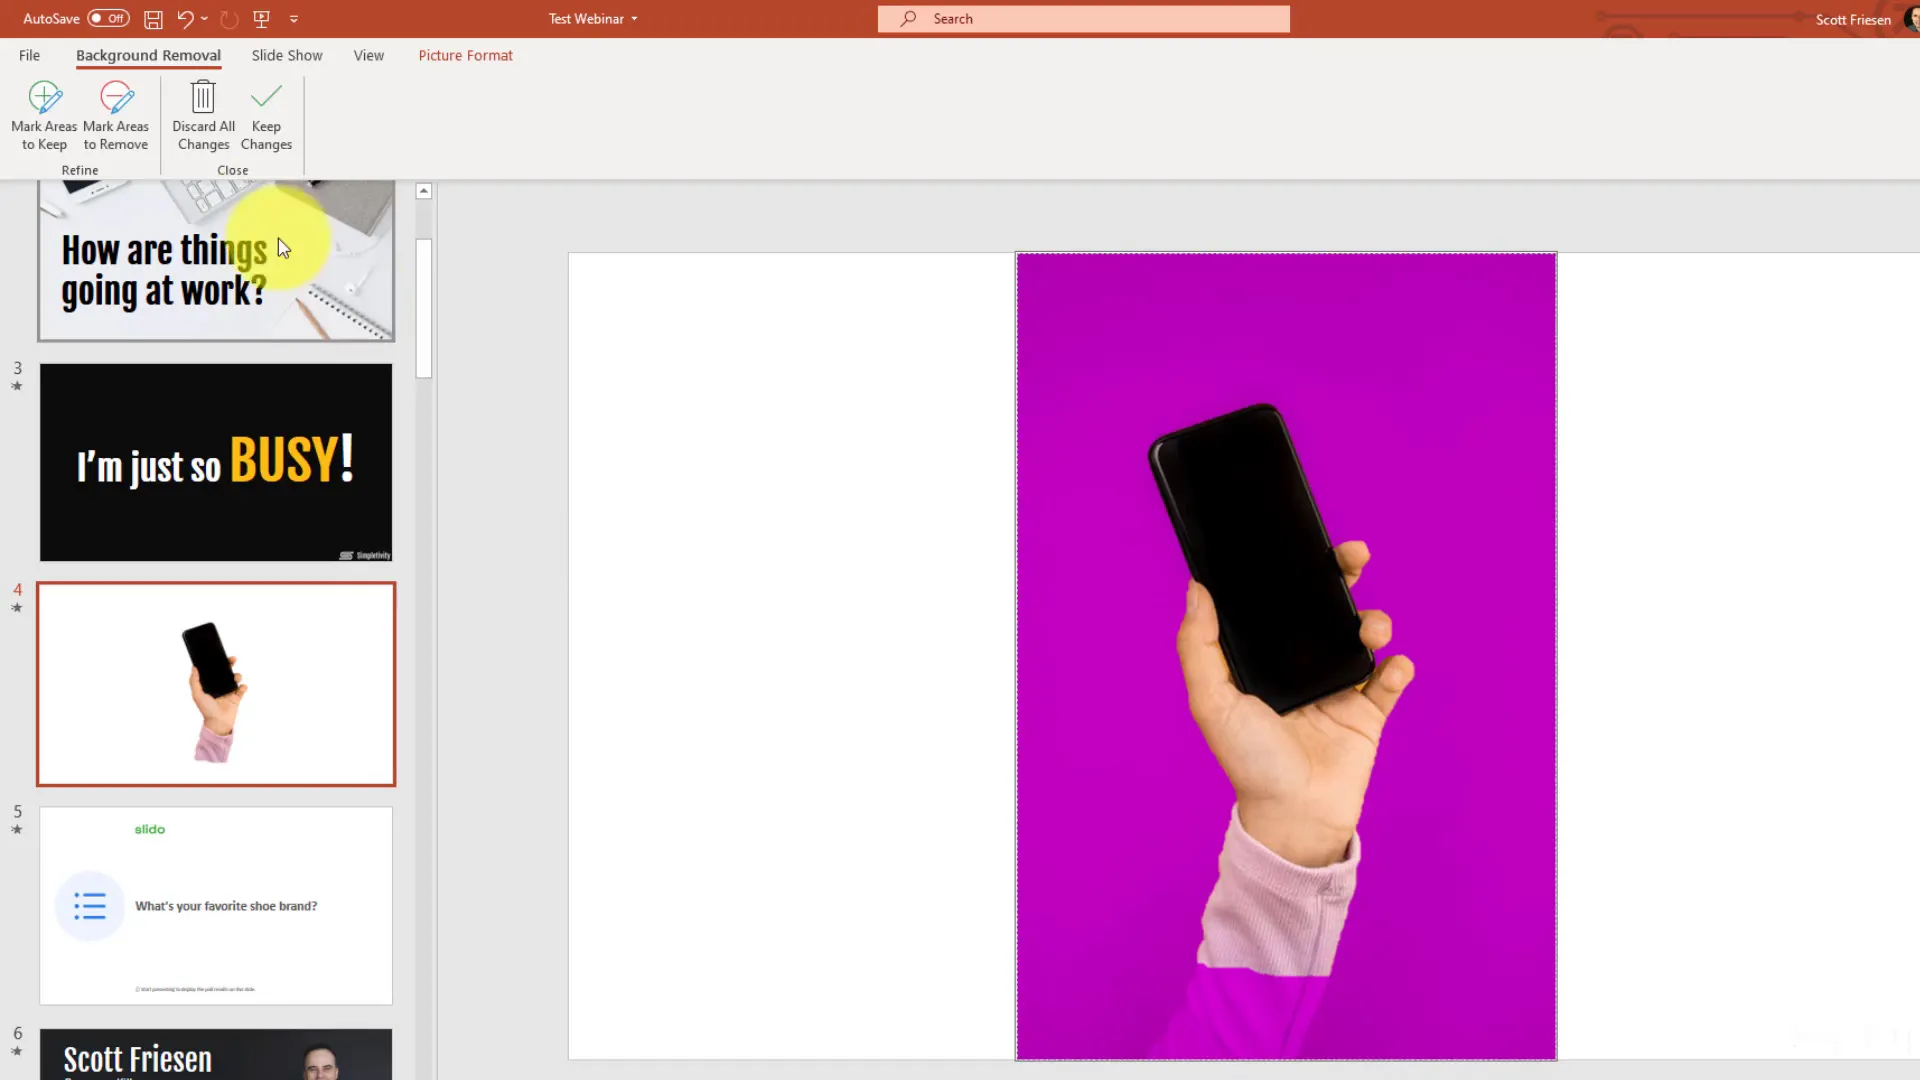
Removing backgrounds allows you to place images anywhere on your slide without awkward boxes or clashing colors. It also gives you more creative freedom to layer images with text or other design elements, resulting in a more polished, professional appearance.

Tip #6: Add a Countdown Timer for Breaks and Exercises
When you’re presenting, especially in longer sessions or workshops, breaks or interactive exercises are often necessary. However, coordinating timing can be tricky—people’s watches might not be synchronized, and without a visible timer, it’s hard to keep everyone on track.
PowerPoint makes it easy to embed a countdown timer directly into your slides using add-ins from the Office Add-in store. Here’s how to set it up:
- Click on the Insert tab and select Get Add-ins.
- Search for “countdown” or “timer” in the add-ins store.
- Select an add-in like Break Time and click Add.
- Grant the necessary permissions to install the add-in.
- Customize the timer duration (e.g., 5 or 10 minutes) and choose a visual theme.
- Start the timer during your presentation to keep your audience informed about break time.
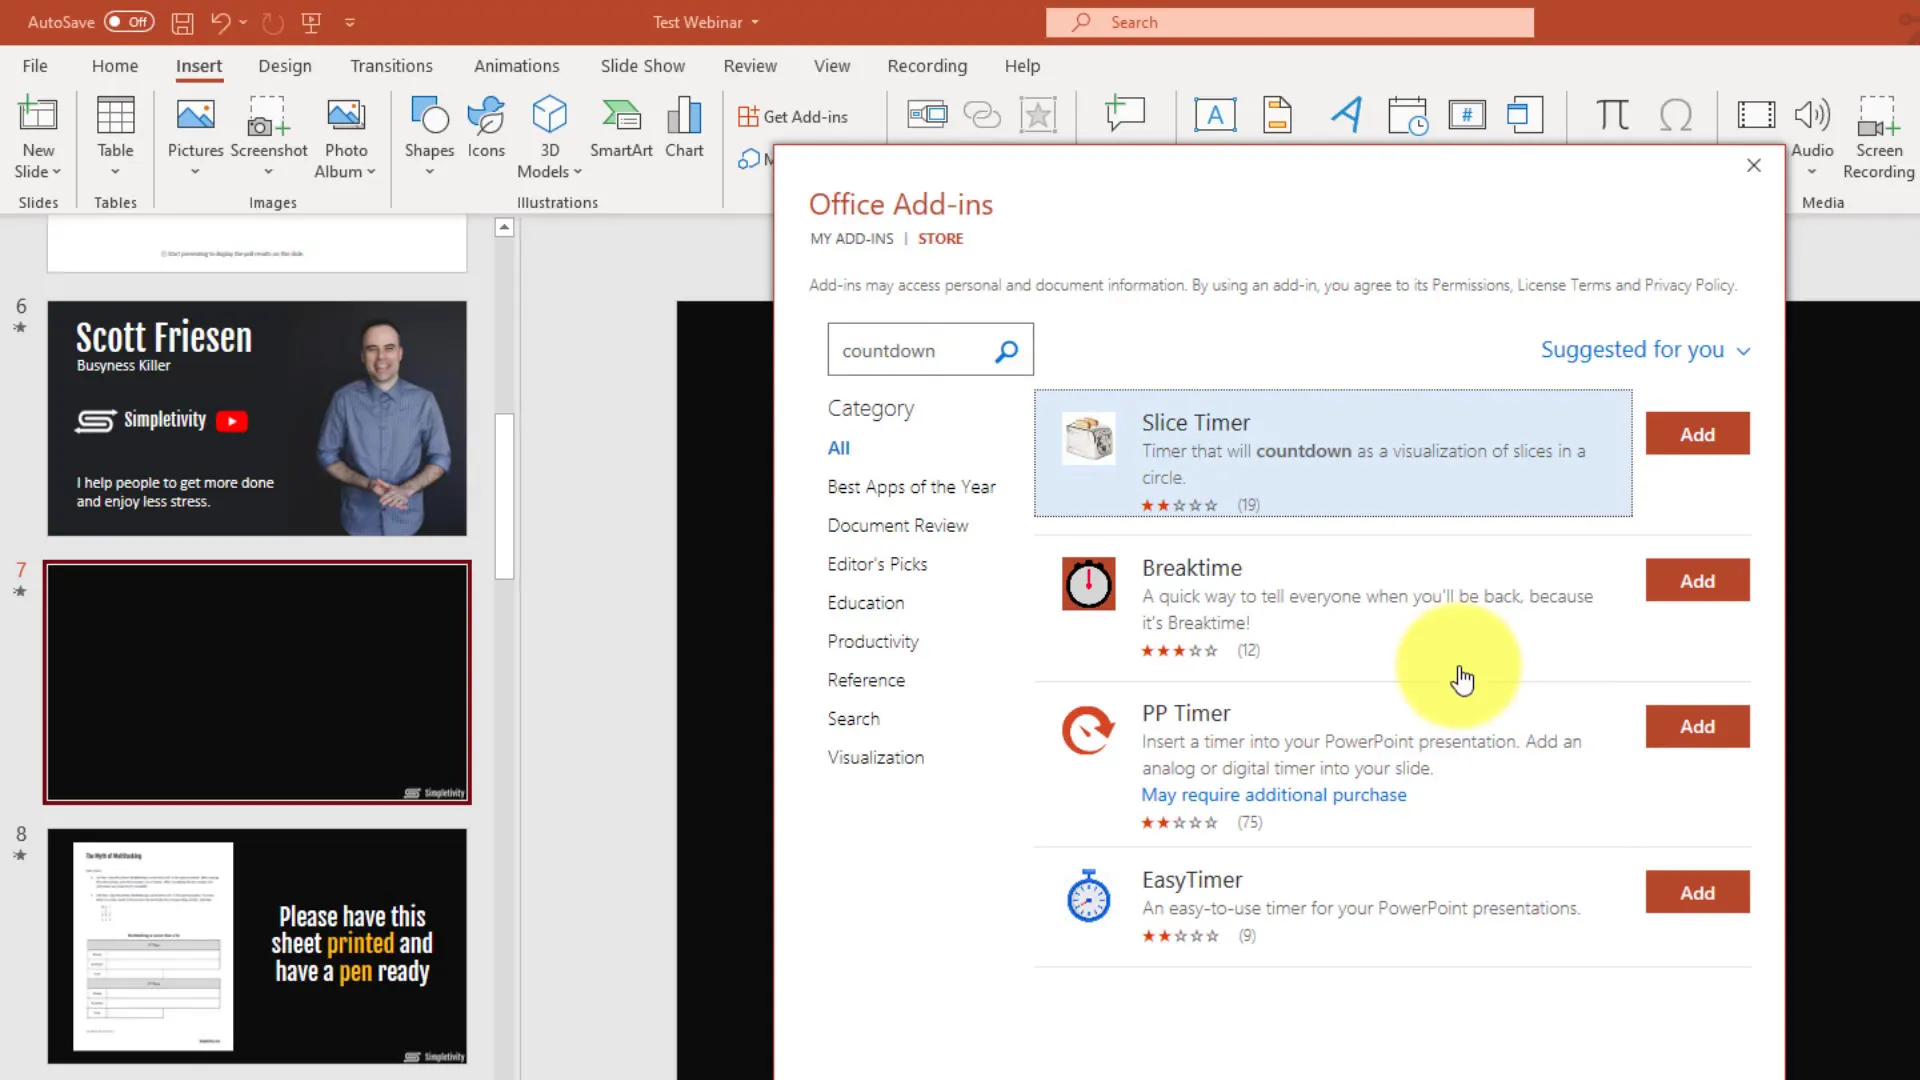
This built-in timer keeps your session running smoothly and looks professional. It removes guesswork and helps attendees return promptly, improving overall time management during your presentation.
Tip #7: Engage Your Audience with Live Polling Inside PowerPoint
Engaging your audience is critical, especially when presenting virtually where attention spans can be shorter. One of the most effective ways to keep your audience involved is through live polling. Instead of switching between apps or websites, you can embed live polls directly into your PowerPoint presentations using extensions like Slido.
Slido integrates seamlessly with PowerPoint and allows you to insert interactive polls, quizzes, and Q&A sessions right into your slides. Your audience can participate in real-time by visiting a simple URL and entering a code or scanning a QR code.
Here’s how it works:
- Install the Slido add-in for PowerPoint.
- Create your poll questions directly within PowerPoint.
- During your presentation, display the poll slide and invite your audience to participate.
- Watch the results update live on your slide to foster discussion and interaction.
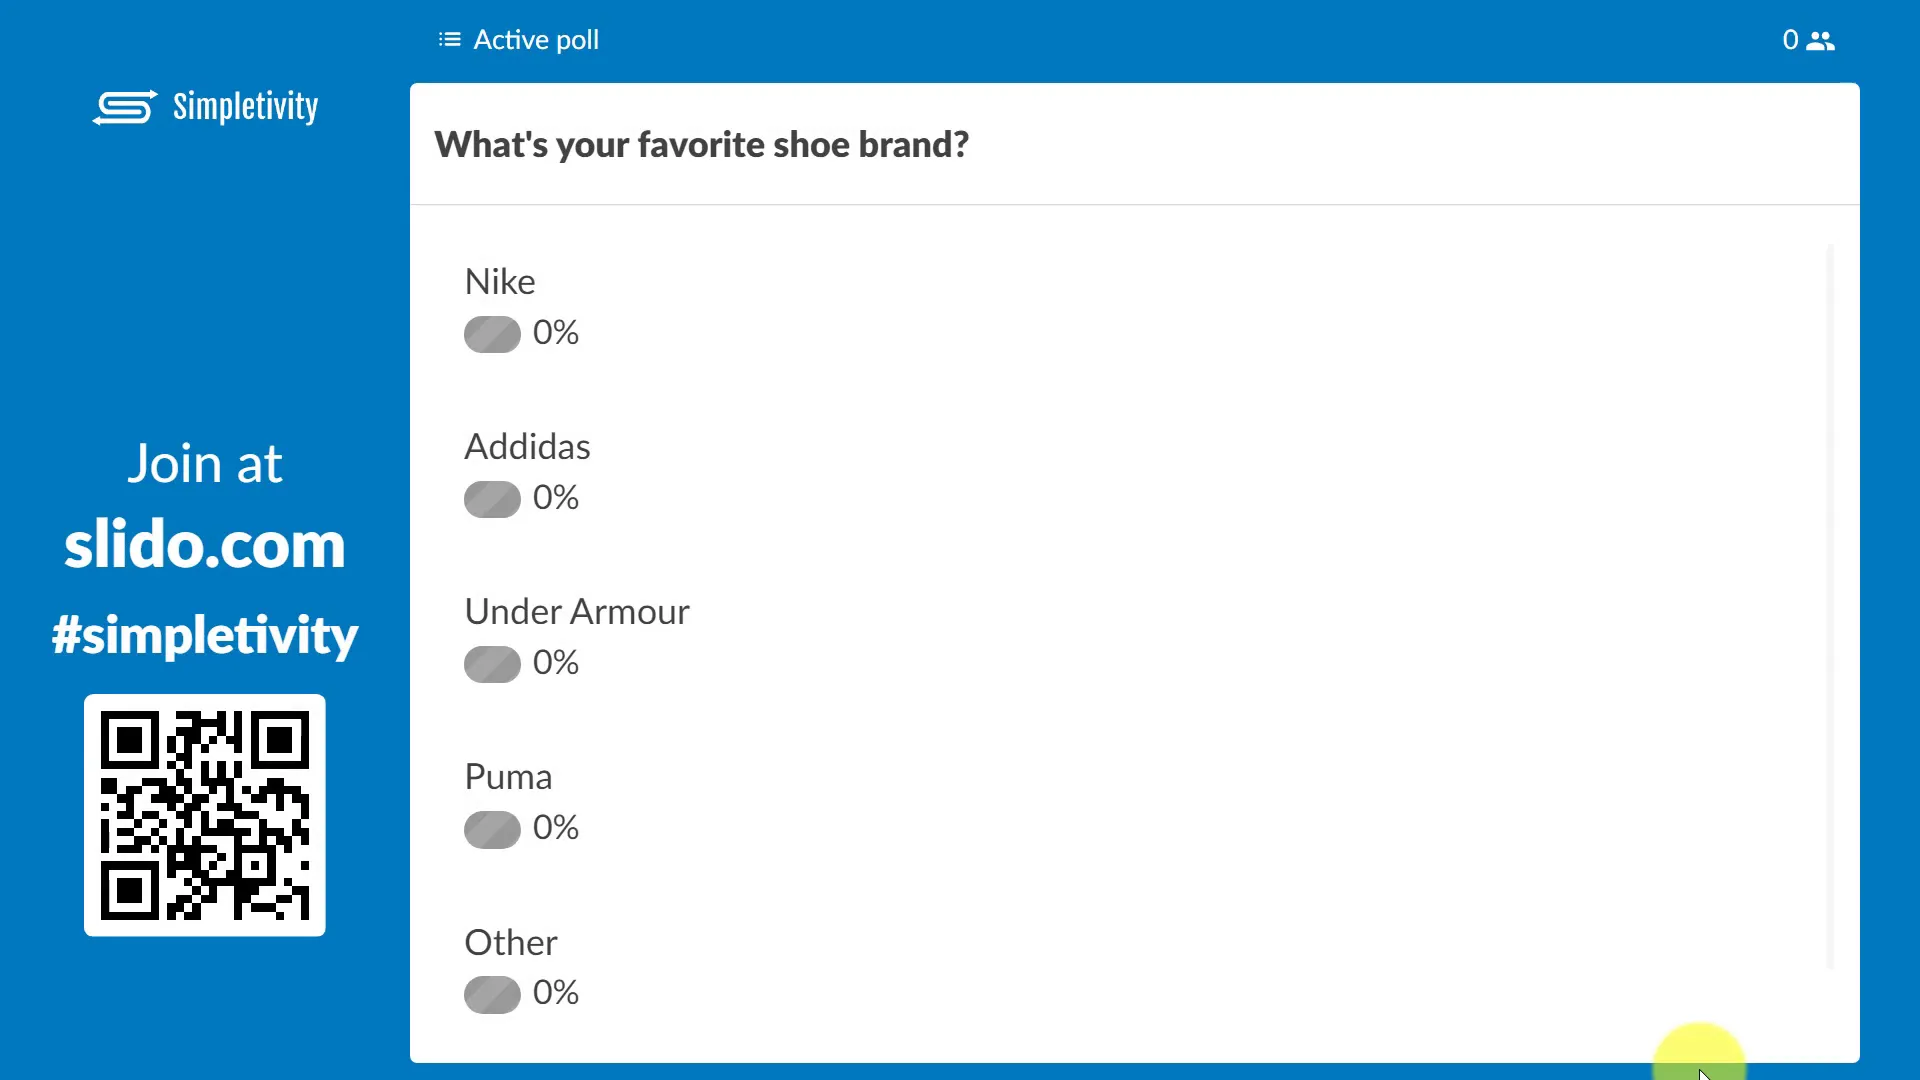
This feature makes your presentation more interactive and engaging, encouraging audience participation and making your content more memorable. It’s a fantastic tool for virtual presentations, workshops, and classrooms alike.
Conclusion: Transform Your PowerPoint Presentations Today
PowerPoint doesn’t have to be boring or mundane. With just a few simple tips and tricks, you can significantly enhance the look, feel, and impact of your presentations. From upgrading your mouse cursor to adding live polls, these seven techniques will help you create presentations that not only look awesome but also keep your audience engaged and impressed.
Remember, small details like aligning your slide objects properly or removing image backgrounds can elevate your professionalism, while dynamic features like morph transitions and subtle animations add polish and pizzazz. Embedding timers and live polls further improves your audience’s experience by keeping them informed and involved.
Start implementing these tips today, and watch your presentations transform into powerful, memorable experiences that leave a lasting impression.
Frequently Asked Questions (FAQ)
1. How do I access the laser pointer and other cursor options in PowerPoint?
During your presentation, right-click anywhere on the slide, then select Pointer Options from the menu. From there, you can choose between the laser pointer, pen, or highlighter tools to enhance your presentation.
2. What’s the best way to align multiple objects on a slide?
Select all the objects you want to align by holding the Shift key and clicking each one. Then, go to the Arrange menu, choose Align, and select the desired alignment option, such as Align Middle. You can also distribute objects evenly using Distribute Horizontally or Distribute Vertically.
3. Can I customize animations like teeter or other emphasis effects?
Yes. After applying an animation, open the Animation Pane and click the dropdown arrow next to your animation. From here, you can adjust the timing, duration, repetition, and start options to suit your needs.
4. How does the Morph transition work?
Morph creates a smooth animation between two slides that share common objects. By duplicating a slide and rearranging or resizing objects on the second slide, Morph animates the transition to emphasize content dynamically.
5. Is it possible to remove image backgrounds directly in PowerPoint?
Yes. Select your image, go to the Picture Format tab, and click Remove Background. Use the tools provided to mark areas to keep or remove until you’re happy with the result, then click Keep Changes.
6. How can I add a countdown timer to my PowerPoint slides?
Go to Insert > Get Add-ins, search for “countdown” or “timer,” and add an appropriate add-in like Break Time. Customize the timer duration and theme, then start it during your presentation.
7. What is Slido, and how does it integrate with PowerPoint?
Slido is an add-in that allows you to insert live polls, quizzes, and Q&A sessions directly into your PowerPoint presentations. Your audience can participate via a website or QR code, and results appear live on your slides, fostering engagement.
Check out the full video: 7 PowerPoint Tips to Make Your Presentation Look Awesome!


