If you’ve ever wondered how to craft amazing PPT slides that captivate your audience with smooth animations and seamless transitions, you’re in the right place. In this comprehensive guide, we’ll explore how to create a stunning title slide animation in PowerPoint, complete with a beautiful glassmorphic effect and a flawless transition to the next slide using the Morph feature.
This tutorial is based on the expert techniques shared by One Skill PPT, who generously offers a free PowerPoint template to get you started. Whether you’re a beginner or a seasoned presenter, mastering these animation tricks will elevate your presentation game and help you deliver professional, polished slides that wow your audience.
Ready to learn the secrets behind amazing PPT slides? Let’s dive in!
Table of Contents
- Getting Started: Downloading the Free Template and Setting Up Your Slide
- Creating the Glassmorphic Effect: A Modern Design Touch
- Animating the Title Slide: Fade, Wipe, and Motion Path Techniques
- Setting Up the Slide Transition: Using Morph for Smooth Zoom Effects
- Animating Glassmorphic Circles: Combining Zoom and Spin Animations
- Tips for Perfect Morph Transitions: Naming and Organizing Shapes
- Frequently Asked Questions (FAQs)
- Conclusion: Elevate Your Presentations with Amazing PPT Slides
Getting Started: Downloading the Free Template and Setting Up Your Slide
The journey to creating amazing PPT slides begins with having the right tools. Thankfully, One Skill PPT offers a free Pitch Zoom PowerPoint template that contains all the essential elements for this tutorial. Here’s how to get started:
- Visit pptskill.com and sign up for a free account.
- Once signed in, navigate to Chapter 12 and locate the bonus slides titled “Pitch Zoom Template.”
- Scroll down to find the free download button and click it to download the template.
- Open the downloaded PowerPoint file and start with a fresh blank slide for your customizations.
Once you have your blank slide ready, the first step is to add a beautiful background image to set the tone for your presentation. The tutorial uses a high-quality photo sourced from Freepik, which you can also use or substitute with an image of your choice.
To insert the background image:
- Copy the image from the source slide or directly insert it via Insert > Pictures.
- Paste or place the image to cover the entire slide area.
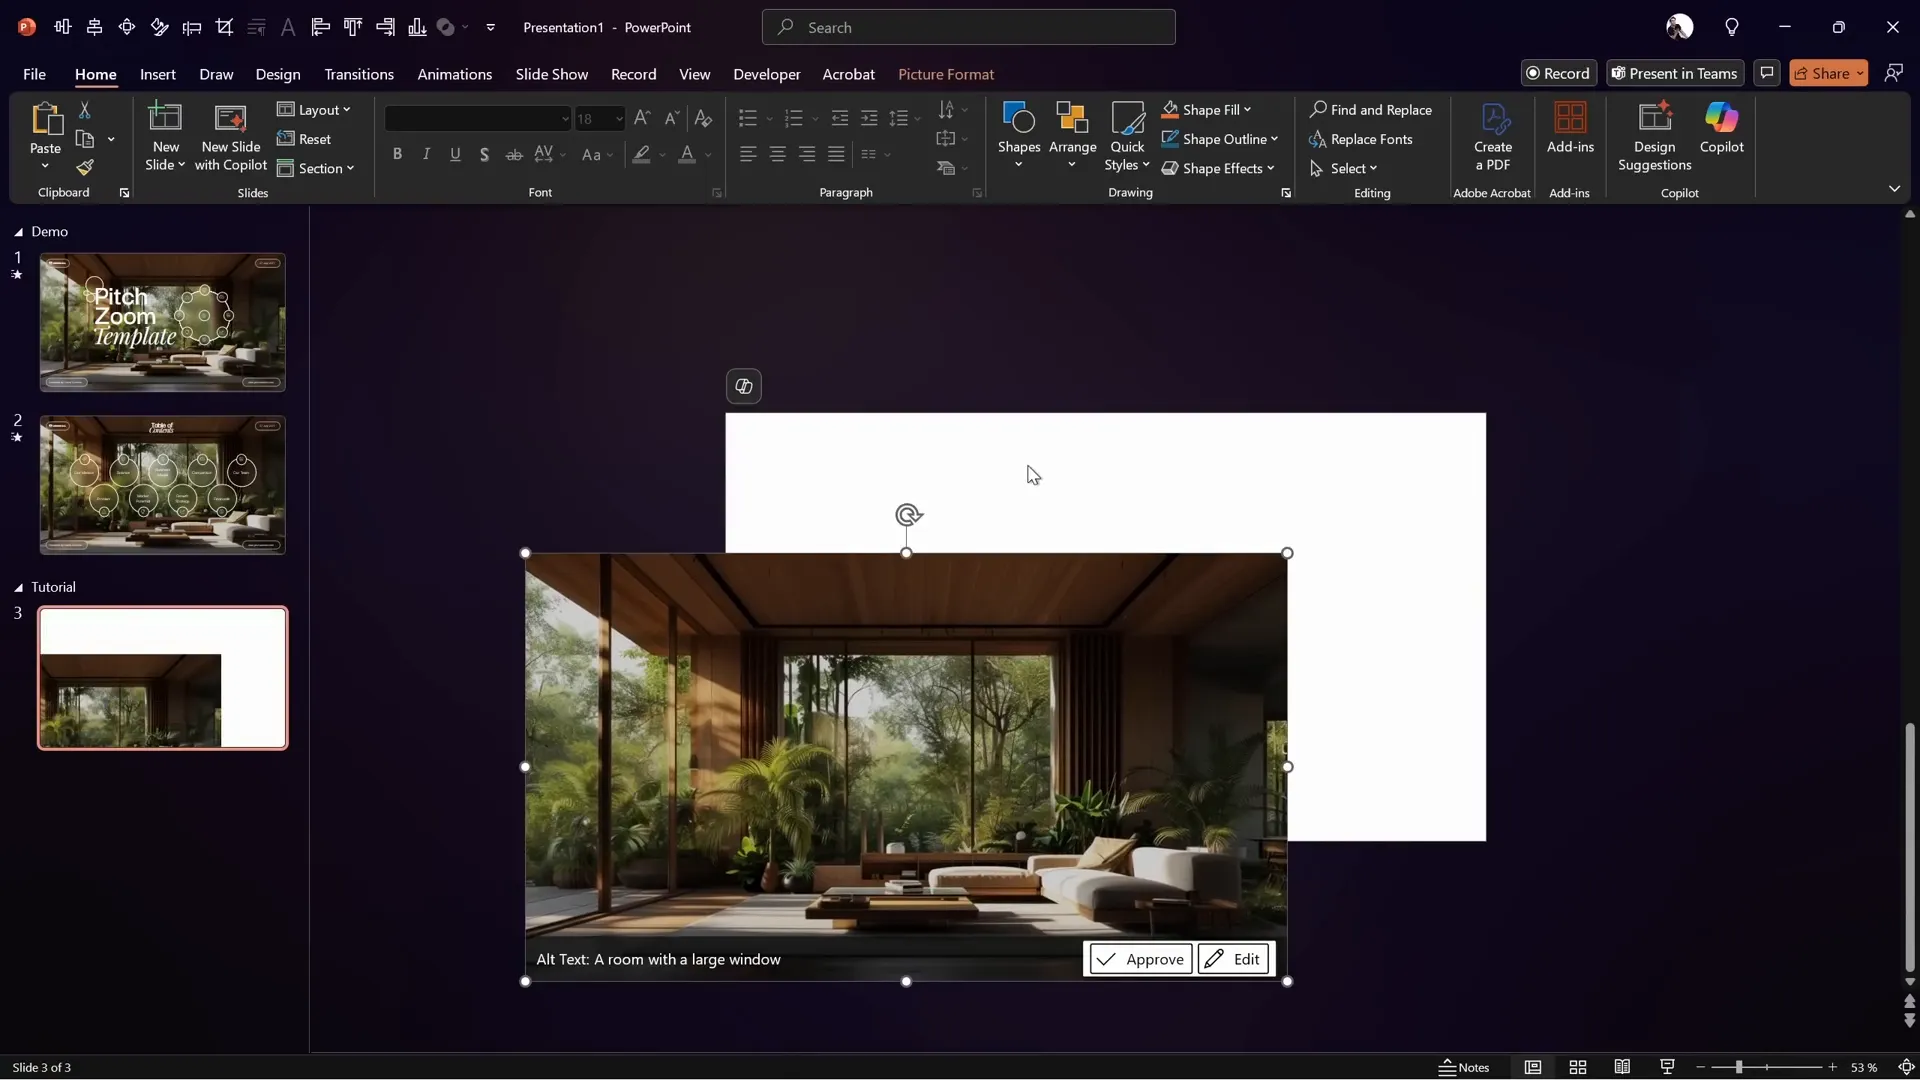
With the background set, you’re ready to move on to the exciting part — creating the glassmorphic effect.
Creating the Glassmorphic Effect: A Modern Design Touch
Glassmorphism is a trendy design style that mimics the look of frosted glass, featuring translucent elements with a blurred background. This effect adds depth and sophistication to your slides, making your content stand out elegantly.
Here’s how to achieve this effect in PowerPoint:
- Duplicate the background image: Select the background image and press Ctrl+D (or right-click and choose Duplicate).
- Apply a blur effect to the duplicated image:
- Right-click the duplicate image and select Picture Format.
- Navigate to Artistic Effects and choose the Blur effect.
- Adjust the blur to the maximum level for a fully blurred background.
- Set the blurred image as the slide background:
- Copy the blurred image.
- Delete the blurred image from the slide.
- Click on an empty area of the slide, then go to Format Background.
- Choose Picture or texture fill, and select Clipboard as the source.
- Bring back the original sharp image: Paste the original image on top of the blurred background to retain clarity.
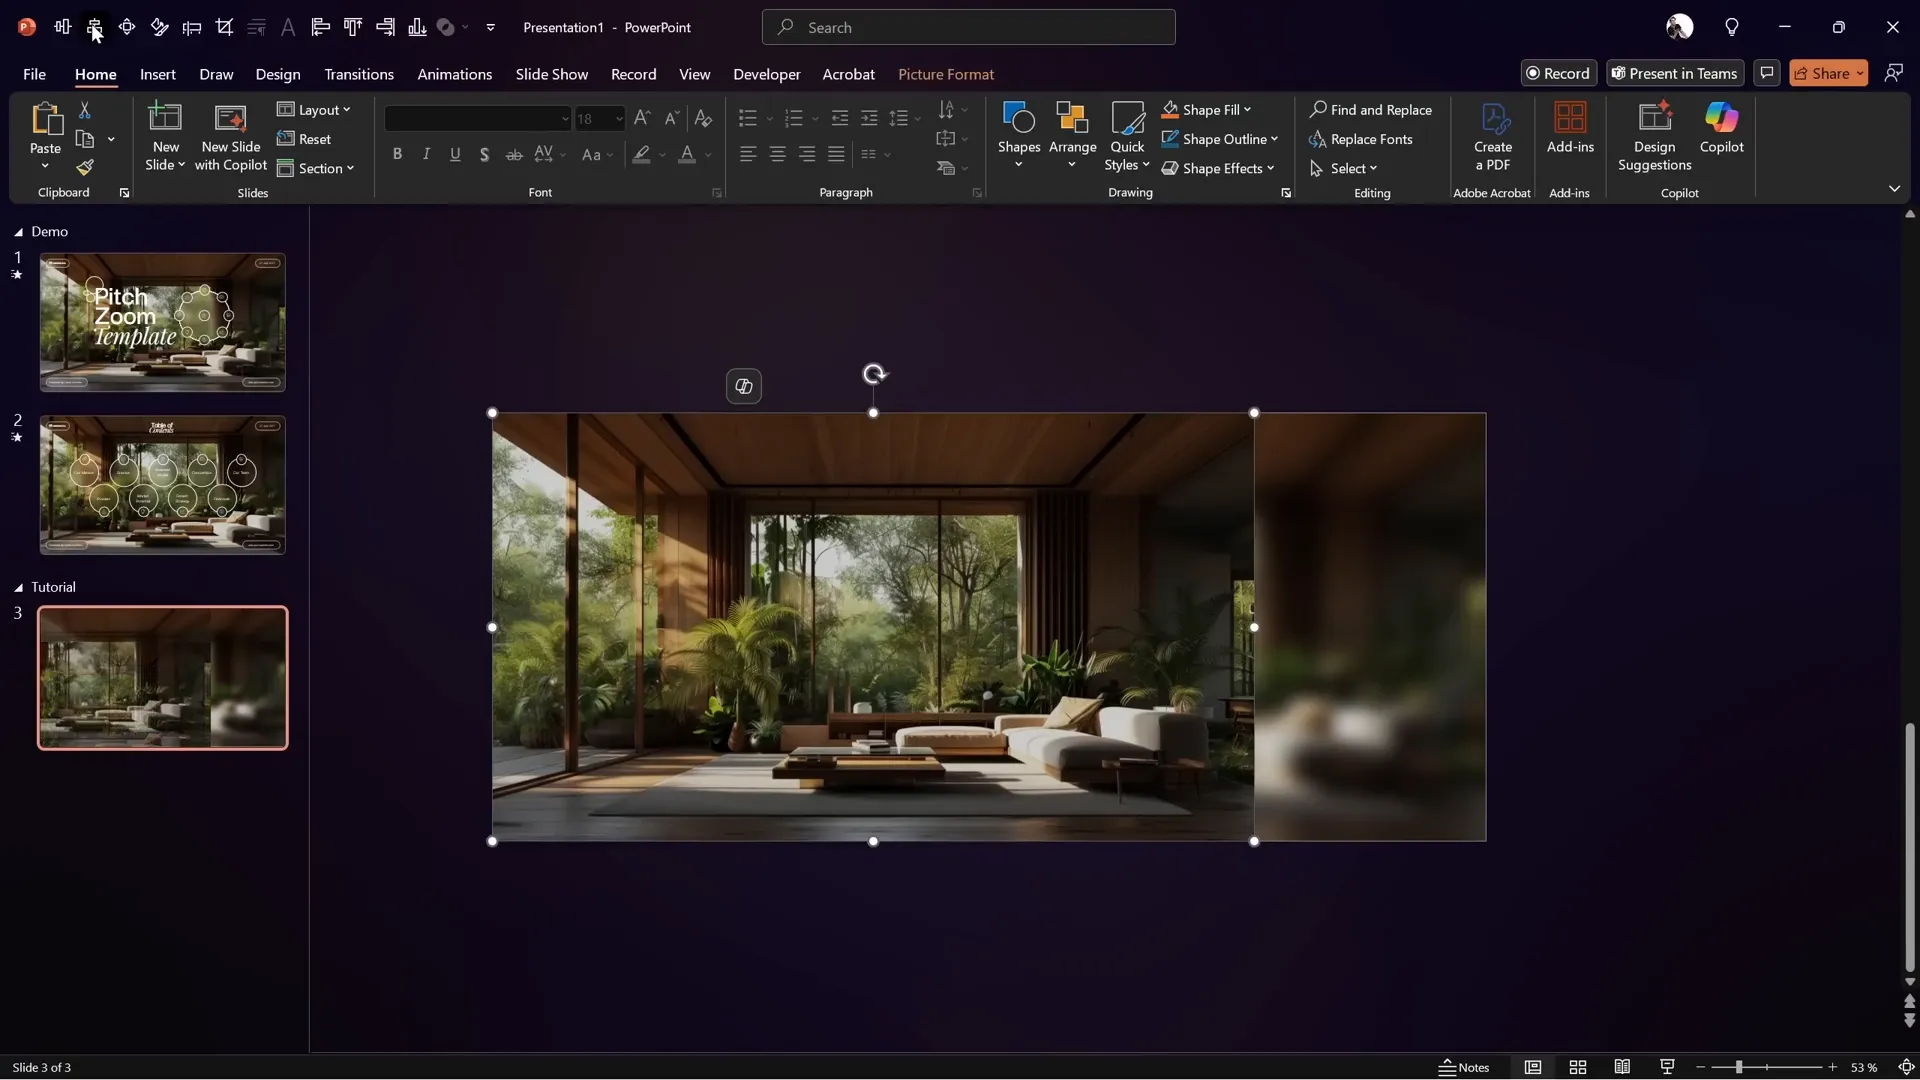
Now that the slide has a blurred background, you can create the glassmorphic shapes that reveal the blurred image beneath, simulating frosted glass.
Creating the Glassmorphic Shape
- Insert a shape — for example, a circle — anywhere on the slide.
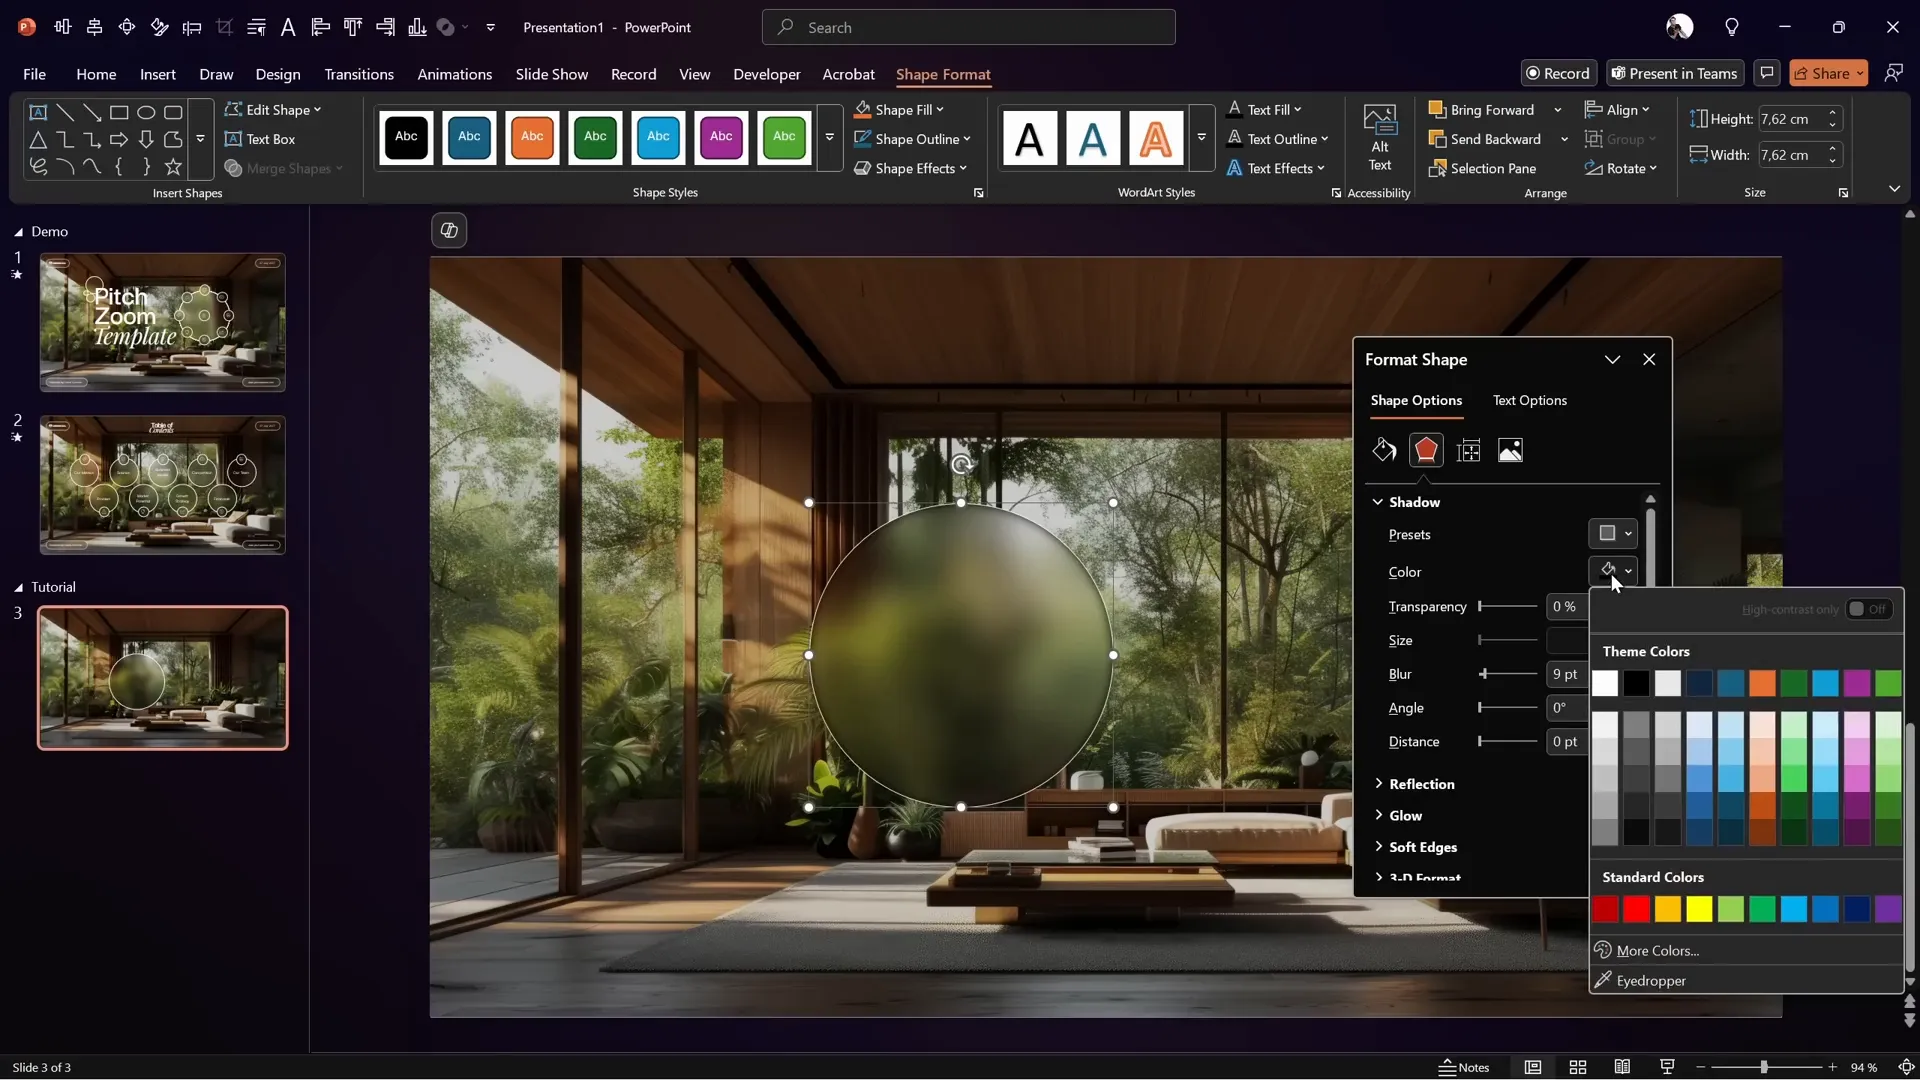
- Right-click the shape and choose Format Shape.
- Under Fill, select Slide background fill. This fills the shape with the blurred background portion beneath it.
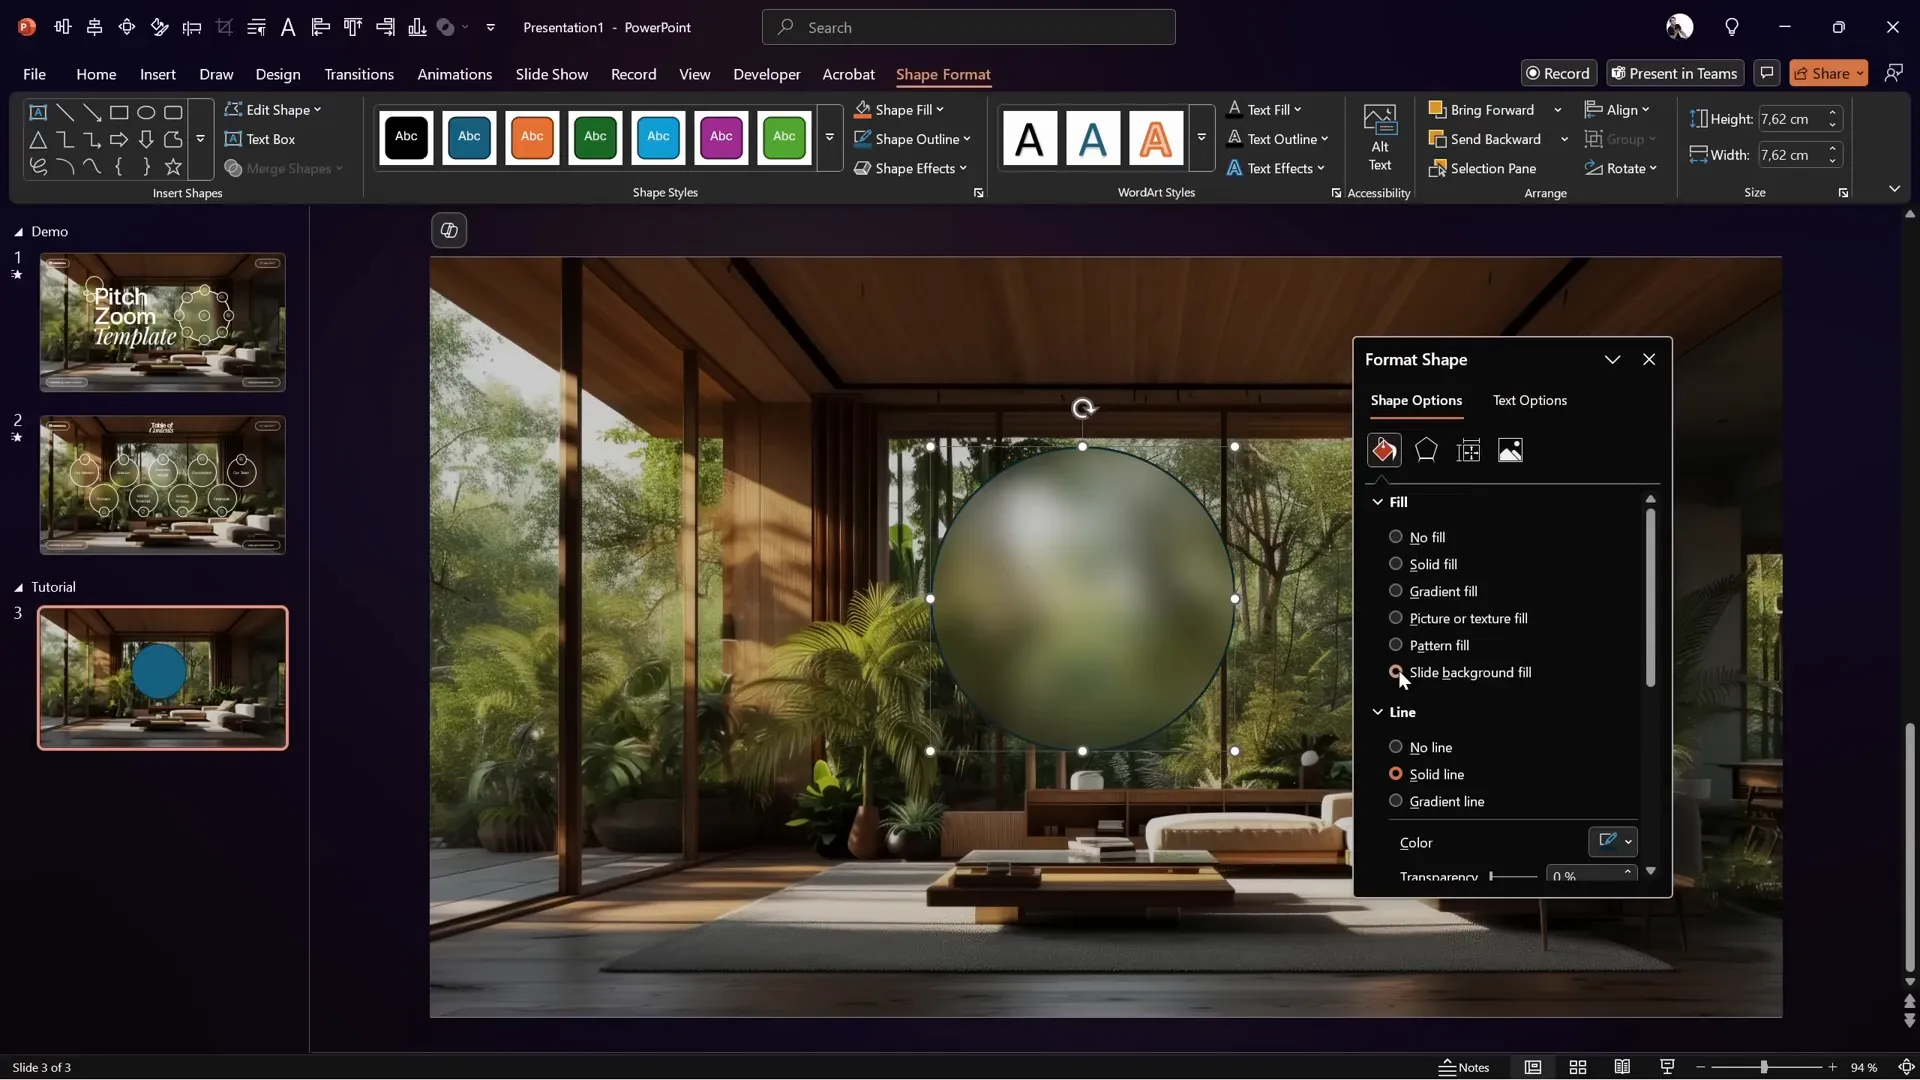
To enhance the glassmorphic look, add the following effects to the shape:
- A thin white outline (border).
- A white inside shadow with a slight blur.
These subtle touches create a realistic glass effect that adapts dynamically when you move the shape around the slide.
Animating the Title Slide: Fade, Wipe, and Motion Path Techniques
Animations breathe life into your slides. For your title slide, combining multiple animations on each text element can create a polished and engaging entry effect.
In this tutorial, the slide title consists of three separate text boxes, each animated to fade in with a slight upward motion, creating a smooth and professional appearance.
Step-by-Step Animation Setup
- Copy your title text boxes and any decorative shapes (like rounded rectangles) onto your slide.
- Open the Animation Pane and remove any existing animations to start fresh.
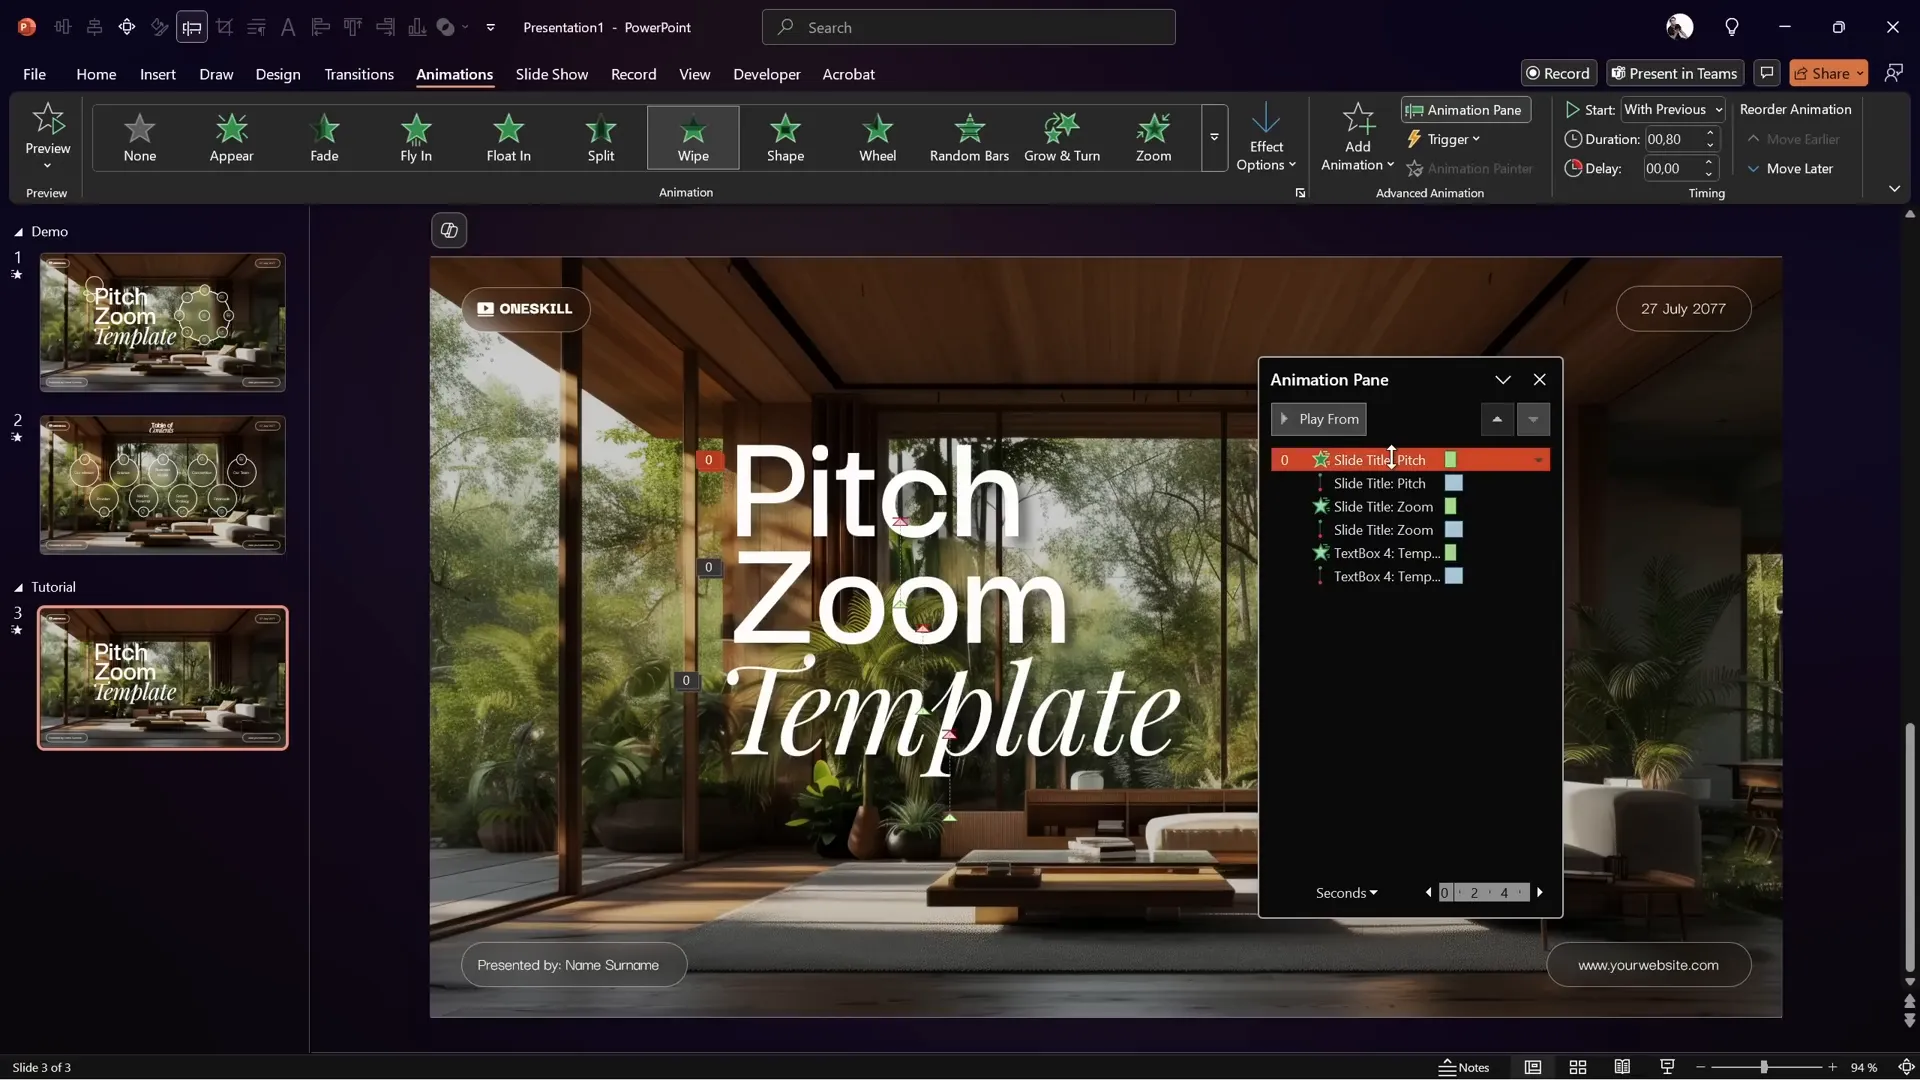
- Select the first text box (e.g., “Pitch”) and add a Wipe animation:
- Set the direction to From Top.
- Set the animation to start With Previous.
- Adjust the duration to 0.8 seconds.
- Add a second animation to the same text box — a Motion Path (Line):
- Adjust the end point slightly upwards to shorten the travel distance.
- Set it to start With Previous.
- Duration: 1.25 seconds.
- In effect options, select Smooth Start/End with maximum smooth end.
- Reverse the path direction so the text moves upward.
- Preview the animation to see the text wipe down as it moves up smoothly.
- Use the Animation Painter to copy the two animations from the first text box to the other title text boxes.
- Add delays to the middle and last text boxes’ animations (0.25s and 0.5s respectively) to create a staggered effect.
- Apply the same two animations to the rounded rectangles in the corners of the slide for consistency.
- Organize your animations in the pane by moving the rectangle animations to the top.
This multi-layered animation approach results in a professional and dynamic title slide that captures attention immediately.
Setting Up the Slide Transition: Using Morph for Smooth Zoom Effects
Transitions between slides can be as important as the animations on individual slides. The Morph transition in PowerPoint allows you to create smooth, cinematic effects such as zooming and moving objects fluidly between slides.
How to Set Up the Morph Transition
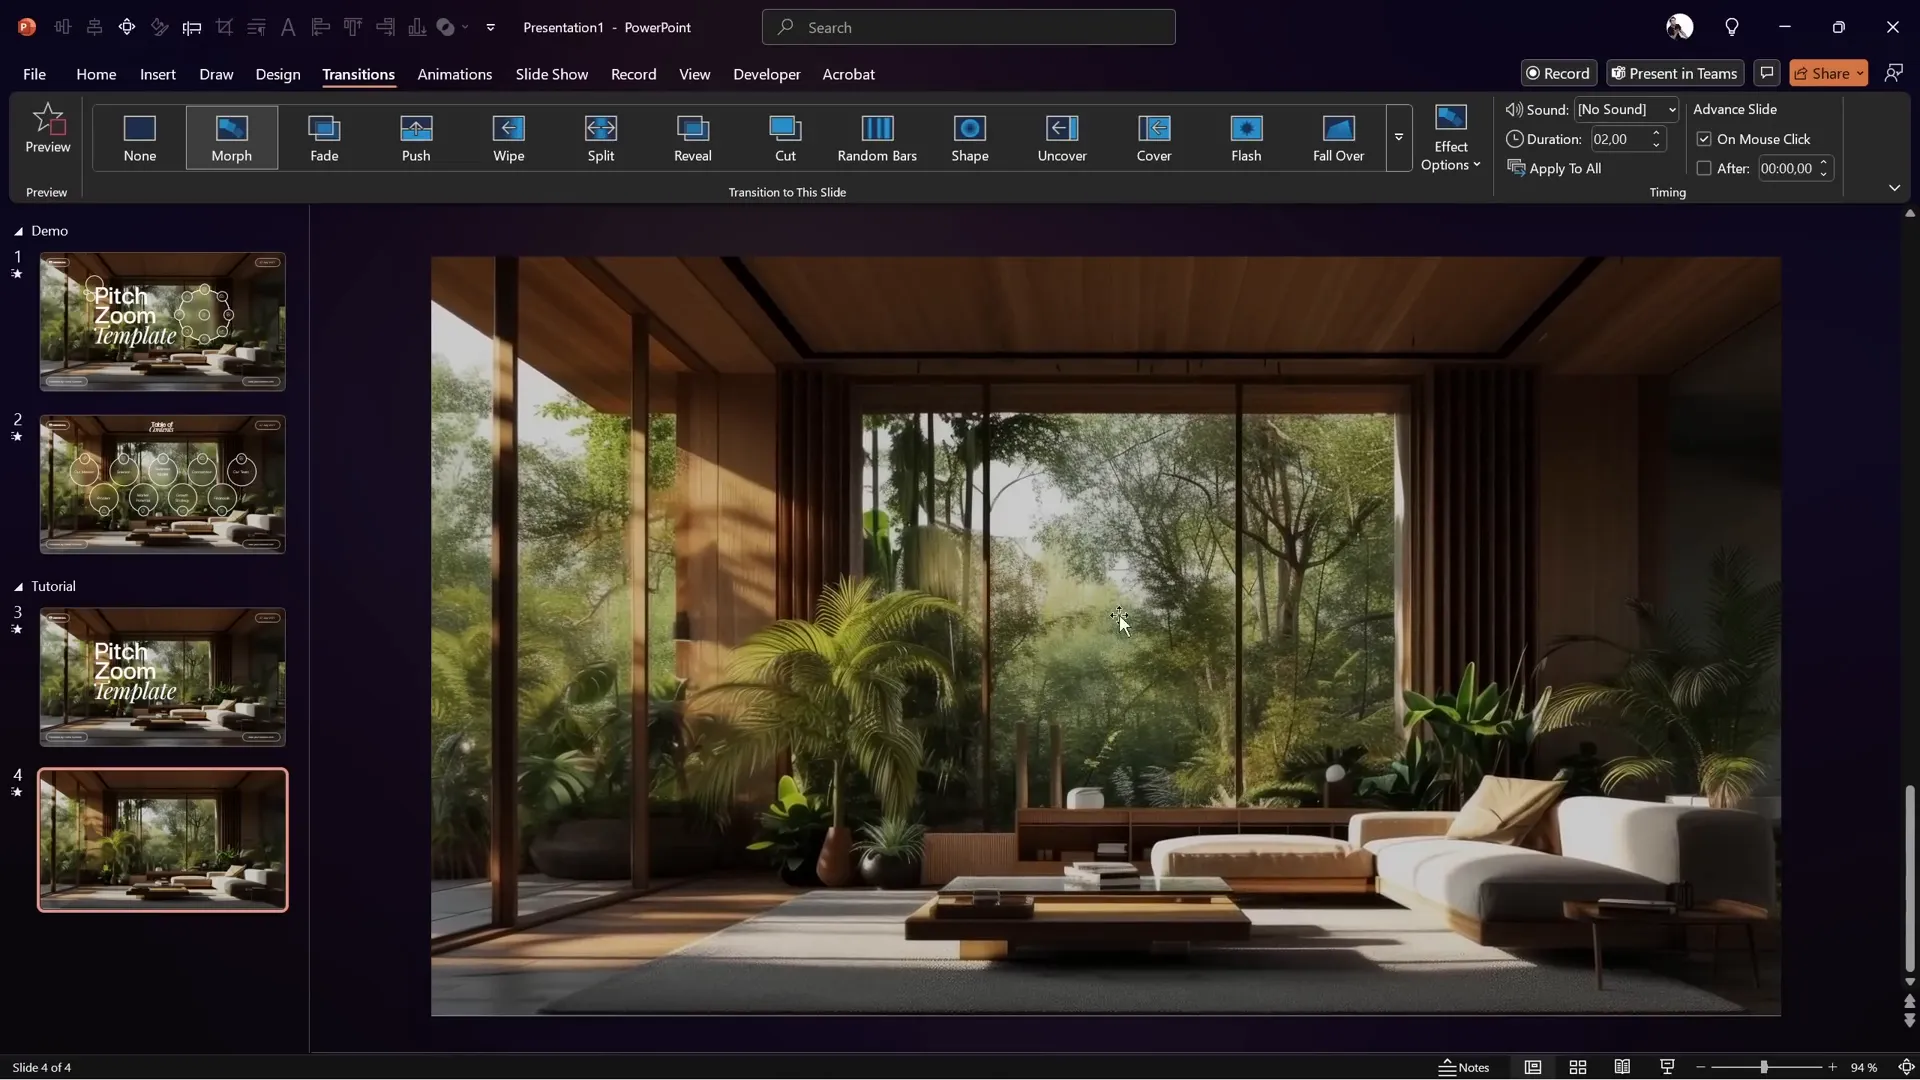
- Insert a second blank slide after your title slide.
- Apply the same background image but use the Crop tool to zoom in slightly on the image for this slide.
- Set the slide transition to Morph and adjust the transition duration to 2 seconds.
- Apply a subtle Fade transition on the title slide to keep the flow smooth.
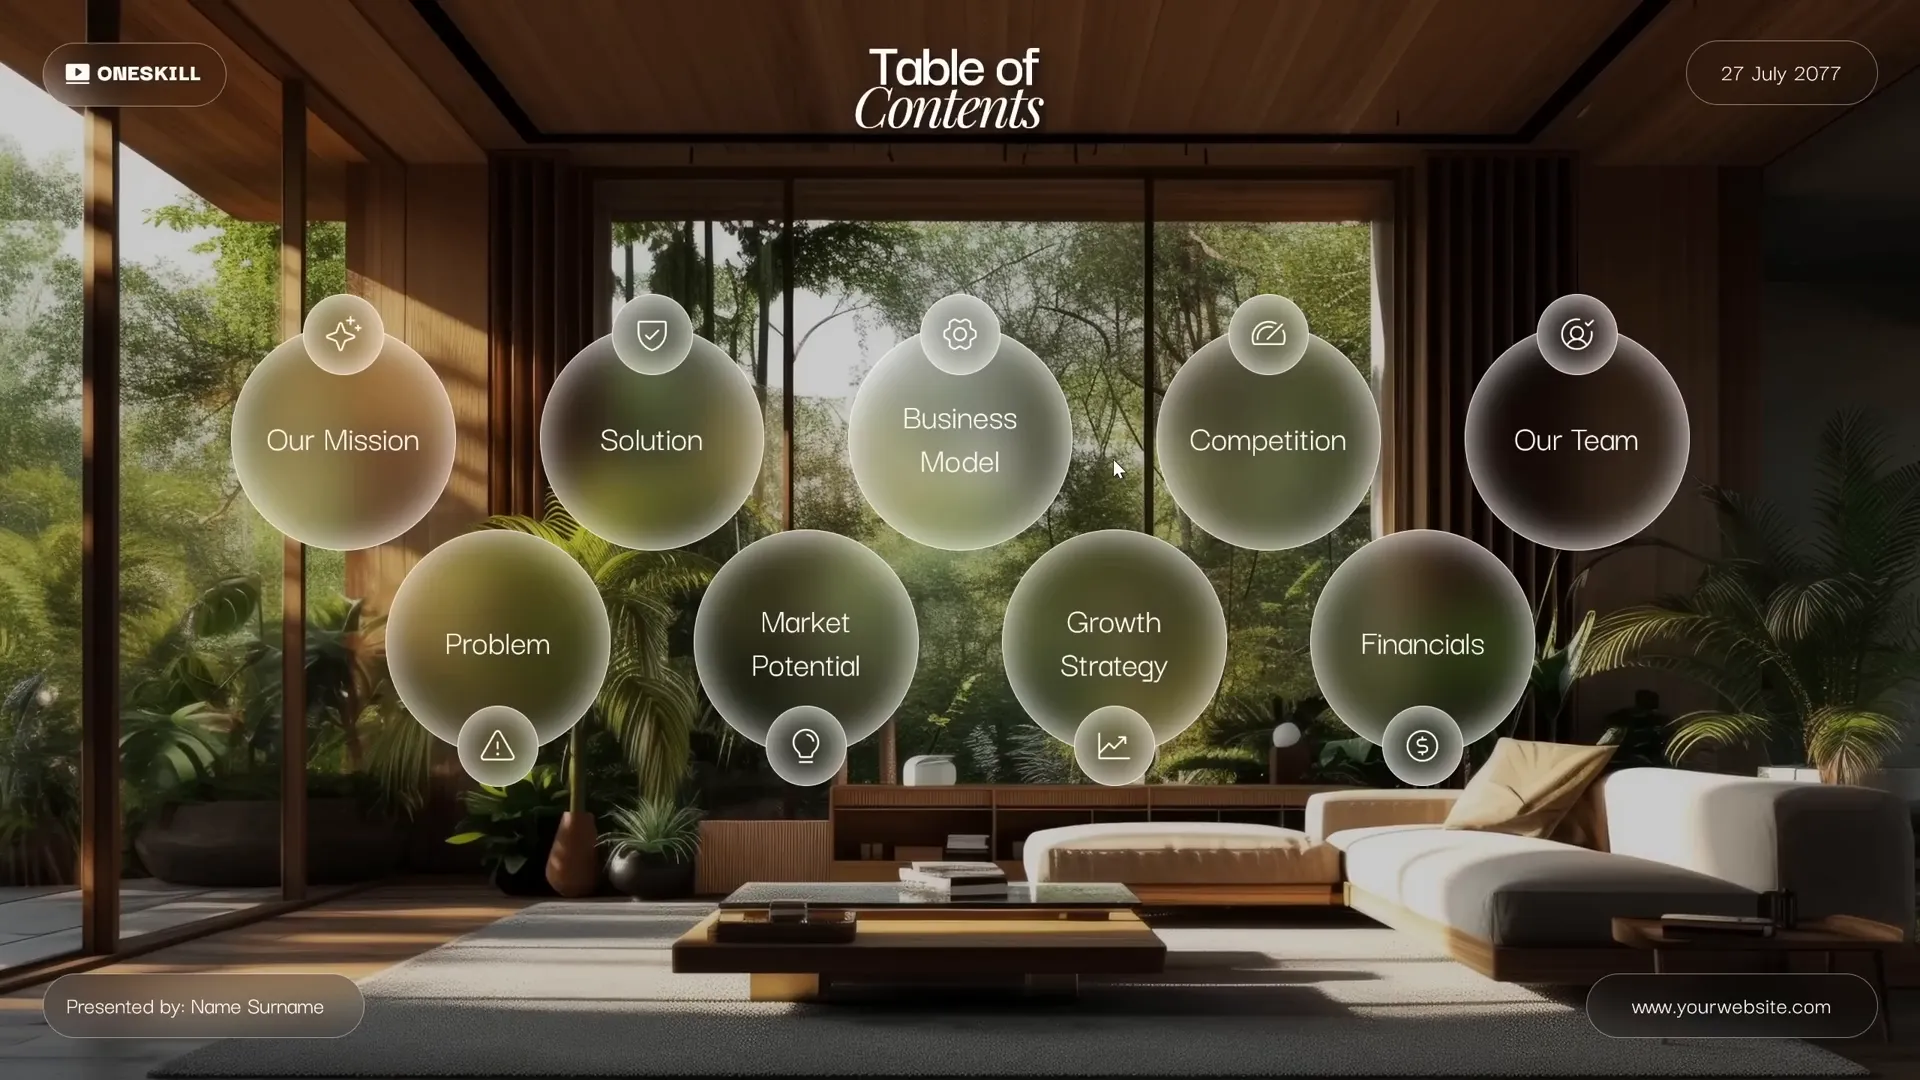
- Paste the “Table of Contents” text box onto both slides but position it outside the visible slide area on the first slide so it animates in with Morph on the second slide.
When you run the slideshow, the Morph transition will smoothly zoom the background image from the first to the second slide and animate the table of contents text sliding in from the top — a visually pleasing and professional effect.
Animating Glassmorphic Circles: Combining Zoom and Spin Animations
On the second slide, the presentation features multiple glassmorphic circles arranged with text and icons. These circles can be animated to zoom and spin in a synchronized and elegant way.
Creating and Animating the Circles
- Each circle uses the same slide background fill technique to maintain the glassmorphic effect.
- Apply a thin white border and a soft white inside shadow to each circle for realism.
- Inside the larger circles, add text labels; smaller circles can include icons from sources like Phosphor Icons.
To animate the circles:
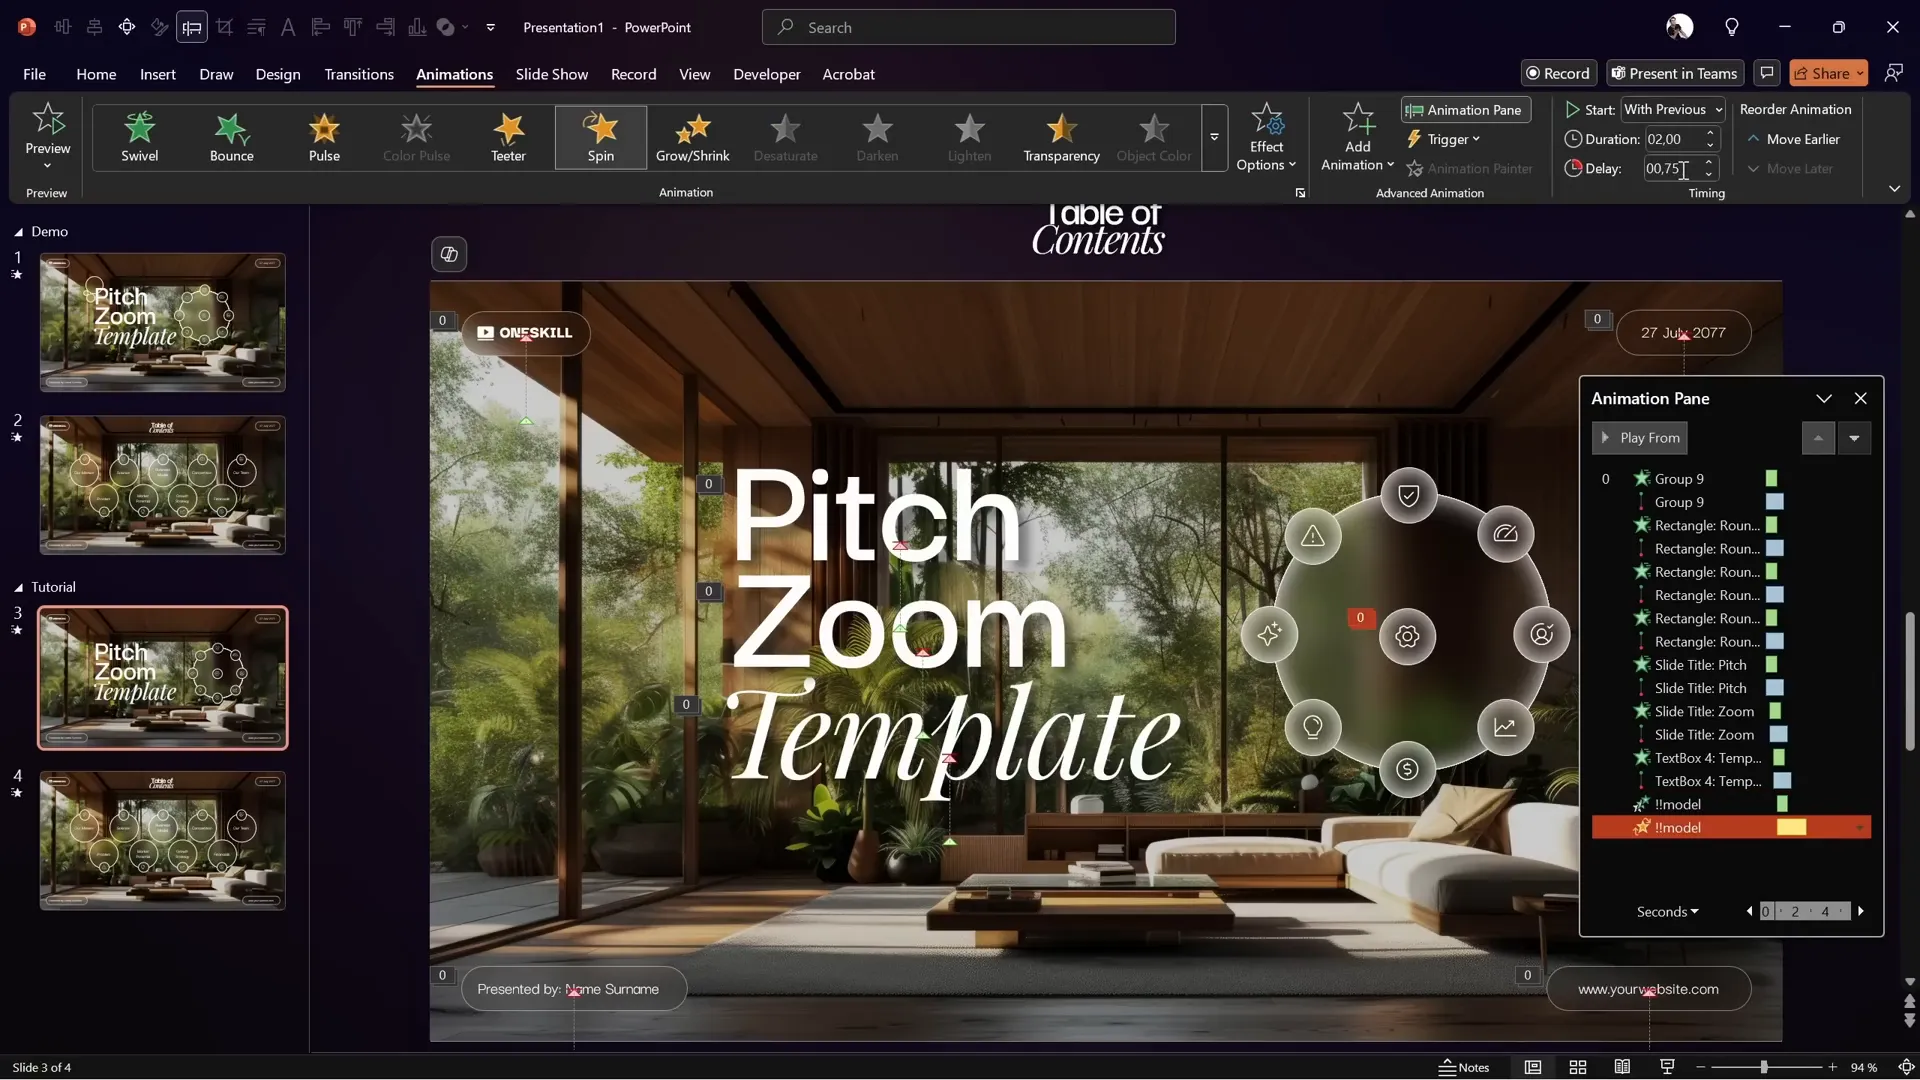
- Select the small circle in the middle and add a Zoom animation:
- Start: With Previous
- Duration: 0.75 seconds
- Delay: 0.75 seconds
- Add a Spin animation to the same circle:
- Start: With Previous
- Duration: 1.5 seconds
- Delay: 0.75 seconds
- Effect options: Maximum smooth end
- Use the Animation Painter to copy these two animations to all smaller circles and the big central circle.
- For big circles beyond the first, add an Appear animation to keep their text hidden initially:
- Start: With Previous
- Delay: 2.25 seconds
This combination of animations creates a dynamic and engaging effect where circles zoom and spin into place, while text appears at the right moment, maintaining clarity and focus.
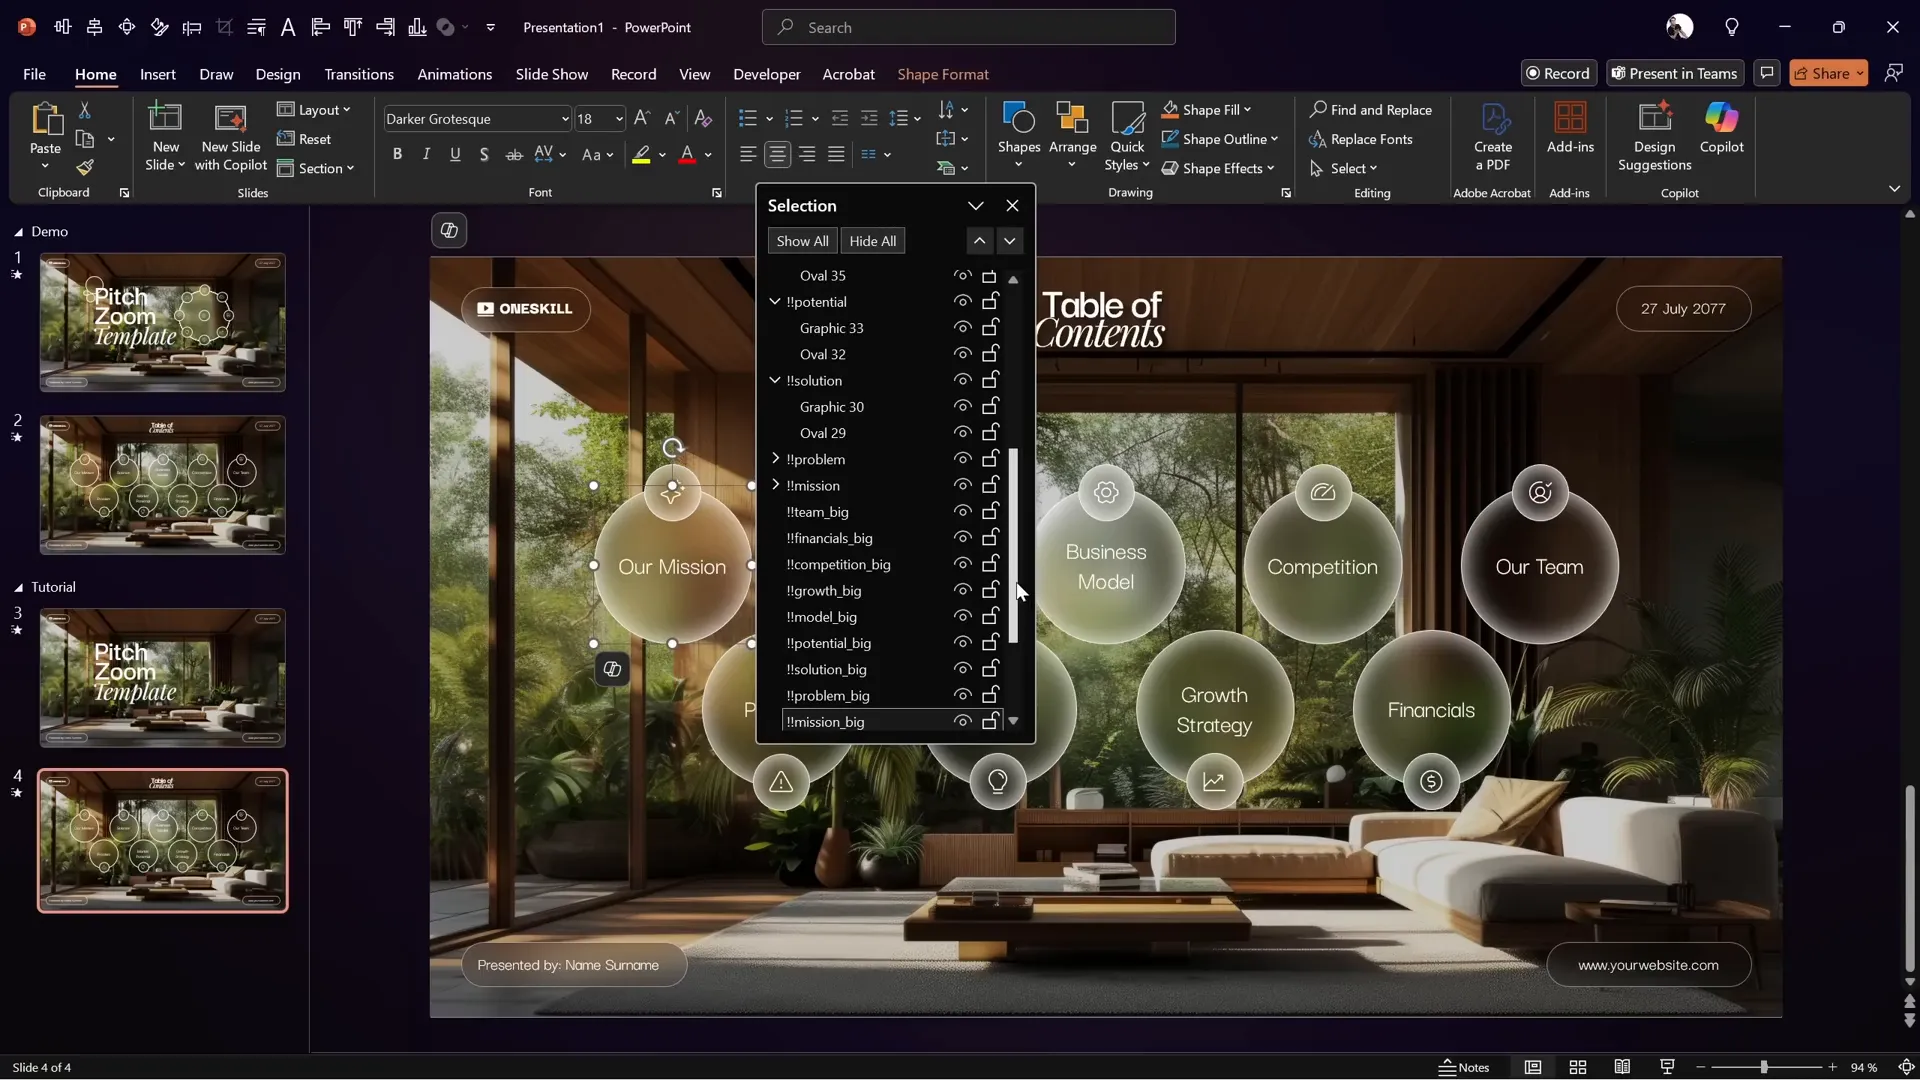
Tips for Perfect Morph Transitions: Naming and Organizing Shapes
The Morph transition relies heavily on matching shapes between slides. Naming your shapes correctly ensures smooth animations without unwanted shape swaps or glitches.
Best Practices for Naming Shapes
- Use double exclamation marks (!!) at the start of each shape’s name.
- Use consistent names for the same shapes across slides.
- For example, name a smaller circle
!!missionand its corresponding bigger circle!!mission big. - Maintain the same naming on both slides to help Morph identify and animate the objects properly.
To organize and rename shapes:
- Open the Selection Pane (Home > Select > Selection Pane).
- Rename each shape according to your naming convention.
- Copy shapes from the second slide to the first for consistent naming and alignment.
- Align shapes precisely using PowerPoint’s Align tools.
Proper naming and alignment are crucial for creating amazing PPT slides with smooth Morph transitions that look professional and clean.
Frequently Asked Questions (FAQs)
1. Where can I download the free Pitch Zoom PowerPoint template?
You can download the free template by signing up at pptskill.com. After signing in, navigate to Chapter 12 and look for the bonus slides titled “Pitch Zoom Template” to find the download button.
2. What is the glassmorphic effect, and how can I create it in PowerPoint?
Glassmorphism is a design style featuring translucent elements with blurred backgrounds, resembling frosted glass. In PowerPoint, you create this effect by setting a blurred version of your background image as the slide background and filling shapes with the slide background fill. Adding white borders and inside shadows enhances the realism.
3. How does the Morph transition enhance slide animations?
The Morph transition allows smooth animations of shapes and images between slides by animating their size, position, and other properties. When combined with well-named and aligned shapes, Morph creates seamless zoom and movement effects that look highly professional.
4. Can I add clickable slide zooms inside the glassmorphic circles?
Yes! You can insert clickable slide zooms inside the circles to create interactive presentations. For detailed instructions, check out the previous Pitch Zoom tutorial by One Skill PPT.
5. How do I make animations start simultaneously or with delay?
In the Animation Pane, you can set animations to start With Previous for simultaneous animation or set a delay time to stagger animations for more dynamic effects.
6. Why is it important to name shapes for Morph transitions?
Morph matches shapes across slides by their names. Without consistent naming, Morph may confuse shapes and produce undesirable animation effects. Using a naming convention like starting with “!!” helps Morph recognize and animate shapes correctly.
Conclusion: Elevate Your Presentations with Amazing PPT Slides
Creating amazing PPT slides involves more than just adding text and images — it’s about combining design, animation, and transitions to tell your story visually and dynamically. With the techniques shared in this tutorial, you now have the tools to craft stunning title slide animations featuring a modern glassmorphic effect and smooth Morph transitions for zooming and distributing elements.
Remember these key takeaways:
- Use high-quality background images and create a blurred version for glassmorphic effects.
- Fill shapes with slide background fill to achieve the glass effect, and enhance with borders and shadows.
- Combine wipe and motion path animations for elegant text entry effects.
- Leverage Morph transitions for smooth zoom and object movement between slides.
- Name and organize shapes consistently to ensure Morph works flawlessly.
- Use animation delays and layering to control the timing and visibility of slide elements.
By mastering these techniques, you can transform your presentations into engaging visual experiences that leave a lasting impression.
For those interested in taking it a step further, adding clickable slide zooms inside the glassmorphic circles opens up interactive possibilities — be sure to explore One Skill PPT’s previous tutorials for more advanced tips.
Now, go ahead and start creating your own amazing PPT slides that captivate and impress!