
Welcome to this comprehensive guide on creating stunning animated octagon waterdrop infographics using the powerful combination of PowerPoint and Inkscape. This tutorial is inspired by the expertise shared by One Skill PowerPoint, a talented creator who masterfully blends these tools to produce captivating visuals. Whether you’re a designer, presenter, or infographic enthusiast, this step-by-step walkthrough will empower you to craft unique waterdrop-shaped infographics that not only look professional but also come alive with animation.
In this article, we will explore the entire process—from crafting the foundational waterdrop shapes to assembling and animating the final infographic. You’ll learn how to leverage Inkscape’s precision vector tools to create perfect polygons and shapes, and then bring them into PowerPoint for styling and animation. So, let’s dive in and discover how to make your infographics stand out!

Table of Contents
- Introduction to Waterdrop Infographics
- Creating the Square Waterdrop Infographic in PowerPoint
- Challenges of Creating Polygonal Waterdrop Infographics in PowerPoint
- Leveraging Inkscape for Precision Vector Shapes
- Creating Waterdrop Shapes Using Circles and Bezier Tool in Inkscape
- Repeating the Process for Hexagon, Heptagon, and Octagon
- Importing Waterdrop Infographics into PowerPoint
- Adding Animations to Enhance Your Infographic
- Final Check and Presentation
- Additional Resources and Learning Opportunities
- Frequently Asked Questions (FAQ)
- Conclusion
Introduction to Waterdrop Infographics
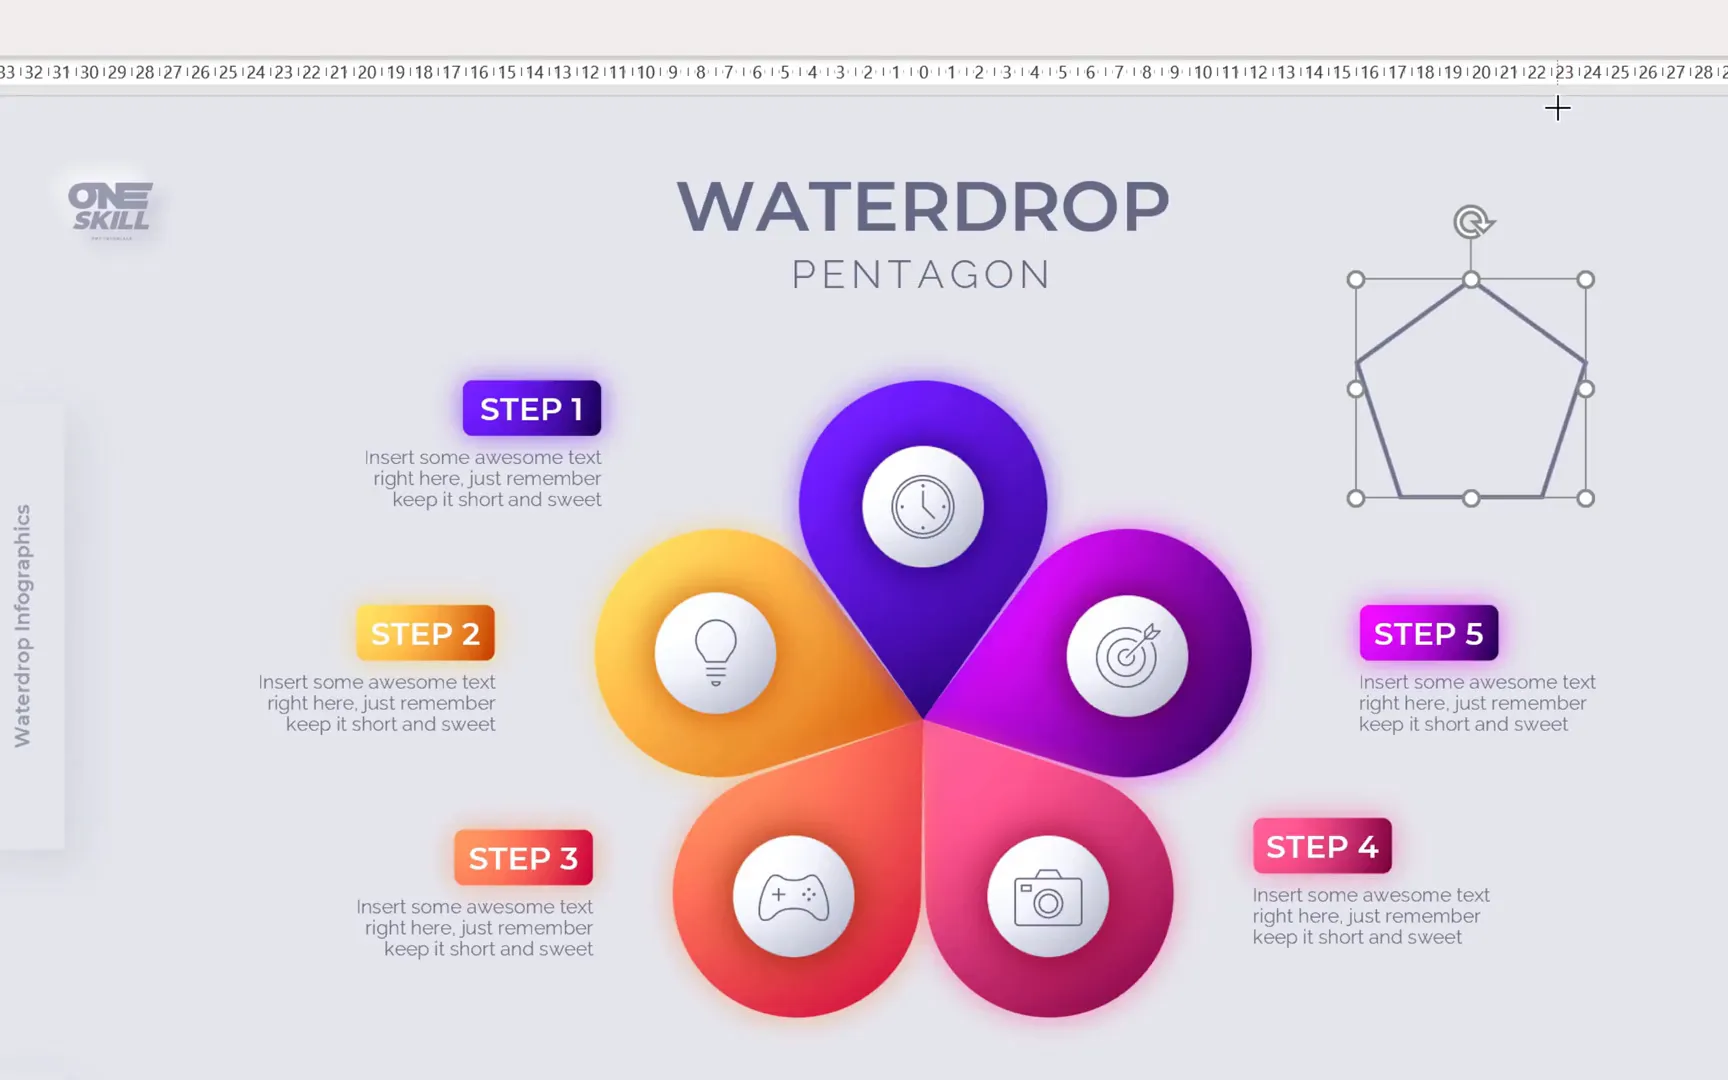
Waterdrop infographics are an eye-catching way to present information using teardrop-shaped elements arranged in polygonal formations. These shapes can vary in complexity—from simple squares with four drops to intricate octagons with eight. The charm lies in the fluid, soft appearance of the waterdrop shapes combined with geometric precision, making them perfect for dashboards, presentations, and data storytelling.
In this guide, we’ll focus on how to draw these waterdrop shapes effectively, especially when their dimensions vary—from thin and narrow drops to wider ones—as seen in different polygon structures like pentagons and squares.
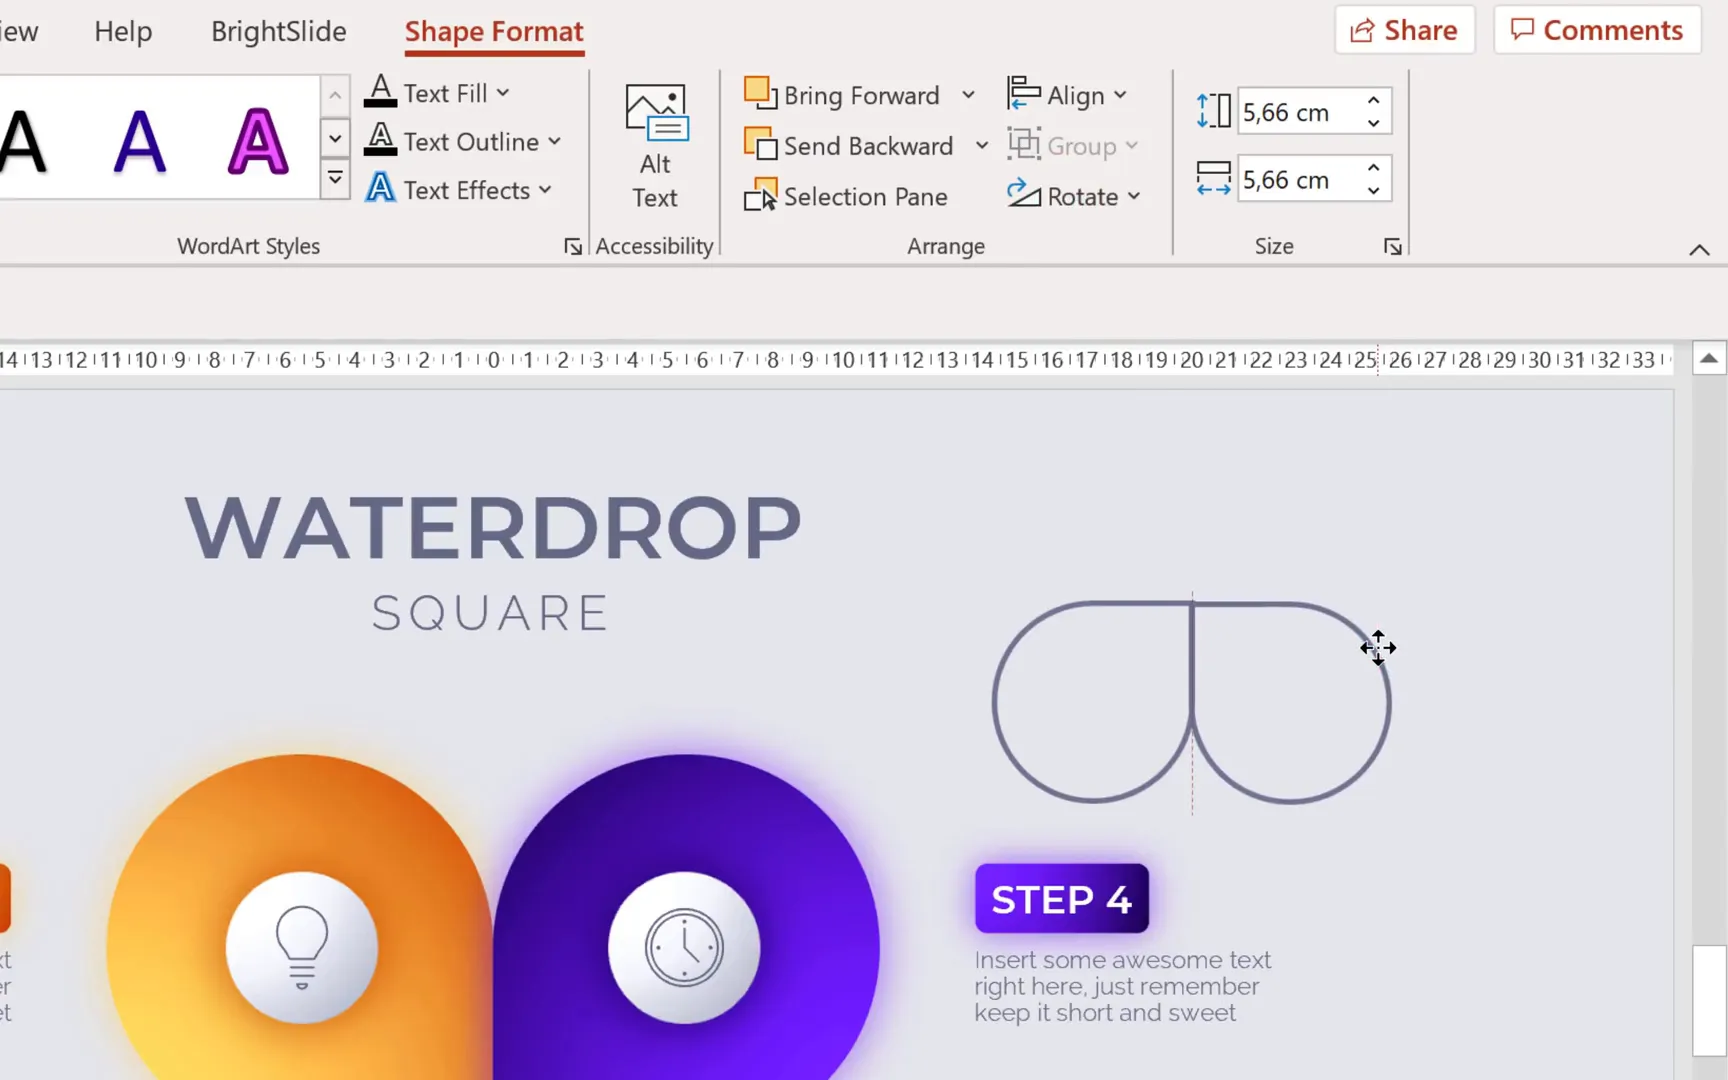
Creating the Square Waterdrop Infographic in PowerPoint
Starting simple, the square waterdrop infographic is the easiest to create directly within PowerPoint. PowerPoint offers a built-in teardrop shape in its shape menu, which we can use as the base for our waterdrop.
- Select the Teardrop shape from the shapes menu.
- Hold down the Shift key while drawing to create a perfect teardrop.
- Duplicate this shape and flip the copy horizontally.
- Bring the two teardrops close together to form half of the square.
- Group these two shapes (Ctrl + G) to keep them together.
- Duplicate the grouped shape, flip it vertically, and align it below the first group.
- Group all four teardrops to form a complete square waterdrop infographic base.
This method provides a quick and effective foundation with minimal fuss. Though the shapes are uncolored initially, they can be styled further with fills, gradients, and shadows to enhance their visual appeal.
Challenges of Creating Polygonal Waterdrop Infographics in PowerPoint
While the square is straightforward, creating other polygons like pentagons, hexagons, heptagons, and octagons is more complex in PowerPoint. This complexity arises because PowerPoint lacks specialized teardrop shapes that perfectly fit polygon corners, especially when you want the waterdrops to align seamlessly without gaps or overlaps.
For example, to build a pentagon waterdrop infographic, you would:
- Insert a pentagon shape (hold Shift for proportion).
- Manually insert circles at each corner of the pentagon, ensuring the circle centers snap exactly to the corners.
- Ensure the circles touch each other without gaps or overlaps, which is challenging to achieve precisely.
- Use the freeform tool to draw special triangle shapes that connect the circle edges to the pentagon center.
- Union the circles and triangles to create the waterdrop shape.
However, this approach is tedious and prone to imperfections in PowerPoint, as editing points often reveals gaps or misalignments. The precision needed is hard to reach manually.
Leveraging Inkscape for Precision Vector Shapes
To overcome PowerPoint’s limitations, the best approach is to use Inkscape, a free and powerful vector graphics program that integrates well with PowerPoint. Inkscape allows for precise polygon creation, snapping, and path operations that make drawing perfect waterdrop shapes much easier.
Here’s how to get started with Inkscape:
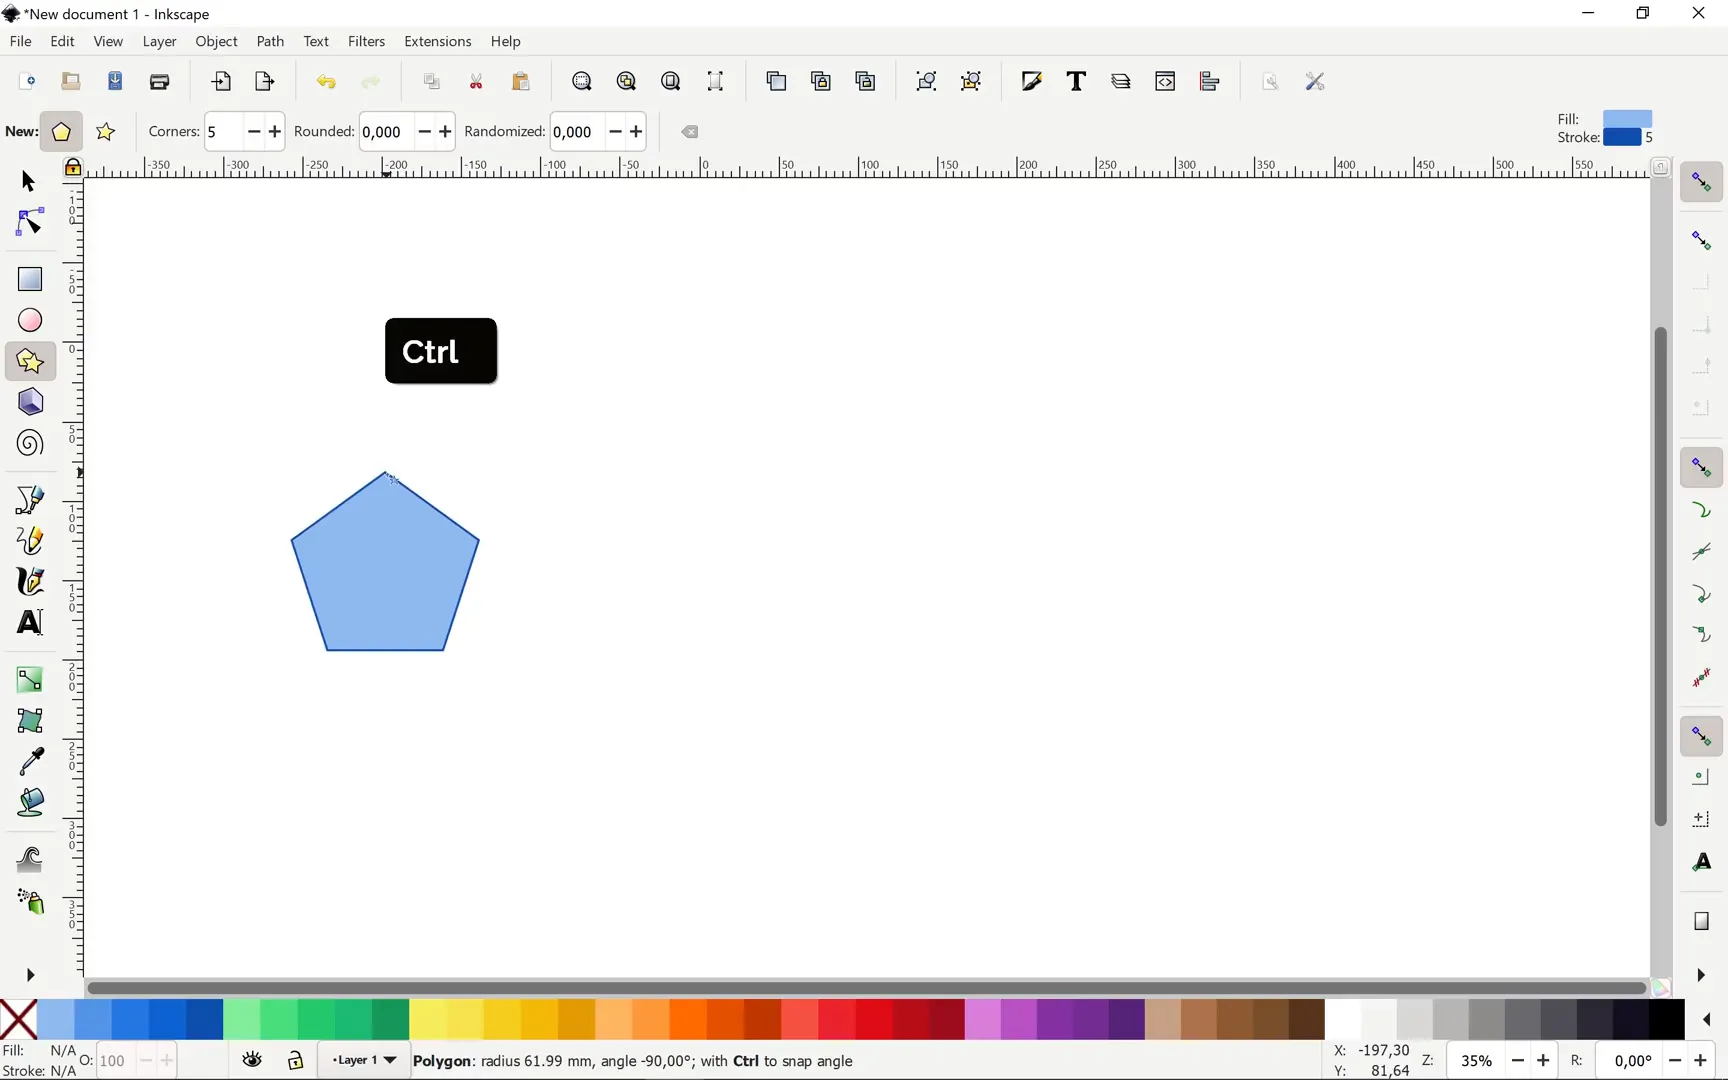
- Open Inkscape and hide the page border to maximize workspace.
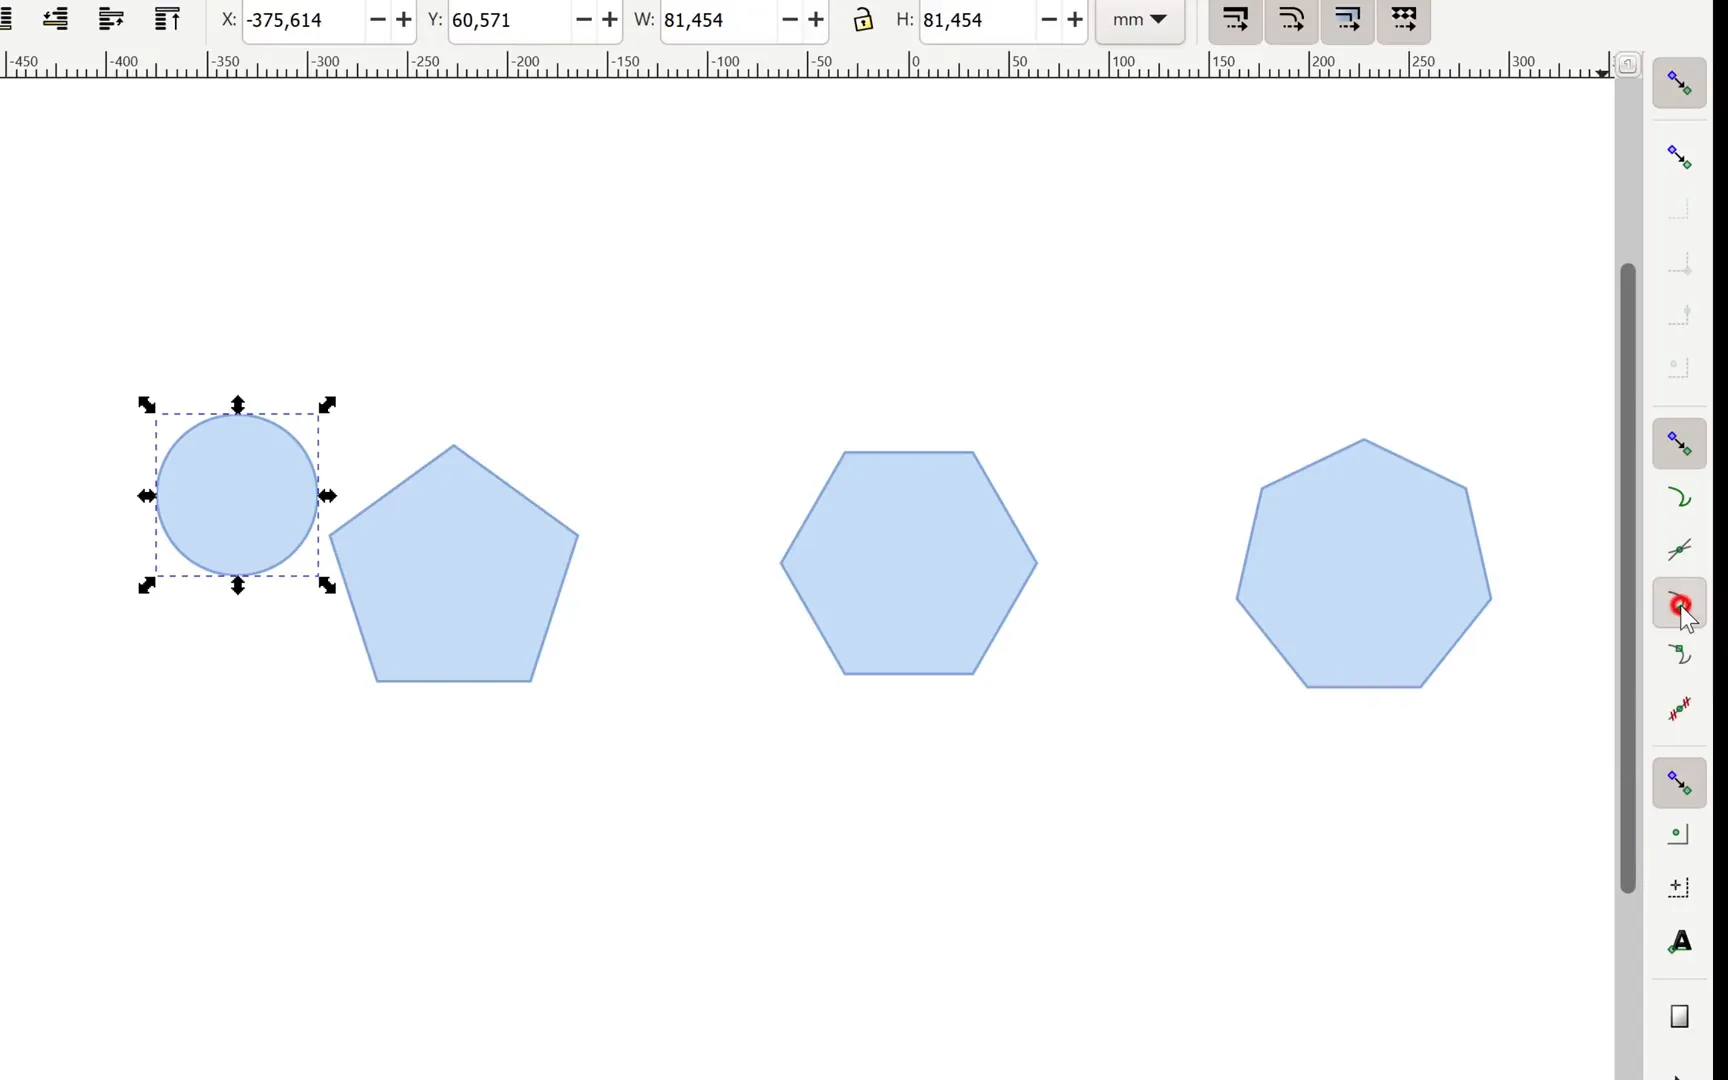
- Select the Polygon tool and set the number of corners based on the shape you want (e.g., 5 for pentagon, 6 for hexagon).
- Hold down the Ctrl key to draw regular polygons.
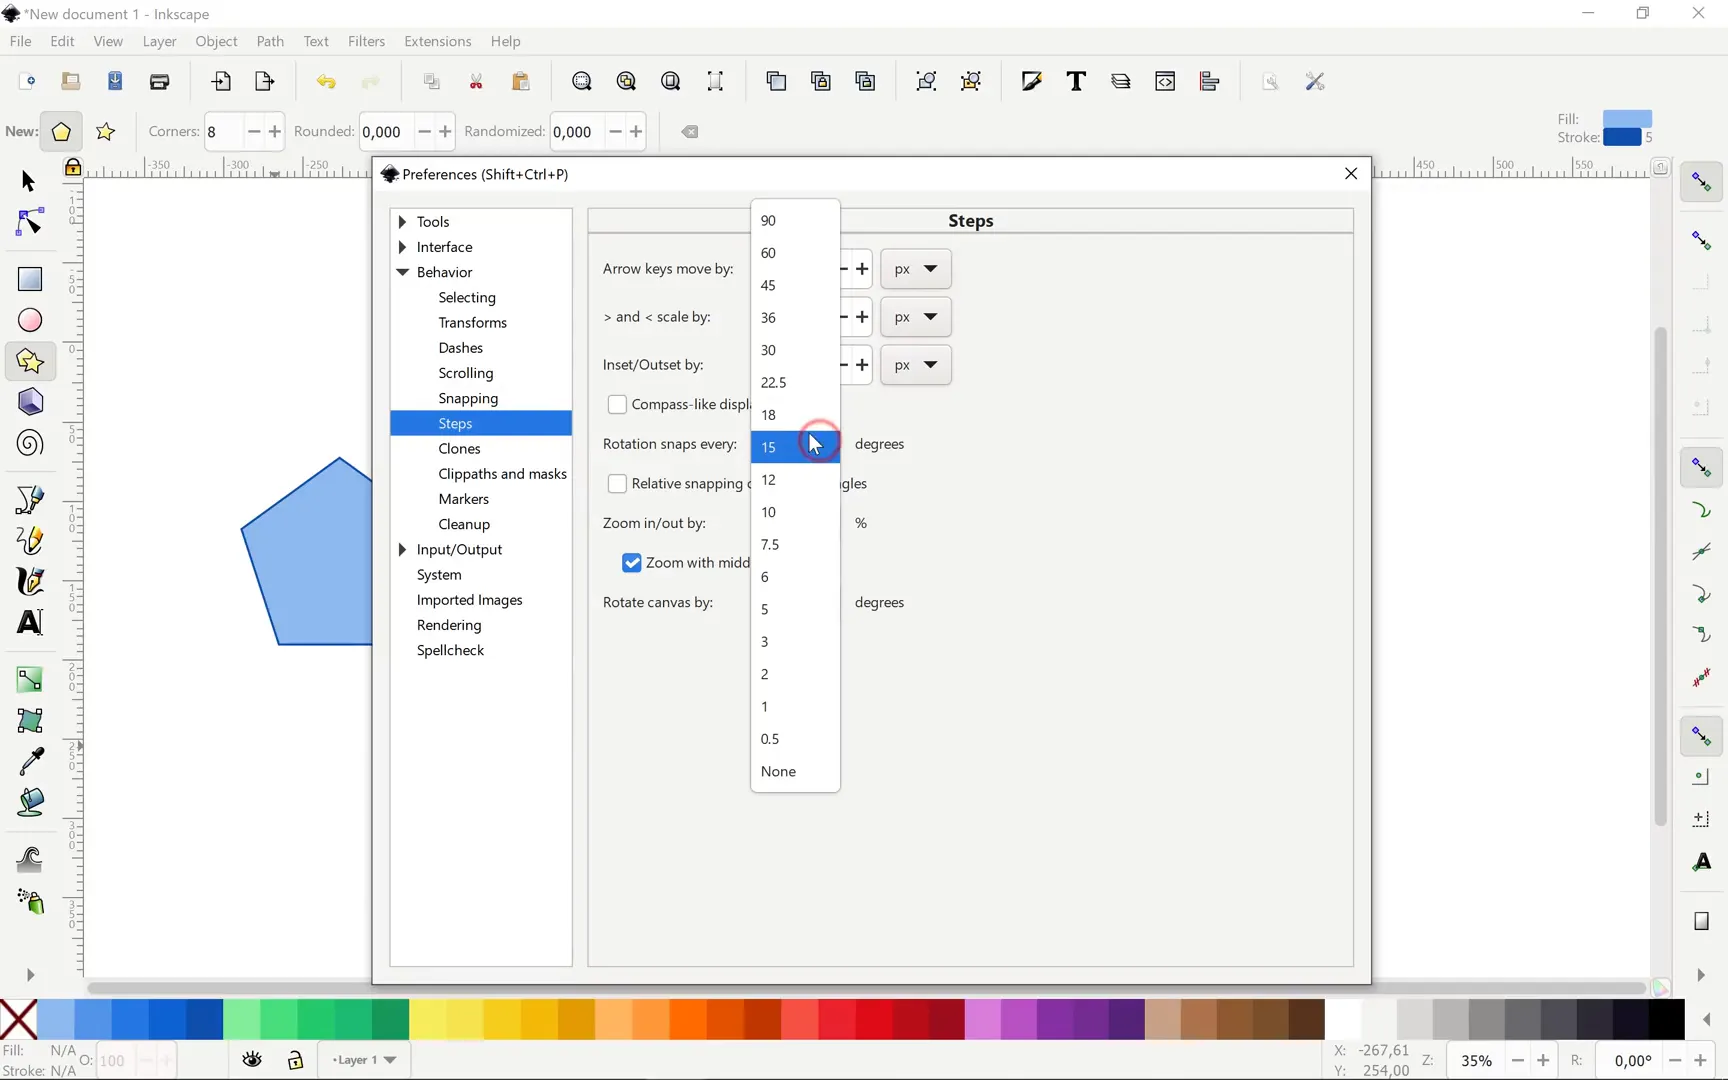
- For an octagon, adjust rotation snapping to 22.5° in preferences to ensure a flat edge at the bottom.
- Draw all required polygons (pentagon, hexagon, heptagon, octagon) and align them horizontally with opacity set to around 50% for better visibility during editing.
Adjusting Rotation Snapping for Octagons
Octagons are special because achieving a flat bottom edge requires precise rotation snapping. In Inkscape:
- Go to Preferences > Snapping.
- Find the rotation snapping option and set it to 22.5° (360° divided by 16).
- Draw the octagon again to get the perfect flat edge at the base.
This setup is crucial for clean, professional-looking octagon waterdrop infographics.
Creating Waterdrop Shapes Using Circles and Bezier Tool in Inkscape
Once the polygons are ready, the next step is to create the waterdrop shapes by combining circles and custom path shapes.
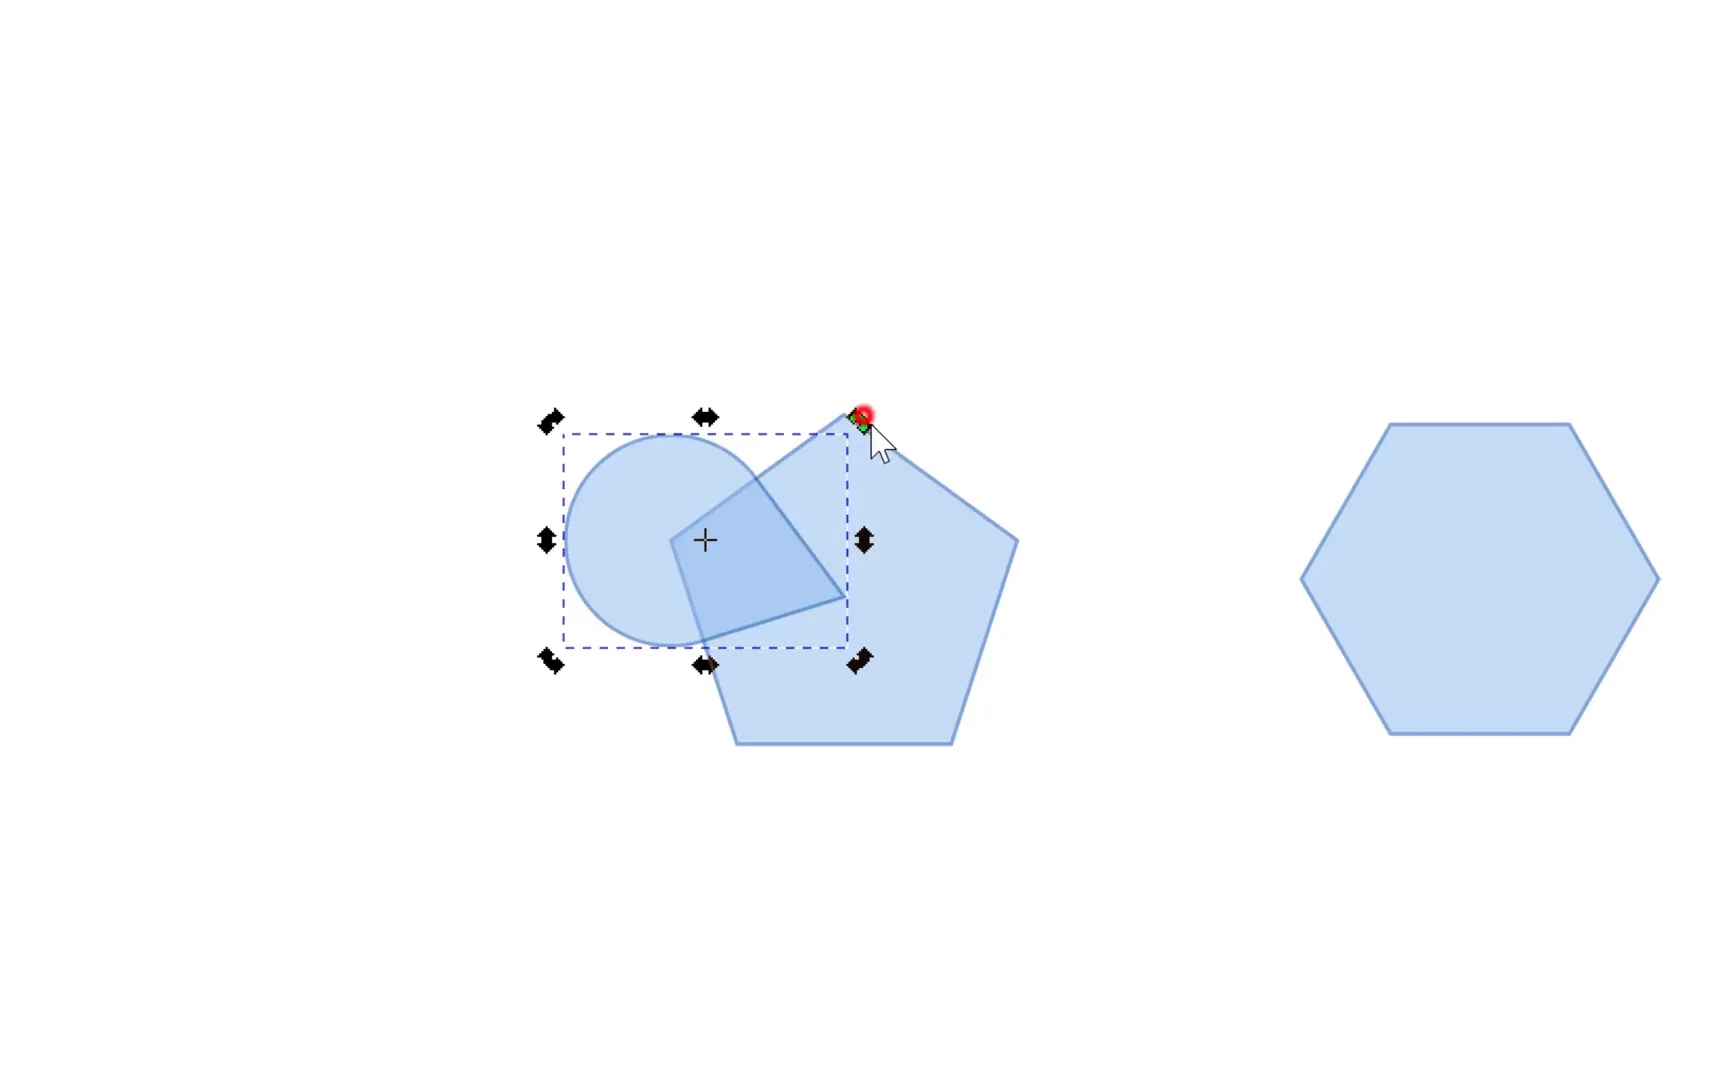
Here’s how it works for the pentagon:
- Use the Circle tool (hold Ctrl for perfect circles) to draw a circle.
- Enable snapping options for snap to cusp nodes (polygon corners) and snap centers of objects.
- Position the circle so its center snaps exactly to a pentagon corner.
- Duplicate this circle and check for unwanted overlaps or gaps.
- Measure the length of any side of the pentagon using Inkscape’s measure tool to determine the correct circle diameter.
- Resize the circle to match the side length, ensuring circles touch perfectly without overlap or space.
- Using the Bezier tool, draw a triangle connecting the center of the pentagon and the edge of the circle.
- Snap the triangle’s points to the intersection of the circle and pentagon edges.
- Select both the circle and triangle, then union (Path > Union) them to form a perfect waterdrop shape.
This method ensures precise, smooth shapes that are difficult to achieve manually in PowerPoint.
Rotating and Duplicating Waterdrops Around the Polygon
After creating one waterdrop shape, the next step is to duplicate and rotate it evenly around the polygon to complete the infographic.
To do this:
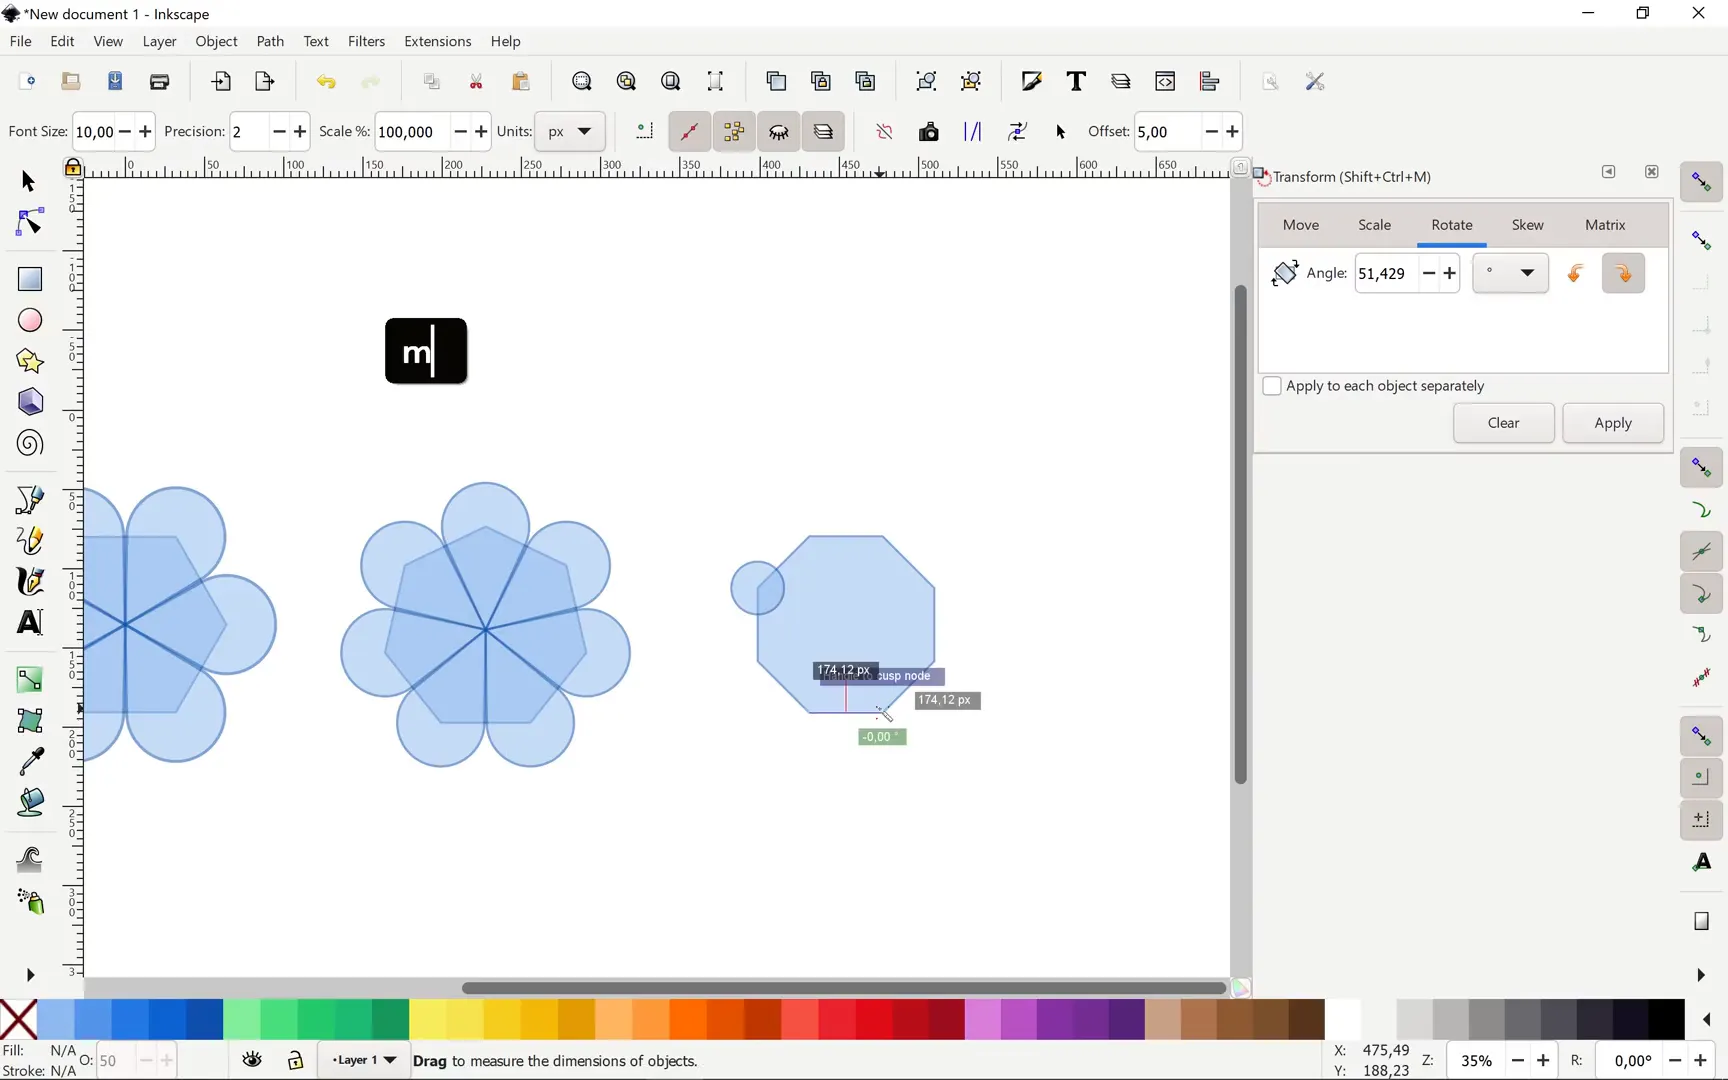
- Enable snap to rotation center in Inkscape.
- Change the rotation center of the waterdrop shape to the corner of the polygon (click the shape twice to reveal the rotation center and drag it to the polygon corner).
- Use the Transform > Rotate dialog to rotate the shape by 360° divided by the number of polygon sides (e.g., 72° for pentagon).
- Duplicate the shape and apply the rotation repeatedly until the polygon is filled with waterdrops.
This process is both fun and efficient, producing perfectly aligned waterdrops around the polygon shape.
Repeating the Process for Hexagon, Heptagon, and Octagon
The same technique applies to other polygons:
- Draw the polygon with the correct number of sides.
- Draw circles at corners with diameter matching polygon side length.
- Create the waterdrop shape by combining a circle and a Bezier triangle.
- Set the rotation center and duplicate the waterdrop, rotating by 360° divided by the polygon’s number of sides.
For example, the hexagon requires circles sized to its side length (~241 pixels), and rotations of 60° increments. The heptagon and octagon follow similarly, with rotations of approximately 51.4° and 45°, respectively.

Importing Waterdrop Infographics into PowerPoint
Once all shapes are perfected in Inkscape, it’s time to bring them into PowerPoint for styling and animation. Here’s how:
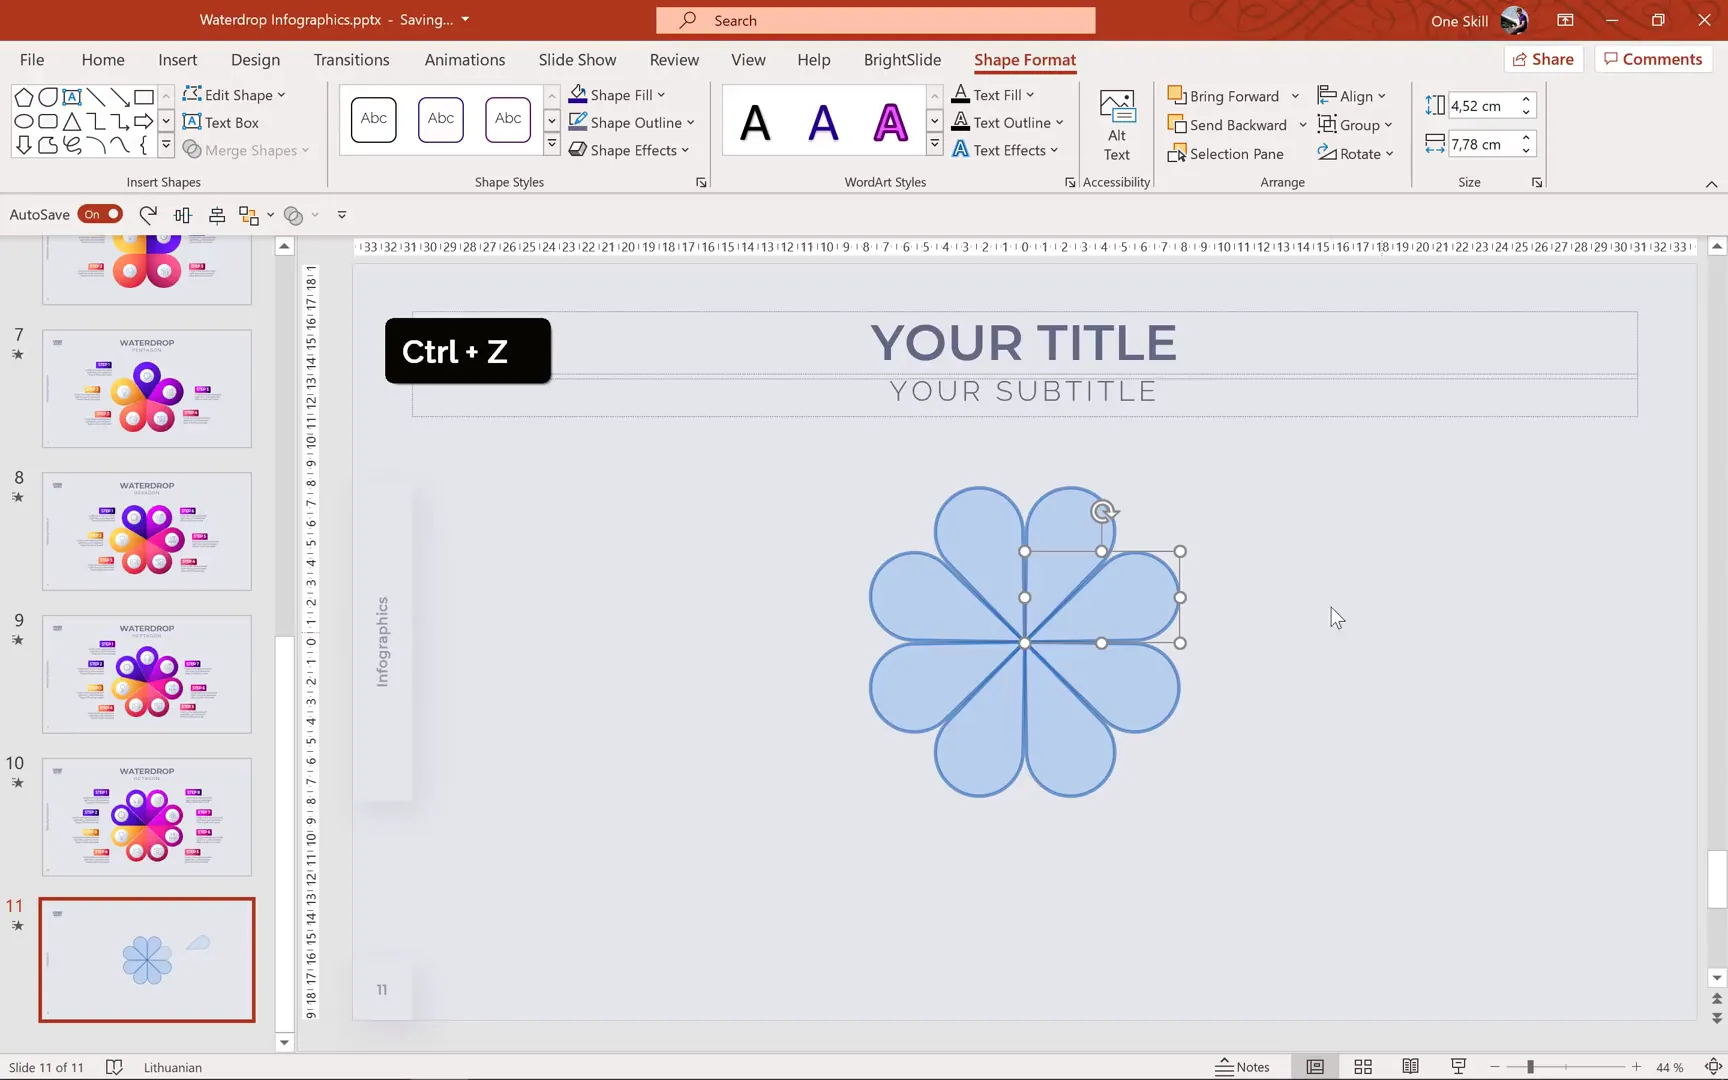
- Select the completed waterdrop infographic in Inkscape and copy it (Ctrl + C).
- Switch to PowerPoint, insert a new slide, and paste (Ctrl + V) the infographic.
- Convert the pasted image to shapes by ungrouping it multiple times until all individual elements are selectable.
- Edit fills, colors, and opacity as desired.
- Group all waterdrop shapes back together for easy manipulation.
- Adjust size and position to match existing infographic dimensions or slide layout.
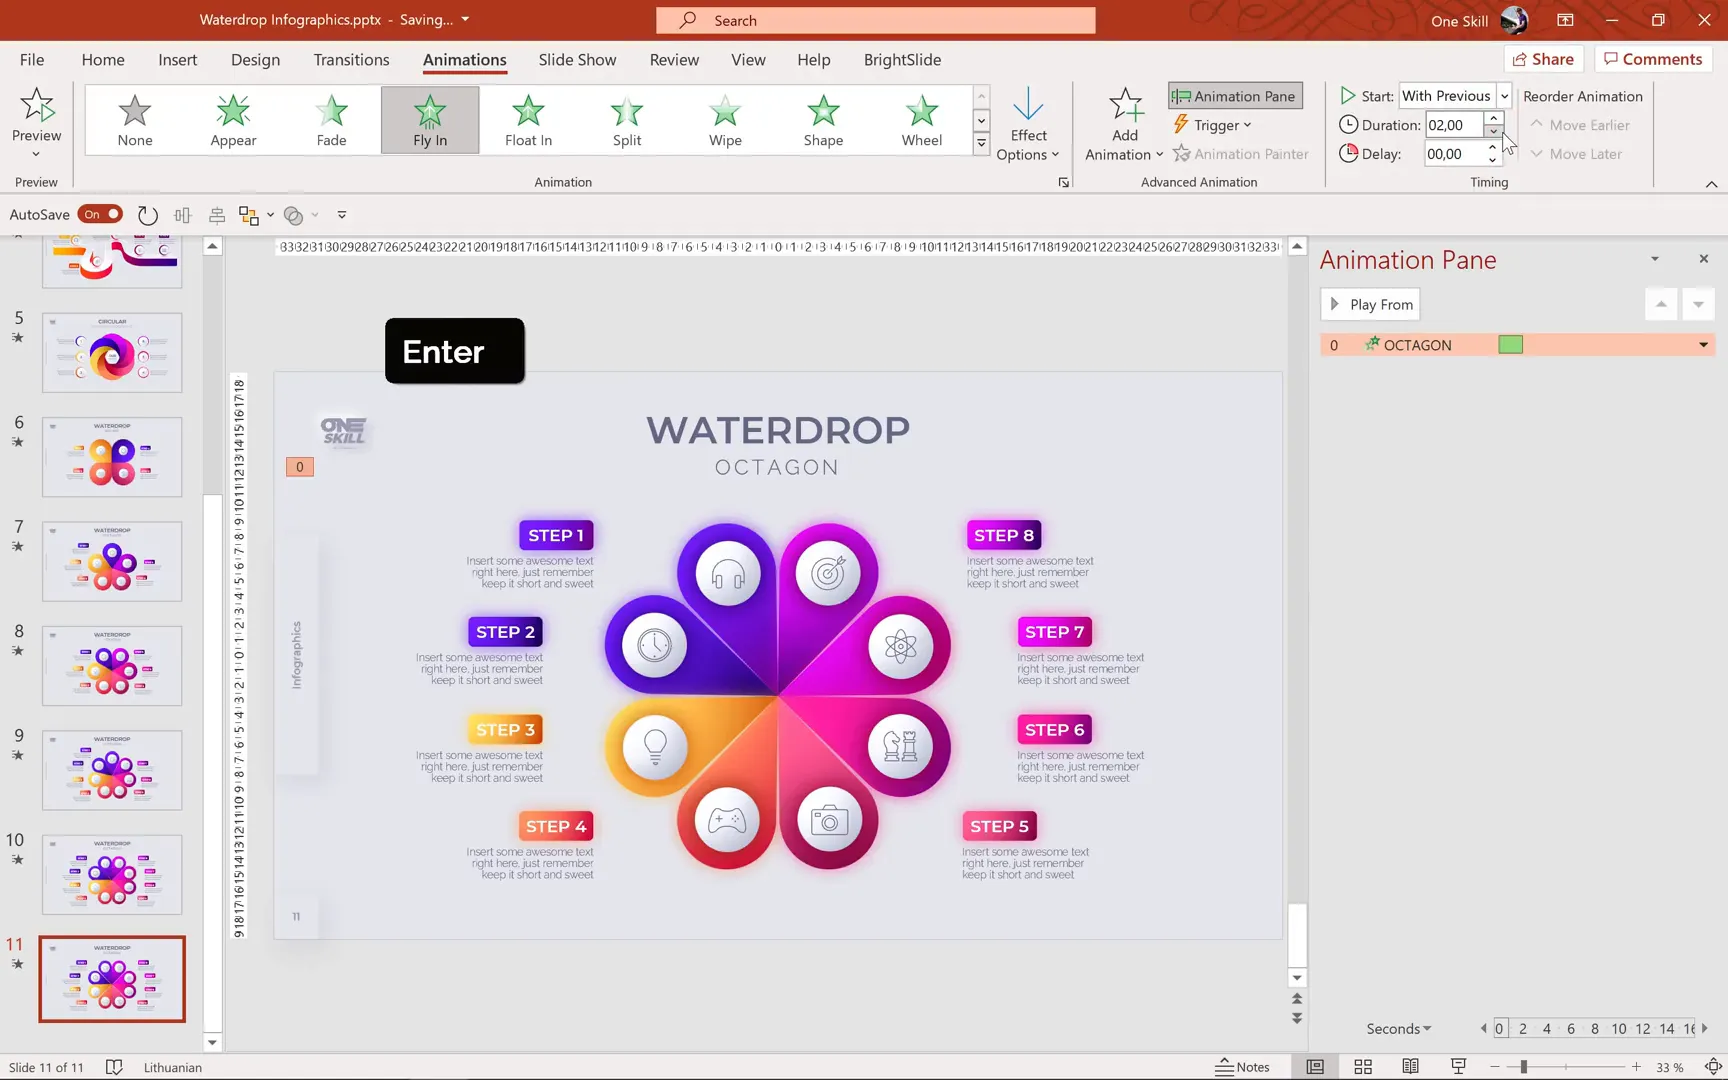
For example, the octagon infographic can be resized to a height of about 23.22 cm, with the width adjusting automatically to maintain aspect ratio. You can also use style copying from previous infographics to speed up the design process.
Adding Animations to Enhance Your Infographic
PowerPoint shines when it comes to animating infographics, making them more engaging and dynamic. Here’s a breakdown of how to animate your waterdrop infographic:
- Subtitle and Title: Use the Fly In animation from the top, starting with previous, lasting 2 seconds, and add a bounce effect at the end lasting 1.5 seconds.
- Waterdrop Group: Apply the Spinner entrance animation with a 2-second duration, starting with previous and no delay.
- Icons: Use the Zoom entrance animation with a duration of 1.75 seconds, starting with previous.
- Step Texts: Apply the same fly-in animation as the subtitle, but stagger their entrances with increasing delays (0.2 second increments), alternating the direction from left or right depending on their position.
The animation painter tool is invaluable for copying animations from one object to another, saving time and ensuring consistency.
Final Check and Presentation
After setting up all animations, review your infographic in full-screen presentation mode to ensure smooth transitions and timing. The waterdrop shapes spin into view, the titles bounce in elegantly, and the steps slide in sequentially, creating a visually appealing and professional infographic.
Congratulations! You’ve successfully created an animated waterdrop infographic combining the precision of Inkscape with the animation power of PowerPoint.

Additional Resources and Learning Opportunities
If you want to explore more infographic designs and techniques, consider checking out One Skill PowerPoint’s classes on platforms like Skillshare and Udemy. These classes provide access to project files, including all waterdrop infographic slides, and offer a deep dive into PowerPoint and Inkscape for infographic design.
You can get a 14-day free trial of Skillshare Premium to access these lessons and elevate your design skills quickly.
Frequently Asked Questions (FAQ)
What is the best software to create waterdrop infographics?
For precision and ease, combining Inkscape for vector shape creation with PowerPoint for styling and animation offers the best results. Inkscape’s vector tools handle complex shapes, while PowerPoint brings them to life with animations.
Can I create waterdrop infographics entirely in PowerPoint?
While possible for simple shapes like squares, creating precise waterdrop infographics for polygons such as pentagons and octagons is challenging in PowerPoint alone due to limited shape and snapping tools. Inkscape helps overcome these limitations.
Is Inkscape free to use?
Yes, Inkscape is a free, open-source vector graphics editor that you can download and use without any cost. It is compatible with PowerPoint and perfect for creating infographics and detailed vector shapes.
How do I import shapes from Inkscape into PowerPoint?
After creating your infographic in Inkscape, simply copy the vector shapes and paste them into PowerPoint. You might need to ungroup the objects multiple times in PowerPoint to edit individual elements.
Can I animate imported shapes in PowerPoint?
Absolutely! Once your shapes are in PowerPoint and grouped properly, you can apply any of PowerPoint’s animation effects, including entrance, emphasis, and exit animations, to create dynamic infographics.
Are there shortcuts to speed up the animation process?
Yes, use the Animation Painter tool in PowerPoint to copy animations from one object to others. This ensures consistency and saves time when animating multiple elements.
Conclusion
Creating animated octagon waterdrop infographics is a rewarding process that blends creativity with technical skills. By harnessing the power of Inkscape to design precise vector shapes and PowerPoint to style and animate, you can produce professional-quality infographics that captivate your audience.
This tutorial has walked you through the entire journey—from drawing waterdrop shapes on polygons, adjusting rotation centers, to importing and animating these shapes in PowerPoint. With practice, these techniques can be adapted to various infographic styles and presentation needs.
So go ahead, experiment with polygons, colors, and animations, and bring your data stories to life with beautiful waterdrop infographics!
Stay inspired, keep designing, and watch your presentations shine.
Check out the full video: Animated Octagon Waterdrop Infographic 🔥PowerPoint + Inkscape🔥


