

Table of Contents
- Introduction: What you’ll learn
- Why use a Bincular Design Slide in Powerpoint?
- Before you begin: assets and setup
- Step-by-step walkthrough
- Design tips and best practices
- Animation and timing guide
- Duplicating slides and swapping images
- Advanced variations and ideas
- Common mistakes and how to fix them
- Resources and download
- FAQ
- Conclusion
Introduction: What you’ll learn
Hi — I’m the creator behind this tutorial and in this guide I’ll walk you through how to build a polished, interactive Bincular Design Slide in Powerpoint. In the video I demonstrated each click, but here you’ll get a comprehensive written walkthrough with design rationale, troubleshooting tips, and ideas for extending the concept. By the end of this article you will be able to construct a binocular-style slide where each lens shows an image, allows a zoom animation, and can be quickly duplicated and customized for multiple images.

This tutorial covers everything from inserting the binocular graphic and creating a custom background to cutting out the lens areas and adding the zoom (shrink and zoom) animation. I’ll also show you how to duplicate the design and swap images so you can produce multiple slides quickly. Throughout this post I’ll refer to the design as the Bincular Design Slide in Powerpoint — that is the specific technique we’ll be making and optimizing.
Why use a Bincular Design Slide in Powerpoint?
A Bincular Design Slide in Powerpoint is a creative way to present multiple images while keeping the slide visually focused and interactive. Here are the top reasons to use it:
- It creates a strong focal point — the binocular lenses guide the viewer’s eye.
- It allows multiple images to occupy the same visual real estate through duplication and image swapping.
- It adds simple but effective motion (zoom) to bring attention to each image without overwhelming the audience.
- It’s flexible — use it for case studies, product zooms, team photos, travel slides, or storytelling sequences.
Because the concept is largely built with shapes, picture fills, and standard animations, the Bincular Design Slide in Powerpoint works well across many versions of PowerPoint and is simple to edit for colleagues and clients.
Before you begin: assets and setup
Preparation speeds up the build. Here’s what to gather before you start your Bincular Design Slide in Powerpoint project.
Required assets
- Binocular image or illustration (PNG or vector is best)
- High-resolution photos to appear inside the lenses (landscape or portrait depending on lens shape)
- Background image or gradient (optional — you can use a solid color if preferred)
Suggested PowerPoint settings
- Slide size: Standard (16:9) works well for modern screens.
- Ruler and grid: Turn them on when aligning shapes precisely.
- Version tip: This workflow uses Merge Shapes options — available in modern PowerPoint versions (2016 onward and Office 365).
Pro tip: Keep your original images in a separate folder and name them logically (e.g., “Lens1_Landscape.jpg”, “Lens2_Baby.jpg”). That makes swapping images quicker when duplicating slides.
Step-by-step walkthrough
Below is a detailed, step-by-step guide showing exactly how I built the Bincular Design Slide in Powerpoint. You can follow verbatim or adapt the steps to suit your own artwork and slide layout.
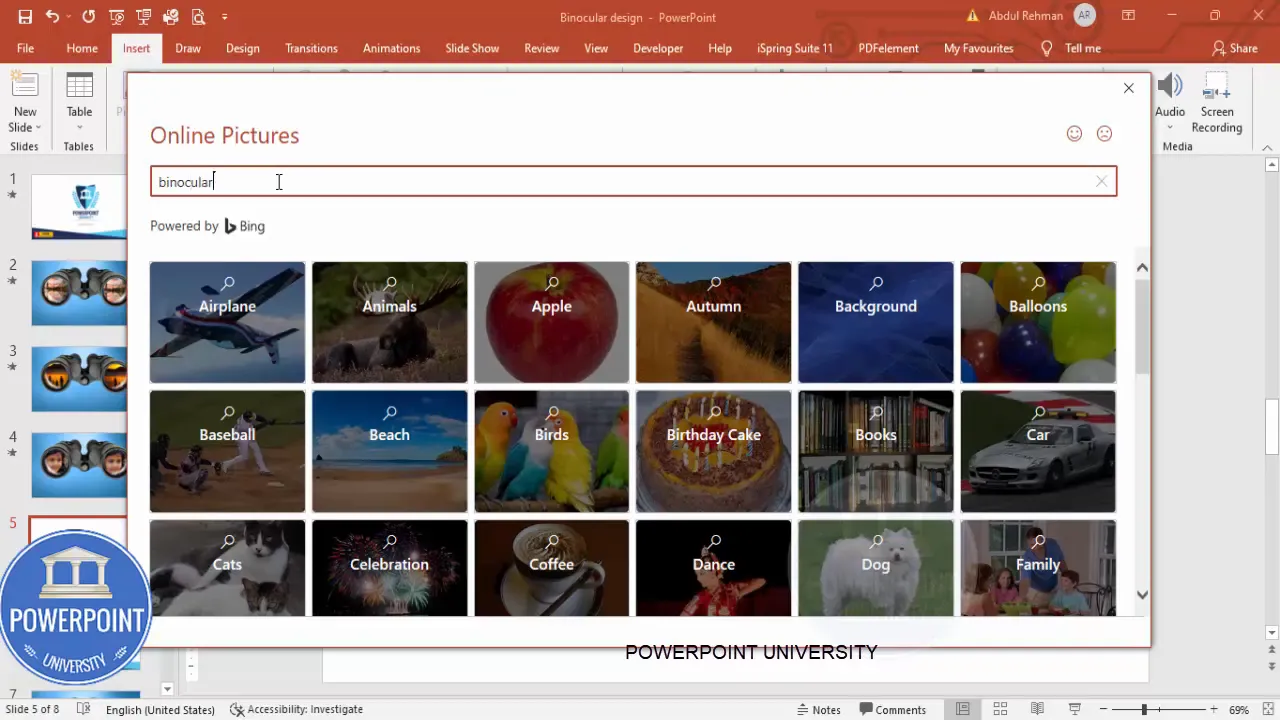
1. Add a new slide and insert your binocular graphic
- Open PowerPoint and insert a blank slide (Home > New Slide > Blank).
- Insert the binocular image: Insert > Pictures > Online Pictures (or This Device if you have a local PNG). Search for “vernacular” or use your own binocular asset. Insert the chosen image and position it centrally on the slide.
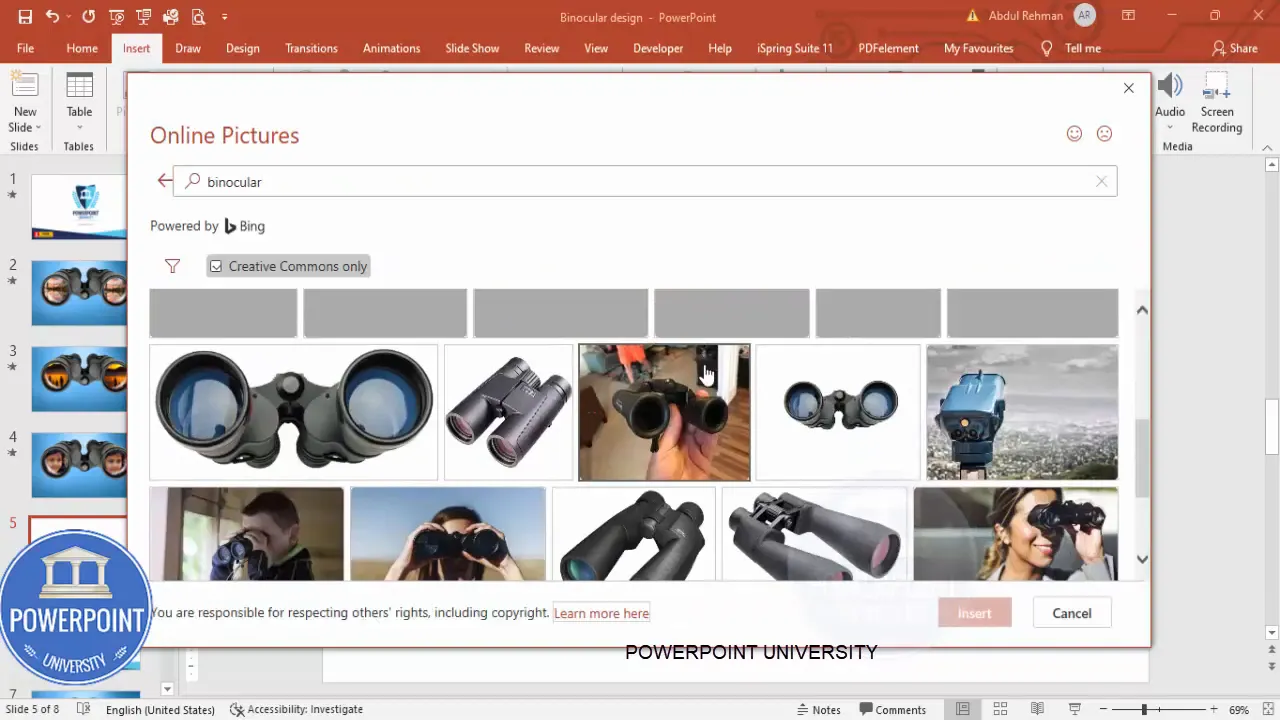
When choosing the binocular graphic, opt for an image where the lenses are clearly delineated (circles or ovals). That makes the shape subtraction step cleaner.
2. Create the background
- Insert a full-slide rectangle: Insert > Shapes > Rectangle. Draw the rectangle to cover the entire slide.
- Remove the outline: Shape Format > Shape Outline > No Outline.
- Set a gradient or picture fill: Right-click the rectangle > Format Shape > Fill > Picture or texture fill > Insert Online Pictures and search for “blue gradient” (or use your own).
- Send rectangle to back: Right-click > Send to Back.

Why use a picture gradient? A subtle image-based gradient gives texture and depth compared to a flat color, especially behind a binocular asset where the lenses will reveal underlying imagery.
3. Draw shapes to cut out the lenses
- Insert oval shapes over the lenses: Insert > Shapes > Oval. Hold Shift while drawing to keep them perfectly circular (or freehand for oval lenses).
- Position each oval exactly over the lens you want to “open” — the goal is to later subtract these shapes from the binocular graphic and the background.
- Remove outlines on the ovals: Shape Format > Shape Outline > No Outline.
- Use transparency to nudge placement if needed (Format Shape > Fill > Transparency slider) so you can see the binocular beneath while aligning.
Take time here — precise alignment means the cutout will look intentional and professional. I often nudge by 1-2 pixels with the arrow keys for perfect alignment.
4. Subtract lens shapes from the binocular graphic
- Select the binocular image and then, while holding Shift, select the oval(s) you drew.
- Go to Shape Format > Merge Shapes > Combine (or Subtract depending on the effect). In my workflow I used Combine to remove the lens sections from the binocular layer, creating transparent holes where the lenses were.
- Inspect for artifacts — if any stray pixels remain, clean up with additional small shapes and reapply Merge Shapes.
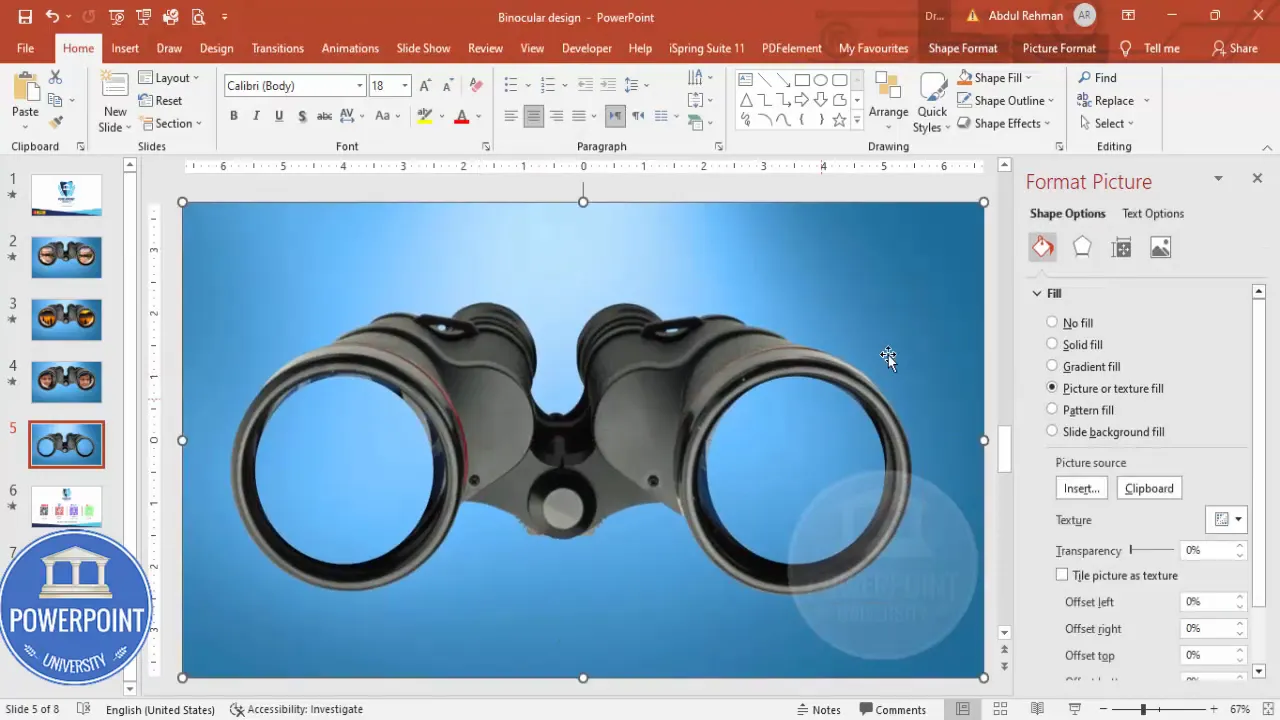
After combining, the binocular graphic will appear without the filled lens areas, letting whatever is behind it show through — exactly what we want for the Bincular Design Slide in Powerpoint.
5. Subtract lens shapes from the background
- Now select the background rectangle and the same oval shapes (or duplicate ones positioned exactly over the lenses).
- Go to Shape Format > Merge Shapes > Subtract. This will remove the lens-shaped sections from the background layer so the picture that we’ll place behind the lens will not be partially blocked by any background layer.
Subtracting these shapes from the background ensures the lens pictures appear crisp and uninterrupted by the gradient rectangle.
6. Add the images that appear inside the lenses
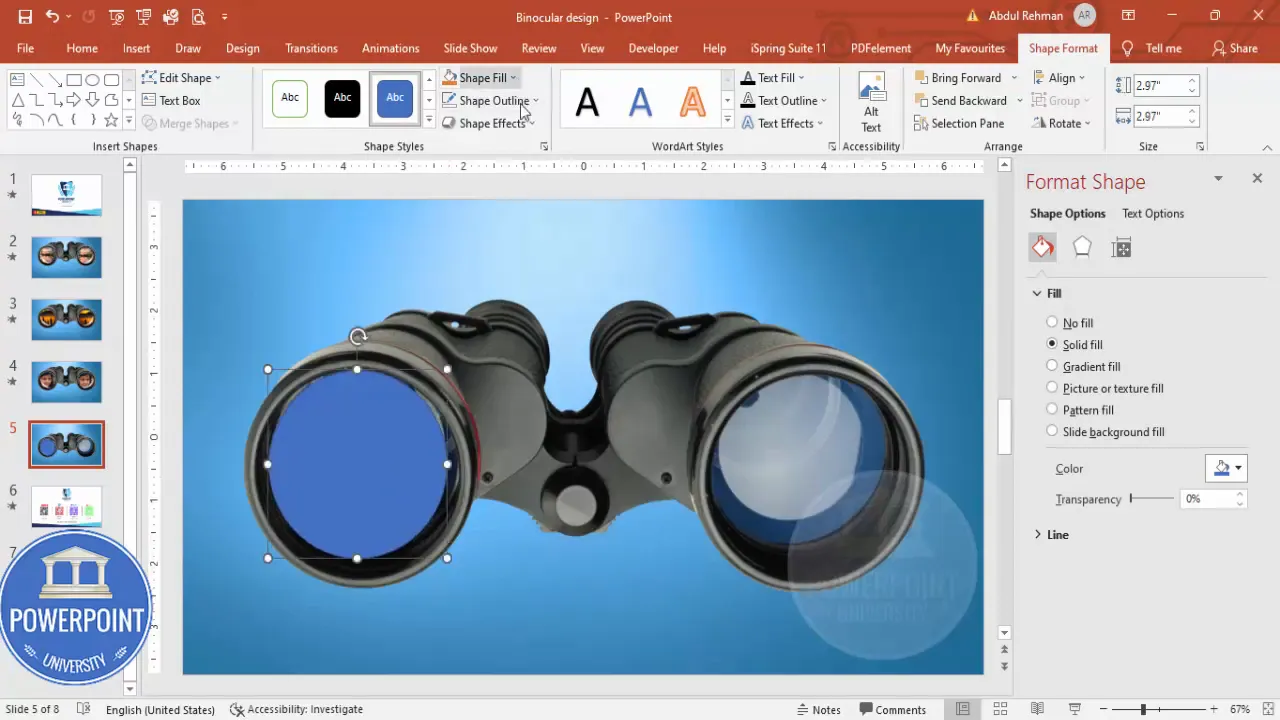
- Draw an oval that matches each cutout but slightly larger to ensure full coverage (Insert > Shapes > Oval).
- Select both ovals, then go to Shape Format > Shape Fill > Picture > Insert Online Pictures (or This Device). Search for landscape photos or your chosen imagery and insert.
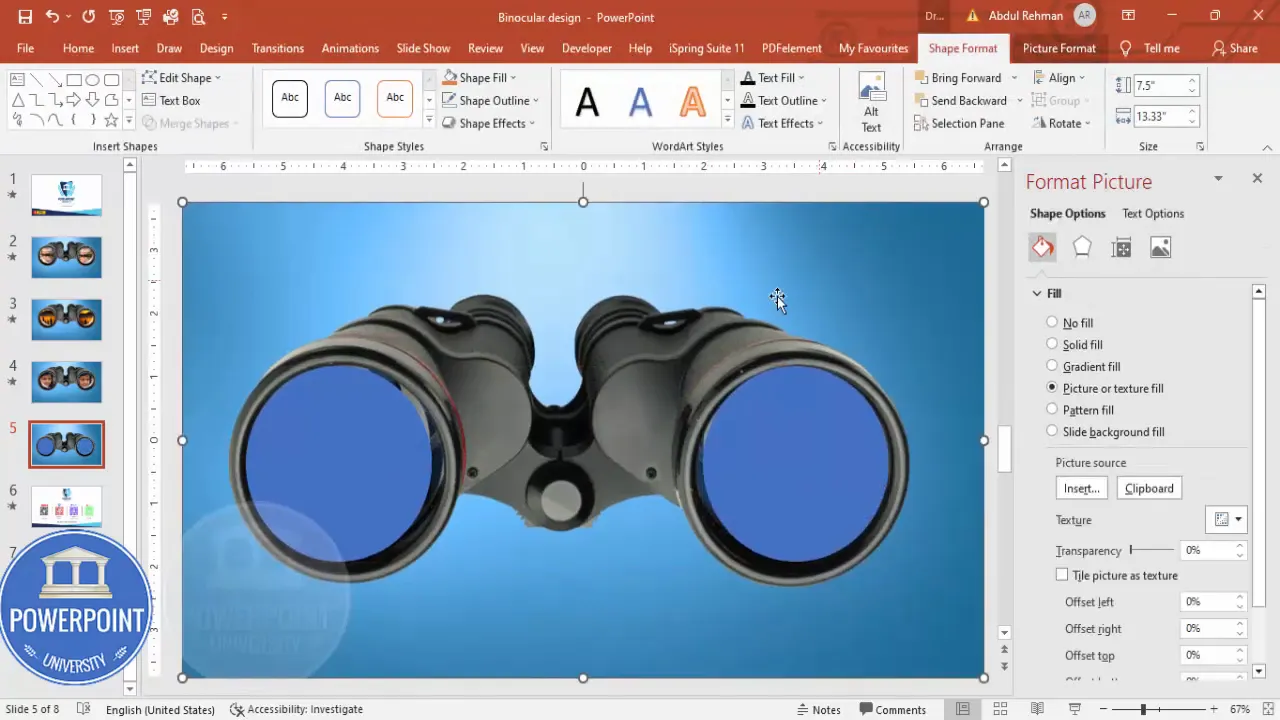
- Send these picture-filled ovals behind the binocular layer but above the background (Right-click > Send Backward or Send to Back depending on layer order).
- Adjust the picture offsets for each oval (Format Shape > Fill > Offset settings) to position the focal area of the photo inside the lens. Use the Offset Bottom/Left sliders to place the heart of the image inside the visible area.
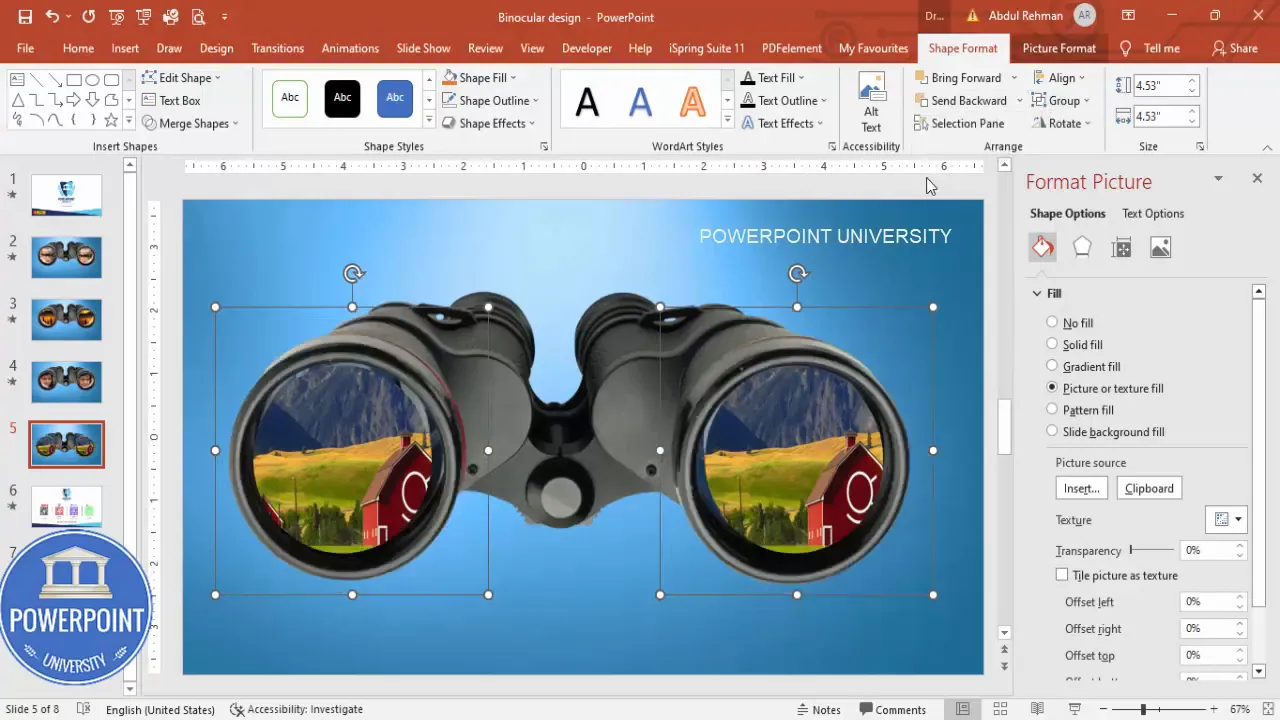
Because the oval shapes are picture fills, you can fine-tune the visible portion of the picture inside each lens by adjusting the offset values. This step is critical for composition — make sure the subject of each photo sits well within the lens frame.
7. Add the zoom animation
- Open Animations and enable the Animation Pane.
- Select a picture-filled oval (the one that appears inside a lens).
- Animations > Add Animation > Emphasis > Grow/Shrink (or choose “Zoom” depending on your PowerPoint version).
- Right-click the animation in the Animation Pane > Effect Options. Set Size to your desired percentage (for example, 150% to zoom in). Check Auto-reverse if you want it to grow and then shrink back automatically.
- Adjust timing: Duration (faster for snappier effects, slower for a more cinematic zoom). You can also set the trigger: On Click, With Previous, or After Previous depending on interactivity you want. I usually leave it to On Click so the presenter controls the zoom.
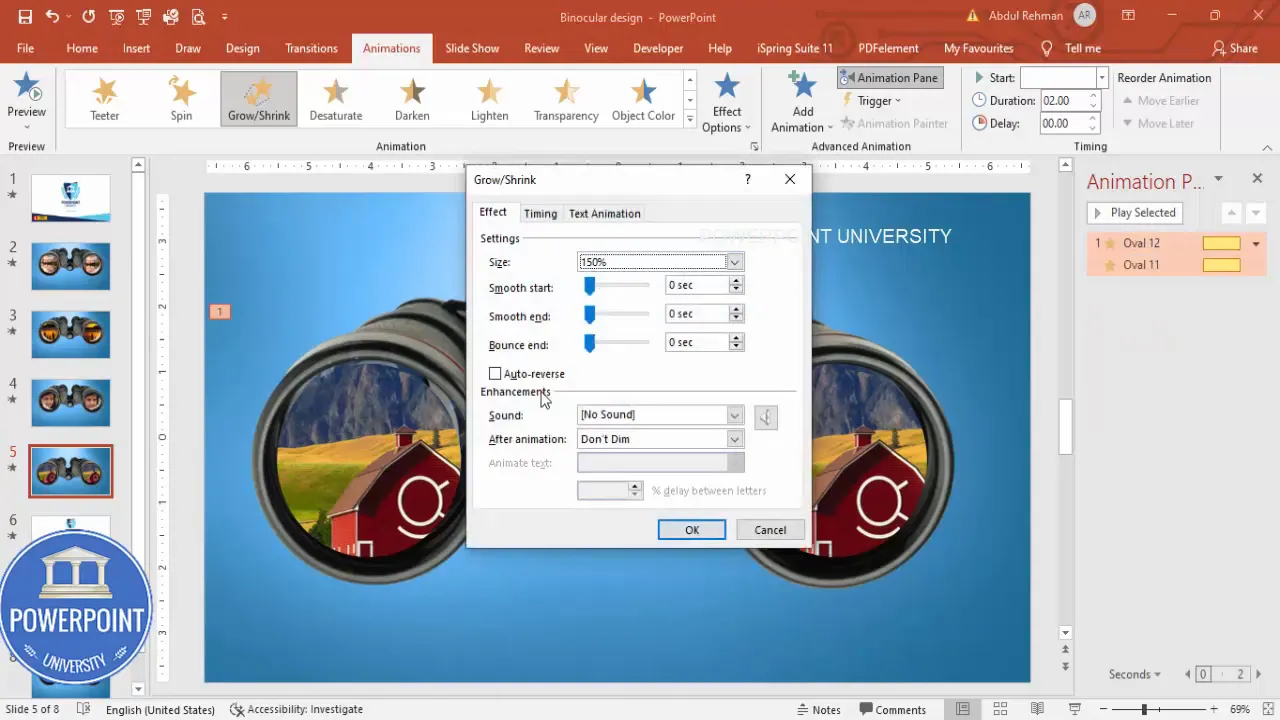
The zoom animation gives life to the Bincular Design Slide in Powerpoint. A modest zoom (120–150%) looks professional; extreme zoom can feel jarring. I recommend testing the animation in Slide Show mode to tune the feel.
8. Duplicate the slide and swap images for quick variations
- In the left slide thumbnail pane, right-click the slide and choose Duplicate Slide.
- On the duplicated slide, right-click a picture-filled oval > Format Shape > Fill > Picture > Change Picture > Online Pictures (or This Device) and choose a new image.
- Make sure offset values are reset or adjusted (often set to 0 for easy manipulation) and reposition the image inside the oval to focus the subject where you want it in the lens.
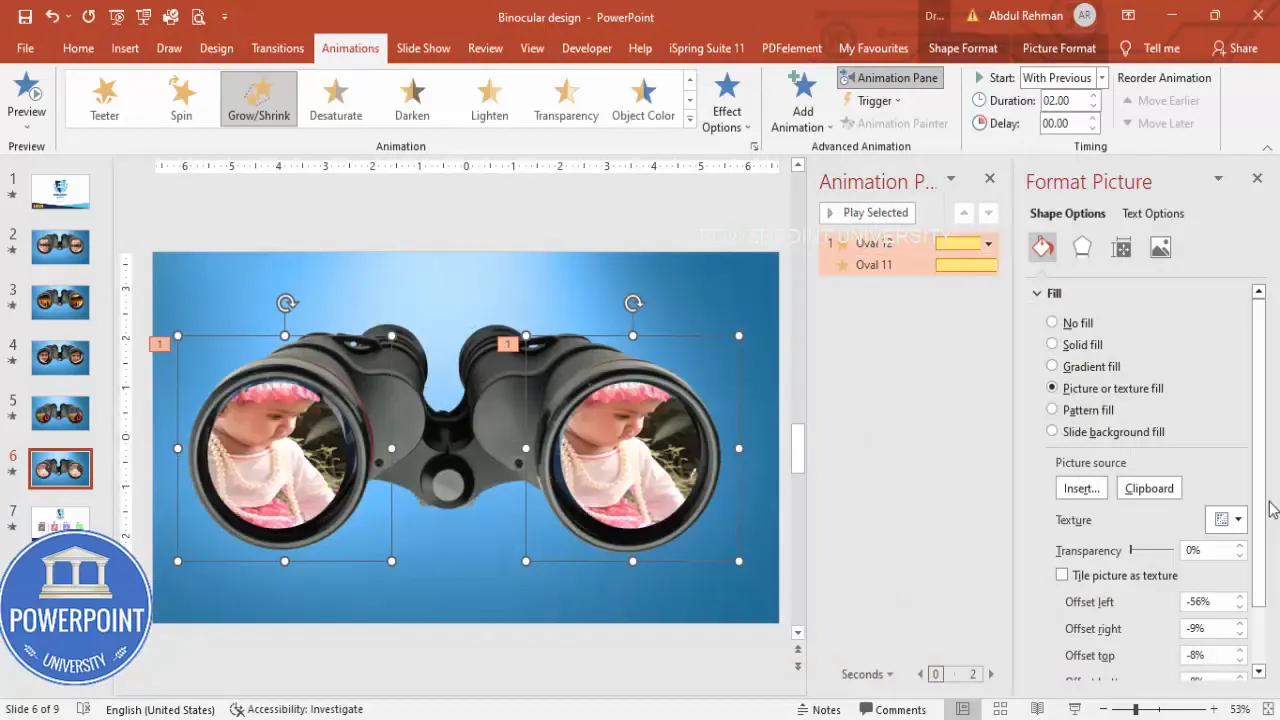
This duplication method is the fastest way to produce a sequence of slides with the same binocular frame but different lens content — perfect for storytelling or showcasing multiple products.
Design tips and best practices
Here are practical tips I use every time I build a Bincular Design Slide in Powerpoint. These are the small choices that make the slide look sharp and behave reliably in a presentation.
1. Use high-resolution images
Because lenses are relatively small areas on the slide, low-res images can look pixelated when zoomed. Use images with at least 1500 pixels on the long edge where possible.
2. Match aspect ratios
Try to choose source images that match the lens aspect ratio (square, circular, or oval). That reduces cropping and preserves composition.
3. Mind layer ordering
- Layer order should ideally be: background rectangle at the very back, picture-filled ovals above the background, binocular graphic above the picture-filled ovals, and any decorative elements on top.
- If Subtract or Combine operations change layer behavior, use Send to Back / Bring to Front to restore the order.
4. Keep animations subtle
A small, quick zoom is usually more effective than an exaggerated slow zoom in a business context. Choose duration between 0.5s and 1.5s depending on the effect you want.
5. Use consistent offsets for a cleaner sequence
When making multiple slides, use identical offset values so each new image sits consistently in the lenses. I keep an offset checklist as a note in my file (e.g., Lens1 Offset: Left 20, Top 10; Lens2 Offset: Left 15, Top 12).
Animation and timing guide
Animation tuning is where the slide goes from static to engaging. Below is a small guide to common animation settings and recommended values for the Bincular Design Slide in Powerpoint.
- Animation type: Emphasis > Grow/Shrink (or Zoom).
- Size: 120%–150% recommended.
- Duration: 0.5s–1.5s (shorter = snappier).
- Auto-reverse: Optional — useful for looping or automatic return.
- Trigger: On Click for presenter control; After Previous for self-running slides.
Example settings for a professional presentation:
- Size: 130%
- Duration: 0.8s
- Start: On Click
- Auto-reverse: Yes (if you want it to return immediately)
Tip: If you have two lenses and want them to animate alternately, stagger the timings and triggers: set Lens 1 to On Click and Lens 2 to After Previous with a 0.2s delay so the second feels connected to the first but doesn’t overlap awkwardly.
Duplicating slides and swapping images
One of the biggest time-savers when building a deck is duplicating slides. For the Bincular Design Slide in Powerpoint, duplication allows you to maintain consistent layout and animation while changing content quickly.
Quick duplication workflow
- Right-click the slide thumbnail > Duplicate Slide.
- Right-click each picture-filled oval > Format Shape > Fill > Change Picture > choose new image.
- Adjust offsets and any per-slide captions or text boxes.
- Run the slide show to confirm animations and alignment.
If you plan to produce many slides, keep a template slide at the beginning of the section titled “BINOCULAR TEMPLATE” and duplicate from that master slide every time. That reduces the risk of accidental adjustments creeping into your sequence.
Create Slides in Seconds with ExpertSlides AI |
|
Generate AI Presentations today: |
| TRY NOW! |
Advanced variations and ideas
The basic Bincular Design Slide in Powerpoint can be extended in many creative ways. Here are tested variations you can try to build more sophisticated visuals:
- Hover-triggered zoom (for interactive kiosks): Use Action Settings to hyperlink the zoom animation to a mouseover trigger when presenting on a touch-enabled or interactive display.
- Audio-synced reveal: Add a subtle sound effect or voiceover that triggers with the zoom to explain what’s visible in the lens.
- Caption overlays: Fade in a small caption under each lens on click to provide context without crowding the design.
- Looped gallery: Set animations After Previous with delays to make the images loop automatically — handy for unattended displays.
- Multiple binocular pairs: Repeat the basic design horizontally or vertically to create a grid of binocular frames for comparison slides.
Each of these variations keeps the central idea of the Bincular Design Slide in Powerpoint while adapting the interaction model to different presentation contexts.
Common mistakes and how to fix them
When building this design, presenters often run into the same issues. Below I list the common problems with quick fixes so you can move past roadblocks fast.
1. The lens image is misaligned or cropped oddly
- Cause: Incorrect offset or picture fill alignment.
- Fix: Right-click the picture-filled oval > Format Shape > Fill > Offset settings. Adjust Left/Top offsets until the subject is centered within the lens.
2. Merge Shapes fails or creates artifacts
- Cause: Overlapping shapes that are not placed cleanly, or working with grouped images.
- Fix: Ungroup any grouped objects (Right-click > Group > Ungroup), ensure shapes are on the same layer (select objects in the order you want), and retry Merge Shapes. If artifacts persist, redraw the oval slightly larger/smaller and attempt Merge again.
3. Animation behaves inconsistently across slides
- Cause: Different animation settings on duplicated slides or timing conflicts.
- Fix: After duplicating, check the Animation Pane for each slide and standardize Size/Duration/Start settings. Use Copy Animation (Animation Painter) to replicate the exact animation settings.
4. Image quality looks poor after zoom
- Cause: Low-resolution source image.
- Fix: Replace with higher-resolution images. Avoid excessive zoom percentages (keep below 150%).
Resources and download
To speed things up, I’ve prepared a downloadable PowerPoint template that contains the Bincular frame, pre-cut lens areas, and a sample set of animations. Use it as a starting point and swap your images.
Download: https://www.dropbox.com/scl/fi/ujf391w2hefthk57ya0qt/Binocular-design.pptx?dl=0&rlkey=pjy3vtlfyp5i960znclugn98a
Remember: if you use online pictures, be mindful of licensing. For client work, prefer licensed stock or in-house photography.
FAQ
Q: What is a Bincular Design Slide in Powerpoint?
A: A Bincular Design Slide in Powerpoint is a slide layout that uses a binocular or dual-lens graphic to reveal images behind the lenses. It typically includes picture-filled shapes, cutouts in the foreground graphic, and animations (such as zoom) to emphasize each lens.
Q: Which PowerPoint versions support the Merge Shapes feature used in this workflow?
A: Merge Shapes is available in PowerPoint 2013 and later for Windows and in Office 365 versions. If your version lacks Merge Shapes, you can create a similar look by carefully layering PNGs with transparent lens areas or by using external image editors to create the cutouts before importing into PowerPoint.
Q: How do I ensure consistent alignment when duplicating slides?
A: Use a template slide with the finalized layout and animation. When duplicating, don’t move the shapes unless you must. If you need to adjust, use the arrow keys for small nudges and keep a note of any offset values you used so you can reapply them consistently.
Q: Can I use this design with portrait images?
A: Yes. If your lens area is oval, portrait images can be cropped and offset to display the subject properly. You may need to adjust the crop/offset to avoid awkward compositions. When possible, choose images with flexible composition or crop them in an external editor first.
Q: Is there a way to make the lenses interactive (e.g., mouseover to zoom)?
A: PowerPoint does not natively support hover-triggered animations in slide show mode on all platforms. For interactive setups (kiosk mode), you can use Action Settings with hyperlinks or use third-party add-ins. For most live presentations, On Click triggers provide reliable control.
Q: What are recommended animation sizes for a professional look?
A: I recommend a Size between 120% and 150% with a Duration of 0.5s to 1.5s. These values create a noticeable but tasteful zoom effect for the Bincular Design Slide in Powerpoint.
Q: Where can I get suitable images?
A: Use licensed stock photography from services like Unsplash (free for many uses), Pexels, Shutterstock, or your organization’s photo library. Always check usage rights. For internal presentations, company images often look best and are risk-free.
Q: Can the design be exported as a video or GIF?
A: Yes. After finalizing animations, export the presentation or the specific slide as an MP4 (File > Export > Create a Video). For GIFs, you can use third-party tools or export a short video and convert it to GIF. Note that exported GIFs may lose some smoothness depending on resolution and frame rate.
Troubleshooting quick reference
- Merge Shapes errors: Ungroup and reselect shapes; redraw if necessary.
- Zoom looks pixelated: Replace image with higher resolution and reduce zoom size.
- Offset controls missing: Ensure your fill is set to Picture > File and not a pattern or texture which may disable offset options.
- Animation not firing: Check that the object is not locked or grouped and that the animation is assigned to the correct object.
Example use cases
The Bincular Design Slide in Powerpoint works in many presentation scenarios. Below are concrete examples of how you can use it.
- Product detail slide: Show two product variants in the lenses and zoom to highlight features.
- Before-and-after: Place the “before” photo in left lens and “after” in right lens for visual comparison.
- Case study showcase: Sequence several slides with different project images to tell a narrative.
- Portfolio highlight: Display two sample works side-by-side and zoom to emphasize detail.
- Event recap: Show event highlights in the lenses and animate each one during your spoken recap.
Step-by-step checklist (copyable)
- Insert blank slide
- Insert binocular graphic and center
- Add full-slide rectangle as background, apply gradient fill
- Draw oval shapes to match lenses (no outline)
- Combine/Subtract shapes from binocular and background as needed
- Insert picture-filled ovals, set offsets
- Add Grow/Shrink or Zoom animation
- Test animation in Slide Show mode
- Duplicate slide and swap pictures for additional frames
- Export or include in final deck
Final notes and presentation delivery tips
Now that you’ve built your Bincular Design Slide in Powerpoint, here are a few final delivery tips to ensure it lands well with your audience:
- Practice the timing. Know when to click so the animation supports your speaking, not distracts from it.
- Use a remote clicker for clean transitions and to avoid hovering over the laptop touchpad during the presentation.
- When presenting online, test the slide deck in the webinar software to ensure animations show correctly for viewers.
- Limit motion overall — one animated focal point per slide is ideal in most professional settings.
More examples and inspiration
If you want to extend the Bincular Design Slide in Powerpoint concept further, consider combining it with other PowerPoint features:
- Layer a semi-transparent caption box under each lens to provide quick context.
- Add an animated arrow that appears on click to direct attention to a specific detail seen after the zoom.
- Pair with a fade-in title to sequence narrative development while the slide remains visually interesting.
Conclusion
Building a Bincular Design Slide in Powerpoint is a simple yet powerful way to create focused, image-driven slides. The technique relies on clean layering, Merge Shapes operations, picture fills, and a tasteful zoom animation — all standard tools in PowerPoint. Use the duplication strategy to efficiently produce multiple slides that share the same design framework but contain different content.
With a little preparation and attention to alignment, image quality, and timing, you can create professional binocular slides that elevate your presentations and keep your audience engaged. If you’d like the exact template I used, download it here and adapt for your project: https://www.dropbox.com/scl/fi/ujf391w2hefthk57ya0qt/Binocular-design.pptx?dl=0&rlkey=pjy3vtlfyp5i960znclugn98a
Additional screenshots for reference
FAQ — Extended
Q: Can I animate the binocular graphic itself?
A: Yes — you can add entrance or emphasis animations to the binocular graphic (e.g., Fade or Appear). I recommend keeping the binocular graphic static while animating the lens images to maintain focus. If animating the binocular, use subtle effects and ensure the lens images animate after the binocular to avoid awkward overlaps.
Q: Will this design work on Mac PowerPoint?
A: Yes, most modern Mac versions support Merge Shapes and the animation features used here. Interface differences exist, but the workflow is similar. If your Mac version lacks a Merge Shapes command, consider pre-editing your binocular graphic in an image editor to create transparent lens areas.
Q: How can I make sure the slide looks good on mobile devices?
A: For mobile viewing, keep the composition simple and avoid tiny details in the lens images. Export to PDF for static sharing or to MP4 for a video version. Test on the target device before final delivery.
Thanks for following this step-by-step guide. The Bincular Design Slide in Powerpoint is a flexible and visually compelling technique — once you build your first template, you’ll find many creative uses for it.
Check out the full video: Binocular Design Slide in PowerPoint. Tutorial No.: 992


