
PowerPoint presentations often rely on static slides and simple animations that can sometimes feel flat or uninspiring. But what if you could create smooth, professional transitions that captivate your audience and make your message stand out? That’s exactly what the PowerPoint Morph transition offers—a sleek, elegant way to animate your slides and bring your content to life with seamless movement and transformation.
In this comprehensive guide, inspired by the expert tips from Leila Gharani, you’ll discover how to harness the power of Morph to create stunning presentations that look polished and professional. From zooming into specific slide details to spotlighting individuals in a group photo, and animating timelines with dynamic shape morphing, these techniques will elevate your presentation game and keep your audience engaged.
Whether you’re a business professional, marketer, educator, or student, learning to use Morph transitions in creative ways can transform your PowerPoint slides from ordinary to extraordinary. Let’s dive into three practical examples that show you exactly how to apply Morph and unlock its full potential.
Table of Contents
- Understanding the Power of Morph in PowerPoint
- Example 1: Zooming Into Slide Details to Focus Attention
- Example 2: Spotlighting Individuals in a Group Photo
- Example 3: Animating Timelines with Shape Morphing
- Additional Insights on Using the Morph Transition
- Frequently Asked Questions (FAQ)
- Conclusion
Understanding the Power of Morph in PowerPoint
The Morph transition in PowerPoint is a powerful tool that enables smooth animations between slides by recognizing common objects and transforming them seamlessly from one slide to the next. Unlike typical slide transitions, Morph works across slides, dynamically animating objects, images, shapes, and even text characters.
What makes Morph especially useful is its ability to create elegant zoom effects, spotlight particular elements, and animate complex timelines without complicated setups or third-party tools. It’s built into Microsoft PowerPoint, making it accessible for anyone looking to enhance their presentations with professional-quality animations.
Before we jump into the examples, here’s a quick overview of what you’ll learn:
- How to zoom into specific parts of a slide to focus audience attention
- How to spotlight individual people in a group photo using Morph and cropping
- How to animate timelines with shape morphing and text transitions
Let’s explore each of these techniques in detail, step-by-step.
Example 1: Zooming Into Slide Details to Focus Attention
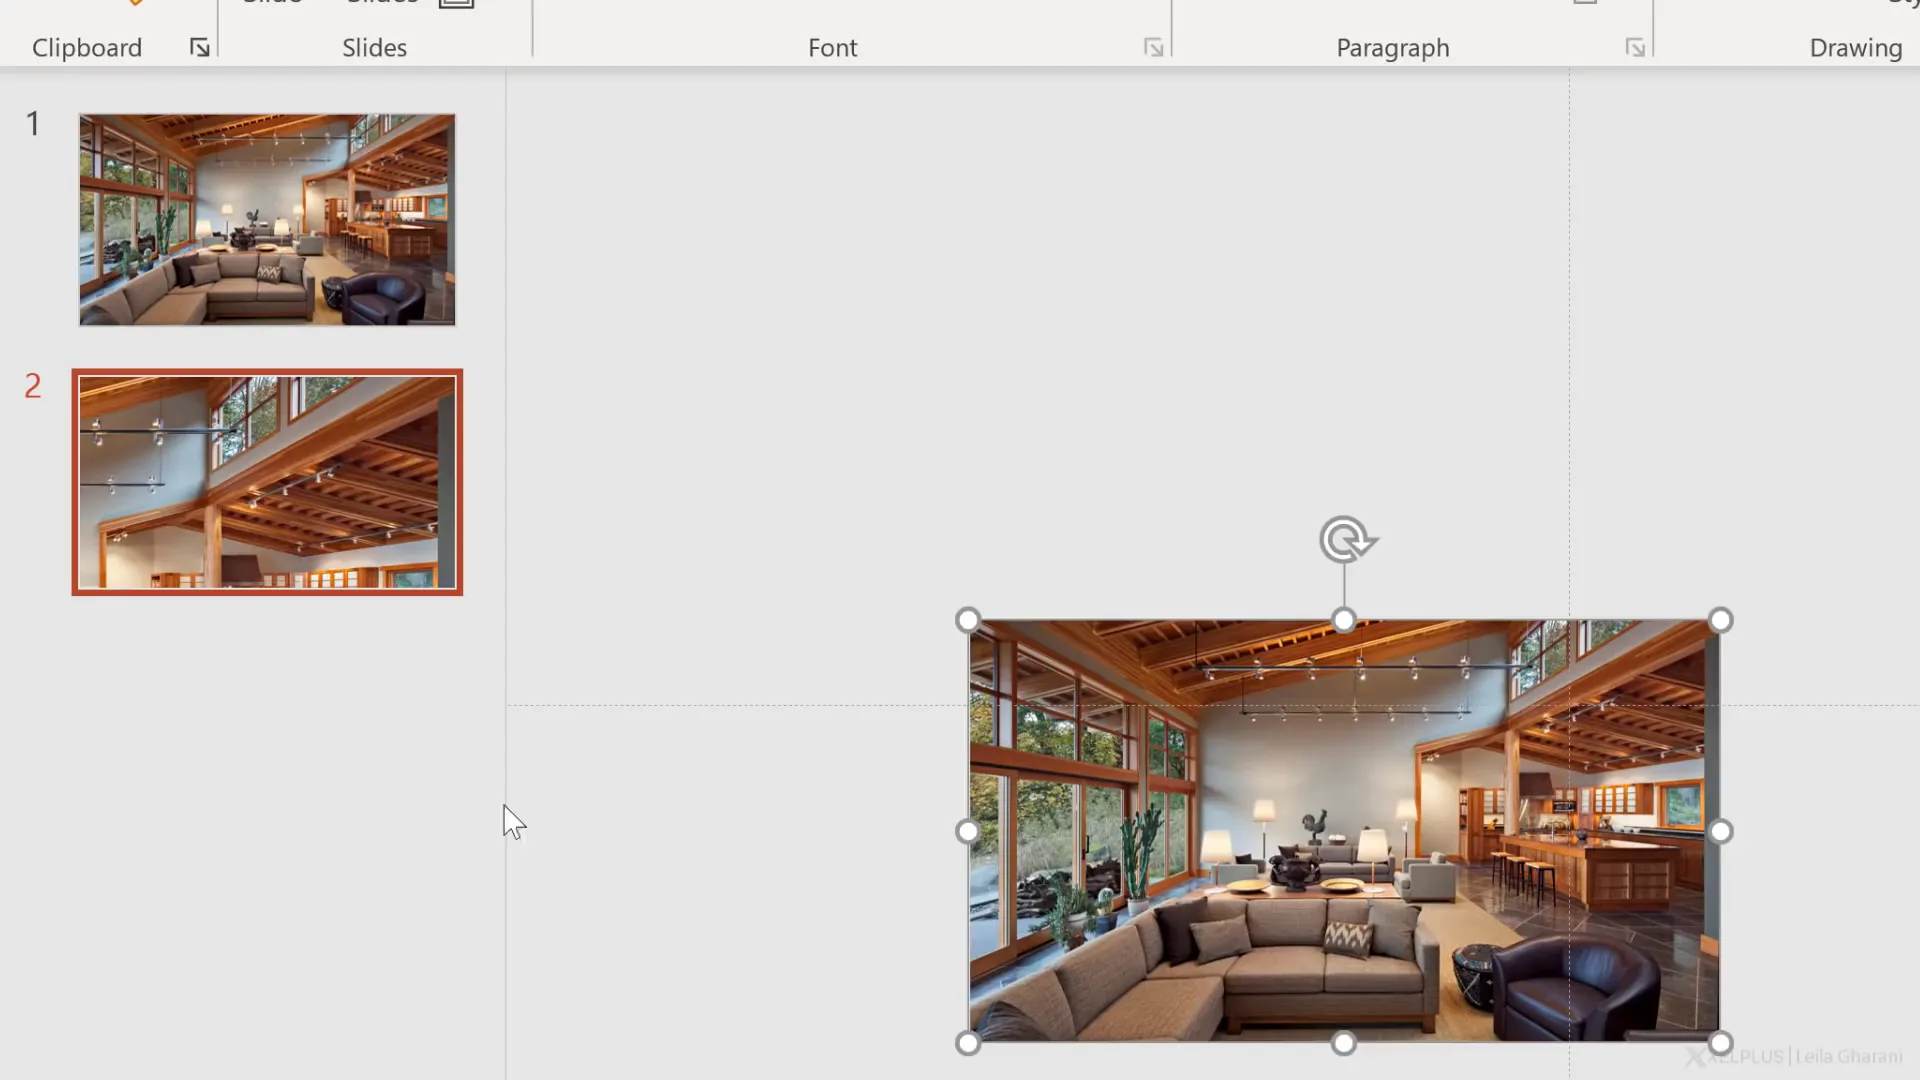
Imagine you’re trying to convince someone to rent a beautiful summer home. You could simply show a picture of the house and describe its features, like the extra light from the windows, the great kitchen, and the cozy couch. But this approach often fails to fully engage your audience’s attention on the specific areas you want to highlight.
A more effective way is to use the Morph transition to zoom in on certain parts of the house as you talk about them. This method directs your audience’s eyes exactly where you want them, helping them visualize the space and making your presentation more persuasive.
Step-by-Step Guide to Zooming With Morph
- Start with your original slide that shows the entire picture of the house.
- Duplicate the slide by right-clicking on it and selecting Duplicate Slide. This creates a copy that you’ll modify to zoom in.
- Make the picture larger on the duplicated slide to zoom in on a specific part. You can do this by holding down the Control key and scrolling the mouse wheel to zoom out on the slide canvas, then resizing the image so the part you want is centered and enlarged.
- Position the zoomed area on the slide carefully. For example, if you want to focus on the kitchen, move the picture so the kitchen is front and center.
- Repeat the process for other areas you want to highlight, such as the couch. Duplicate the zoomed-in slide again, reposition the image, and resize it to spotlight the new area.
- Create a final slide that returns to the original full view of the house, so your presentation flows back to the big picture after zooming in on details.
- Select all the zoomed slides (hold down Shift and click each slide), then go to the Transitions tab and choose Morph as the transition effect.
When you run the presentation, the Morph transition will smoothly zoom into each part of the house as you discuss it, then zoom back out to the full view at the end. This technique is highly effective because it visually guides your audience’s focus without distracting animations or abrupt cuts.
Why Zooming Matters in Presentations
Zooming in with Morph is more than just a cool effect—it’s a strategic tool for storytelling. By focusing on details, you help your audience absorb your message more clearly. Instead of overwhelming them with the entire slide at once, you guide their eyes to what matters most. This improves retention and engagement, especially when presenting complex layouts or large images.
Plus, because Morph transitions are smooth and elegant, they enhance your presentation’s professional look without feeling gimmicky or distracting.
Example 2: Spotlighting Individuals in a Group Photo
Presenting a team or group of people can be tricky, especially when you want to highlight specific individuals. Simply pointing or describing who is who can confuse your audience, who may struggle to follow along.
Using Morph along with cropping techniques, you can create a spotlight effect that visually isolates each person as you introduce them. This method makes your presentation clearer and more engaging, allowing your audience to focus on one person at a time.
How to Create a Spotlight Effect with Morph and Crop
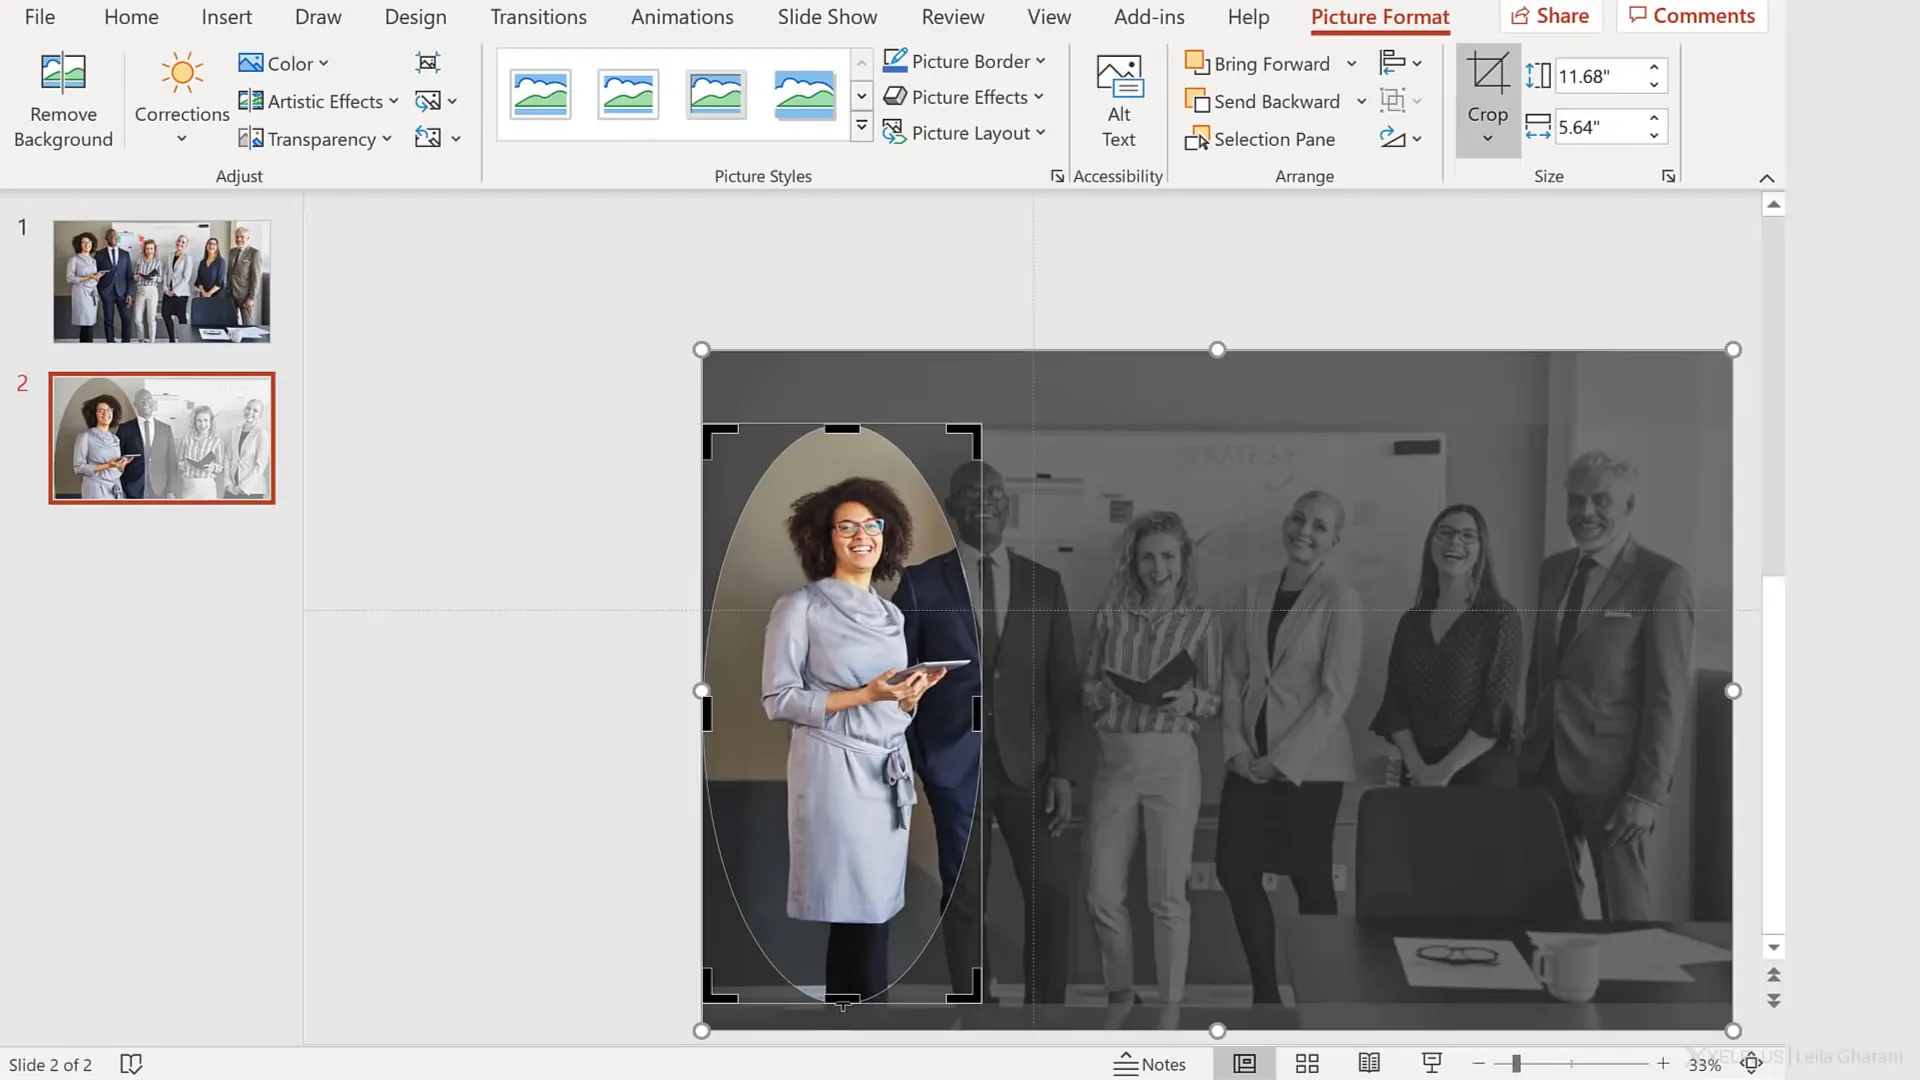
- Start with a group photo that includes everyone you want to present.
- Copy the image and paste it directly on top of itself on the same slide, so you have two layers of the same photo.
- Convert the bottom image to grayscale by selecting it, going to Picture Format > Color, and choosing a light gray tone. This creates a muted background layer.
- Leave the top image in full color—this will be the spotlighted person.
- Duplicate this slide to create multiple slides for each person you want to highlight.
- On each duplicated slide, crop the top image to an oval shape around the face of the person you want to spotlight. Use Picture Format > Crop > Crop to Shape and select an oval. Carefully adjust the crop handles without moving the image itself, so only the desired face appears in full color.
- Add a text box near the highlighted face with the person’s name and position.
- On subsequent slides, move the images slightly to reposition the spotlighted person, so they are centered and other team members remain visible but muted.
- Finish with a slide showing the full-color group photo again to conclude the introduction.
- Select all the spotlight slides, then apply the Morph transition from the Transitions tab.
When you present, the Morph transition will smoothly shift the spotlight from one person to the next, fading others into grayscale and focusing your audience’s attention naturally. This technique eliminates confusion and makes team introductions much clearer and more visually appealing.
Why Use Two Layers of the Same Image?
Using two copies of the same image—one in grayscale and one in full color—allows Morph to animate between these states smoothly. Morph looks for common objects on consecutive slides and transitions them dynamically. By layering the images, you control which part is highlighted and which fades into the background, creating a professional spotlight effect without complicated animation setups.
Example 3: Animating Timelines with Shape Morphing
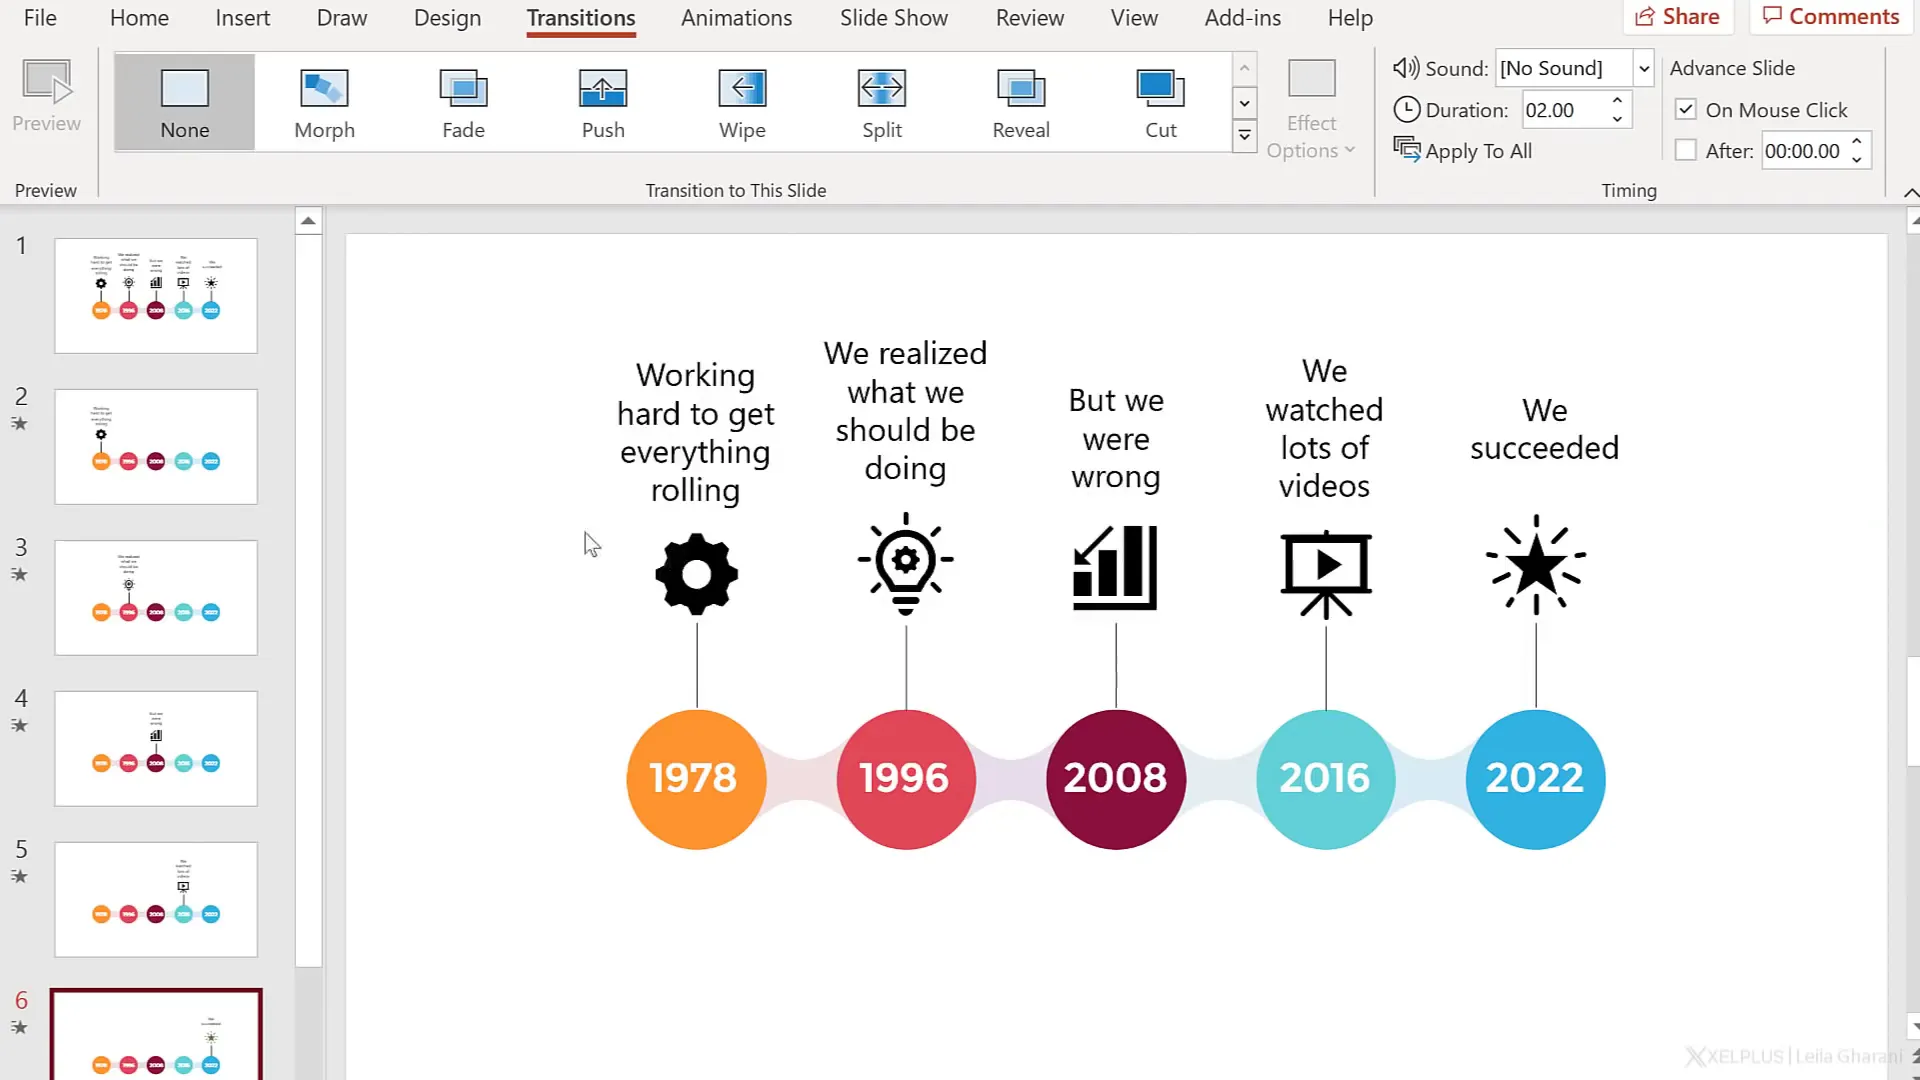
Timelines are a common element in presentations to show progress, milestones, or project phases. However, static timelines can feel crowded or confusing, especially when they contain multiple points close together.
Splitting the timeline into separate slides and using Morph to animate the transition between points creates a dynamic, engaging experience. Morph can move lines, highlight shapes, and even animate text, making your timeline easy to follow and visually appealing.

How to Animate a Timeline Using Morph
- Break your timeline into multiple slides, each showing one or a few points instead of all at once. This reduces clutter and focuses audience attention.
- Copy and paste timeline elements instead of recreating them from scratch on each slide. Morph recognizes copied objects as the same and animates them smoothly.
- Use the Selection Pane (Home > Select > Selection Pane) to confirm object names and manage your timeline elements.
- For shapes or icons inserted separately, rename their object names to be identical across slides. Prefix the name with two exclamation marks (!!) to force Morph to treat them as the same object, even if they were inserted separately.
- Apply the Morph transition across the timeline slides.
- For text boxes, you can also morph the characters by selecting the slides, going to Transitions > Morph > Effect Options, and choosing Characters. This animates text changes smoothly.
When you run the presentation, Morph will move the timeline line, fade icons in and out, and animate text changes seamlessly, creating a polished and professional timeline animation. This technique saves time and effort compared to manual animations while delivering a sophisticated visual effect.
Tips for Effective Timeline Animations
- Use copy-paste for timeline elements whenever possible to help Morph identify objects for transition.
- Rename objects consistently across slides to force Morph to animate them, especially for icons or shapes inserted anew.
- Experiment with morphing text characters to create smooth text transitions that complement your timeline animation.
- Keep the timeline simple and focused by breaking it down into digestible parts, avoiding overcrowded slides.
Additional Insights on Using the Morph Transition
Transitions and animations in business presentations often get a bad rap for making slides look unprofessional or cartoonish. Many presenters avoid them altogether to maintain a serious tone. However, Morph is a notable exception.
“The great thing about Morph is that it has the opposite effect. It makes your presentations look more professional.”
Morph’s smooth, elegant animations enhance your slides without overwhelming them. It allows you to guide your audience’s attention naturally and create a narrative flow that keeps them engaged. When used thoughtfully, Morph can elevate your presentation from basic to brilliant.
Common Use Cases for Morph in Professional Settings
- Product demonstrations: Zoom in on product features or details.
- Team introductions: Spotlight individual members clearly.
- Project timelines: Animate progress and milestones dynamically.
- Data visualization: Morph between charts, graphs, or infographics smoothly.
- Storytelling: Create visual narratives with seamless scene changes.
By integrating Morph transitions into your workflow, you can create presentations that are not only informative but also visually compelling and memorable.
Frequently Asked Questions (FAQ)
What is the Morph transition in PowerPoint?
The Morph transition is a feature in Microsoft PowerPoint that allows smooth animations between slides by recognizing and transforming common objects from one slide to the next. It can animate images, shapes, text, and more to create professional-looking transitions.
Do I need special skills to use Morph effectively?
No. Morph is designed to be user-friendly. By duplicating slides and making simple adjustments like resizing, repositioning, or cropping objects, you can create impressive animations without advanced design or animation skills.
Can Morph animate text as well as images and shapes?
Yes. Morph can animate text characters smoothly by selecting the Characters option under Morph’s effect options. This allows for seamless text transitions between slides.
How can I make Morph recognize objects for animation?
Morph looks for objects with the same name or identical copies across slides. Copying and pasting objects between slides helps Morph identify them. For objects inserted separately, you can rename them with the same name, prefixed by double exclamation marks (!!), to force Morph to animate them.
Can Morph make my presentations look unprofessional or distracting?
When used tastefully, Morph enhances professionalism by creating smooth, elegant transitions. Unlike flashy or gimmicky animations, Morph adds polish and clarity, helping guide audience attention rather than distracting from your message.
Is Morph available in all versions of PowerPoint?
Morph is available in recent versions of Microsoft PowerPoint, including Office 365 and PowerPoint 2019 and later. It may not be available in older versions or some limited editions.
Conclusion
The PowerPoint Morph transition is a versatile, powerful tool that can transform your presentations into engaging, professional experiences. By mastering simple techniques like zooming into slide details, spotlighting individuals in group photos, and animating timelines with shape morphing and text effects, you can captivate your audience and communicate your ideas more effectively.
Whether you’re preparing a sales pitch, team introduction, project update, or educational lecture, Morph gives you the ability to add smooth, elegant animations that enhance comprehension and keep your audience focused.
Remember, the key to success with Morph is thoughtful use—focus on guiding attention and storytelling rather than overwhelming your slides with effects. With practice and creativity, Morph will become an indispensable part of your PowerPoint toolkit, helping you deliver presentations that are not only informative but also visually compelling and memorable.
Ready to take your presentations to the next level? Start experimenting with Morph today and see the difference it can make!
Thank you for reading, and happy presenting!
Check out the full video: 3 Cool Effects You Did NOT Think are Possible in PowerPoint | Morph


