
Welcome, creative minds and PowerPoint enthusiasts! Today, I’m excited to share a comprehensive, step-by-step guide on how to make an epic, dynamic image slider right inside PowerPoint. This tutorial will empower you to create a visually stunning, interactive product slider featuring clickable buttons, smooth fade and blur effects, animated titles, and the magic of the Morph transition. Whether you’re a seasoned PowerPoint user or a curious beginner, this guide is tailored to help you build a professional image slider that will captivate your audience.
This method was inspired by a tutorial from One Skill PowerPoint, who expertly demonstrates how to leverage PowerPoint’s advanced features to create interactive, engaging presentations. Let’s dive in and unlock the full potential of PowerPoint together!
Table of Contents
- Introduction to the Dynamic Image Slider Concept
- Step 1: Setting Up Your Slide and Template
- Step 2: Choosing and Preparing Your Images
- Step 3: Adding Images and Titles to Your Slide
- Step 4: Enhancing Depth with Shadows
- Step 5: Adding Blur Effects for Focus and Depth
- Step 6: Creating Interactive Navigation Buttons
- Step 7: Preparing Multiple Slides for the Slider
- Step 8: Applying the Morph Transition and Linking Buttons
- Step 9: Fixing Morph Animation Issues with Object Naming
- Step 10: Finalizing and Testing the Slider
- Bonus Tips for Enhancing Your PowerPoint Slider
- Frequently Asked Questions (FAQ)
- Conclusion
Introduction to the Dynamic Image Slider Concept
Image sliders are a fantastic way to showcase multiple products, ideas, or visuals within a single slide deck, offering an interactive and fluid user experience. The slider we’ll build is powered by the Morph transition, a powerful animation tool in PowerPoint that creates smooth movement and transformation effects between slides without complex animation setups.
Our slider will include:
- Interactive clickable navigation buttons
- Fade and blur effects for depth and focus
- Animated titles to enhance visual appeal
- Clean, modern design with custom shadows and overlays
- High-resolution images generated with AI to ensure uniqueness
This project is perfect for product presentations, portfolios, marketing decks, or any scenario where you want to demonstrate multiple items dynamically.
Step 1: Setting Up Your Slide and Template
First, let’s create a clean slate to work on. Insert a new slide and set the background to black for a sleek, modern canvas. To make your design process smoother, it’s useful to customize your slide master to include footers and slide numbers if needed. However, for this project, we’ll hide these elements to maintain a clean look.
Here’s how to do it:
- Insert a new blank slide.
- Go to the Insert tab, then Header & Footer.
- Uncheck the footer and slide number options to hide them.
- Confirm to apply the changes.
Now you have a completely black slide that serves as the perfect backdrop for your image slider.

Step 2: Choosing and Preparing Your Images
The visual impact of your slider depends heavily on the quality and style of your images. For this project, I used AI-generated images of gaming controllers created with Leonardo AI, an incredible tool for generating unique and consistent visuals.
If you’re new to Leonardo AI, I highly recommend exploring it on Skillshare, where you can find excellent classes on mastering this tool. The class by Christian Wojtarovich is particularly helpful for learning how to create consistent images across different styles, which is essential for a cohesive slider.
For this slider, we’ll work with three images:
- Neon Controller
- Golden Controller
- Frosty Controller
These images bring a futuristic gaming vibe and vibrant colors, perfect for demonstrating the slider’s capabilities.
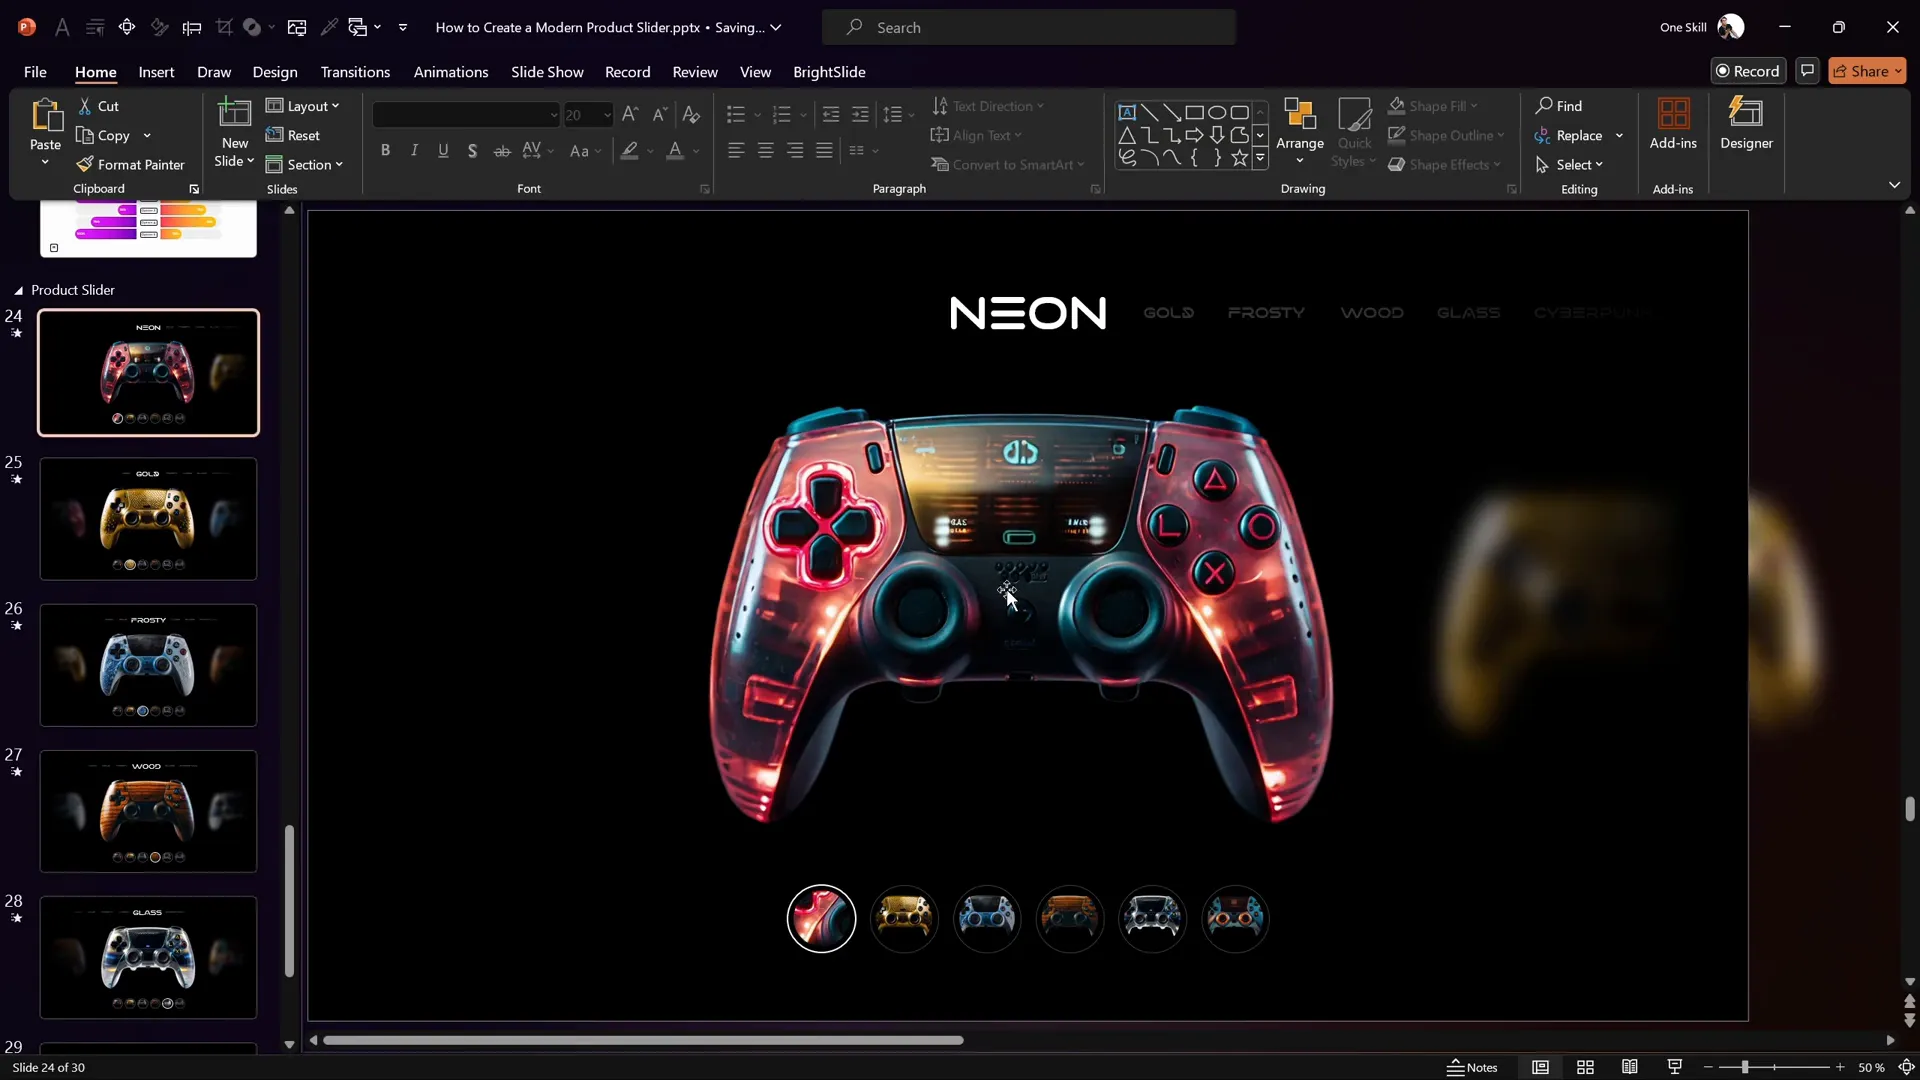
Step 3: Adding Images and Titles to Your Slide
Let’s start by placing the Neon controller image onto our slide. Simply copy and paste the image, then position it centrally. Above this image, add a text box for the product name. Here, I used the font Virino Normal at size 60, which may seem large but suits the doubled slide dimensions (wider and taller than default) for better resolution.
To emphasize the main product, add two smaller text boxes on either side with additional information or subtitles. Set these smaller text boxes to 80% transparency to keep the focus on the central title.
Now, paste the other two controller images (Golden and Frosty) onto the slide. Resize these to a height of 14 centimeters and align all three images horizontally along the middle of the slide.
This arrangement creates a visual hierarchy with the main product in the center and supporting images flanking it.
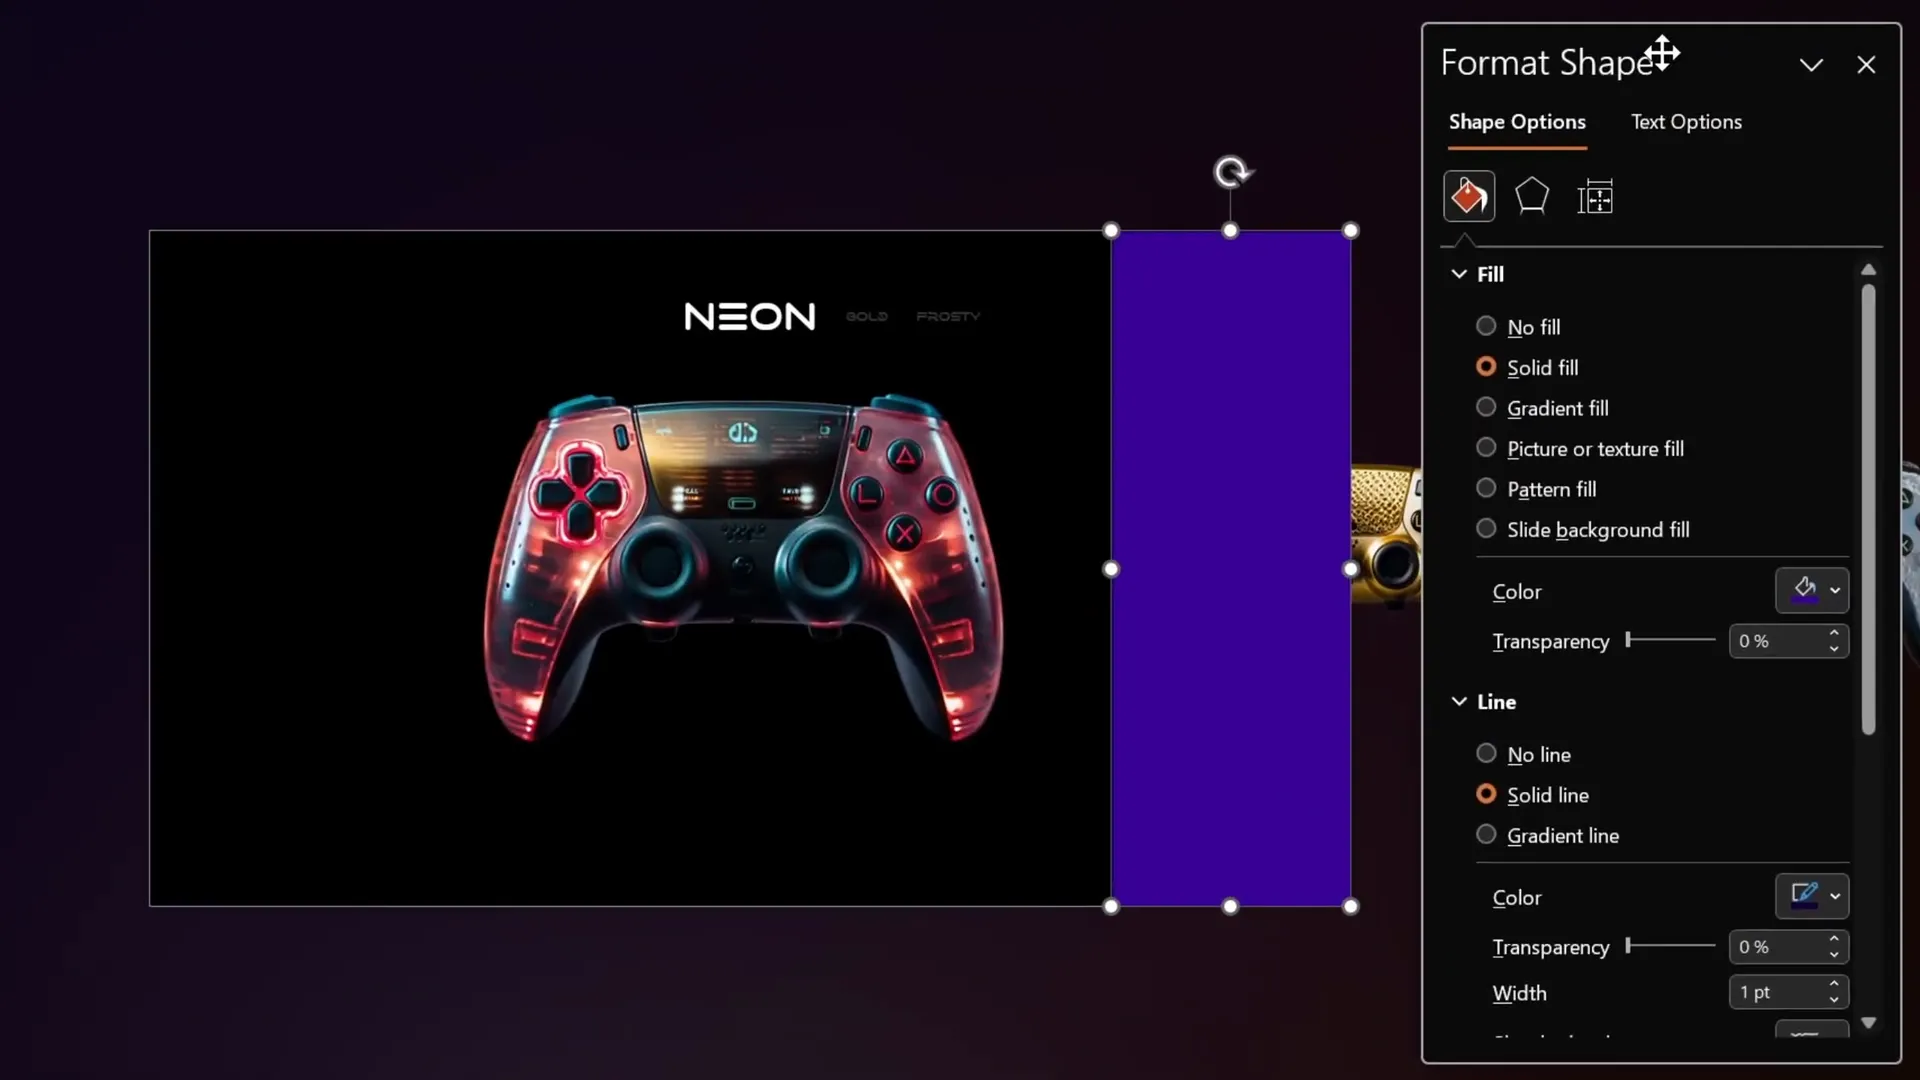
Step 4: Enhancing Depth with Shadows
To add depth and a sense of mystery, we’ll create shadows on the left and right edges of the slide, making the controllers look like they’re emerging from darkness.
Follow these steps:
- Insert two full-height rectangles, one on each side of the slide.
- Apply a gradient fill to these rectangles with the following settings:
- Start with black color fully transparent on the inner edge
- Fade to solid black towards the slide edge
- Adjust the gradient direction from left to right for the right rectangle and flip horizontally for the left.
- Adjust the gradient stops to control shadow intensity (e.g., the solid black stop at 90%).
These shadows add a dramatic visual effect, framing the images beautifully.
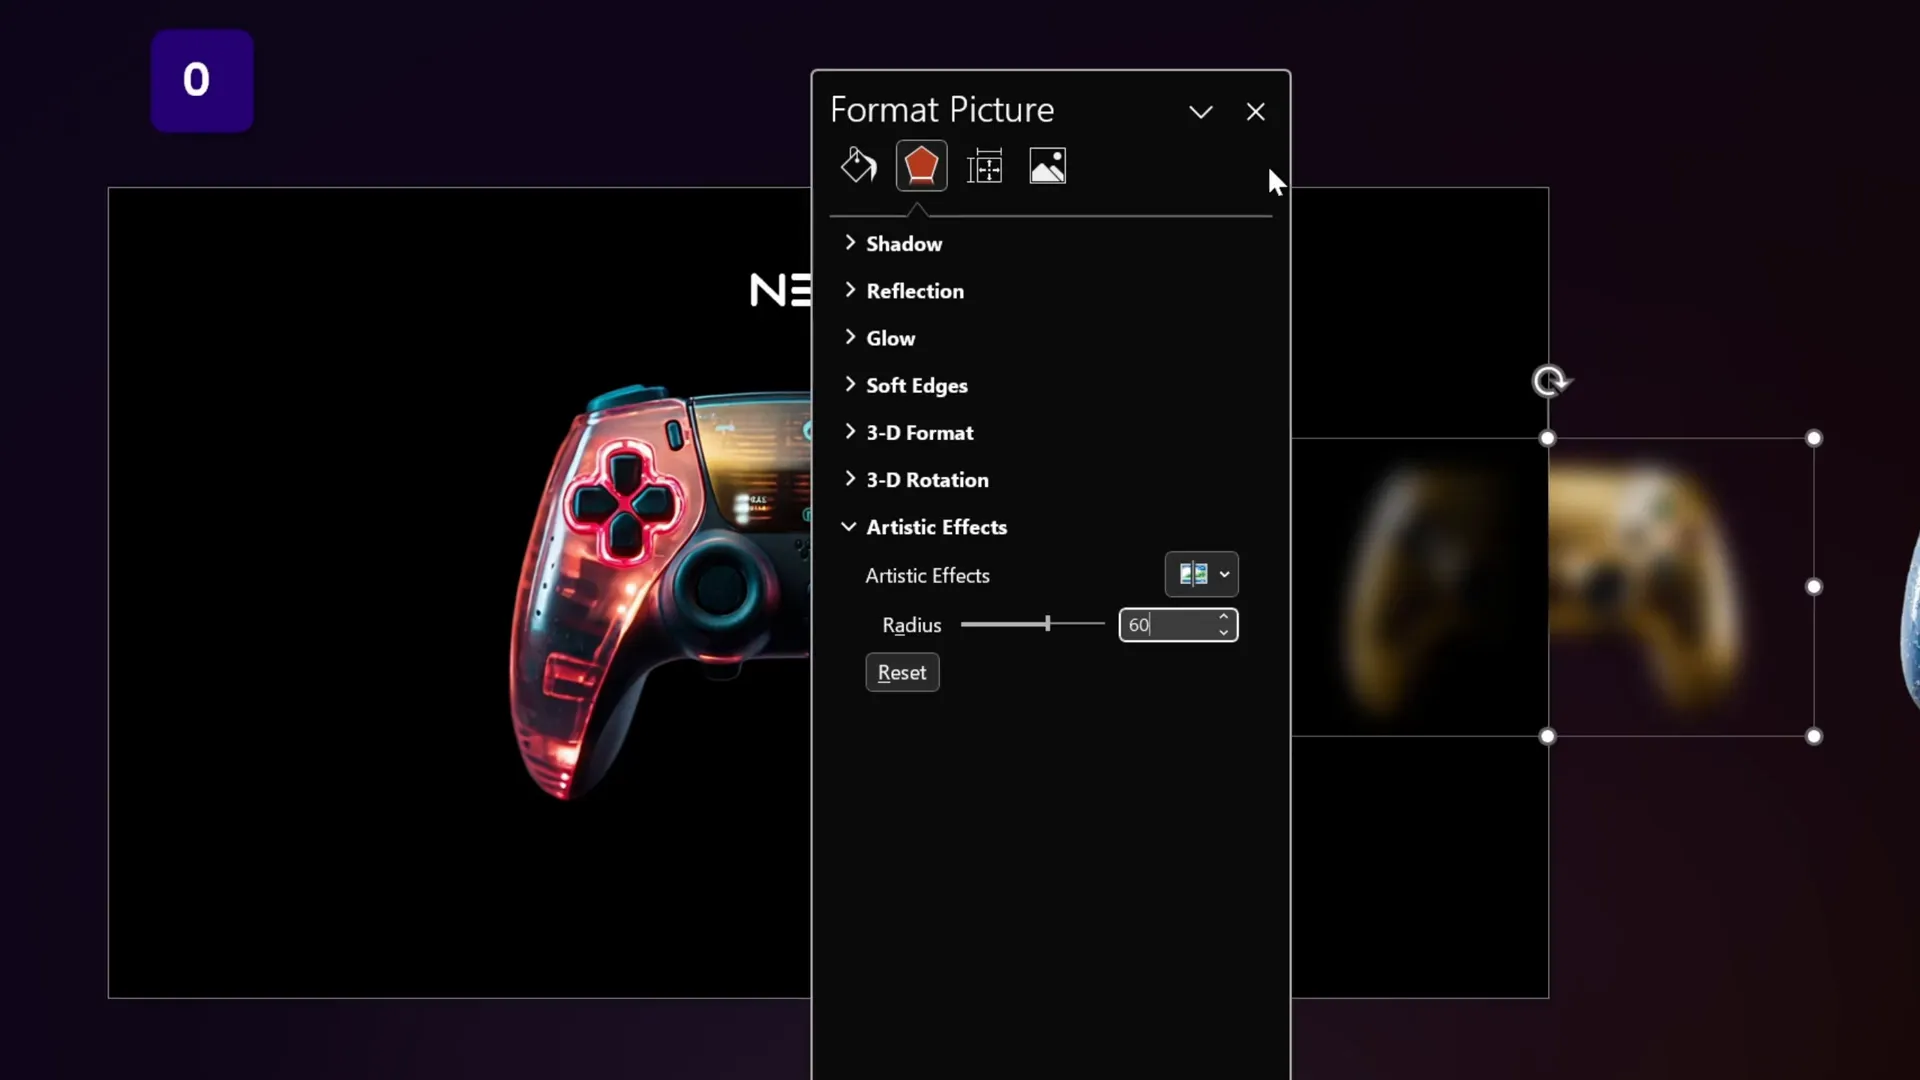
Step 5: Adding Blur Effects for Focus and Depth
To simulate depth of field and direct attention to the central image, apply a blur effect to the smaller side images. For example, apply a 60% blur artistic effect to the Golden and Frosty controllers on the right and left.
This technique creates an illusion that these controllers are positioned further away, enhancing the slider’s 3D feel.
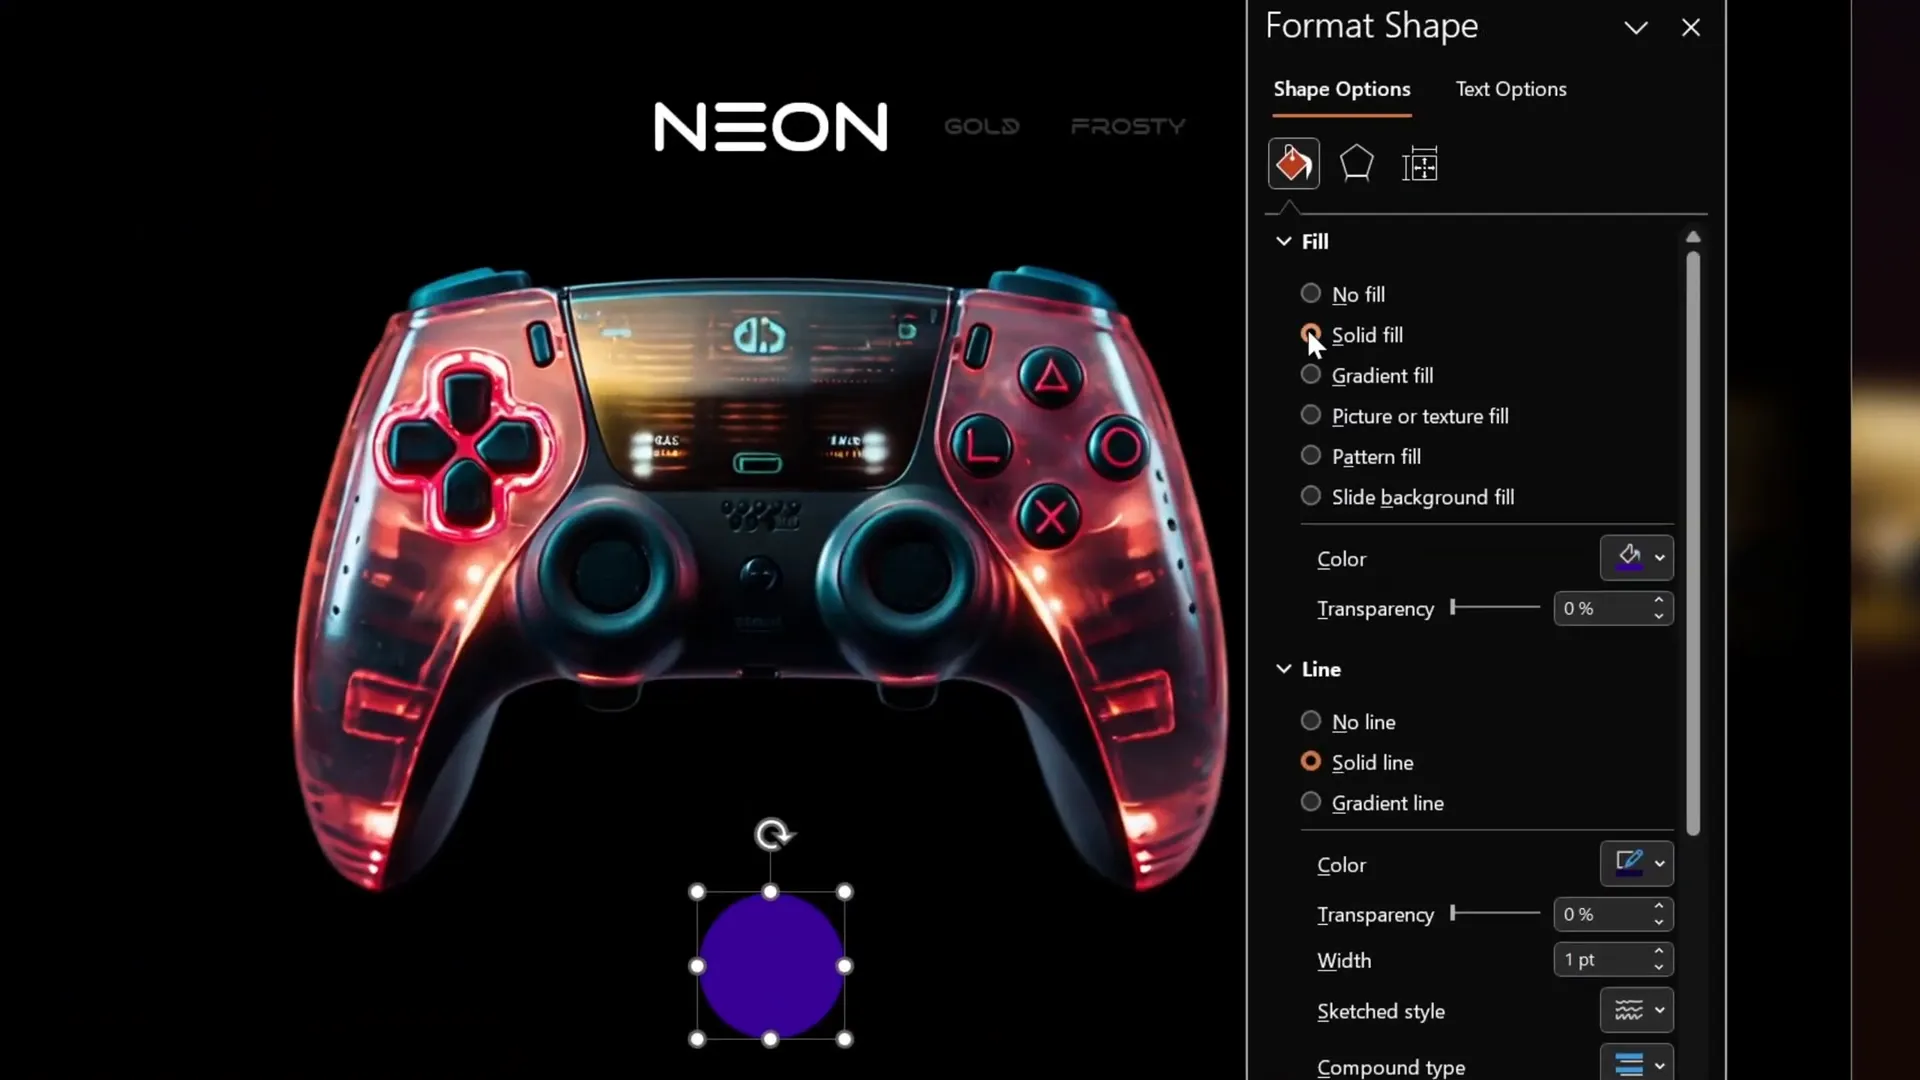
Step 6: Creating Interactive Navigation Buttons
Navigation buttons allow users to click through the slider images seamlessly. Here’s how to craft stylish, clickable buttons:
- Insert a perfect black circle by holding down the Shift key while drawing.
- Add a white outline with 1pt width and 75% transparency.
- Duplicate this circle and resize the duplicate smaller.
- Center align both circles to create a ring effect.
- Fill the smaller circle with a cropped portion of the Neon controller image by:
- Duplicating the Neon image
- Bringing the smaller circle to the front
- Selecting both the image and circle, then using Shape Format > Merge Shapes > Intersect
- Adjust cropping to focus on the desired image area.
- Duplicate this button two more times for a total of three buttons.
- Replace the image fills of the second and third buttons with the Golden and Frosty controller images respectively.
- Use guides to align all buttons horizontally under the images.
To highlight the active button, increase the outer circle line width to 1.5pt and make the line fully opaque.

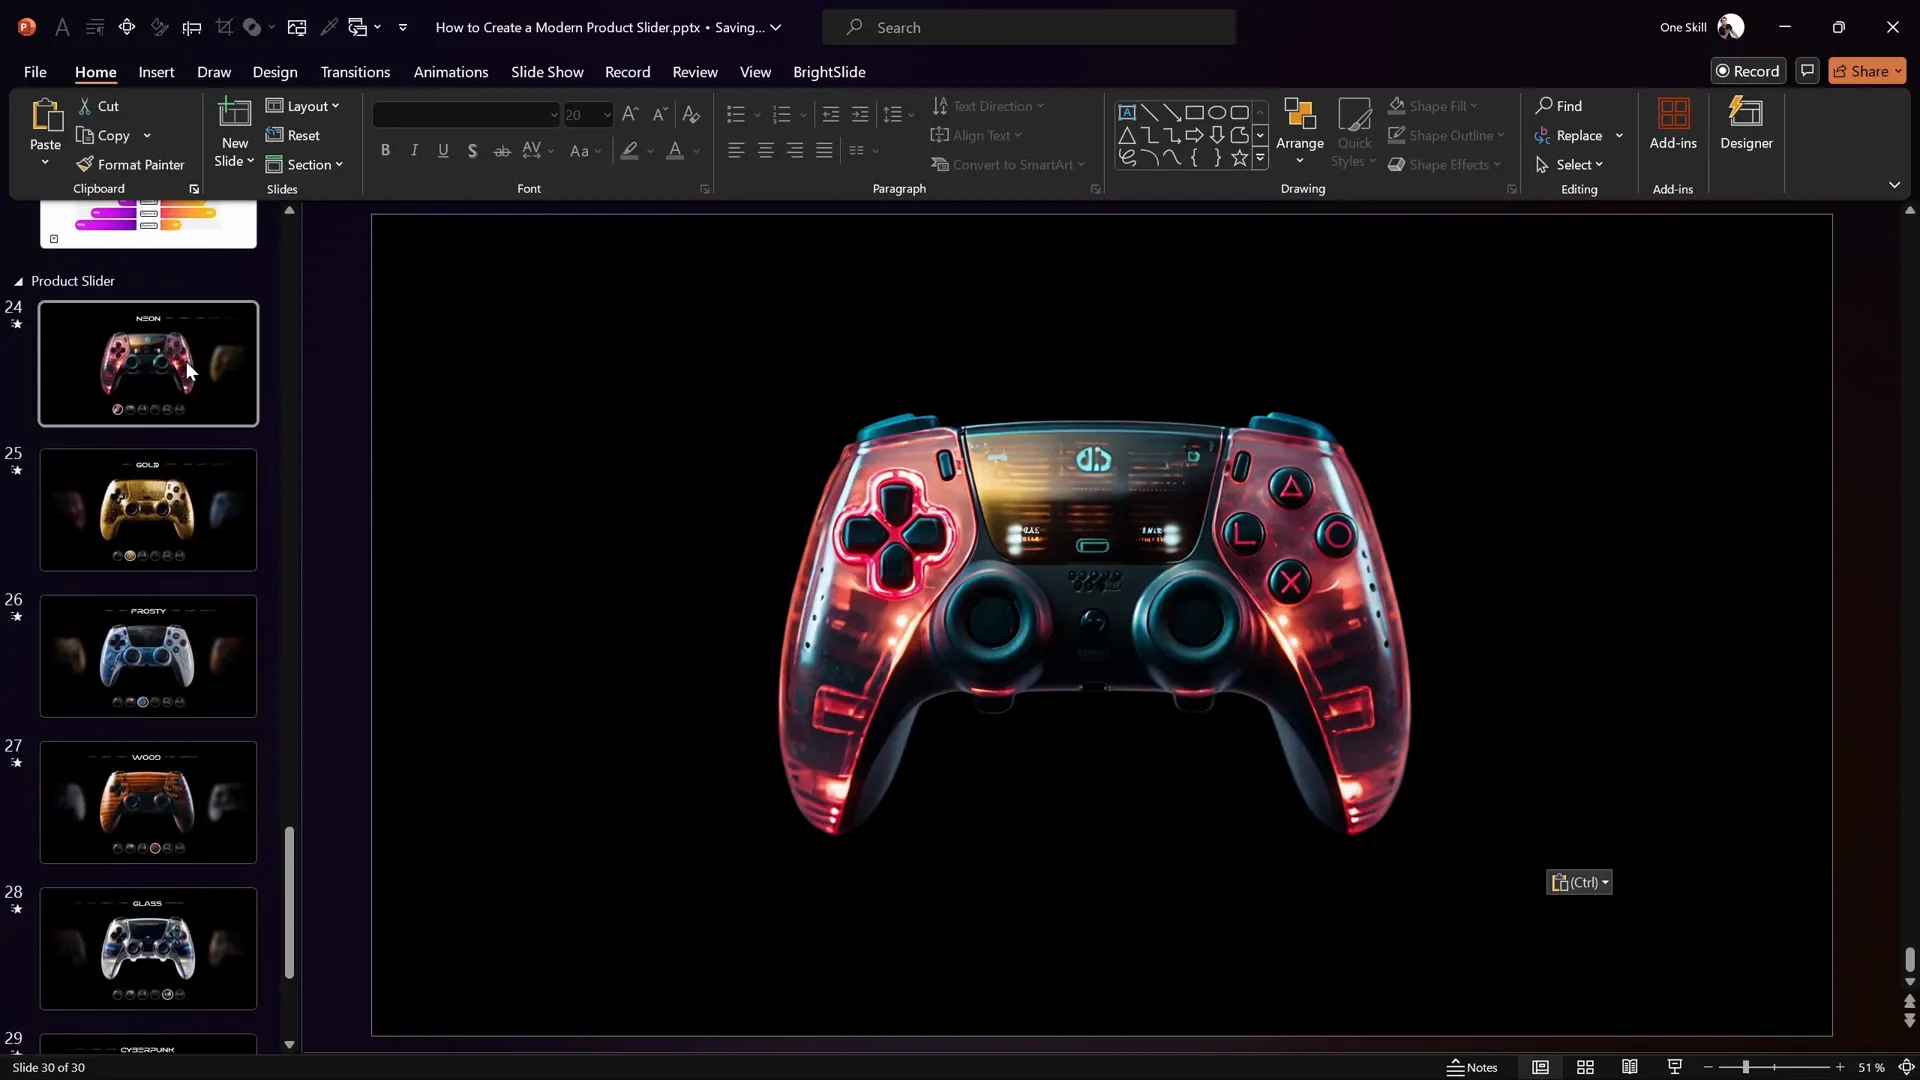
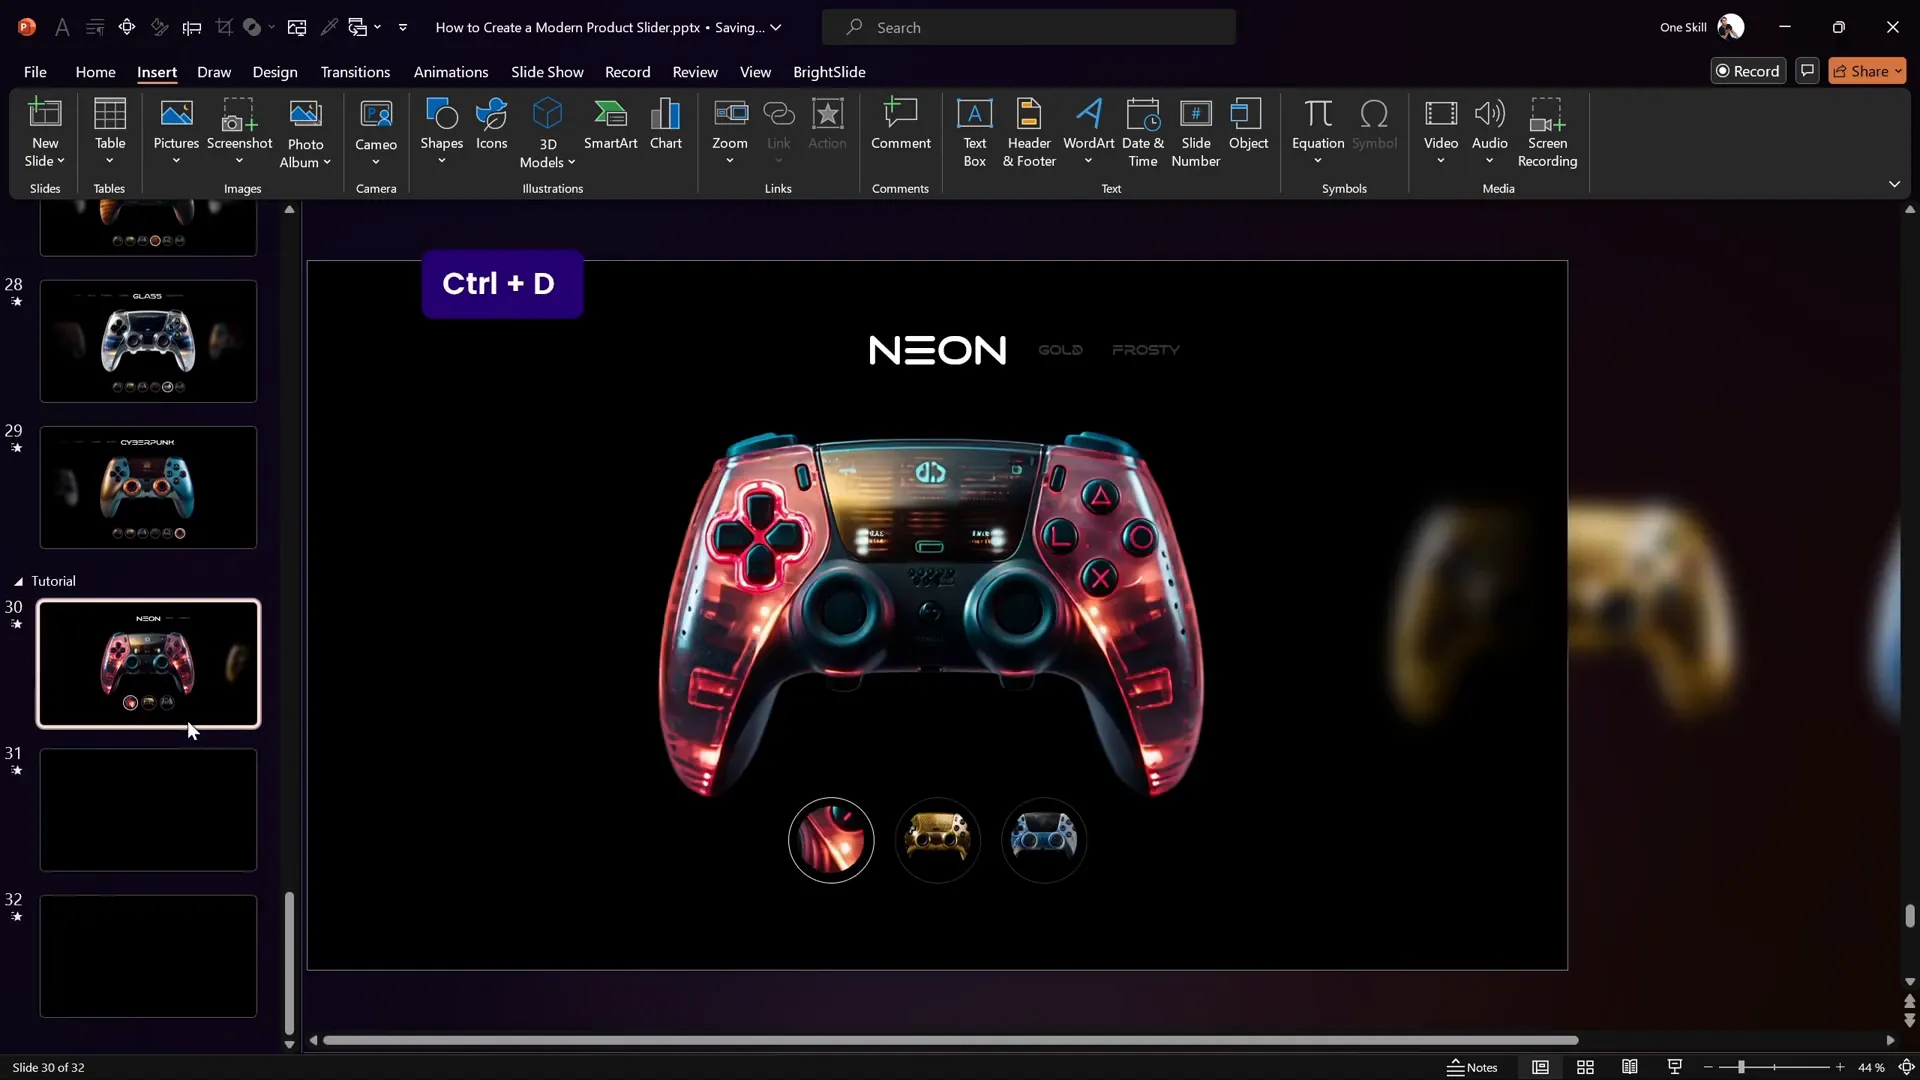
Step 7: Preparing Multiple Slides for the Slider
Since our slider has three images, we’ll create three corresponding slides. This allows the Morph transition to animate the movement between the images.
Steps:
- Insert two additional blank slides and hide their footers and slide numbers.
- Duplicate the first slide’s content onto the second and third slides.
- On each slide, adjust the position of the images to shift the focus:
- Slide 1: Neon controller centered
- Slide 2: Golden controller centered
- Slide 3: Frosty controller centered
- Adjust blur effects accordingly:
- Remove blur from the centered image
- Add blur to side images
- Update the product name text boxes to reflect the focused controller on each slide.
- Update the active button highlight to the corresponding button on each slide.
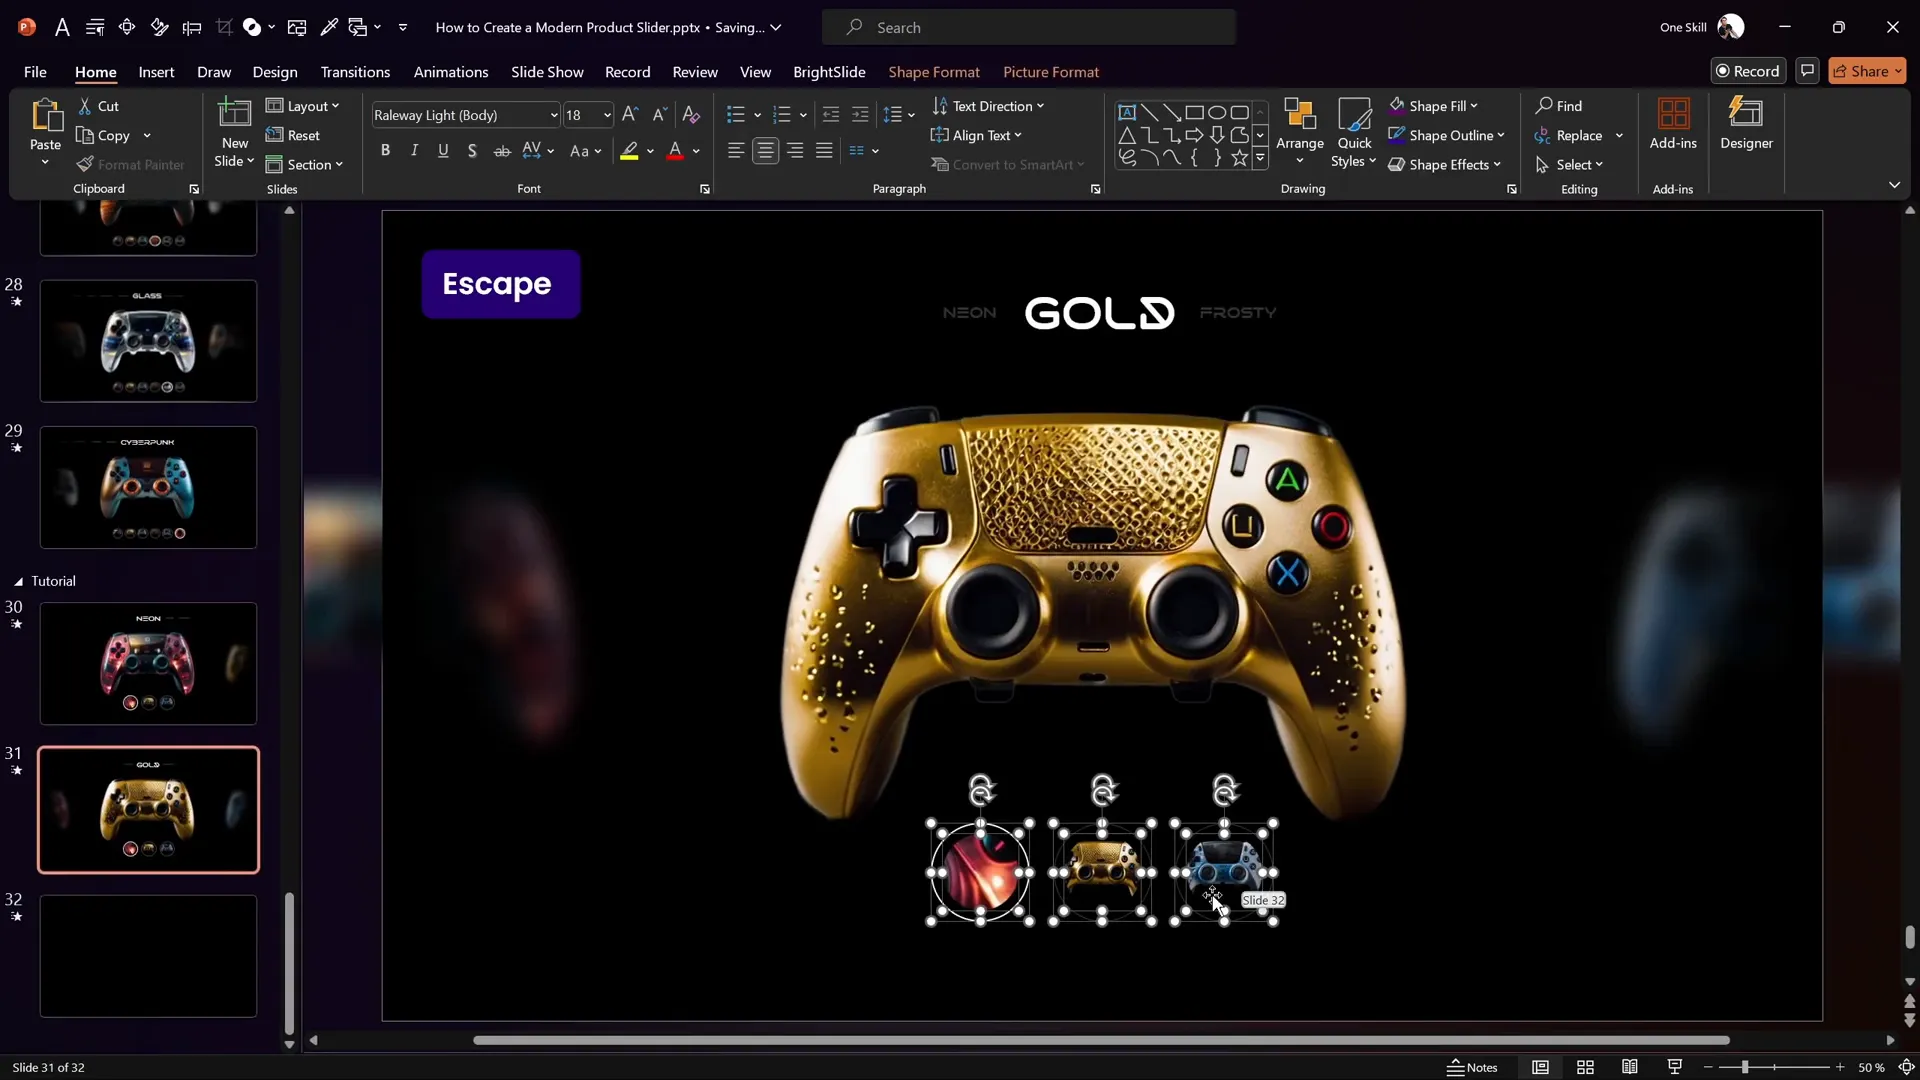
Step 8: Applying the Morph Transition and Linking Buttons
The Morph transition will animate the movement of the images and buttons smoothly between slides, creating the illusion of a seamless slider.
To set up the transition:
- Select all three slides.
- Go to the Transitions tab, choose Morph, and set duration to 2 seconds.
Next, make the navigation buttons clickable to jump to their respective slides:
- Select the first button, go to Insert > Link, and choose Place in This Document.
- Link it to Slide 30 (or the slide number corresponding to the first slider slide).
- Repeat for the second and third buttons, linking them to the second and third slides respectively.
Now clicking the buttons will jump between slides with smooth morph animations.

Step 9: Fixing Morph Animation Issues with Object Naming
Sometimes, the Morph transition can behave unexpectedly with complex objects like our buttons. To fix animation glitches:
- Rename the outline circles of the buttons on the first slide using double exclamation marks to ensure they are recognized as the same objects across slides:
- First button outer circle: !!ring one
- Second button outer circle: !!ring two
- Third button outer circle: !!ring three
- Delete buttons from other slides and copy-paste the corrected buttons from the first slide onto them.
- Update the active button highlight on each slide as before.
This naming trick helps the Morph transition track objects properly, resulting in smooth button animations.
Step 10: Finalizing and Testing the Slider
With all elements set, it’s time to test your slider:
- Run the slideshow from the first slide.
- Click the navigation buttons to see the images slide smoothly left and right.
- Observe the blur and shadow effects enhancing the depth.
- Notice the animated titles updating with the focused image.
If everything works as expected, congratulations! You’ve created a dynamic, professional image slider entirely within PowerPoint.

Bonus Tips for Enhancing Your PowerPoint Slider
- Use High-Resolution Images: Doubling slide dimensions allows for sharper images and better visual quality.
- Experiment with Animation Durations: Adjust Morph transition timing to achieve the pace that fits your presentation style.
- Customize Button Styles: Change colors, shapes, or add icons to match your branding.
- Leverage AI Tools: Tools like Leonardo AI can help you generate unique images tailored to your project.
- Explore Slide Master: Customize footers, numbers, and layouts globally for consistent design.
Frequently Asked Questions (FAQ)
Q: What is the Morph transition in PowerPoint, and why is it essential for this slider?
A: Morph is a transition effect that animates smooth movement, resizing, and transformation of objects between slides. It’s essential for this slider because it creates seamless visual transitions without complex animation sequences, making images and buttons slide fluidly.
Q: Can I use this slider technique with more than three images?
A: Absolutely! You can extend the slider by adding more slides and images, duplicating the setup steps, and adjusting navigation buttons accordingly. Just ensure consistent naming for Morph to work correctly.
Q: How do I generate images like the gaming controllers used here?
A: The images were created using Leonardo AI, an AI image generation tool. You can learn to use Leonardo AI through classes available on Skillshare, which teach you how to create consistent and styled images for your projects.
Q: What if the Morph transition doesn’t animate buttons correctly?
A: This usually happens due to inconsistent object names. Rename your shape outlines with unique names containing double exclamation marks (e.g., !!ring one) to help PowerPoint track objects properly across slides.
Q: Can the blur and shadow effects be customized?
A: Yes! You can adjust the intensity of blur effects via Artistic Effects and customize shadows by tweaking gradient stops and colors on rectangles. Experiment to find the look that best suits your design.
Q: Is it possible to download the tutorial slides and templates?
A: Yes, you can download the slides used in this tutorial for free by signing up for a free trial on Skillshare and accessing the resources linked in the tutorial description.
Conclusion
Creating a dynamic product slider in PowerPoint is more achievable than you might think. With the power of the Morph transition, interactive buttons, and thoughtful design elements like blur and shadows, you can elevate your presentations to a new level of professionalism and engagement.
Remember, the key steps involve setting up your slides properly, using high-quality images (AI-generated or otherwise), designing intuitive navigation, and ensuring smooth transitions with careful object management.
Whether you’re showcasing products, portfolios, or creative projects, this image slider technique will help you communicate effectively and impress your audience.
Stay creative, keep experimenting, and enjoy the magic of PowerPoint!
Check out the full video: I’ve Made DYNAMIC Product Slider in PowerPoint!🔥 Step-by-Step


