

- Introduction
- Table of Contents
- What you’ll need
- Step-by-step tutorial
- Set up the slide and base rectangle
- Insert and fill the mirror image
- Cut the mirror shape with Freeform and edit points
- Combine shapes to subtract the mirror area
- Add background images behind the mirror
- Duplicate and swap images for the slide-in effect
- Animate image transitions with entrance effects
- Add moving cloud and other accents
- Design tips and best practices
- Common problems and fixes
- Use cases for the Creative PowerPoint Slide
- FAQ
- Conclusion
Introduction
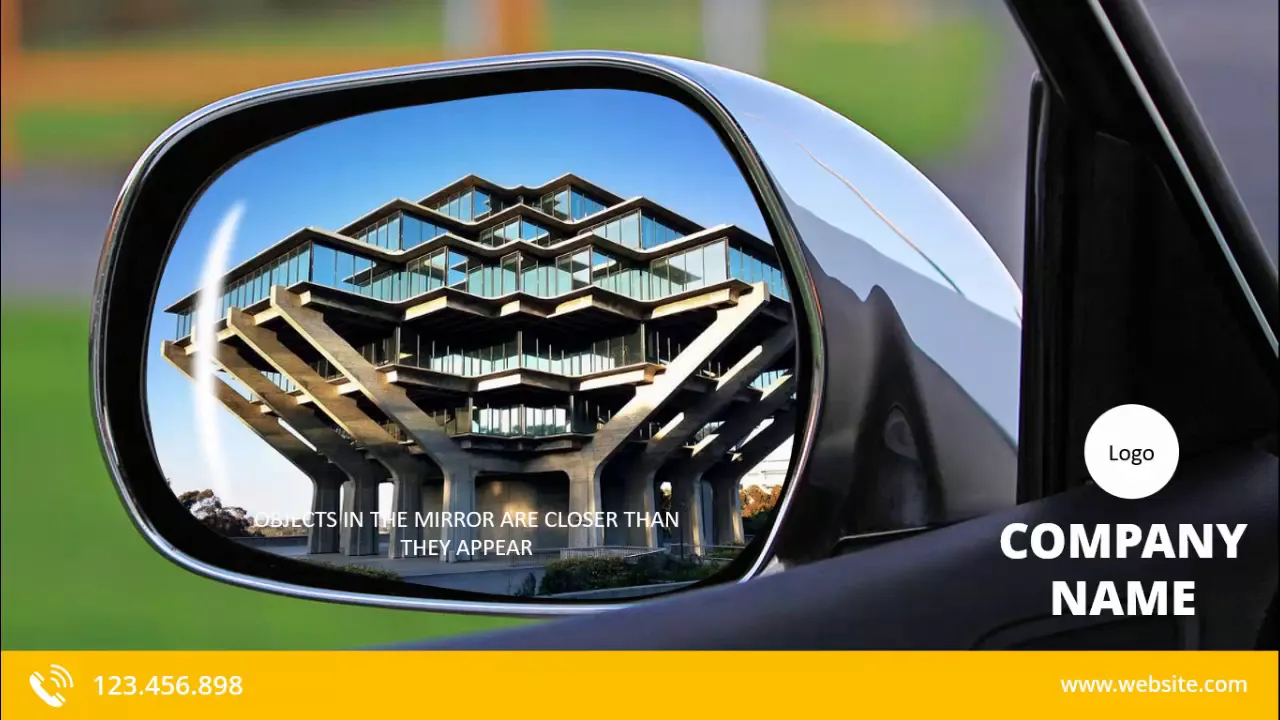
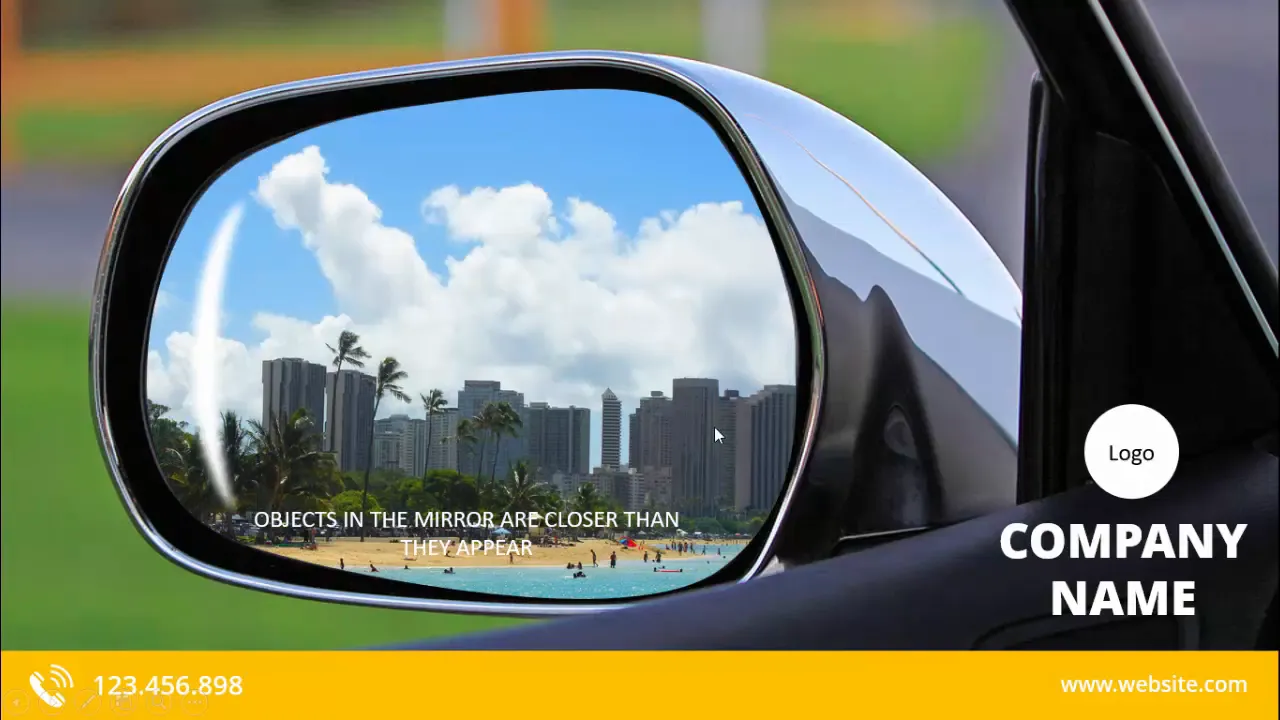
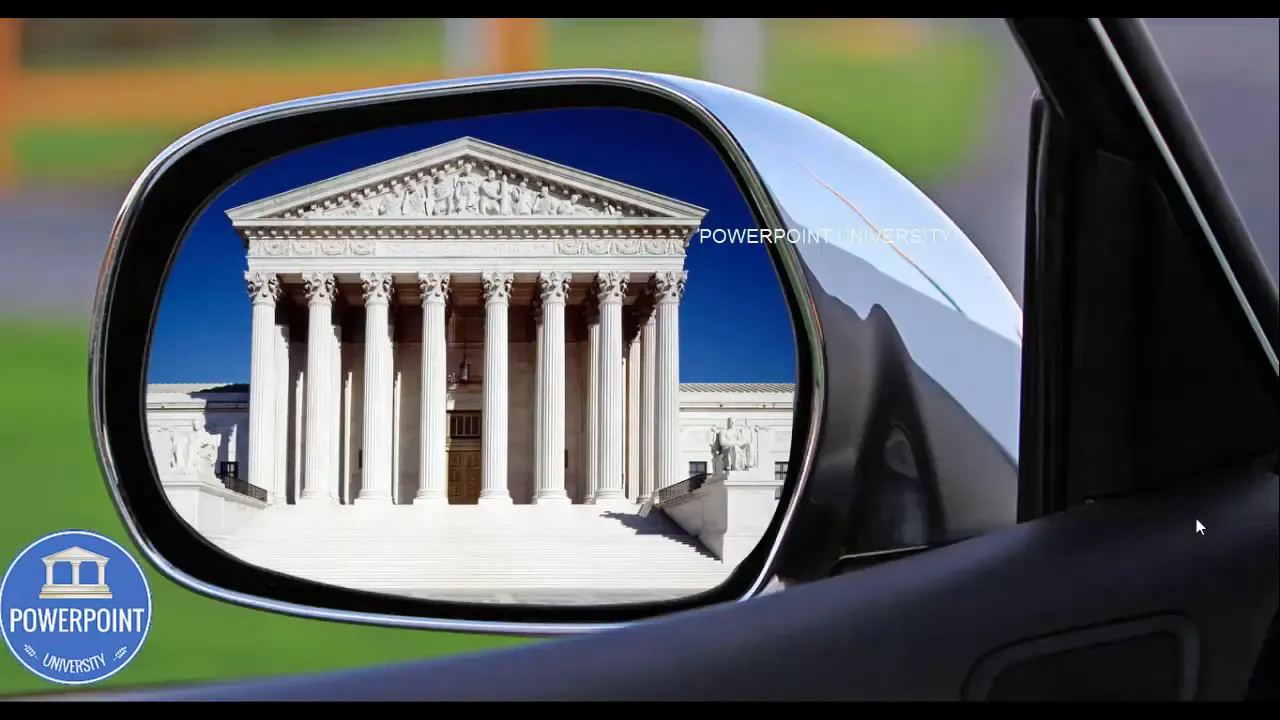
I’m POWERPOINT UNIVERSITY, and in this walkthrough I’ll teach you how to build a Creative PowerPoint Slide that uses a car’s side mirror as a window to switch between multiple backgrounds. The goal is to create a polished, interactive slide where clicking advances the scene inside the mirror — from a city building to green landscape to a beach — while keeping your branding and contact details visible. This Creative PowerPoint Slide is ideal for travel agencies, product demos, portfolio highlights, or any presentation that benefits from a cinematic detail.
In what follows I’ll guide you step-by-step through creating the effect: inserting and masking images into a custom mirror shape, combining shapes to cut out the reflective area, stacking background images, and animating them to slide in on click. You’ll also get practical tips for making the shape smooth, trimming extra anchor points, and adding a moving cloud accent to bring your Creative PowerPoint Slide to life.
Why this tutorial works
- It focuses on simple core PowerPoint tools: Shapes, Format Shape, Merge Shape, Duplicate, and Animations.
- It uses non-destructive editing: you’ll keep originals so you can replace backgrounds quickly.
- It combines vector editing (freeform shape) with bitmap images and animations for a professional look.
- The techniques scale: once you’ve made one Creative PowerPoint Slide, you can reuse the layout for many slides or templates.
What you’ll need
- Microsoft PowerPoint (desktop version recommended for Merge Shapes and advanced editing).
- High-resolution images (car, buildings, landscapes, beach, clouds) — local files or online pictures through PowerPoint.
- Basic familiarity with inserting shapes, right-click context menus, and the Animation Pane.
- Five to ten minutes to sculpt the mirror freeform for a realistic look (it’s slightly time-consuming but the result is worthwhile).
Before we start: save a copy of your presentation so you can experiment without fear of losing a baseline version. Name it something like “Creative PowerPoint Slide – Mirror Effect.pptx”.
Step-by-step tutorial
1. Set up the slide and base rectangle
Start with a fresh slide. Insert a rectangle that covers the entire slide area — this becomes the base for your mirror image and background management.
- Insert > Shapes > Rectangle, then draw it to cover the whole slide.
- Right-click the rectangle > Format Shape. Under Fill choose Picture or texture fill.
- Either insert a picture from your computer or use Insert > Online Pictures and search for a relevant image (I used “mirror” to find an image of a car side mirror).
- Set Offset properties (Left, Right, Top, Bottom) to zero so the picture fills the rectangle exactly.
- Make the shape outline No outline.
This full-slide rectangle acts as the canvas that holds the initial car image. Later we’ll cut out the mirror shape to reveal other images behind it.
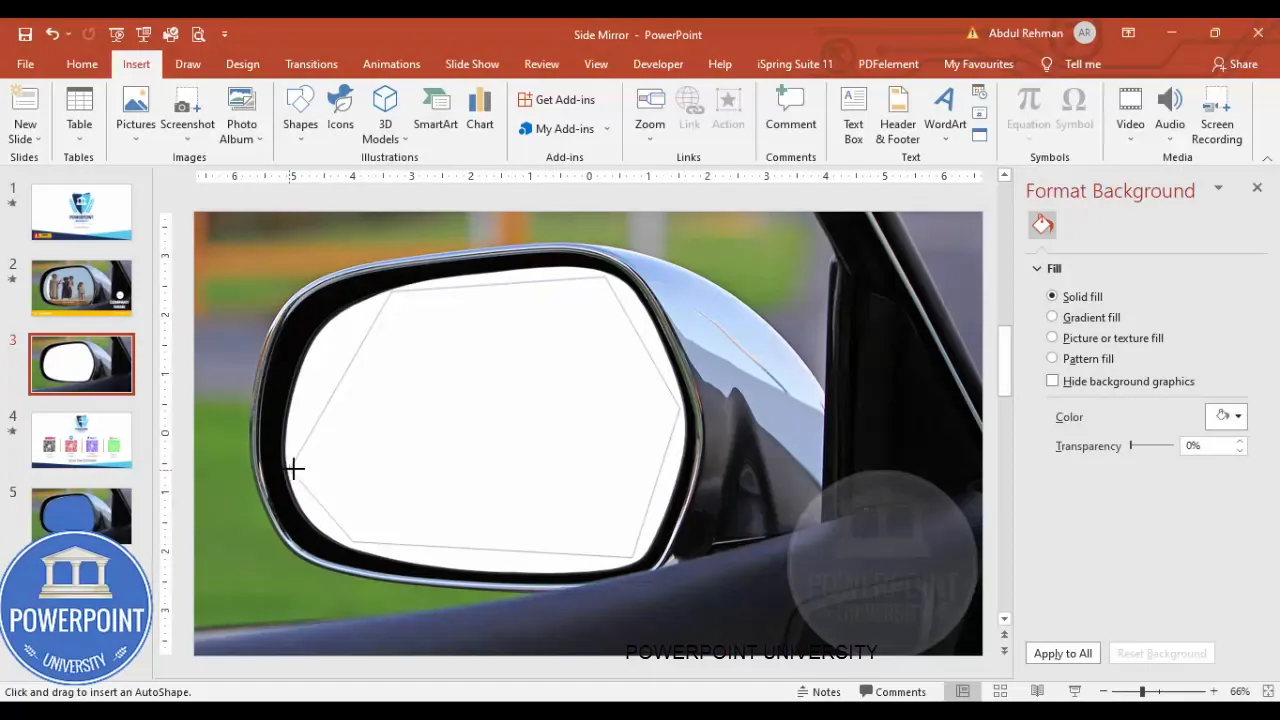
2. Insert and fill the mirror image
With the base rectangle filled, you’ll want to isolate the mirror area so that we can subtract it and later replace what shows through the mirror.
- Zoom into the mirror area so you can work precisely.
- We’ll create a custom mask using the Freeform tool.

3. Cut the mirror shape with Freeform and edit points
Use the Freeform shape to trace the mirror. This gives you precise control compared to basic shapes.
- Insert > Shapes > Lines > Freeform: Draw a polygon-like outline around the mirror by clicking at corners and along curves. Join the last point back to the first to close the shape.
- If the Freeform adds extra points, right-click the shape > Edit Points. Delete unnecessary points by right-clicking the anchor and selecting Delete.
- For each anchor point, right-click and choose Smooth Point to get natural curves instead of jagged corners.
- Make the shape fill Transparent and set outline to No outline while you work — this helps you see the image below.
Patience here pays off. Sculpt the curve slowly and test the visual fit often — slight adjustments can ripple across adjacent curves, so go step-by-step.
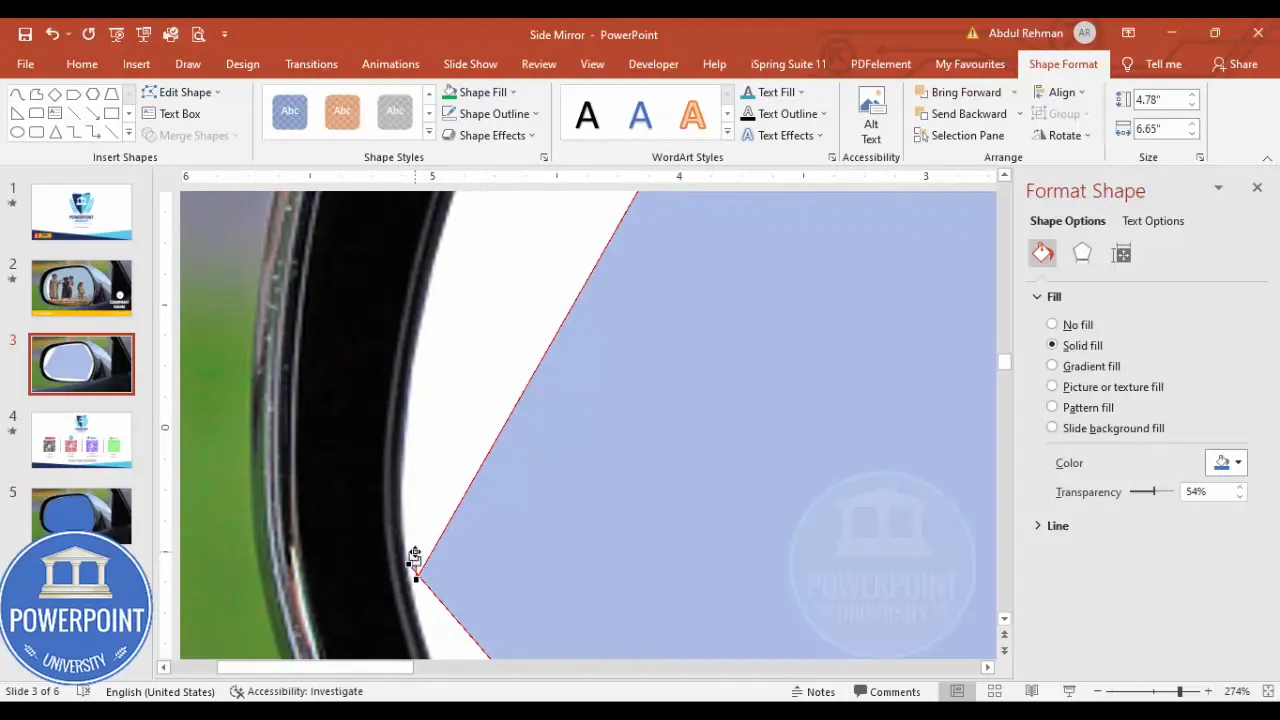
4. Combine shapes to subtract the mirror area
Now that you have the Freeform mirror shape, subtract it from the base rectangle so the mirror becomes a hole through which other images can be seen.
- Select the base rectangle.
- Hold Shift and select the Freeform mirror shape.
- Go to Shape Format > Merge Shapes > Combine.
When you combine, PowerPoint subtracts the overlapping area from the topmost shape — in our setup that removes the mirror portion from the rectangle. You should now see a cutout where the mirror once was. This cutout is the window for your background images.
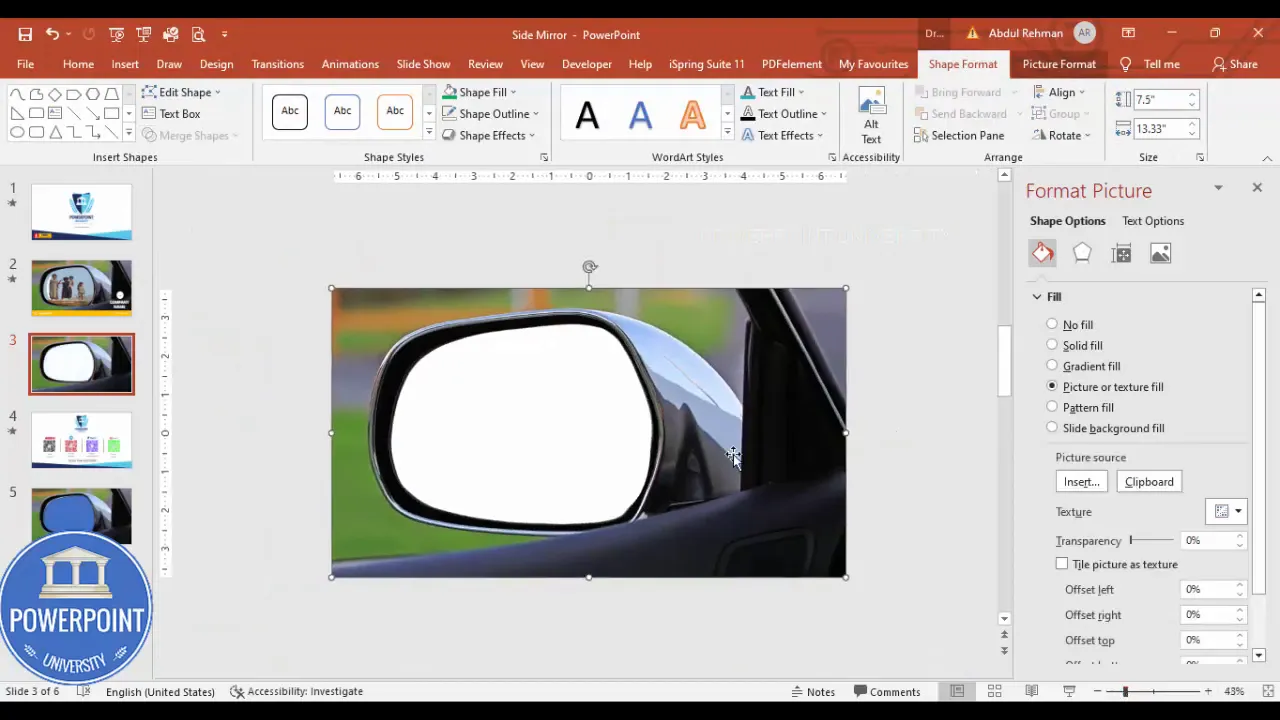
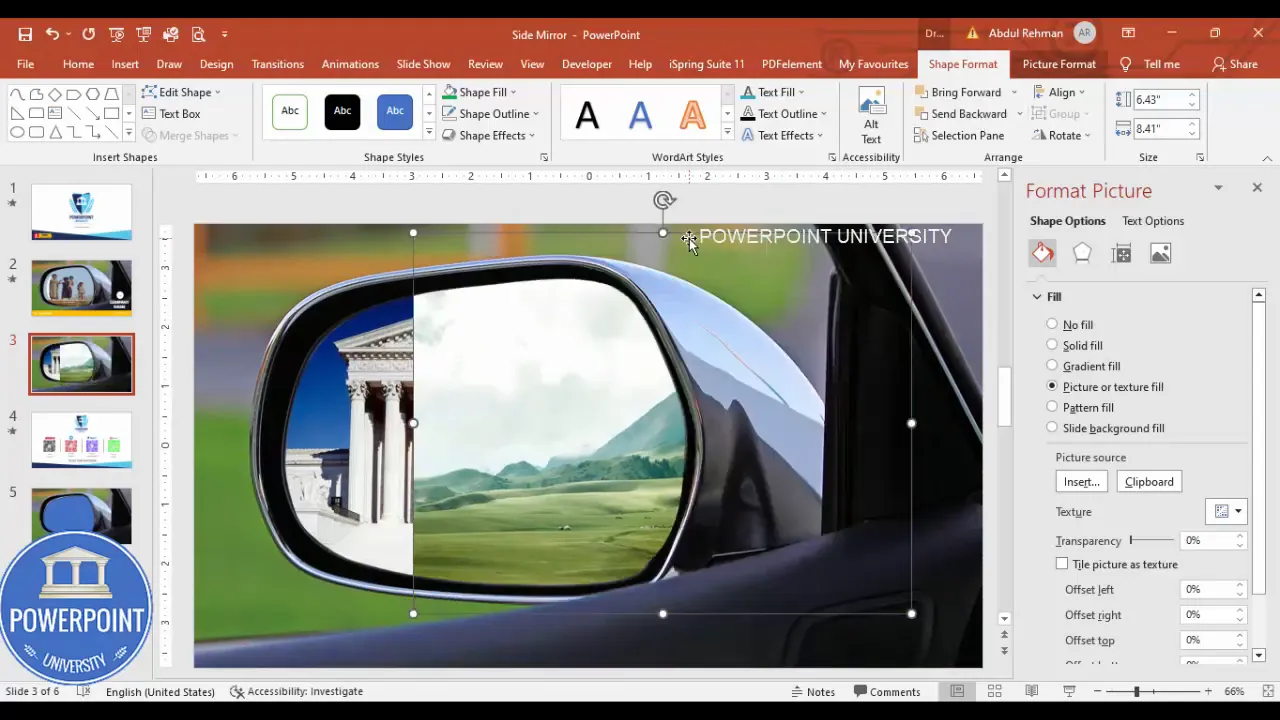
5. Add background images behind the mirror
With the cutout in place, you’ll add images behind it that will be revealed inside the mirror. Each image represents a different scene — city building, green landscape, beach, etc.
- Insert > Shapes > Rectangle and draw a rectangle slightly larger than the cutout area. This rectangle will hold the background image you want to appear in the mirror.
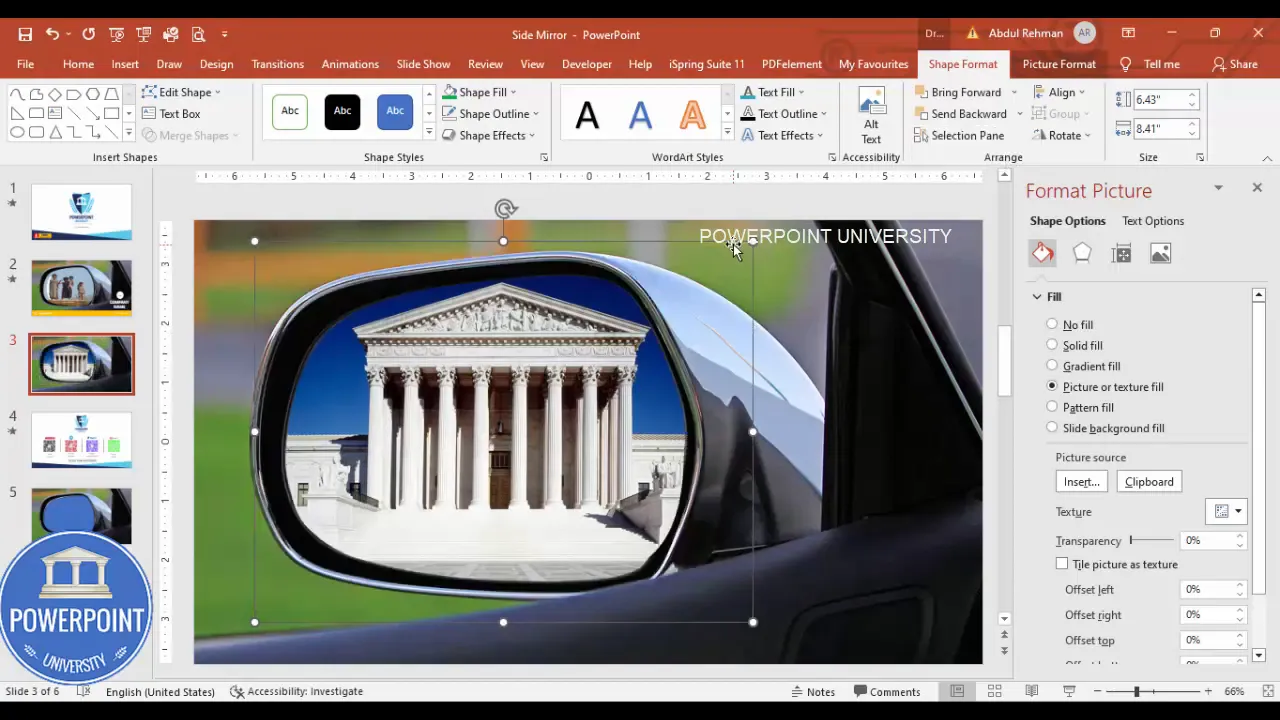
- Right-click the new rectangle > Format Shape > Fill > Picture or texture fill > Insert image (choose a building, landscape, or beach image from Online Pictures or your PC).
- Right-click the rectangle > Send to Back so it sits behind the base rectangle with the mirror cutout.
- Adjust the image position to ensure the visual content appears inside the mirror window.
Repeat this for as many scenes as you want. Each background is a separate rectangle with its own picture fill. Keep them stacked behind the cutout in the order you want them to appear when animated.
6. Duplicate and swap images for the slide-in effect
To prepare multiple scenes, duplicate the background rectangle and change the filled picture. This gives you identical shapes that differ only by image content — useful for clean animations.
- Select the background rectangle and press Ctrl+D to duplicate it.
- Right-click the duplicate > Format Shape > Picture or texture fill > Insert > Online Pictures, then search for “green landscape” (or your chosen keyword) and insert the image.
- Right-click > Send to Back so the new image sits behind the mirror cutout as well.
- Repeat duplication for a third image (for example, search and insert a “beach”).
By keeping the shapes the same and only changing the image fill, you preserve alignment and size so the animation looks smooth and consistent.
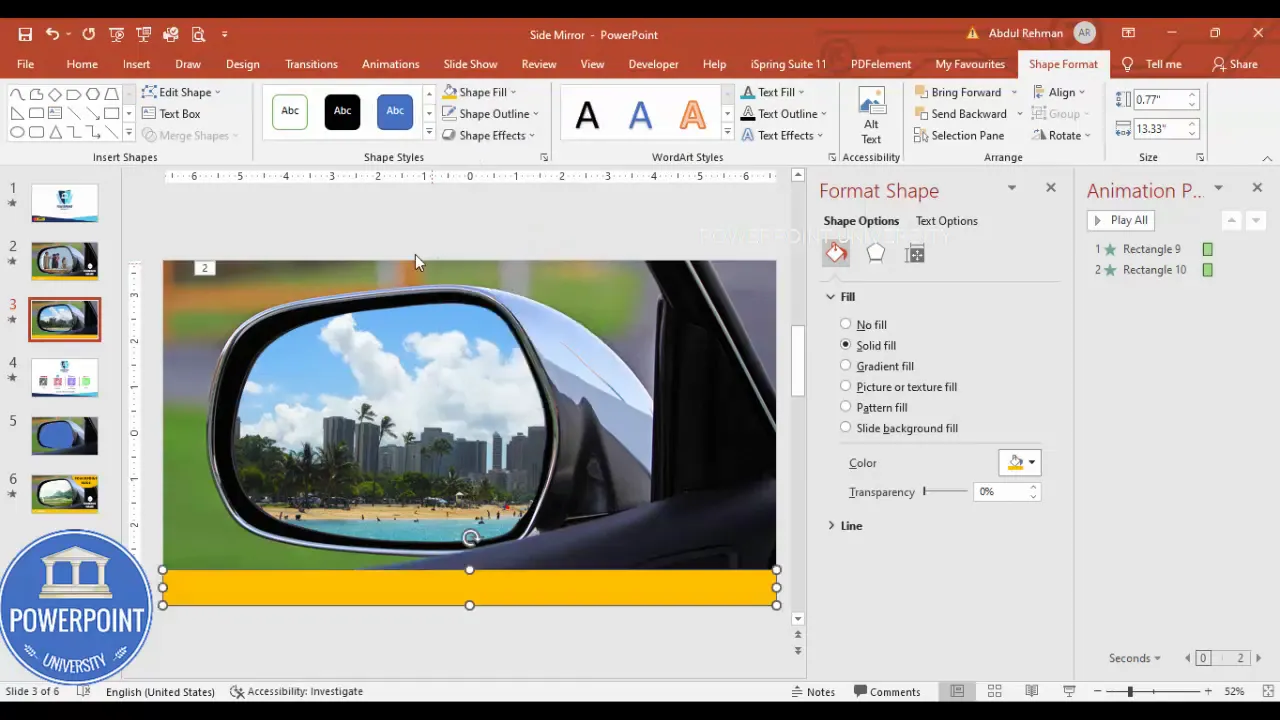
7. Animate image transitions with entrance effects
Now the fun part: making the images slide or appear in the mirror when you click. Use entrance animations configured to occur on click and stacked in the Animation Pane.
- Open the Animations tab and enable the Animation Pane.
- Select the background rectangle (the one you want to appear second) and choose an entrance effect. I experimented with Peek In but settled on the Strips entrance for a clean reveal. Set it to On Click.
- For the next background rectangle choose a similar entrance effect and set it to On Click as well.
- Order the animations in the Animation Pane so they fire in the order you want scenes to appear. Typically you’ll want the topmost background to animate first, then the next, and so on.
- TIP: For momentary polish, set the duration to 0.6–0.9 seconds and add a subtle Ease In or Ease Out where available.
When you run the slide show and click, each click will trigger the next background to appear through the mirror cutout. This creates the interactive switching effect for your Creative PowerPoint Slide.

8. Add moving cloud and other accents
A small accent like a moving cloud can give the scene energy. While the transcript mentioned a moving cloud, it didn’t detail the steps — so here’s a practical and simple implementation for a moving cloud using PowerPoint’s motion path.
- Insert > Shapes > choose a simple cloud shape or insert a PNG cloud with transparent background.
- Place the cloud on top of the slide where you want it to start. Set the shape fill to white (or insert a PNG) and remove the outline.
- Animations > Add Animation > Motion Paths > select Left or Right depending on direction. Use a long path so the cloud travels smoothly across the slide.
- Adjust the motion path endpoints in the Normal view so the cloud exits and enters the stage naturally.
- Set the cloud animation to With Previous or After Previous so it moves automatically while you click to advance images. Adjust duration to 8–12 seconds for a gentle drift.
Combine transparency and a slight blur if your cloud image allows — this keeps the cloud from overpowering the mirror visuals. The moving cloud is an optional flourish but elevates the overall polish of your Creative PowerPoint Slide.
Design tips and best practices
Creating a Creative PowerPoint Slide that looks professional requires attention beyond the mechanical steps. Here are design-focused tips I use every time:
Keep alignment and proportions consistent
- Use guides and rulers (View > Guides/Ruler) to align the mask and background rectangles precisely.
- When duplicating backgrounds, keep their size identical to avoid jitter during animation.
Choose images for matching perspective
Because the mirror window implies depth and reflection, select background photos that look believable when revealed inside the mirror. For instance:
- Urban scenes with vertical lines look good for a mirror held at a slight angle.
- Landscape or beach images should have horizon lines placed carefully so the part visible in the mirror isn’t disorienting.
Control color and contrast
- If the mirror frame or surrounding car has strong tones, slightly adjust the background image’s brightness/contrast so the content inside the mirror feels integrated.
- Use Format Picture adjustments (Brightness, Contrast, Color) to match lighting across scenes.
Use subtle motion and timing
- A small entrance animation with 0.6–0.9 seconds duration feels modern and professional.
- Don’t animate everything at once — prioritize the mirror scene and one accent (cloud, logo fade, or text slide).
Keep text readable
If you overlay text (logo, company name, contact details) on the slide like I did in the example, ensure contrast and font size are strong. Consider placing your contact panel outside the mirror on a solid colored band to maintain legibility.
Create Slides in Seconds with ExpertSlides AI |
|
Generate AI Presentations today: |
|
TRY NOW! |
Common problems and fixes
While building the Creative PowerPoint Slide you may hit a few common snags. Here’s how I solve them:
Freeform shape looks jagged or has too many points
- Use Edit Points to delete redundant anchors.
- Right-click each anchor > Smooth Point to convert corners into curves.
- If things become unwieldy, undo and retrace that section slowly, placing anchors only where necessary (corners and major curvature changes).
Image alignment shifts when editing
- Place images into rectangles that are slightly larger than the cutout, then align using Align > Align Center/Align Middle relative to slide.
- If changes to one background inadvertently affect another, ensure you’re editing the correct object (check Selection Pane: Home > Select > Selection Pane).
Animations look jumpy
- Match durations and easing across similar animations (e.g., set all Strips entrances to the same duration and ease).
- Use the Animation Pane to reorder and preview animations in real-time.
- Make sure duplicated rectangles are identical in size; otherwise transitions will appear to jump.
Merge Shapes option greyed out
- Merge Shapes is available in newer desktop versions of PowerPoint. If your Merge Shapes is disabled, ensure you’re using the desktop app (not the web version) and that both shapes are selected.
- Sometimes grouping prevents merging. Ungroup shapes before attempting Merge Shapes.
Use cases for the Creative PowerPoint Slide
This technique is versatile. Below are several practical applications for a Creative PowerPoint Slide built around a mirror cutout and animated backgrounds:
- Travel agency hero slide: Use the mirror to show different destinations (city, countryside, beach) with your agency’s logo and contact panel anchored on the slide.
- Automotive showcase: For car launches, show how the exterior environment reflects on the mirror or window — great for lifestyle storytelling.
- Portfolio highlights: Use a thematic cutout (not just a mirror) to reveal different project images in sequence.
- Product comparison: Animate different scenarios behind a product-focused cutout to illustrate use cases.
- Conference slide: Keep speaker details visible while switching background imagery tied to session topics.
Step checklist: quick reference
- Insert full-slide rectangle and fill with car image
- Create Freeform shape for mirror and edit points to smooth
- Combine shapes (Shape Format > Merge Shapes > Combine)
- Insert background rectangles and fill with images
- Stack backgrounds behind the cutout and align
- Duplicate background rectangles and swap images
- Apply entrance animations with consistent timing
- Add cloud motion path and other accents
- Preview, refine, and save
Advanced customizations
Once you’ve built the basic Creative PowerPoint Slide, consider these enhancements:
Interactive triggers
Instead of relying purely on clicks to advance, use triggers to link a shape (like a button) to a specific animation. This allows you to manually select which scene appears next.
Masked reflections with transparency
Make the mirror feel reflective by duplicating the mirror cutout, filling it with a soft gradient (low opacity), and layering it subtly over the background images. This simulates a faint glass reflection.
Masking complex shapes
You can create any custom mask shape — steering wheel, phone screen, storefront window — by following the same Freeform and Merge Shapes procedure. The Creative PowerPoint Slide concept is the same; only the mask changes.
Accessibility and export tips
- Use high-contrast text for contact details and alt text for exported slides if you’ll share them as PDFs.
- When exporting to video, remember animations are preserved. Export the slide as an MP4 if you need a looping promotional clip.
- To send the template to others, embed fonts and include linked images or package the file so images aren’t missing on another machine.
Frequently Asked Questions (FAQ)
Q: Do I need PowerPoint desktop or will the web version work for the Creative PowerPoint Slide?
A: The desktop version of PowerPoint (Office 365 desktop or Office 2016/2019) is recommended because Merge Shapes and detailed Edit Points controls are more reliable there. The web app has limited shape-merge functionality, so some steps may not be available.
Q: How do I make the mirror cutout look more realistic?
A: After you’ve subtracted the mirror area, add a subtle inner shadow or a duplicate thin border to simulate the mirror frame. Use Format Shape > Effects > Shadow and lower opacity. You can also overlay a very faint gradient or semi-transparent white shape to simulate a reflective sheen.
Q: Can I replace the images later without redoing the shape?
A: Yes. Background rectangles with picture fills can be swapped anytime via Format Shape > Picture or texture fill > Insert. This keeps your mask intact and saves time when updating content.
Q: How do I make the cloud move continuously during the show?
A: Use a long motion path with a long duration and set it to Repeat or start With Previous so it loops as long as the slide remains active. If you export as a video, make sure the loop is baked in by setting a long timeline or duplicating the cloud’s motion.
Q: What if Merge Shapes removes more than I expect?
A: Make sure the freeform mirror shape is on top of the base rectangle before combining. PowerPoint subtracts overlaps based on z-order. Use the Selection Pane (Home > Select > Selection Pane) to confirm ordering.
Q: How can I keep the contact panel visible across scenes?
A: Place your contact panel on a layer above the background rectangles and above the cutout so it’s never affected by the background animations. If you want it animated, add its own subtle entrance or emphasis animation apart from the mirror images.
Troubleshooting checklist
- Merge Shapes greyed out? Switch to desktop PowerPoint and ensure shapes are selected, ungrouped, and not protected.
- Images shifting after duplication? Use exact width/height values in Format Shape to keep consistency.
- Animation appears behind the mirror cutout? Check layering order and make sure the animated object is behind the cutout but in front of the background (or vice versa, depending on the effect).
- Slide runs slowly with many high-res images? Compress images (File > Compress Pictures) or reduce resolution for smoother playback.
Final thoughts and creative variations
The Creative PowerPoint Slide technique — using a custom Freeform mask to reveal animated backgrounds — opens many design possibilities. Once you’ve mastered the mirror effect, try changing the mask to other familiar shapes: a smartphone screen to simulate an app, a shop window to show product shots, or even a pair of glasses to switch between different speaker POVs. The underlying method remains the same: create the mask, subtract it from a base, place background images behind, and animate them.
Remember that the strength of this effect lies in subtlety. Too many competing animations or overly long motion distracts the audience; tasteful transitions and a single accent (like the cloud) will give your Creative PowerPoint Slide a professional, cinematic feel.
If you want to replicate exactly what I built, follow the step checklist, allocate time to refine the Freeform points, choose harmonious images, and preview the slide several times to perfect timing. The effort is well worth it — this is the kind of detail that makes your presentation stand out.
Conclusion
The Creative PowerPoint Slide is a compact but impressive effect you can add to your deck in under 30 minutes once you get comfortable with Freeform shapes and Merge Shapes. It combines simple tools to deliver a high-impact result: a visual window inside a side mirror that cycles through backgrounds on click. Use it for travel offers, automotive showcases, portfolio highlights, and more.
To recap, the core workflow is:
- Fill a base rectangle with your scene (car image).
- Create and refine a Freeform mask around the area you want to act as a window (mirror).
- Merge shapes to subtract the mask from the base rectangle.
- Insert background rectangles behind the cutout and fill them with photos.
- Duplicate, swap images, and animate entrance effects.
- Add one or two accents like a moving cloud to enhance realism.
Now go make your own Creative PowerPoint Slide — experiment with masks, images, and animation timing until you achieve the look you want. The result will be worth the time.
Additional screenshots for reference
Ready to try?
Grab some images, open PowerPoint, and build your own Creative PowerPoint Slide. Start simple, then add polish: edit points, align precisely, and fine-tune timing. You’ll end up with a memorable slide that elevates your presentation.
Check out the full video: Creative PowerPoint Slide


