
Table of Contents
- Introduction: Why this tutorial matters
- Overview & design goals
- What you’ll build (visual summary)
- Step-by-step: Create the base shapes
- Step-by-step: Add background image and overlays
- Step-by-step: Create the central lock and glow
- Step-by-step: Build the option bubbles and icons
- Typography, color, and accessibility tips
- Animations that improve clarity
- Variations and advanced tweaks
- Common problems & how to fix them
- Checklist before finalizing
- Frequently Asked Questions (FAQ)
- Final thoughts and next steps
Introduction: Why this tutorial matters
I’m POWERPOINT UNIVERSITY, and in this in-depth walkthrough I’ll show you exactly how I Design Cybersecurity slide in powerpoint. Whether you’re preparing a short internal security briefing, a training slide, or a conference presentation, a well-crafted cybersecurity slide communicates both authority and clarity. The goal of this article is to not only reproduce a clean, modern cybersecurity visual, but to teach you design decisions you can reuse across many slides.
Throughout this guide I’ll lead you through every step I use to Design Cybersecurity slide in powerpoint: building custom shapes, inserting a relevant background, layering gradients, adding icons, and grouping elements for quick duplication. Expect practical shortcuts, alignment tips, and suggestions for making the slide accessible and animation-ready.
Overview & design goals
Before we begin building, let’s clarify what we want the finished slide to accomplish. When I Design Cybersecurity slide in powerpoint, I aim for three goals:
- Visual clarity: a strong focal point (lock icon) with supporting items arranged clearly around it.
- Hierarchy of information: main title, six actionable items, icons to aid quick recognition.
- Flexibility: template-like elements that can be duplicated or edited for more or fewer items.
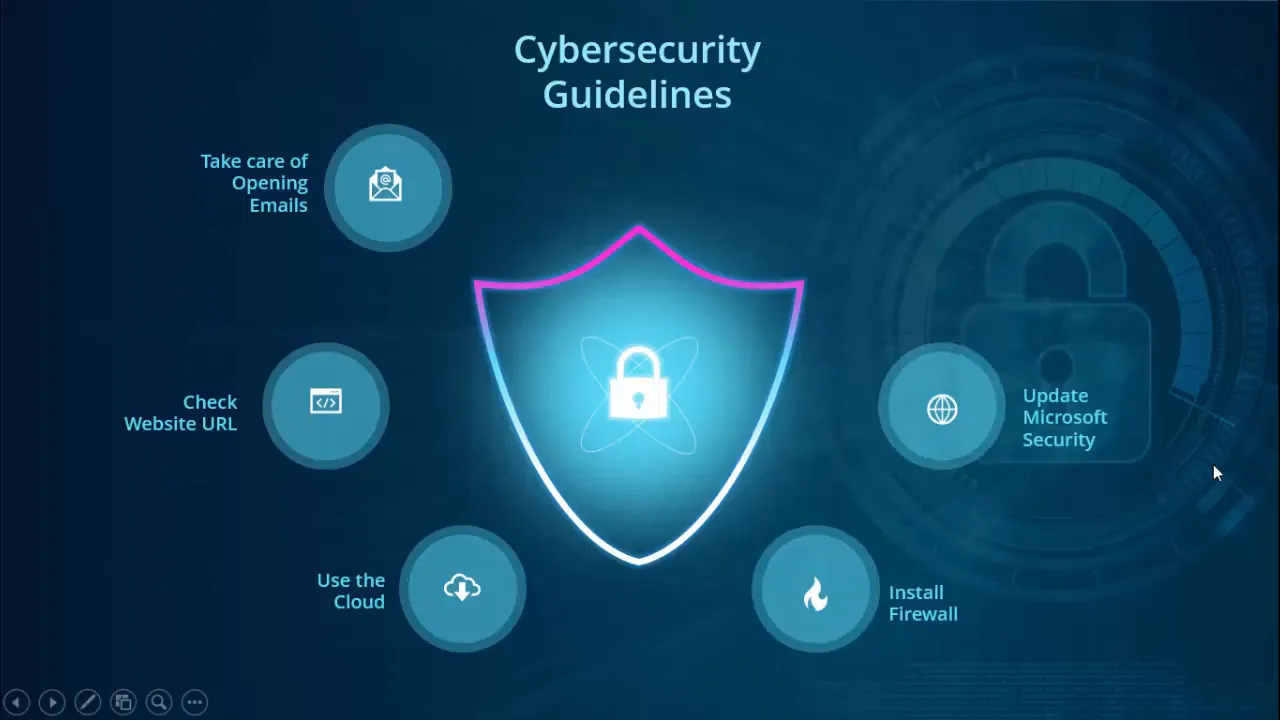
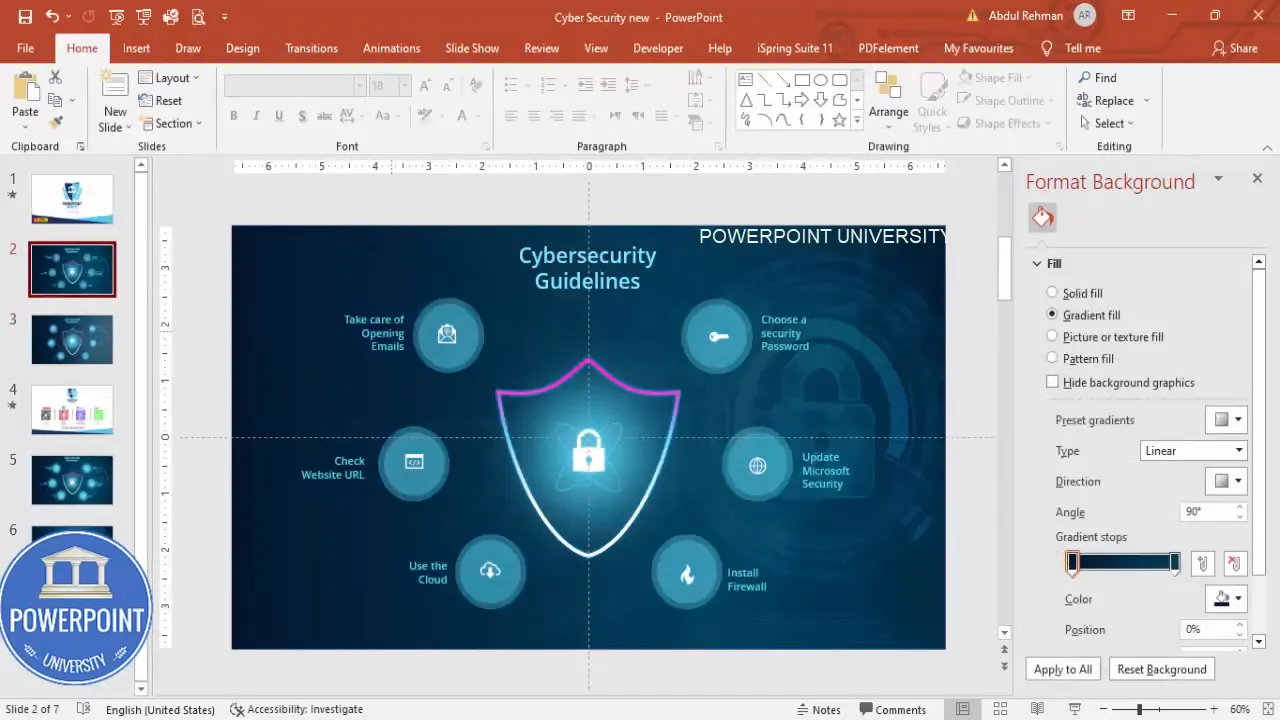
The final layout will have a central lock symbol inside a decorative shield-like shape, a soft glow behind it for emphasis, a semi-transparent background photo related to cybersecurity, and six oval option bubbles arranged around the center with icons and short labels: “Take care opening emails,” “Check website URL,” “Use the cloud,” “Install firewall,” “Update Microsoft security,” and “Choose a secure password.”
What you’ll build (visual summary)
When you follow this guide to Design Cybersecurity slide in powerpoint, you’ll end up with a single slide that is:
- Suitable for security awareness presentations
- Clean, modern, and easily editable
- Optimized for presentation mode and for exporting as PNG/PDF
I’ll also show you how to make the slide interactive with simple click-to-reveal animations and how to group objects for fast edits. If you want to reuse the layout for other topics, you’ll be able to flexibly change icons, labels, and background imagery.
Step-by-step: Create the base shapes
We start by creating the shield-like central shape. The trick is to combine simple PowerPoint shapes and then edit points for precision.
- New slide and enable guides: Insert a new blank slide. Go to View and enable Guides. This makes alignment much easier when you Design Cybersecurity slide in powerpoint.
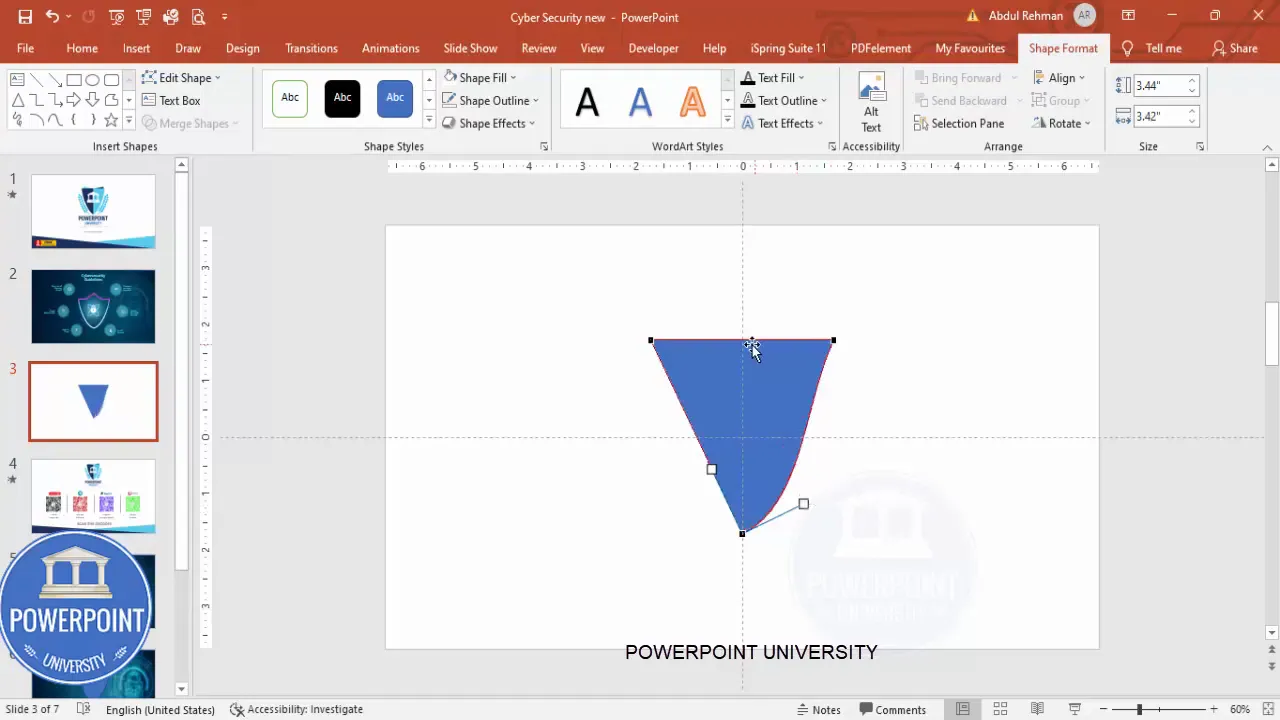
- Insert the triangle: Go to Insert > Shapes > Triangle. Draw a vertical triangle centered on the slide.
- No outline: With the triangle selected, set Shape Outline to No Outline to avoid unwanted borders.
- Align exactly: Use Align > Align Center and Align > Align Middle to place the triangle precisely at the center.
- Flip and edit points: Rotate the triangle and Flip Vertical if necessary. Right-click > Edit Points. Drag the side points inward to create a tapered, shield-like top. To add refinement, right-click on a path point and choose Add Point (you may see it as Add Anchor Point), then drag it upward slightly to create the “crest” at the top of the shield.
- Trim the left side: To make a symmetrical shield, draw a rectangle that overlays the left half, select both shapes, and use Merge Shapes > Subtract to cut away the left portion. Duplicate (Ctrl+D), flip horizontally, and snap into place to create a full symmetrical shield.
- Union and outline: Select both halves and use Merge Shapes > Union. Set a stroke (outline) color and set the fill to No Fill for now—this yields a hollow shield outline that will later frame the lock icon.
Why this approach? Building a shield from two mirrored halves gives precise control over the curvature and lets you keep the center line clean for the lock icon. When I Design Cybersecurity slide in powerpoint I prefer vector-like custom shapes so the slide scales cleanly when displayed on screens of different sizes.
Quick tips
- Turn on Smart Guides (View > Guides and Grid) to snap objects perfectly.
- When you Edit Points, hold Shift for fine movements.
- If Merge Shapes is grayed out, ensure the file is not in a restricted mode or the shapes are standard shapes (not grouped or inside placeholders).
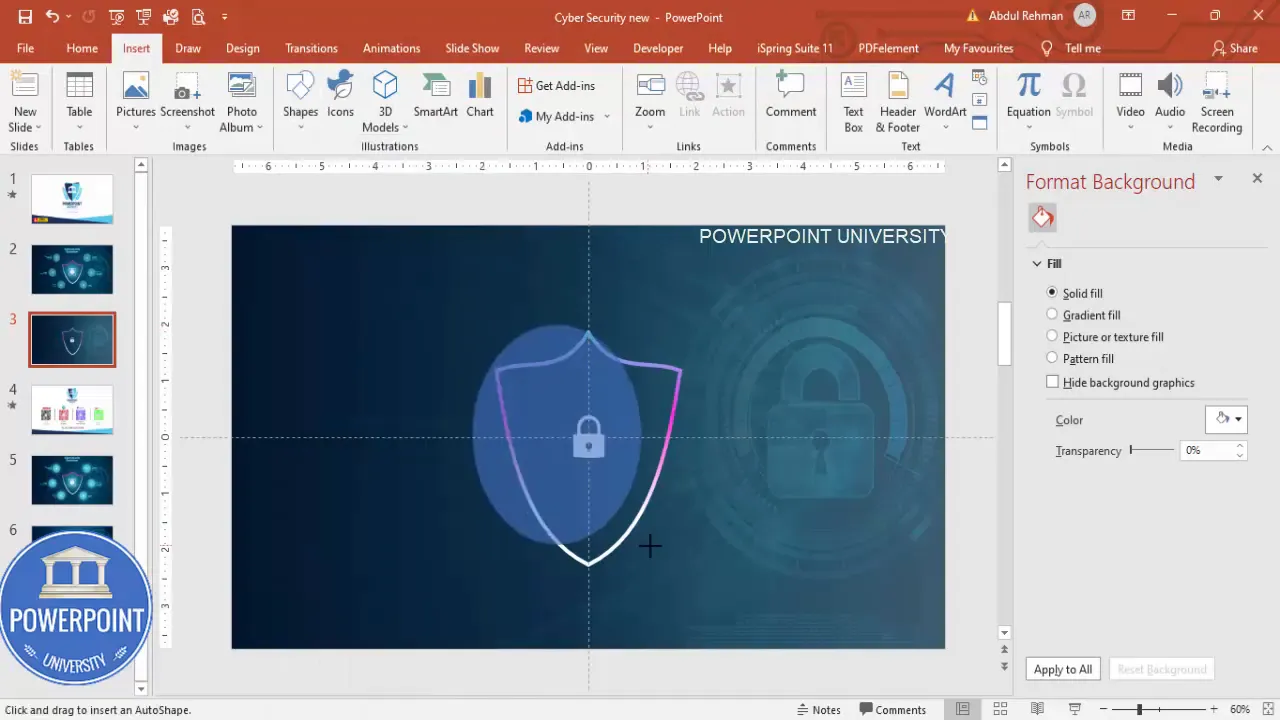
Step-by-step: Add background image and overlays
A compelling cybersecurity slide needs immediate visual context. A dimmed, full-bleed image with colored gradient overlays looks modern and keeps text readable.
- Full-slide rectangle: Insert > Shapes > Rectangle. Draw to cover the entire slide. Remove the outline.
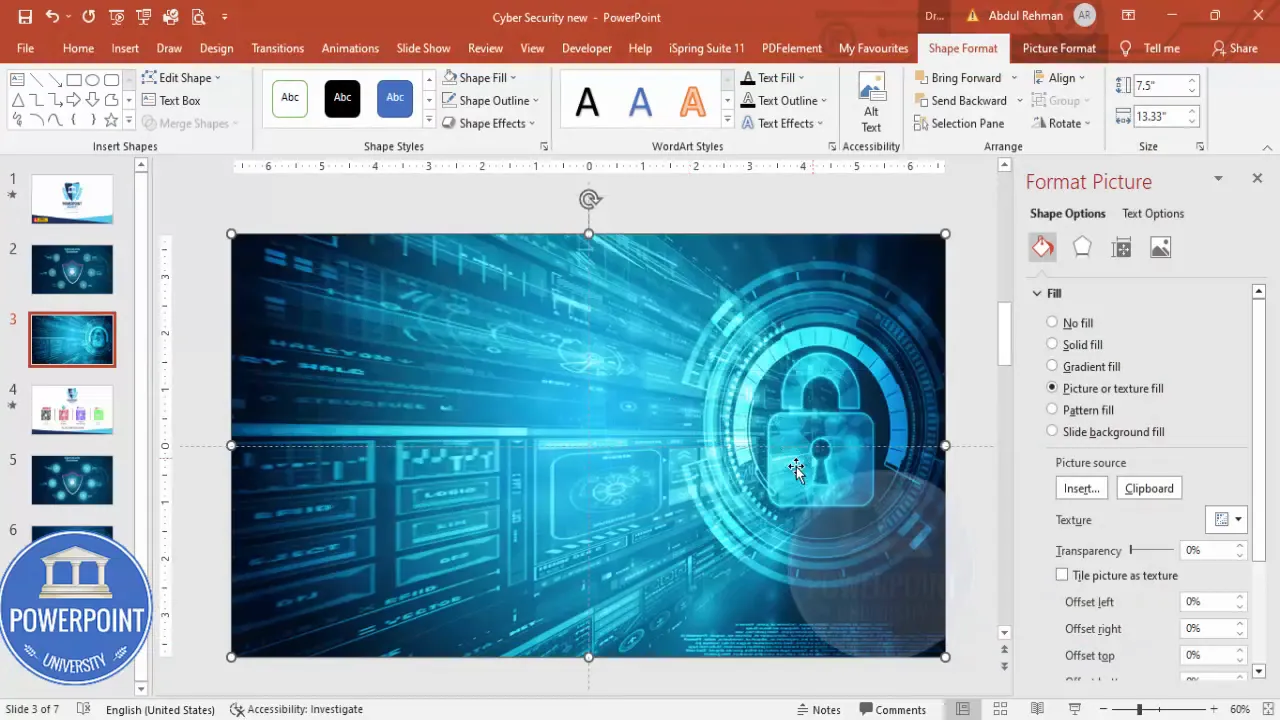
- Fill with picture: Right-click > Format Shape > Fill > Picture or texture fill. Choose Insert from File or Online Pictures and search for “cyber security”. Select a strong but not overly busy image (e.g., padlock and shield visuals work well).
- Send to back and adjust transparency: Right-click > Send to Back. Increase transparency (I typically set around 50%) so the background supports but doesn’t overpower foreground elements.
Next, add a colored overlay to unify the palette:
- Second full-slide rectangle: Insert another rectangle to cover the slide; remove the outline.
- Gradient fill: In Format Shape, choose Gradient Fill. I use two stops — dark blue and dark teal — and set a linear direction with the darker tone on the left. Adjust transparency for the lighter stop so the image peeks through.
- Extra gradient stop (optional): Add a third stop to create a more nuanced overlay. Slight transparency at the edges helps keep the slide airy.
- Send overlay to back: Send the gradient layer just above the picture layer so it tints the photo but you can still layer other objects above it.
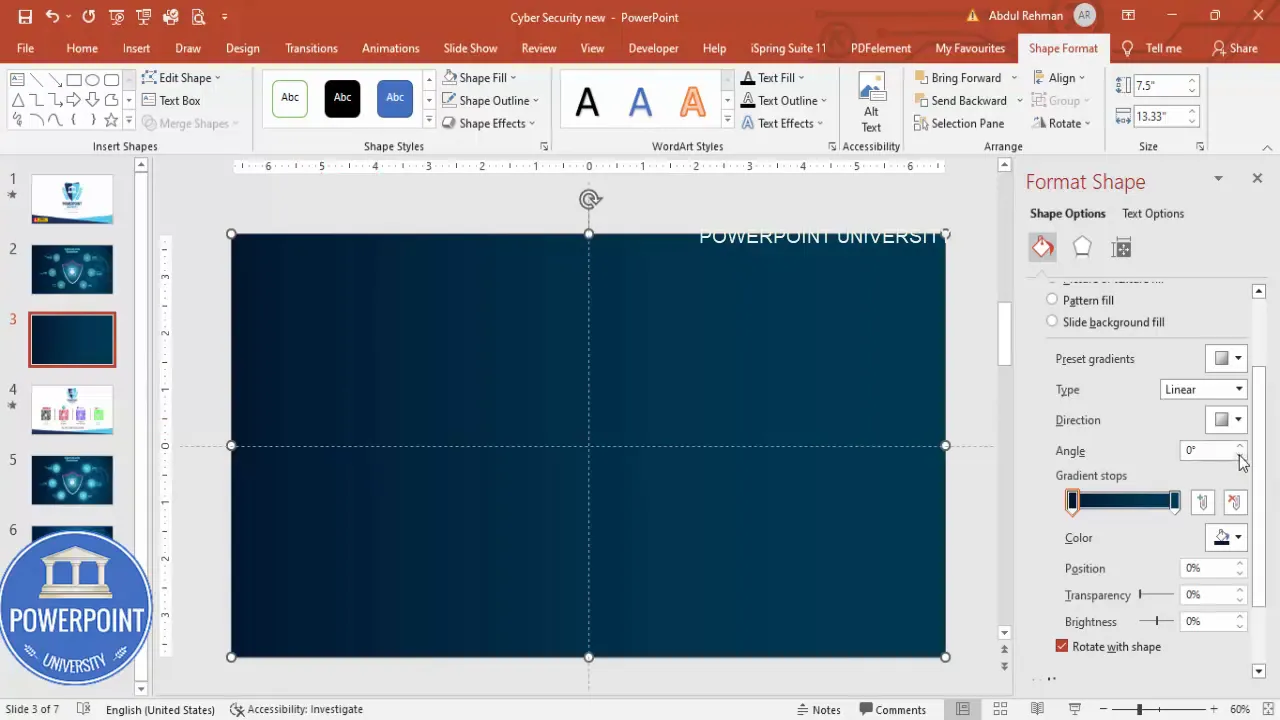
Why use a tinted overlay?
A tinted gradient overlay increases contrast for foreground text and shapes while giving the slide a cohesive color palette. When I Design Cybersecurity slide in powerpoint I always use overlays when there is a photographic background — it keeps the presentation readable and visually consistent.
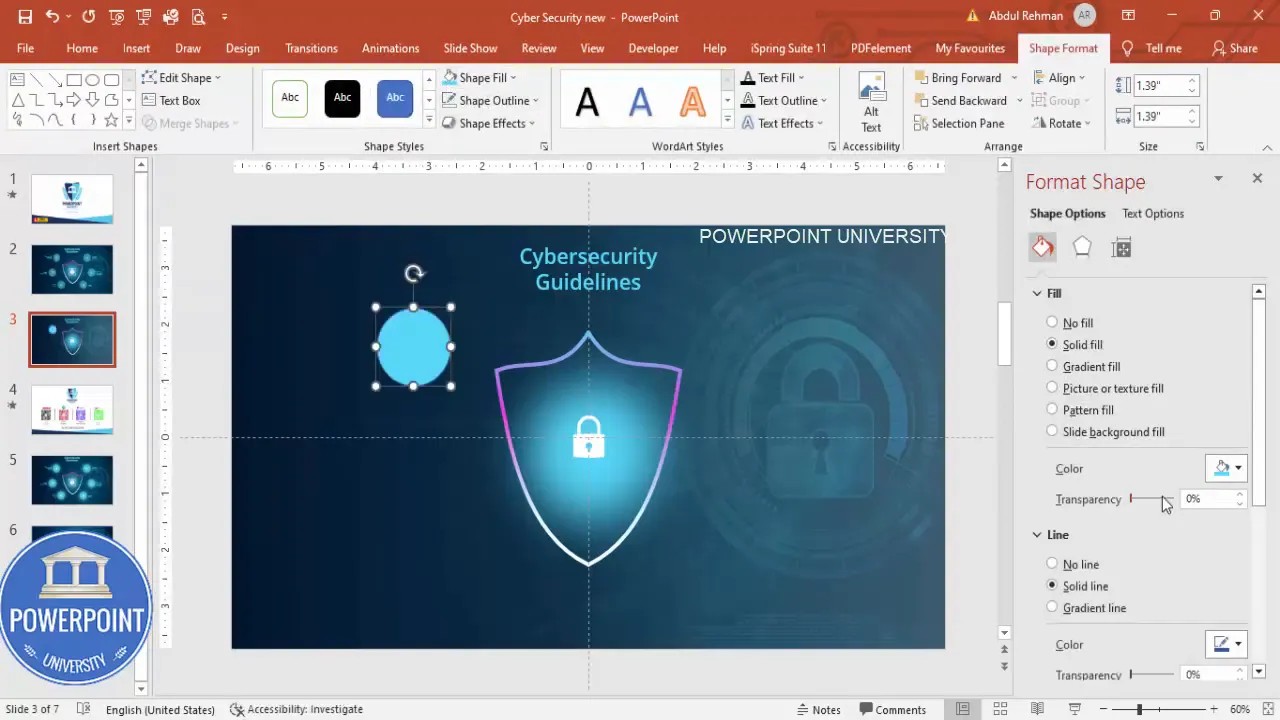
Step-by-step: Create the central lock and glow
The center lock is the focal point. We will add a decorative gradient outline line, place the lock icon, and create a soft glow behind it to draw attention.
- Outline line: With the shield already created, select the shape and apply no fill but a gradient line (Format Shape > Line > Gradient Line). Add three color stops: white, purple, blue to give a subtle chromatic outline. Increase width to around 5.5 pt for visibility.
- Insert the icon: Go to Insert > Icons and search for a padlock or lock. Insert the icon and color it white. Scale the icon to sit comfortably inside the shield. Group the icon and shield if you want to move them together later.
- Soft glow behind the lock: Insert > Shapes > Oval. Draw a large oval behind the shield; set no outline and choose a turquoise/blue fill. Then, in Format Shape > Effects > Soft Edges (or Blur), increase size to create a soft halo. Send to back so the glow sits between the lock and the background overlay.
That glow is a simple trick that points the eye to the lock. When I Design Cybersecurity slide in powerpoint, this subtle emphasis helps viewers immediately recognize the theme before reading text.
Design considerations for the lock
- Keep the icon simple — flat, single-color icons read better at a distance.
- If you use a multi-color outline, ensure the icon contrasts strongly (white on dark outline is a safe choice).
- Test at slideshow size to ensure the lock remains legible on the largest presentation screens you’ll use.
Step-by-step: Build the option bubbles and icons
Now we’ll create the six option bubbles that explain the actual cybersecurity guidelines. These are the actionable items viewers will remember, so clarity and consistency are essential.
- Insert oval base: Insert > Shapes > Oval. Draw a horizontally oriented oval that will serve as the option bubble. I set the fill color to the same turquoise-blue as the glow and increase transparency to about 50% so the background texture shows through slightly.
- Duplicate and resize: Press Ctrl+D to duplicate the oval, reduce the size slightly, then align the smaller one centered on the larger one. Select both and Group (Ctrl+G) so they move together.
- Create six copies: With the grouped bubble selected, press Ctrl+D repeatedly until you have six copies. Arrange them around the center — three on the left and three on the right — using Ctrl+Shift drag to maintain straight horizontal or vertical movement.
- Align precisely: Use Align > Align Middle/Align Center and Distribute Horizontally/Vertically as needed to ensure even spacing.
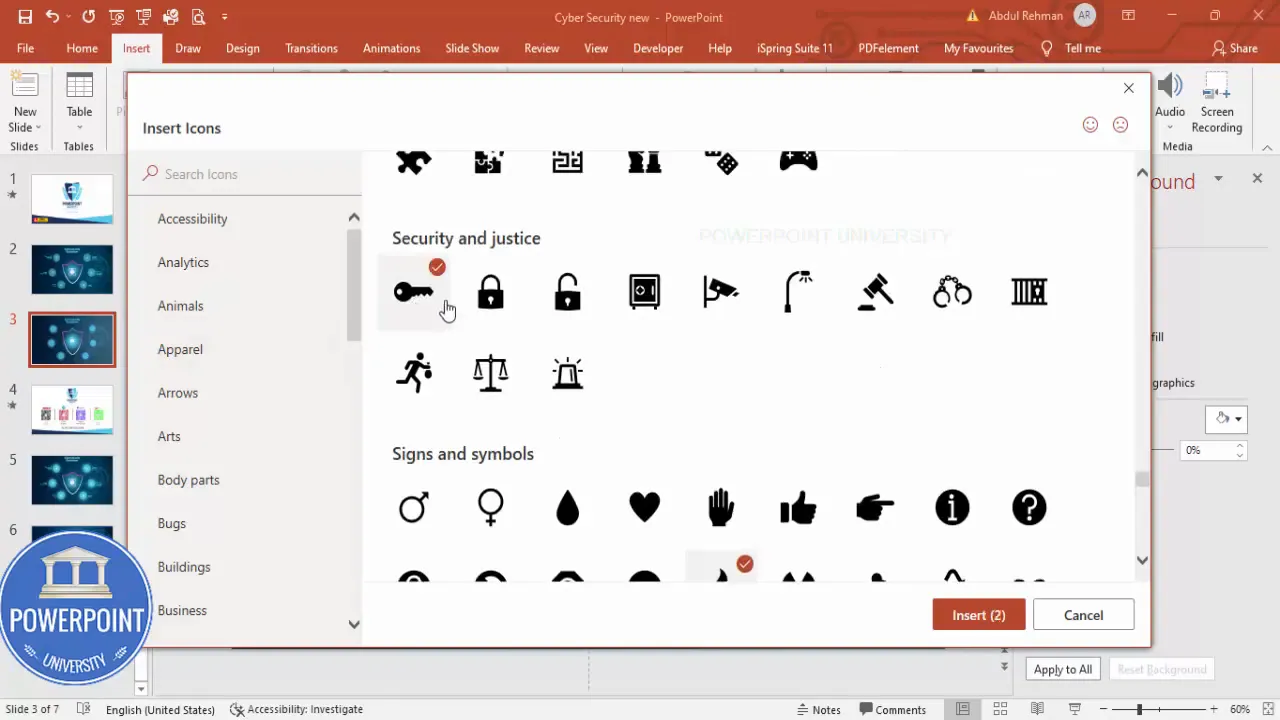
Next, add icons into each bubble:
- Choose relevant icons: Insert > Icons. Pick simple, single-color icons for consistency: mail (for opening emails), globe or URL (for checking website URL), cloud (for cloud usage), flame or shield (for firewall), refresh or update (for updates), lock or key (for passwords).
- Size and color: Make the icons about 0.5″ in height (or 12–18 pt depending on slide scale) and color them white for strong contrast against the semi-transparent bubble.
- Place icons inside bubbles: Center each icon vertically and align left or center depending on whether your text label sits to the right or below. For this layout, icons sit left in each bubble with short text to their right.
- Add text labels: Use a clean sans-serif font such as Open Sans SemiBold. Keep lines short (5–8 words) and use right-aligned text for bubbles on the right, left-aligned for bubbles on the left. Duplicate the text boxes (Ctrl+D) so formatting is consistent.
Here are the common labels I use when I Design Cybersecurity slide in powerpoint:
- Take care when opening emails
- Check website URL before entering data
- Use the cloud responsibly
- Install and maintain a firewall
- Update Microsoft security and patches
- Choose and rotate secure passwords
Layout options
You can arrange these bubbles symmetrically around the center lock, vertically along both sides, or form a circular orbit. The key is balance and spacing so the slide looks intentional, not cluttered.
Typography, color, and accessibility tips
Good typography and accessible colors are especially important when you Design Cybersecurity slide in powerpoint. Security topics often go to broad audiences; your slide must be readable for everyone.
Typography
- Use a clear sans-serif font like Open Sans, Helvetica, or Calibri for body text. For headings, Open Sans SemiBold works well.
- Maintain font sizes: heading 32–44 pt (depending on slide size), body text 18–28 pt for readability from a distance.
- Limit line length: keep labels to a single short line where possible for quick scanning.
Color and contrast
- Ensure a contrast ratio of at least 4.5:1 between text and background for body text and 3:1 for large text. Tools like the WebAIM Contrast Checker can help.
- Use a unified palette: one primary color (teal/blue), one accent gradient (purple/blue), and neutral white/gray for text/icons.
- Use semi-transparent shapes to maintain legibility while letting background imagery show through.
Accessibility considerations
- Avoid relying on color alone to communicate meaning. Combine icons with labels.
- Provide a transcript or speaker notes that list the six points in plain text for screen readers.
- Use sufficient font sizes and line spacing to accommodate viewers with low vision.
Animations that improve clarity
Simple, purposeful animations can help your audience process information. When I Design Cybersecurity slide in powerpoint, I favor subtle click-to-reveal animations that avoid distraction.
- Entrance effect: Use Appear or Fade for each option bubble so you can introduce guidelines one at a time. Set them to On Click for paced delivery.
- Motion path (optional): A short float-up or zoom-in adds a professional touch but keep the duration short (0.3–0.6s).
- Sequential order: In the Animation Pane, order the animation so the lock and central group are visible first, then reveal each option from top to bottom or left to right.
- Consistency: Use the same animation for each option bubble to avoid visual noise.
Pro tip: if you plan to export the slide as a static PNG for handouts, make sure your design holds up without the animations. Use animation mainly for presentation mode.
Create Slides in Seconds with ExpertSlides AI |
|
Generate AI Presentations today: |
| TRY NOW! |
Variations and advanced tweaks
Once you know how to Design Cybersecurity slide in powerpoint using the base method, you can explore variations:
- Circular option layout: Arrange six bubbles in a circular orbit around the lock to emphasize centrality.
- Vertical checklist: Make the left side a vertical list and the right side imagery, using the same icons and colors.
- Interactive navigation: Create hyperlinks (Action > Hyperlink > Slide) so clicking an option jumps to a detailed slide about that guideline.
- Animated infographic: Use Morph transitions and duplicate slides to animate the transition of bubbles into dedicated content areas.
Advanced users can also convert shapes into SVGs, edit them in vector tools, and import back to PowerPoint for refined curves. But for most presenters, PowerPoint’s built-in shapes and Edit Points are perfectly sufficient.
Common problems & how to fix them
Here are typical issues I encounter when people Design Cybersecurity slide in powerpoint and how to resolve them:
- Shapes won’t merge: Ensure shapes are not grouped or within placeholders; draw them on the slide surface. Try saving and reopening if Merge Shapes remains unavailable.
- Icon too large or pixelated: Use vector icons (Insert > Icons) instead of raster images; they scale cleanly.
- Background too busy: Increase overlay opacity or blur the photo in an external editor, then reinsert.
- Text too small on projector: Increase font sizes; when in doubt, test on the actual presentation screen.
- Animations not playing consistently: Use simple Fade/Appear transitions and avoid simultaneous complex animations to reduce performance hiccups on older machines.
Checklist before finalizing
Before you present or export, run through this checklist every time you Design Cybersecurity slide in powerpoint:
- All text is readable at presentation distance (walk to the back of the room and preview).
- Contrast check passed for critical labels and icons.
- Iconography is consistent — same stroke weight, color, and style.
- Animations are ordered and timed for your speaking pace.
- Objects are grouped logically (Ctrl+G) so moving and editing is fast.
- Slide saved in multiple formats (PPTX for edits, PDF/PNG for distribution).
Frequently Asked Questions (FAQ)
Q: What font should I use when I Design Cybersecurity slide in powerpoint?
A: I recommend a clear sans-serif font like Open Sans, Helvetica, or Calibri. For headings use a semi-bold weight (e.g., Open Sans SemiBold) and for body text use regular or semi-bold for short phrases. Consistency is more important than novelty.
Q: How many times should I repeat the keyphrase when I Design Cybersecurity slide in powerpoint?
A: When optimizing content for search or internal tagging, include the phrase in the title and introduction and sprinkle it across headings and the body. For the slide itself, don’t add the phrase to the slide — keep slide text short and focused on the six items.
Q: What image should I use for the background when I Design Cybersecurity slide in powerpoint?
A: Choose an image that suggests security without distracting from the text. Examples: close-up of a padlock, abstract shield, or lines of code in a dark background. Reduce opacity and add a gradient overlay to avoid visual competition with foreground elements.
Q: How do I make the slide accessible for people with visual impairments?
A: Use high contrast, clear fonts, and include a text-only slide or speaker notes listing the six key items. Avoid color as the only differentiator; pair color with icons or bold labels.
Q: Can I reuse this layout for other topics besides security?
A: Absolutely. The centered icon with surrounding option bubbles is a versatile infographic pattern. Replace the central icon, the background image, and labels to adapt it for marketing, product features, or process steps.
Q: How do I export the slide for print or handouts?
A: File > Save As > choose PNG or PDF. If exporting as an image, use high resolution and ensure text remains legible. For handouts, consider a two-column layout with the slide on one side and detailed text on the other.
Q: My icons look inconsistent. How do I fix that when I Design Cybersecurity slide in powerpoint?
A: Use Insert > Icons for a consistent set. If you mix downloaded icons, make sure they share the same stroke thickness and style. Convert icons to shapes (Right-click > Convert to Shape) for advanced editing if necessary.
Q: Are there any shortcuts I should know to speed up the creation?
A: Yes. Use Ctrl+D to duplicate elements quickly, Ctrl+G to group, Alt+Shift to nudge objects in fine increments, and Align tools to distribute objects evenly. Turn on Guides to snap objects to the center and to each other.
Q: How do I create the glow effect behind the lock?
A: Insert a large oval behind the lock, use a turquoise/blue fill with no outline, then apply a soft edge or blur via Format Shape > Effects > Soft Edges. Increase the size of the soft edge until you get a halo effect without hard edges.
Q: Can I animate the six options so they appear on click?
A: Yes. Select each option bubble and apply an Appear or Fade animation. Set them to On Click in the Animation Pane and order them logically. Avoid long animations; short, snappy reveals work best for audience focus.
Final thoughts and next steps
Designing a clear, effective security slide is about balance: visual impact without clutter, emphasis without distraction. When I Design Cybersecurity slide in powerpoint, I focus on creating a clear visual hierarchy, building vector-like shapes for crispness, and using color and soft glows to guide the eye.
If you’d like a ready-made starting point, I often keep a template with the lock, gradient overlay, and six grouped option bubbles so I can quickly swap icons and labels. This lets me produce multiple slides in the same visual language in minutes.
To recap the workflow one final time:
- Enable guides and create custom shield shape via Edit Points and Merge Shapes.
- Add a photographic background and a gradient overlay for contrast.
- Create a gradient outline for the shield and insert a white lock icon.
- Add a soft glow behind the lock to establish a focal point.
- Create semi-transparent oval bubbles, insert consistent icons, and add short labels.
- Apply simple On Click animations for a paced reveal during presentation.
Use this structure every time you Design Cybersecurity slide in powerpoint and you’ll end up with slides that are visually professional and quick to produce. If you need downloadable assets, consider keeping a small library of icons, color palettes, and a master slide to accelerate future work.
Thanks for reading — use these steps to craft slides that help your audience understand and act on important cybersecurity advice.
Check out the full video: Design Cybersecurity Slide in PowerPoint. Tutorial No.: 998


