
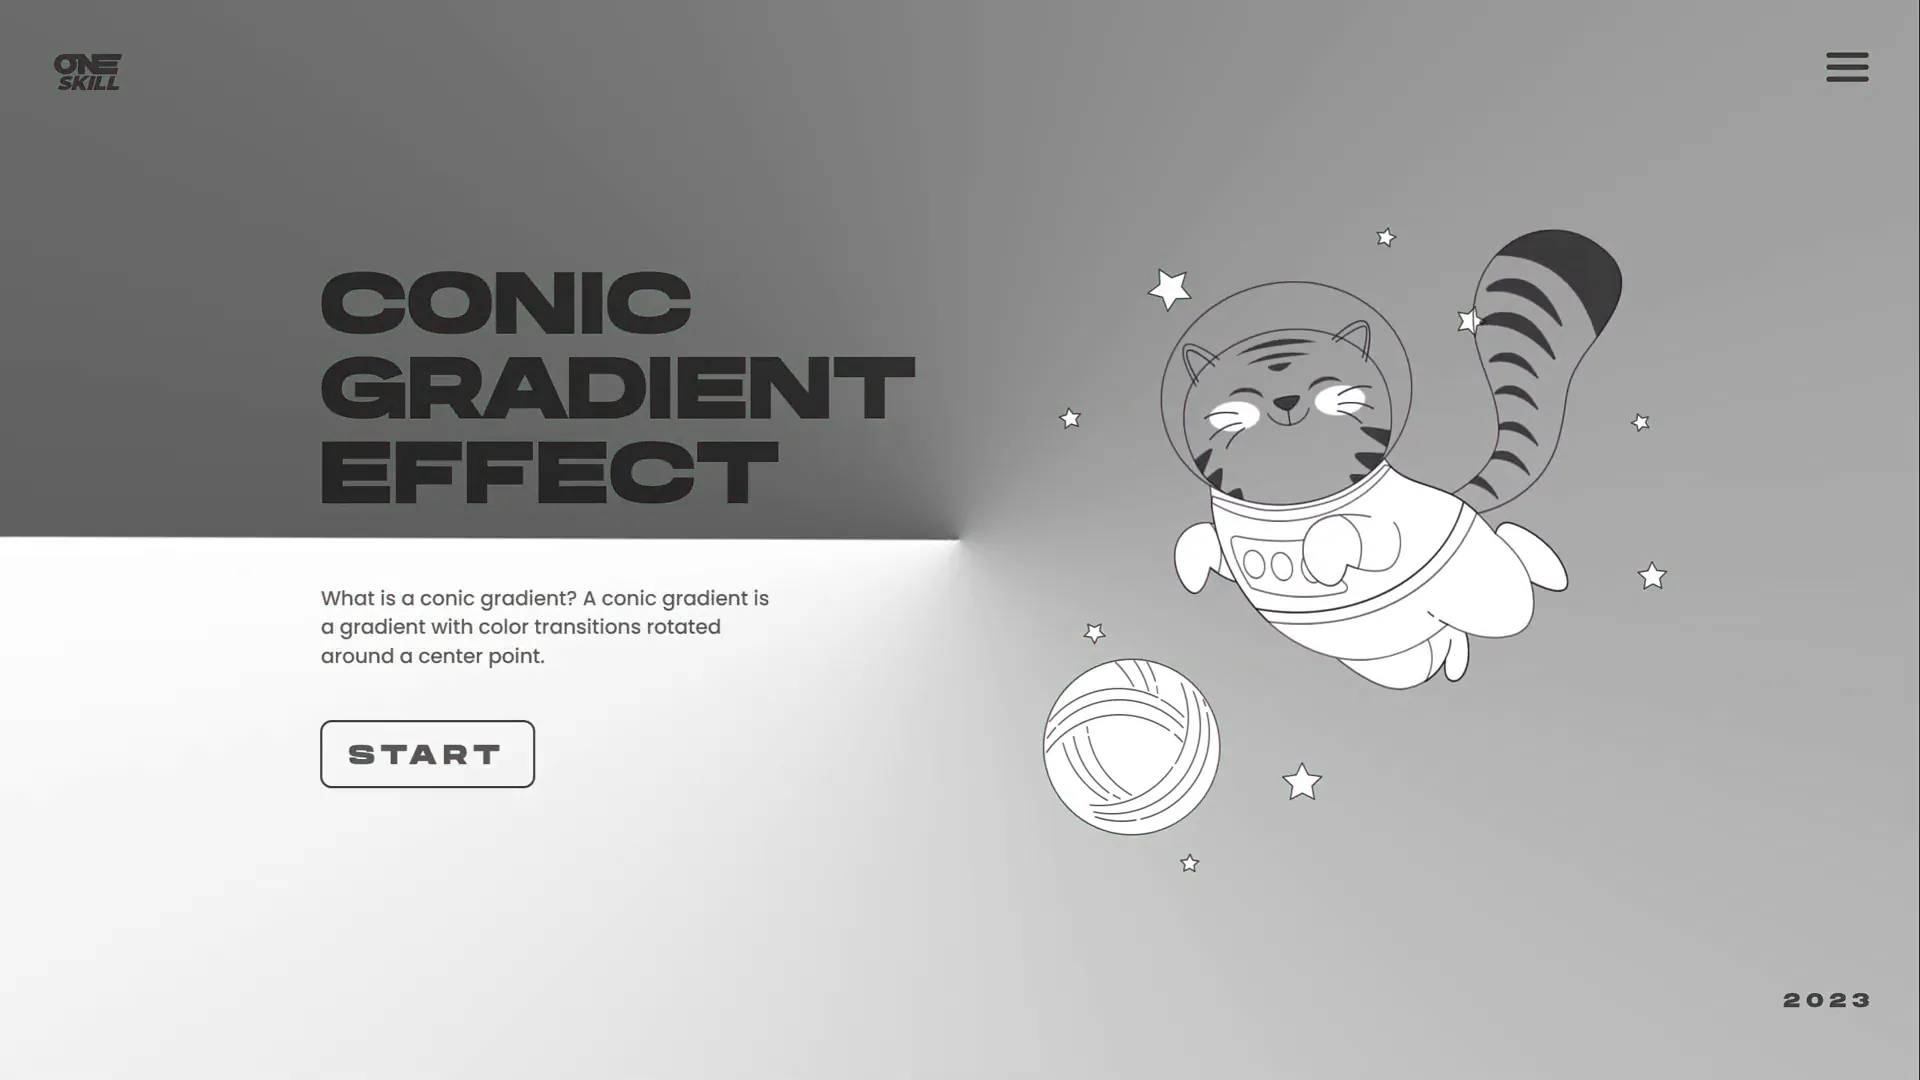
If you’re looking to elevate your PowerPoint presentations with stunning visual effects, learning how to create dynamic PowerPoint animation effects is a game changer. Among the many creative options available, the spinning conic gradient effect stands out as a unique, eye-catching design element that can transform your slides from ordinary to extraordinary.
In this comprehensive guide, you’ll discover how to craft this impressive animated gradient effect using PowerPoint, even if the software doesn’t natively support conic gradients. Inspired by UI Adrian’s work with Figma, this tutorial adapts that concept for PowerPoint users, showing you step-by-step how to create, customize, and animate your own conic gradient background. Plus, you’ll learn tips for making the effect versatile with different colors and how to integrate fun elements like animated illustrations.
Get ready to impress your audience with this creative PowerPoint animation effect that’s both professional and playful. Let’s dive in!
Table of Contents
- What Is a Conic Gradient?
- Why Use a Conic Gradient in PowerPoint?
- Creating the Conic Gradient Using Figma
- Importing and Preparing the Gradient in PowerPoint
- Animating the Gradient Spin Effect
- Customizing Background Colors for Versatility
- Adjusting Brightness for Light or Dark Themes
- Adding Content and Animated Illustrations
- Tips for Using PowerPoint Animation Effects Effectively
- Frequently Asked Questions
- Conclusion
What Is a Conic Gradient?
A conic gradient is a type of gradient that transitions colors around a central point, creating a circular or angular color effect. Unlike linear or radial gradients which flow in straight lines or from a center outwards, the conic gradient looks like colors spinning or revolving around a pivot.
This style of gradient can be visually striking and is commonly used in modern UI designs to add depth, motion, and a dynamic feel to backgrounds and elements.
Why Use a Conic Gradient in PowerPoint?
PowerPoint presentations often rely on static backgrounds that can feel dull or uninspiring. Incorporating a spinning conic gradient adds:
- Visual interest: The rotating gradient naturally draws the eye and keeps viewers engaged.
- Modern design flair: This effect mimics trending UI design elements, giving your slides a contemporary professional look.
- Customization flexibility: You can easily change colors, brightness, and speed to match your branding or presentation mood.
- Animation synergy: When paired with other animated elements like text or illustrations, the gradient enhances the overall dynamic feel without overwhelming.
However, PowerPoint itself lacks a native option for conic gradients, which is why this tutorial leverages an external design tool — Figma — to create the base gradient image before animating it in PowerPoint.
Creating the Conic Gradient Using Figma
Figma is a free, web-based design tool that makes creating conic gradients simple. Here’s how you can create your own conic gradient for PowerPoint:
- Sign up or log in to Figma using your Google account or email at figma.com.
- Once logged in, click New design file to open a blank canvas.
- Insert a frame (Figma’s term for a page or artboard) by clicking the frame tool or the “+” button.
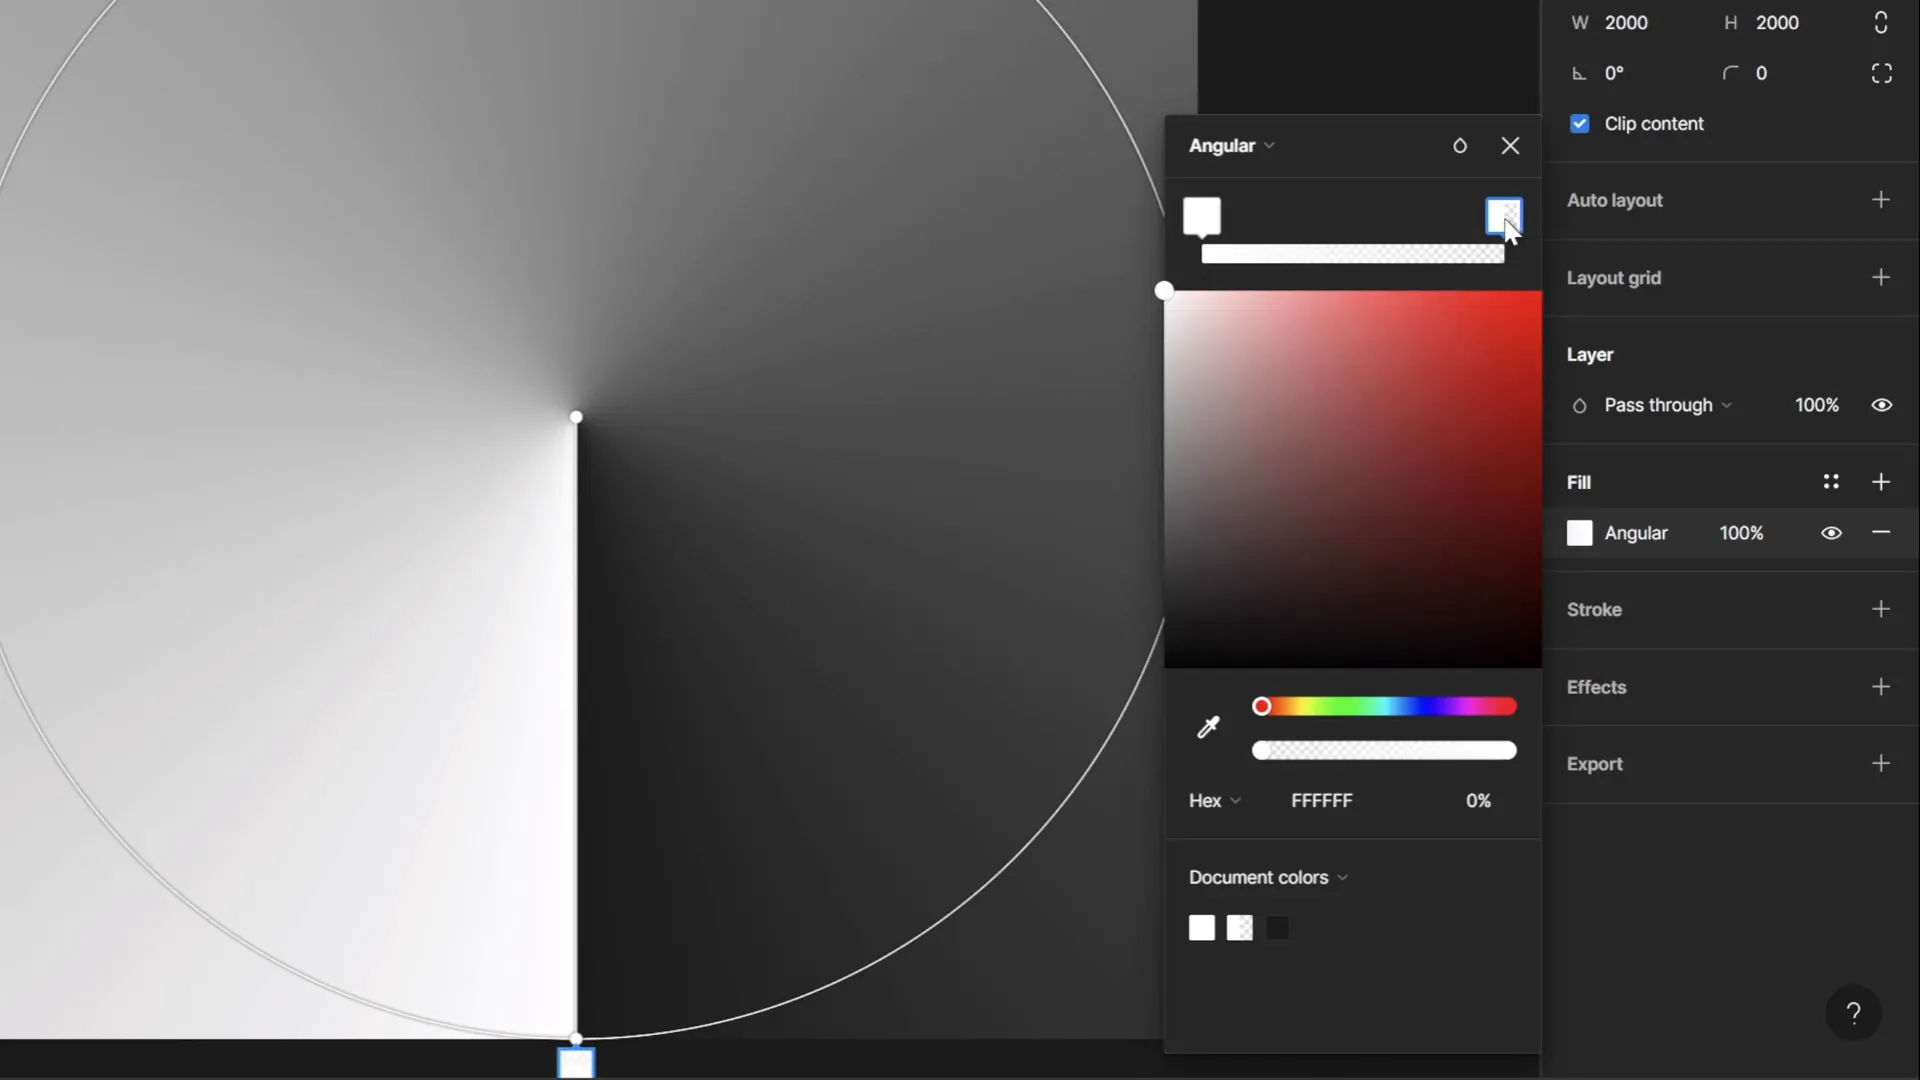
- On the right panel, set the frame dimensions. Instead of the default 1920×1080, use 2000 pixels width and 2000 pixels height to create a large square canvas. This size gives you more flexibility when importing into PowerPoint.
- With the frame selected, click the Fill color option in the right panel.
- Change the fill type from solid to Angular gradient (also known as conic gradient).
- Adjust the color stops. For best flexibility in PowerPoint, set the left color stop to solid white and the right color stop to transparent white. This will allow the gradient to take on different background colors later.
- Optionally, customize the hue of your gradient stops for different color effects, but sticking to white and transparent white is recommended for maximum versatility.
- Rename your frame to “Conic Gradient” for easy identification.
- Export the frame as a PNG image by clicking Export in the bottom right corner and selecting PNG format.
By using this method, you generate a high-quality conic gradient image that you can import into PowerPoint and animate.
Importing and Preparing the Gradient in PowerPoint
Now that you have your conic gradient image, it’s time to bring it into PowerPoint and prepare it for animation:
- Open your PowerPoint presentation or create a new slide with a white background.
- Go to Insert > Pictures and select your exported conic gradient PNG.
- Resize the image by dragging a corner while holding Ctrl + Shift to maintain proportions and enlarge it until it covers the entire slide.
- To ensure the gradient covers all edges during rotation, insert a circle shape by going to Insert > Shapes > Oval, then hold the Shift key while drawing to make a perfect circle.
- Center the circle on the slide both horizontally and vertically using the Align tools.
- Set the circle’s fill to transparent so you can see the gradient behind it.
- Resize the circle so it’s slightly larger than the slide itself.
- Resize your conic gradient image to be slightly larger than the circle, ensuring full coverage during spin.
- Select both the gradient image and the circle by holding Shift and clicking each.
- Go to Shape Format > Merge Shapes > Intersect. This crops the gradient image into a perfect circle shape, preventing corners from showing during rotation.
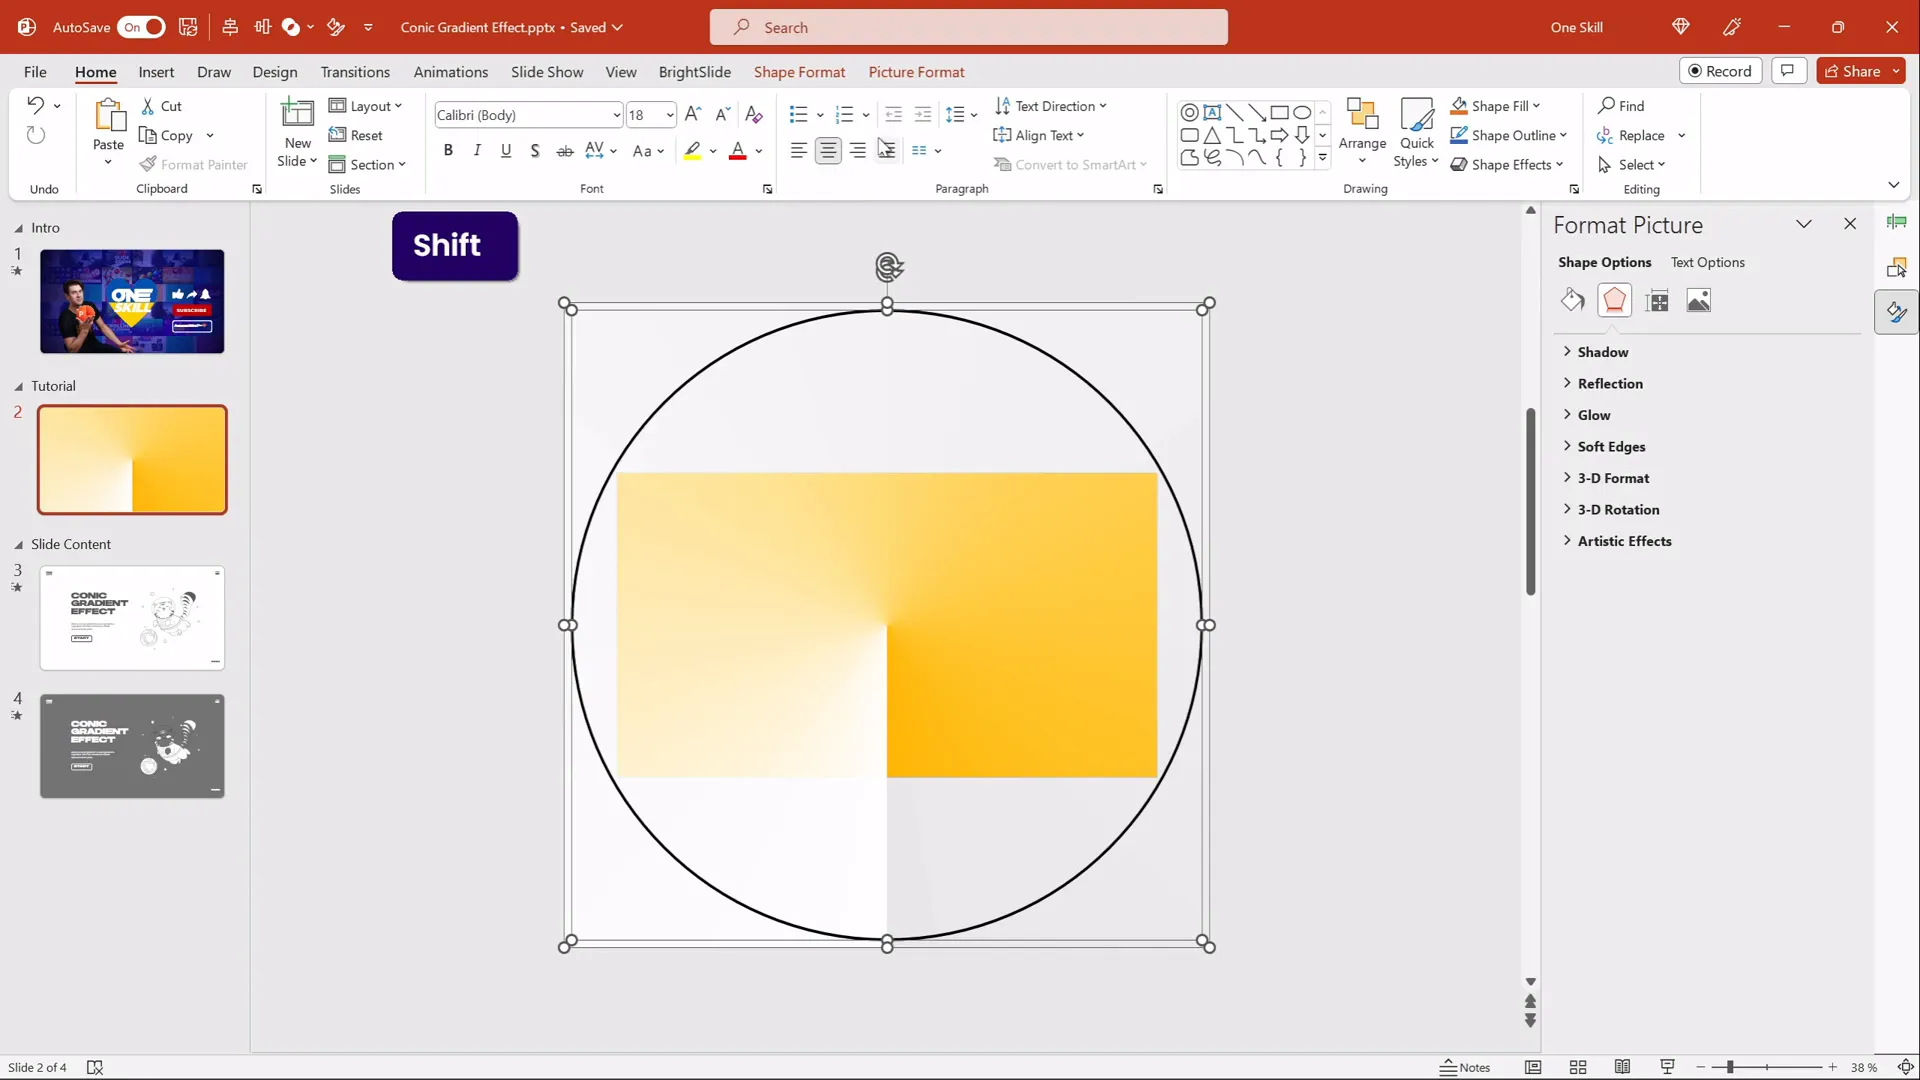
Now you have a perfectly shaped conic gradient ready to animate without exposing any unwanted corners or edges during rotation.
Animating the Gradient Spin Effect
Animating the conic gradient to spin around its center creates the mesmerizing effect that will captivate your audience. Here’s how to do it:
- Select the circular conic gradient image.
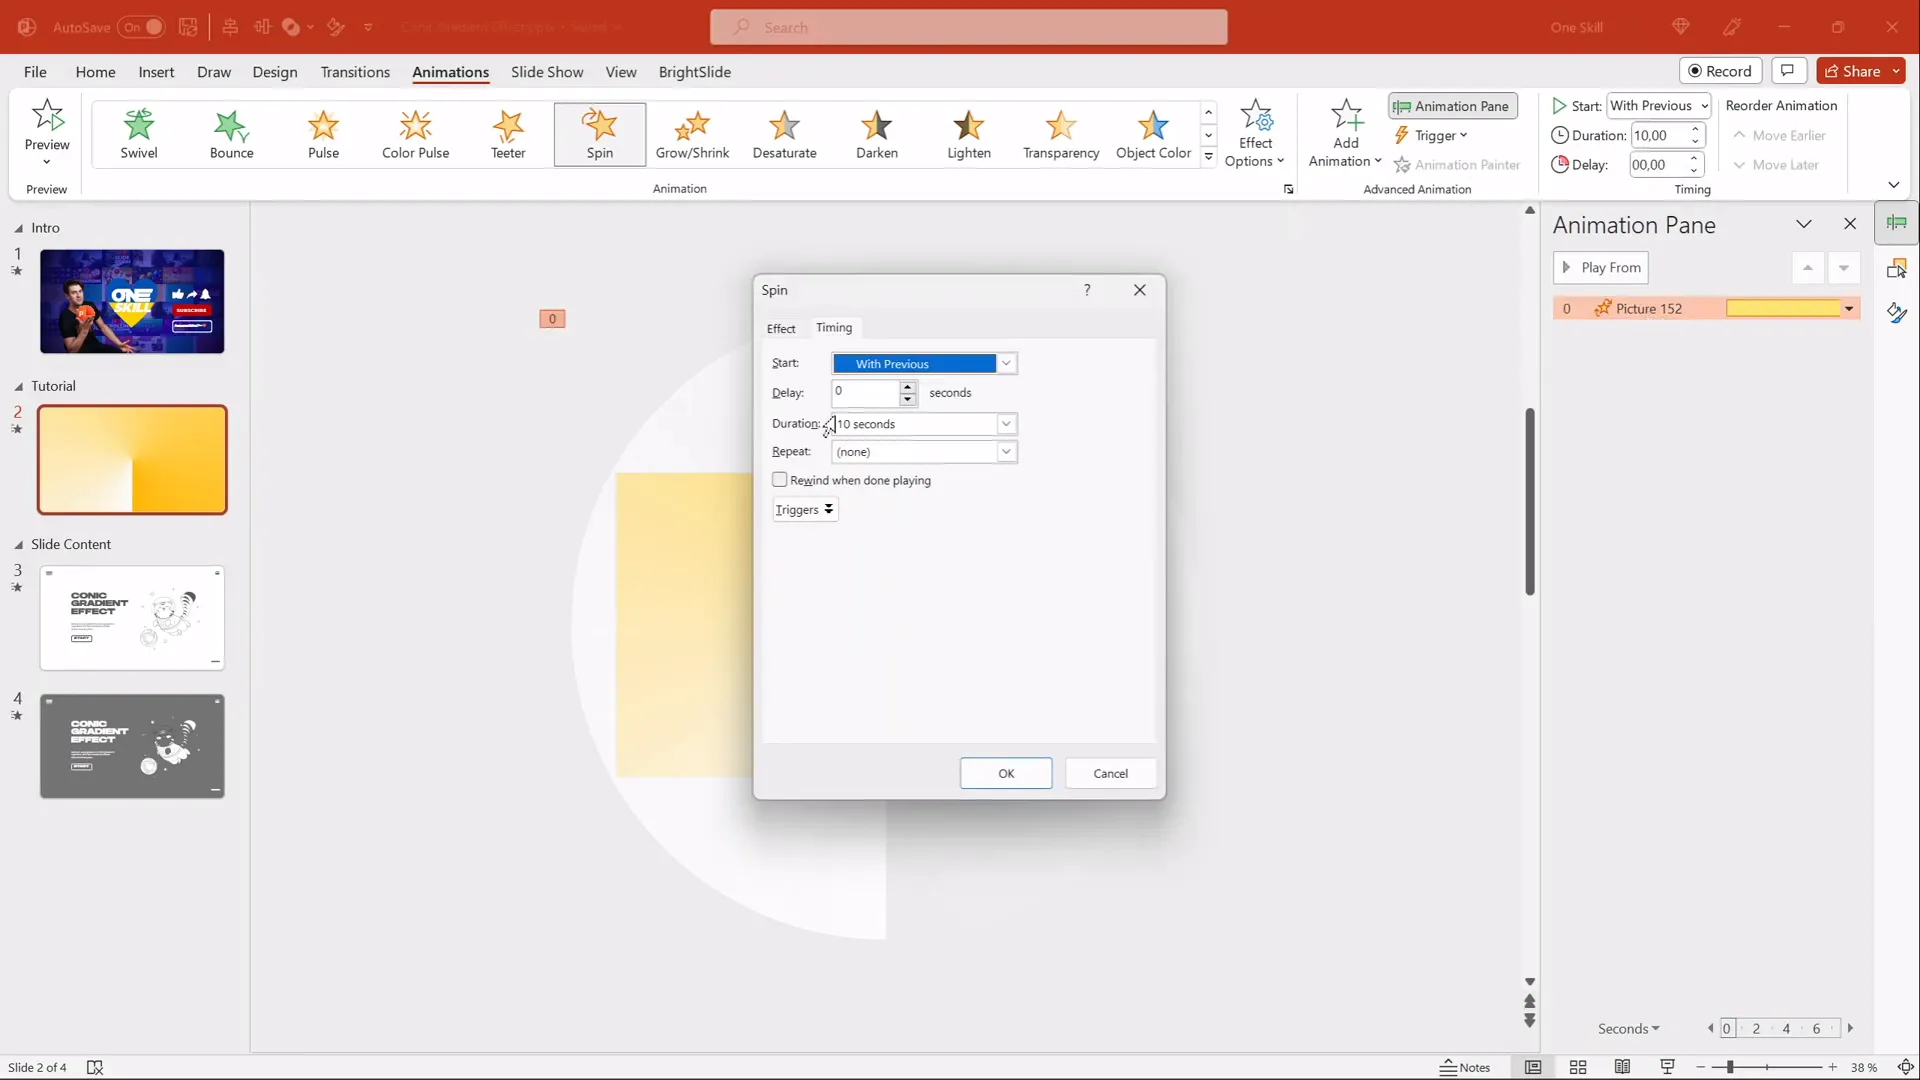
- Go to the Animations tab and choose Spin from the animation gallery.
- Open the Effect Options panel.
- Set the Rotation to Clockwise and choose Full Spin (360°).
- Set the animation to Start With Previous so it begins automatically when the slide loads.
- Adjust the duration to around 10 seconds for a smooth, slow rotation.
- In the Timing options, set the animation to Repeat Until End of Slide for continuous spinning.
- Disable Smooth Start and Smooth End for a consistent rotation speed.
- Preview your animation by pressing Shift + F5 or Play From Current Slide.
Enjoy your beautiful, spinning conic gradient background that adds dynamic motion without distracting from your slide content.
Customizing Background Colors for Versatility
One of the clever aspects of this conic gradient technique is its flexibility. Because you designed the gradient with white and transparent stops, you can easily change the slide’s background color to transform the gradient’s appearance.
Here’s how to customize the background color and see the gradient effect adapt:
- Duplicate your slide by right-clicking the slide thumbnail and selecting Duplicate Slide.
- Right-click the slide background and choose Format Background.
- Choose a new solid fill color, such as a light purple, blue, or any color that fits your theme.
- Notice how the conic gradient image’s transparent areas now blend with this new background color, changing the overall look of the gradient.
- Experiment with various background colors to create multiple gradient styles without recreating the gradient image.
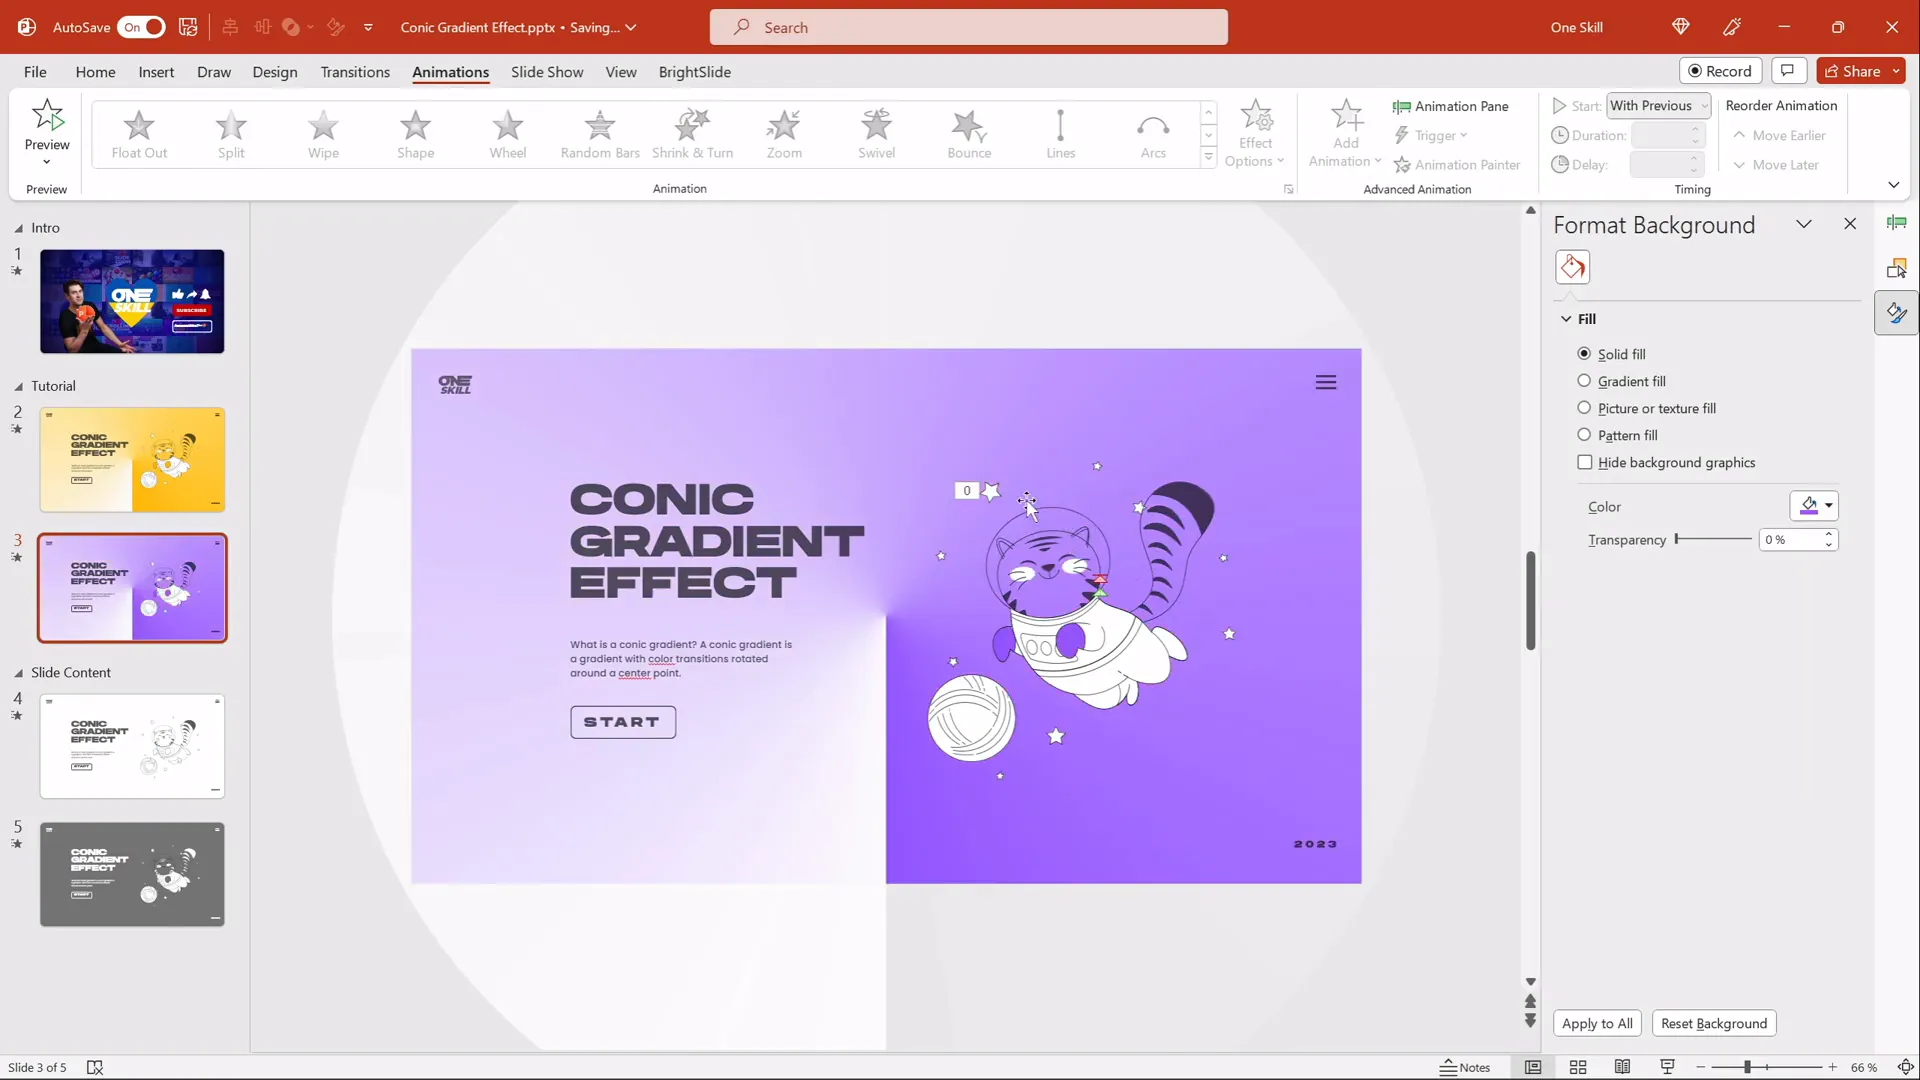
This technique allows you to maintain one gradient image while producing a wide variety of colorful animated backgrounds simply by changing the slide’s fill color.
Adjusting Brightness for Light or Dark Themes
If you want to switch from a light gradient look to a darker one, PowerPoint’s picture correction tools make it easy. Here’s how to adjust brightness and transparency:

- Select the conic gradient image on your slide.
- Go to Picture Format > Corrections.
- Use the Brightness slider to decrease brightness, turning the gradient darker.
- If the dark effect is too strong, adjust the Transparency slider to soften it.
- Pair the dark gradient with a complementary background color, such as black or dark gray.
- For readability, ensure your slide text uses light colors (e.g., white or light gray) when using dark backgrounds.
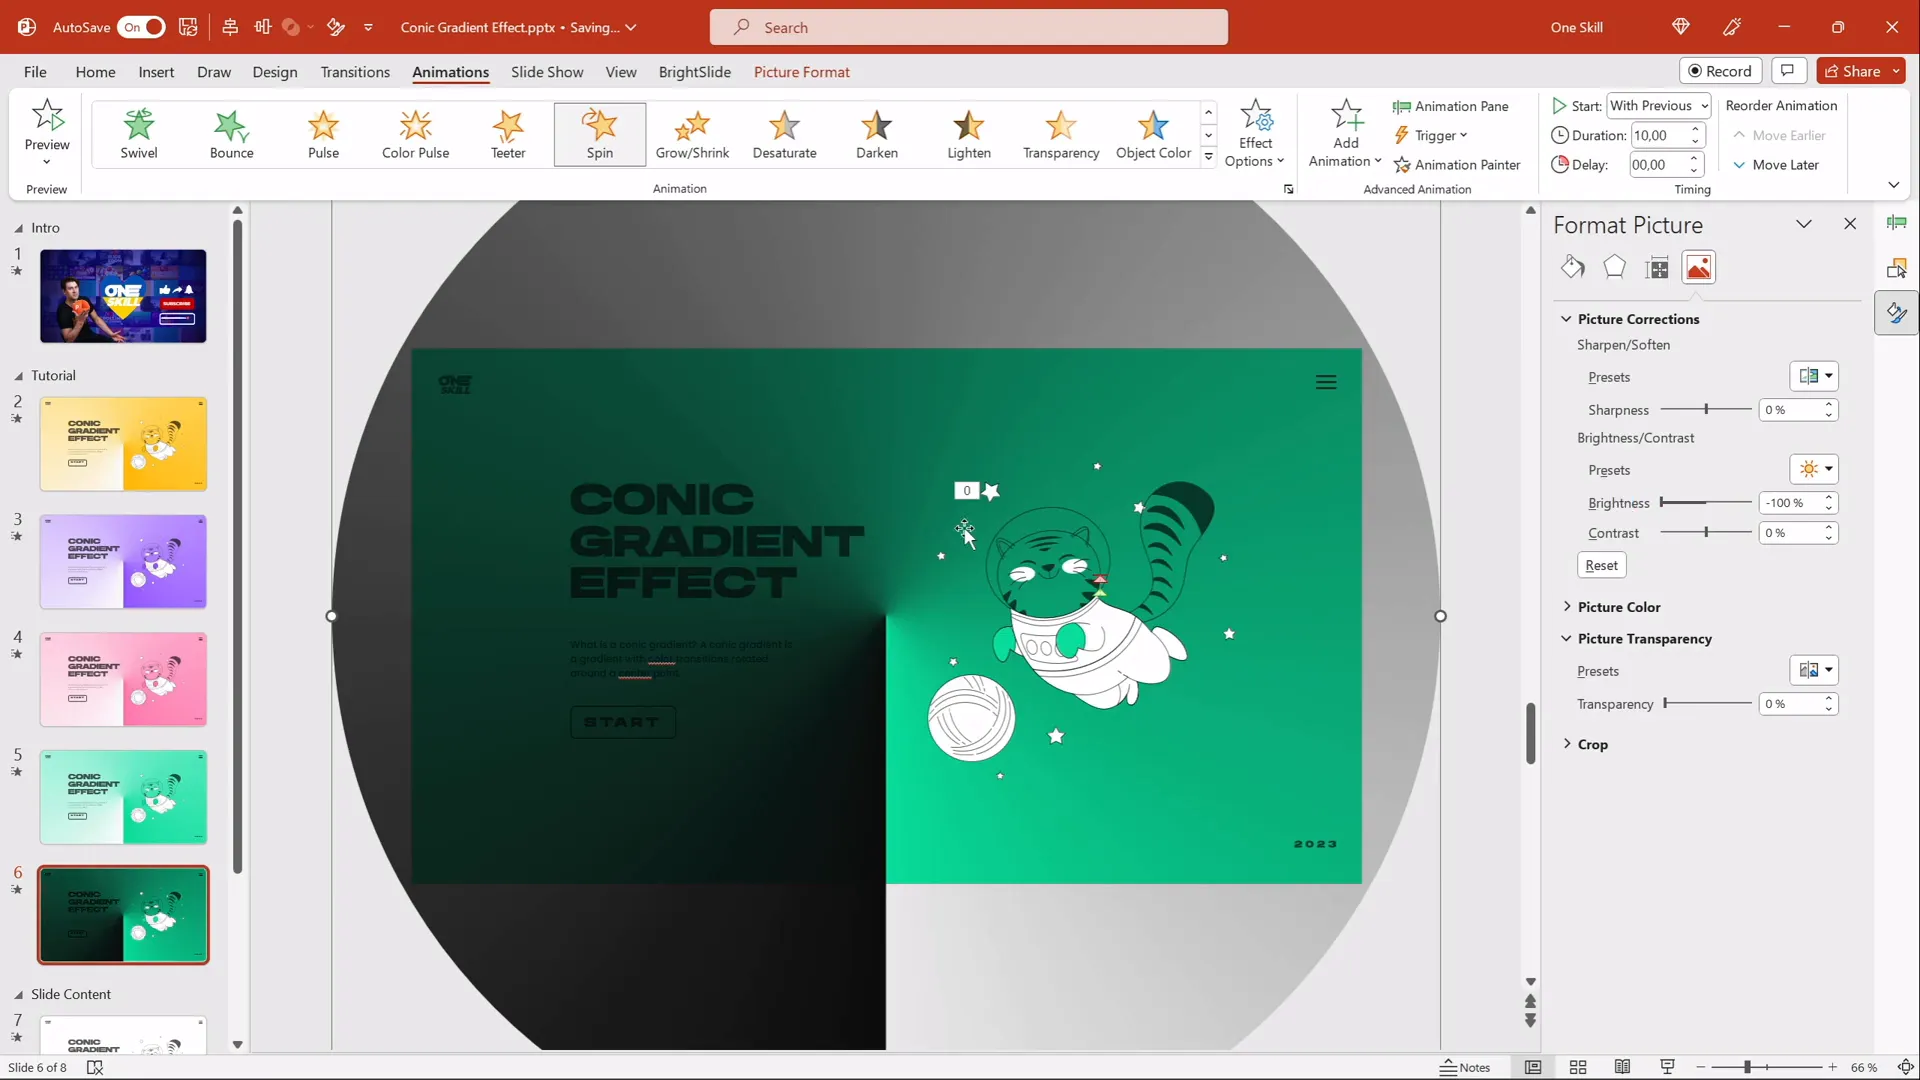
This flexibility means you can adapt the spinning conic gradient effect to fit light or dark themed presentations effortlessly.
Adding Content and Animated Illustrations
To showcase how this gradient effect can enhance your actual slide content, consider adding text boxes and fun illustrations. Here’s how to make the most of it:
- Place text boxes on one side of the slide for titles, bullet points, or key messages. Use clean, readable fonts like Hands On for a friendly, handwritten look.
- On the opposite side, add playful animated illustrations such as a flying cat or astronaut from resources like Storyset. Download illustrations in SVG format for easy editing in PowerPoint.
- Animate the illustrations separately using entrance or motion path animations to complement the spinning background.
- Ensure text contrast is adequate for readability against the changing background.
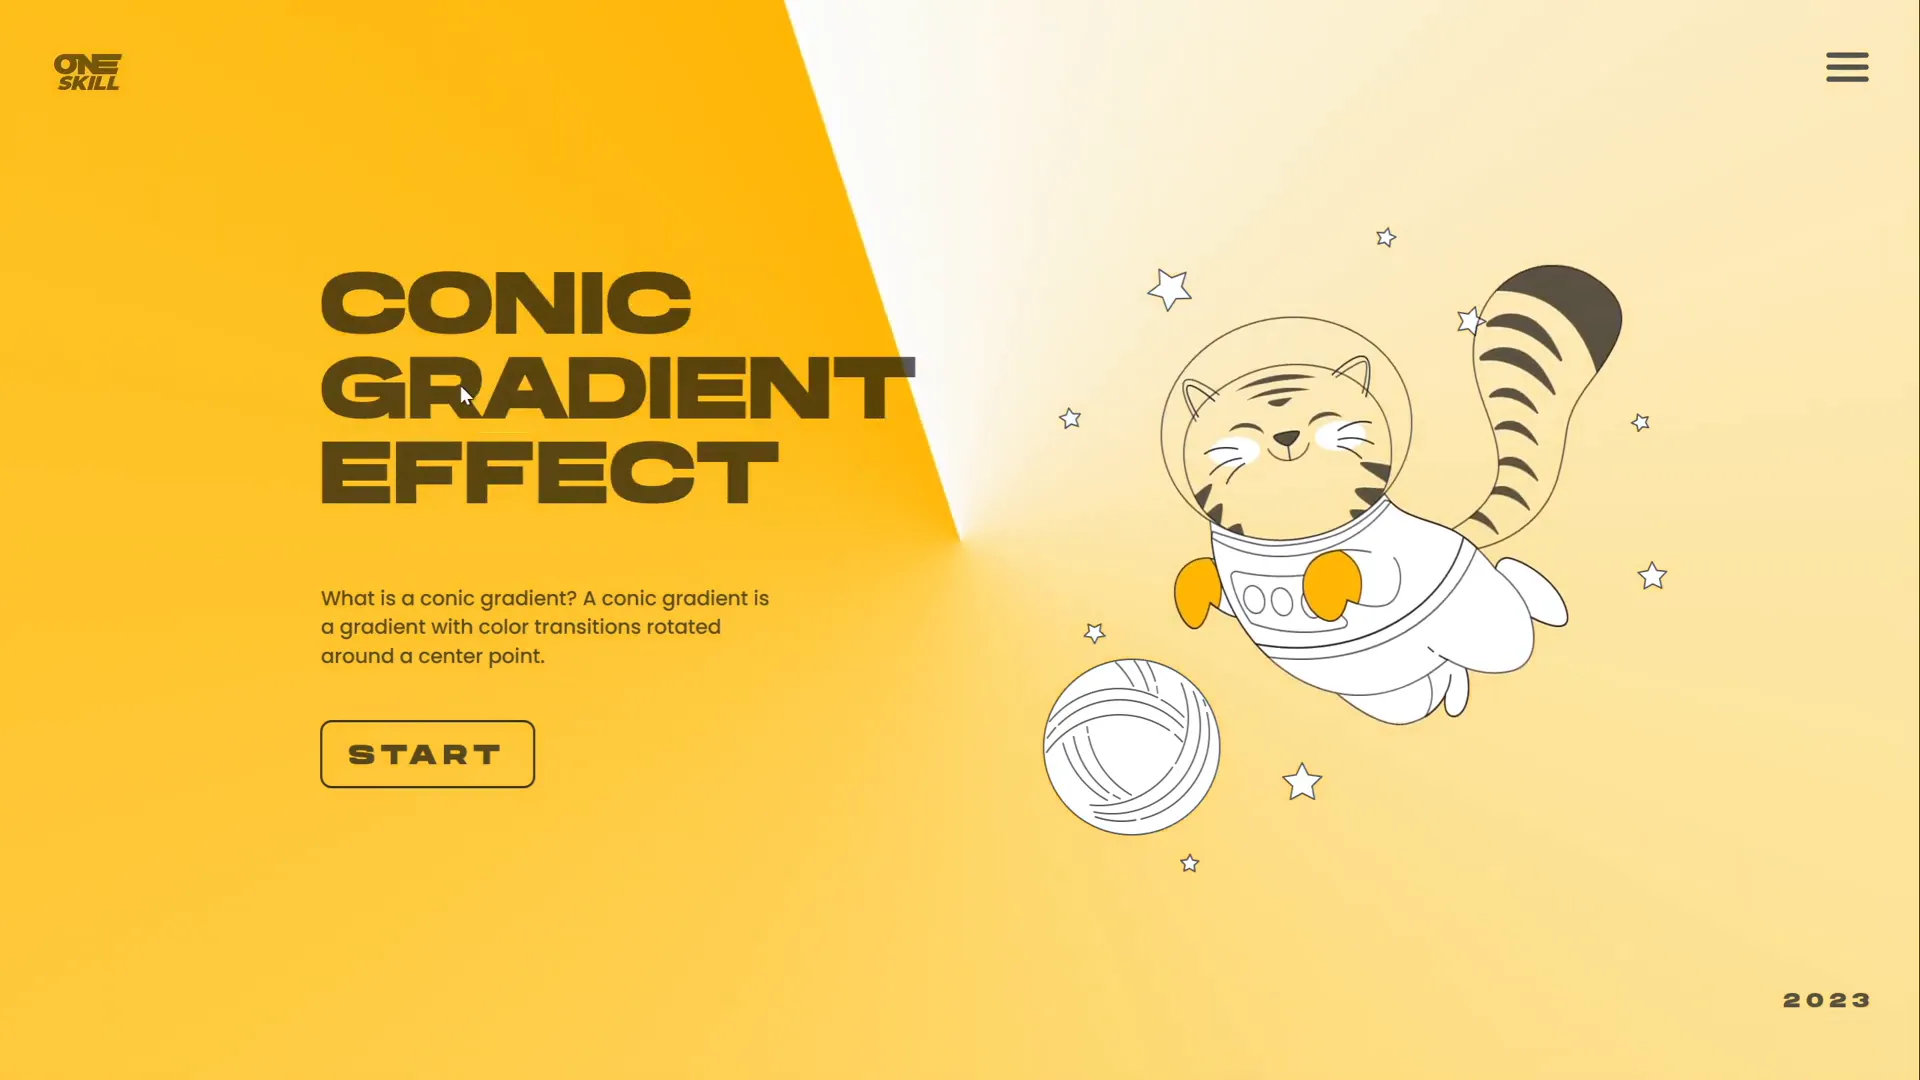
Bringing together animated backgrounds and illustrated elements creates engaging, memorable presentations that stand out.
Tips for Using PowerPoint Animation Effects Effectively
While animation effects like the spinning conic gradient can add polish to your presentation, it’s important to use them thoughtfully. Here are some best practices:
- Keep it subtle: Avoid overly fast or distracting animations that can overwhelm your content.
- Maintain readability: Always ensure text and important visuals are easy to see against animated backgrounds.
- Use consistent styles: Match your animations with your overall presentation theme for cohesion.
- Limit the number of animations: Too many moving parts can confuse your audience—use animations to enhance, not distract.
- Test on different devices: Make sure animations run smoothly and look good on the equipment you’ll present with.
- Provide fallbacks: Prepare static versions of slides in case animations don’t work on some systems.
By following these tips, your PowerPoint animation effects will elevate your presentation without detracting from your message.
Frequently Asked Questions
Can I create a conic gradient directly in PowerPoint?
PowerPoint currently does not support native conic gradients. To create this effect, use a design tool like Figma to generate the gradient image, then import and animate it in PowerPoint.
Is Figma free to use for creating gradients?
Yes, Figma offers a free tier that allows you to create and export designs such as conic gradients without any cost. You can sign up with your Google account and start designing immediately.
Will the spinning animation work in all versions of PowerPoint?
The spin animation is available in most modern versions of PowerPoint, including Office 365 and PowerPoint 2016 and later. If you have an older version, verify animation options to ensure compatibility.
How can I make the gradient spin slower or faster?
Adjust the duration of the spin animation in the Animations tab. A longer duration results in slower spinning, while a shorter duration speeds it up. Ten seconds is a good starting point for smooth motion.
Can I change the colors of the conic gradient after importing it into PowerPoint?
Since the gradient is an image, you cannot directly change its colors in PowerPoint. However, by setting the gradient with white and transparent stops in Figma and changing the slide background color in PowerPoint, you can effectively change the gradient’s appearance.
Where can I find free animated illustrations to add to my slides?
Websites like Storyset offer free SVG illustrations that you can customize and animate in PowerPoint for added visual interest.
Conclusion
Creating impressive PowerPoint animation effects like the spinning conic gradient is easier than you might think, even with PowerPoint’s limitations. By leveraging free tools like Figma for gradient creation and PowerPoint’s animation features, you can produce professional, dynamic backgrounds that captivate your audience and elevate your presentations.
This tutorial showed you how to create a conic gradient, import and crop it in PowerPoint, animate it with a spinning effect, and customize its color and brightness for different looks. Adding animated illustrations and well-designed text completes the effect, making your slides both beautiful and engaging.
Experiment with different colors, animation speeds, and content placements to make this effect uniquely yours. And remember, thoughtful use of animation enhances your message rather than distracting from it.
Happy presenting, and may your next PowerPoint be your most impressive yet!
Check out the full video: IMPRESSIVE PowerPoint Design Idea 😍 Conic Gradient Effect


