Welcome, my dear friends! If you’ve ever wanted to add mesmerizing animations to your PowerPoint presentations but felt overwhelmed or unsure where to start, you’ve come to the right place. Whether you’re a beginner or someone looking to master advanced animation techniques, this comprehensive guide will empower you to transform your slides into dynamic storytelling tools.
My name is Kaspare, from Vilnius, Lithuania, and I’ve been crafting PowerPoint tutorials for nearly a decade. Millions of people have trusted my guidance to elevate their presentations, and now I’m excited to share with you the secrets behind truly breathtaking PowerPoint animations.
In this article, you will learn everything from the fundamentals of PowerPoint animations to advanced techniques that will make your presentations stand out. We’ll explore the types of animations, how to apply and customize them, and even special features like draw animations and 3D model animations. By the end, you’ll be equipped to create any animation you envision.
Table of Contents
- Why Master PowerPoint Animations?
- Getting Started: PowerPoint Animation Fundamentals
- Exploring Popular Animations and Their Uses
- Advanced Animation Techniques
- Four Additional Ways to Animate in PowerPoint
- Tips for an Amazing PowerPoint Animation Experience
- Frequently Asked Questions (FAQ)
- Conclusion: Start Creating Incredible PowerPoint Animations Today!
Why Master PowerPoint Animations?
Animations are more than just eye candy—they are powerful tools that can help you:
- Engage your audience: Movement naturally attracts attention and keeps viewers interested.
- Highlight key points: Use emphasis animations to draw focus to important text or images.
- Create smooth transitions: Animations make your presentation flow seamlessly from one idea to the next.
- Tell a story: Advanced animations can guide your audience step-by-step through complex information.
Whether you are a designer, business professional, entrepreneur, teacher, speaker, or student, mastering PowerPoint animations will elevate your communication and presentation skills to new heights.
Getting Started: PowerPoint Animation Fundamentals
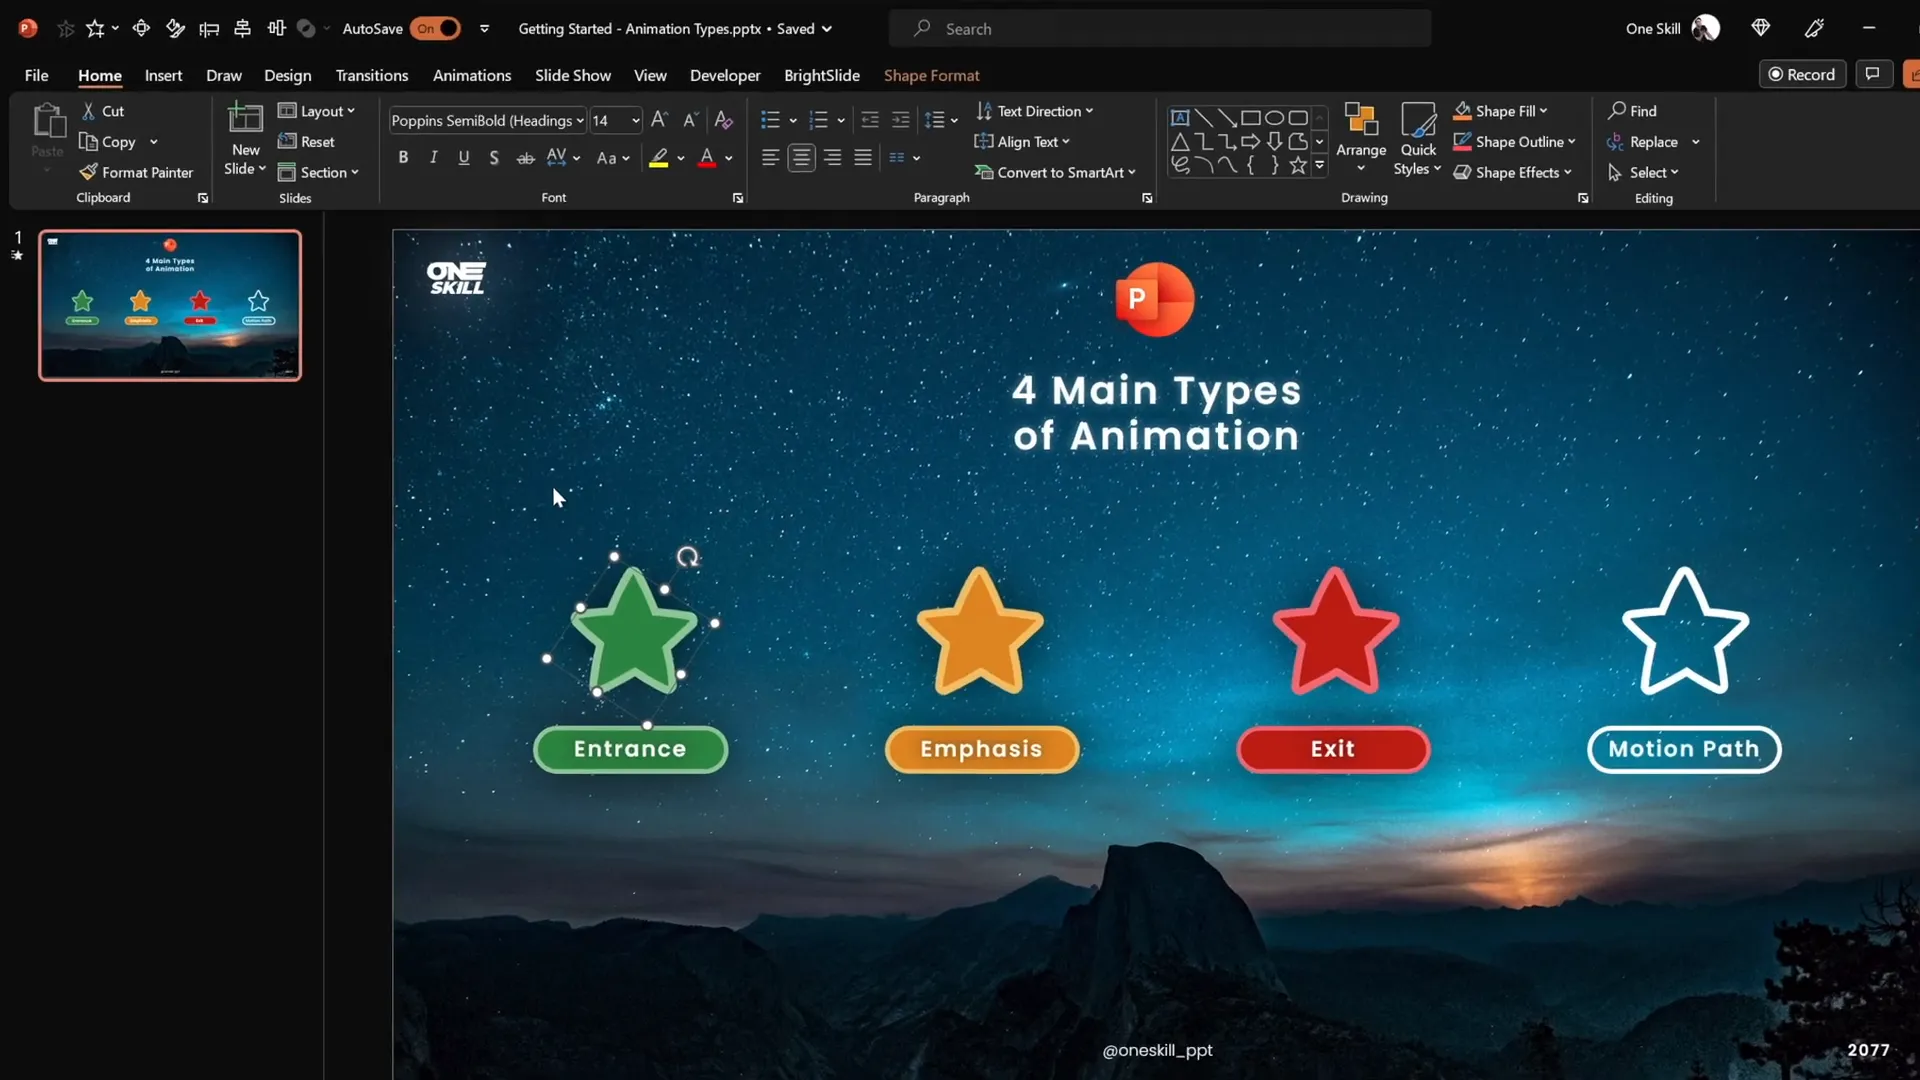
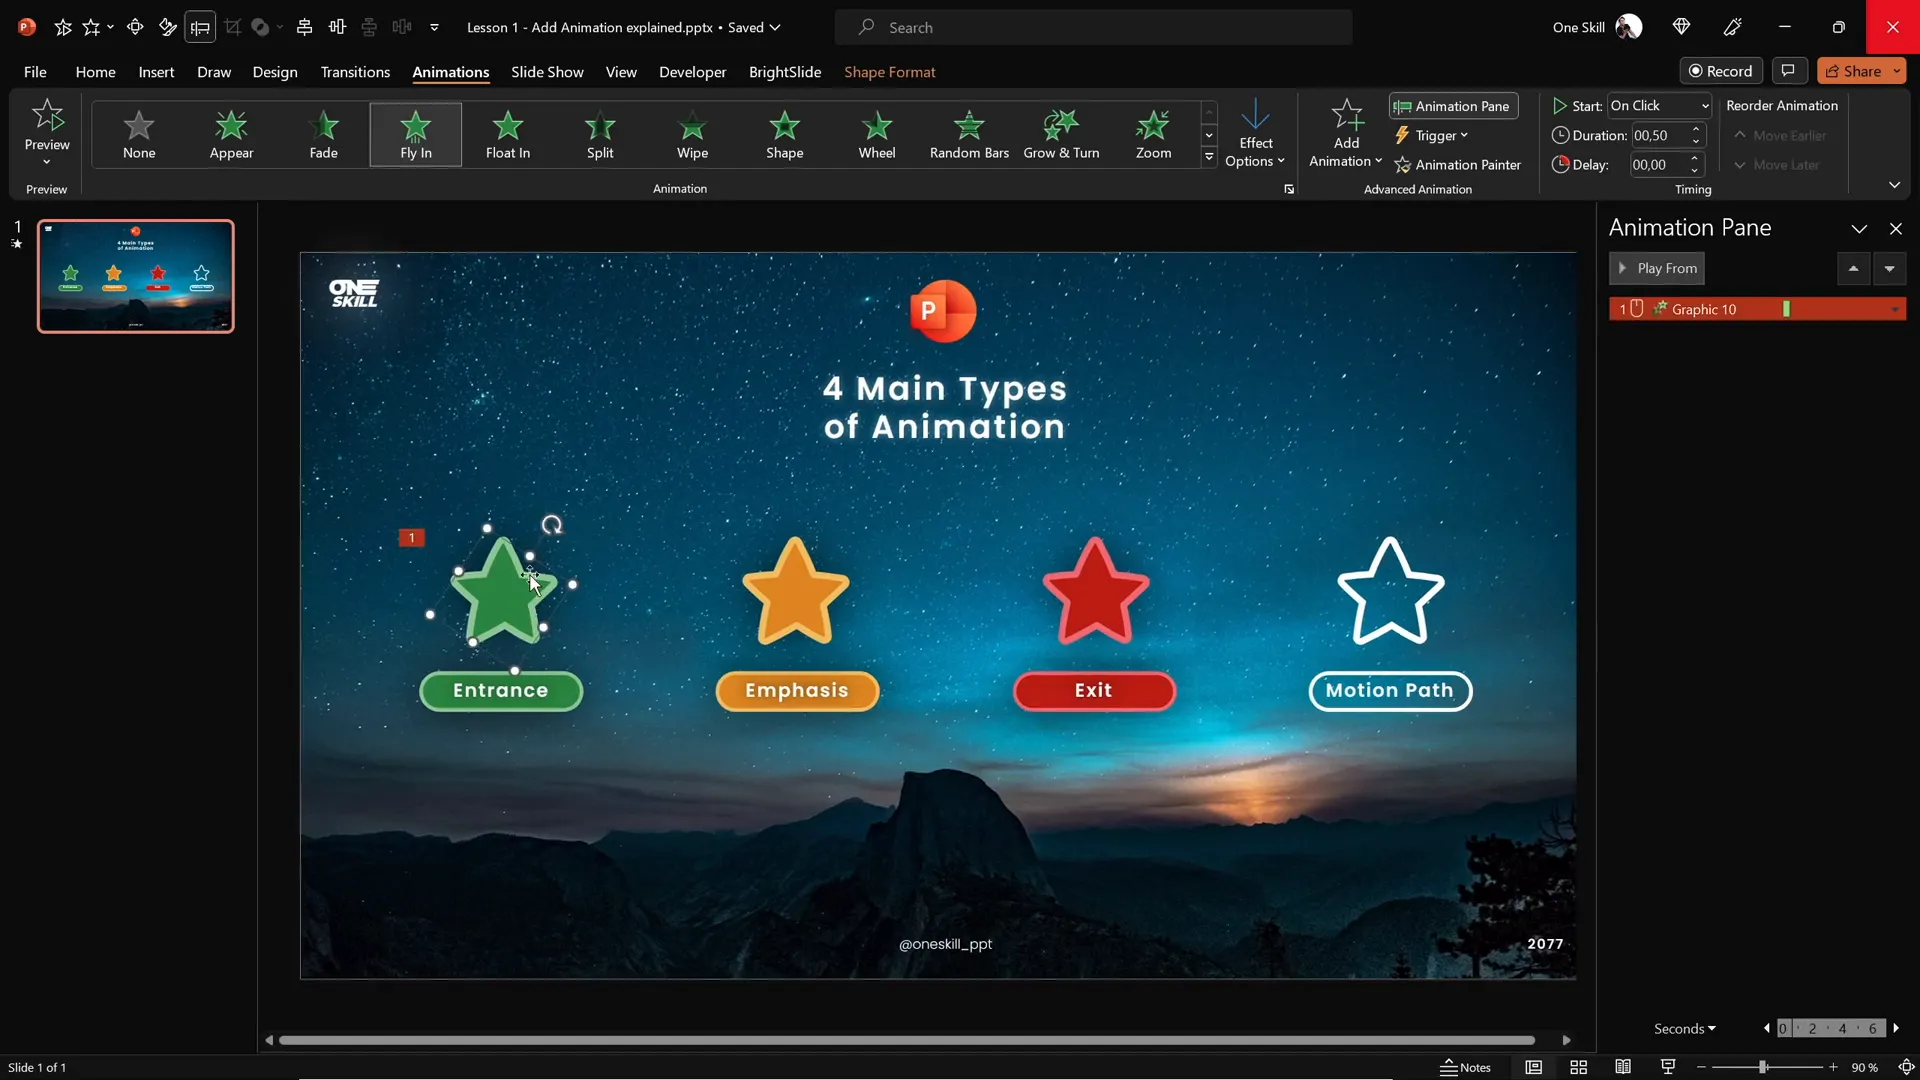
Before diving into complex animations, it’s essential to understand the four main types of animations available in PowerPoint:
- Entrance Animations: These animations introduce elements onto your slide. For example, a picture or text can fly in or fade into view.
- Emphasis Animations: Use these to highlight or draw attention to an element already on the slide, such as spinning or changing color.
- Exit Animations: These animations make elements leave the slide, like zooming out or fading away.
- Motion Path Animations: These allow you to move an object along a custom path, like a line, circle, or any shape you define.
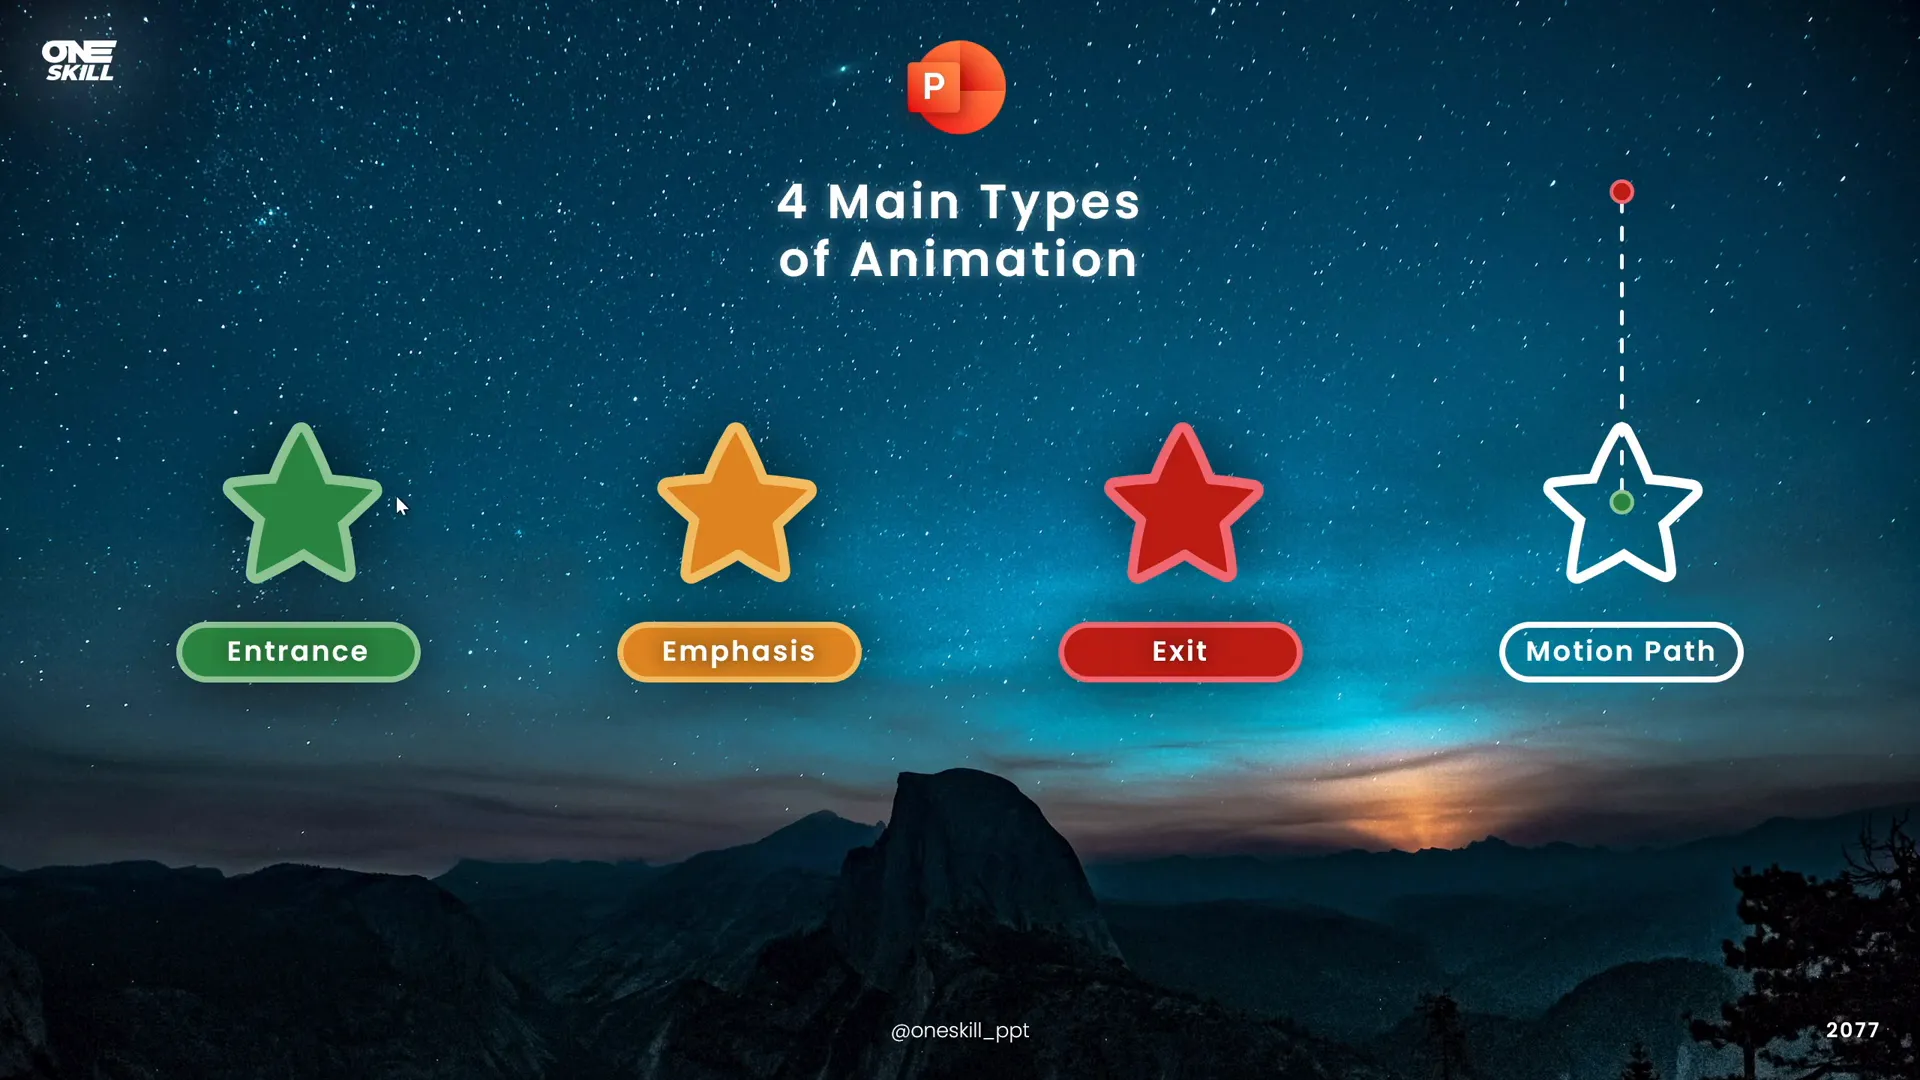
For motion path animations, you can adjust the starting and ending positions by dragging the green and red bubbles respectively. This flexibility lets you tailor the movement exactly to your needs.
Applying Animations to Slide Elements
Almost any object on your slide—shapes, text boxes, pictures, or videos—can be animated. To apply an animation:
- Select the object you want to animate.
- Go to the Animations tab in PowerPoint.
- Choose your desired animation from the options shown. You can click the arrow to see a full list categorized by entrance, emphasis, exit, and motion paths.
- Click on an animation to preview it immediately. If auto preview is off, enable it using the Preview button.
For example, the flying entrance animation can be customized by choosing the direction from which the object flies in.
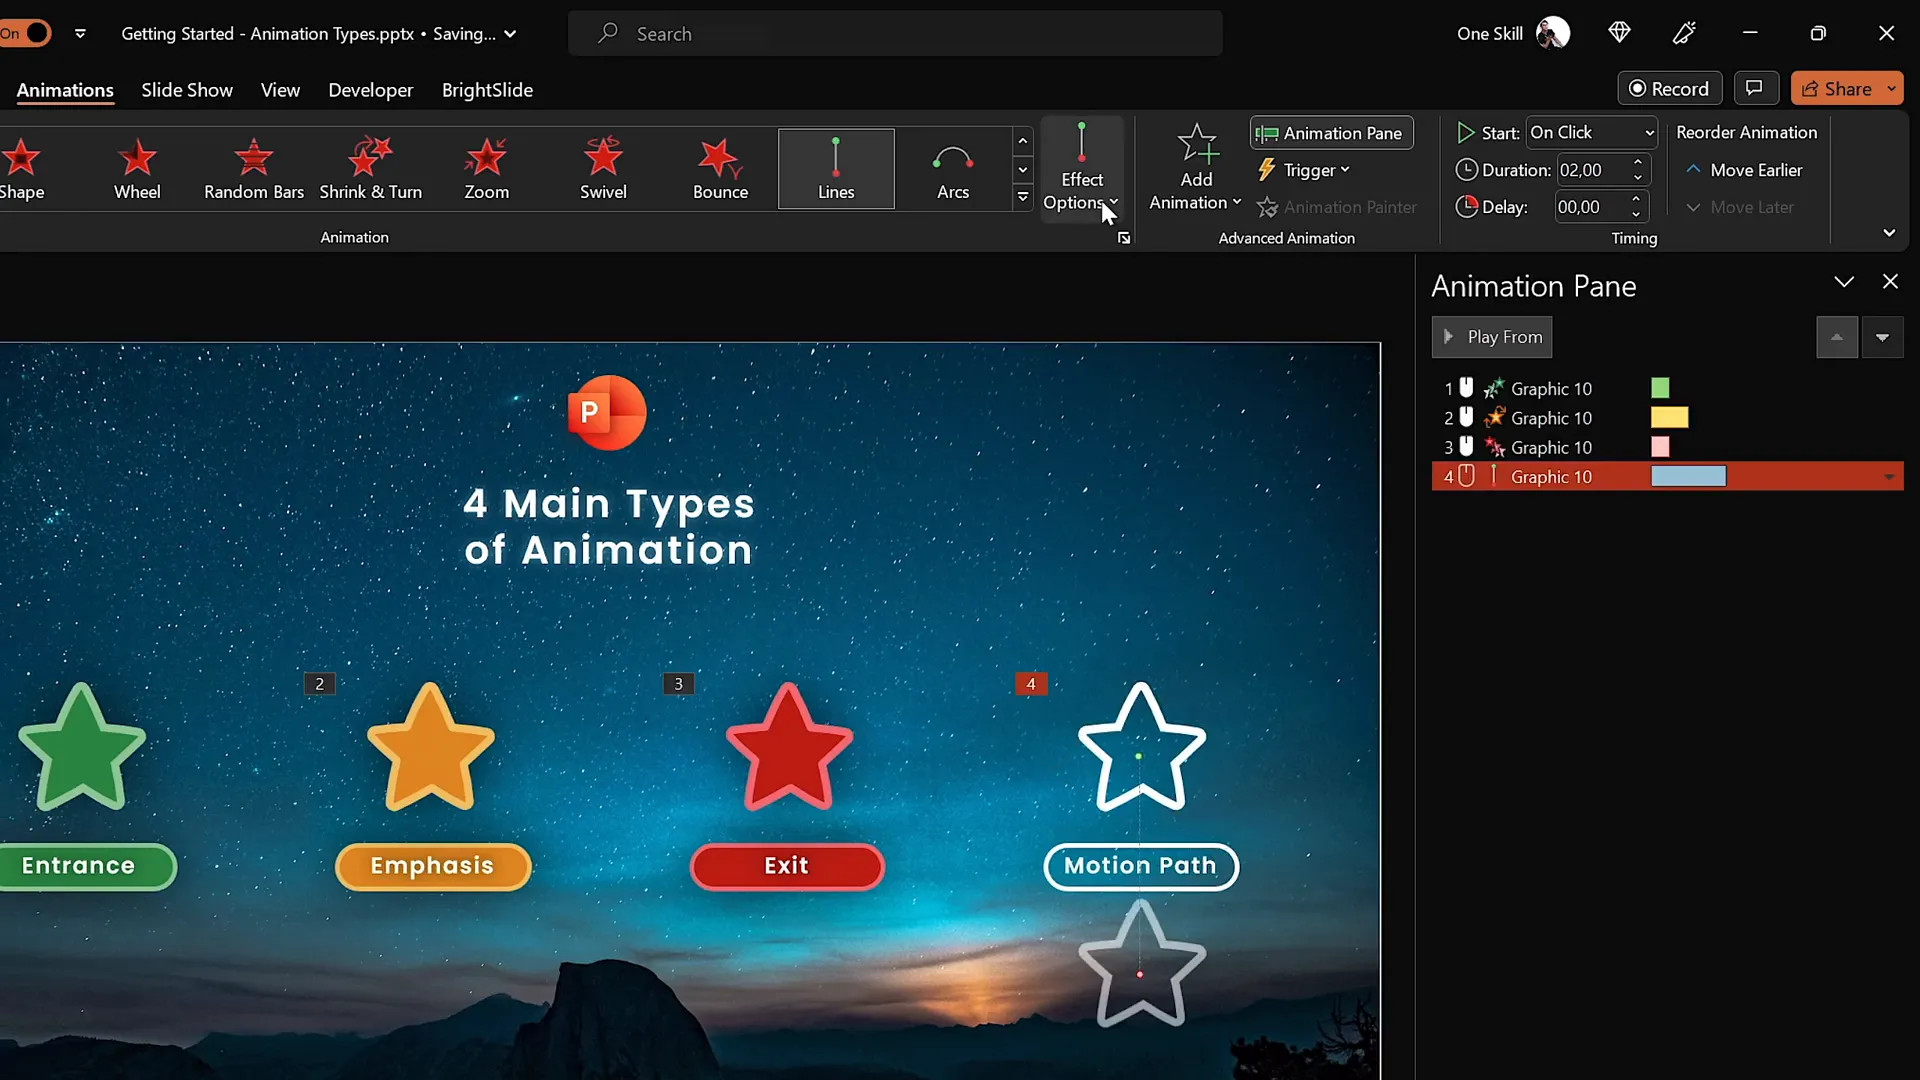
Adding Multiple Animations to a Single Object
Sometimes, you may want an object to perform more than one animation, such as flying in and then spinning. To do this correctly:
- First, add your initial animation as usual.
- To add a second animation, don’t select it from the main animation list on the left (this will replace the first animation).
- Instead, use the Add Animation button on the ribbon, which lets you layer animations on the same object.
This method ensures all animations play as intended, allowing you to create complex effects with ease.
Understanding the Animation Pane
The Animation Pane is your control center for managing all animations on a slide. It displays a list of animations applied, along with details like:
- When the animation starts (on click, with previous, or after previous).
- Duration and delay times.
- Animation type and order.
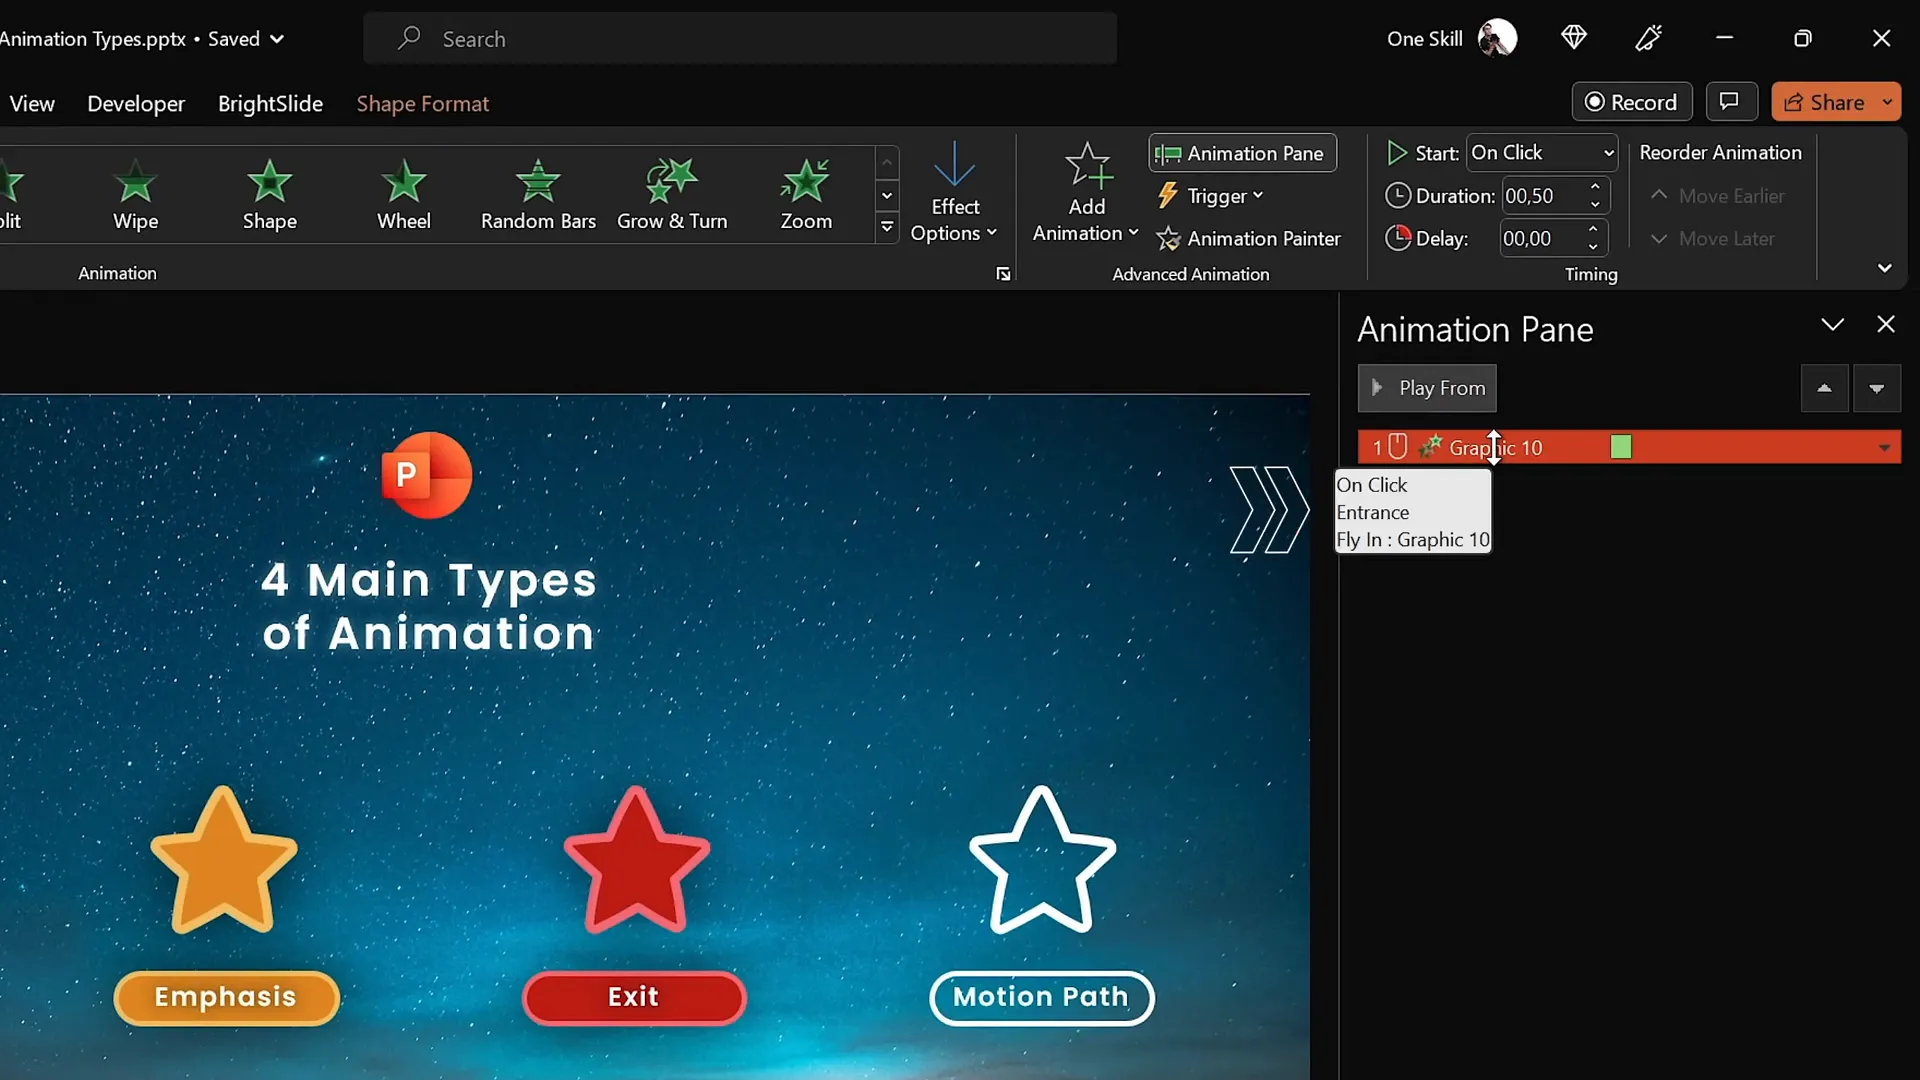
You can reorder animations, change their timing, and customize their behavior from this pane. For example, you can set one animation to start automatically after the previous one finishes, or wait for a mouse click to trigger.
Exploring Popular Animations and Their Uses
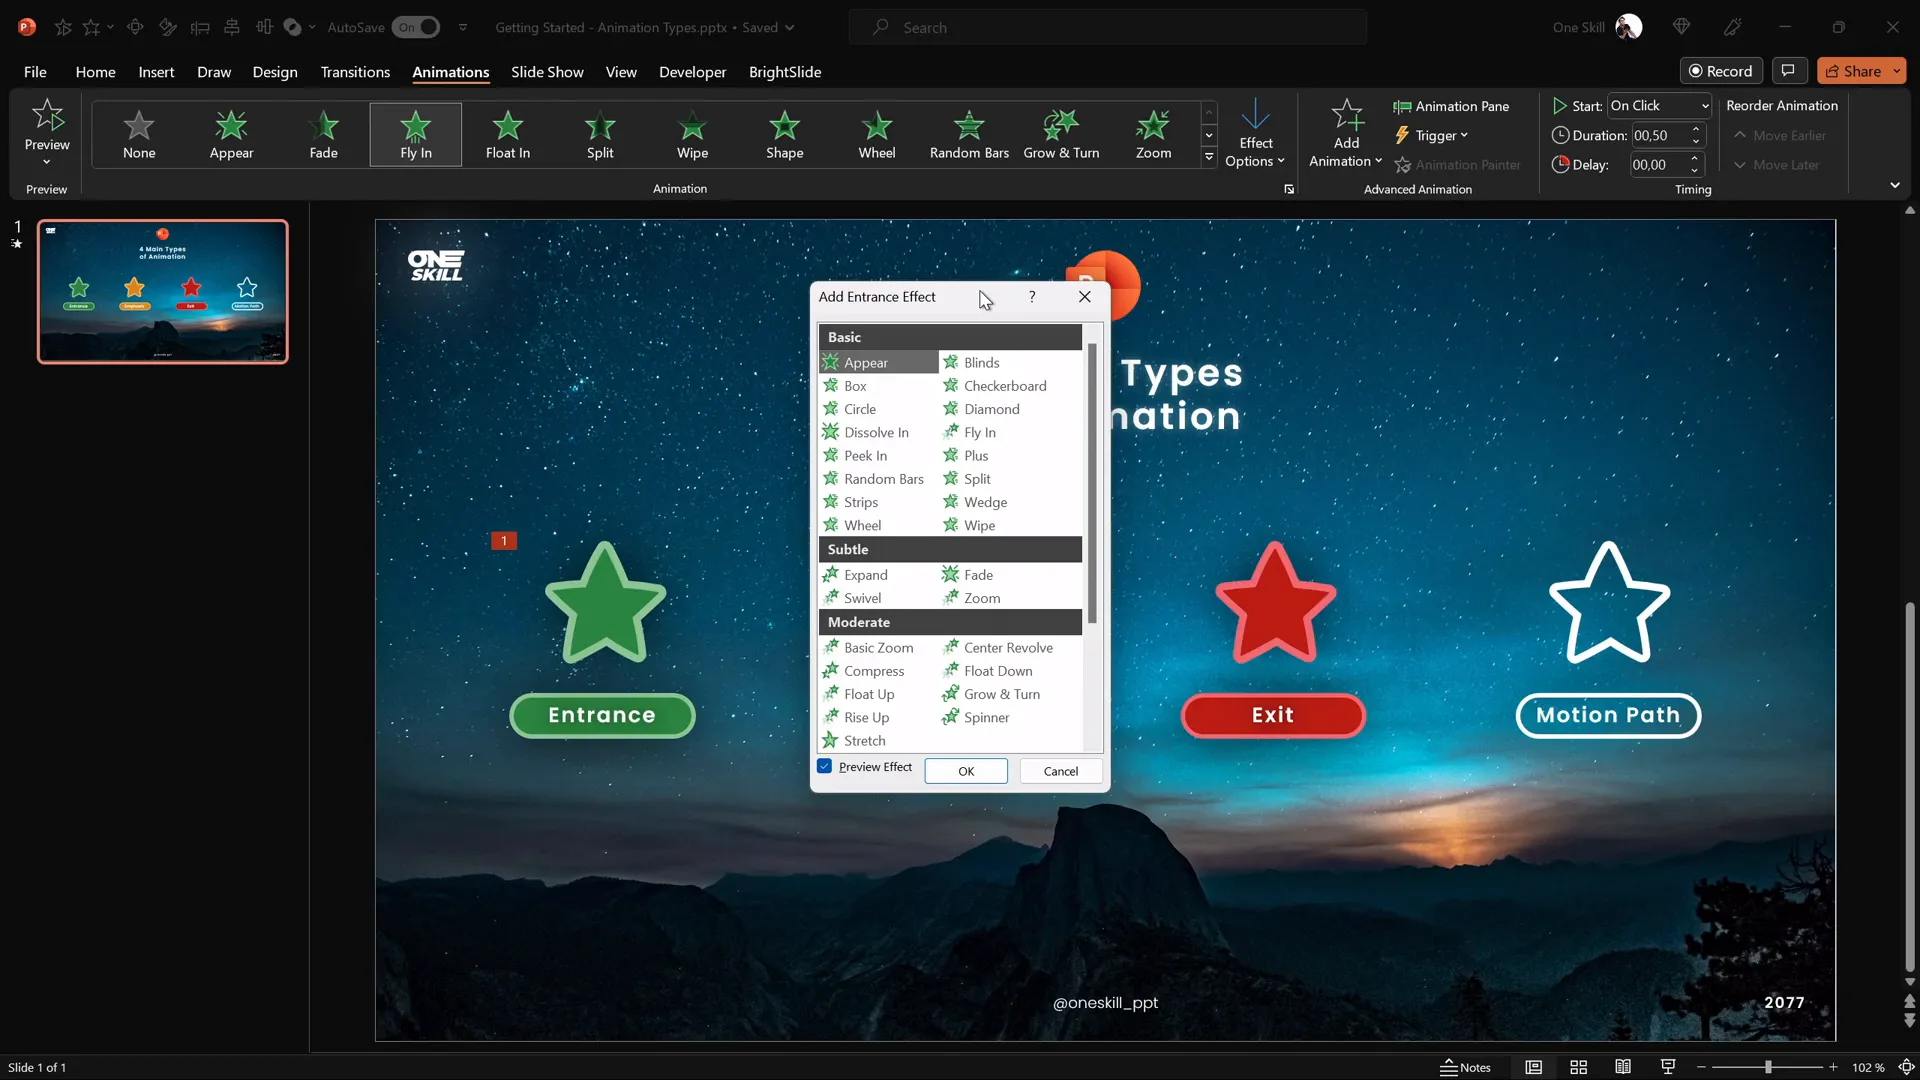
PowerPoint offers a variety of animations categorized into four groups based on their style and intensity:
- Basic Animations: Simple entrance effects like flying or fading that work well in professional presentations.
- Subtle Animations: Gentle effects like fade and zoom that add polish without distraction.
- Moderate Animations: More noticeable effects such as zoom and flow down, great for introducing important content.
- Exciting Animations: Bold animations like pinwheel, which should be used sparingly to avoid overwhelming your audience.
Based on years of experience, here are some of the most effective animations to start with:
- Flying: Great for basic entrance of objects.
- Fade and Zoom: Popular subtle animations for smooth transitions.
- Flow Down: Useful for moderate emphasis.
- Pinwheel: Exciting but best reserved for photos or special effects.
Advanced Animation Techniques
Customizing Motion Paths
Motion path animations let you move objects along lines or shapes you define. You can:
- Drag the start and end points to control the path.
- Use shapes like circles or custom curves for complex motion.
- Activate the Auto Reverse option to make objects return along the same path automatically.
For example, animating a star to move upward and then return smoothly creates a dynamic effect that captures attention.
Combining Animations with Timing
Adjusting when animations start and how long they last is crucial for smooth presentation flow. Use the animation pane to set:
- Start options: On click, with previous, or after previous.
- Duration: How long the animation takes.
- Delay: How long to wait before starting.
For example, you can have a flying animation happen on click, followed immediately by a spin animation that runs faster to add flair.
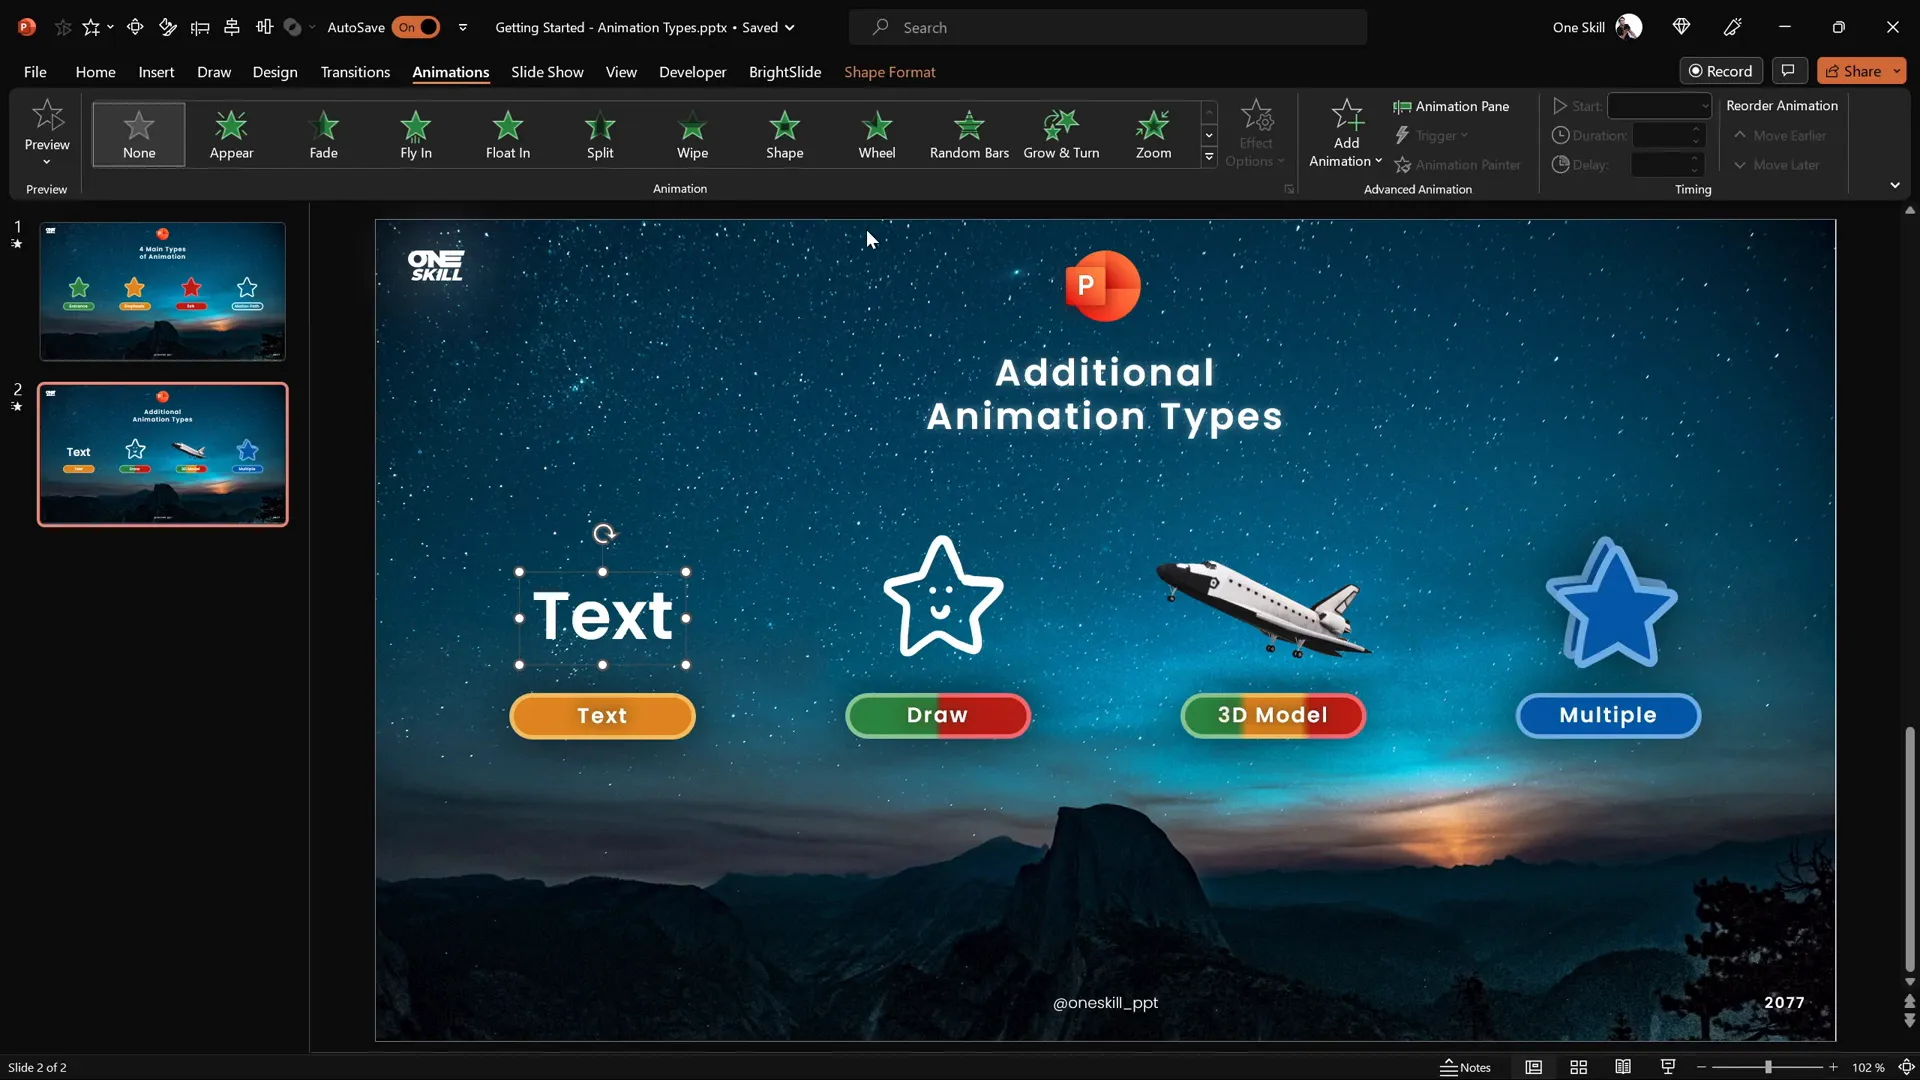
Four Additional Ways to Animate in PowerPoint
Besides the four main animation types, PowerPoint offers even more creative options to bring your slides to life.
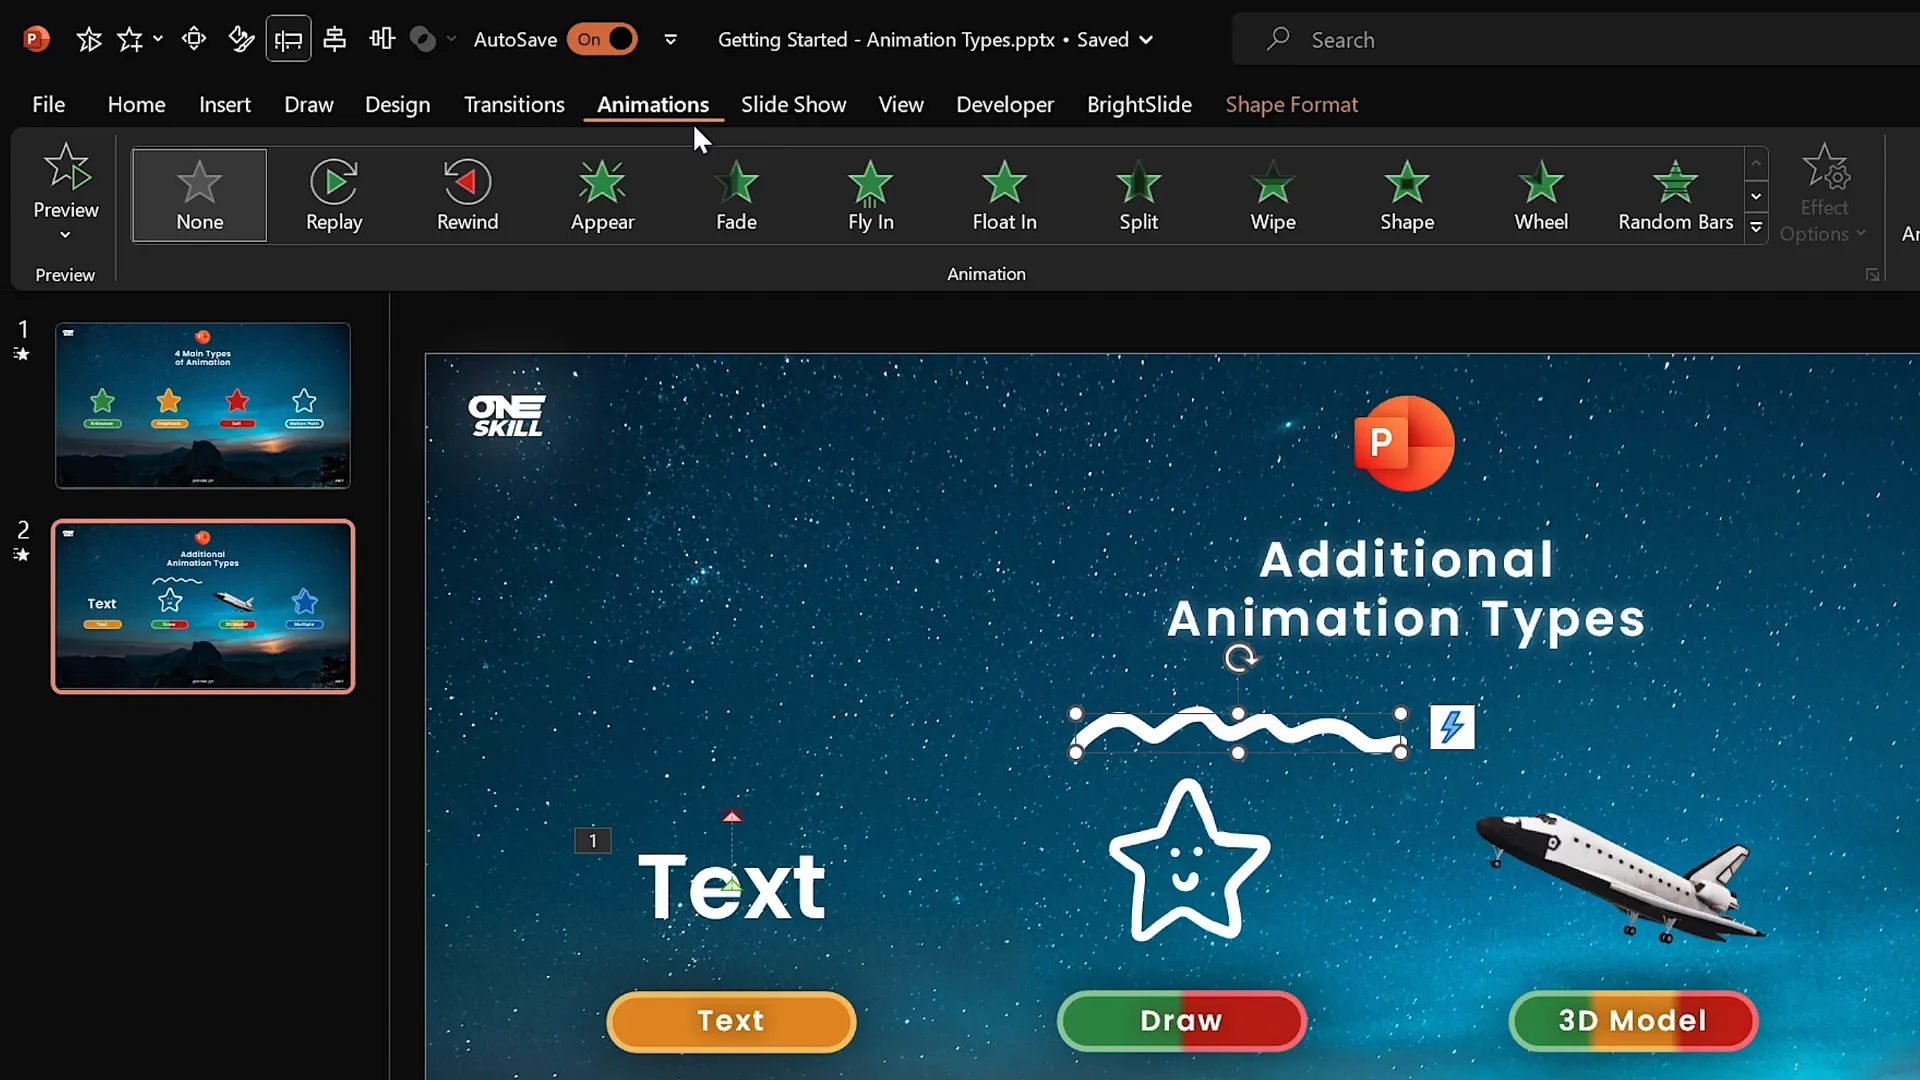
1. Text Animations
Text animations fall under emphasis animations but are special because they only apply to text elements. You can animate text in various ways, such as:

- Changing text color dynamically.
- Applying wave effects to make text flow.
- Animating words or letters individually for dramatic effect.
Adjust the intensity and style of text animations to suit your presentation tone and audience.
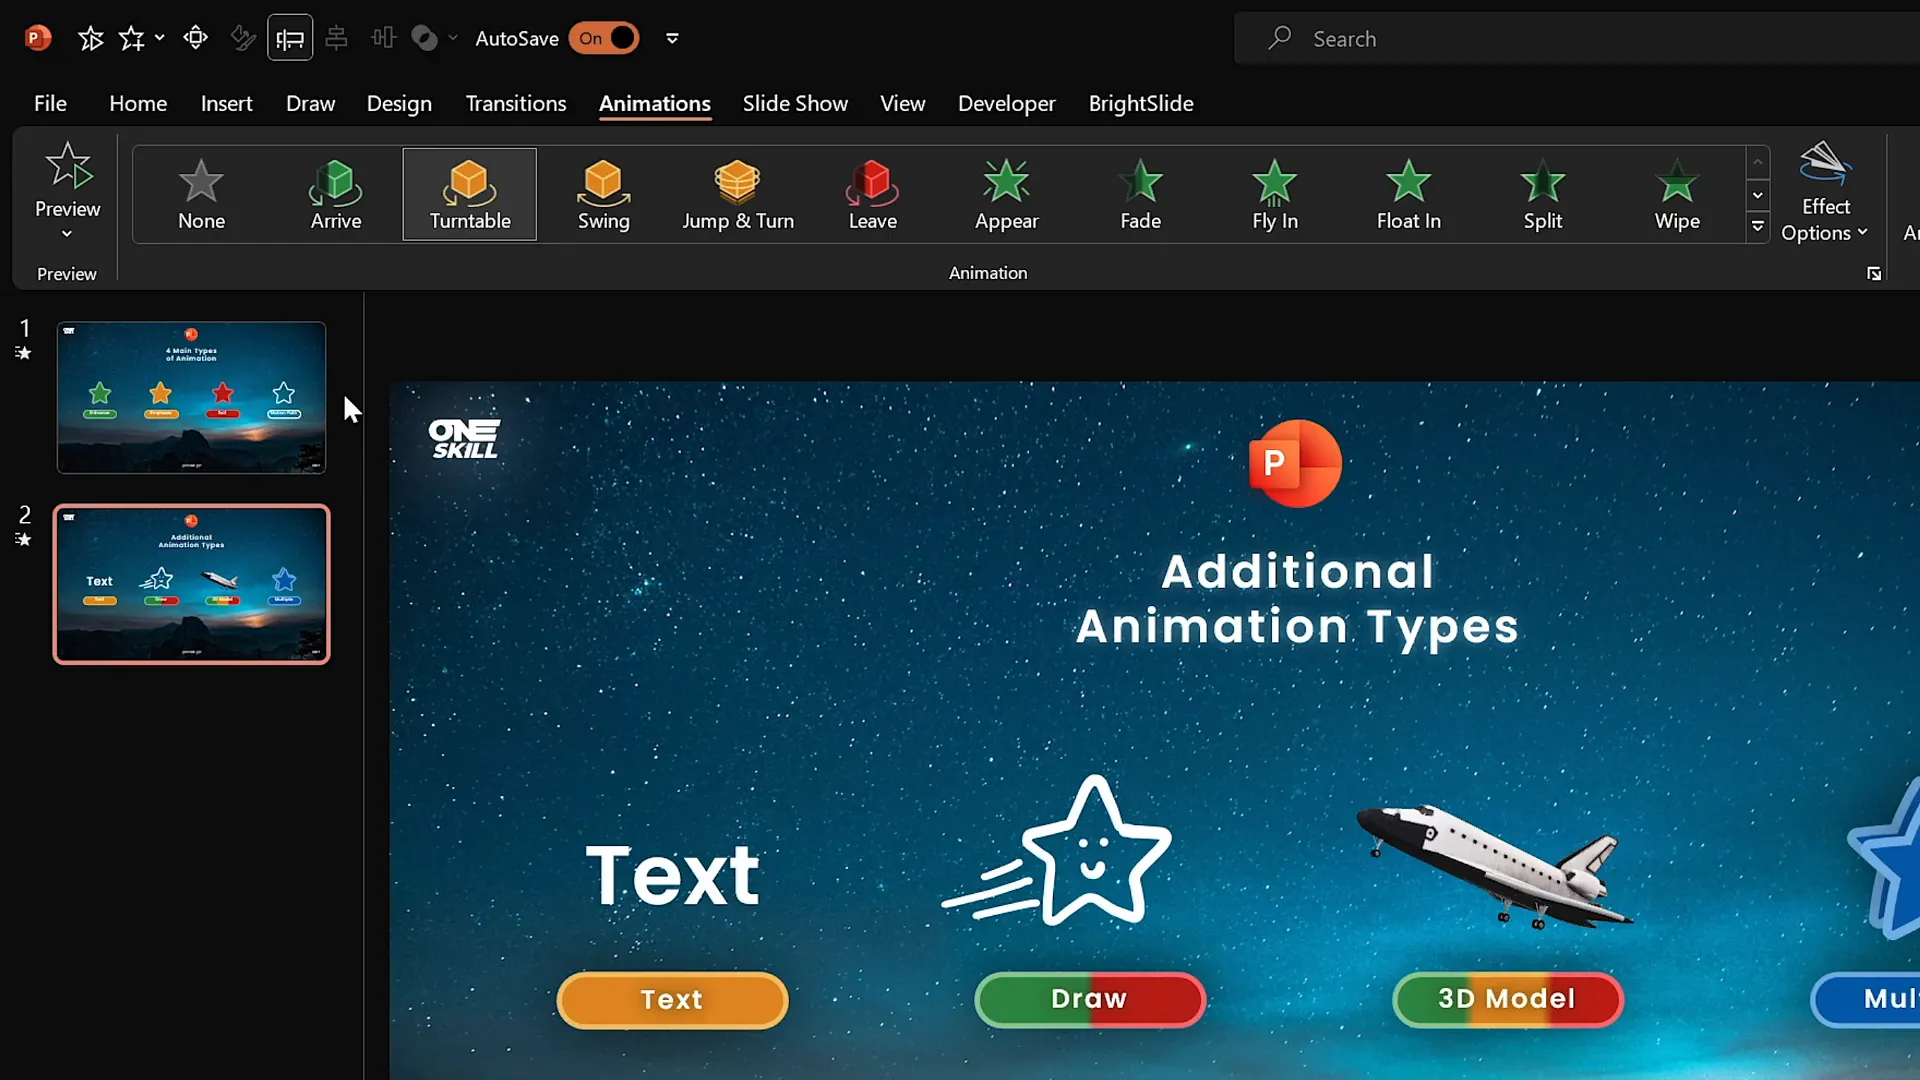
2. Draw Animations
If your version of PowerPoint includes the Draw feature, you can animate hand-drawn objects. Here’s how it works:
- Use the Draw tab to select pens or brushes and create custom drawings on your slide.
- Apply Replay animation to have the drawing appear as if it’s being drawn live.
- Use Rewind animation to reverse the drawing effect, making it vanish stroke by stroke.
This feature is perfect for adding a personal, creative touch or emphasizing hand-drawn diagrams during a presentation.
3. 3D Model Animations
PowerPoint now supports 3D models, which can be animated with specialized effects:
- Insert 3D models from stock libraries or your own files.
- Rotate, zoom, or spin the model using entrance, emphasis, and exit animations tailored for 3D objects.
- Control animation speed and direction to match your presentation style.
For example, a slow 20-second turntable animation can showcase a 3D model’s details, or you can speed it up for a more dynamic effect.
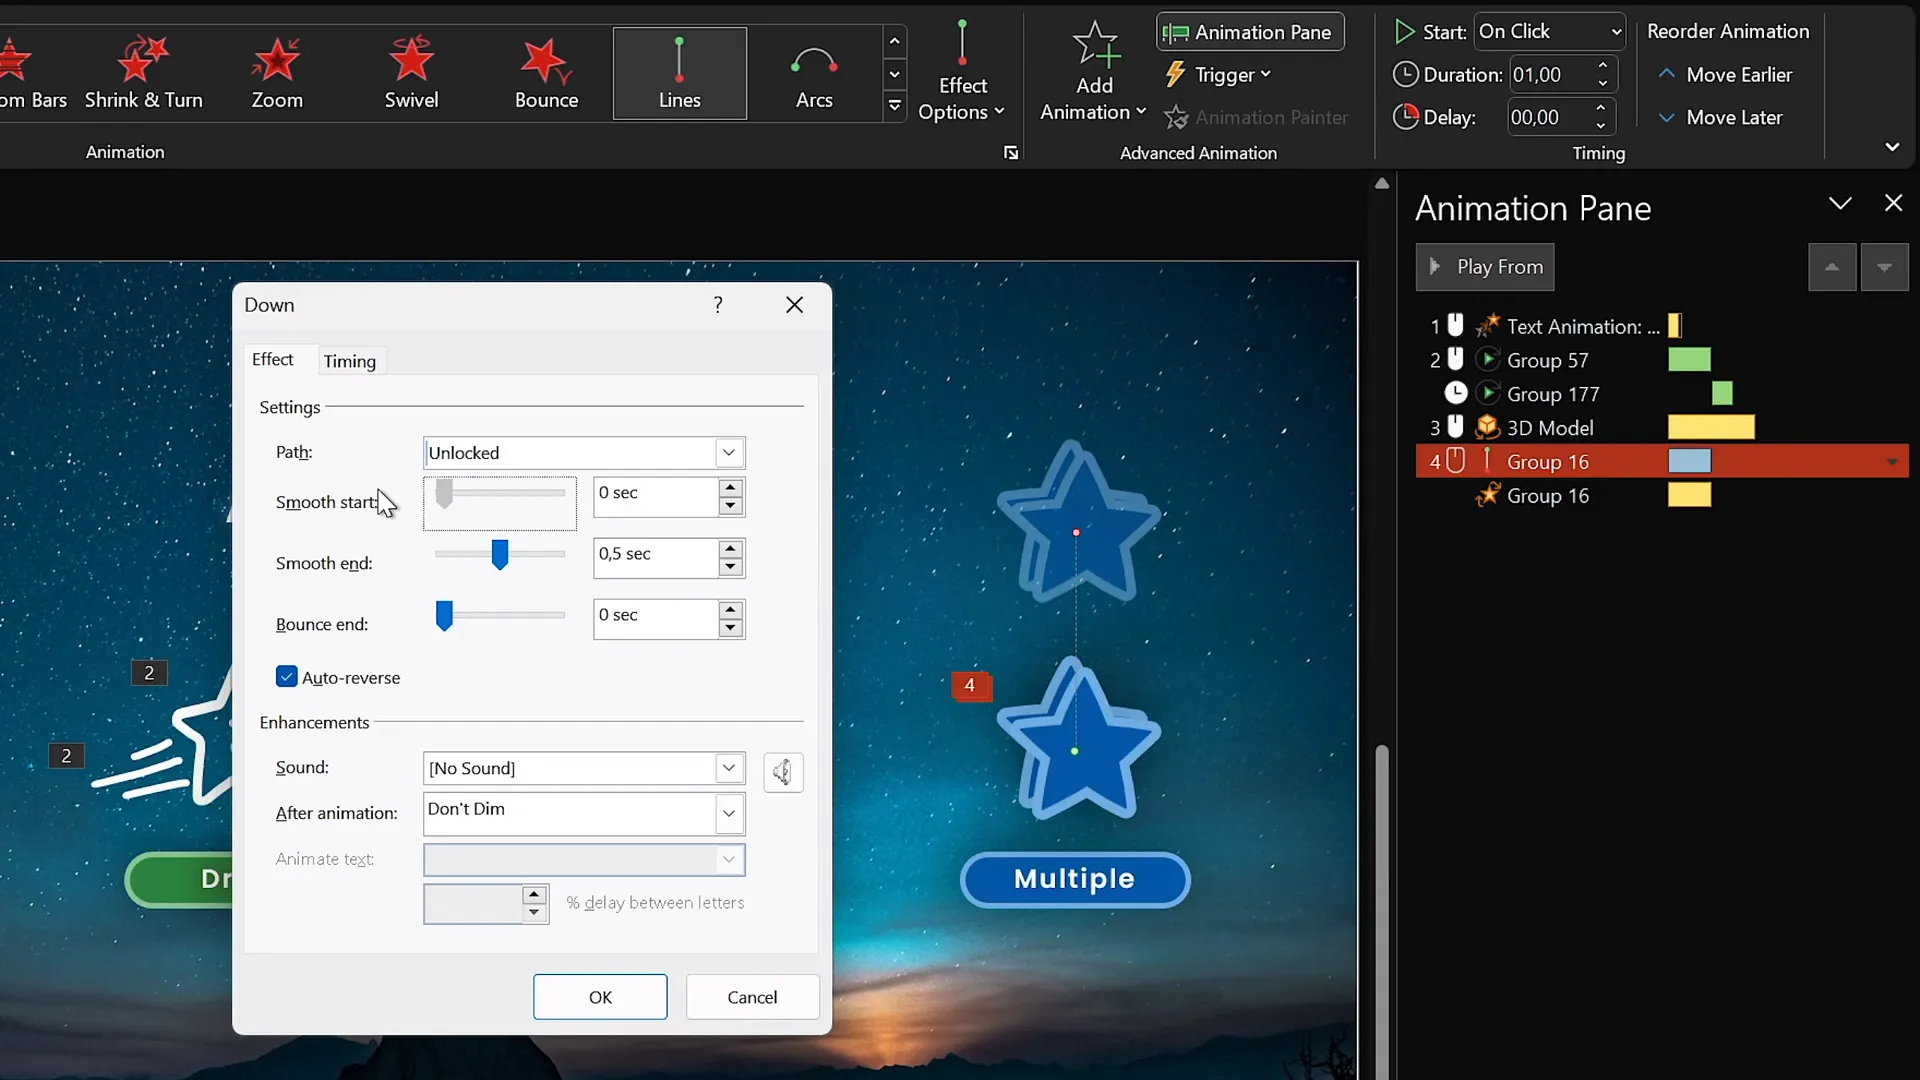
4. Multiple Animations for Custom Effects
Combining multiple animations on the same object opens the door to custom, sophisticated effects. For instance, you can:
- Apply a motion path to move an object.
- Add a spin animation that runs concurrently.
- Synchronize the animations to start together or sequentially for smooth storytelling.
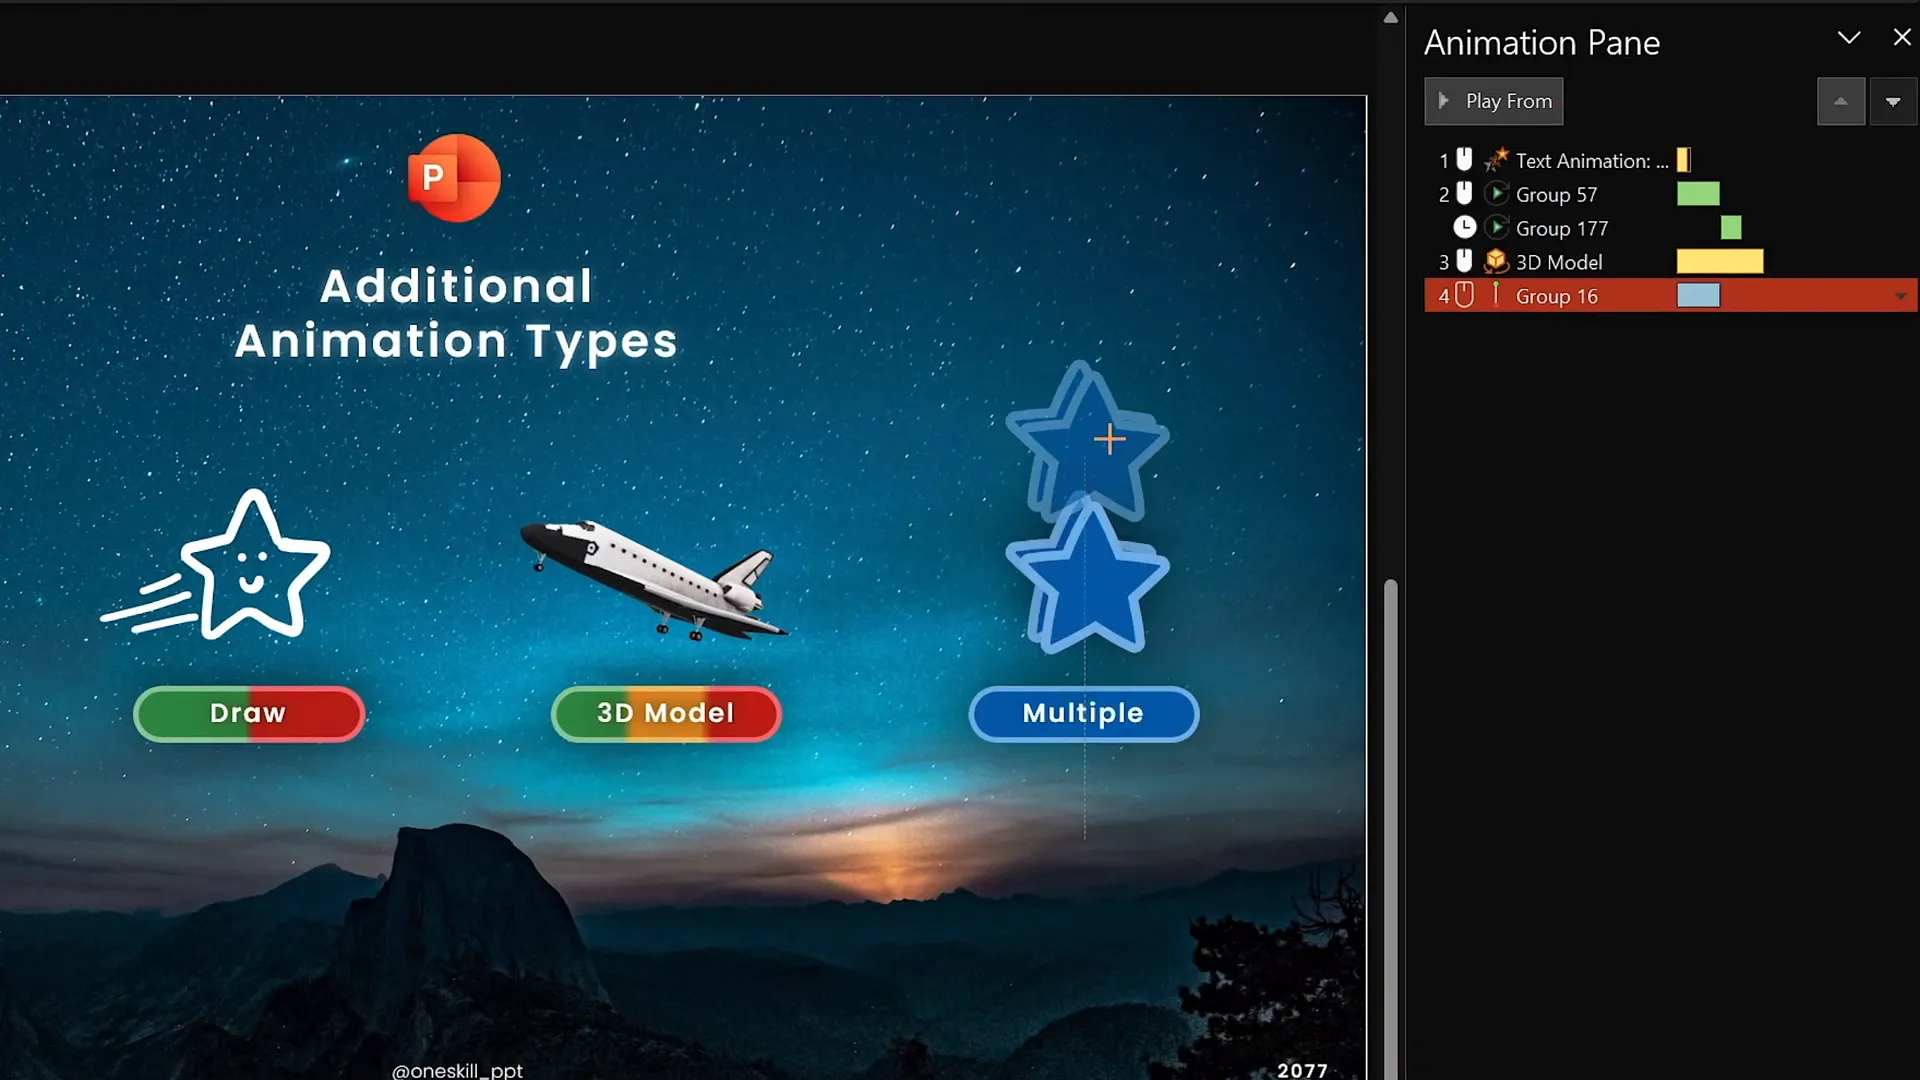
Don’t forget to adjust the durations so all animations finish at the same time, and use the Animation Pane to manage the sequence and timing.
Animation Smoothing
To make animations look professional and polished, use the smoothing options available in the animation settings. Increasing the smooth end makes movements gentler and more natural, avoiding abrupt stops.
This small tweak can significantly elevate the quality of your animations, making your slides feel refined and carefully crafted.
Tips for an Amazing PowerPoint Animation Experience
- Use animations purposefully: Avoid overusing exciting or flashy animations that distract rather than enhance your message.
- Keep it smooth: Use smooth start and end options to create natural transitions.
- Layer animations: Combine entrance, emphasis, and exit animations creatively to tell your story effectively.
- Test and preview: Use the preview and animation pane frequently to ensure your animations flow as intended.
- Use the right version: For best results, use PowerPoint 2019, 2021, or Microsoft 365 on Windows to access advanced features like the animation timeline.
Frequently Asked Questions (FAQ)
Q: Can I animate videos and images in PowerPoint?
A: Absolutely! You can add entrance, emphasis, exit, and motion path animations to photos, videos, shapes, and text boxes alike.
Q: How do I add multiple animations to a single object?
A: Use the Add Animation button instead of selecting animations from the main list. This lets you layer multiple effects on the same object.
Q: What versions of PowerPoint support these advanced animation features?
A: PowerPoint 2019, 2021, and Microsoft 365 on Windows have the most advanced animation tools, including the timeline feature. Mac versions support animations but lack some advanced timeline controls.
Q: How can I make my animations smoother and more professional?
A: Adjust the smooth start and smooth end sliders in the animation effect options to make movements gentler and more natural.
Q: Can I animate 3D models in PowerPoint?
A: Yes! PowerPoint supports 3D model animations with entrance, emphasis, and exit effects tailored specifically for 3D objects.
Q: What are draw animations, and how do I use them?
A: Draw animations replay or rewind hand-drawn objects created with PowerPoint’s Draw tab. They add a dynamic, hand-crafted feel to your slides.
Conclusion: Start Creating Incredible PowerPoint Animations Today!
Mastering PowerPoint animations is a game-changer for anyone who wants to deliver presentations that captivate and communicate effectively. From the four foundational animation types—entrance, emphasis, exit, and motion path—to more advanced techniques like text animations, draw animations, 3D model animations, and custom multiple animations, the possibilities are endless.
Remember, the key to great animations is practice and purpose. Use animations to enhance your message, not overshadow it. Experiment with timing, smoothing, and layering to find the perfect balance for your presentation style.
So, my friends, now is the time to unleash your creativity and start animating like a pro. Whether you’re introducing key points, emphasizing vital information, or simply adding a touch of flair, PowerPoint animations can transform your slides into memorable experiences.
Happy animating—let’s make those presentations super duper awesome!
Check out the full video: The Secret to INCREDIBLE PowerPoint Animations! 🤫✨


