
Welcome to a comprehensive guide on creating stunning PowerPoint slide designs that will elevate your presentations from beginner to expert level. Inspired by the expertise of One Skill PowerPoint, this tutorial distills the secrets behind some of the most beautiful and popular slide templates from 2018 and 2019. Whether you are a novice or someone looking to polish your PowerPoint skills, this article will walk you through ten meticulously crafted slide designs, complete with actionable tips, tricks, and techniques to help you master PowerPoint slide creation from the comfort of your home.

Table of Contents
- Introduction: Why Slide Design Matters
- Getting Started: Essential PowerPoint Basics
- Slide Design #1: The Multipurpose Motegua Template
- Slide Design #2: The Simplicity Template
- Slide Design #3: Versys Minimal Template
- Slide Design #4: Brush Letter Photo Effect
- Slide Design #5: Multi-Rectangle Image Placeholder
- Slide Design #6: Polaroid Photo Placeholders with Animation
- Slide Design #7: Pitch Deck Proposal Template
- Slide Design #8: I9 Template System – Curved Lines and Infographics
- Slide Design #9: Massive Infographics Bundle – Arc Tubes
- Slide Design #10: Marketify Ultimate PowerPoint Template – US Map with Social Media
- Conclusion: Mastering PowerPoint Slide Design
- Frequently Asked Questions (FAQ)
- Additional Resources
Introduction: Why Slide Design Matters
PowerPoint is more than just a tool to display information. It is an art form that combines design, storytelling, and technology. Beautiful slide designs captivate audiences, convey messages more clearly, and enhance the overall impact of your presentation. In this guide, you will learn how to recreate ten of the best-selling and most popular slide designs, drawn from top templates found on marketplaces like GraphicRiver.
Before diving into the designs, it’s important to note that the tutorial uses Office 365, the latest version of PowerPoint, but many techniques are compatible with older versions. Moreover, all fonts and resources mentioned can be downloaded for free from reputable sources such as FontSquirrel and DaFont.
Getting Started: Essential PowerPoint Basics
At its core, creating slides in PowerPoint involves inserting and formatting text boxes, shapes, and pictures. Mastering these elements allows you to build complex and visually appealing designs. Throughout this guide, you will see how to:
- Insert and customize text boxes with fonts like Lato, Raleway, and Selima (a brush font).
- Create and manipulate shapes including rectangles, rounded rectangles, circles, triangles, and custom freeform shapes.
- Use the Slide Master view to create reusable slide layouts and image placeholders.
- Apply colors using the eyedropper tool to perfectly match design palettes.
- Utilize PowerPoint’s merge shapes functions like union, subtract, and intersect to create complex shapes.
- Adjust text alignment, character spacing, and font styling for professional typography.
- Implement image cropping and overlays to achieve dynamic visual effects.
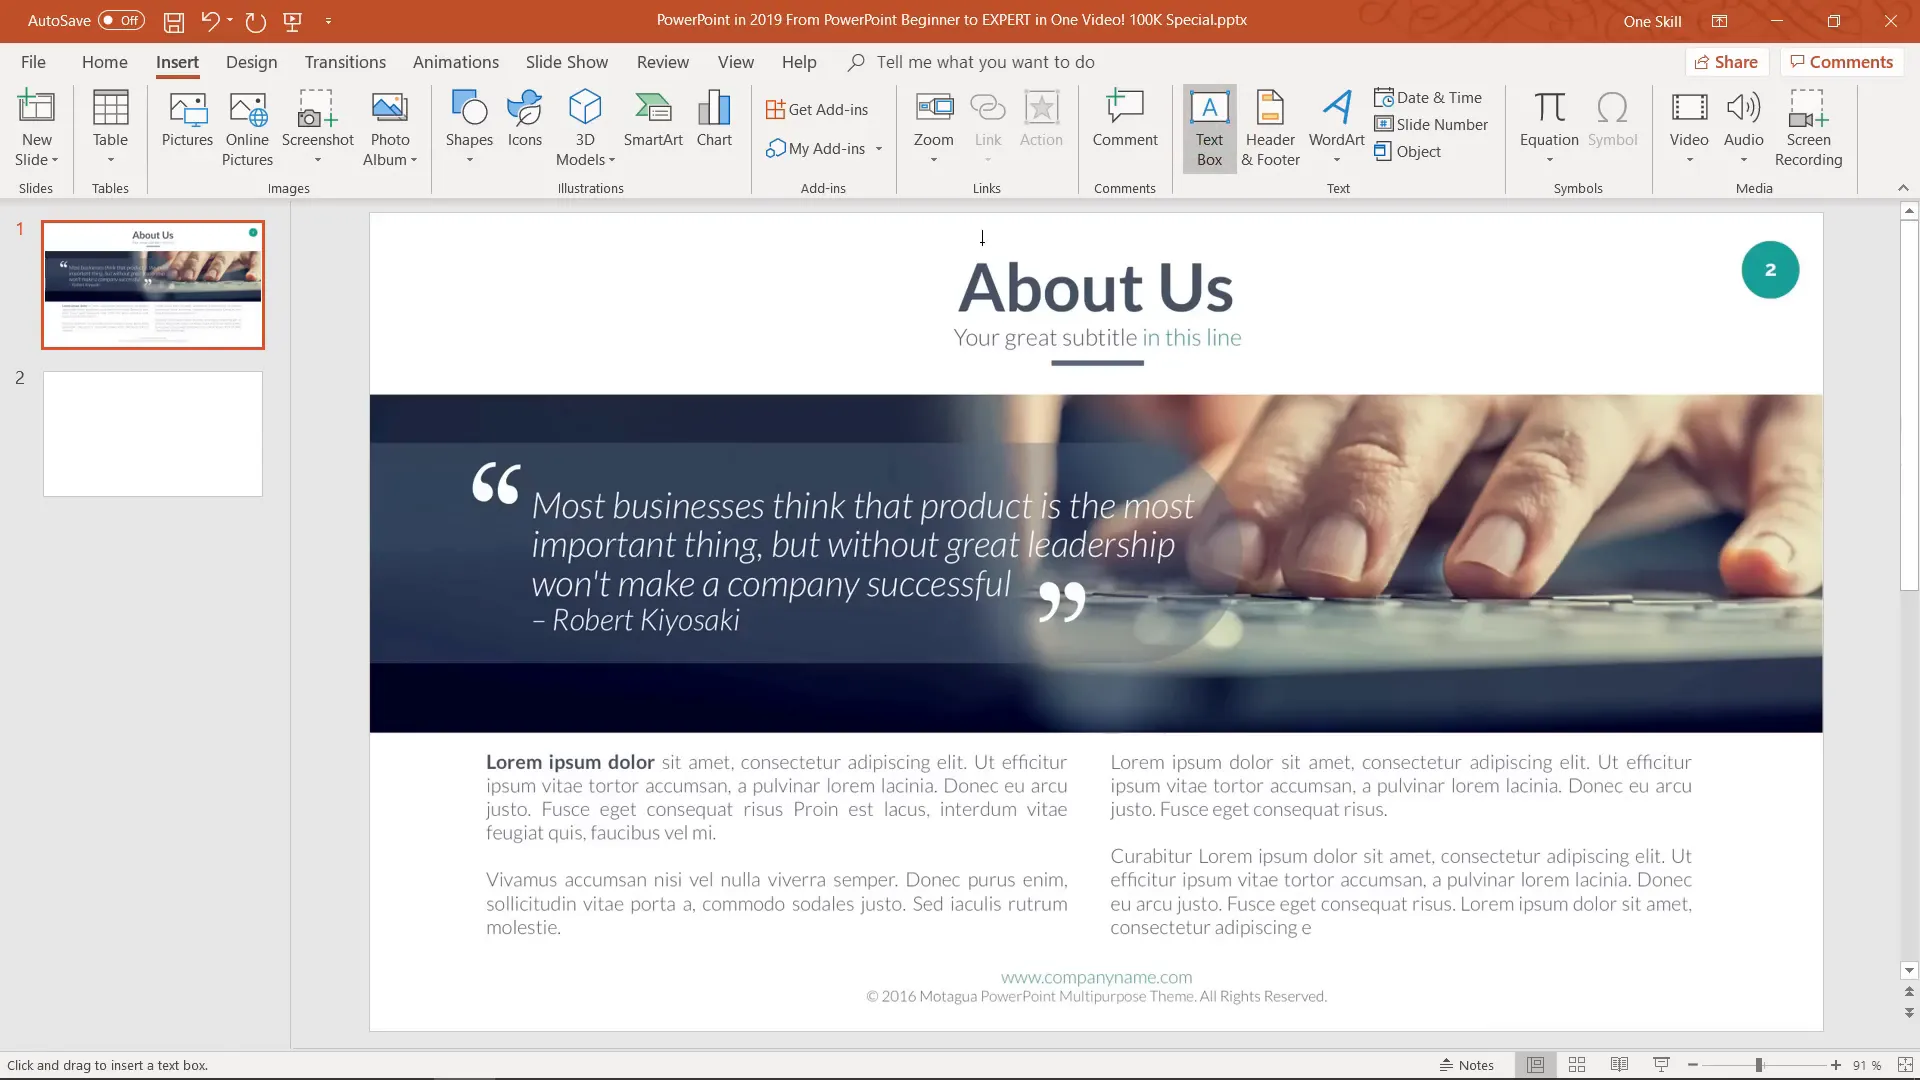
Slide Design #1: The Multipurpose Motegua Template
The first slide we recreate is from the Motegua multipurpose PowerPoint template, known for its clean and elegant layout. This slide features a bold “About Us” heading, smaller descriptive text, a green accent color, a horizontal line, and a full-width image that touches both edges of the slide.
Step-by-Step Creation
- Blank layout: Start with a blank slide by right-clicking and selecting a blank layout.
- Text boxes: Insert text boxes for the main heading and smaller descriptive text. Use the Lato font family, with bold for the heading and light for smaller text. Adjust font sizes for balance.
- Color matching: Use the eyedropper tool to sample colors directly from a reference image to maintain consistent color tones.
- Horizontal line: Insert a straight line using the line tool while holding Shift to keep it straight. Adjust weight and color to match the design. Alternatively, use a thin rectangle for a similar effect.
- Image placement: Insert an image and crop it to extend to the edges of the slide. For flexibility, create a rectangle in Slide Master view, then add a picture placeholder of the same size. This allows easy image replacement without resizing.
- Slide number with bubble: Create a green circle shape in Slide Master, place the slide number text on top, and format the text to white for contrast. This will automatically update for duplicated slides.
- Rounded rectangle quote box: Draw a rounded rectangle, then subtract a rectangle shape from one end using merge shapes to crop it. Apply transparency and fill color to match the background, then insert italicized quote text.
- Decorative hyphens: Use large hyphens with custom font sizes and group them. Duplicate and rotate to add decorative elements.
- Additional text boxes: Insert justified text boxes with bolded keywords, aligned neatly on the right side.

This slide teaches core skills such as text box reuse, color sampling, shape merging, and Slide Master utilization, laying a foundation for more complex designs.
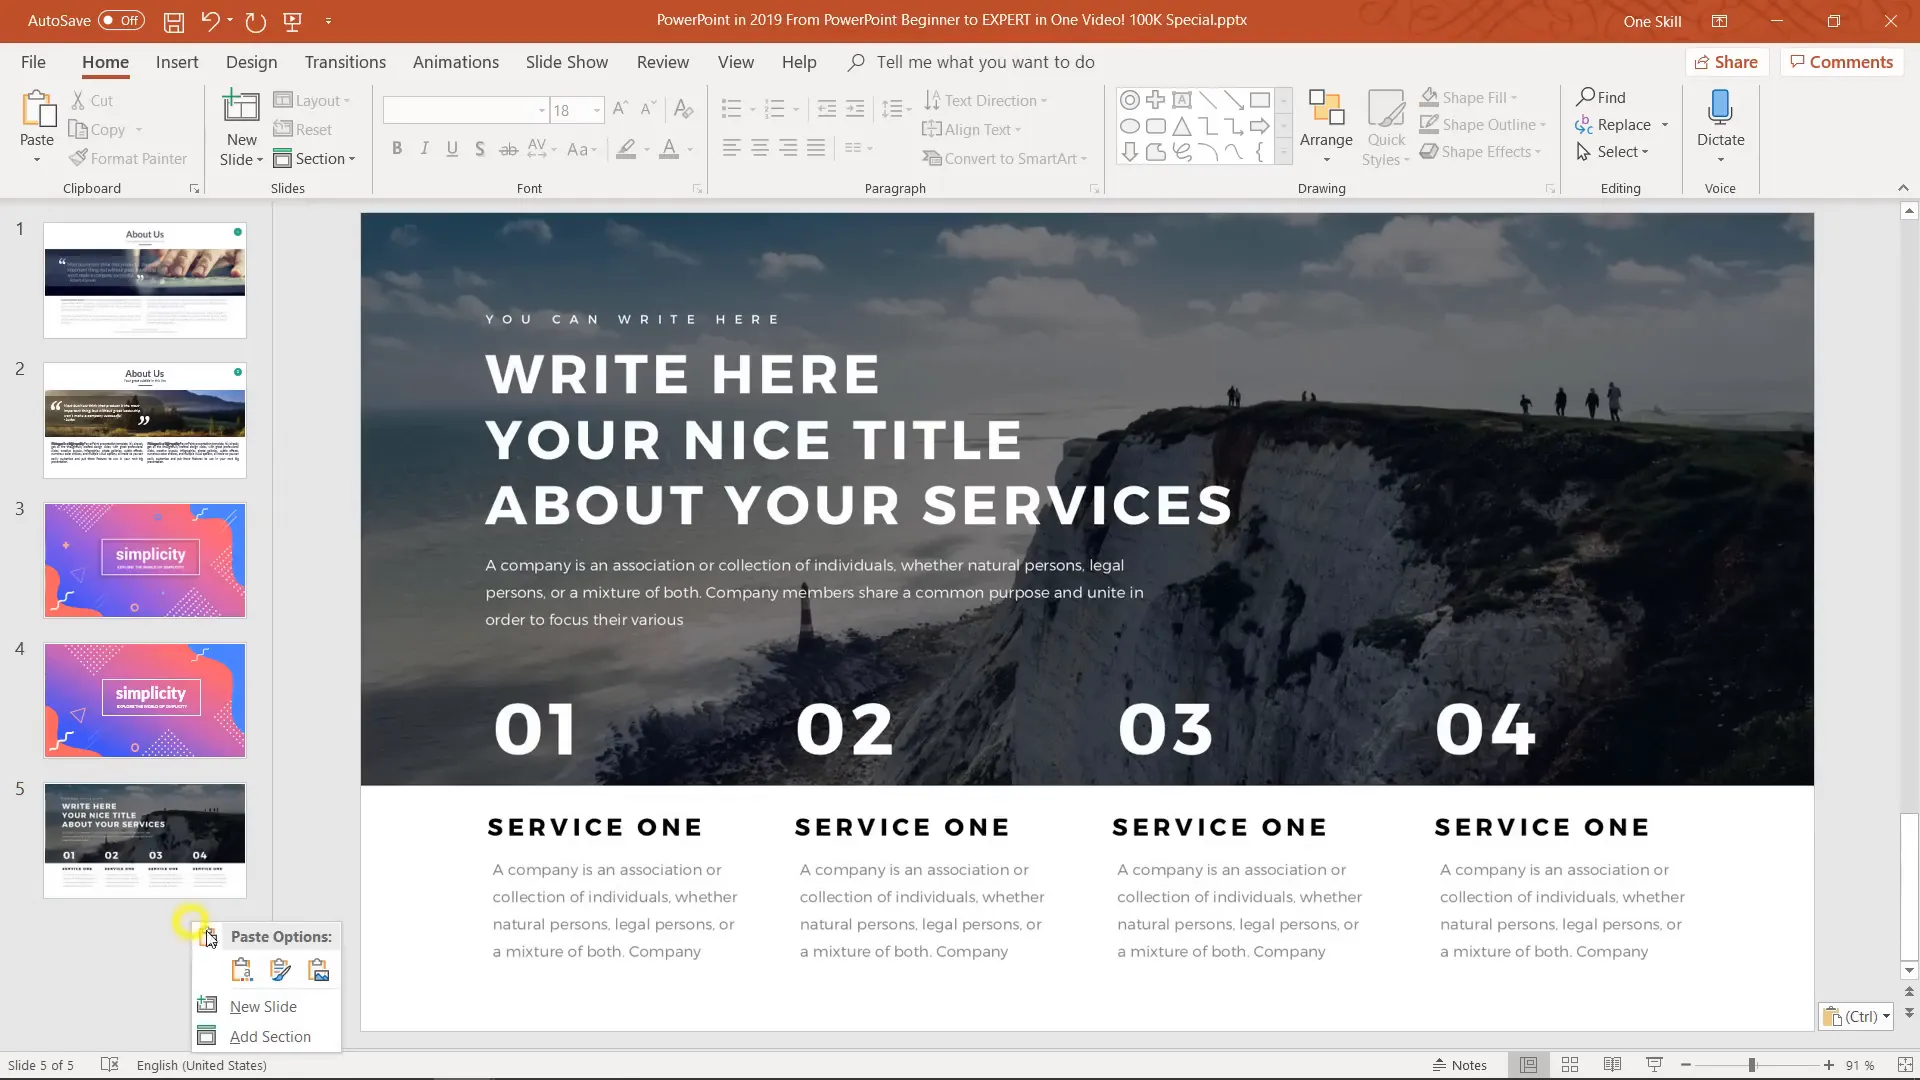
Slide Design #2: The Simplicity Template
The second slide comes from the Simplicity template and focuses on creative use of gradients, shapes, and shadows. It features a gradient background, a white outlined rectangle with shadow, colorful abstract shapes, wavy lines, and decorative bubbles.
Creating a Gradient Background
There are two ways to create a gradient background:
- Use the Format Background option and select Gradient fill.
- Insert a full-slide rectangle and fill it with a custom gradient.
The gradient is built using multiple gradient stops sampled from the original design, creating a smooth transition between colors.
Box with Shadow and Text
Insert a rectangle with no fill and white outline, positioned centrally. Add a shadow effect with custom distance and blur to match the original design. Insert text using the Raleway font, adjusting letter spacing to create a modern look.
Abstract Shapes and Curves
Create abstract red and blue shapes using the Freeform Shape tool. Click to create points and then edit points to add curves using the handles. Fill shapes with colors sampled from the design and remove outlines.
Wavy lines are created with the Curve tool, adjusting points and line weight. Use the “round cap” line option to smooth line ends.
Decorative White Bubbles
Draw circles, duplicate them using Ctrl+D to create rows of bubbles. Group and rotate as needed. These bubbles add depth and visual interest.
Additional Elements
- Triangles with no fill and colored outlines.
- Plus signs and hollow circles created using shapes and outline adjustments.
- Shooting bullet effects created with rounded rectangles filled with gradients transitioning to transparency.
This slide highlights advanced shape manipulation, gradient creation, and layering techniques.
Slide Design #3: Versys Minimal Template
The third slide features a large image placeholder with a semi-transparent black overlay and grouped text boxes with varying fonts and letter spacing.
Image with Color Overlay
Insert an image placeholder and overlay it with a semi-transparent black rectangle for a sleek effect. This overlay is created in Slide Master view so it can be reused easily.
Text Grouping and Formatting
Create multiple text boxes with different fonts such as Raleway Light and Extra Bold. Adjust letter spacing for a clean, minimal look. Group text boxes for easy duplication and alignment.
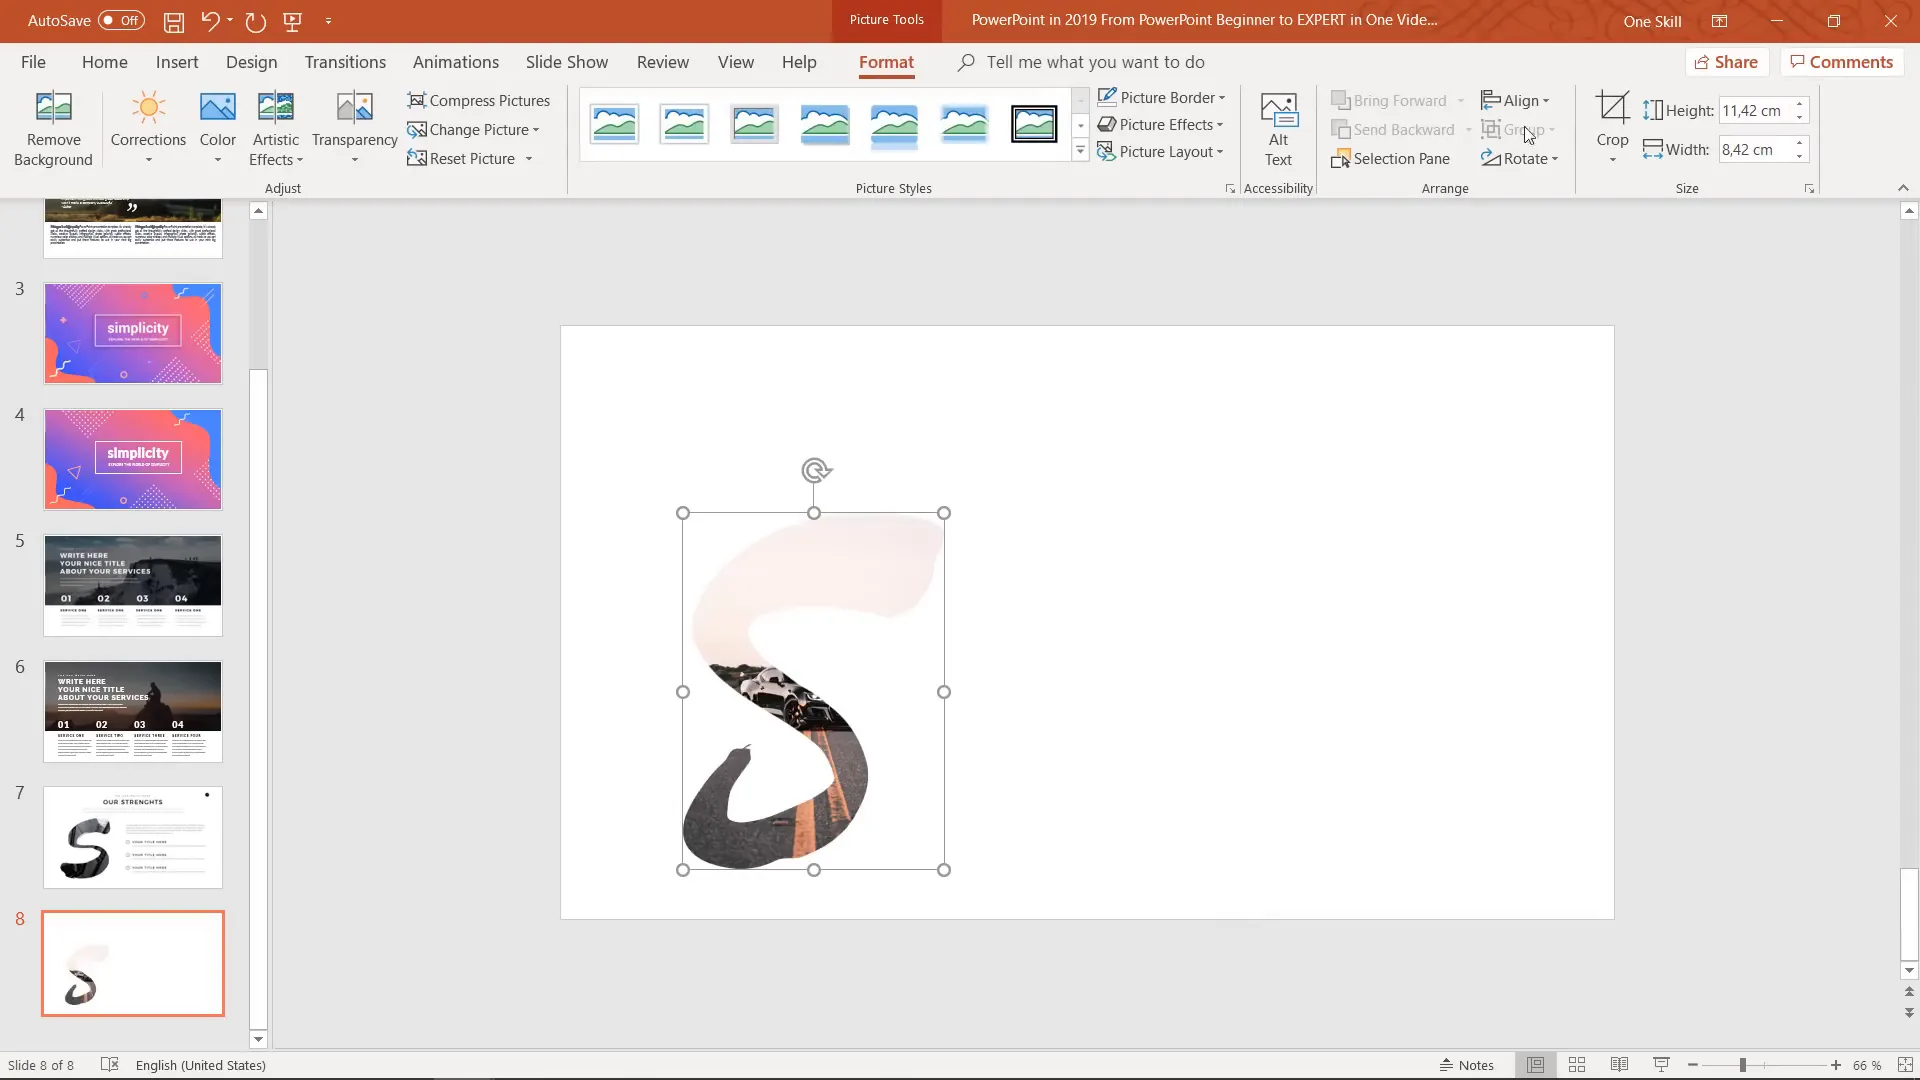
Slide Design #4: Brush Letter Photo Effect
This slide features a large, brush-style letter filled with a photo, creating a dramatic visual effect.
Creating the Brush Letter Effect
- Insert a large text box with a single letter using a brush font like Selima.
- Duplicate a blank slide layout in Slide Master and paste the letter.
- Insert a picture placeholder behind the letter.
- Select both the letter and placeholder, merge shapes using “Intersect” to create a photo-shaped letter.
- Apply an inside shadow effect to add depth.
- Fill the placeholder with any image and crop as needed.
Decorative Bubbles with Arrows
Create circular shapes and freeform arrow shapes, group them for easy manipulation, and position them alongside the letter for added flair.
Slide Design #5: Multi-Rectangle Image Placeholder
This design uses multiple rectangles merged into a single custom image placeholder, creating a segmented photo effect.
Steps to Create
- Draw several rectangles covering the target area.
- Distribute them evenly using align options.
- Merge rectangles with “Union” to form a single shape.
- Cut the shape and paste it into a duplicated blank layout in Slide Master.
- Insert a picture placeholder and send it behind the shape.
- Select the placeholder and shape, then intersect to create the custom placeholder.
- Apply images and adjust cropping as needed.
Slide Design #6: Polaroid Photo Placeholders with Animation
This slide features multiple rotated photo placeholders styled like Polaroid photos, complete with white outlines and drop shadows. The photos fly in with pinwheel animations.
Creating Polaroid Placeholders
- Duplicate a blank slide layout in Slide Master and insert a picture placeholder shaped as a rectangle.
- Add a white outline with appropriate weight (around 10 pt) and sharp corners (miter join).
- Add a shadow effect with blur and transparency to simulate depth.
- Duplicate and rotate placeholders to create the Polaroid stack effect.
- Adjust outline thickness for smaller photos.
Animating Photos
Add entrance animations like “pinwheel” to photos and use the animation painter to apply the effect to other photos. Set animations to start “after previous” for smooth sequential effects.

Slide Design #7: Pitch Deck Proposal Template
This slide demonstrates a custom image placeholder with rounded rectangles and colorful overlays, complemented by social media icons in colored circles.

Creating the Image Placeholder
- Draw multiple fully rounded rectangles and position them horizontally with equal spacing.
- Merge the shapes with “Union” and subtract overlapping areas to create a unique shape.
- Paste the shape into Slide Master and add a picture placeholder behind it.
- Intersect the placeholder and shape to create a reusable custom placeholder.
- Fill with photos and adjust cropping.
Adding Colorful Circles and Icons
- Create circles with no outlines and fill them with colors sampled from the design.
- Insert icons (microphone, television, camera, keyboard) from a resource library or SVG files.
- Align icons to the center of the circles using alignment tools.
- Group icons and circles for easy manipulation.
- Insert social media icons at the bottom, adjusting spacing with distribution tools.
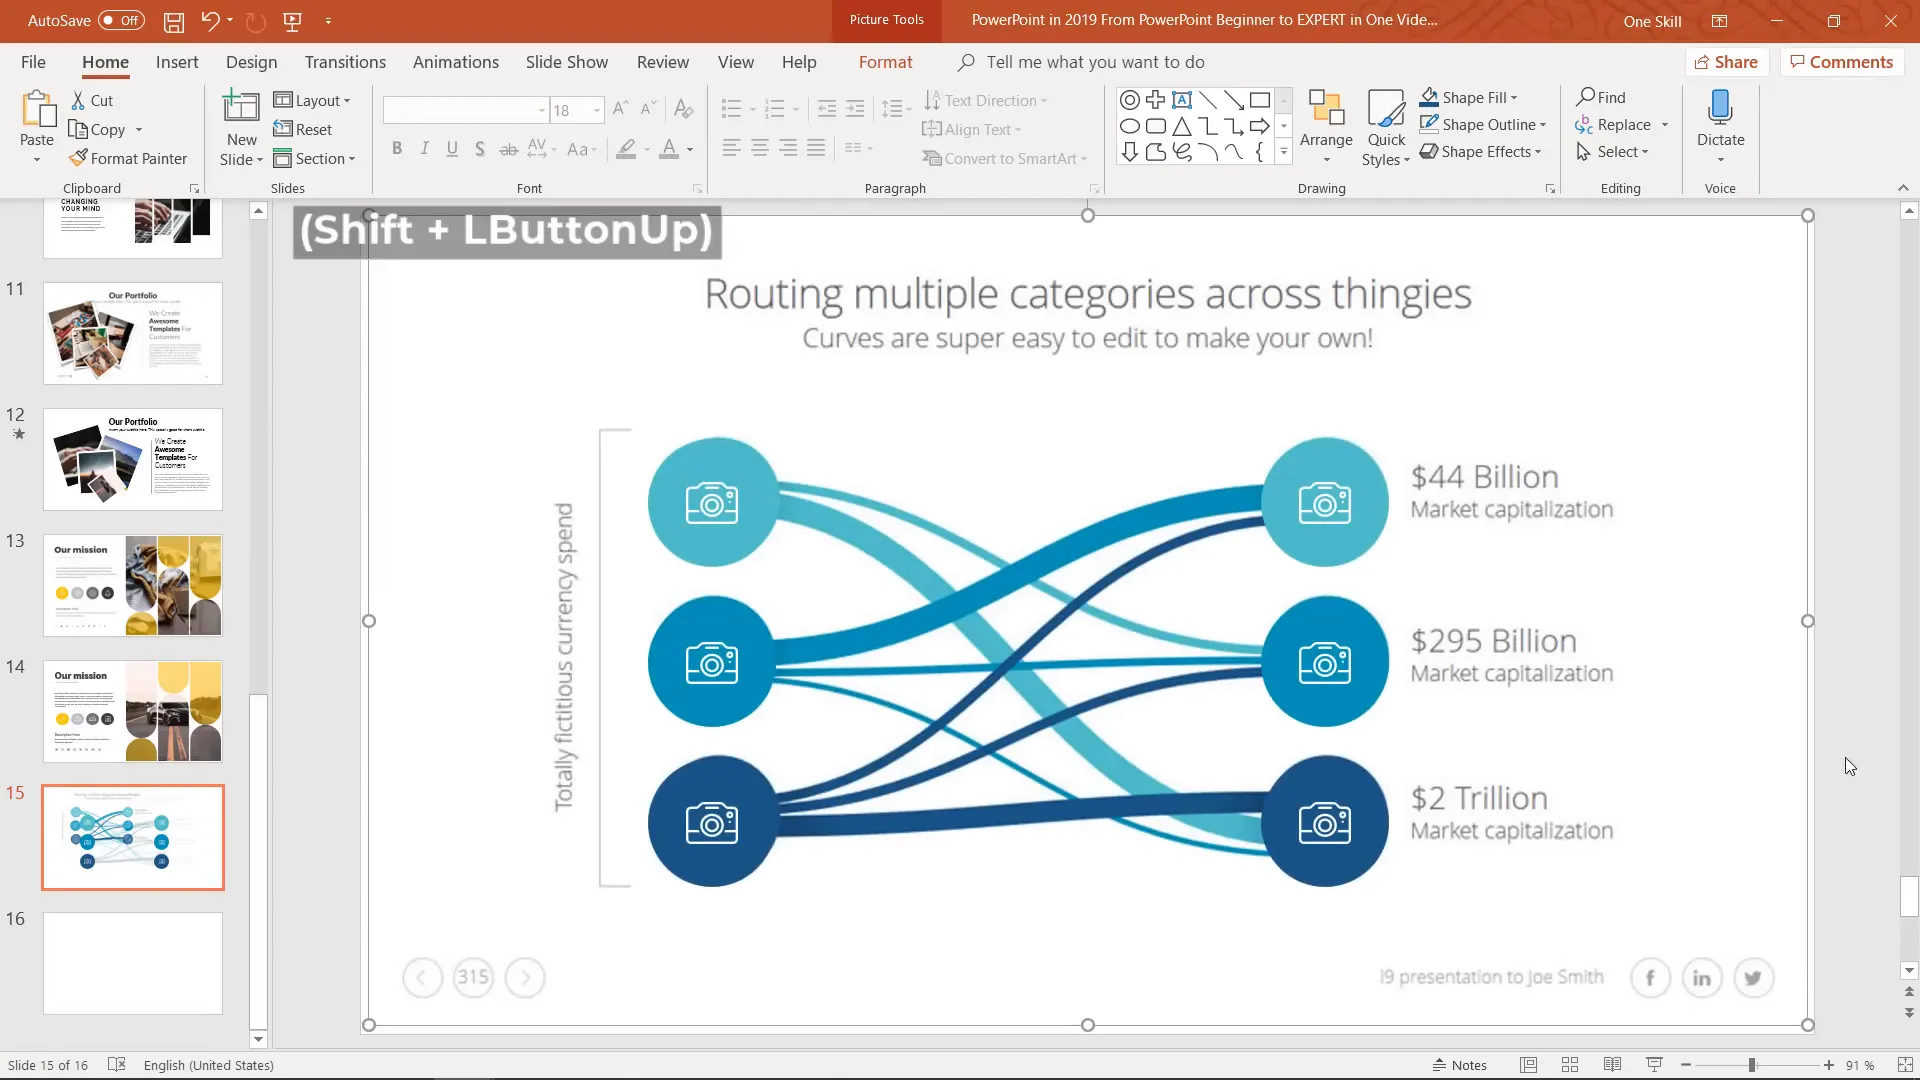
Slide Design #8: I9 Template System – Curved Lines and Infographics
This slide focuses on creating curved infographic lines connecting circular icons, demonstrating advanced shape manipulation and gradient fills.
Creating Circular Icons and Duplicating
- Insert circles and remove outlines.
- Insert icons into one circle and duplicate to avoid repetitive work.
- Use Ctrl+Shift to duplicate and move objects in straight lines.
Drawing Curved Lines
There are several methods to create curves:
- Using the Curve tool, adding multiple points and adjusting handles.
- Using curved connectors, though less precise.
- Using freeform shapes with two points, then editing points to smooth the curve — the preferred method.
Gradient Stroke for Lines
Apply multi-stop gradients to the line strokes to add dimension and shadow effects, enhancing visual appeal.
Handling Overlapping Lines
Add subtle shadows to overlapping lines for distinction and clarity.
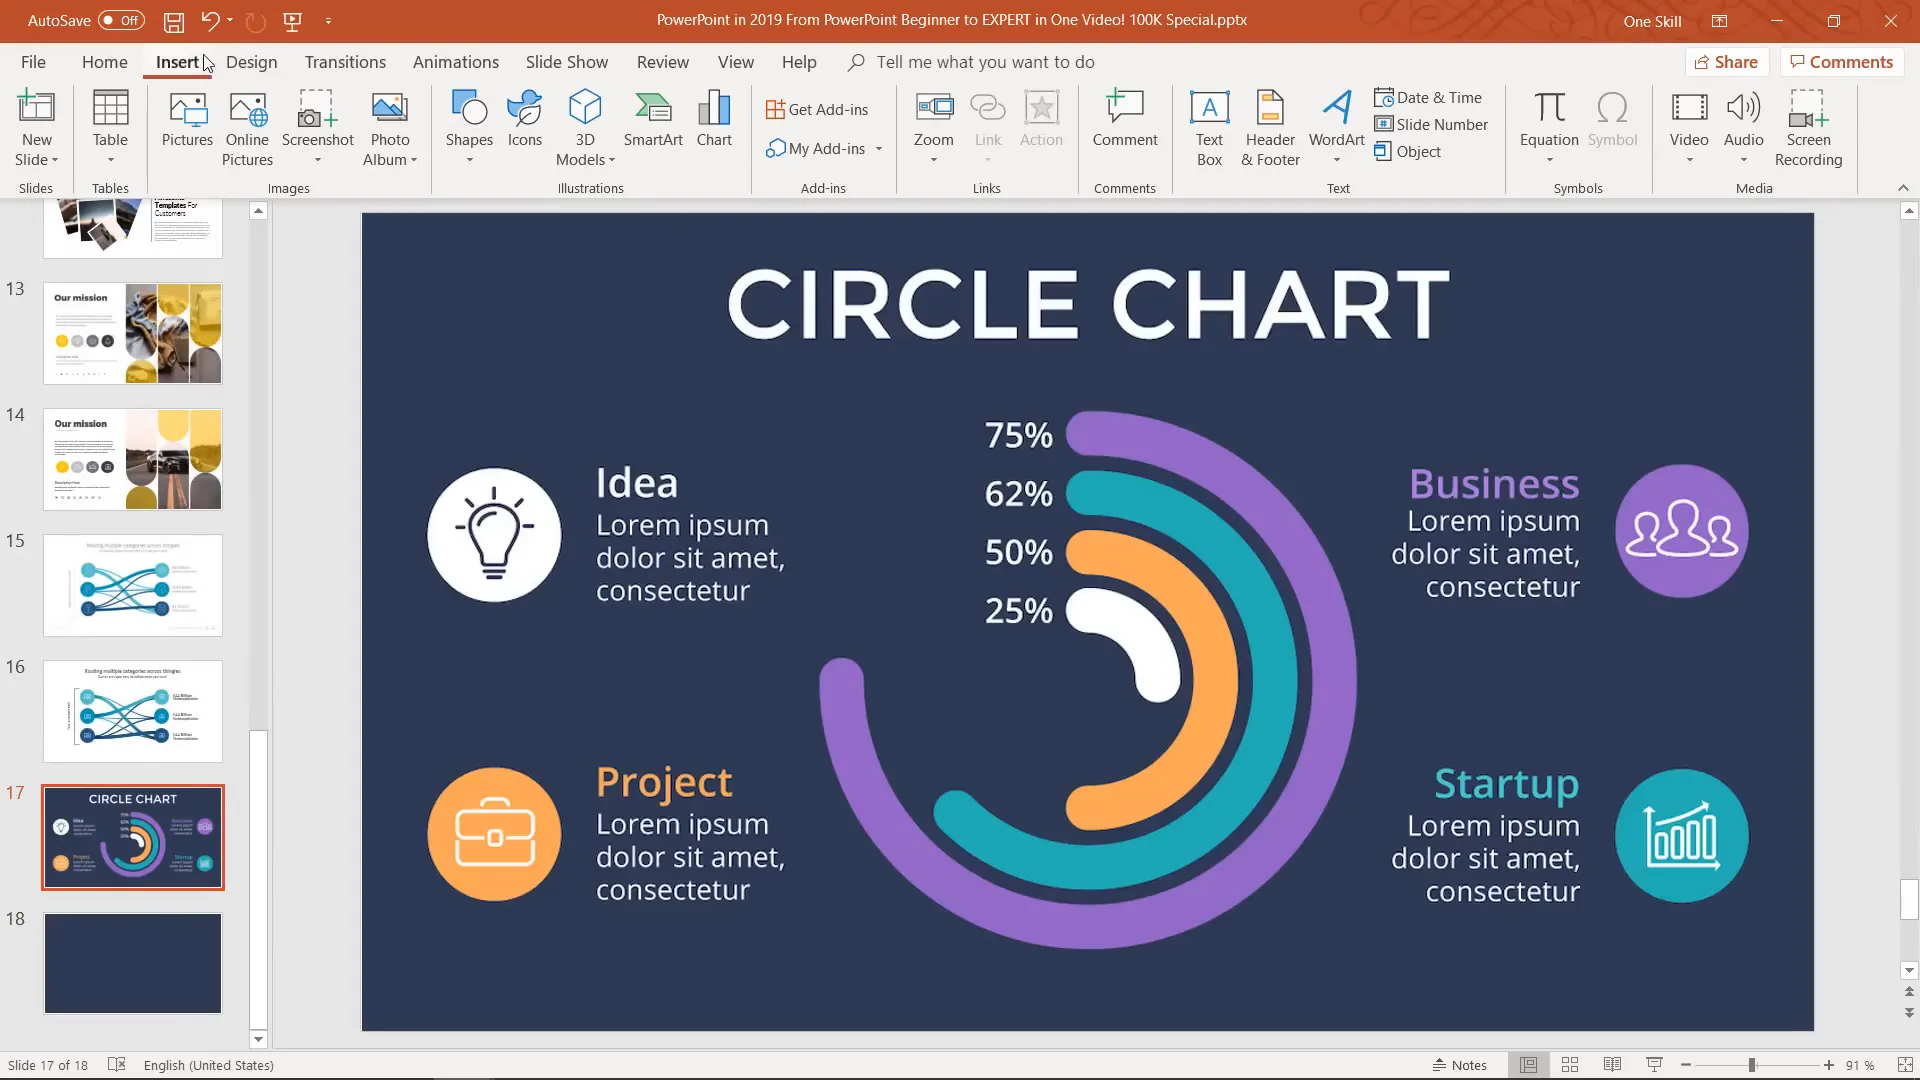
Slide Design #9: Massive Infographics Bundle – Arc Tubes
This slide features tube-like arcs forming a circular infographic with percentage labels.
Using the Arc Shape
- Insert arcs from basic shapes and hold Shift to maintain proportion.
- Adjust arc length using yellow handles.
- Increase line weight to create thick tubes.
- Set line caps to rounded for smooth ends.
- Duplicate arcs, resize while holding Ctrl+Shift to maintain center scaling.
Color Matching and Layering
Use the eyedropper tool to sample colors, and layer arcs carefully to create a cohesive infographic.
Manual Percentage Labels
Insert text boxes for percentages manually. While these won’t update automatically, they allow for custom design flexibility beyond standard charts.
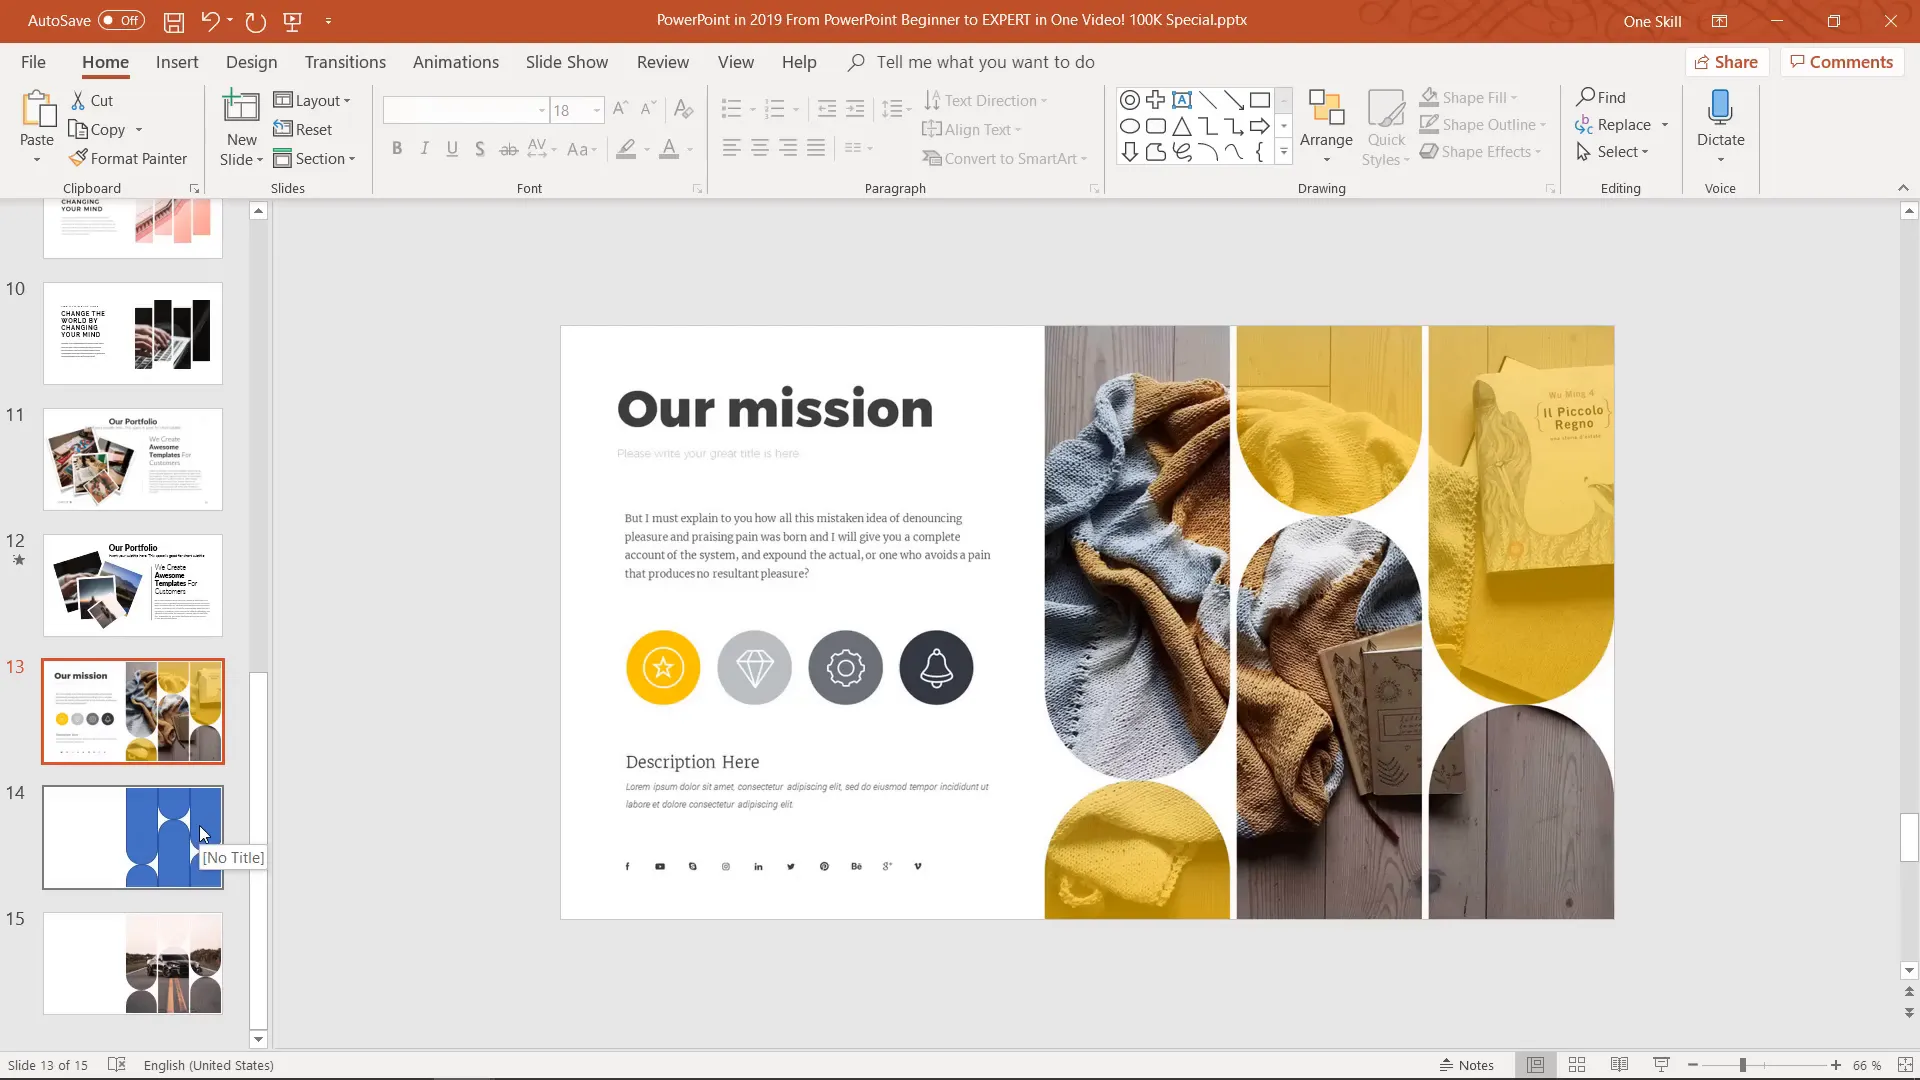
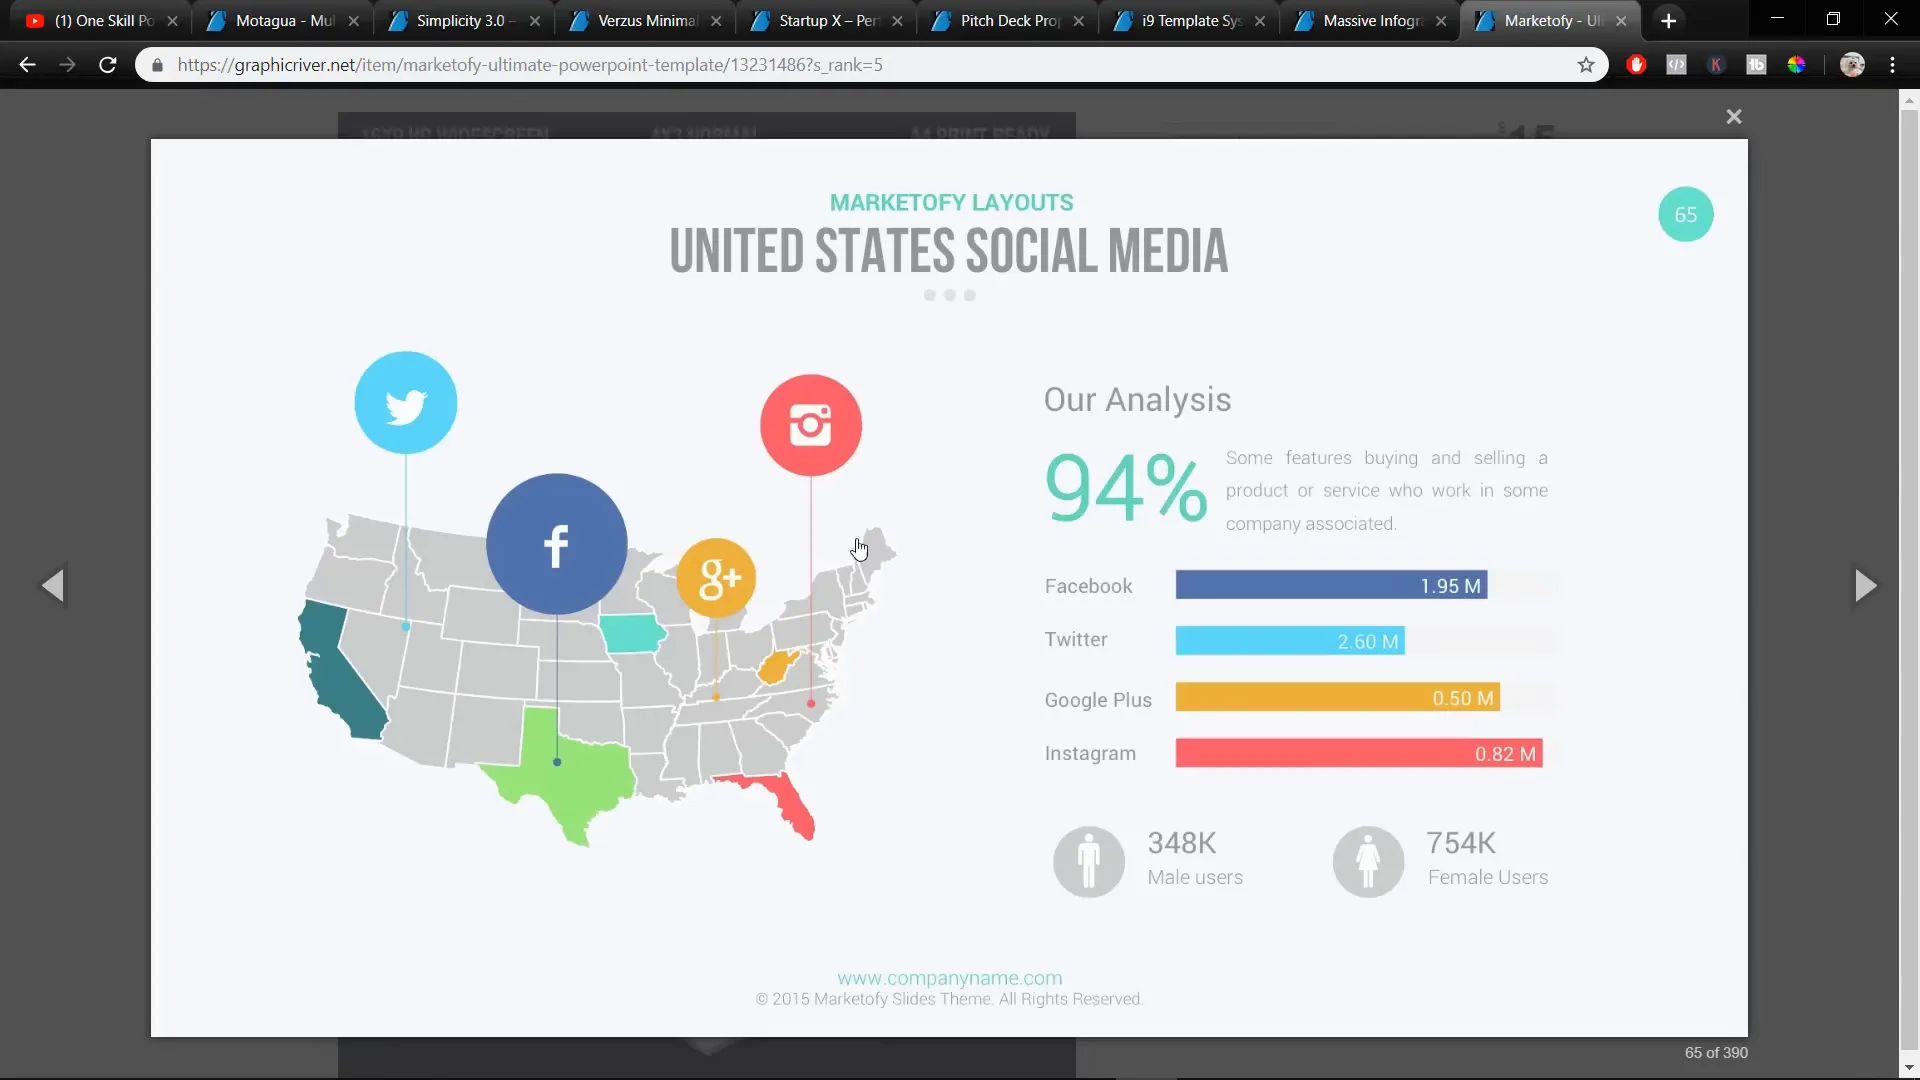
Slide Design #10: Marketify Ultimate PowerPoint Template – US Map with Social Media
This slide showcases a map of the United States with highlighted states and social media bubbles connected by arrows.
Inserting and Coloring the Map
- Import a detailed US map with individual states from a resource file.
- Select and color states individually to highlight regions.
Creating Social Media Bubbles and Connectors
- Draw circles filled with light blue and no outline.
- Insert arrow lines connected to circles, using arrowheads shaped like bubbles.
- Group bubbles and arrows for easier positioning.
- Duplicate and adjust positions to create multiple social media callouts.
Inserting and Editing Icons
- Use white social media icons (Twitter, Facebook, Google Plus, Instagram) from a resource library or SVG files.
- Remove unwanted outlines by intersecting icons with circles.
- Adjust slide background temporarily to black for better icon visibility during editing.
- Restore background to white once editing is complete.
Additional Infographic Elements
Rounded and sharp rectangles with text represent data sliders. Use the “Change Shape” feature to convert rectangles to rounded ones, and double-click to insert text directly.
Conclusion: Mastering PowerPoint Slide Design
By working through these ten slide designs, you have learned a wide range of PowerPoint skills, including:
- Advanced use of Slide Master for reusable layouts and placeholders.
- Shape manipulation techniques such as merging, subtracting, and intersecting.
- Precise color matching with the eyedropper tool.
- Text formatting with various fonts, sizes, and spacing options.
- Creating custom image placeholders with unique shapes.
- Adding shadows and transparency for depth and visual interest.
- Animating objects for dynamic presentations.
- Designing infographics with arcs, curves, and maps.
These techniques will empower you to create professional and eye-catching PowerPoint presentations that stand out in any setting. With practice, you can customize and expand upon these designs to suit your unique presentation needs.
Frequently Asked Questions (FAQ)
Q1: What PowerPoint version is needed to follow these techniques?
While this tutorial uses Office 365 for its latest features, most techniques are compatible with older versions. Some advanced features like Slide Master image placeholders may vary slightly.
Q2: Where can I find the fonts used in these designs?
Fonts such as Lato, Raleway, and Selima can be downloaded for free from websites like FontSquirrel and DaFont. Links to these fonts are also provided in the resources.
Q3: How can I reuse custom slide layouts across presentations?
Use the Slide Master view to create and save custom layouts with placeholders and design elements. These layouts can then be reused and adapted across different presentations.
Q4: Can I replace images easily in custom placeholders?
Yes. When using picture placeholders in Slide Master, you can click the image icon to insert or replace photos without resizing or repositioning manually.
Q5: How can I create curved shapes and lines?
Use the Freeform Shape tool or Curve tool to draw custom shapes and lines. Edit points and handles to adjust curves precisely. For lines, use the line options to add rounded caps.
Q6: Are the icons used in these designs free?
Many icons are sourced from free resources such as One Skill PowerPoint’s resource pack or websites like Flaticon. Ensure you use SVG format for best compatibility and quality.
Q7: How do I animate objects in PowerPoint?
Select the object, choose animations from the ribbon, pick entrance effects like “pinwheel,” and set timing options such as “after previous” for smooth sequences. Use Animation Painter to copy animations across multiple objects.
Q8: Where can I find more PowerPoint tutorials like this?
Explore channels and websites dedicated to PowerPoint tutorials, including One Skill PowerPoint’s YouTube channel and website, which offer extensive lessons on animation, infographics, and slide zoom features.
Additional Resources
- One Skill PowerPoint Patreon – Download resources including icons and maps.
- PowerPoint Tutorials and Templates – Access free lessons and premium templates.
- PowerPoint Animation Tutorials
- PowerPoint Beginner Tutorials
- PowerPoint Slide Zoom Tutorials
Embark on your journey to becoming a PowerPoint expert by practicing these designs and exploring further tutorials. Your presentations will never be the same again!
Check out the full video: PowerPoint Slide Design from Beginner to EXPERT in One Video 🔥100K Special🔥


