
Welcome, my friends! If you’re looking to elevate your PowerPoint presentations with stunning visual effects, you’ve come to the right place. Today, I’m going to show you how to create an epic PowerPoint video effect where text rises from behind mountains and then disappears behind them again—all within PowerPoint itself. This tutorial will guide you through every step, from inserting videos to advanced masking techniques and animations that bring your slides to life.
Whether you’re a seasoned PowerPoint user or just getting started, this effect will add a fresh, professional touch to your presentations. Let’s dive in!
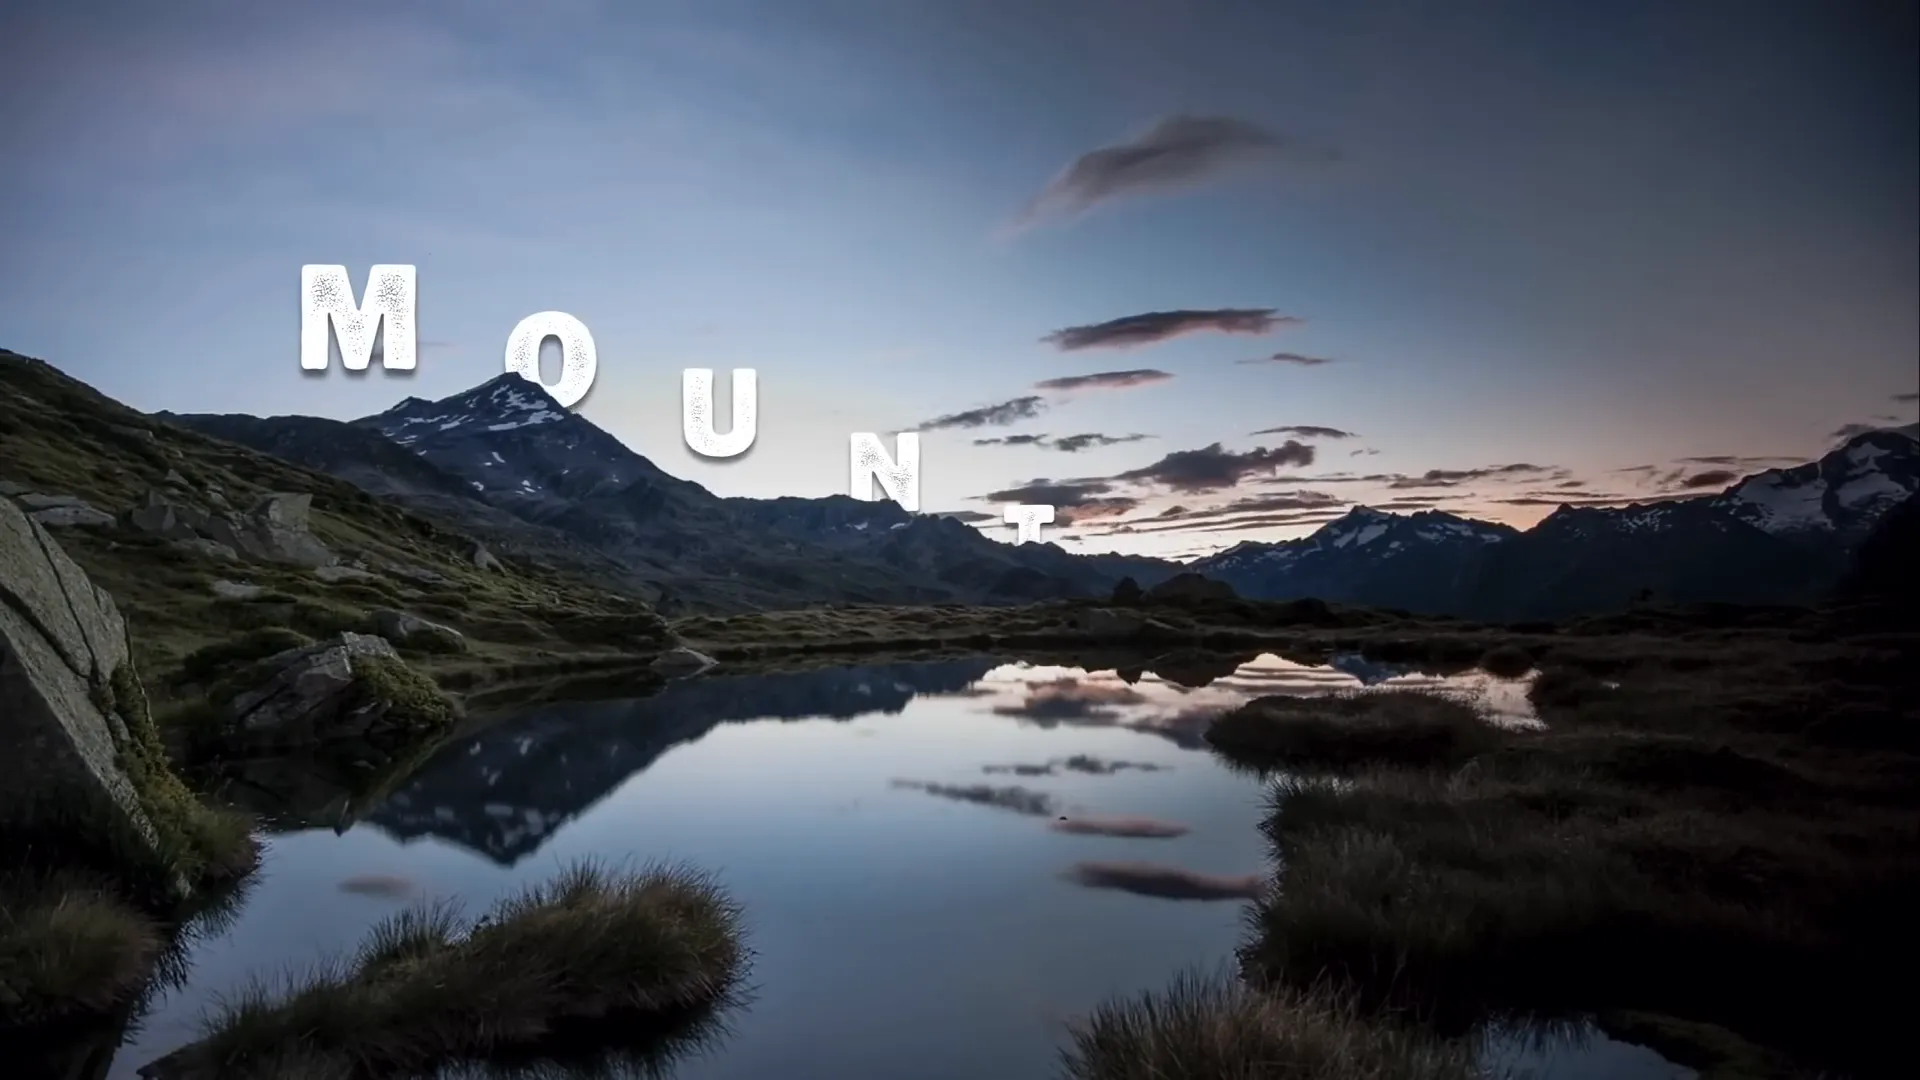
Table of Contents
- Inserting the Video into PowerPoint
- Creating Two Video Layers for Masking
- Cropping the Video to the Mountain Shape
- Advanced Masking Using Photopea
- Synchronizing Playback of Both Videos
- Adding and Animating Text Between Video Layers
- Final Touches and Tips
- Frequently Asked Questions (FAQ)
Inserting the Video into PowerPoint
The foundation of this effect is a beautiful landscape video with distinct mountains and a changing sky. I found an amazing time-lapse video on Pexels by Eberhard, which is perfect because the mountains remain static while the sky changes dynamically.
Here’s how to insert and prepare the video:
- Create a new blank slide: Start fresh by adding a blank slide to your PowerPoint presentation.
- Insert the video: Drag and drop your downloaded video onto the slide.
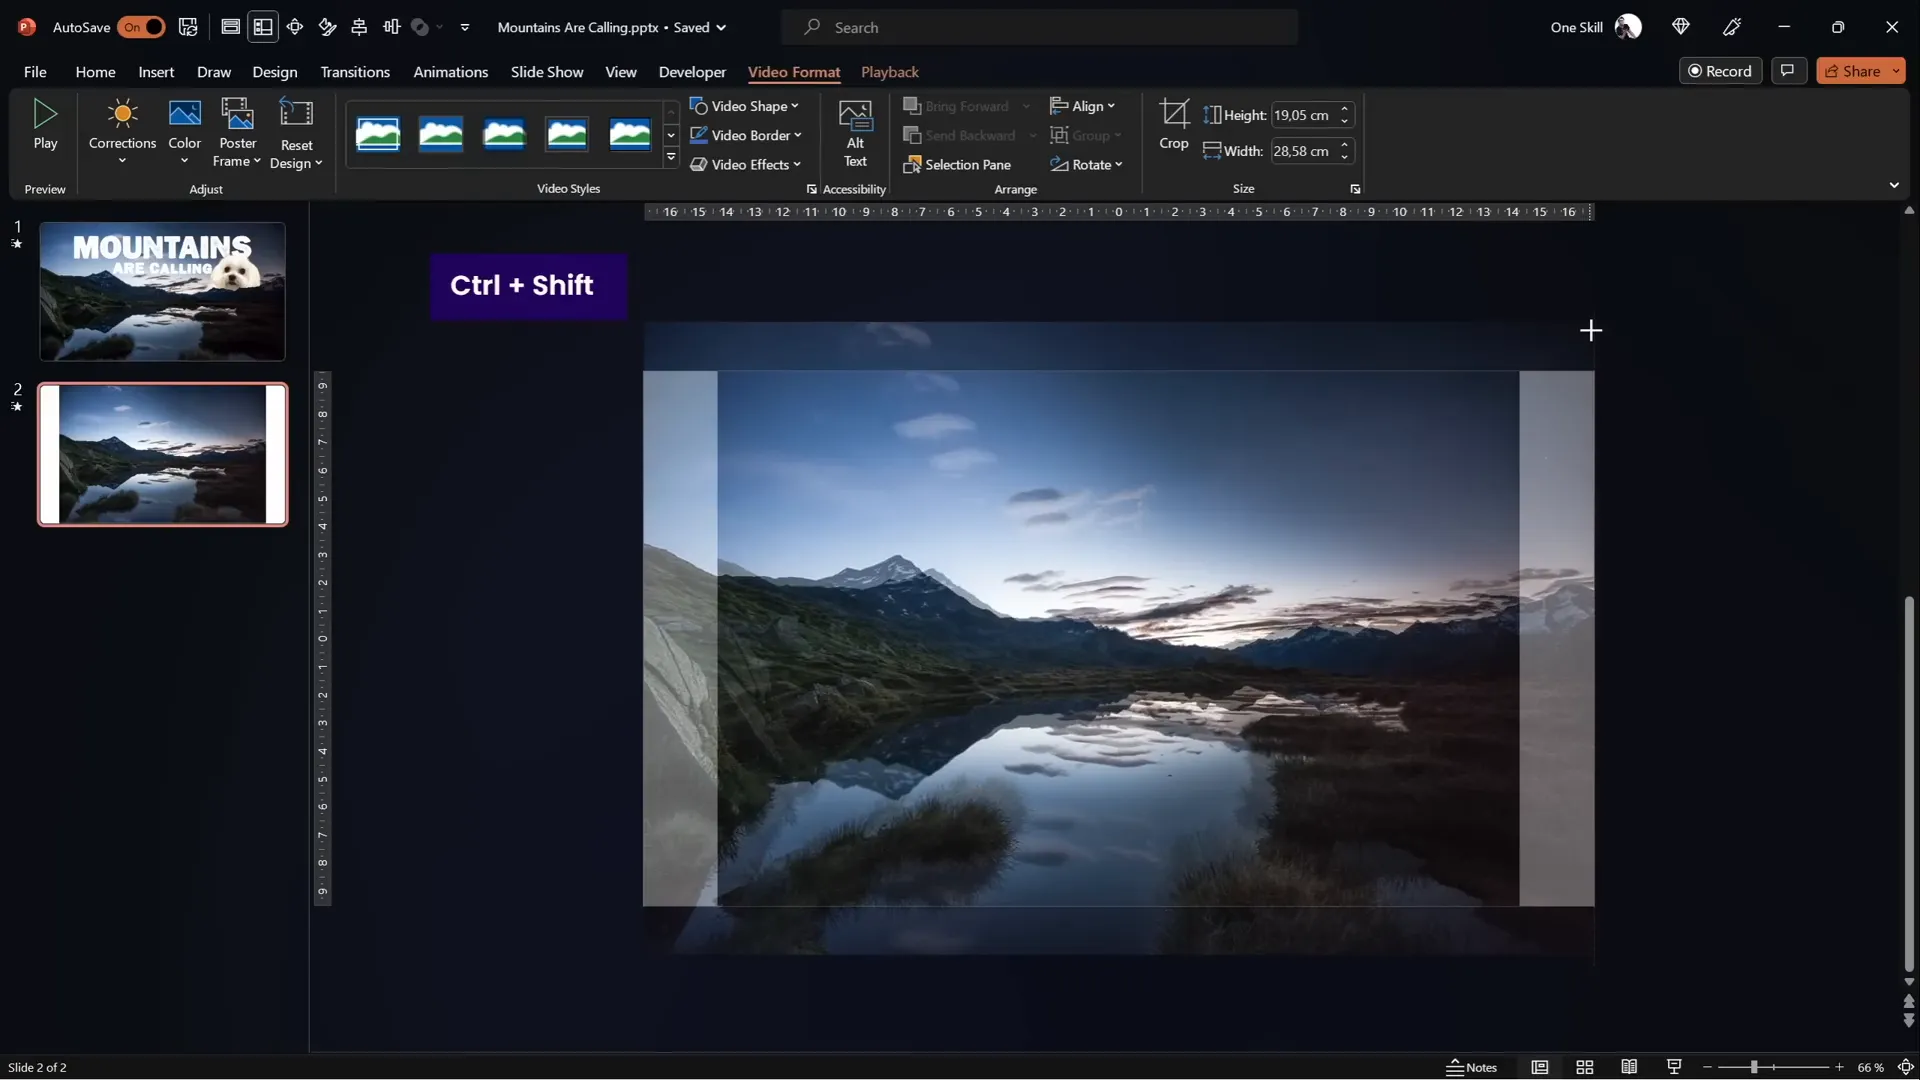
- Center and resize the video: Use the corner handles while holding
Ctrl+Shiftto resize the video proportionally from the center, ensuring it covers the entire slide. - Crop to match slide ratio: Crop the top and bottom edges so the video fits perfectly without distortion.
- Adjust brightness: Reduce brightness by 5% in the Format Video panel. This subtle darkening helps white text stand out later.
- Set playback options: Configure the video to start automatically and loop indefinitely to maintain continuous motion.
Once these steps are done, play your slide to confirm the video loops smoothly and fills the background.
Creating Two Video Layers for Masking
This effect hinges on a clever trick: using two identical video clips layered on top of each other. Here’s why:
- Bottom layer: The full video plays as the background.
- Top layer: The same video cropped so only the mountains remain visible, acting as a mask.
Between these two layers, you can insert any content—like text or images—that will appear to rise from behind the mountains and then disappear behind them.
Steps to set this up:
- Duplicate the video: Copy the original video and paste it onto the slide.
- Rename layers: For clarity, rename the bottom video
Video Backgroundand the top videoVideo Front. - Align both videos: Ensure both are perfectly centered and stacked.
- Crop the top video: Crop the top portion of the front video to remove the sky, leaving only the mountains visible.
At this point, anything placed between these two videos will appear sandwiched, allowing for creative effects like text appearing behind the mountains.
Cropping the Video to the Mountain Shape
Cropping the top video with a straight line is simple but doesn’t look natural. To achieve a seamless mountain edge, you need to crop following the mountain contours. Here’s how:
- Use the Freeform Shape Tool: Insert a freeform shape and manually trace the mountain line by clicking points along the contour.
- Close the shape: Connect the last point back to the first to create a closed shape.
- Subtract the shape from the top video: Select the top video, hold
Shift, select your custom freeform shape, then use the Merge Shapes > Subtract function to cut out the sky precisely.
Note: If you don’t see the Merge Shapes button in your toolbar, you can add it via the Quick Access Toolbar settings. This tool is essential for advanced shape editing.
While this method works, it requires patience and a steady hand to trace the mountain line accurately.
Advanced Masking Using Photopea
If you want a more precise and less tedious way to crop the sky, you can use a free online photo editor called Photopea. This method involves converting the sky into a vector shape that can be imported into PowerPoint for exact masking.
Step-by-step guide:
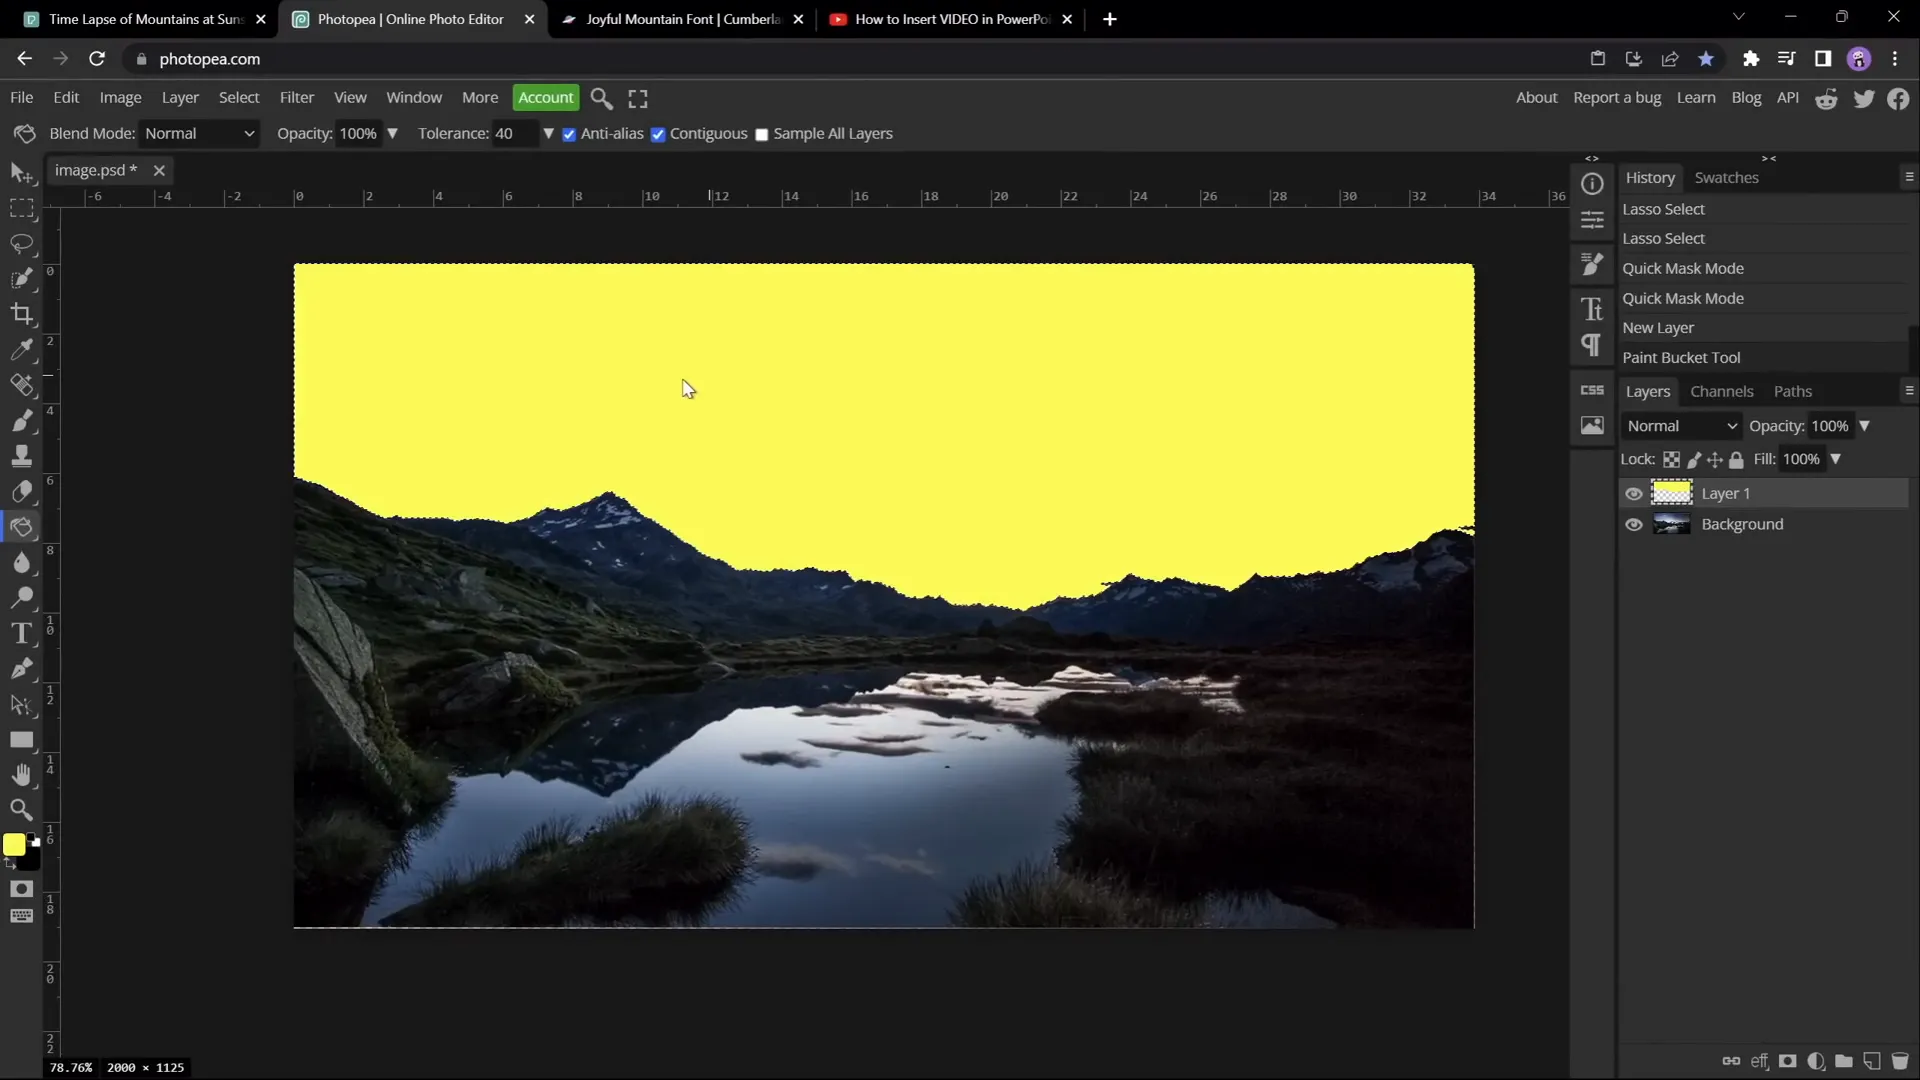
- Copy a screenshot of the video frame: Select the front video in PowerPoint and press
Ctrl + Cto copy a frame. - Paste into Photopea: Open Photopea and press
Ctrl + Vto paste the image. - Select the sky: Use the Quick Selection Brush tool to click on the sky area multiple times to select it.
- Refine selection: Use the lasso tool in subtract mode to remove any parts of the mountains accidentally selected.
- Create a new layer: Add a blank layer and fill the selection with any color (e.g., yellow) using the bucket tool.
- Vectorize the bitmap: Hide the background layer, select the colored sky layer, then go to Image > Vectorize Bitmap. Choose the photo mode and check polygon for a clean vector shape.
- Export as SVG: Save the vectorized sky shape as an SVG file.
- Import SVG into PowerPoint: Drag and drop the SVG file onto your slide, then convert it to a shape to reveal editable vector points.
- Subtract the vector shape: Select the front video and the imported sky shape, then use Merge Shapes > Subtract to cut out the sky perfectly.
This method gives you a clean, pixel-perfect mask following the mountain contours, making the effect truly professional.
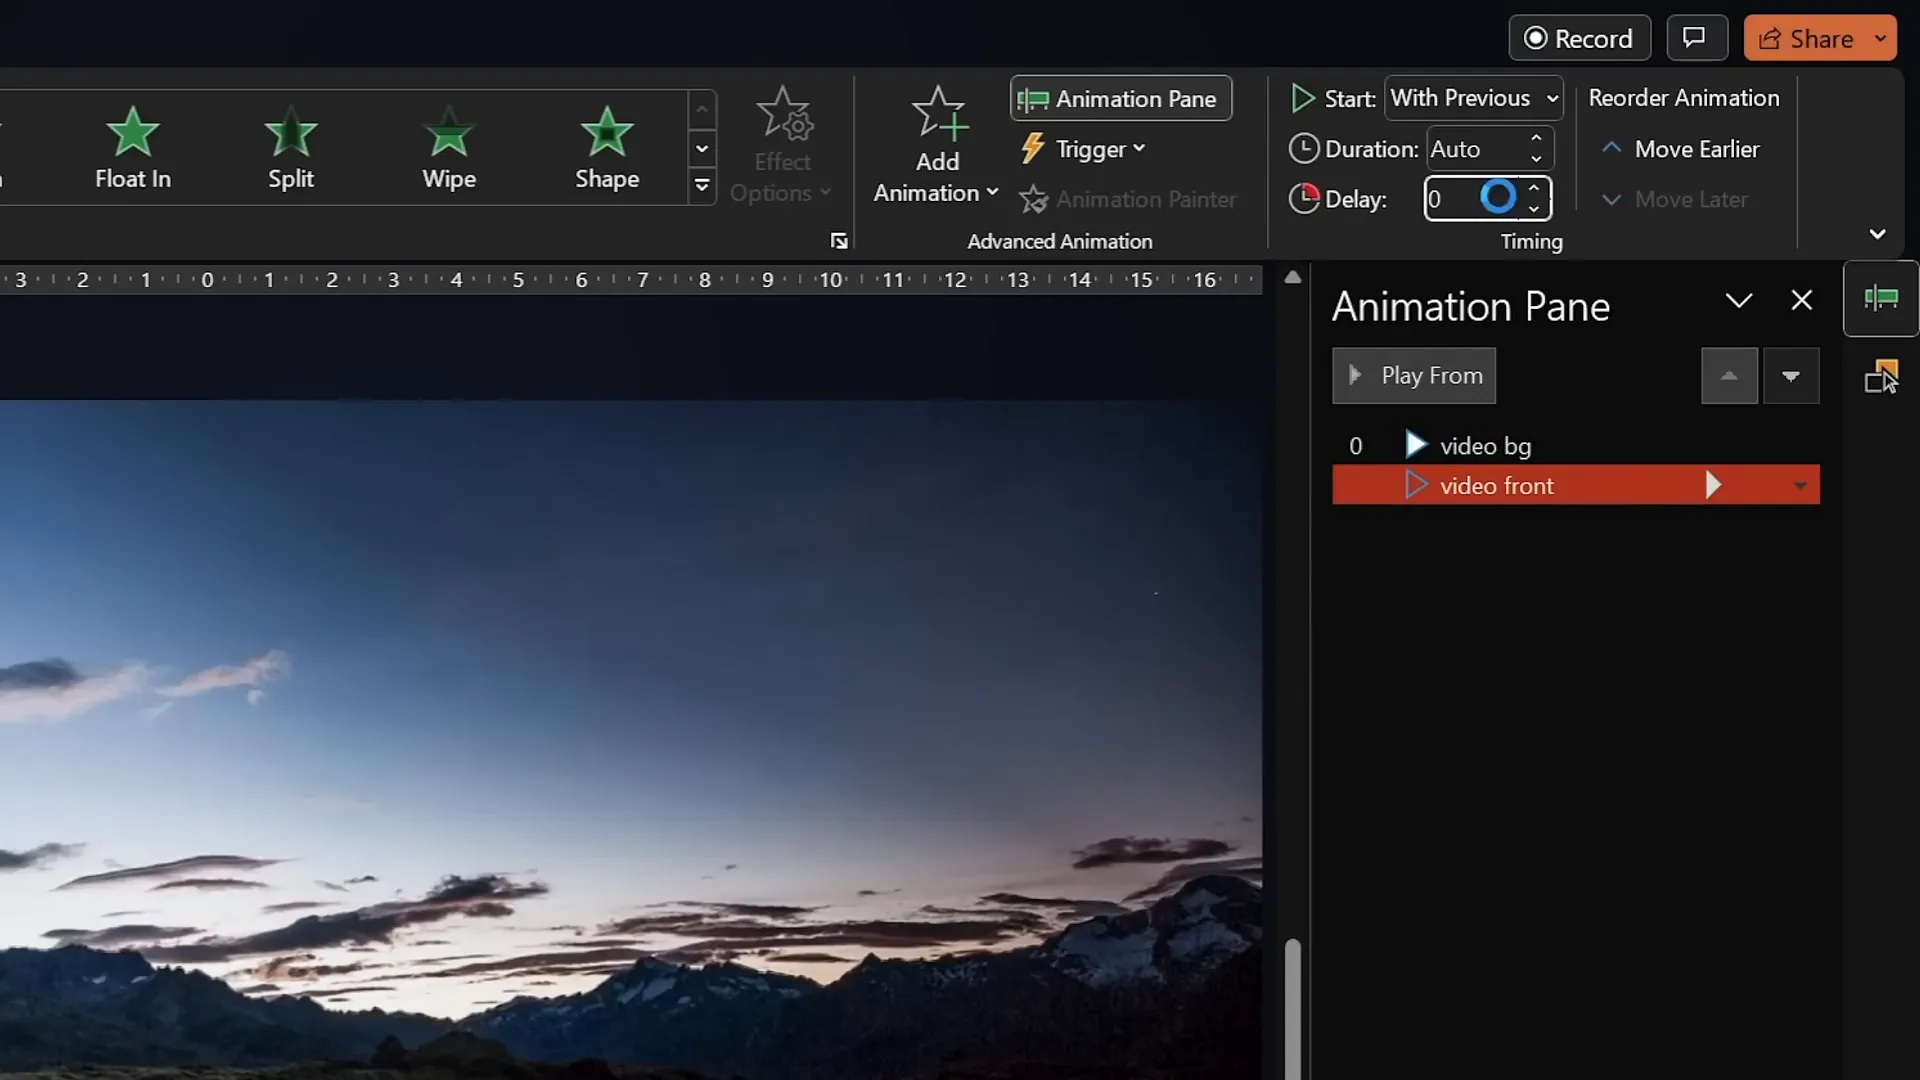
Synchronizing Playback of Both Videos
Having two video clips playing simultaneously can cause synchronization issues if not set correctly. To ensure both videos play in harmony:
- Add Play Animation: Select the front video and add a Play animation.
- Set Animation Timing: Set both videos’ Play animations to start With Previous, making them start automatically together.
- Remove Delays: Ensure there are no delays in the animations—set delay to zero.
When you run the slide, both videos will play as one seamless clip, with the front video masking the sky and revealing the mountains.
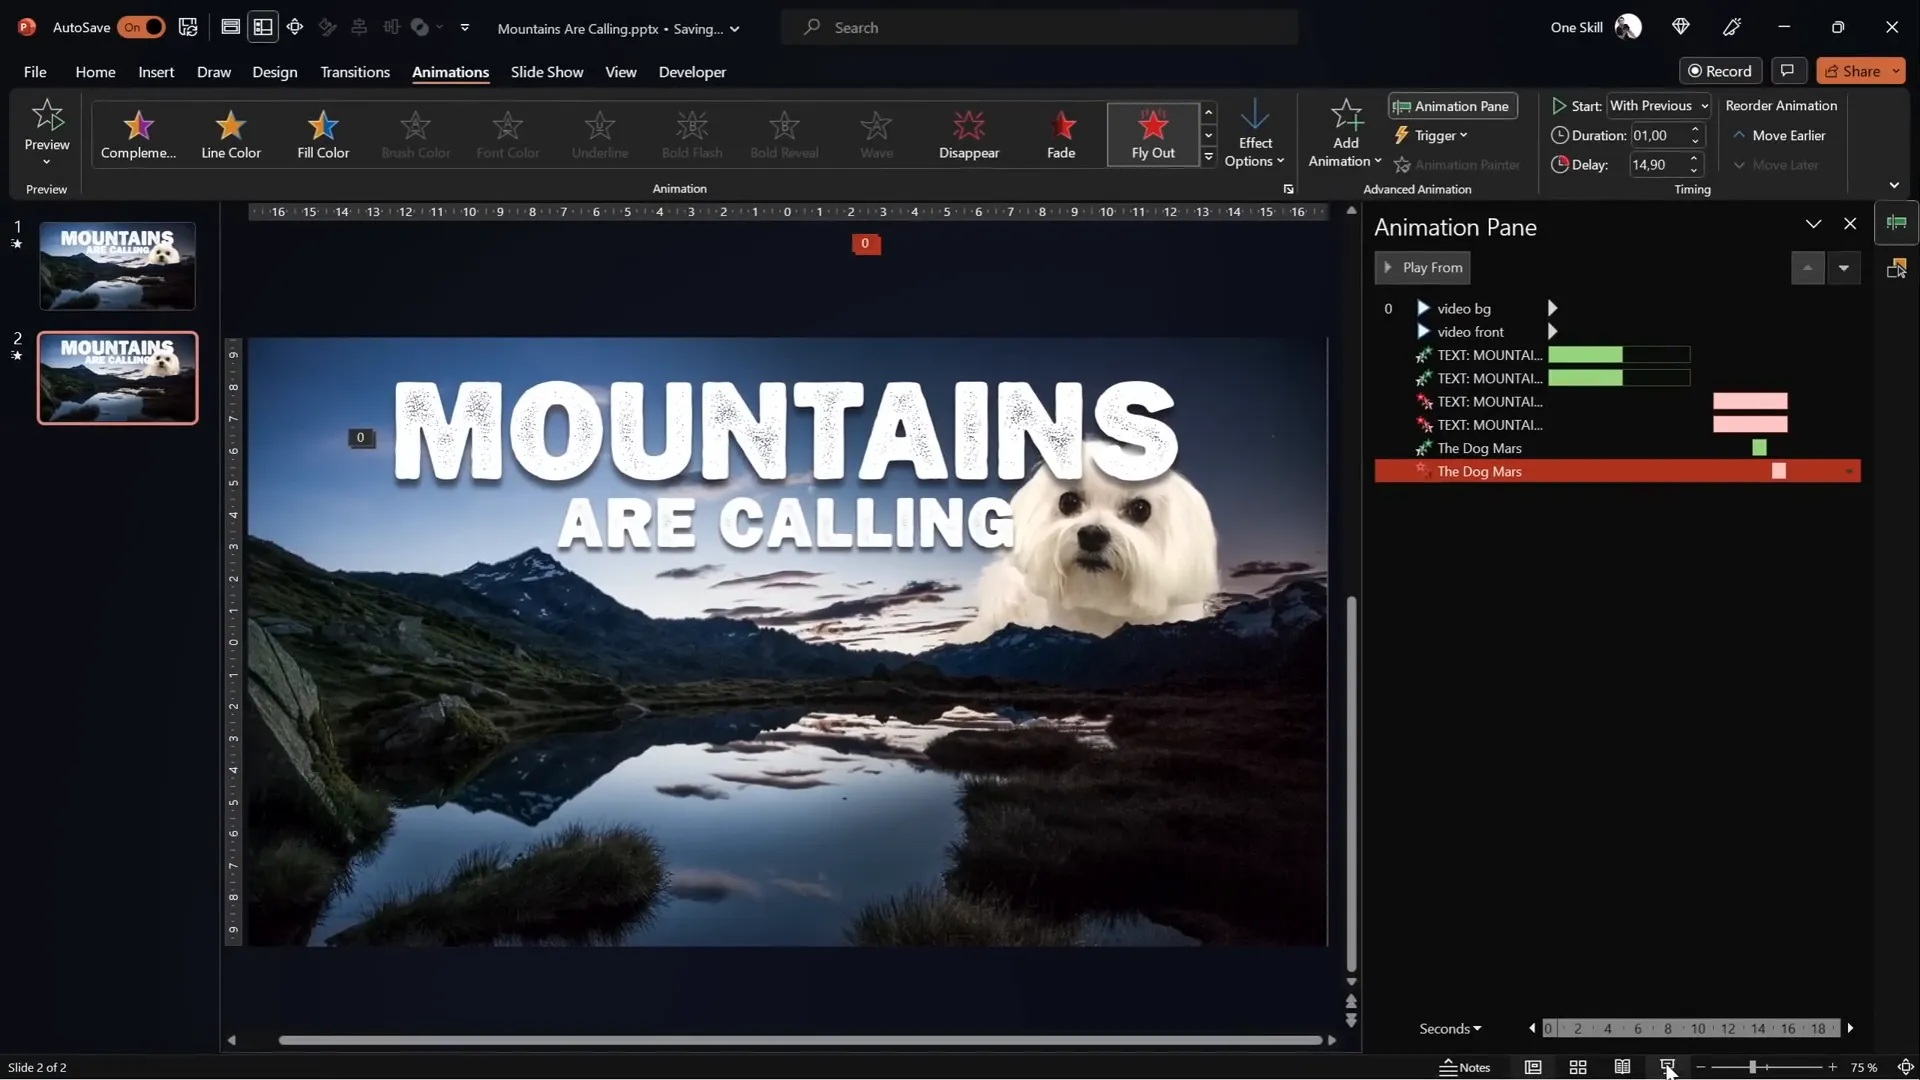
Adding and Animating Text Between Video Layers
Now for the fun part—adding text that appears to rise from behind the mountains and then disappear behind them again.
Insert and format the text
- Add a text box: Insert your desired text between the two video layers in the Selection Pane by moving the text box below the front video.
- Choose a font: I recommend the beautiful Joyful Mountain font for a natural, mountainous vibe.
- Apply formatting: Use consistent font sizes and colors (e.g., white) to ensure readability over the darkened video.
Animate the text
To make the text rise and disappear dynamically, use these animation steps:

| Animation Type | Settings | Effect |
|---|---|---|
| Fly In (Entrance) | Start: With Previous Duration: 5 seconds Effect Options: Smooth End, Animate By Letter (5% delay) |
Text flies in letter by letter, rising up behind mountains. |
| Basic Zoom (Entrance) | Start: With Previous Duration: 5 seconds Effect Options: Animate By Letter (5% delay) |
Text zooms in simultaneously for a dynamic effect. |
| Fly Out (Exit) | Start: With Previous Duration: 5 seconds Effect Options: Smooth Start |
Text flies out smoothly, disappearing behind mountains. |
| Basic Zoom Out (Exit) | Start: With Previous Duration: 5 seconds Delay: ~11 seconds Effect Options: No Letter Animation |
Text zooms out and fades away elegantly. |
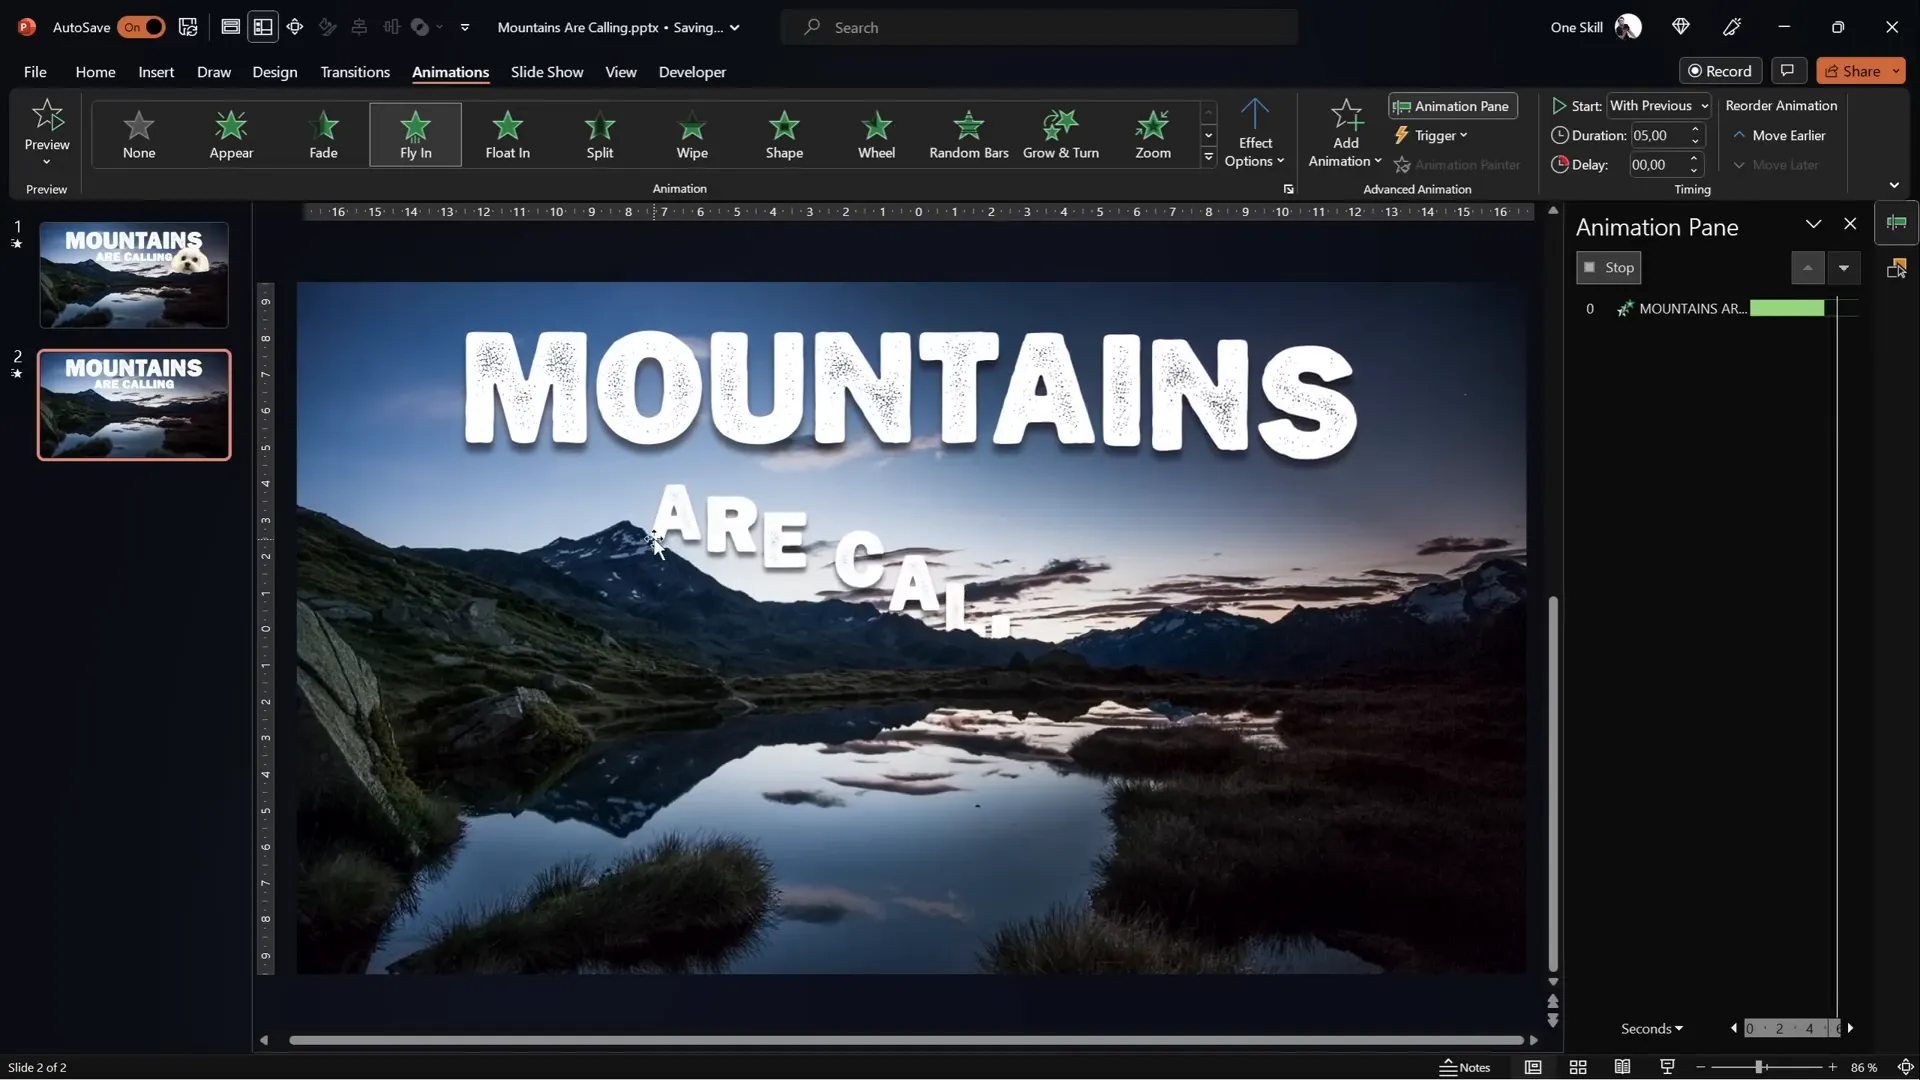
Combining these animations creates a polished and captivating effect of text emerging from and vanishing behind the mountains.
Final Touches and Tips
To add personality and fun to your slide, consider inserting images or objects between the video layers. For example, I added my dog Mars, who appears behind the mountains and interacts with the animation timeline.
To manage animations and layering effectively:
- Use the Selection Pane: Rename objects for clarity and reorder them precisely.
- Adjust animation order: Drag animations in the Animation Pane to control timing and sequence.
- Test your presentation: Always run your slide in full-screen mode to verify smooth playback and animation flow.
If you want to explore more creative ways to use videos in PowerPoint, check out additional tutorials and channels that offer tips on cropping videos into custom shapes and other advanced effects.
Frequently Asked Questions (FAQ)
Can I use any video for this effect?
Yes! However, videos with static foreground elements (like mountains) and dynamic backgrounds (like changing skies) work best for this effect. You want clear edges to mask accurately.
What version of PowerPoint is required?
This tutorial uses PowerPoint for Office 365, which supports advanced features like Merge Shapes and video playback controls. Some features may not be available in older versions.
How do I add the Merge Shapes button if it’s not visible?
You can add Merge Shapes to your Quick Access Toolbar via PowerPoint settings. This feature is essential for subtracting shapes and creating precise masks.
Is Photopea free to use?
Yes, Photopea is a free online photo editor similar to Photoshop. It’s perfect for creating vector shapes from images and exporting SVG files for PowerPoint.
Can I animate other objects besides text?
Absolutely! You can insert images, icons, or even your own photos between the video layers and animate them to create rich, dynamic presentations.
How can I ensure both videos stay perfectly synchronized?
Use the Animation Pane to set both videos’ Play animations to start With Previous and remove any delay. Testing the slide in full-screen mode will help confirm synchronization.
Can I use this effect for commercial presentations?
Yes, as long as you have the appropriate licenses for your videos and fonts. Always check licensing for any assets you use.
Summary
Creating epic PowerPoint video effects that combine layered videos and animated text is completely achievable with just a few clever techniques. By using two identical video clips—one cropped to reveal the mountains—you can insert text or images that appear to rise from behind the mountains and disappear behind them again.
Whether you choose to manually crop the video using PowerPoint’s Freeform tool or leverage the power of Photopea for precise vector masking, this effect adds a professional and dynamic dimension to your presentations. Coupled with smooth animations like Fly In, Zoom, and Fly Out, your slides will captivate your audience and stand out.
Remember to synchronize your videos’ playback, manage your layers carefully, and experiment with different fonts and animations to match your presentation’s style. And don’t forget to have fun with it—add personal touches like images or mascots to make your slides truly unique.
Now that you know the secrets behind this effect, go ahead and try it out in your next PowerPoint project. Your audience will be amazed!
Check out the full video: EPIC PowerPoint Video Effect Tutorial


