
If you’re looking to elevate your PowerPoint skills and create captivating presentations that feature smooth animations and modern UI elements, you’re in the right place. This guide will walk you through the process of designing an animated slide design in PowerPoint that mimics a virtual planner user interface, complete with morph transitions and slide zoom effects.
Whether you’re a beginner or intermediate PowerPoint user, this tutorial will give you actionable steps and tips to build a professional and engaging animated slide deck using PowerPoint’s built-in tools. Throughout the process, you’ll learn how to incorporate high-quality images, remove backgrounds, create morph animations, design UI widgets with blurred backgrounds, and implement slide zooms for a dynamic navigation experience.
Table of Contents
- Getting Started: Setting Up Your PowerPoint Presentation
- Selecting and Preparing Images for Your Slides
- Creating Morph Animations for Smooth Transitions
- Designing Modern UI Widgets with Blurred Backgrounds
- Adding Slide Zooms for Interactive Navigation
- Finalizing and Testing Your Animated Slide Design
- FAQ: PowerPoint Animated Slide Design
Getting Started: Setting Up Your PowerPoint Presentation
Before diving into the design process, it’s important to understand the structure of your presentation. For this virtual planner UI, we will create a total of four beautiful slides, each serving a specific purpose:
- A slide featuring a background image with a model wearing virtual reality (VR) glasses.
- Slides that use morph transitions to animate the model shrinking/growing and text/widgets flying in from the sides.
- Slides showcasing additional UI widgets like time, weather, and schedule cards.
- A slide zoom navigation element that enables interactive tab-like navigation within the presentation.
To start, open PowerPoint and insert a blank new slide to begin designing your first slide.
Inserting a Background Image
The first step is to select a beautiful background image that will set the tone for your presentation. This tutorial uses high-quality photos from Depositphotos (Depositphotos.com), which offers a wide range of photos, vectors, music, and videos.
Sign in to Depositphotos and choose your favorite background image. Download it in Excel quality or higher for best results.
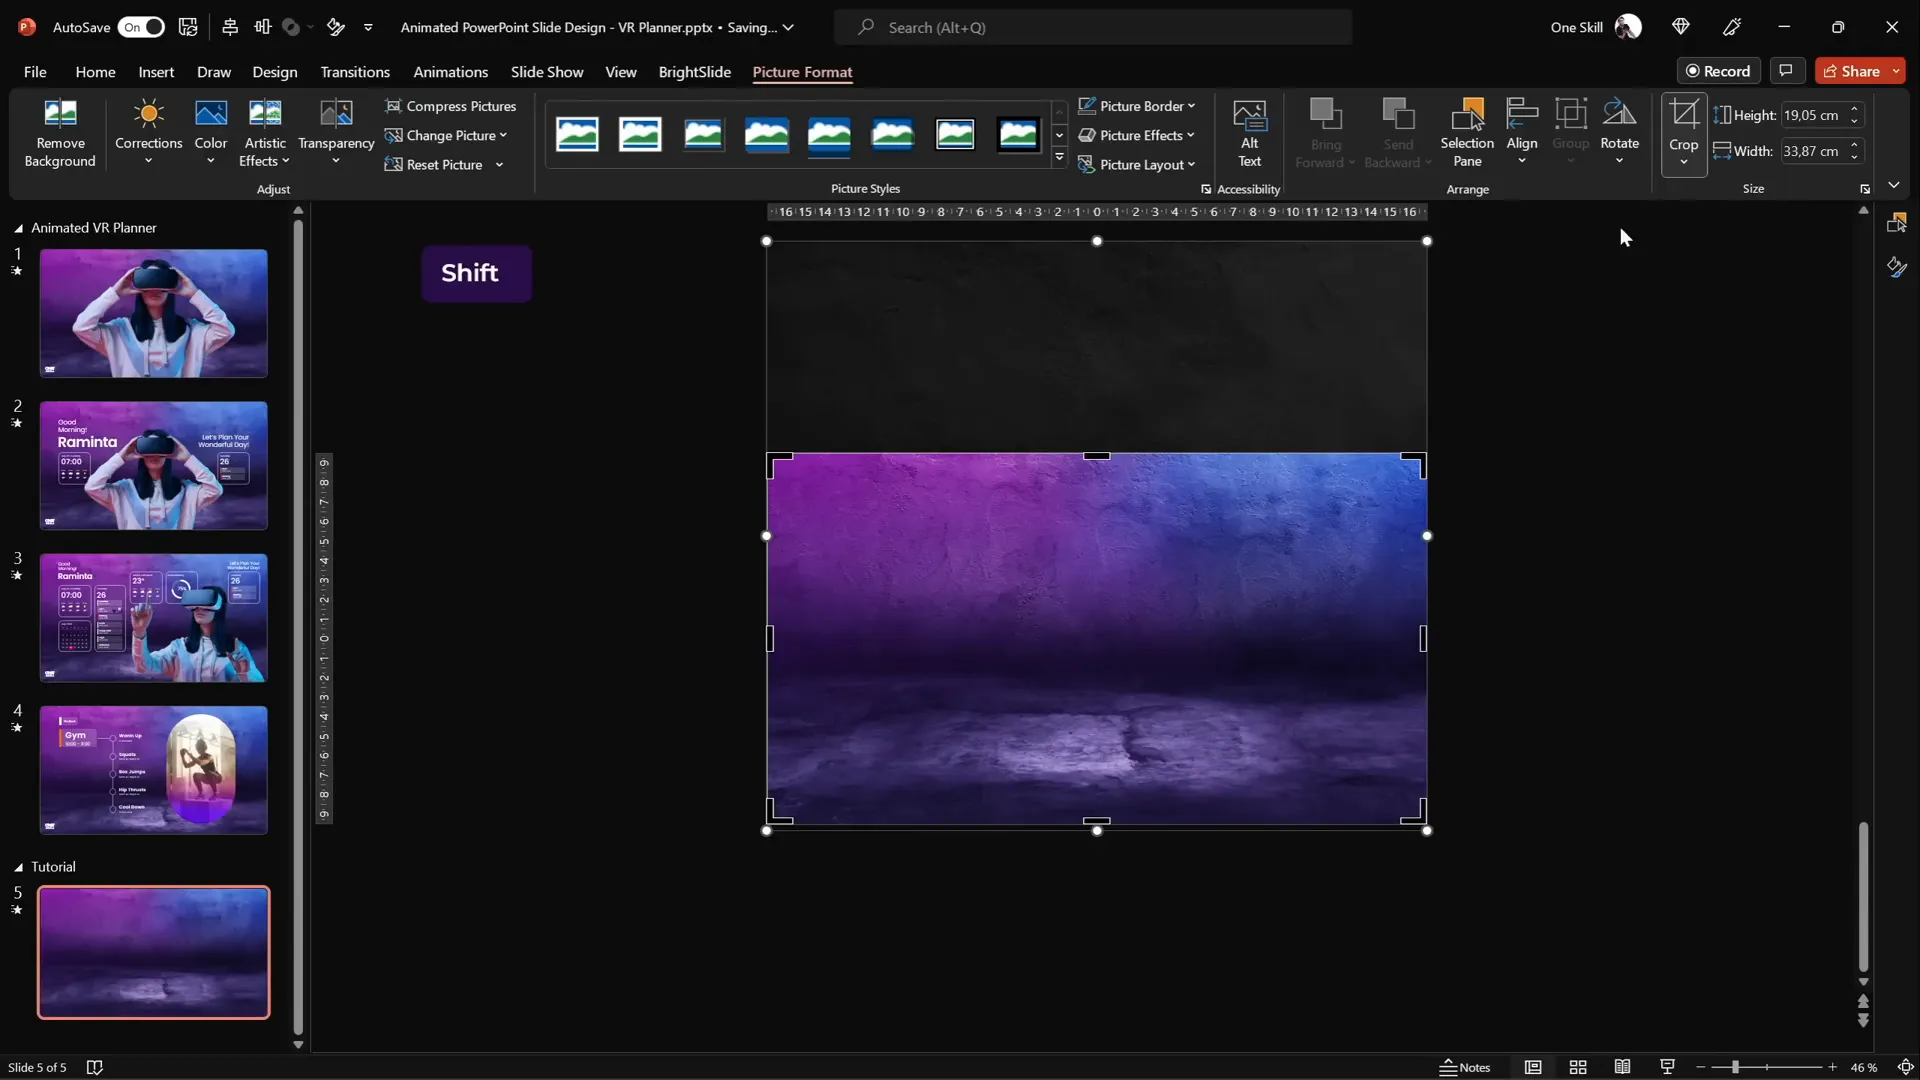
Back in PowerPoint, insert the image by navigating to Insert > Pictures > This Device and select your downloaded background photo. Resize the photo so it covers the entire slide by holding down Ctrl + Shift and dragging the corners.
Crop the photo to fit a 16:9 aspect ratio, then adjust its position as needed before finalizing the crop.
Selecting and Preparing Images for Your Slides
Next, we need to add the image of the model wearing VR glasses. This image will be used as a centerpiece for your UI design and animations.
Removing the Background from Photos
Most stock photos come with backgrounds that may not fit your slide design. Fortunately, Depositphotos offers a free background remover tool, which makes it easy to isolate the subject.
Simply drag and drop your image into the tool, and it will automatically remove the background, leaving you with a clean cutout of the model.
You can download this cutout photo for free in standard resolution or opt for an HD version with a subscription plan. Use promo code ONESKILL20 for a 20% discount on any subscription.
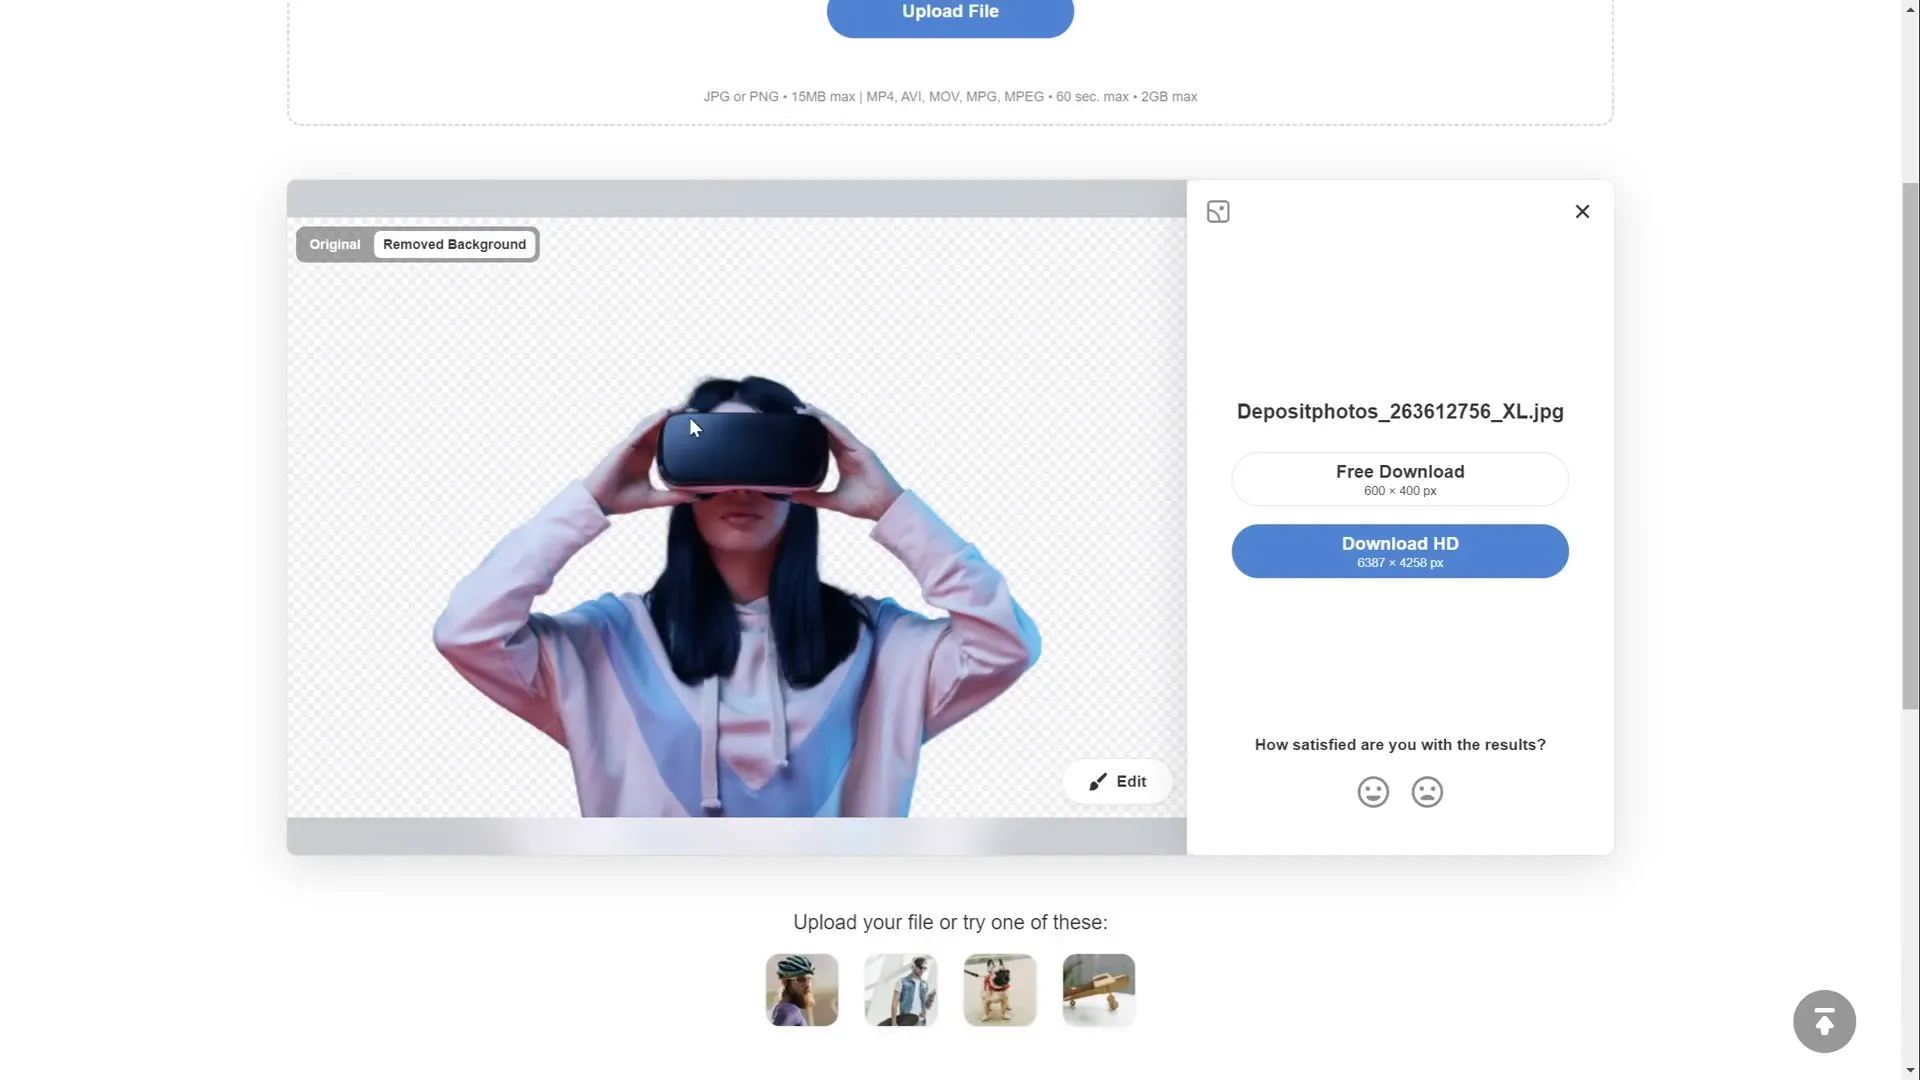
Once you have your cutout image, paste it into your PowerPoint slide. Position and resize the model image as desired, making sure it is centered.
Creating Morph Animations for Smooth Transitions
One of the highlights of this presentation is the use of the Morph transition, which allows for sleek, animated transformations between slides.
Animating the Model Shrinking and Text Flying In
For the first transition, we want the model to shrink in size while some text boxes and widgets fly in from the sides.
- Duplicate your current slide by right-clicking the slide thumbnail and selecting Duplicate Slide or pressing Ctrl + D.
- On the duplicate slide, resize the model to be smaller and keep it center aligned.
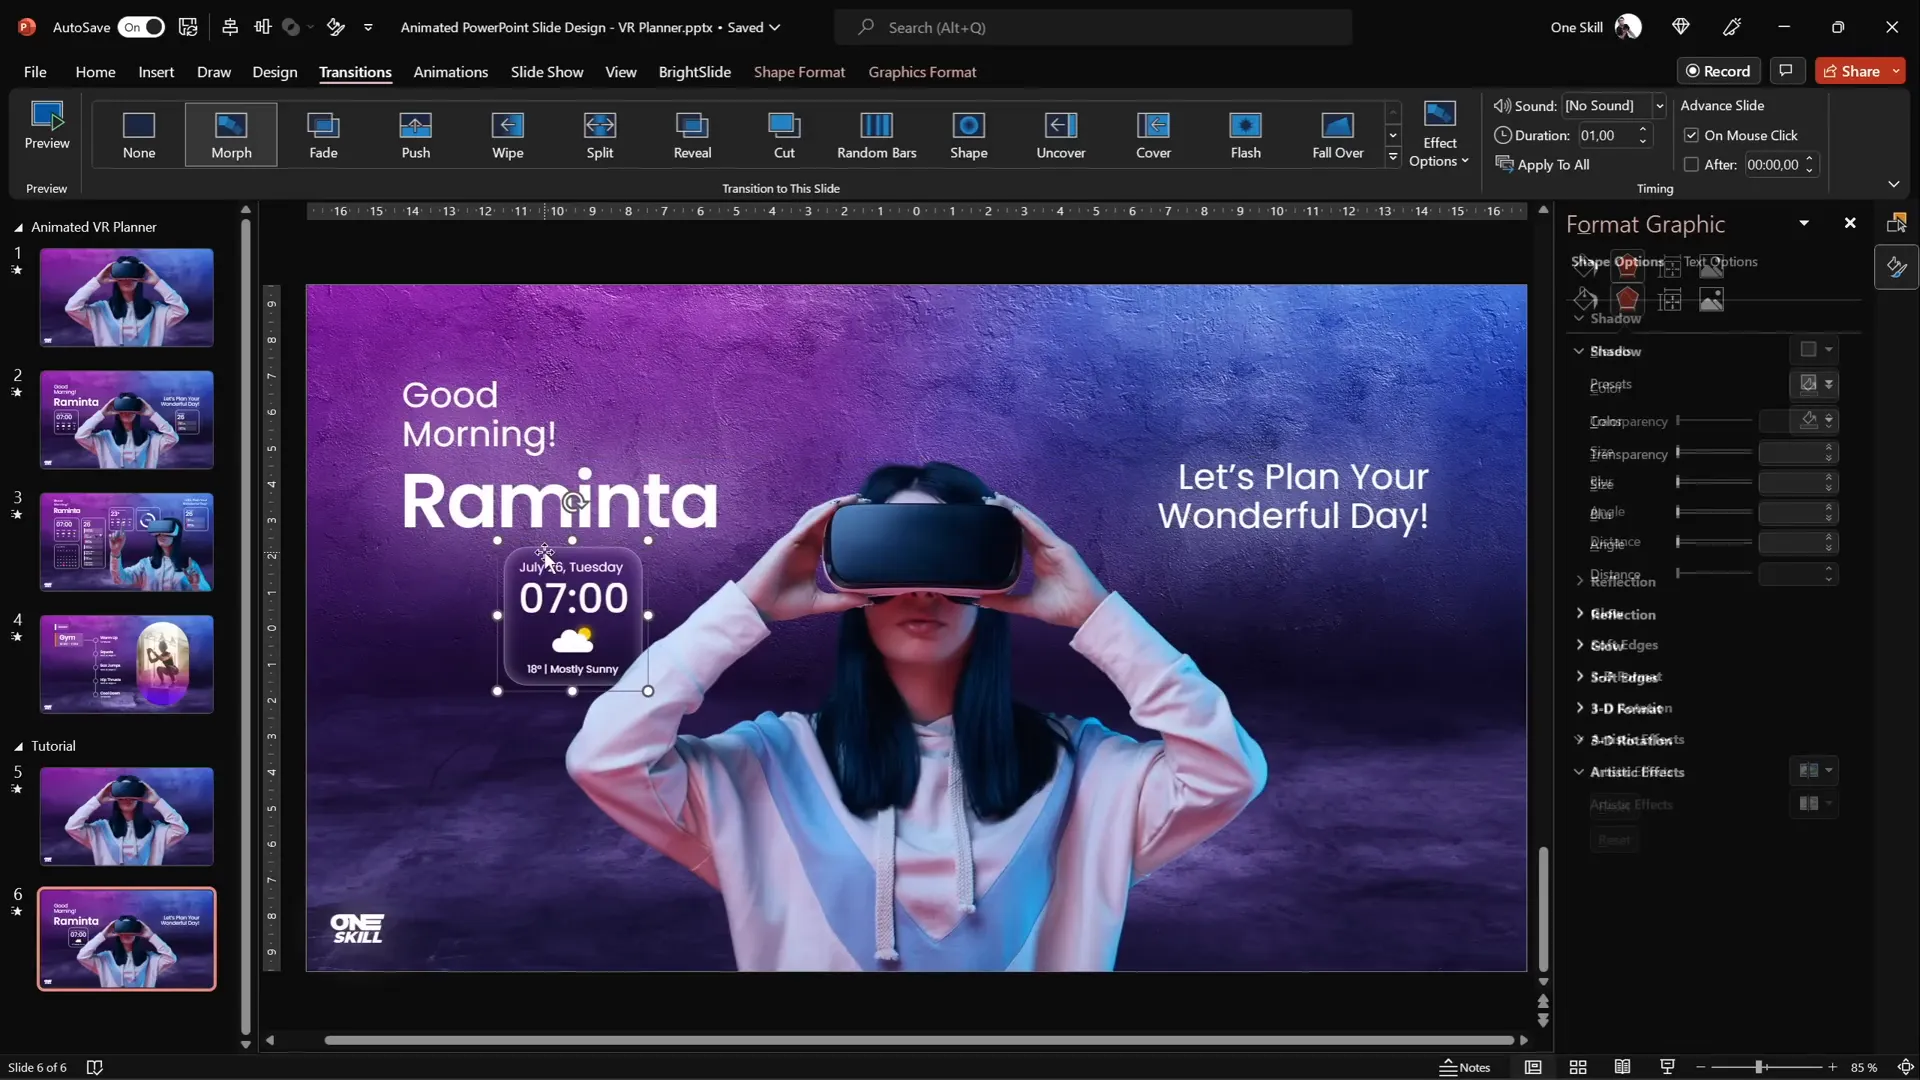
- Insert the text boxes you want to appear on the slide. For example, a greeting like “Good morning, Raminta. Let’s plan your wonderful day.”
- Use the Poppins font, available for free on Google Fonts, with different font weights like Regular and SemiBold.
- Add a white shadow effect to all text boxes with blur set to 100 points and 100% size to create a glowing effect.
- Arrange the text boxes so they are positioned nicely around the model.
- Copy the text boxes and paste them into the previous slide, positioning them just outside the slide window on the sides.
- Apply the Morph transition to both slides with a duration of 1 second.
When you run the presentation and transition between these slides, the model shrinks while the text boxes smoothly fly in from the sides, creating an engaging animation.

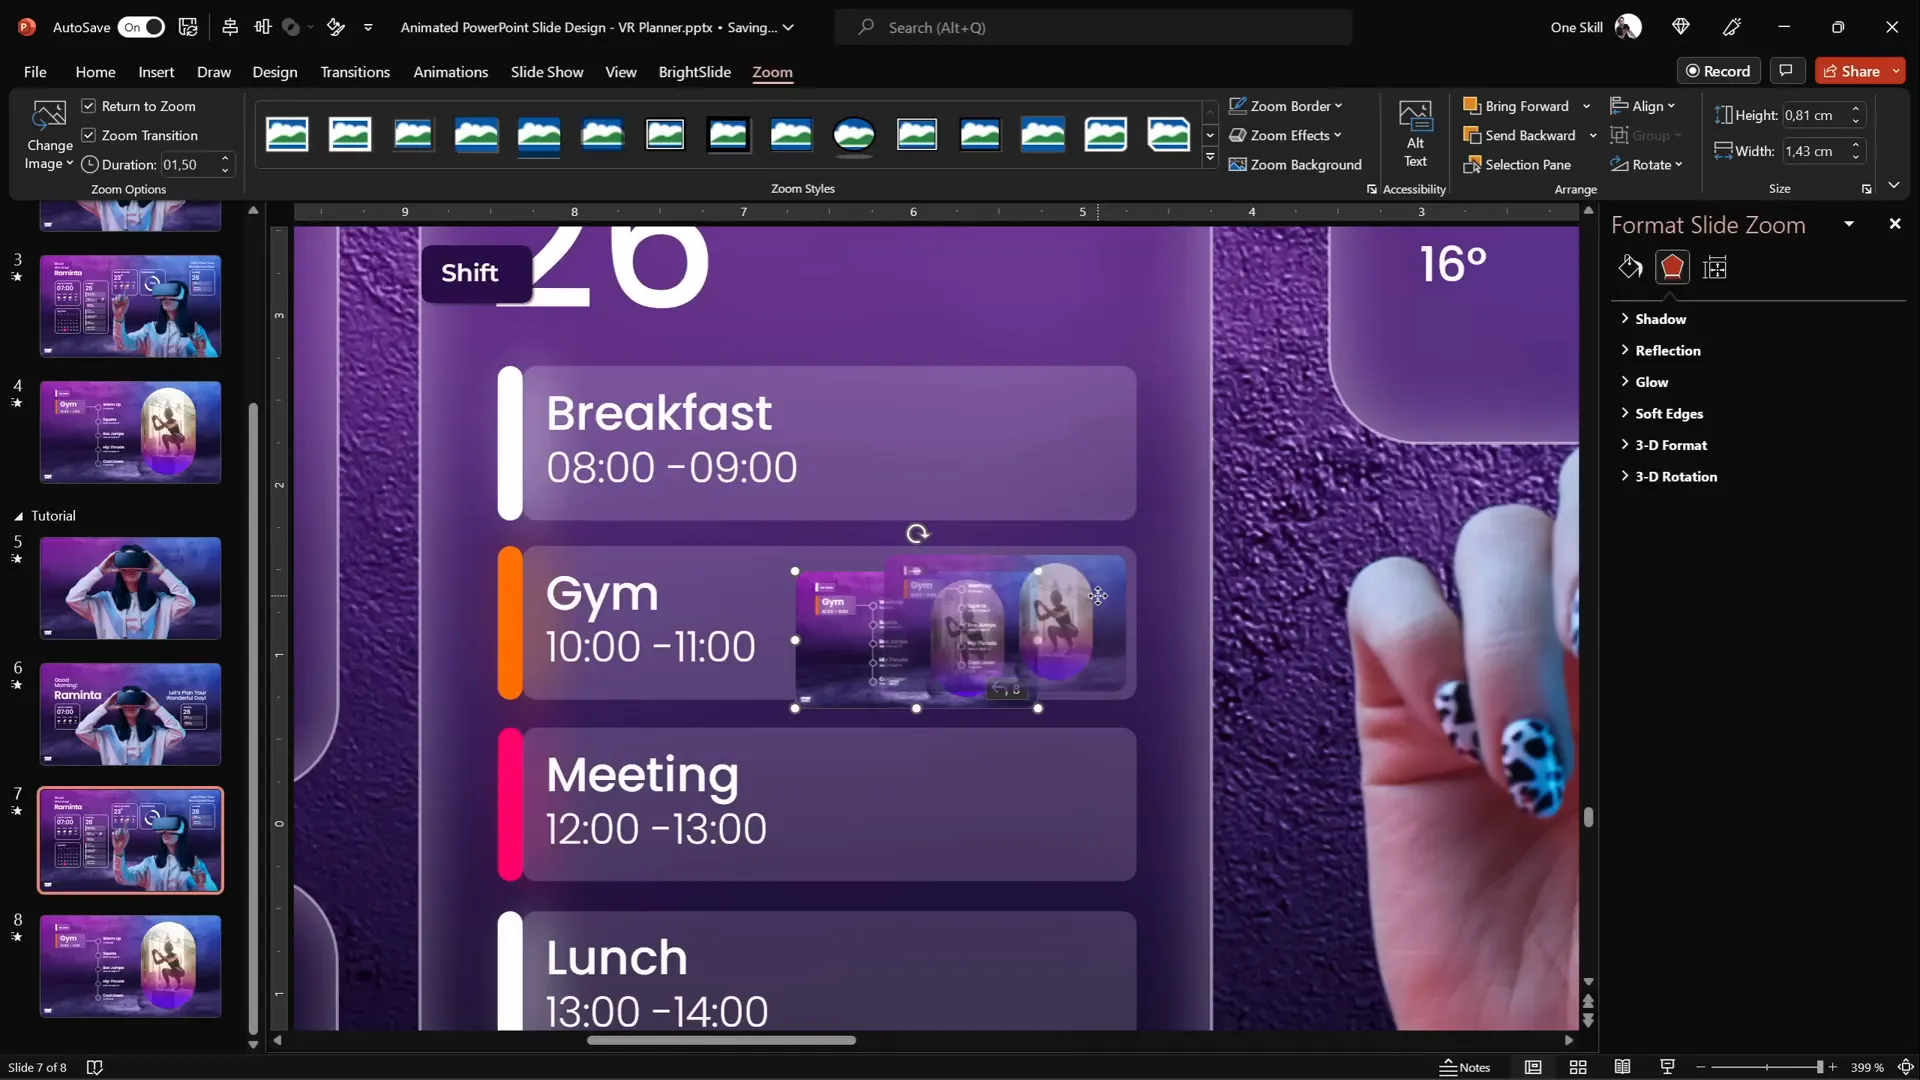
Adding Widgets with Morph Animation
Alongside text, you can add widgets such as current time, weather information, and daily schedules to enhance the UI feel.
Duplicate your slide again and reposition or add new widgets as needed, applying the Morph transition between these slides to animate the widgets appearing or moving.
Designing Modern UI Widgets with Blurred Backgrounds
The widgets in this presentation have a sleek, frosted glass effect, achieved by using blurred backgrounds as fills for shapes.
Step-By-Step Guide to Creating a Blurred Background Widget
- Insert a rounded rectangle shape (Insert > Shapes > Rounded Rectangle).
- Set the outline to white and the fill to no fill.
- Adjust the outline transparency to 50% and set the line width to 0.5 points.
- Copy your background image and paste it onto the slide.
- Apply a blur effect to the copied background image via Artistic Effects and set the blur radius to 50 points.
- Copy the blurred background image, then delete the original copy.
- Go to Format Background, select Picture or texture fill, and choose Clipboard to set the slide background to the blurred image.
- Go back to your rounded rectangle, select Fill > Slide Background Fill to fill the shape with the blurred background.
- Add an inside white shadow with 50% transparency and 15 points blur to create a frosty edge.
This technique creates a widget that looks like a frosted glass card with a blurred background that dynamically matches the slide.

Adding Content and Icons to Widgets
Inside the widget, add text boxes for information such as temperature and weather conditions. Use center alignment for neatness.
To add weather icons, insert PowerPoint’s built-in icons:
- Go to Insert > Icons and search for a cloud icon.
- Change the icon color to white and resize it as needed.
- Insert a perfect circle shape for the sun, position it behind the cloud, and add an orange outer shadow with blur for a glowing effect.
Group all widget elements together for easier management and positioning.
Adding Slide Zooms for Interactive Navigation
Slide Zoom is a powerful PowerPoint feature that allows you to create interactive navigation elements, such as tabs that zoom into specific slides.
How to Add a Slide Zoom
- Copy the slide you want to zoom into and paste it at the bottom of your slide list.
- Ensure the slide has a blurred background using the format painter tool.
- Go to Insert > Zoom > Slide Zoom and select the slide you want to zoom into.
- Resize and position the slide zoom thumbnail on your main slide (e.g., inside a “Gym” tab area).
- Remove the zoom border for a clean look.
- Activate Return to Zoom so you can navigate back to the main slide.
- Set the zoom transition duration to 0.5 seconds.
- Add rounded corners to the zoom thumbnail for a modern UI feel.
- Remove any reflection effects by going to Format Shape > Reflection > None.
You can add multiple slide zooms for different tabs, creating a rich interactive user experience.
Finalizing and Testing Your Animated Slide Design
Once all elements, animations, and slide zooms are in place, it’s crucial to test your presentation thoroughly.
- Use the keyboard arrow keys to navigate between slides and observe the morph transitions and animations.
- Check that the model shrinks and grows smoothly, text boxes fly in and out correctly, and widgets appear as intended.
- Ensure slide zooms work by clicking on the zoomed tabs and returning to the main slide.
- If animations don’t play as expected, verify that objects to be morphed have matching names (e.g., the model photos should share the same name with double exclamation marks at the start).
- Use format painter to copy blurred backgrounds between slides to maintain consistency in UI widget appearances.
By following these steps, you will have created a beautiful, animated virtual planner user interface entirely in PowerPoint, showcasing your design and animation skills.
FAQ: PowerPoint Animated Slide Design
What is the Morph transition in PowerPoint?
The Morph transition enables smooth animations between slides by transitioning objects’ positions, sizes, and properties seamlessly. It’s perfect for creating effects like shrinking images, flying text boxes, and dynamic UI elements.
How do I remove a photo background for use in PowerPoint?
Depositphotos offers a free background remover tool that automatically isolates subjects by removing backgrounds. Alternatively, PowerPoint has a built-in background removal tool under Picture Format > Remove Background.
What is a Slide Zoom and how can it enhance my presentation?
Slide Zoom allows you to create interactive thumbnails that zoom into specific slides when clicked, making your presentation more dynamic and user-friendly, especially for UI design mockups or navigation menus.
How can I create a frosted glass effect for widgets in PowerPoint?
By copying your slide’s background, applying a blur effect to it, and using it as a fill for shapes like rounded rectangles, you can simulate a frosted glass effect. Adding inside white shadows enhances the frosty look.
Which font is recommended for modern UI text in PowerPoint?
The tutorial uses Poppins, a clean and modern sans-serif font available for free on Google Fonts. It offers multiple weights for flexible styling.
How do I ensure morph animations work correctly between slides?
Objects that you want to morph must have the exact same name in the selection pane. For photos, starting the name with double exclamation marks (e.g., “!!photo”) helps PowerPoint recognize them as the same object during the morph transition.
Can I use this technique to create other UI designs in PowerPoint?
Absolutely! The techniques demonstrated here—background removal, morph transitions, blurred background fills, and slide zooms—are versatile and can be applied to many UI design mockups and interactive presentations.
Conclusion
Creating an engaging PowerPoint animated slide design like a virtual planner UI might seem complex at first, but with the right tools and step-by-step guidance, it’s entirely achievable. By leveraging high-quality images, background removal tools, morph transitions, and slide zoom features, you can build dynamic presentations that captivate your audience and showcase your creativity.
Remember to use consistent fonts like Poppins, apply effects thoughtfully, and test your animations thoroughly. With practice, you’ll be able to design professional, animated PowerPoint slides that stand out and communicate your message effectively.
Ready to get started? Open PowerPoint and start creating your own animated slide design today!


