If you want to elevate your PowerPoint presentations with dynamic, eye-catching visuals, mastering the art of creating a PowerPoint animated slide is essential. In this comprehensive guide, we’ll walk through how to build a professional 4-step 3D infographic slide in PowerPoint, complete with animations that engage your audience and clarify your message.
This tutorial breaks down the process step-by-step, showing you how to design a visually appealing 3D steps infographic with customizable icons, colors, and detailed text. Whether you’re presenting a process, workflow, or sequential information, this infographic slide will help you communicate effectively while keeping your slides fresh and captivating.
Table of Contents
- Why Use Animated Infographics in PowerPoint?
- Getting Started: Preparing Your Slide and Guides
- Creating the 3D Step Shapes
- Adding Step Titles, Detailed Text, and Icons
- Applying Animations to Your 4-Step Infographic
- Customizing Your Slide: Colors, Sizes, and More
- Tips for Designing Effective PowerPoint Animated Slides
- Frequently Asked Questions
- Conclusion
Why Use Animated Infographics in PowerPoint?
Infographics are a powerful tool for simplifying complex information and making it visually digestible. Adding animation to your infographic slides in PowerPoint takes this a step further by:
- Enhancing Engagement: Animations draw attention and keep your audience focused on the key points.
- Clarifying Processes: Step-by-step animated reveals help explain sequences or workflows clearly.
- Adding Professionalism: Well-designed animated slides convey polish and care, boosting your credibility.
- Customizable Visuals: Custom icons, colors, and 3D effects allow you to tailor visuals to your brand or message.
By mastering the creation of a PowerPoint animated slide like the 4-step 3D infographic, you can effectively communicate multi-step information with style and clarity.
Getting Started: Preparing Your Slide and Guides
Before diving into shapes and animations, it’s important to set up your workspace properly to ensure precision and alignment throughout the design process.
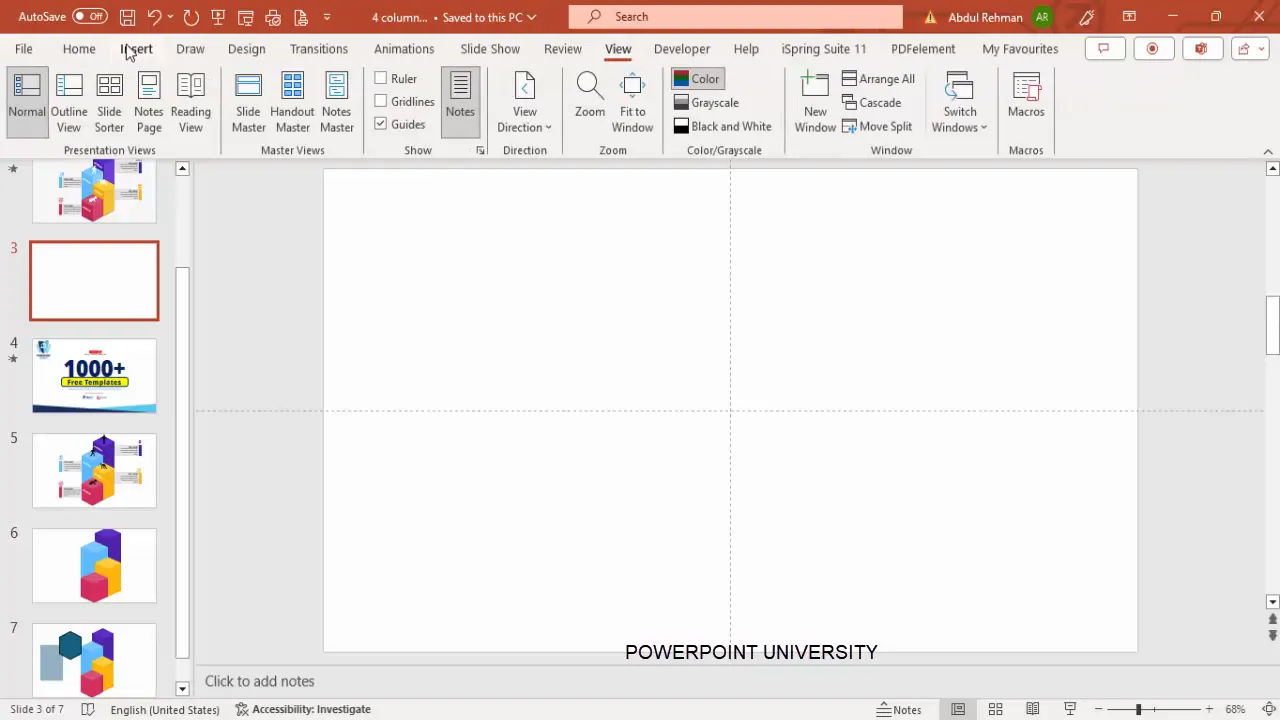
Step 1: Add a New Slide and Enable Guides
Start by adding a new blank slide to your PowerPoint presentation. Then, go to the View tab and enable Guides. These guides help you align shapes and text perfectly, creating a balanced and professional layout.
Step 2: Insert Basic Shapes
For this infographic, we will use basic shapes like hexagons and diamonds to build the 3D step blocks. These shapes provide a solid foundation for the 3D effect and allow for easy customization.
Creating the 3D Step Shapes
This section covers how to construct the 3D shapes that represent each step in your infographic. The process involves creating hexagons as the main step blocks and diamond shapes to simulate a platform, giving a 3D look.
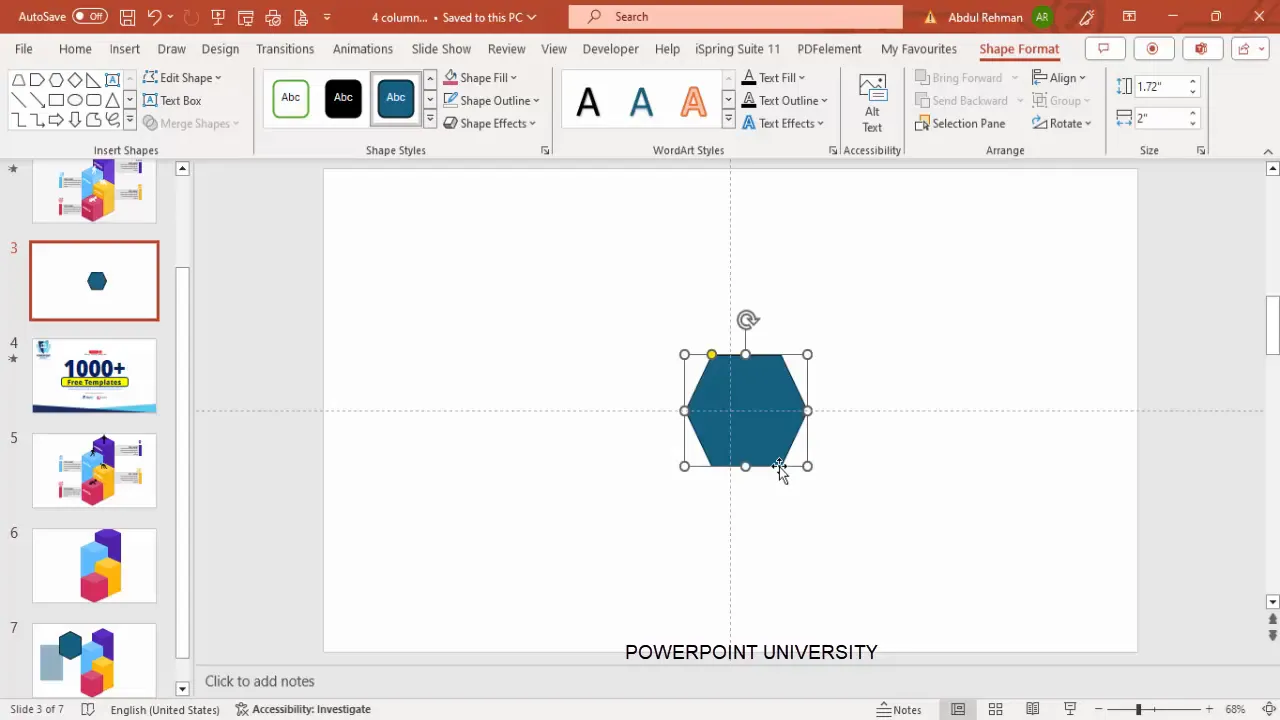
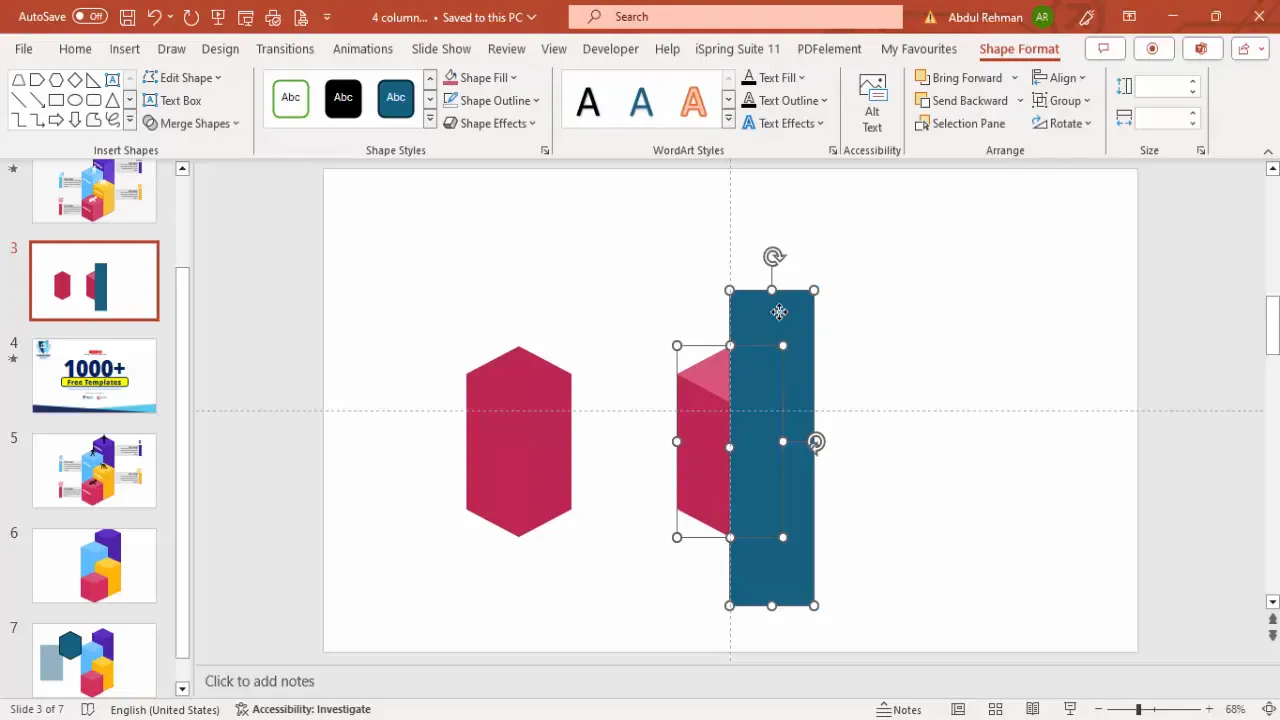
Step 3: Draw and Rotate the Hexagon
- Go to Insert > Shapes and select the Hexagon shape.
- Draw the hexagon on your slide. Hold the Shift key to maintain proportions while resizing.
- Rotate the hexagon to position one of its points at the top. You can do this by dragging the rotate handle or by pressing Alt + Right Arrow six times for precise rotation.
- Remove the shape outline by selecting No Outline.
- Fill the hexagon with a dark color such as maroon or dark purple.
- Center-align the hexagon horizontally and vertically on the slide.
- Increase the height slightly to elongate the hexagon, enhancing its 3D perspective.
Step 4: Create the 3D Platform Using a Diamond Shape
- Insert a Diamond shape from Insert > Shapes.
- Draw the diamond directly below the hexagon to act as the platform.
- Remove the outline and fill it with a light color such as light red.
- Align the diamond precisely beneath the hexagon so the two shapes look connected.
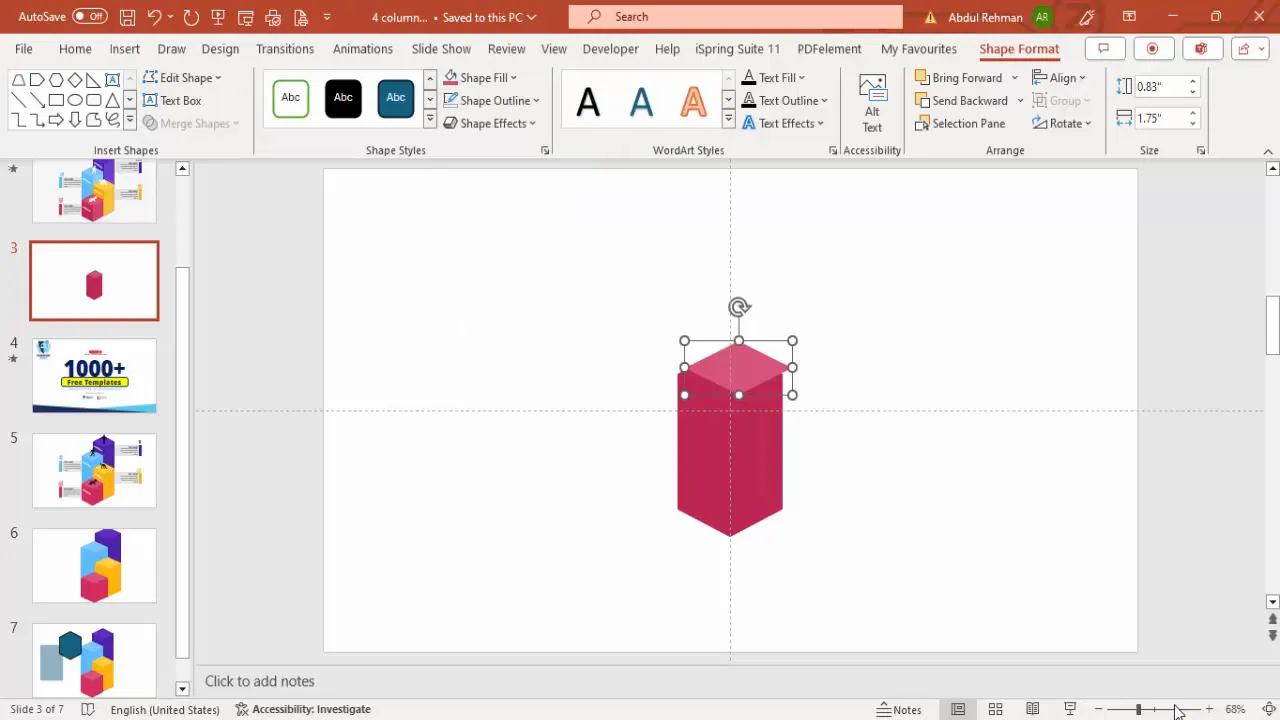
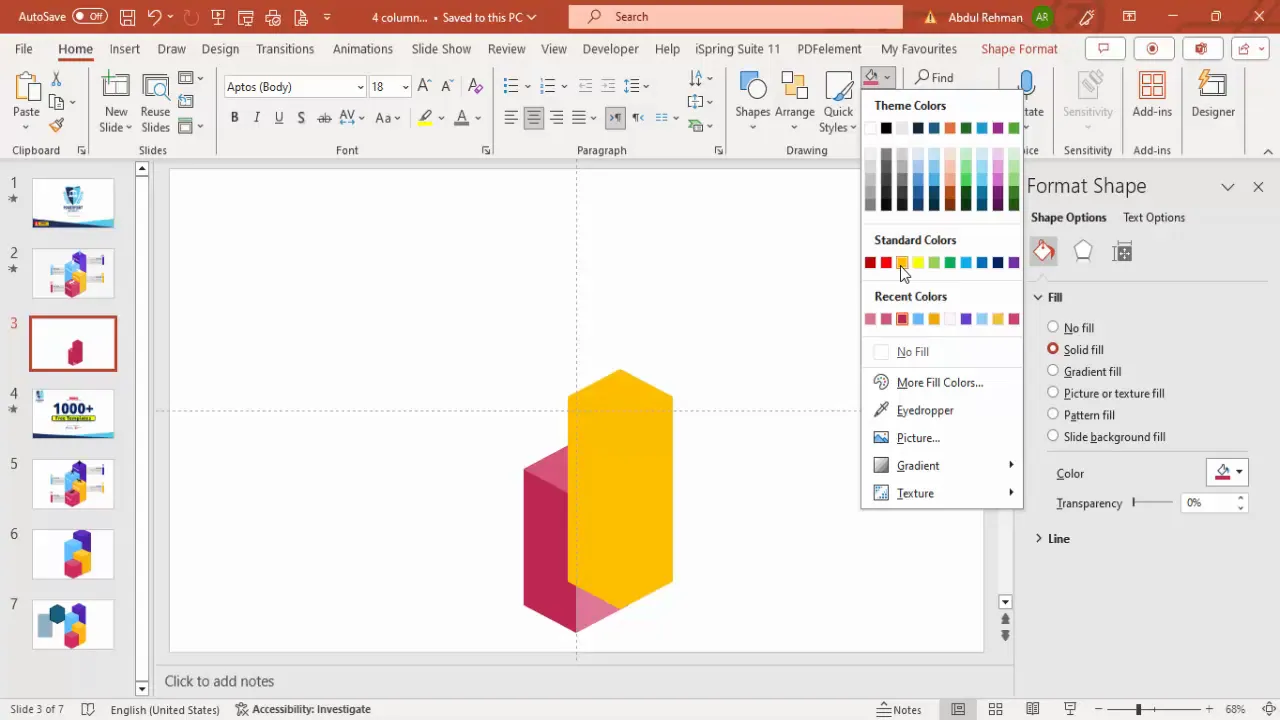
Step 5: Enhance the 3D Effect by Splitting and Lightening
To add depth and perspective, split the diamond shape into two equal parts and lighten one half:
- Duplicate the diamond shape (Ctrl + D).
- Draw a rectangle over half of the diamond, covering the right or left side.
- Select both the rectangle and the diamond, then use Merge Shapes > Fragment to split the diamond.
- Delete the unwanted half, leaving two separate diamond halves.
- Lighten the color of one half to create a shadow effect, enhancing the 3D look.
- Select the hexagon and diamond halves, group them (Ctrl + G), and position them as one unit.
Step 6: Replicate and Customize the 3D Steps
Once you have the first 3D step ready, you can duplicate it to create the remaining steps. Here’s how to maintain shape integrity and customize colors:
- Do not cut the shapes on duplicates to avoid distortion when resizing or moving.
- Group the shapes before resizing or repositioning to keep proportions intact.
- Change the fill colors for each step to differentiate them visually. Suggested colors include orange, yellow, blue, and green.
- For the diamond platform, duplicate and recolor as well, aligning it under each hexagon.
- Adjust the height of each step to create a sense of progression or hierarchy.
Adding Step Titles, Detailed Text, and Icons
With your 3D shapes in place, it’s time to add descriptive elements that communicate the purpose of each step clearly.
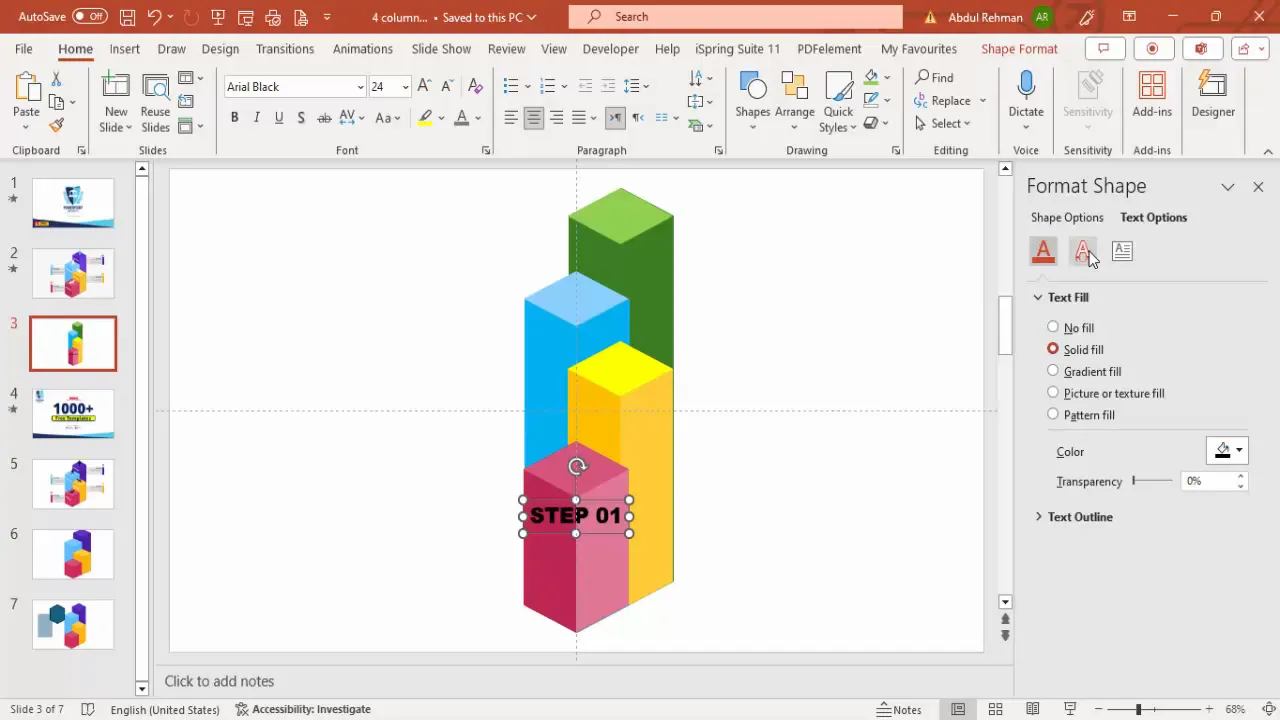
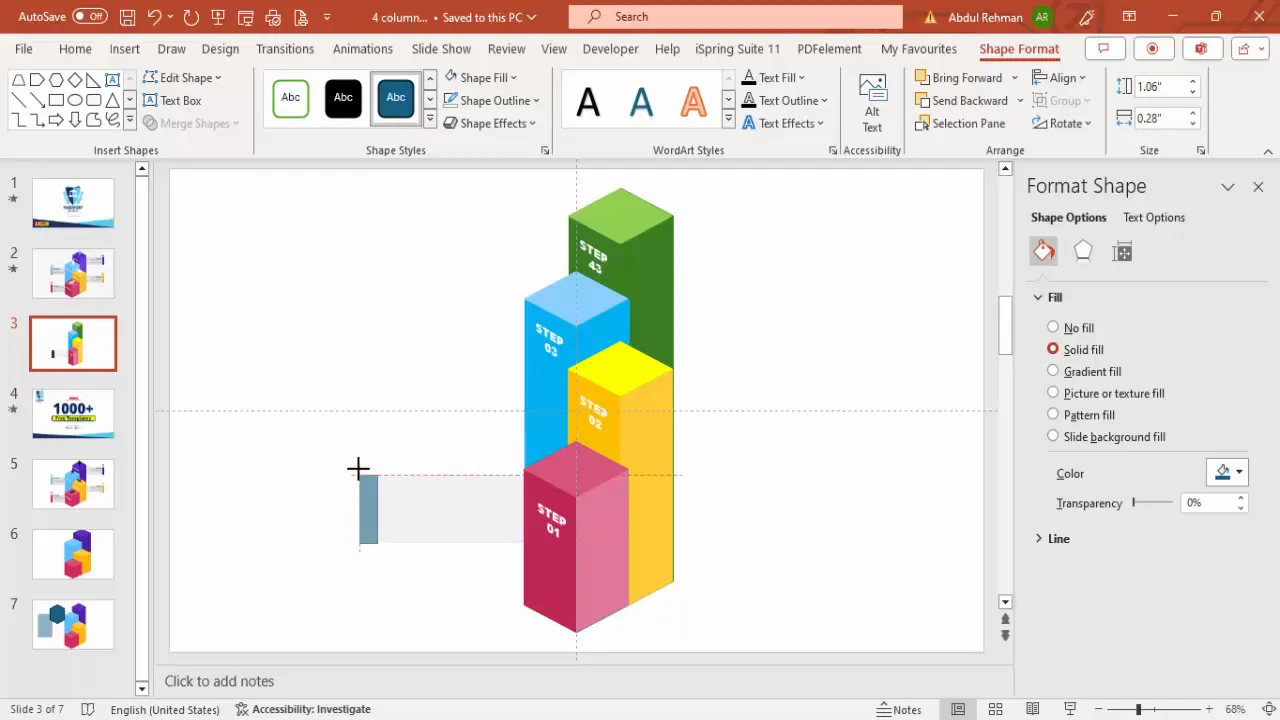
Step 7: Add Step Numbers with 3D Text Effects
- Insert a text box and type the step number, e.g., “Step 1.”
- Use a bold, readable font such as Arial Black and center-align the text.
- Apply 3D rotation effects via Text Options > Text Effects > 3D Rotation to match the angle of your shapes.
- Adjust the font size and color to ensure contrast and visibility. White works well on darker shapes; black may be needed on lighter backgrounds.
- Duplicate the text box for subsequent steps and update the numbers accordingly.
Step 8: Create Text Boxes for Titles and Detailed Descriptions
- Insert a rectangle shape for the text background near each step.
- Remove the outline and fill it with a light gray color for readability.
- Add a smaller rectangle in a corner as a color-coded border matching the step color.
- Insert text boxes for the step title and detailed description.
- Use bold formatting for titles and standard font for descriptions.
- Keep detailed text concise and legible, adjusting font size as needed.
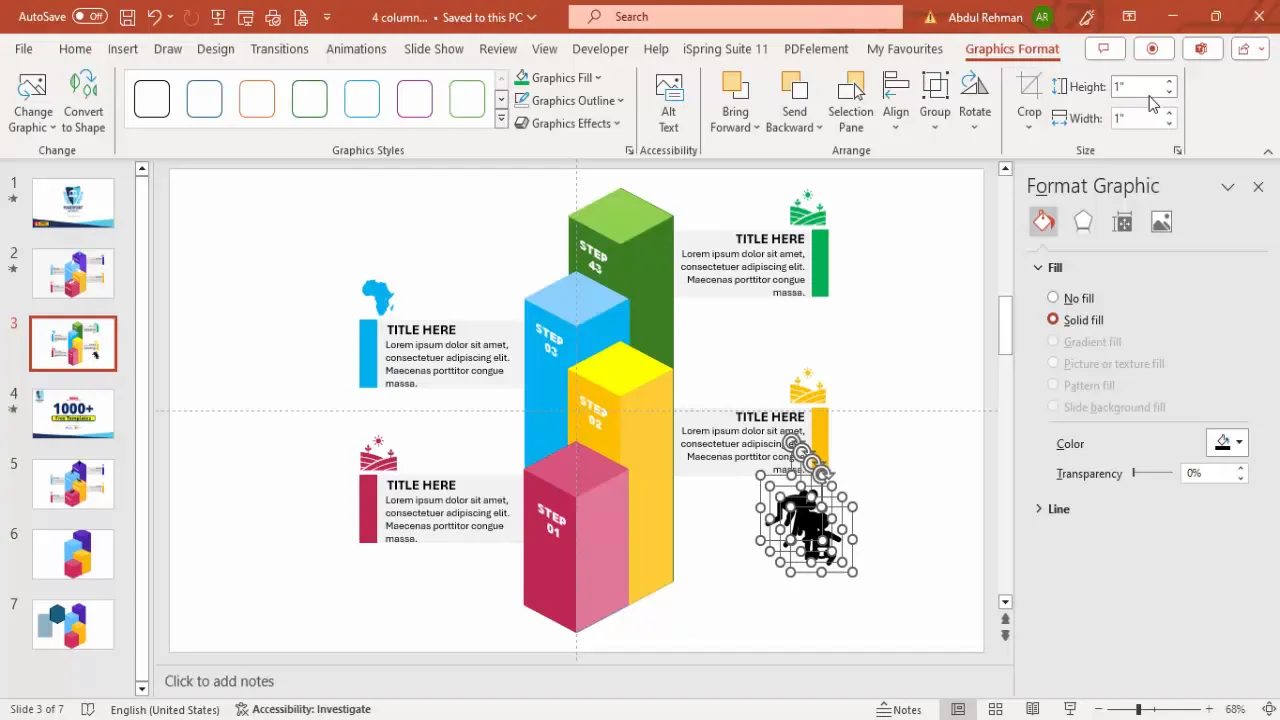
Step 9: Insert and Customize Icons for Visual Interest
Icons add visual cues that help your audience quickly grasp the step’s theme or action.
- Go to Insert > Icons and search for relevant icons that fit your step’s context (e.g., baby icon for step one).
- Insert the icon, resize it to fit near the text, and apply the same fill color used in the step shape for consistency.
- To change an icon, select it and use Graphic Format > Graphic Change to swap icons as needed.
- Align the icon neatly with the text boxes for a cohesive look.
- Duplicate and customize icons for other steps, matching their respective colors.

Applying Animations to Your 4-Step Infographic
Animations bring your infographic to life, guiding your audience through each step with smooth transitions.

Step 10: Group Each Step for Easy Animation
- Select all elements of the first step (shapes, text, icons) and group them (Ctrl + G).
- Repeat this for all the other steps.
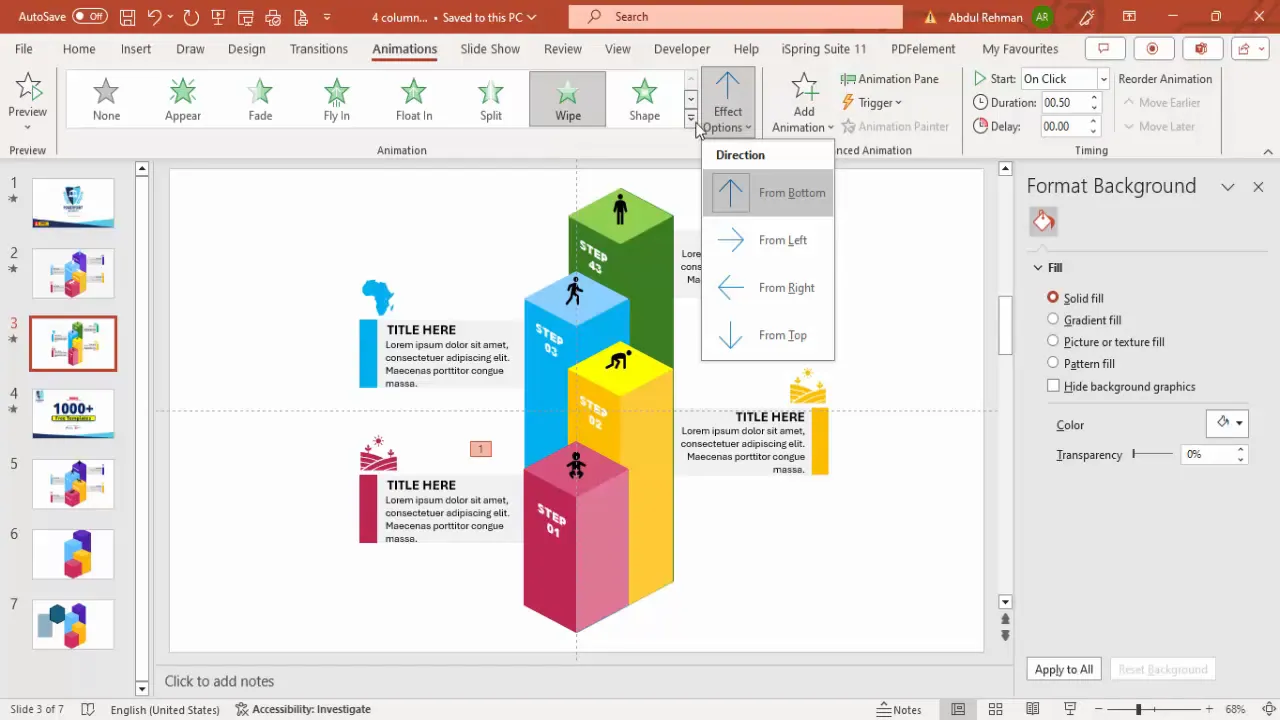
Step 11: Add Entry Animations
- Select the first grouped step and apply an animation like Wipe or Stretch.
- Set the animation direction to suit the design—e.g., wipe from bottom or stretch from right.
- For a more dynamic effect, set the animation to start After Previous so steps appear sequentially.
- Copy the animations to other steps and adjust the animation direction accordingly (e.g., alternate left and right).
Step 12: Preview and Adjust Animation Timing
Run your slideshow to preview the animations. Make sure the steps appear in the desired order and timing. Adjust animation duration and delay as needed for smooth transitions.
Customizing Your Slide: Colors, Sizes, and More
Personalizing your infographic slide ensures it fits your presentation’s theme and message perfectly.
Color Coordination
- Choose colors that align with your brand or presentation palette.
- Use contrasting colors between text and background shapes for readability.
- Apply consistent color coding across steps, text boxes, and icons.
Size and Layout Adjustments
- Resize steps individually to emphasize hierarchy or importance.
- Align steps horizontally or vertically depending on your layout preference.
- Use guides to maintain consistent spacing and alignment.
Adding Extra Visual Elements
You can insert additional icons or images on top of the steps for more context or decorative flair. For example, adding people icons or symbols related to your topic enhances storytelling.
Tips for Designing Effective PowerPoint Animated Slides
- Keep it Simple: Avoid clutter by limiting text and using concise descriptions.
- Use Consistent Fonts: Stick to one or two fonts throughout for professionalism.
- Align Elements Precisely: Use guides and grouping to keep everything neat.
- Test Animations: Preview your slide in presentation mode to ensure smooth transitions.
- Balance Colors: Use color theory principles to create visually appealing palettes.
- Use High-Quality Icons: Choose clear, simple icons that reinforce your message.
- Adapt to Your Audience: Tailor text size and complexity to your viewers’ needs.
Frequently Asked Questions
Can I create more than four steps using this method?
Absolutely! The technique is scalable. You can duplicate and customize additional steps as needed, just be mindful of slide space and readability.
How do I ensure my animations run smoothly during a presentation?
Group related objects before applying animations. Use the Animation Pane to control the order and timing. Always rehearse your presentation to check animation flow.
What if I want to use different shapes instead of hexagons?
You can experiment with other shapes like rectangles, circles, or custom shapes. The key is to maintain consistent style and 3D effects for a cohesive look.
Is it possible to change the icons after inserting them?
Yes. Select the icon, go to Graphic Format > Graphic Change, and choose a new icon without losing any formatting.
Can I download ready-made templates for this infographic style?
Many template providers, including free resources, offer pre-designed infographic slides. However, creating your own ensures customization and learning.
Conclusion
Mastering a PowerPoint animated slide like the 4-step 3D infographic opens up many creative possibilities for your presentations. By combining basic shapes, thoughtful color schemes, clear text, and smooth animations, you can craft compelling visuals that communicate complex processes simply and beautifully.
Remember to plan your layout carefully, maintain consistency, and always preview your animations to deliver a polished presentation. Whether you’re a beginner or an experienced PowerPoint user, these techniques will enhance your slide design skills and impress your audience every time.
Start experimenting today and bring your ideas to life with professional-quality animated infographics!
Check out the full video: Create 4-Step Infographic Slide in PowerPoint


