
If you’re looking for a way to spice up your presentations, an animated timeline is a powerful visual tool that can help engage your audience and clearly communicate progressions over time. Using PowerPoint’s Morph transition, you can create smooth, dynamic animations that bring your timeline to life. In this comprehensive guide, I’ll walk you through the process of building an impressive animated morph timeline in PowerPoint, step-by-step, with tips and tricks to make your presentation stand out.
This tutorial is inspired by real user requests and designed to help you master Powerpoint animation effects with ease. Whether you’re creating a project timeline, historical overview, or product evolution, this guide will empower you to design timelines that are not only functional but visually stunning.
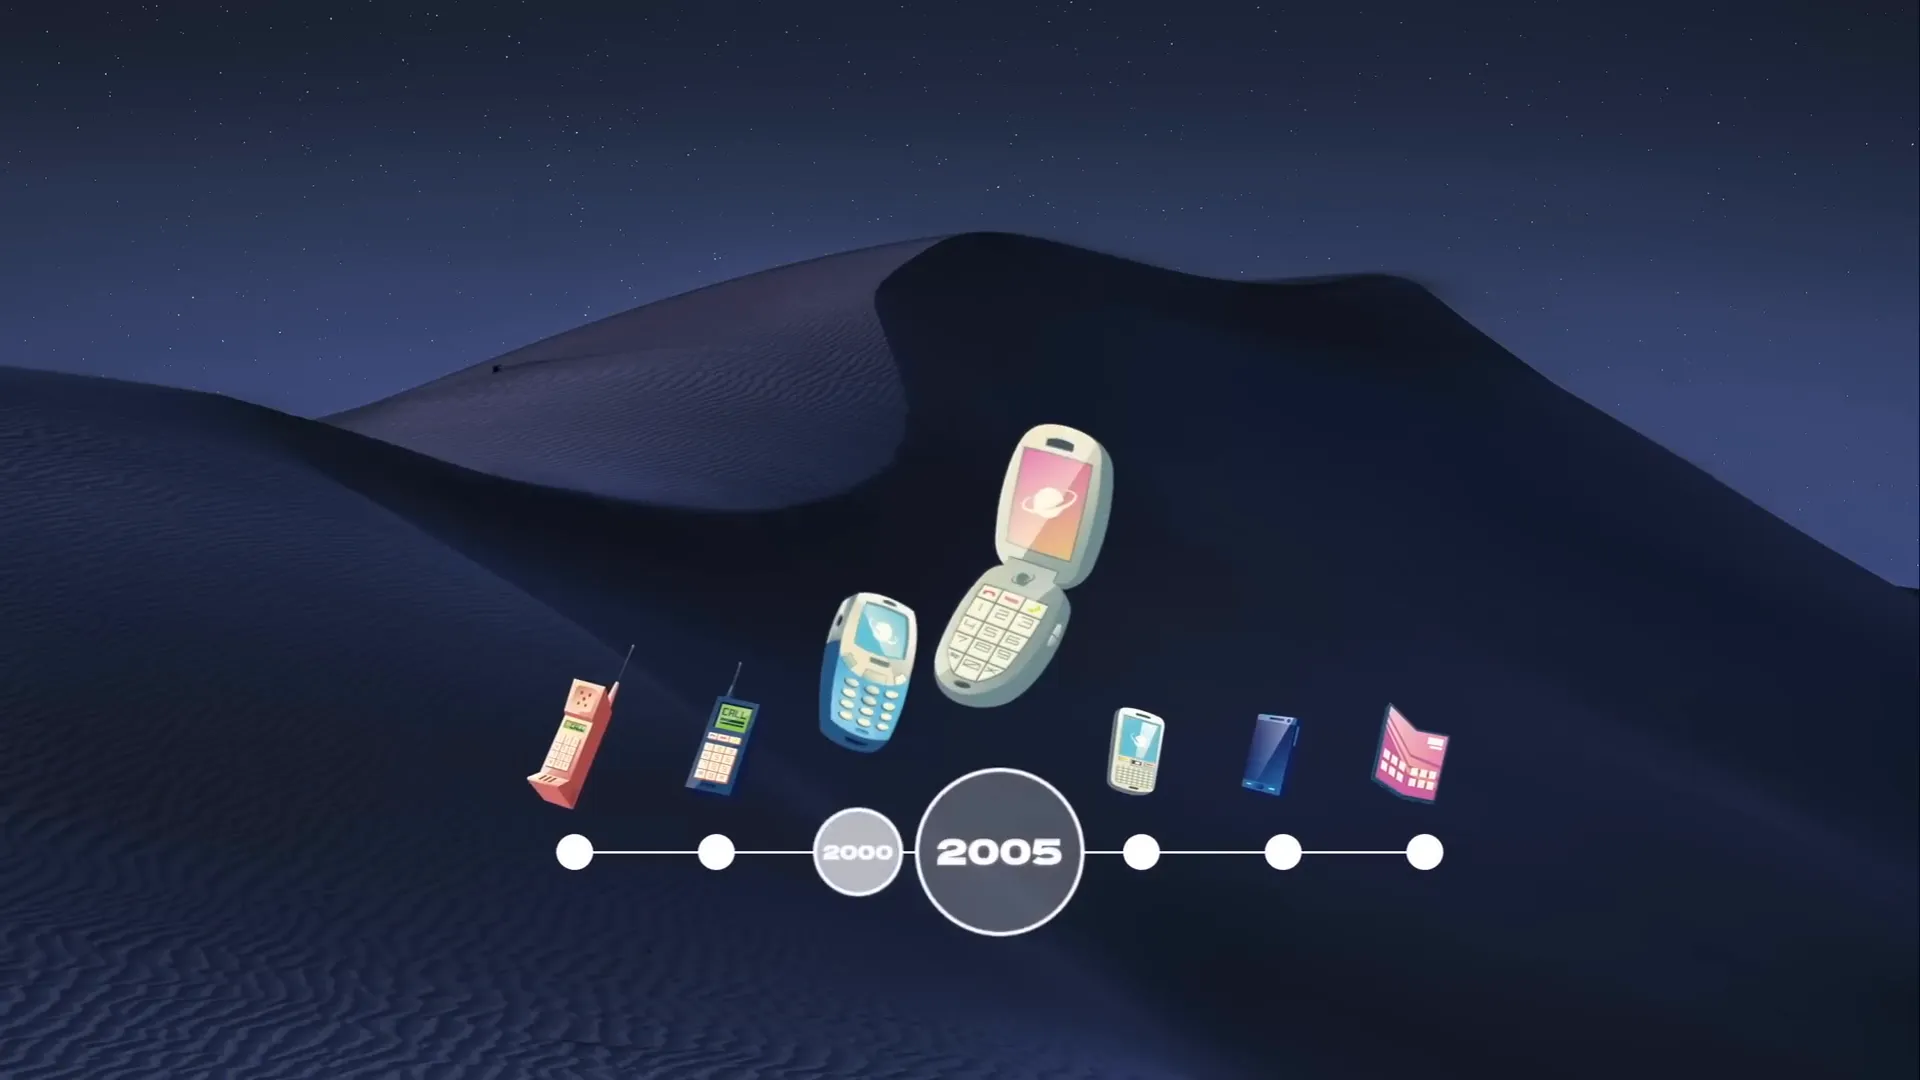
Table of Contents
- Preparing Your Slide and Background
- Creating the Timeline Line and Circles
- Adding Years to Your Timeline Circles
- Naming Objects for Morph Animation
- Applying Slide Transitions for Smooth Animation
- Duplicating Slides and Shifting Timeline Elements
- Highlighting the Current Year with Enlarged Circles
- Enhancing the Timeline with Illustrations
- Adding Hyperlinks for Interactive Navigation
- Frequently Asked Questions
- Conclusion
Preparing Your Slide and Background
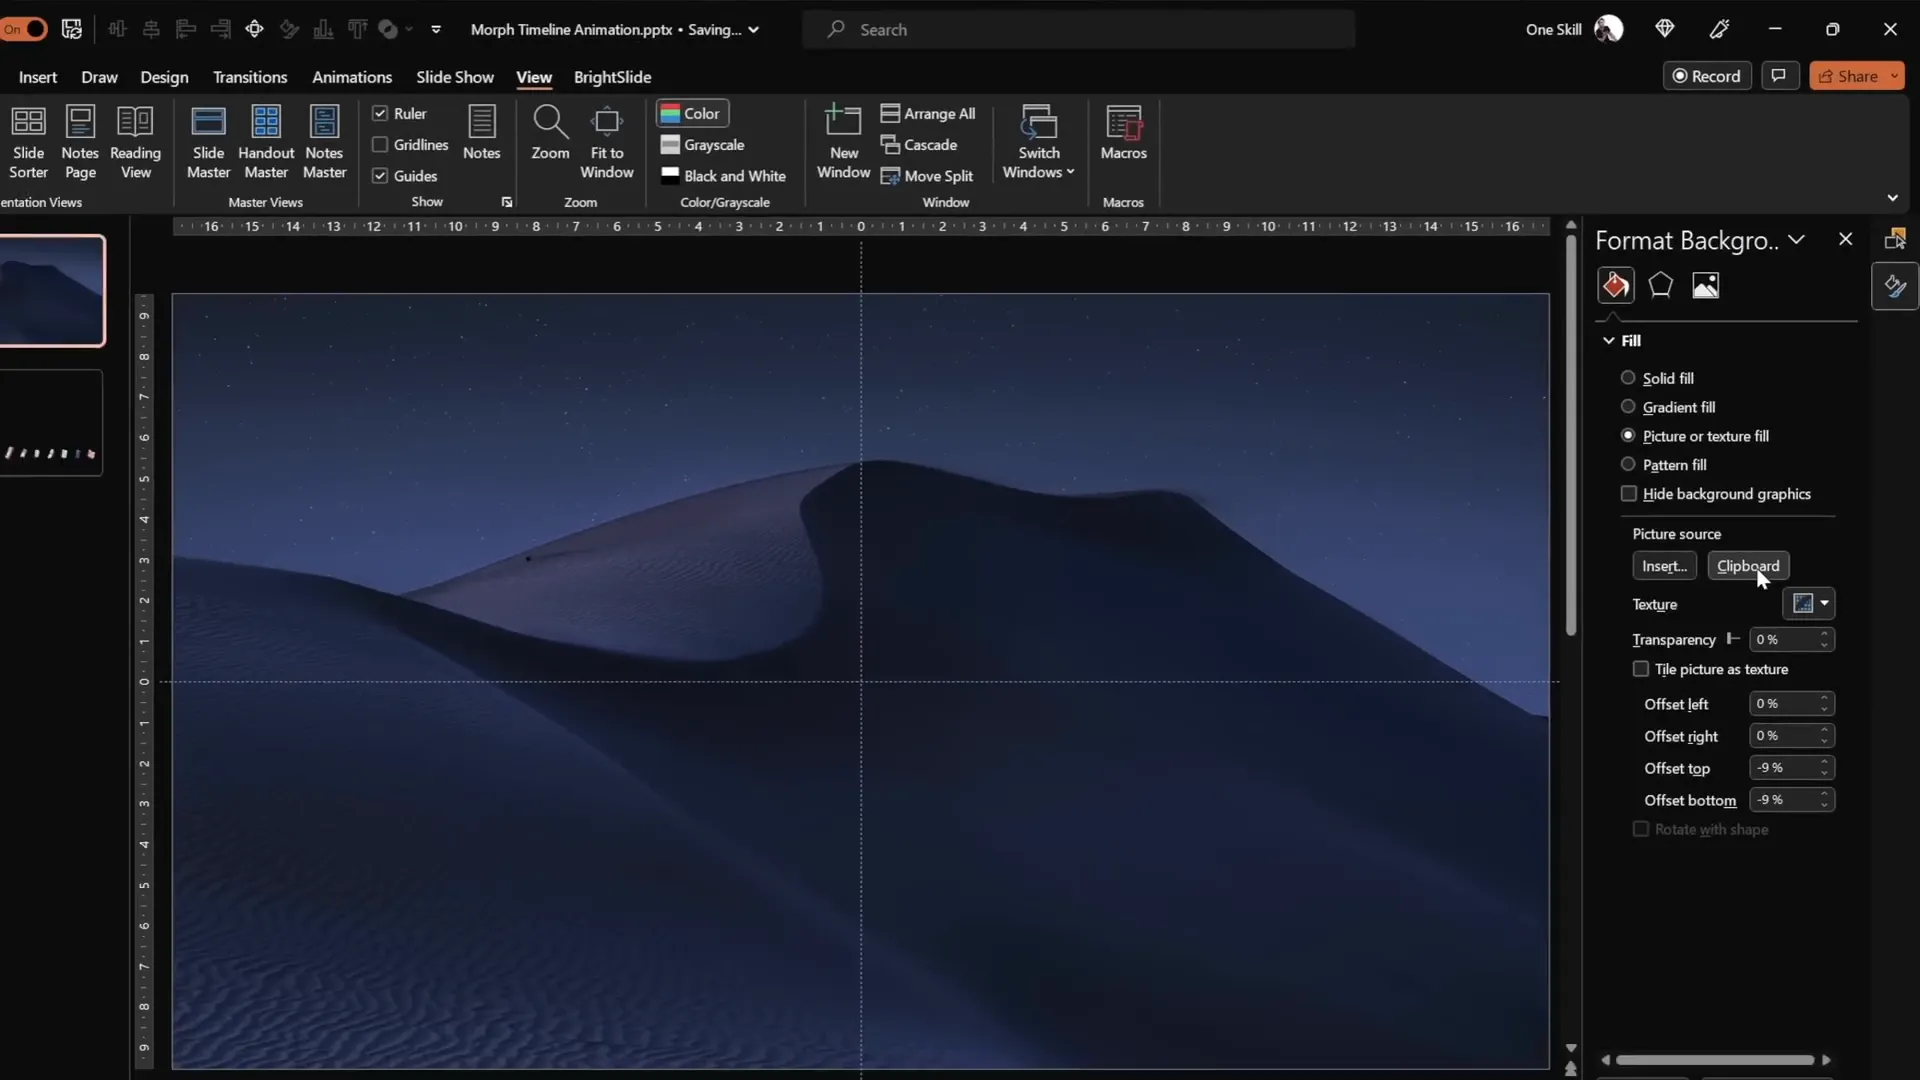
Before diving into the timeline creation, start with a clean slate to maximize your creative control. Begin with a fresh, blank slide layout to avoid unnecessary placeholders that can clutter your workspace.
- Set your slide layout to Blank to remove any default text boxes or titles.
- Activate slide guides to locate the center of the slide easily; this will help you align your timeline elements precisely.
- Fill the slide background with a beautiful picture to set a visually appealing scene. I recommend using free high-quality images from Unsplash. Copy the image and use the slide’s fill options to paste it as a background rather than inserting it as a photo. This approach is crucial because later the timeline circles will use the slide background fill effect, which only works with pasted backgrounds.
By setting a striking background early, your timeline will have a professional, polished look that supports your content without overwhelming it.
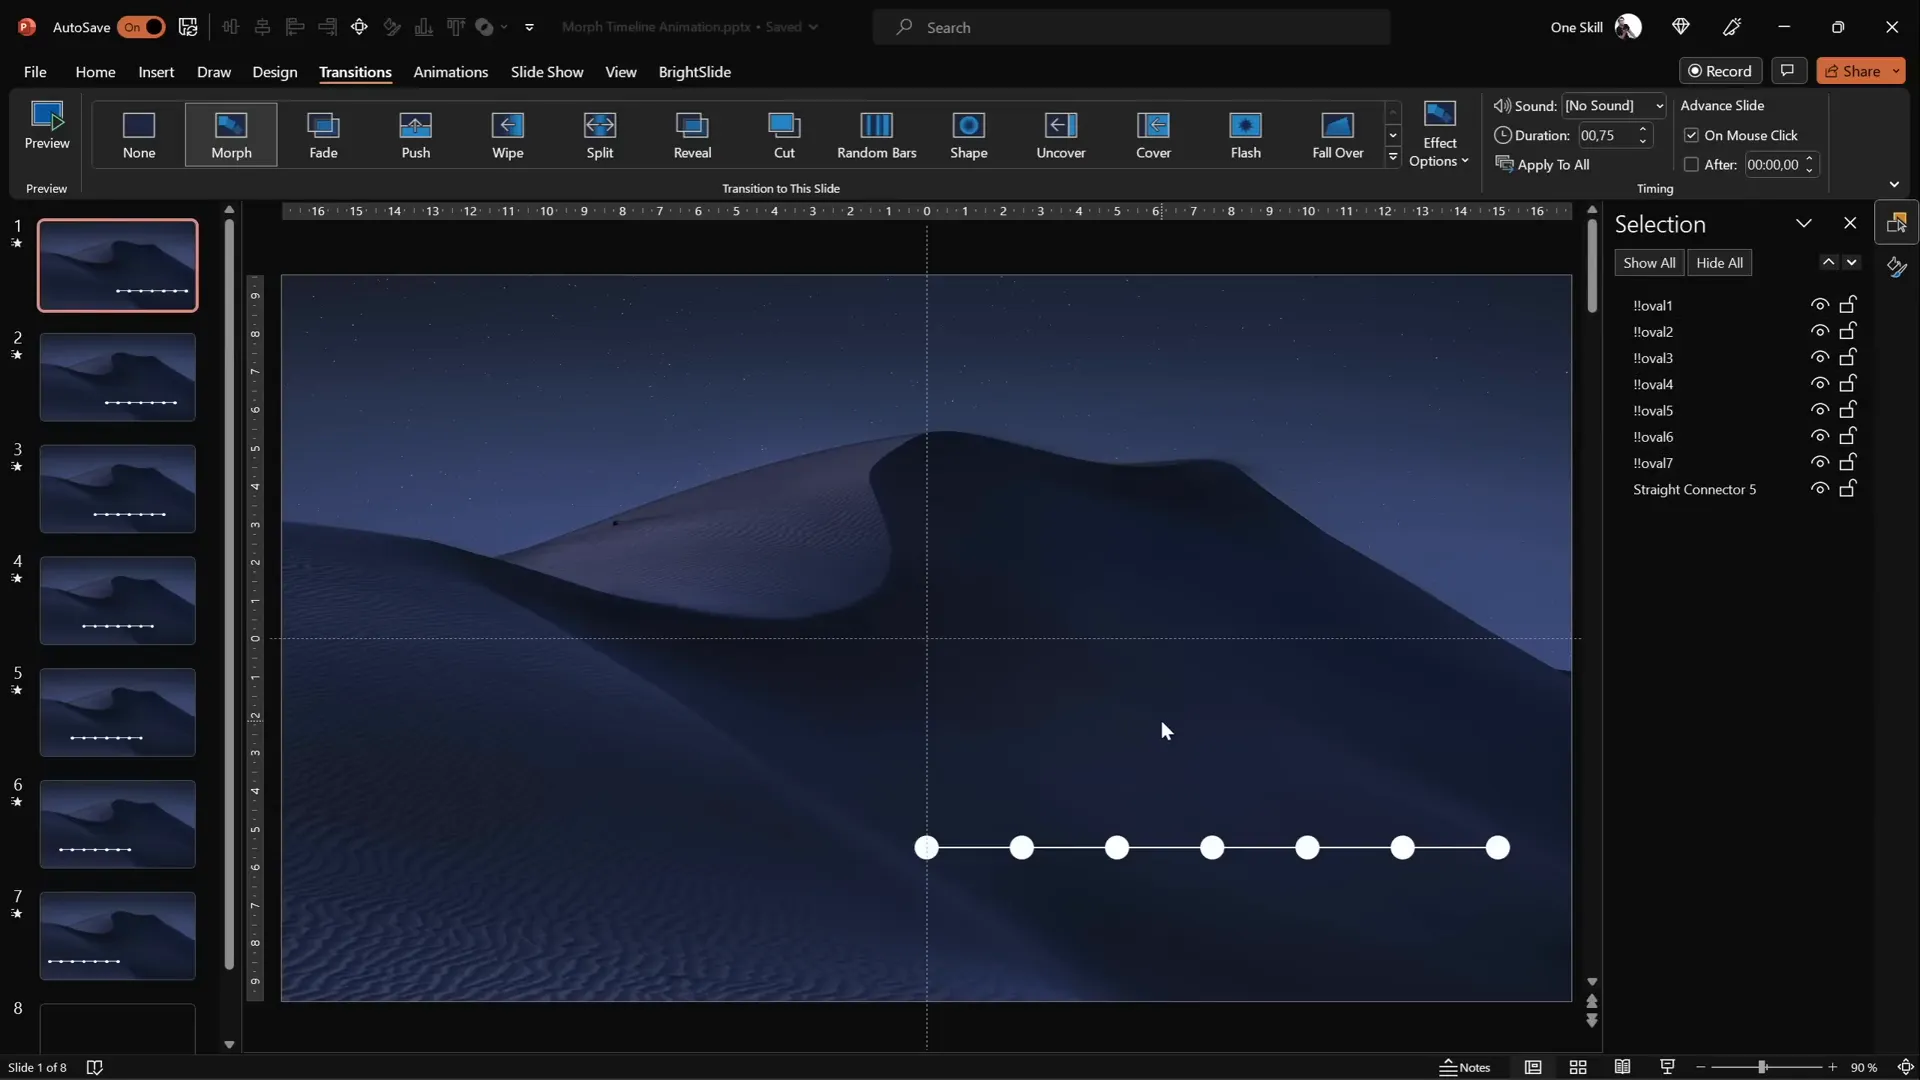
Creating the Timeline Line and Circles
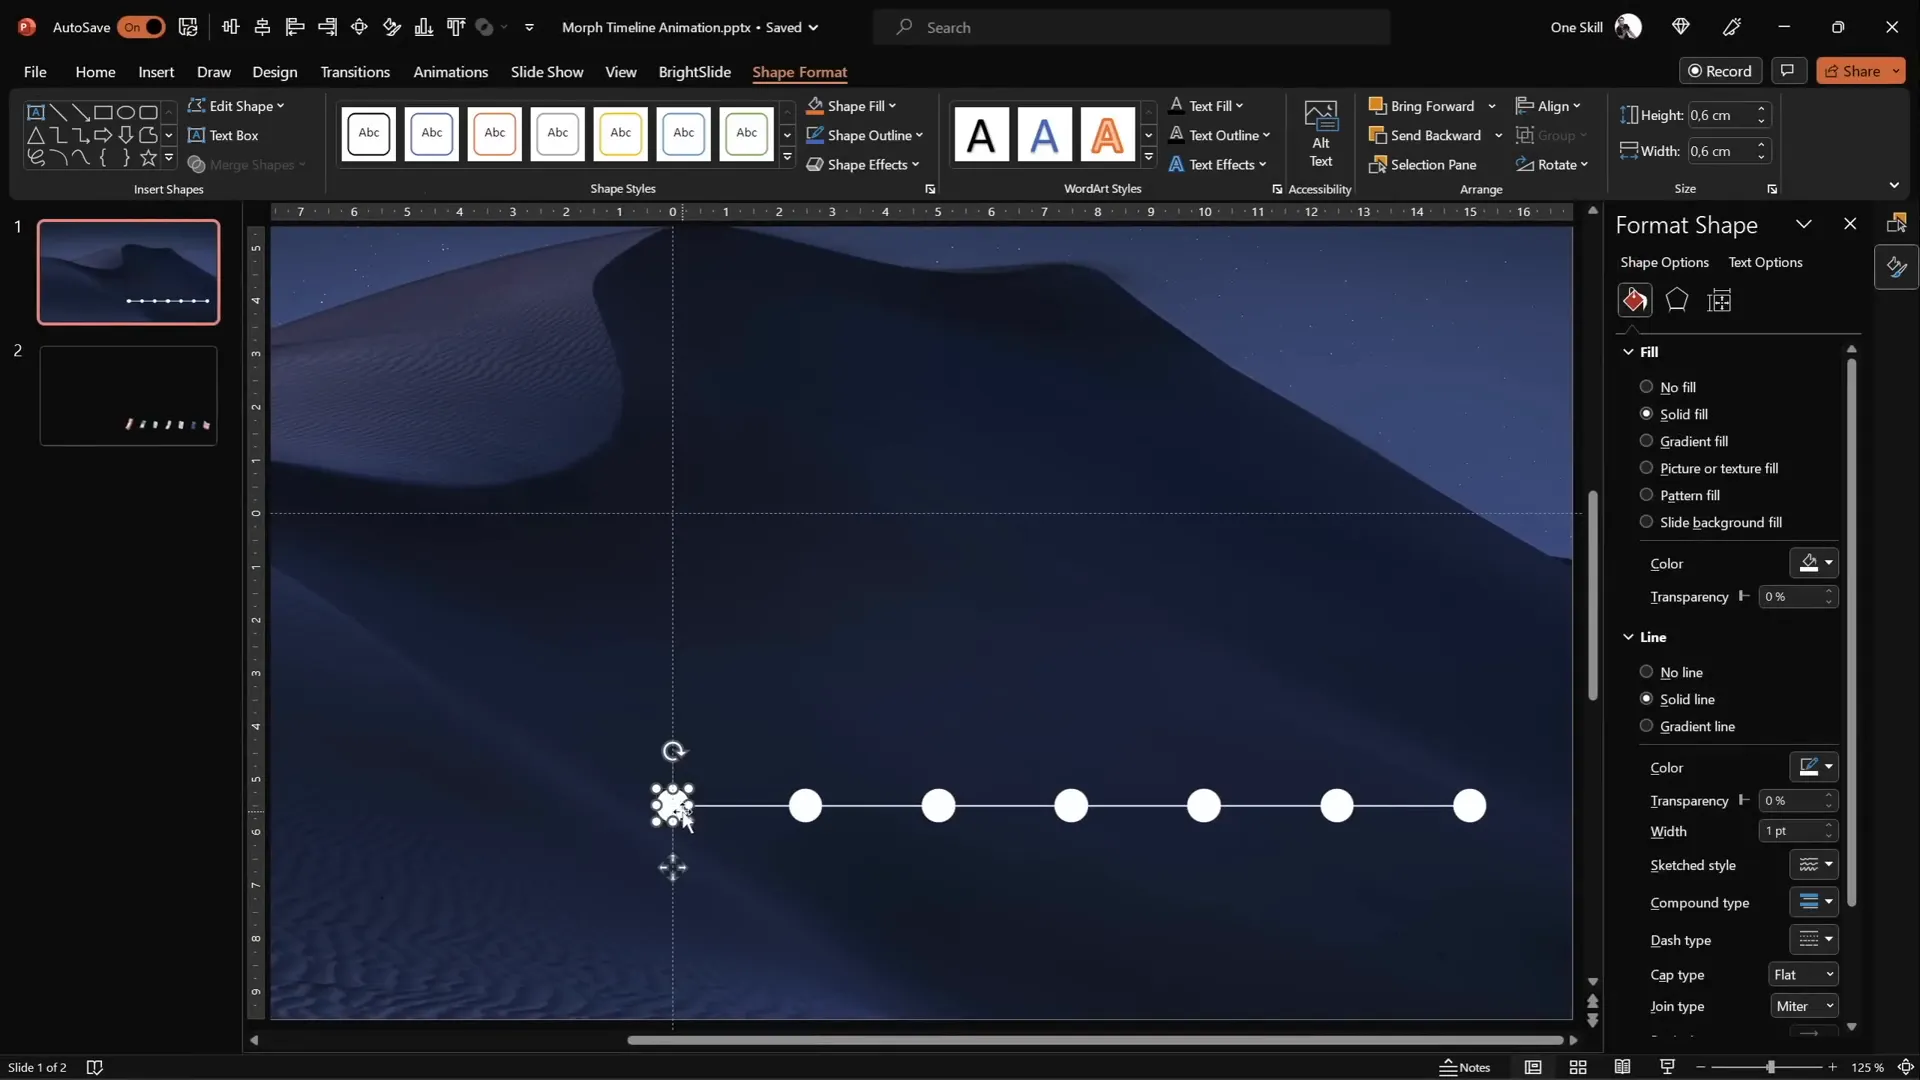
The backbone of your timeline is a horizontal line with evenly spaced circles representing key points or years. Here’s how to build it:
- Draw a horizontal line: Use the Line tool and hold the Shift key to draw a perfectly straight line starting from the slide’s center towards the bottom right corner. Make the line about 15 centimeters long with a thickness of 1 point for a clean, subtle look.
- Insert circles: You’ll need seven circles for this timeline. Hold the Shift key while drawing to create perfect circles. Set each circle’s height and width to 0.6 centimeters, or adjust to your preference.
- Position circles: Place the first circle on the left side of your timeline line. Then, hold down Ctrl + Shift and drag to duplicate the circle, placing the second one on the right side of the line.
- Duplicate circles: Continue duplicating the circles using Ctrl + Shift until you have seven in total.
- Distribute evenly: Select all seven circles, then use the Align options to Distribute Horizontally, ensuring equal spacing between each circle.
This setup forms a clean and balanced base for your timeline points.
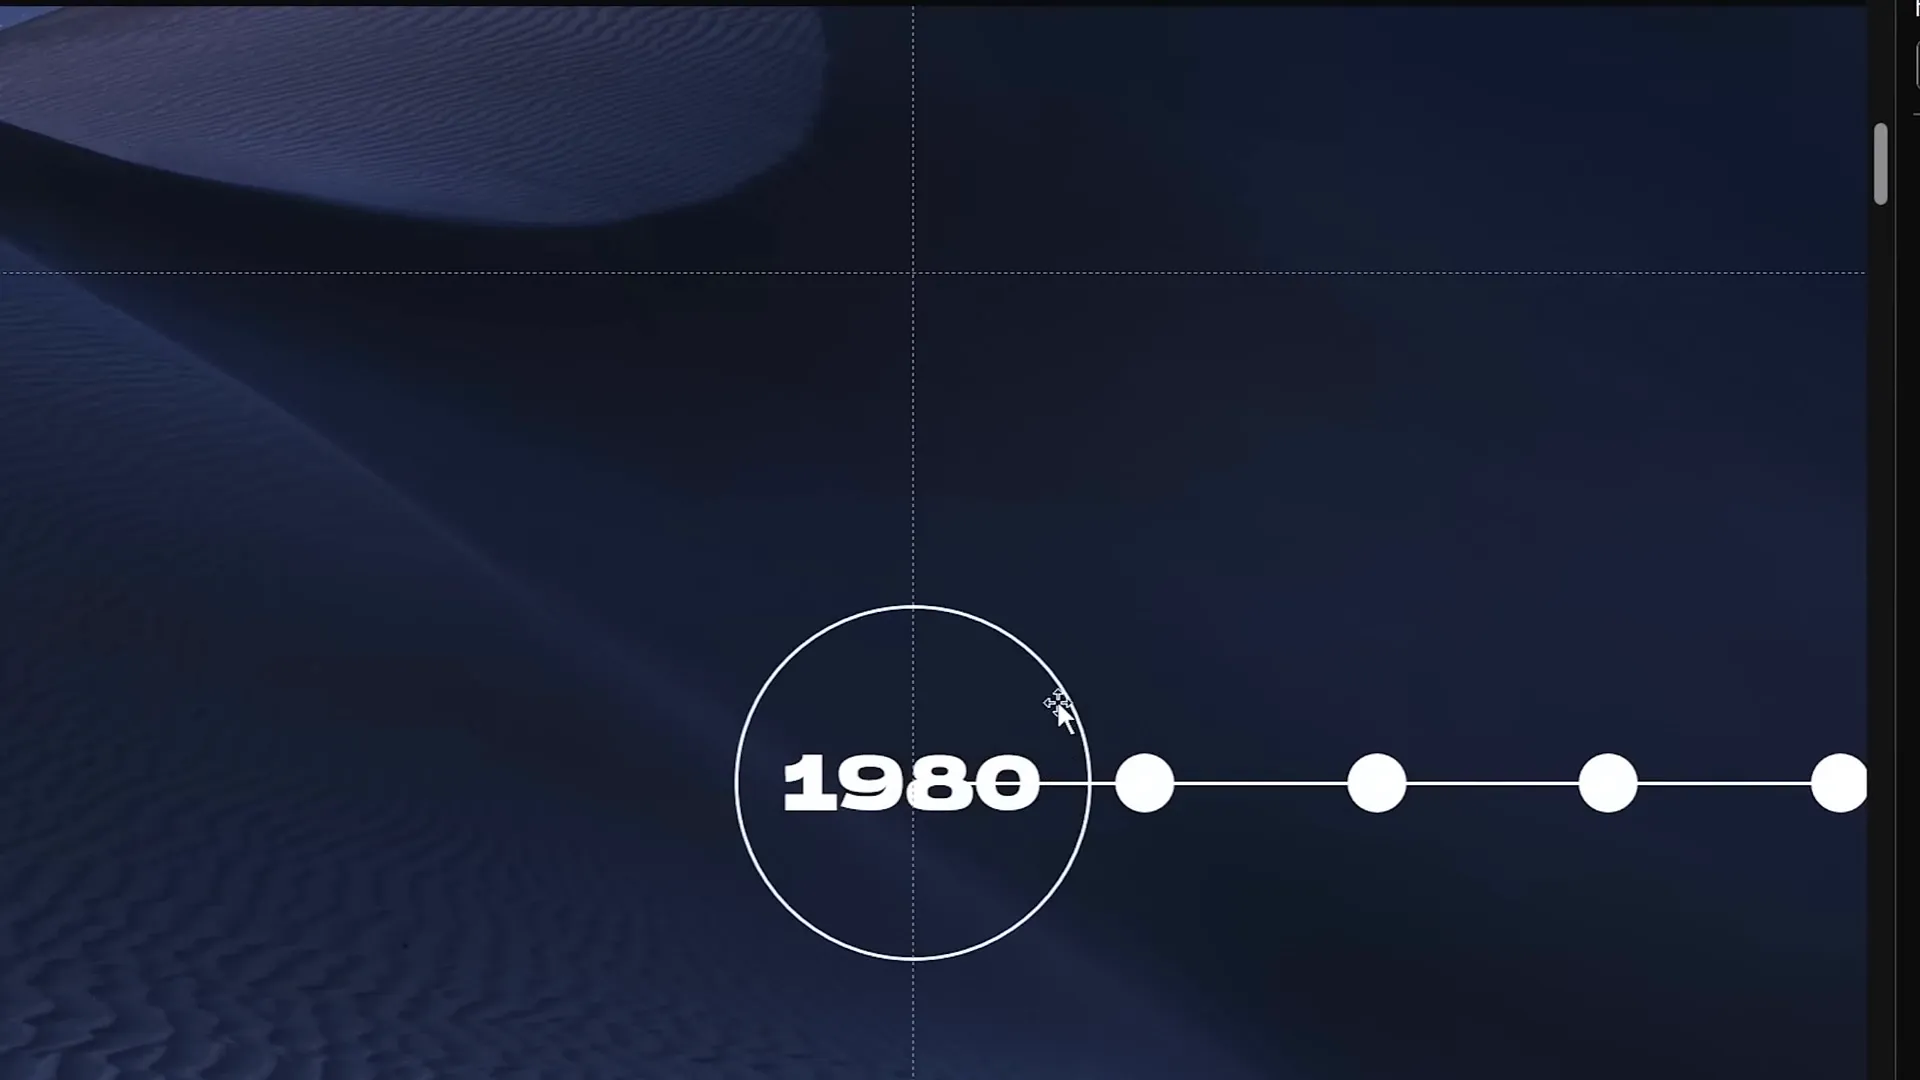
Adding Years to Your Timeline Circles
Now, it’s time to add meaningful content — the years — to your timeline. Follow these steps:
- Zoom into the circles to easily insert text.
- Add text boxes inside each circle with the corresponding years, starting from 1980 and ending at 2020. You can choose any years relevant to your timeline.
- Use a clean and readable font; I recommend Hanson with a small font size of 5 for initial placement.
- Keep the text color black initially to clearly see what you’re typing.
- Once all years are added, select all text boxes and change the font color to white. This will make the text invisible for now, but don’t worry — the morph animation will reveal them later.
Having the years ready sets a solid foundation for your animated timeline.
Naming Objects for Morph Animation
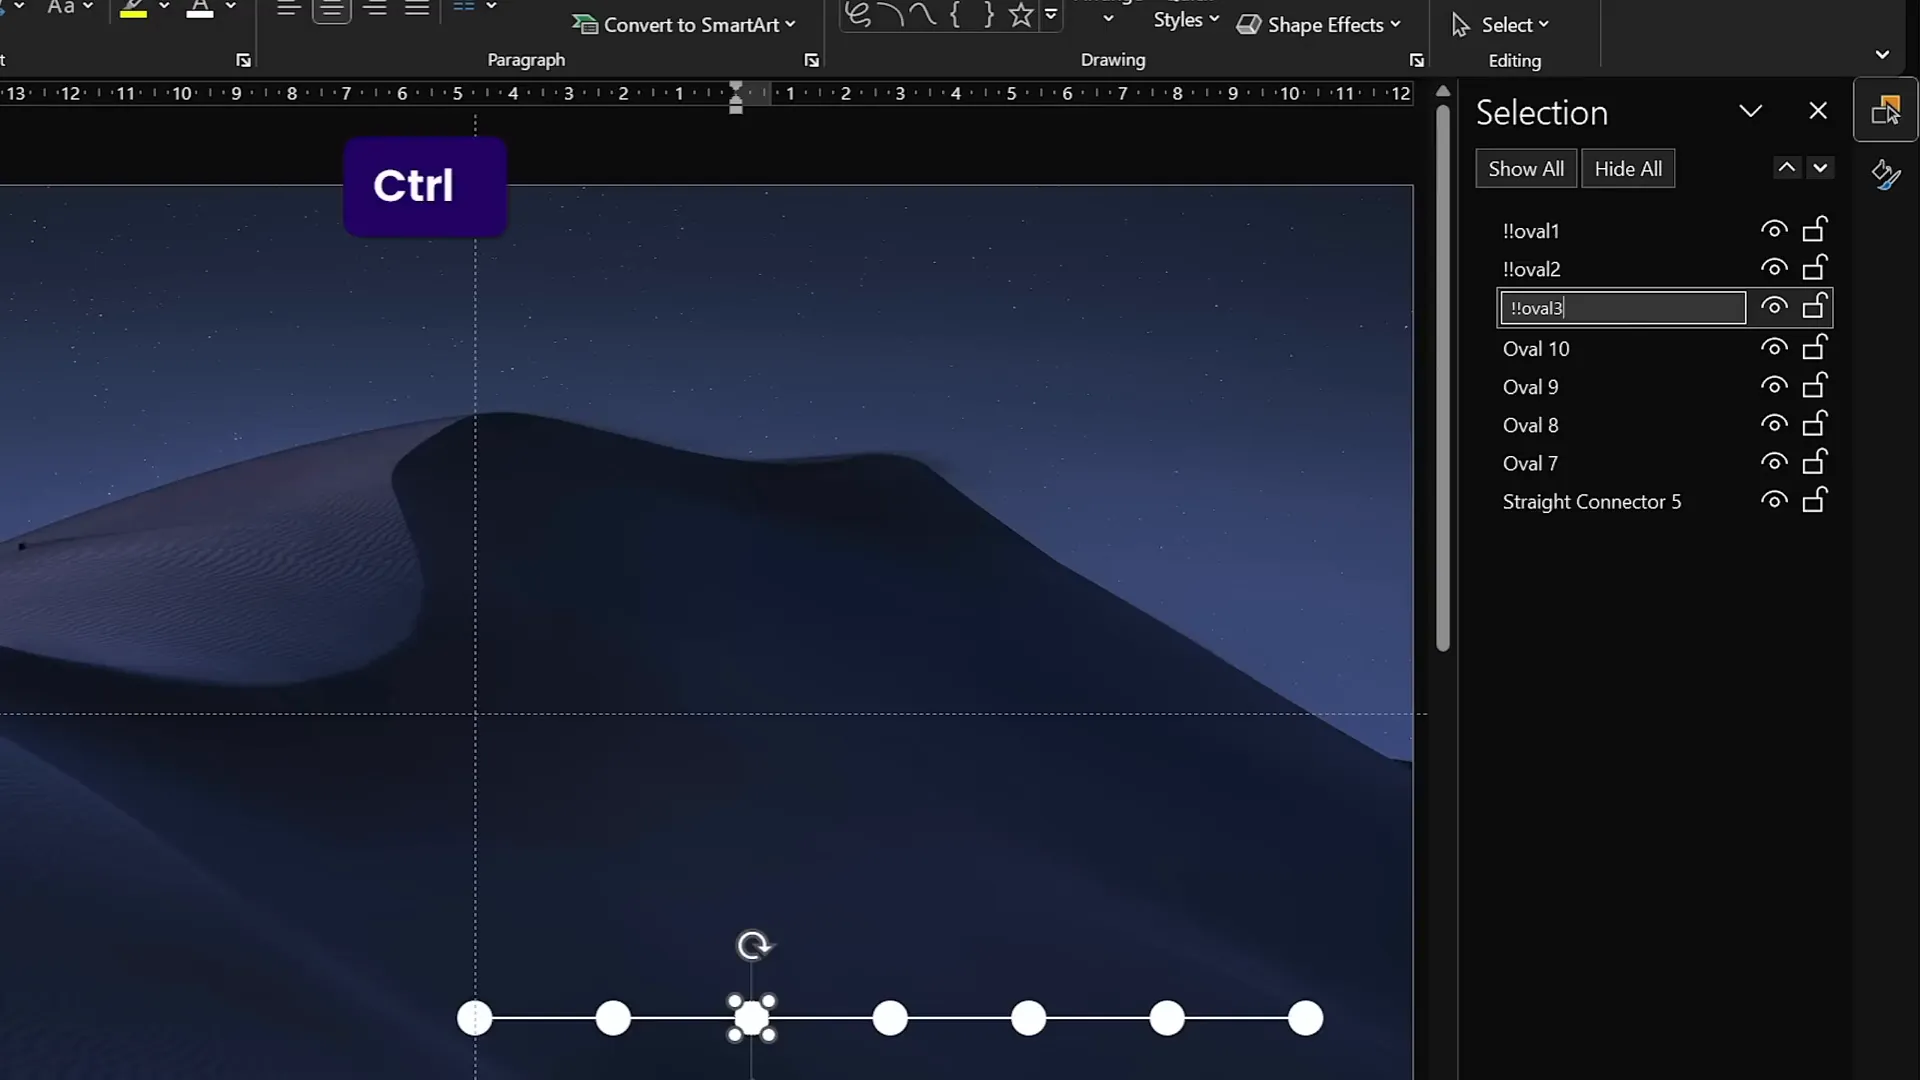
Proper naming of objects in PowerPoint is essential for the Morph transition to recognize and animate corresponding elements across slides. Here’s how to do it:
- Open the Selection Pane from the Home tab under the Arrange dropdown.
- Rename each circle (oval) with a clear, consistent naming convention. For example, start with “!!Oval1” for the first circle, “!!Oval2” for the second, and so on.
- The double exclamation marks (!!) at the beginning ensure these objects appear at the top of the selection pane, making them easier to manage.
- Apply the same naming strategy for other objects you add later, like phone illustrations or icons.
This step is crucial for smooth morphing between slides, as PowerPoint matches objects with the same names to animate them fluidly.
Applying Slide Transitions for Smooth Animation
To bring your timeline to life, you’ll apply the Morph transition between slides. Here’s how to set it up:
- Go to the Transitions tab.
- Select the Morph transition.
- Set the transition duration to 0.75 seconds for a fast but smooth effect.
- This speed keeps the animation dynamic and engaging without feeling rushed.
With this transition, PowerPoint will automatically animate the movement, resizing, and visibility changes of your timeline elements between slides.
Duplicating Slides and Shifting Timeline Elements
The core of the animation comes from duplicating your slide and shifting timeline elements to create the illusion of movement. Follow these steps:
- Duplicate your first slide to create the second slide.
- Select all timeline circles and the timeline line on the bottom of the slide.
- Move these elements one step to the left, aligning with the guide circles you placed earlier.
- Duplicate the second slide to create the third, and repeat the shifting process, moving elements one step left again.
- Continue this process until you have seven slides, each showing the timeline shifted progressively to the left.
- Once done, delete the original guide circles that you used to help with alignment—they are no longer needed.
When you play your slideshow, the Morph transition will animate the timeline circles sliding left smoothly, creating a dynamic scrolling effect.
Highlighting the Current Year with Enlarged Circles
To emphasize the current year or focus point on your timeline, you can enlarge the circle and make its year visible. Here’s a step-by-step approach:

- On each slide, select the circle representing the current year.
- Resize it proportionally by holding Ctrl + Shift while dragging a corner handle. This ensures the circle enlarges from the center without distortion.
- Set the fill of this enlarged circle to a light background fill to cover any underlying lines or text.
- Inside the circle, increase the font size of the year to 24 points for clear visibility.
- Copy the style of this enlarged circle using Ctrl + Shift + C (copy style).
- Paste the style onto the corresponding circles on other slides with Ctrl + Shift + V to maintain a consistent look.
- Repeat this process for all seven slides, each highlighting a different year.
This approach creates a focal point in your timeline animation, drawing the audience’s attention to the active year as the timeline scrolls.
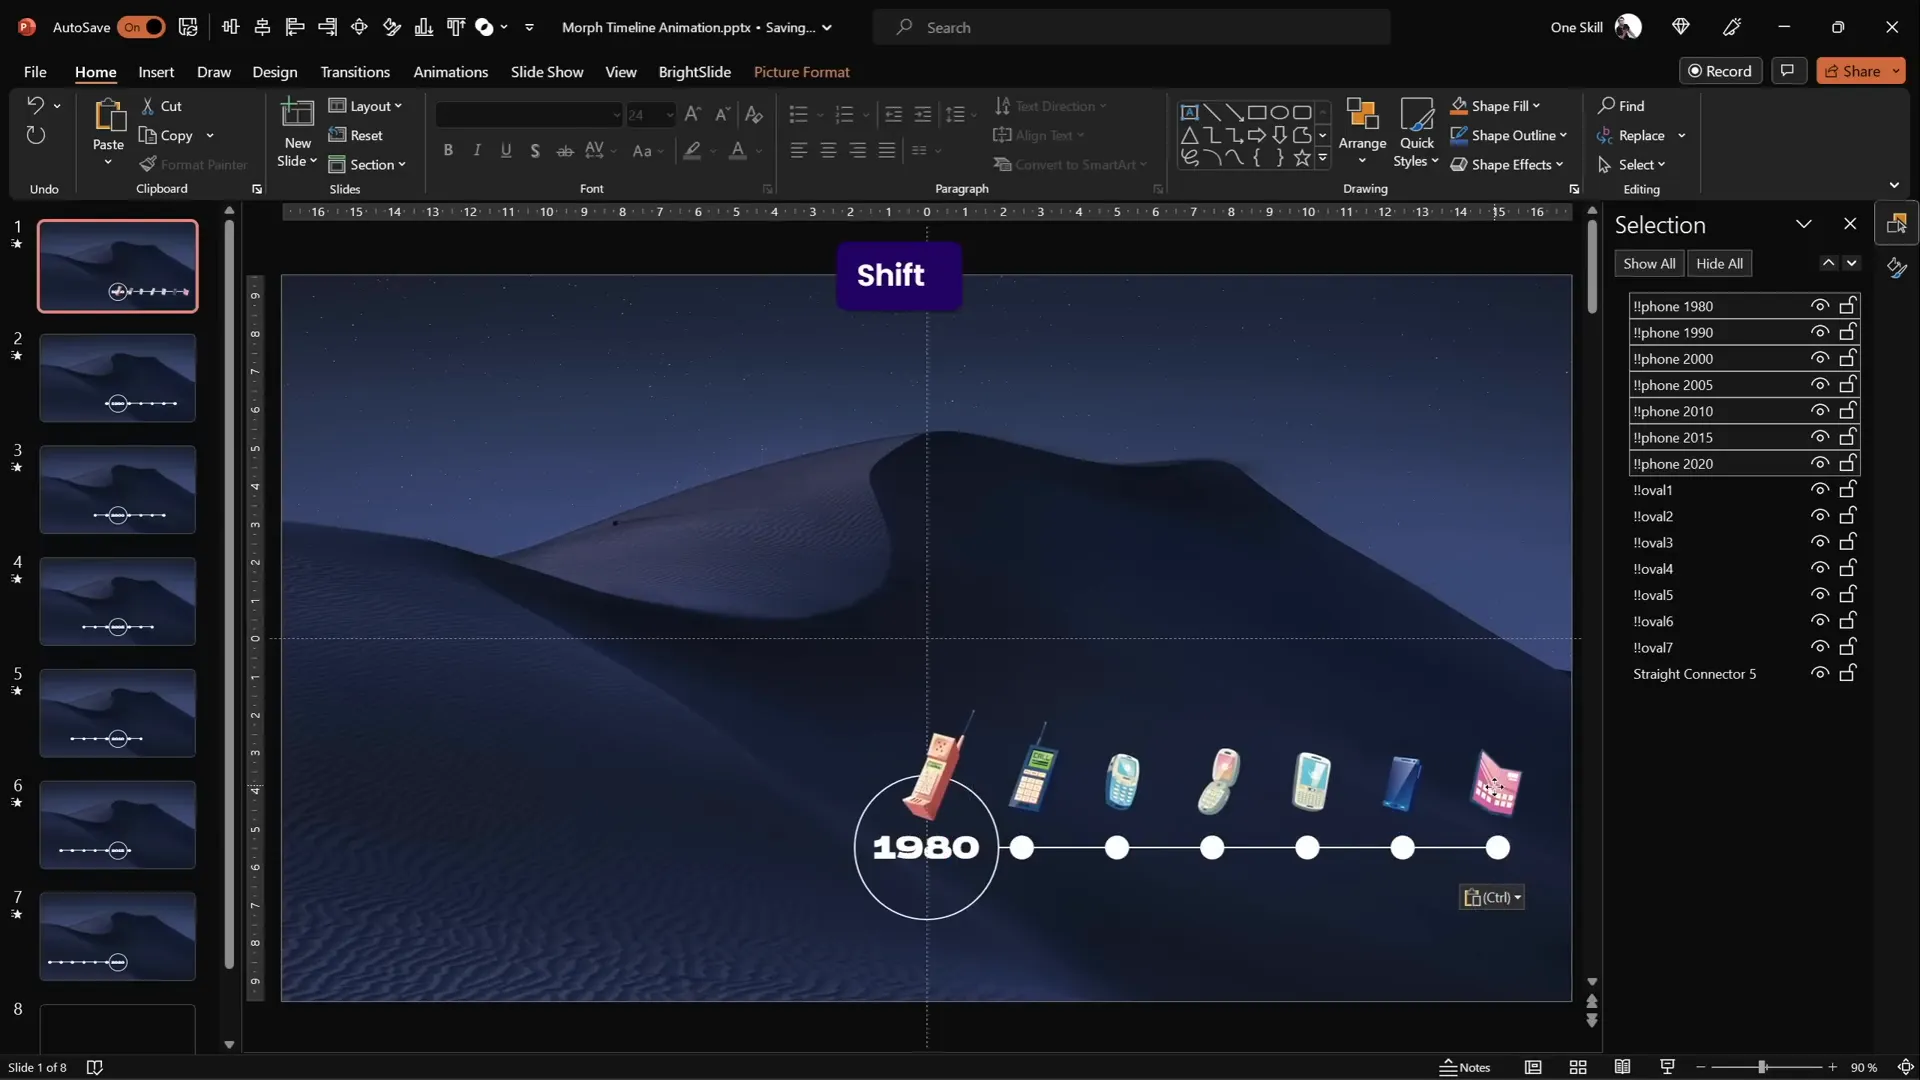
Enhancing the Timeline with Illustrations
Visual elements like illustrations can add personality and context to your timeline. For this project, I used phone illustrations spanning different eras to represent technology evolution alongside the timeline.
- Collect relevant illustrations or images that match your timeline’s theme. I recommend free vector phone illustrations from Freepik.
- Rename each illustration in the Selection Pane with a consistent naming convention starting with double exclamation marks and the corresponding year, e.g., “!!Phone1980”.
- Paste all phone illustrations into the first slide and position them just above the timeline line.
- Resize and rotate each phone illustration as desired to add visual interest and variety.
- For subsequent slides, move all phone illustrations one step to the left, matching the movement of the timeline circles.
- Continue this process across all slides, so each slide features the correct phone illustration aligned with the current year.
This layering of illustrations with your morph timeline makes the animation richer and more informative, enhancing the storytelling aspect of your presentation.
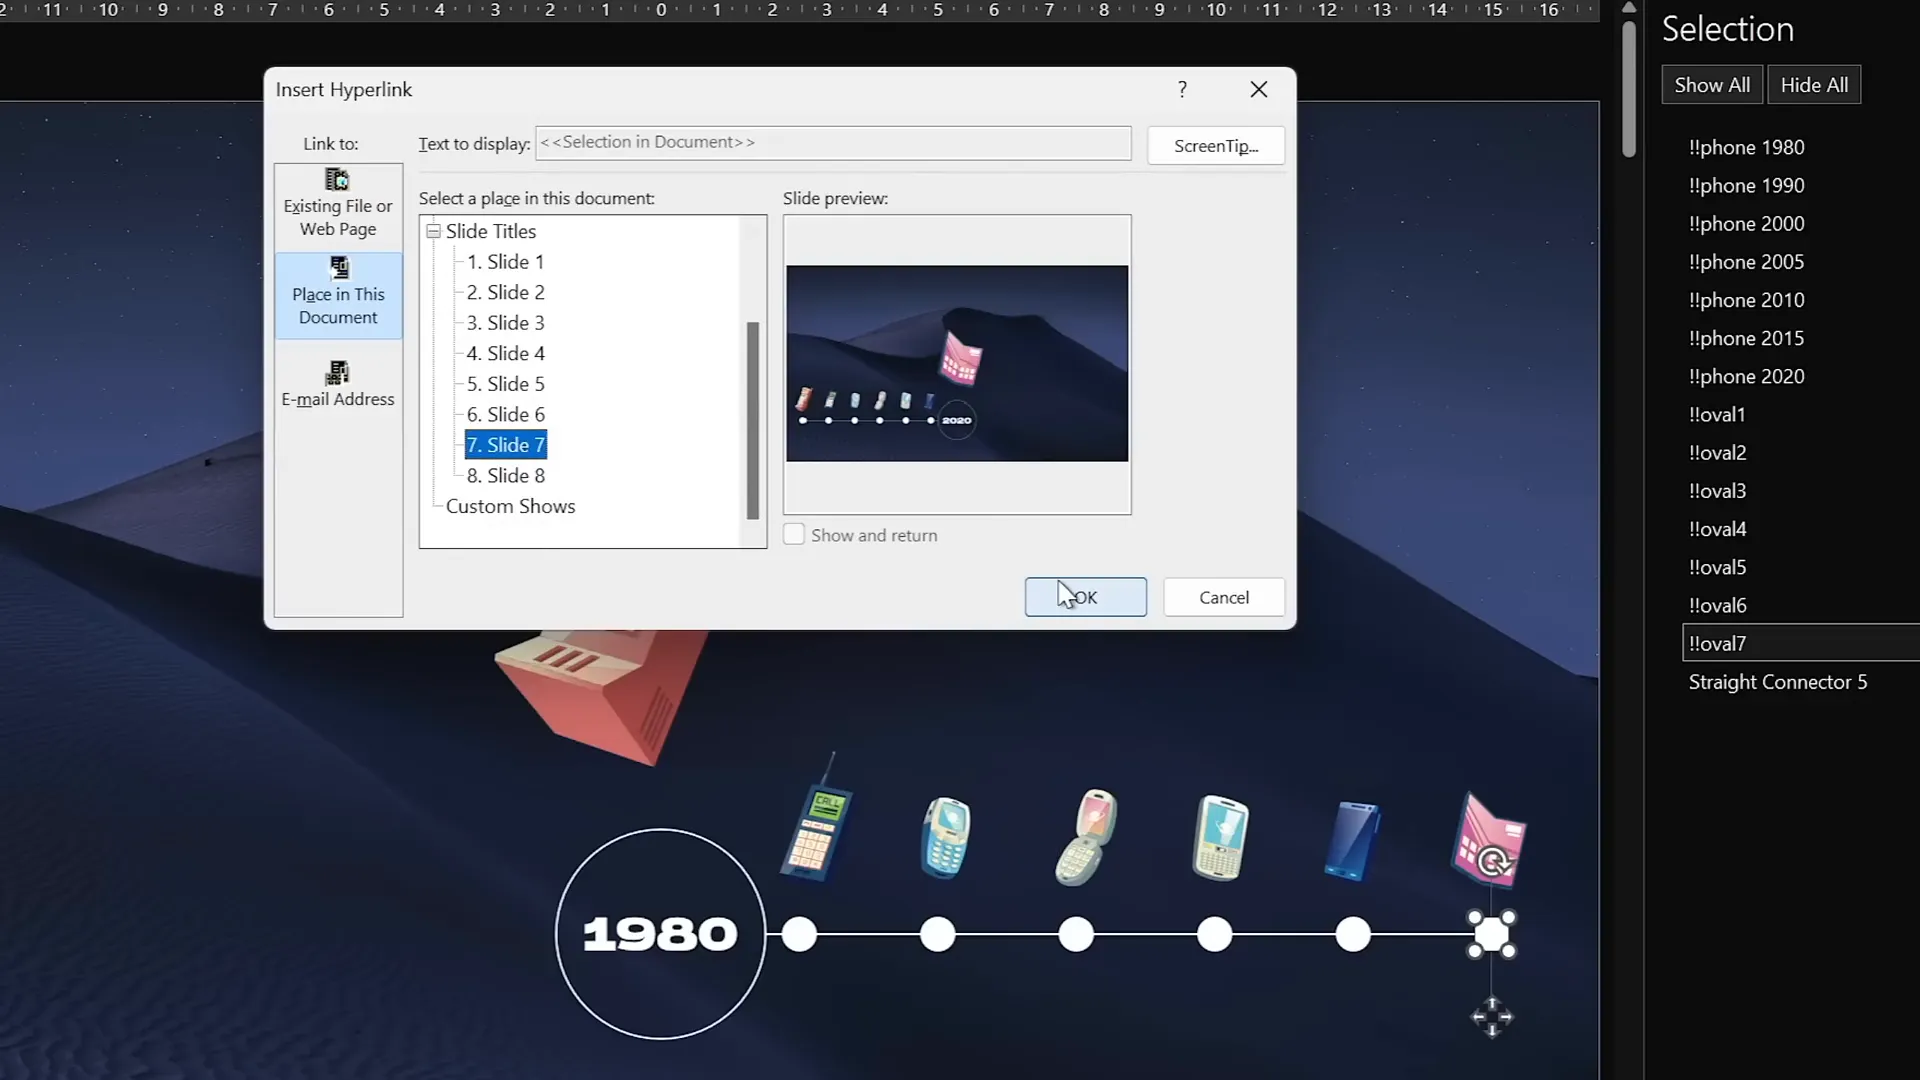
Adding Hyperlinks for Interactive Navigation
To make your timeline interactive, you can add hyperlinks to circles that allow users to jump between specific slides. This is especially useful for presentations where you want to give viewers control over navigation.
- On slide one, select the circle on the right side of the timeline and insert a hyperlink linking to slide seven.
- On slide seven, select the circle on the left side and insert a hyperlink linking back to slide one.
- Use Ctrl + K to open the hyperlink dialog box quickly.
- Optionally, you can link all circles to corresponding slides to create a fully navigable timeline.
With these hyperlinks, clicking on the bubbles will jump the presentation forward or backward, providing an engaging, non-linear navigation experience.
Frequently Asked Questions
What is the Morph transition in PowerPoint?
The Morph transition is a powerful animation feature in PowerPoint that creates smooth movement and transformation effects between two slides. PowerPoint automatically animates objects with the same names to move, resize, or change properties seamlessly, making it ideal for animated timelines.
Can I use my own images and icons for the timeline?
Absolutely! You can use any images or icons that fit your timeline’s theme. Just make sure to rename the objects consistently in the Selection Pane so the Morph transition can link them correctly across slides.
How many slides do I need to create an animated timeline?
The number of slides depends on how many timeline points you want to animate. In this tutorial, we used seven slides for seven timeline points, but you can create more or fewer depending on your data.
Is the Morph transition available in all versions of PowerPoint?
The Morph transition is available in PowerPoint for Microsoft 365, PowerPoint 2019, and later versions. If you have an older version, you may need to upgrade or use alternative animation techniques.
Can I customize the speed of the animation?
Yes, you can adjust the duration of the Morph transition in the Transitions tab. A duration of 0.75 seconds works well for a smooth yet dynamic effect, but feel free to experiment to find what suits your presentation best.
Are there any tips for making my timeline more engaging?
- Use complementary colors and consistent fonts to maintain visual harmony.
- Include relevant illustrations or icons to add context and interest.
- Use enlarged or highlighted elements to focus attention on the current timeline point.
- Incorporate interactive elements like hyperlinks for non-linear navigation.
- Keep text minimal and readable to avoid clutter.
Conclusion
Creating an animated morph timeline in PowerPoint is a fantastic way to elevate your presentations with dynamic visuals and smooth animations. By carefully preparing your slides, naming objects consistently, and leveraging the Morph transition, you can craft timelines that clearly communicate progressions over time while captivating your audience.
Remember to complement your timeline with meaningful illustrations and interactive hyperlinks to enhance engagement. With these Powerpoint animation effects at your fingertips, your timelines will transform from simple static visuals into compelling storytelling tools.
Now it’s your turn to try out these steps and create your own animated morph timeline. Experiment with different themes, images, and transition speeds to find what works best for your presentation style. Happy animating!
Check out the full video: ANIMATED PowerPoint Morph Timeline ✨ Free Download


