Microsoft’s announcement of the AI-powered productivity tool, Microsoft 365 Copilot, has sparked a lot of excitement among PowerPoint users and presentation designers. Integrated into Microsoft 365 apps like Word, Excel, Outlook, and PowerPoint, Copilot promises to transform how we work by quickly generating content and even adding compelling animations to presentations.
Although Copilot isn’t publicly available yet, you can already start creating similar PowerPoint animation effects that wow your audience. In this detailed guide, I’ll walk you through how to replicate the beautiful photo crop and text reveal animations inspired by Copilot using just PowerPoint’s built-in tools — especially the powerful Morph transition.
This tutorial is perfect for anyone looking to elevate their presentation game with professional animation effects, without needing any advanced software or plugins. So, let’s dive in and master these stunning effects step-by-step!
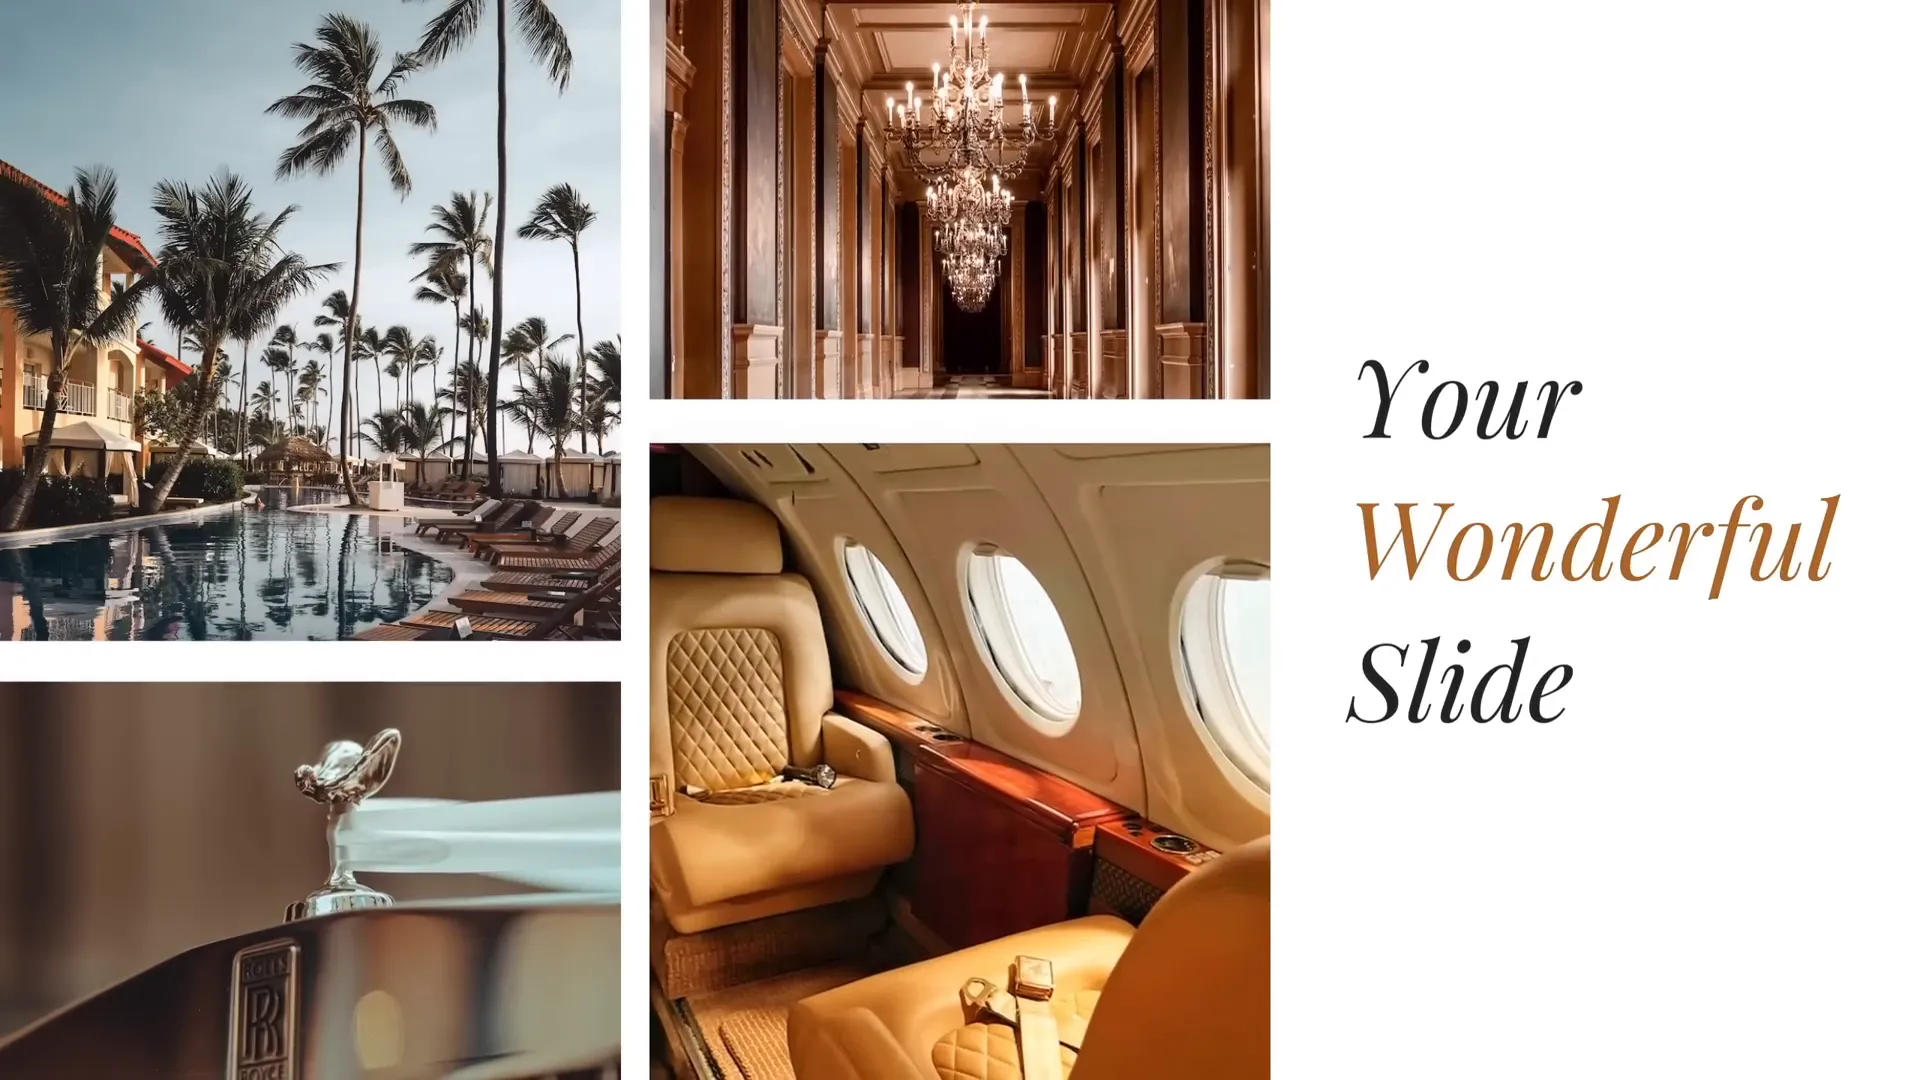
Table of Contents
- Understanding the Copilot-Inspired Animation
- Preparing Your PowerPoint Slide
- Filling Rectangles with Photos Using Merge Shapes
- Working with Text Boxes and Font Choices
- Applying the Morph Transition for Animation
- Creating Animation Delays for Photos
- Tips for Mastering PowerPoint Animation Effects
- Frequently Asked Questions
- Conclusion
Understanding the Copilot-Inspired Animation
The animation we’re recreating is a slick combination of two main effects:
- Photo Crop Animation: Multiple photos are cropped into rectangular shapes with varying heights and animated to “slide” into view from different directions.
- Text Reveal Animation: Text boxes reveal content dynamically by moving up and down, creating a smooth, modern text unveiling effect.
These animations combine to create a visually balanced slide with photos on the left and text on the right, both animating simultaneously for a polished and professional look.
What makes this approach particularly powerful is the use of PowerPoint’s Morph transition, which automatically animates the movement and transformation of objects between slides, making it easy to create complex effects without manual animation timelines.
Preparing Your PowerPoint Slide
The foundation of this animation starts with a simple slide layout:
- Insert four rectangles on the left side of the slide. Each should have a different height to add visual interest.
- Ensure that the rectangles have equal gaps between them for a well-balanced look.
- On the right side, add two simple text boxes for the text reveal animation.
- Use the Playfair Display font at size 54 for an elegant and readable text style.
Here’s a quick checklist to prepare your slide:
| Element | Description | Tips |
|---|---|---|
| Rectangles | Four rectangles with varying heights on the left | Keep equal gaps between each rectangle |
| Text Boxes | Two text boxes on the right side | Use Playfair Display font, size 54 |
Filling Rectangles with Photos Using Merge Shapes
One of the challenges is filling these rectangles with photos so that the images perfectly fit inside them. While PowerPoint’s standard “Fill with Picture” option exists, it often doesn’t provide the precise control needed for this effect.
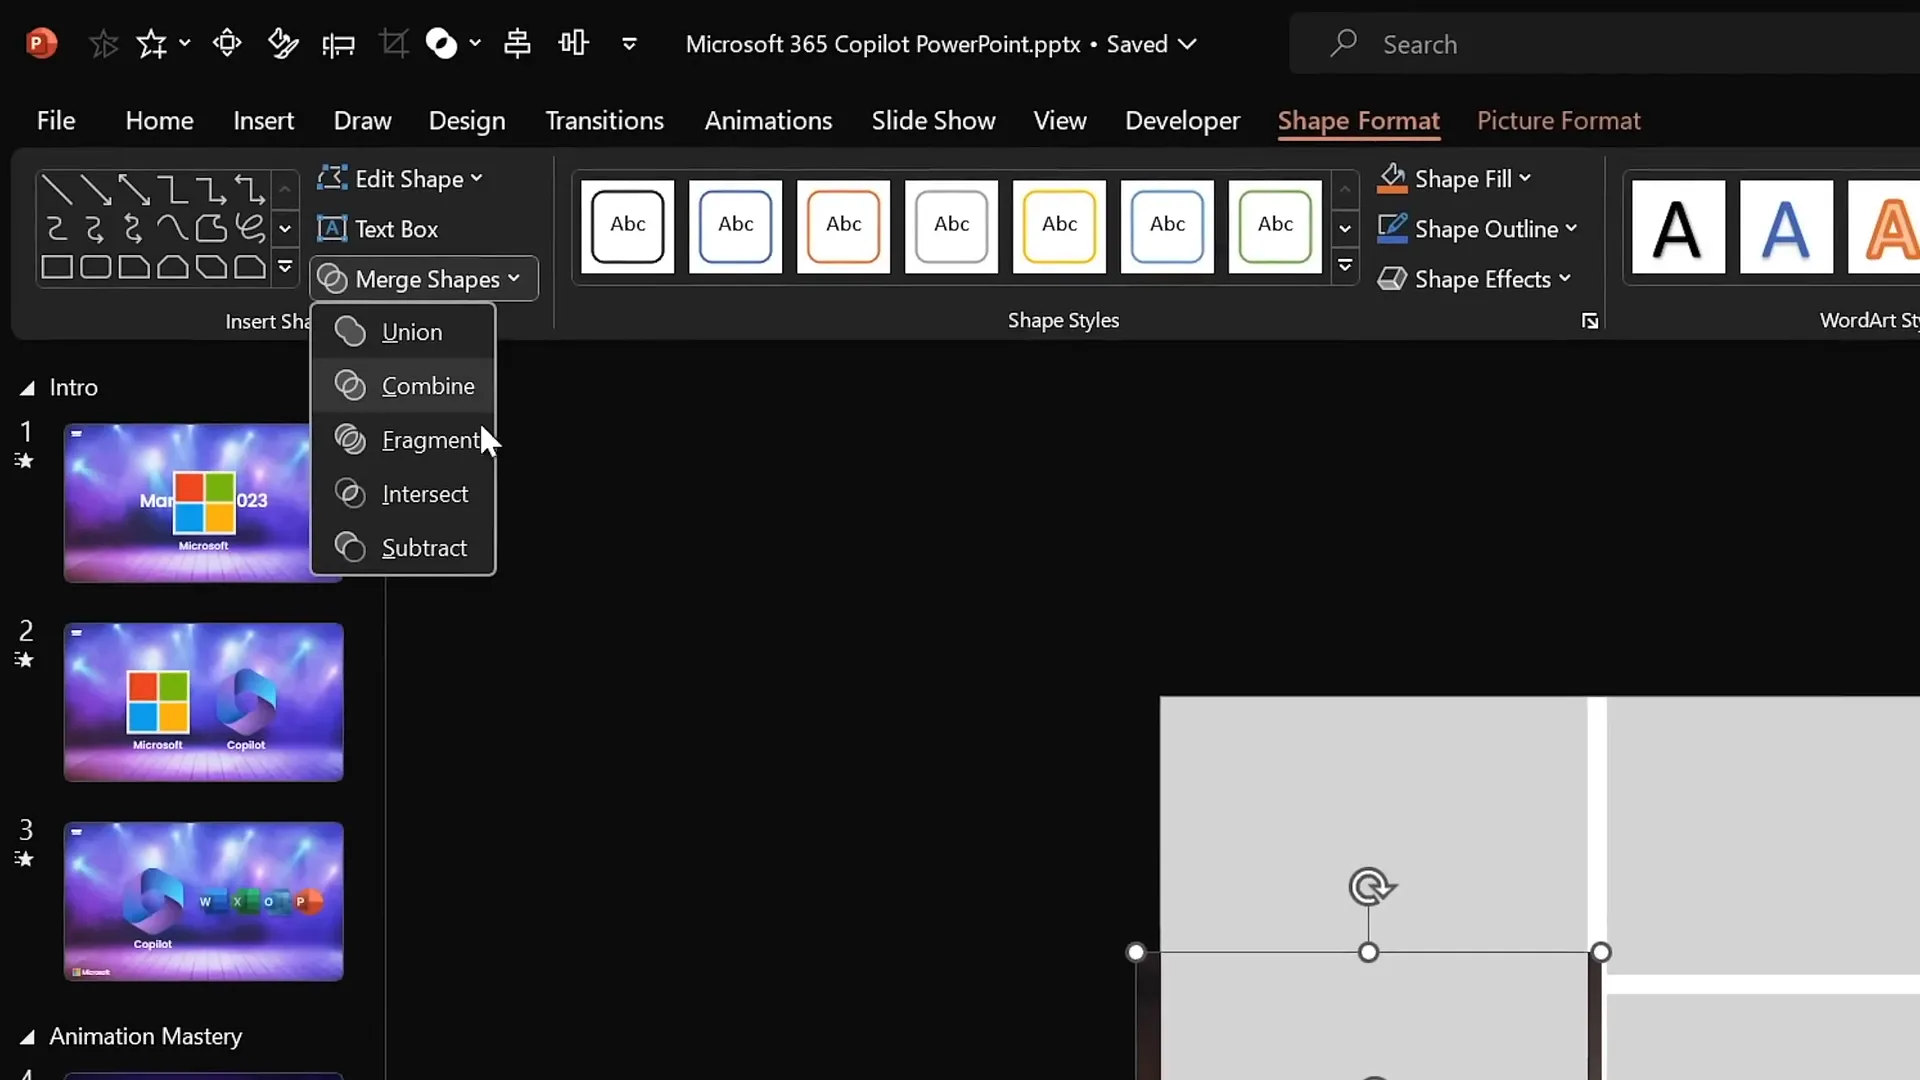
Instead, I recommend using the Merge Shapes > Intersect feature for a cleaner, more flexible approach:
- Insert your photos onto the slide. You can get free, high-quality images from Unsplash.
- Position each photo over a rectangle where you want it to appear.
- Send the photo to the back (right-click > Send to Back).
- Select the photo first, then hold down the Shift key and select the rectangle.
- Go to the Shape Format tab, click Merge Shapes, and choose Intersect.
- This crops the photo perfectly inside the rectangle’s shape.
You can adjust the photo’s position inside the rectangle by selecting it and using the Crop tool to move or resize the visible area.
Repeat this process for each rectangle until all are filled with your desired photos.
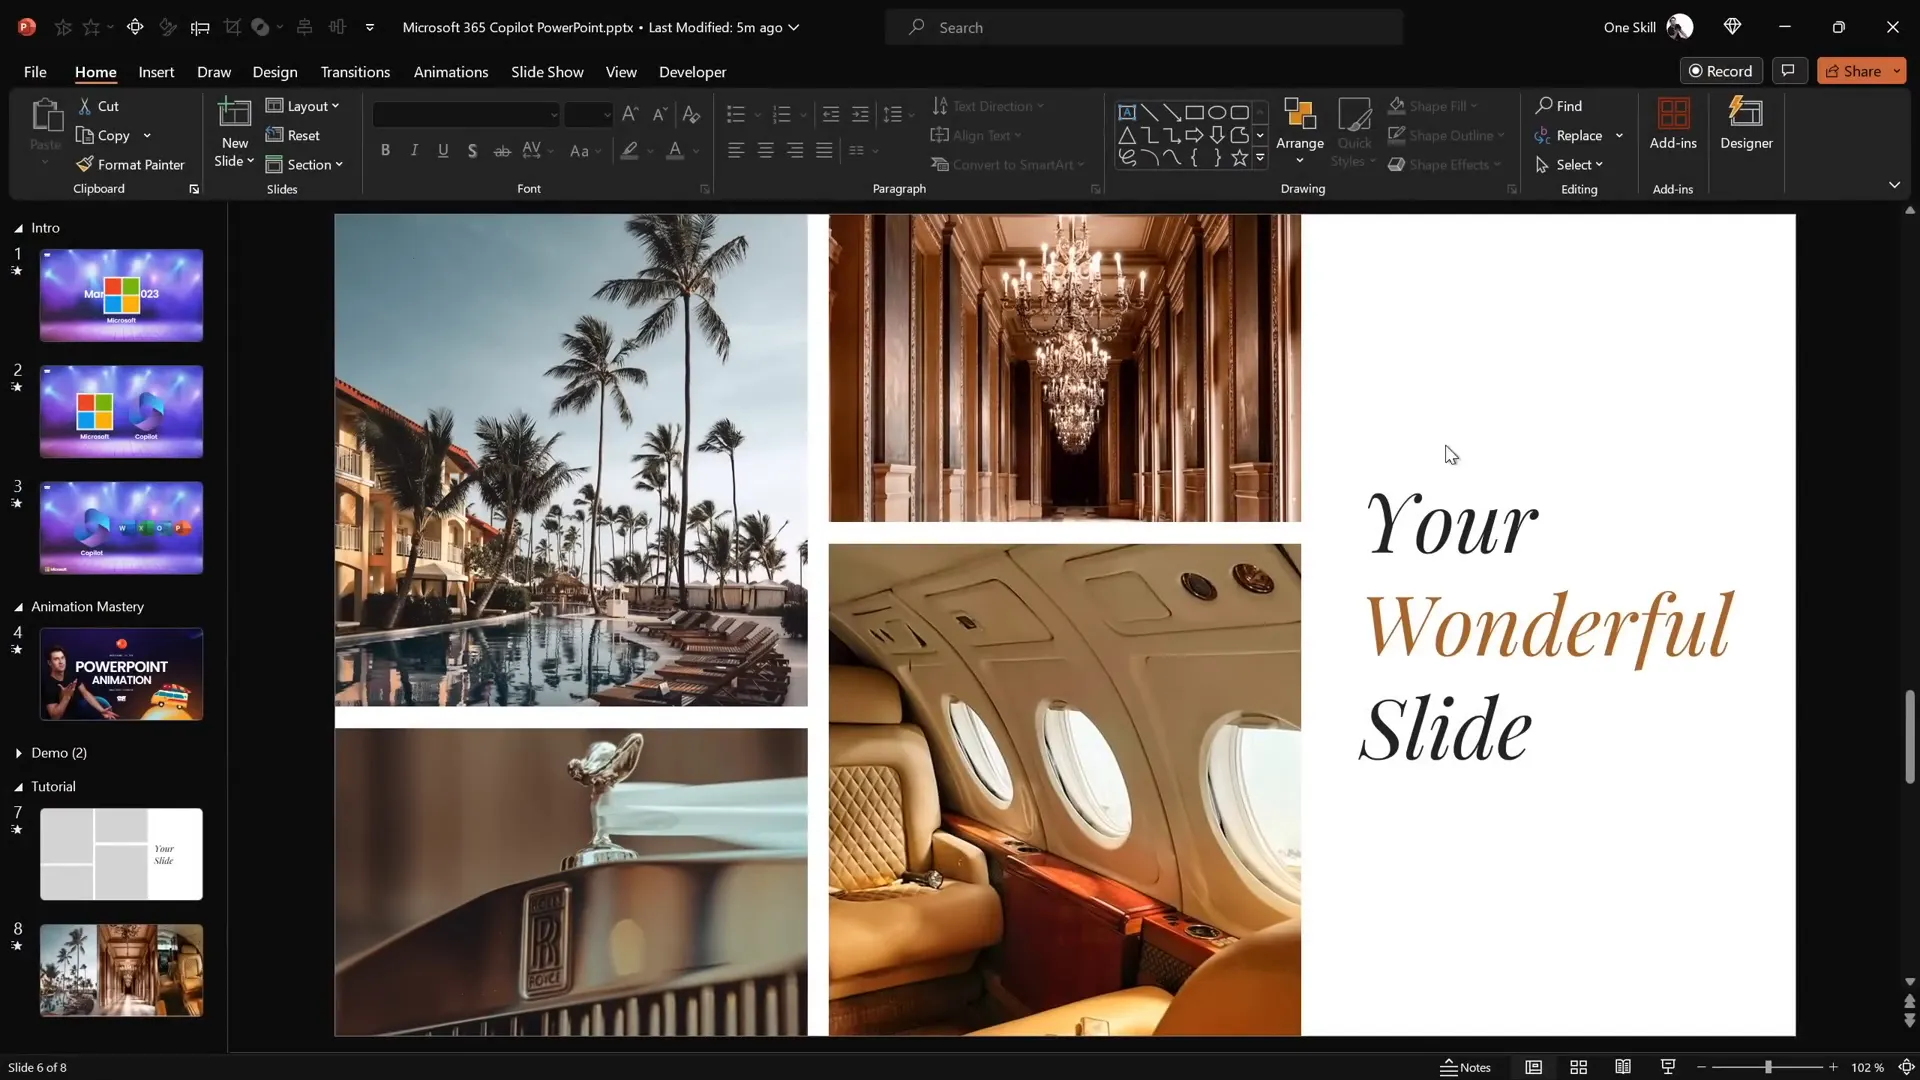
Working with Text Boxes and Font Choices
With the photos perfectly cropped, it’s time to work on the text boxes on the right side of the slide. This part creates the text reveal animation effect.
Here’s the step-by-step process:
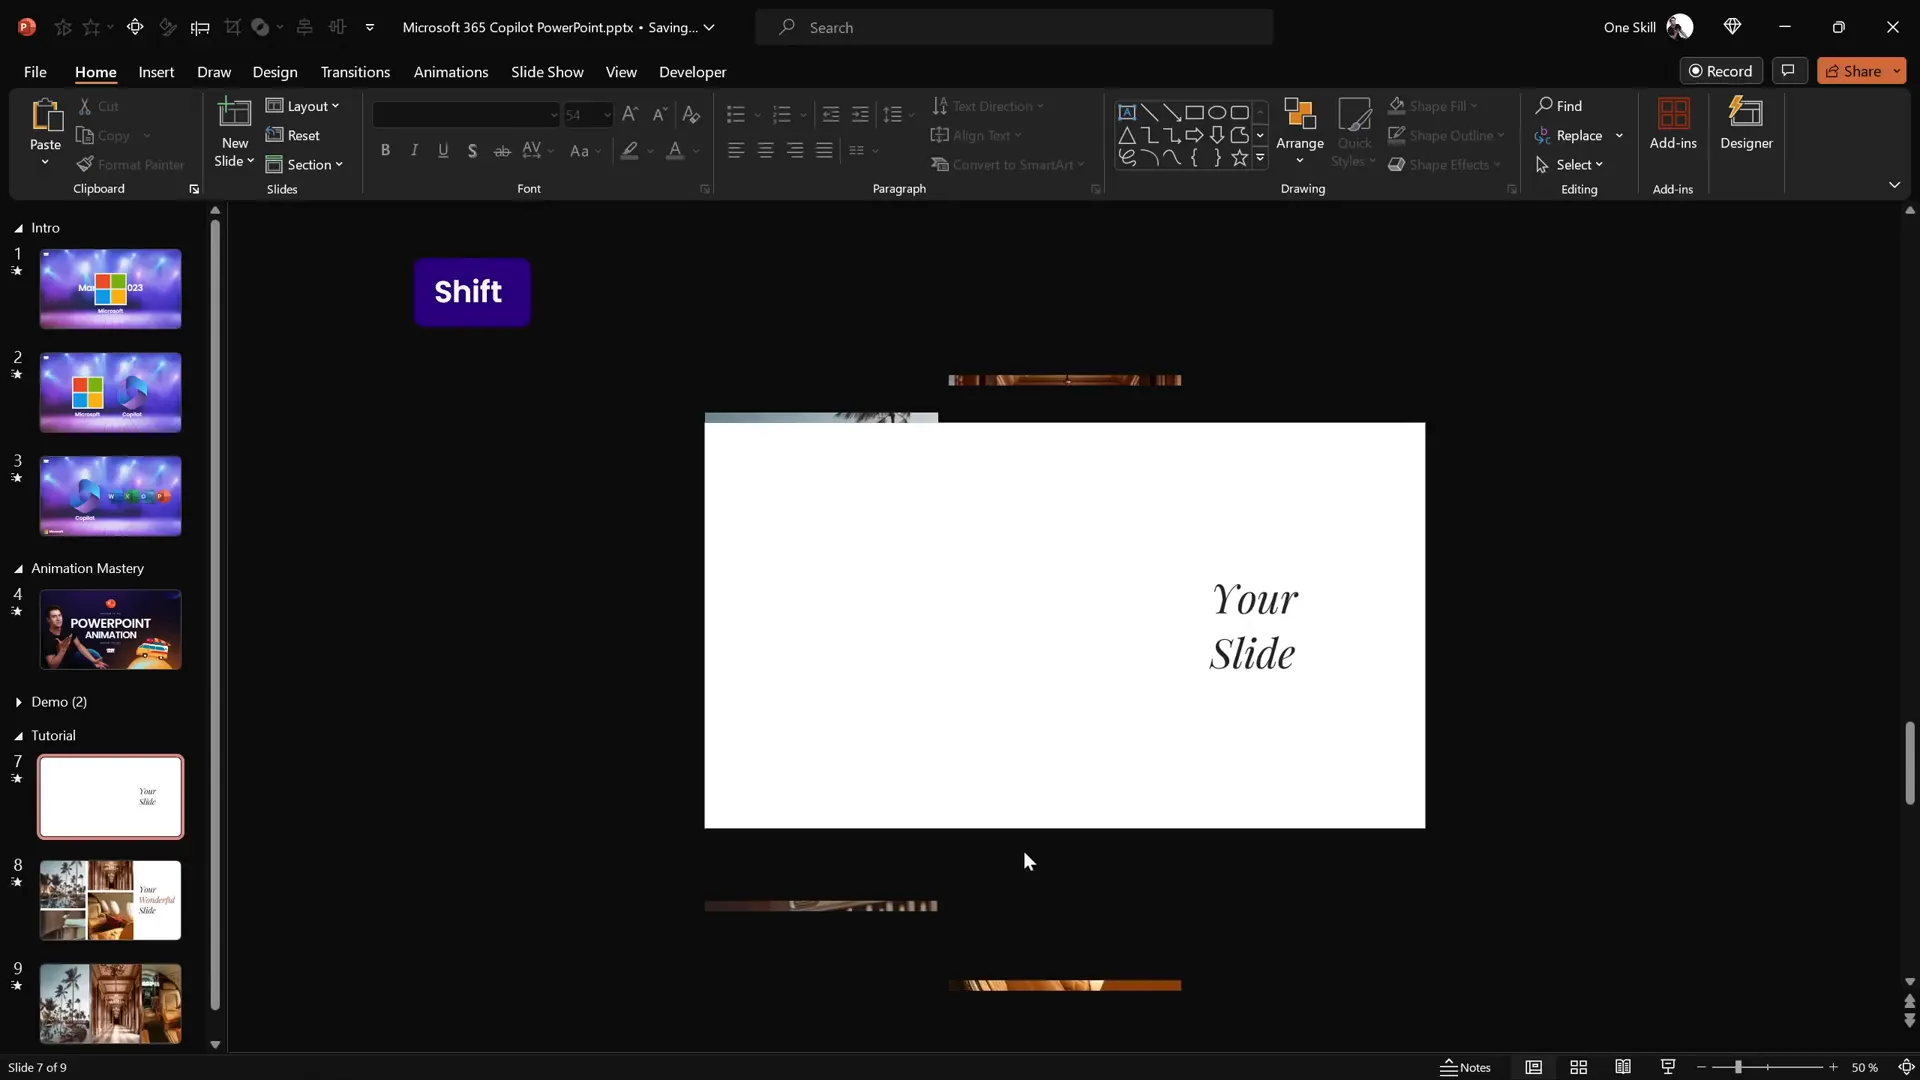
- Duplicate one of the existing text boxes by selecting it and pressing Ctrl + Shift while dragging it down in a straight line.
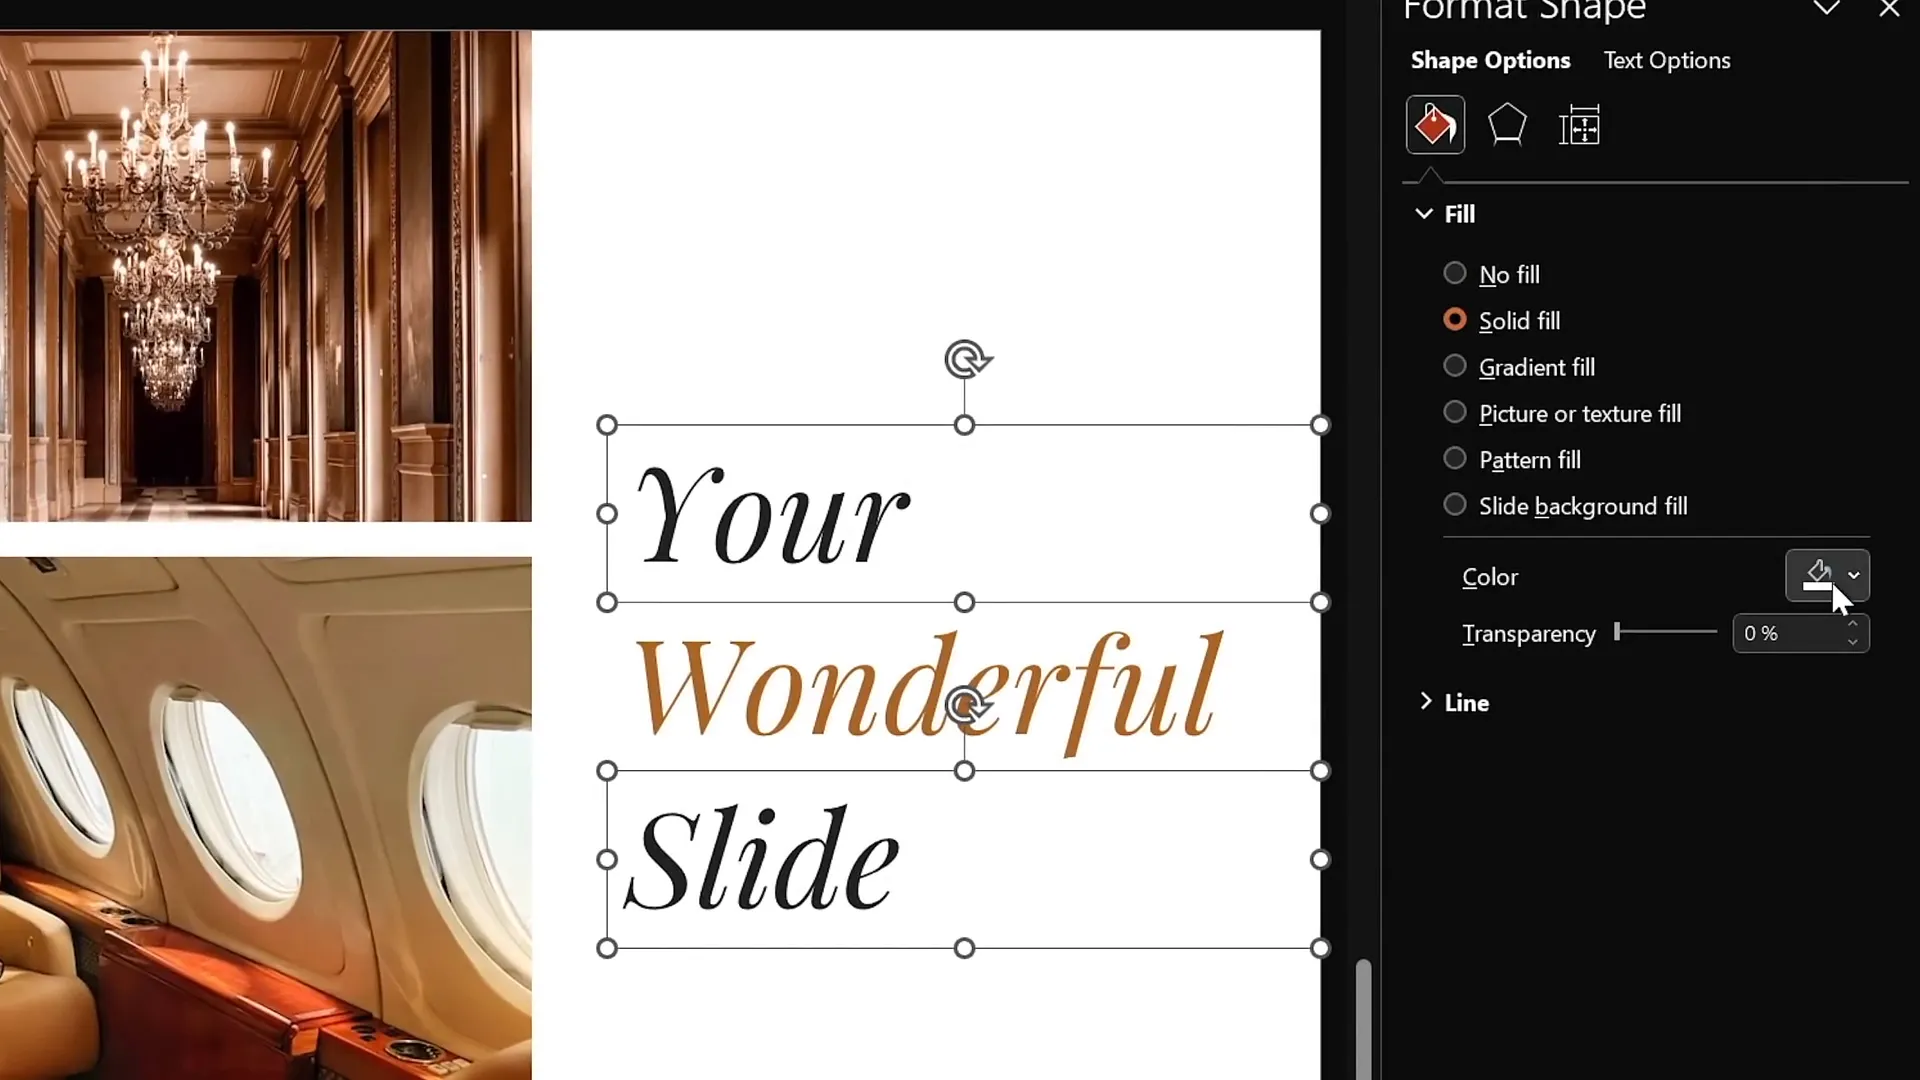
- Change the text of the middle text box to “Wonderful” (or your preferred word).
- Adjust the text color to a visually appealing shade that complements your slide’s design.
- Select all three text boxes and use the Distribute Vertically option to evenly space them.
- Group the three text boxes together and align them to the center of the slide for balance.
- Ungroup the text boxes to continue editing.
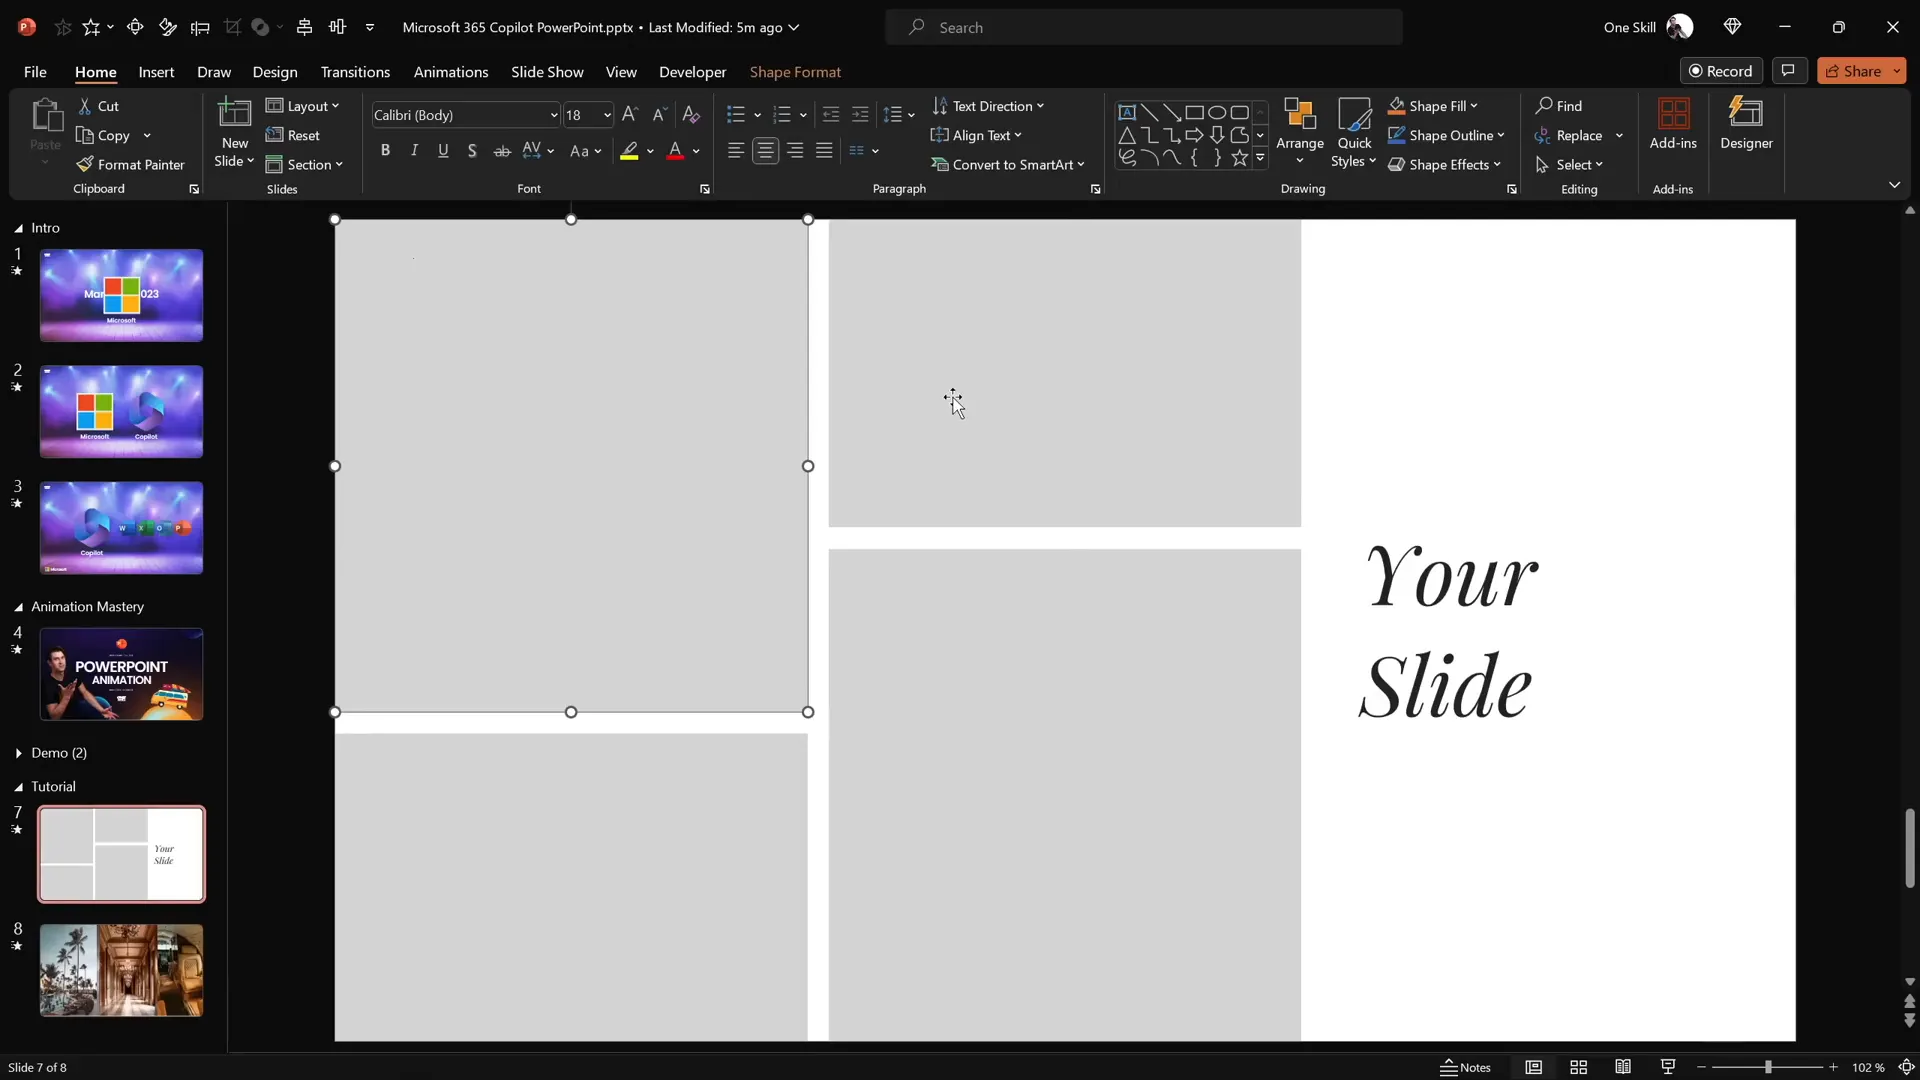
- Add a solid white fill to the top and bottom text boxes to prepare for the reveal effect.
- Send these filled text boxes to the front, so they can mask the middle text box during animation.
This setup allows the middle text box to be hidden initially and then revealed smoothly with the morph animation.
Applying the Morph Transition for Animation
The secret ingredient behind these smooth animations is PowerPoint’s Morph transition. This transition automatically animates movement, resizing, and transformation of objects between two slides.
Here’s how to apply it:
- Duplicate the completed slide to create two identical slides.
- On the second slide, select the middle text box and hide it (either delete or make invisible).
- Move the top text box downward to the middle line of the slide.
- Move the bottom text box upward until it covers where the middle text box was.
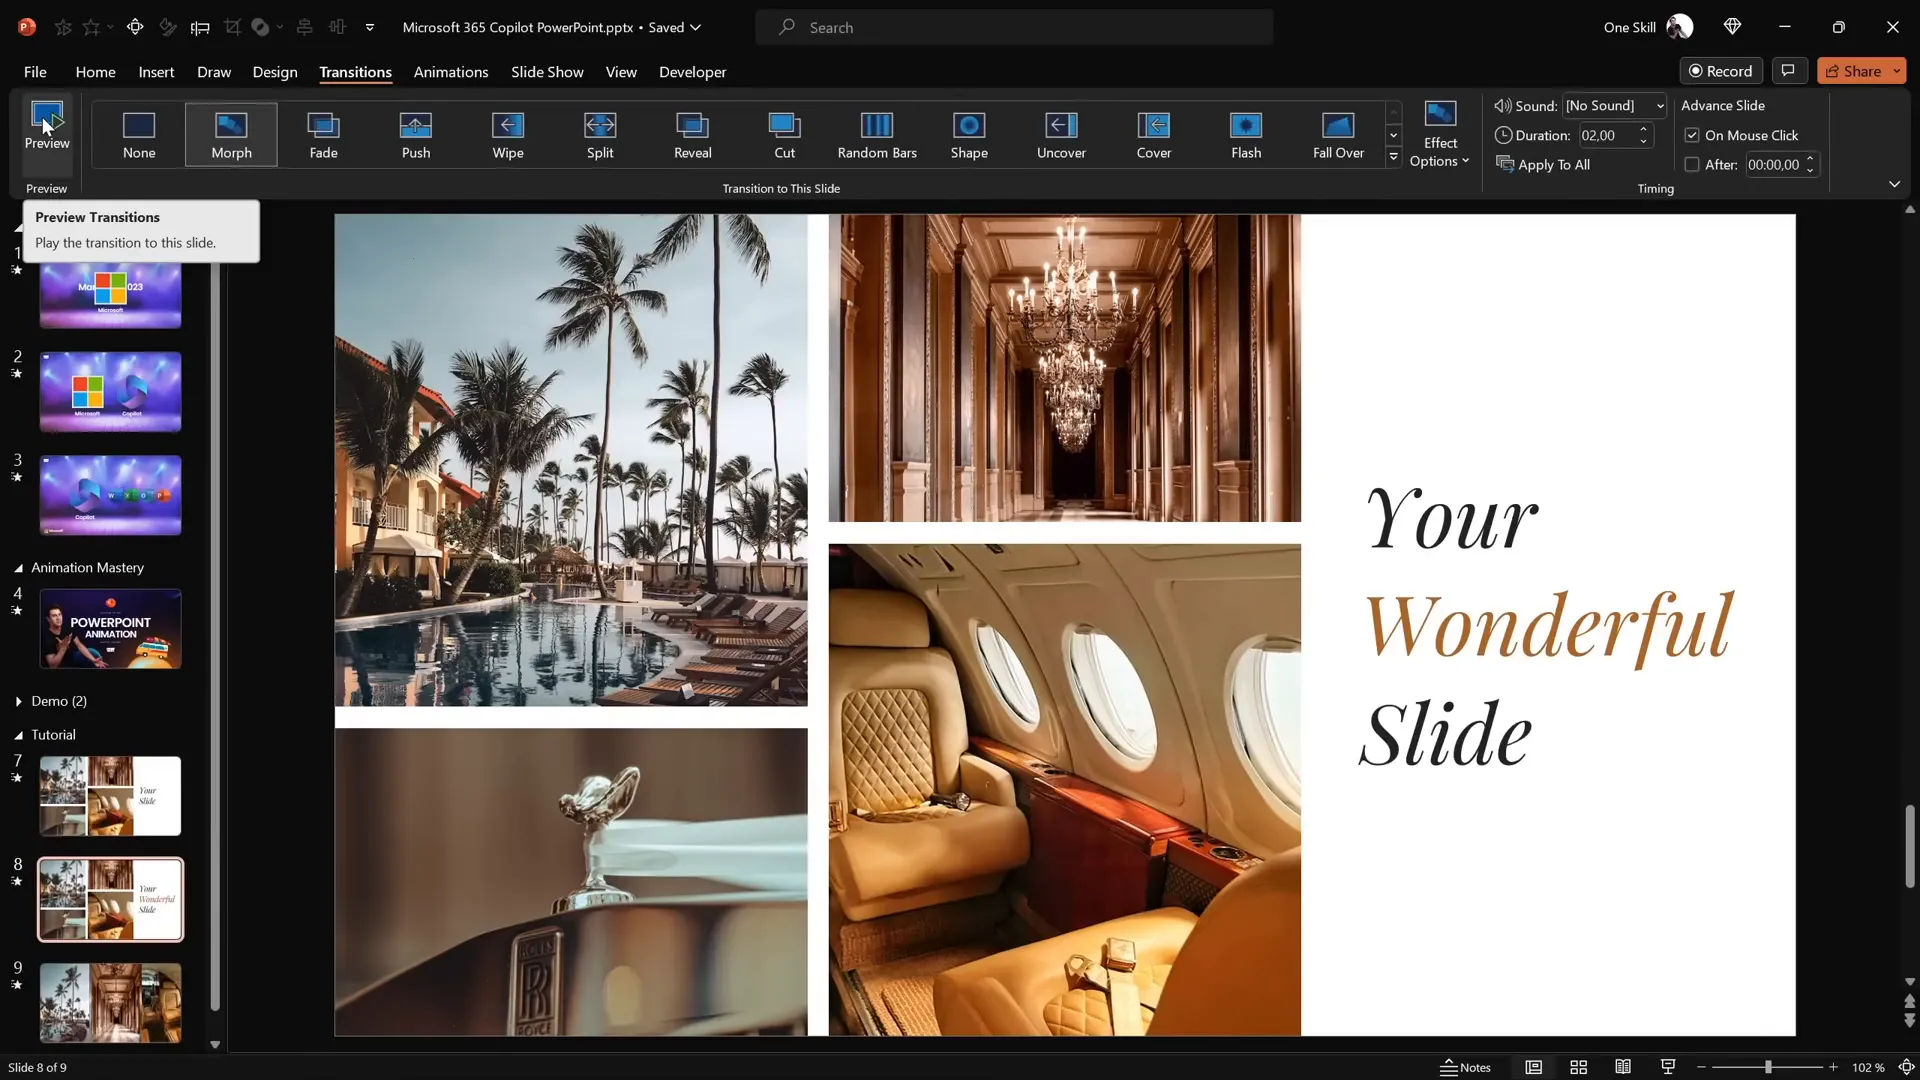
- Make sure the second slide has the Morph transition enabled (found under the Transitions tab).
- Optionally, set the first slide’s transition to Fade or leave it as is.
When you run the slideshow and transition from the first to the second slide, you’ll see the text boxes animate beautifully — the middle text is revealed as the top and bottom boxes slide into place.

Creating Animation Delays for Photos
To add extra polish and mimic the original Copilot animation, you can introduce animation delays for the photos. This means the photos won’t all animate simultaneously but will appear with slight delays, adding a dynamic, staggered effect.
Although Morph transition doesn’t have a built-in delay feature, you can simulate delays by adjusting the photos’ positions on the first slide:
- On the first slide, move some photos slightly further outside the slide boundaries compared to others.
- The photos placed further away will take longer to morph into their final position on the second slide.
- Experiment with different distances to control the timing of each photo’s animation.
This trick creates a natural staggered entrance for the images, enhancing the overall presentation quality.
Tips for Mastering PowerPoint Animation Effects
Creating smooth and professional PowerPoint animation effects requires attention to detail and thoughtful design choices. Here are some tips to help you master these animations:
- Use Morph Transition Strategically: Morph works best when objects have consistent names, shapes, and positions across slides. Use it to animate movements, resizing, and transformations seamlessly.
- Maintain Consistent Spacing: Equal gaps between shapes and text boxes ensure a balanced and visually appealing slide.
- Choose Fonts Wisely: Elegant fonts like Playfair Display add professionalism and readability. Avoid default fonts like Calibri for a more polished look.
- Leverage Merge Shapes: Use “Intersect” to crop images inside shapes precisely without distortion.
- Plan Your Animation Sequence: Simulate delays by varying object positions to avoid all elements animating simultaneously.
- Group and Ungroup Smartly: Group objects for alignment and distribution, then ungroup to animate individually.
- Preview Often: Use Slide Show mode and the Transitions preview button to check your animations frequently.
By following these tips, you can create captivating animations that engage your audience and elevate your presentations.
Frequently Asked Questions
What is the Morph transition in PowerPoint?
The Morph transition is a special slide transition in PowerPoint that animates the smooth movement, resizing, and transformation of objects between two slides. It allows you to create complex animations easily without manually animating each object.
Can I create animation delays using the Morph transition?
While Morph doesn’t have a built-in delay feature, you can simulate delays by positioning objects at different distances outside the slide on the first slide. Objects further away take longer to animate into place, creating a staggered animation effect.
How do I fill shapes with photos in PowerPoint?
You can fill shapes with photos by right-clicking the shape, selecting “Format Shape,” and choosing “Picture or texture fill.” However, for precise cropping, use the Merge Shapes > Intersect method by overlaying a photo on a shape and merging them.
What fonts work well for professional presentations?
Fonts like Playfair Display (used in this tutorial) offer an elegant and professional look. Avoid default fonts like Calibri or Cambria as they can appear generic. Choose fonts that reflect your brand and improve readability.
Is Microsoft 365 Copilot available now?
As of now, Microsoft 365 Copilot is not publicly available. However, you can start creating similar animation effects manually in PowerPoint using the techniques described here.
Conclusion
Microsoft 365 Copilot promises to revolutionize how we create presentations by automating content generation and adding professional animations. While waiting for Copilot’s public release, you can already harness PowerPoint’s powerful features to create stunning animations inspired by it.
By combining simple shapes, photo cropping with Merge Shapes, elegant typography, and the Morph transition, you can replicate the beautiful photo crop and text reveal animations that make presentations stand out.
Remember, PowerPoint animation effects don’t need to be complicated or require external tools. With creativity and practice, you can achieve impressive results that captivate your audience and communicate your message effectively.
If you want to deepen your PowerPoint animation skills, consider exploring dedicated animation courses or tutorials focused on Morph transition and advanced animation techniques.
Happy animating, and may your presentations always wow your audience!
Check out the full video: How I Made Microsoft 365 Copilot Animation in PowerPoint 😁✨


