
Are you looking to elevate your PowerPoint presentations by adding interactive elements that truly engage your audience? PowerPoint animation offers a powerful way to transform static slides into dynamic, clickable experiences that captivate and inform. In this comprehensive guide, we’ll walk you through a step-by-step tutorial on how to create an interactive PowerPoint slide featuring a clickable button that reveals a photo and spins decorative stars — all with smooth, professional animations.
Whether you’re a beginner or an intermediate PowerPoint user, this tutorial breaks down the process into manageable steps, helping you master animation triggers, motion paths, and effects that bring your slides to life. Plus, we’ll share tips on enhancing your design with shadow effects and tips to keep your animations smooth and natural.
Ready to dive in? Let’s explore the art of PowerPoint animation and learn how to make your slides truly interactive.
Table of Contents
- Getting Started: Preparing Your PowerPoint Slide
- Creating a Beautiful Shadow Effect for Your Button
- Designing a Button Press Animation with Motion Paths
- Making the Button Clickable Using Animation Triggers
- Launching a Photo with Animations
- Animating Stars to Spin for Extra Flair
- Final Tips for Interactive PowerPoint Animations
- Frequently Asked Questions
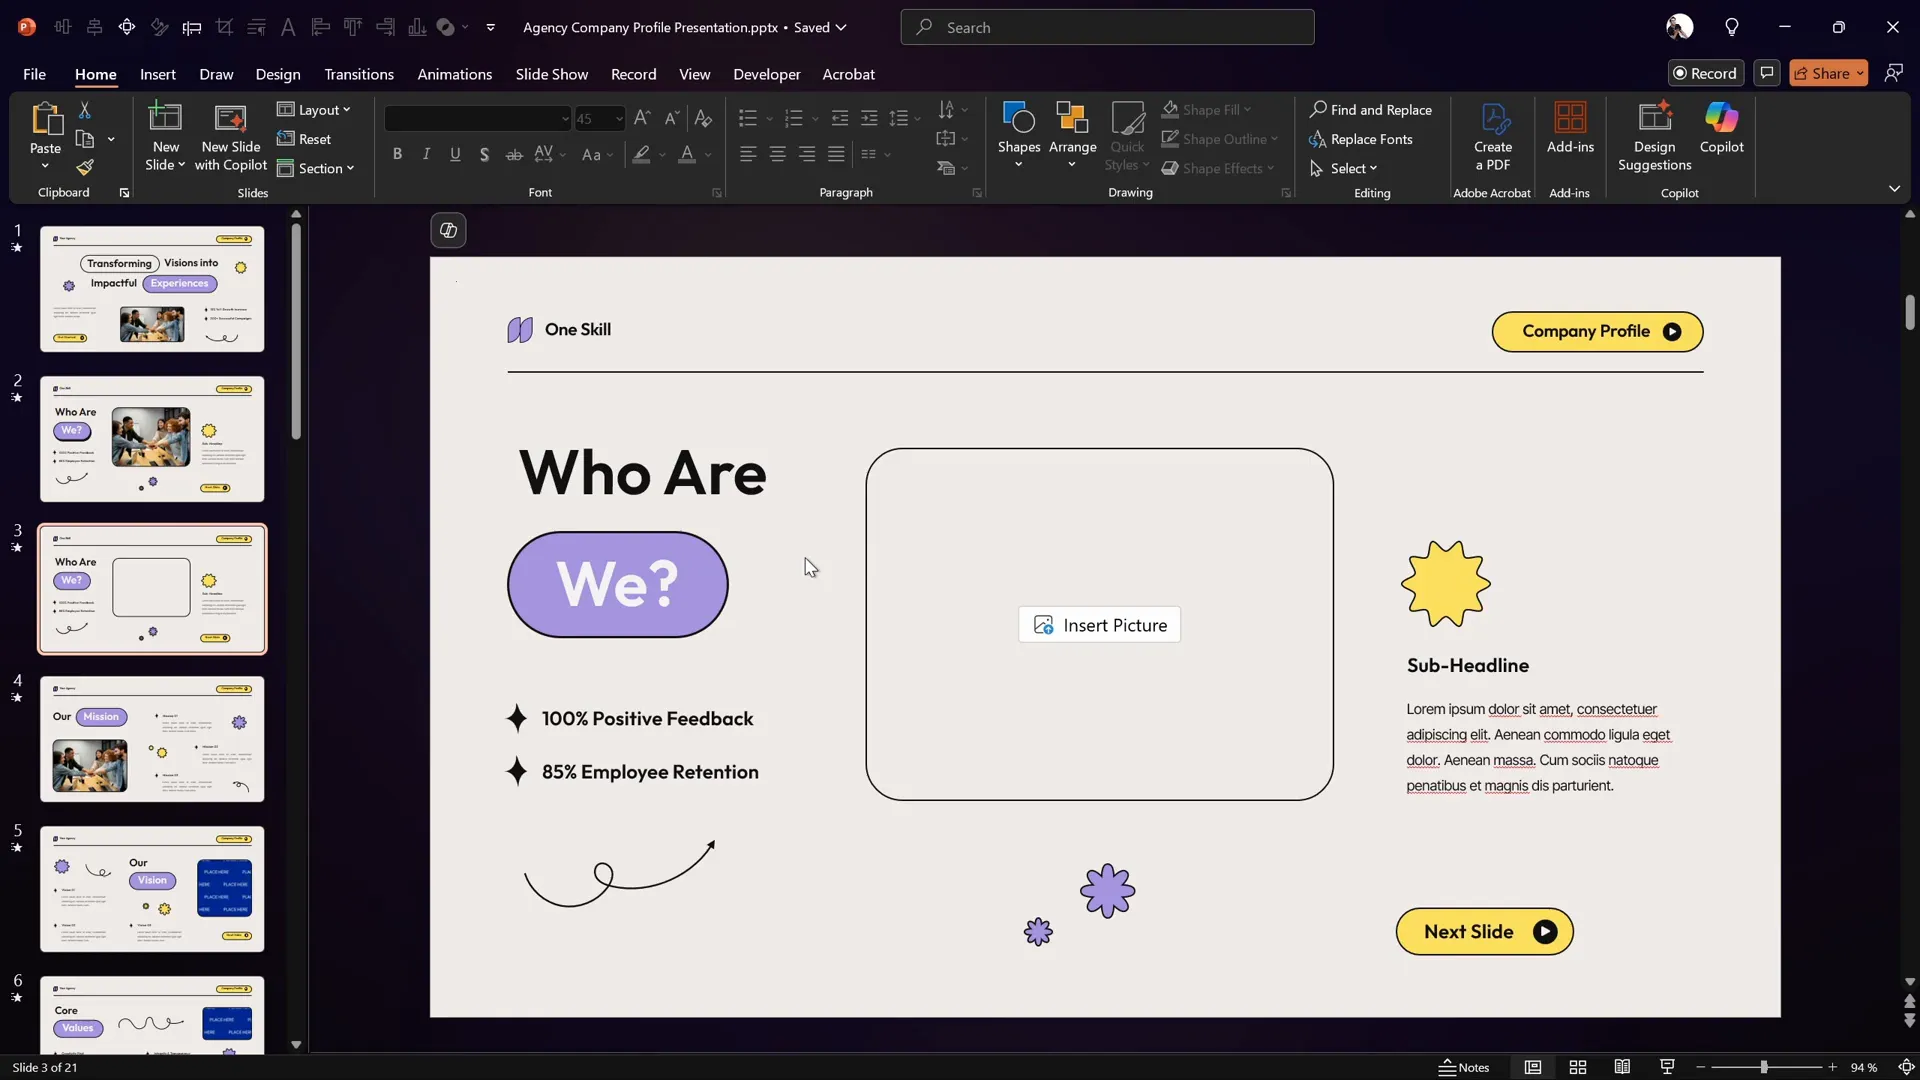
Getting Started: Preparing Your PowerPoint Slide
Before we jump into animations, it’s important to have a well-structured slide that will serve as our canvas. For this tutorial, we’ll use a beautiful PowerPoint template created by Graphiccook, which is available on Envato. This template includes useful elements like a rounded rectangle button, an image placeholder, and some decorative star shapes, which we will animate.
If you prefer, you can also create your own slide with these elements from scratch. The key components you’ll need are:
- A rounded rectangle shape to serve as your button, with text inside it.
- An image placeholder where your photo will appear.
- Small shapes (like stars) that you want to animate for added visual interest.
Having these elements ready will allow you to focus on the animation techniques without spending too much time on design.
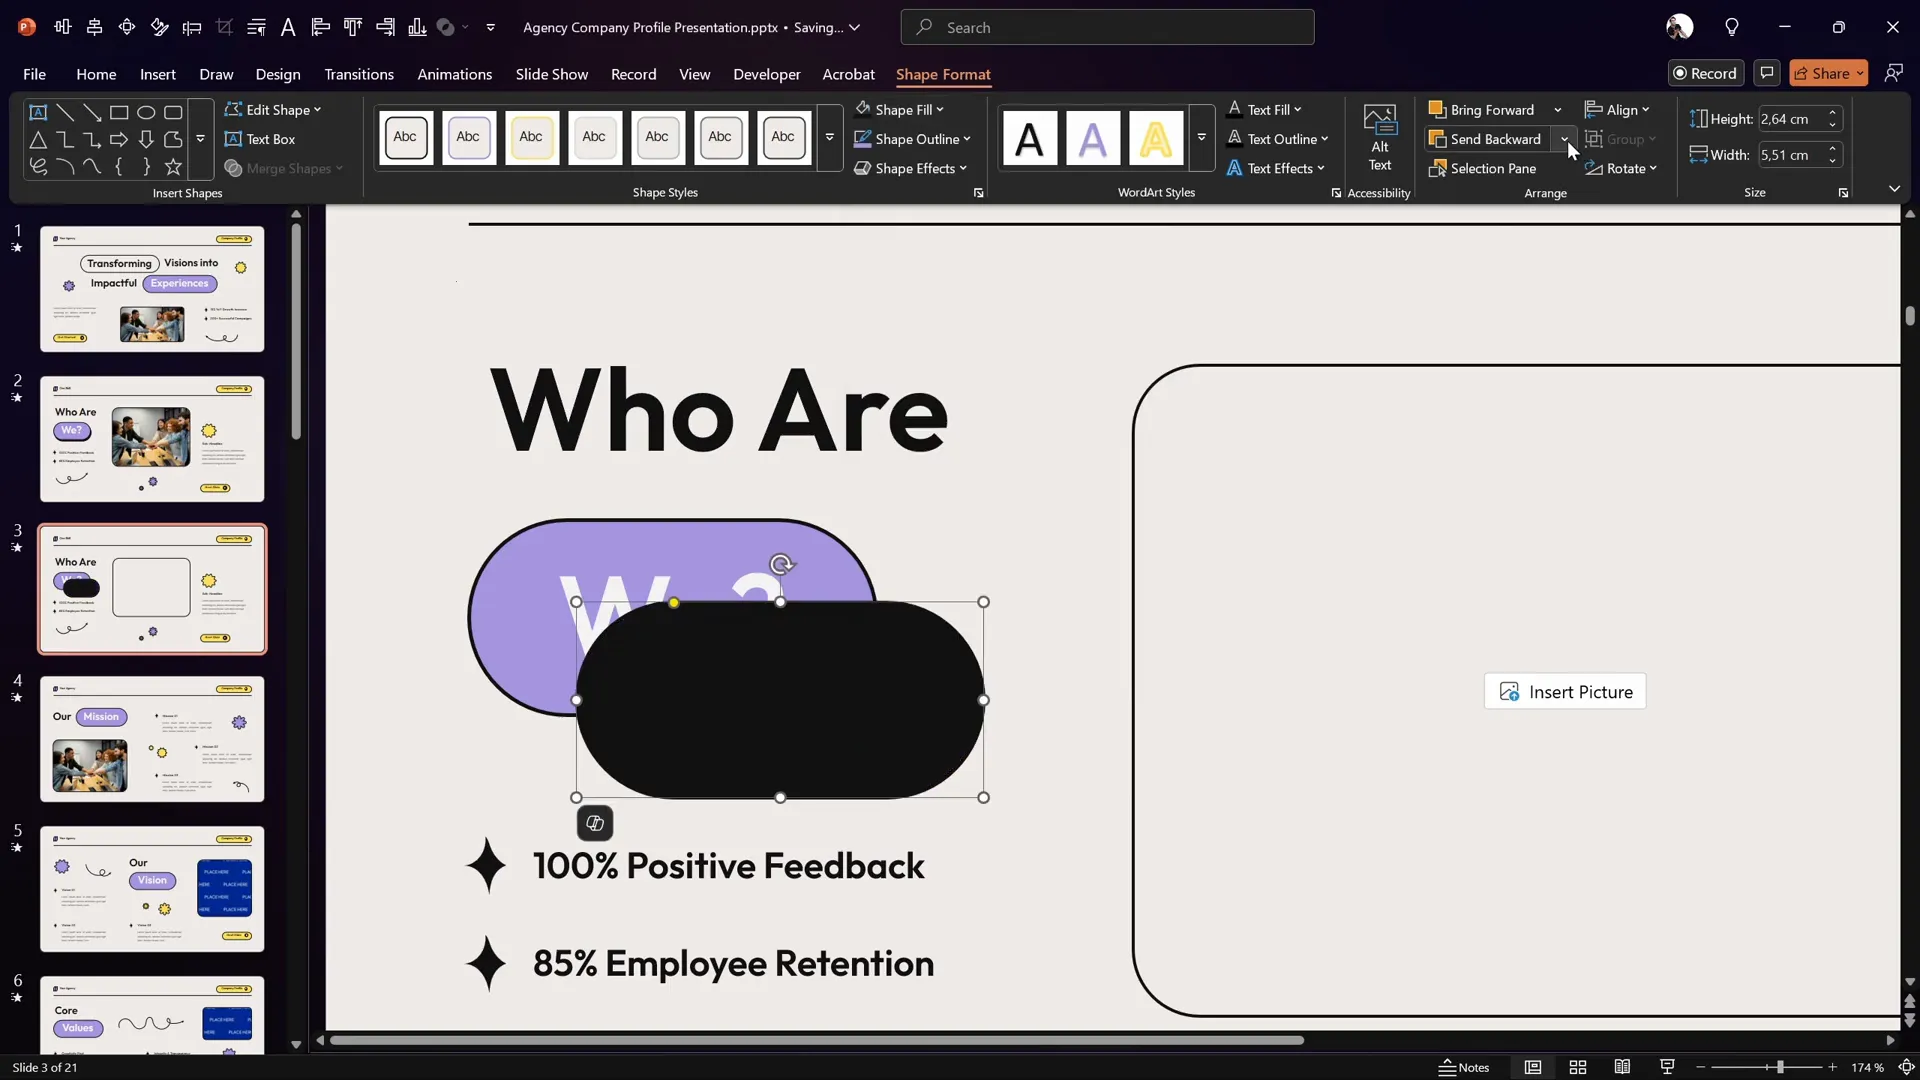
Creating a Beautiful Shadow Effect for Your Button
One subtle but impactful design enhancement is adding a shadow effect to your button. Instead of using the default shadow effect, we’ll create a custom shadow by duplicating the button shape itself. This approach gives you greater control over the shadow’s appearance and allows for more realistic positioning.
Here’s how to do it:
- Select the rounded rectangle button on your slide.
- Zoom in for better precision (optional).
- Press Ctrl + D (or Cmd + D on Mac) to duplicate the button.
- Delete the text inside the duplicated button since it will serve only as the shadow.
- Fill the duplicated shape with a solid black color to simulate the shadow.
- Send this shadow shape to the back, placing it behind the original button.
- Position the shadow shape slightly offset from the button to create a natural shadow effect.
This simple technique results in a clean, professional-looking shadow that enhances the button’s visual depth and makes it stand out on the slide.
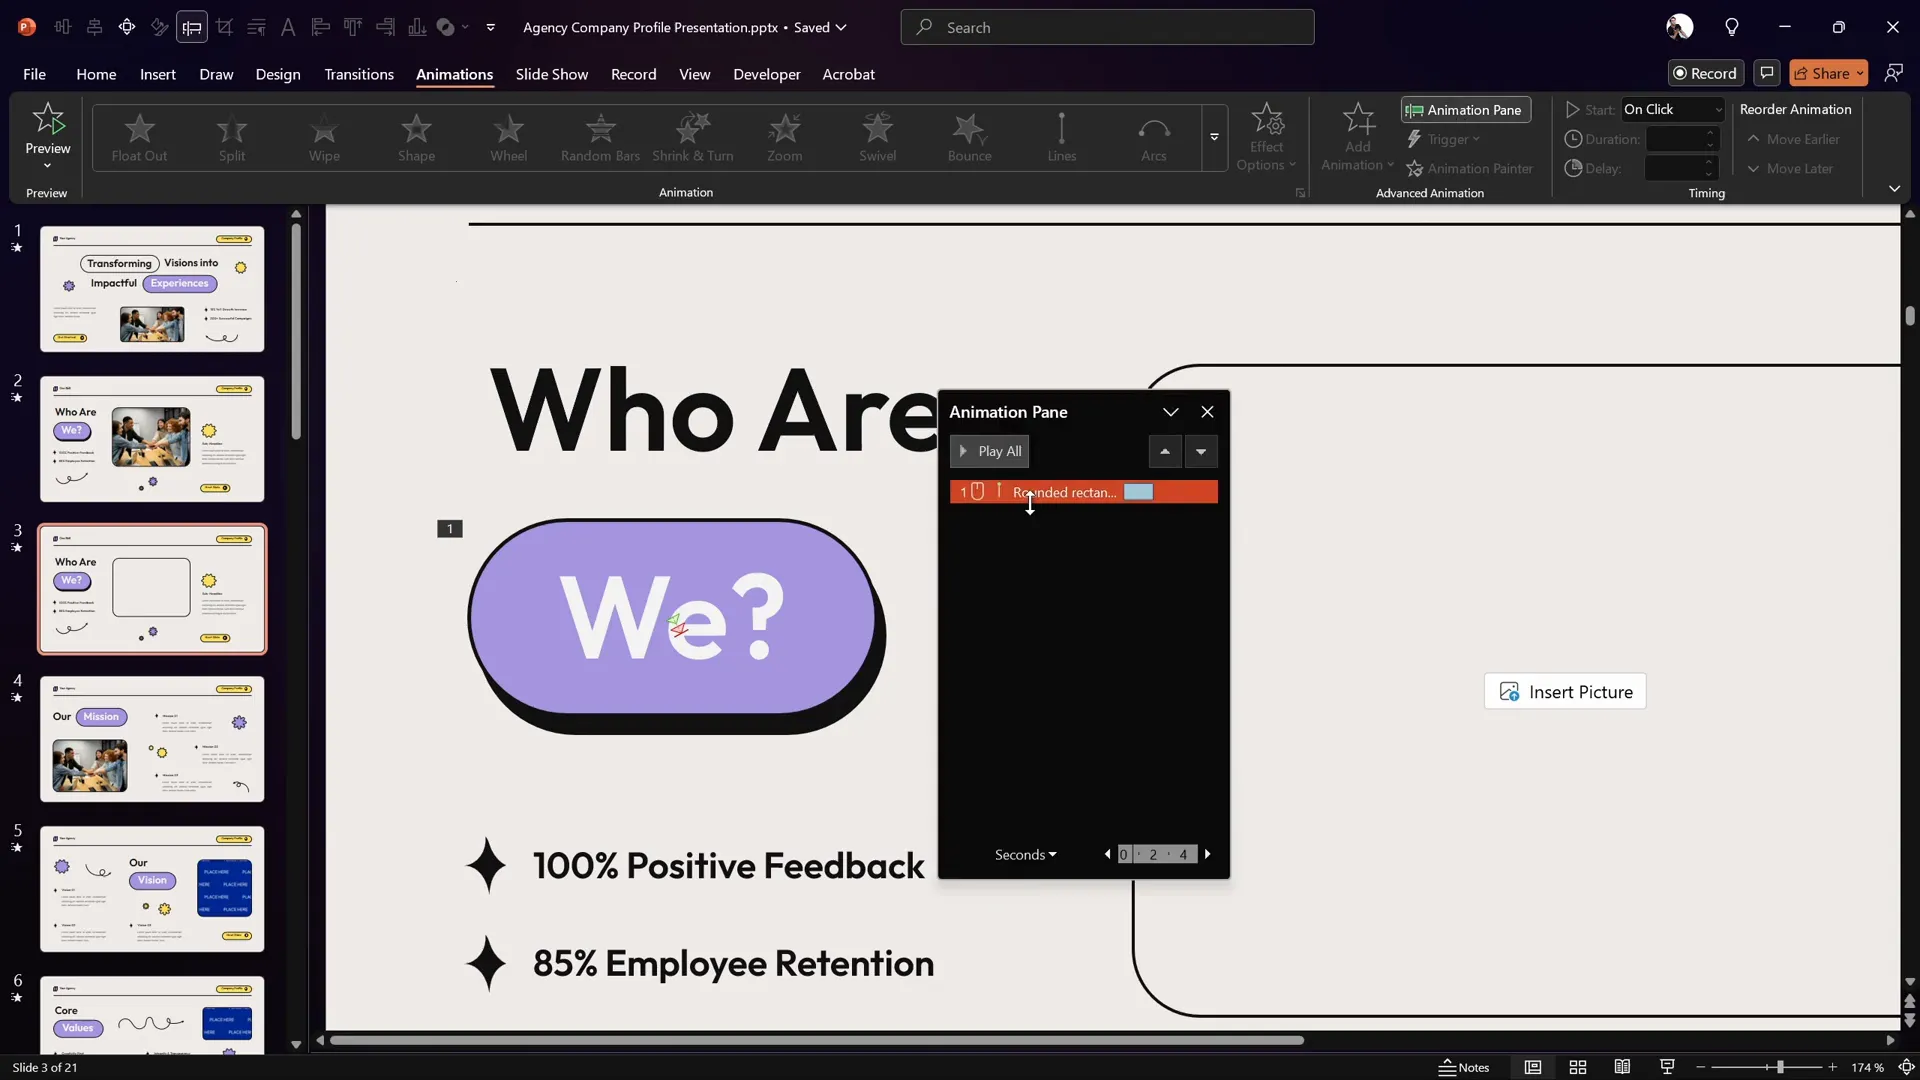
Designing a Button Press Animation with Motion Paths
Now that your button looks inviting, it’s time to add an interactive press effect. We’ll use PowerPoint’s motion path animation to simulate the button being pressed down and then released.
Follow these steps to create the button press animation:
- Select the original rounded rectangle button.
- Go to the Animations tab and click Add Animation.
- Choose Motion Paths and select the Line animation.
- Adjust the motion path so that the button moves precisely on top of the shadow shape. You can drag the red endpoint bubble to position it exactly.
- Set the animation to start With Previous and set the duration to 0.2 seconds for a quick press effect.
- Double-click the motion path animation in the Animation Pane to open Effect Options.
- Enable Auto Reverse so the button moves back to its original position automatically.
- Keep smooth start and smooth end enabled for a natural motion.
Because the motion path is very short, you might notice PowerPoint snapping the start and end points together. If this happens, simply redo the positioning step until you get the desired effect.
Try previewing your animation in Slide Show mode to see the button press in action.
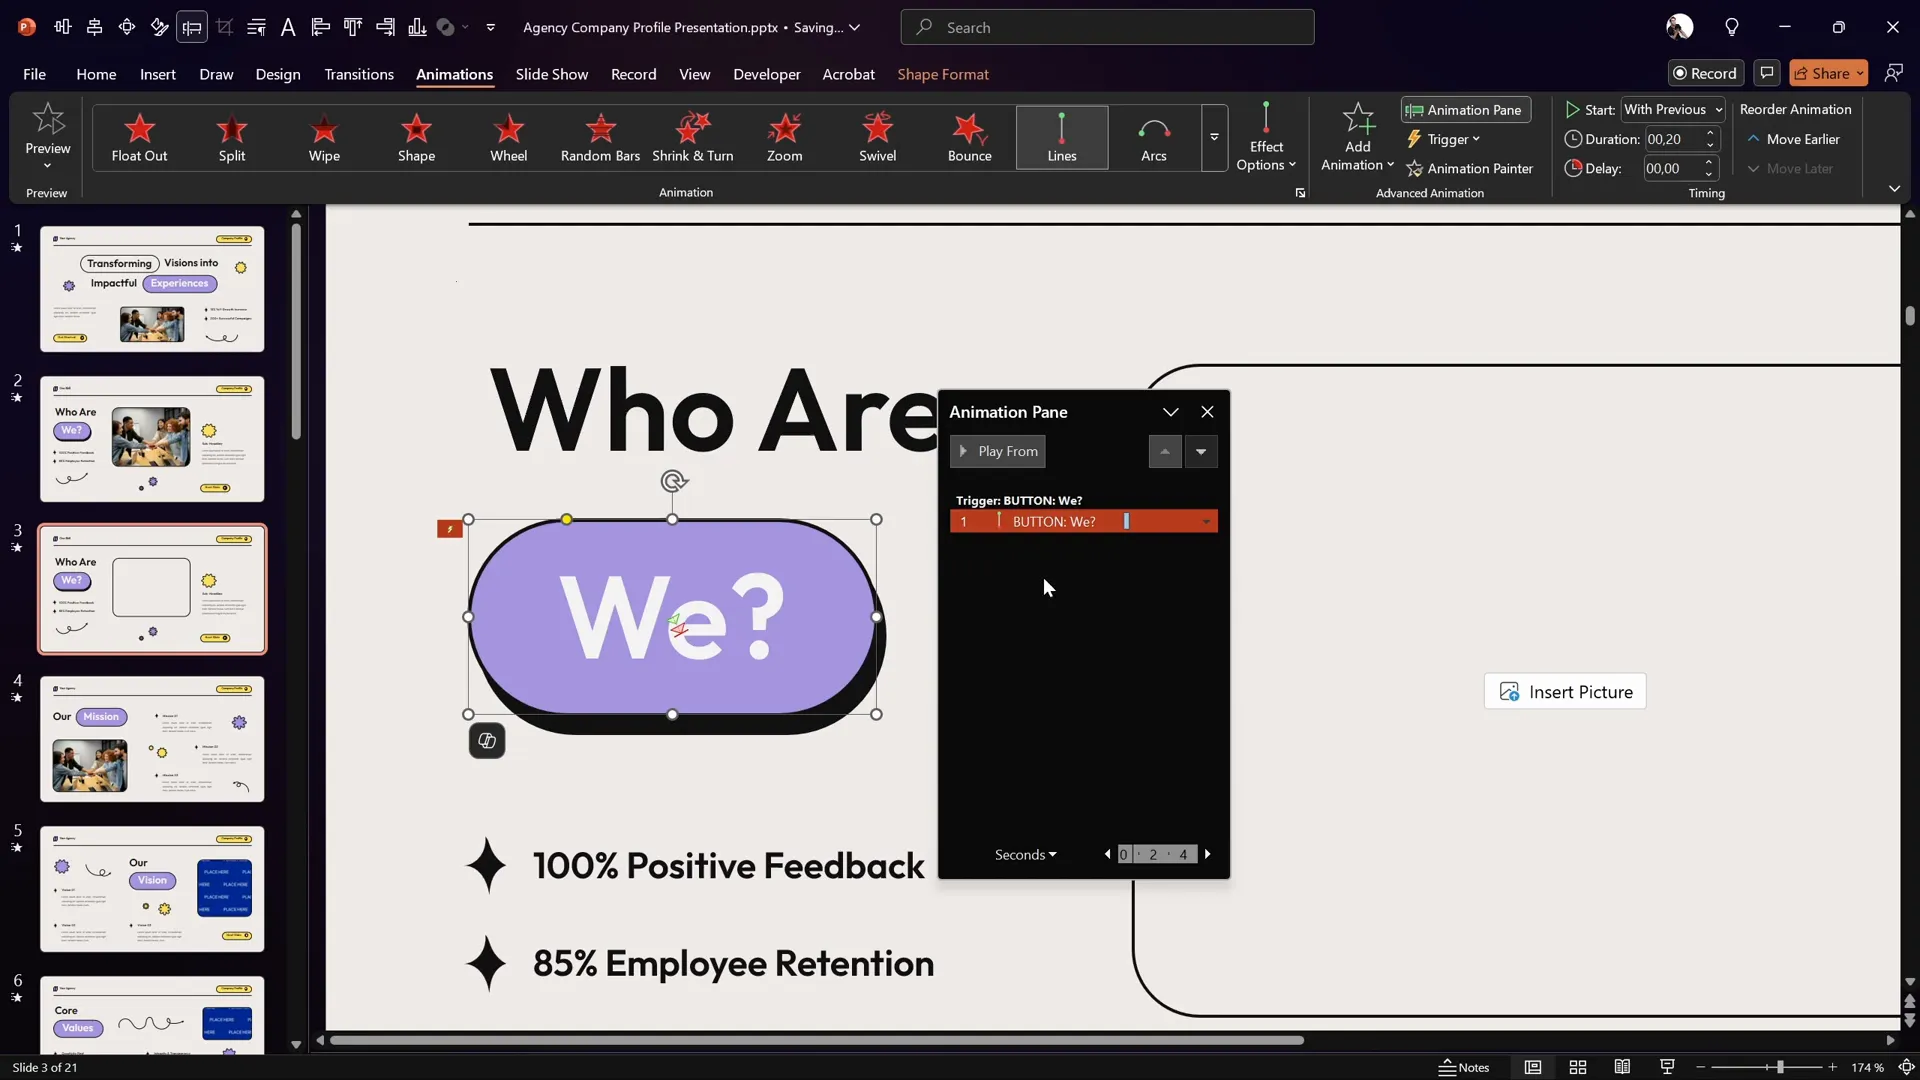
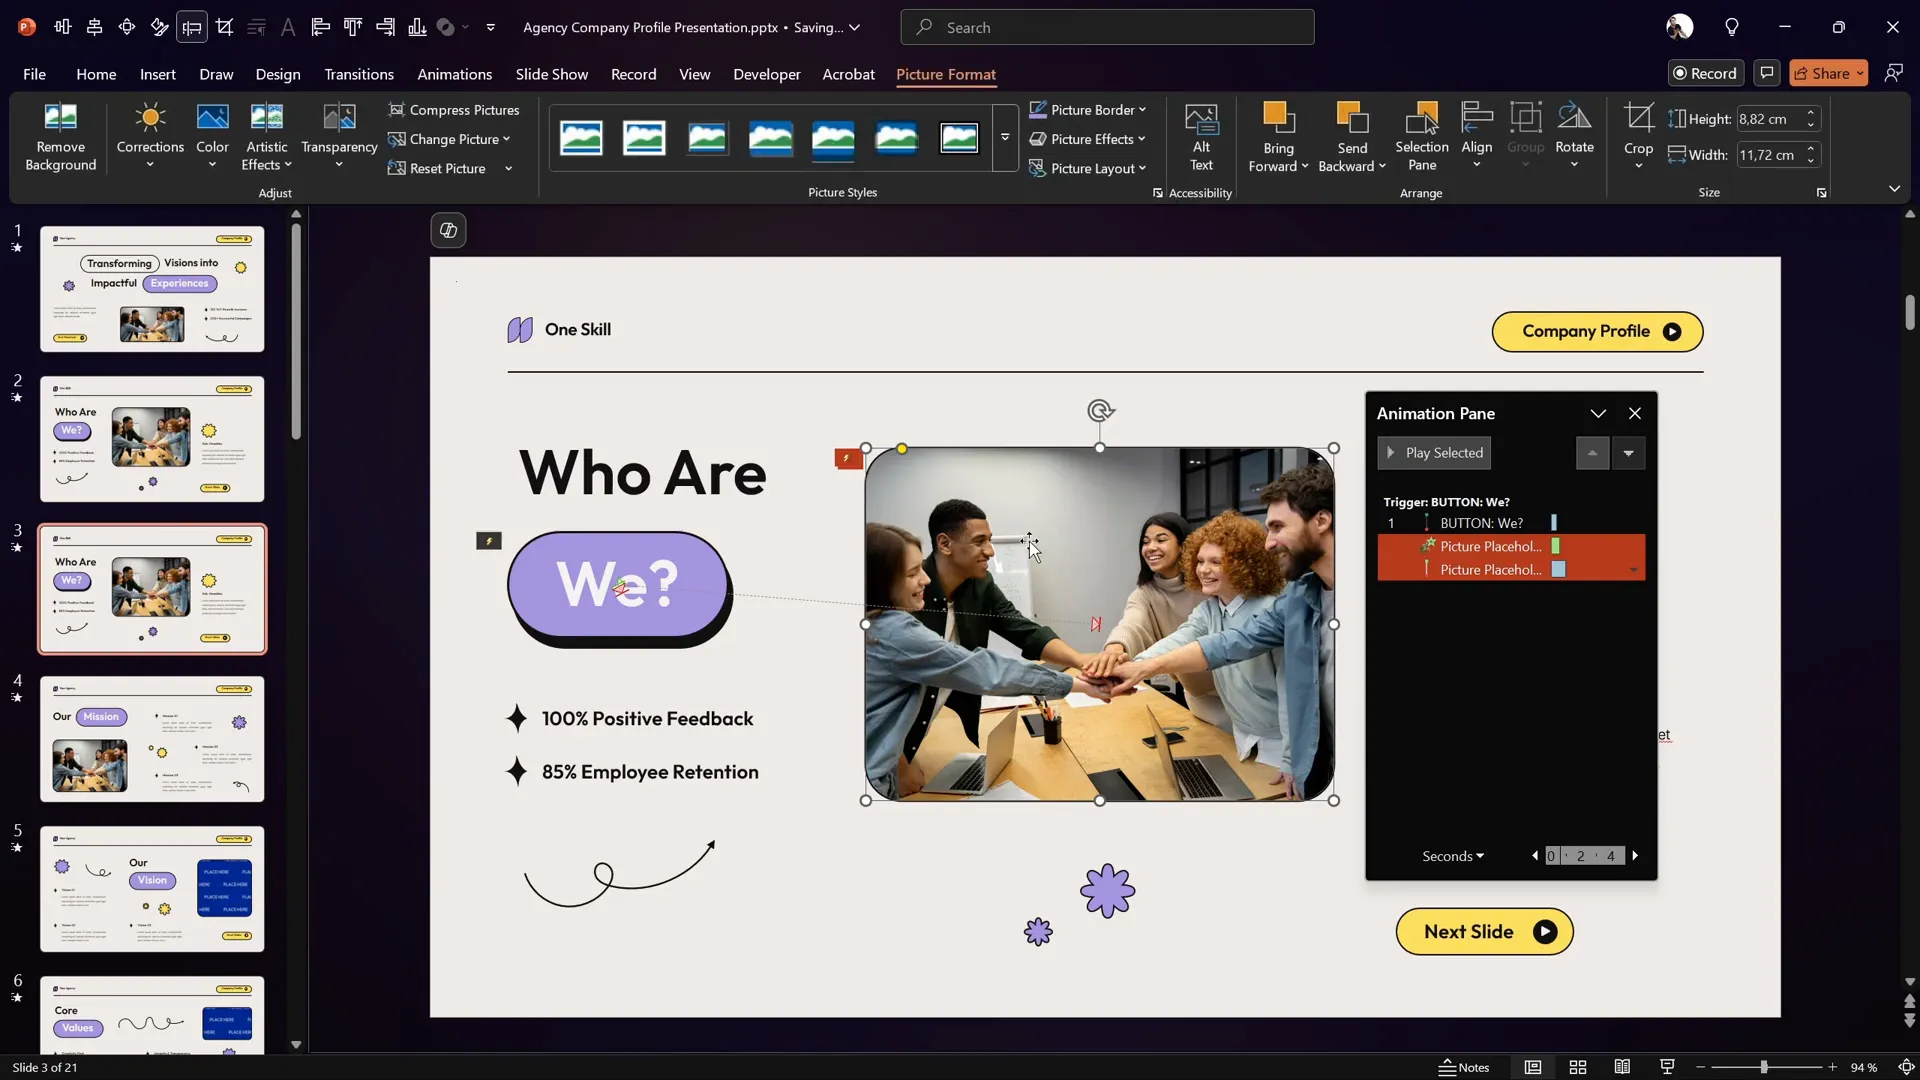
Making the Button Clickable Using Animation Triggers
By default, animations set to start With Previous will play automatically when the slide loads. To create an interactive experience, we want the button press animation to play only when the user clicks the button itself.
PowerPoint’s animation triggers allow you to link animations to specific object clicks. Here’s how to set it up:
- Open the Selection Pane (found under the Home tab > Arrange > Selection Pane) and find your button shape.
- Rename the button shape to a simple name like button for easy identification.
- Go to the Animations tab, select the button press motion path animation in the Animation Pane.
- Click on Trigger and choose On Click of, then select your renamed button.
- Confirm that the animation is set to start With Previous and now has an animation trigger.
Now, when you run the slide show, the button press animation will only play when you click the button, creating a genuine interactive effect.
Launching a Photo with Animations
Next, we’ll make the button do something meaningful by having it launch a photo when clicked. This adds an engaging visual element to your presentation and enhances the interactive experience.
First, fill the image placeholder with a photo. You can find beautiful free photos on sites like Freepik.
Here’s how to animate the photo to pop out smoothly:
- Select the photo in the image placeholder.
- Go to Animations and click Add Animation.
- Choose Basic Zoom from the Entrance animations (you may have to click More Entrance Effects).
- Set the animation to start With Previous and adjust the duration to 0.6 seconds for a smooth zoom effect.
- Drag the photo’s zoom animation into the same trigger group as the button press animation, so both animations play together on button click.
- Test the animation by clicking the button. The photo should pop out as the button presses.

Currently, the photo zooms from the center of the slide, which may look a bit disconnected from the button. To make the photo pop out from the button itself, we’ll add a motion path animation to the photo.
Steps to add a motion path to the photo:
- Select the photo.
- Add a Motion Path – Line animation.
- Drag the red endpoint bubble precisely on top of the button.
- Reverse the path direction so the photo starts at the button location and moves to its final position.
- Set the animation to start With Previous, duration to 1 second, and drag it into the same trigger group.
- Open the motion path’s effect options and set the Smooth End slider to the maximum for a soft landing effect.
- Send the photo behind all other shapes on the slide for a realistic layering effect.
Now, when you click the button, the photo will appear to pop out from the button itself with a smooth, natural motion.
Animating Stars to Spin for Extra Flair
For a bit of fun and to add visual interest, you can animate decorative stars to spin when the button is clicked. This simple touch can make your slide feel more dynamic and engaging.
Here’s how to add spin animations to the stars:
- Hold down the Shift key and select all the star shapes.
- Go to Animations and add a Spin animation.
- Set the animation to start With Previous and duration to 1 second.
- Open the animation’s effect options and add a smooth start and smooth end (0.5 seconds each) for a gentle spin.
- Drag the spin animations into the same trigger group as the button press and photo animations.
- Preview the slide show and click the button. The photo should pop out and the stars should spin simultaneously.

Final Tips for Interactive PowerPoint Animations
Congratulations! You’ve now created a fully interactive PowerPoint slide with a clickable button that animates a photo and spins decorative stars. Here are some final tips to help you polish your animations and make your presentations stand out:
| Tip | Description |
|---|---|
| Use Animation Triggers | Triggers allow you to control when animations play, making your slides interactive rather than automatic. |
| Keep Animations Smooth | Use smooth start and end settings on motion paths and spins to avoid abrupt movements. |
| Group Animations | Group related animations under the same trigger to synchronize effects. |
| Layer Objects Thoughtfully | Send objects backward or forward to create realistic depth and overlapping effects. |
| Test Frequently | Preview your animations often to ensure timing and effects look natural. |
By mastering these techniques, you’ll be able to create engaging presentations that capture your audience’s attention and communicate your message more effectively.
Frequently Asked Questions
What is a PowerPoint animation trigger?
An animation trigger is a feature in PowerPoint that allows you to start an animation based on an action, such as clicking a specific object. This creates interactive slides where animations occur only when the user initiates them.
Can I create interactive buttons without VBA or macros?
Yes! PowerPoint’s built-in animation triggers let you create clickable buttons and interactive elements without needing advanced programming or macros.
How do I make smooth motion path animations?
When setting up motion path animations, use the effect options to enable smooth start and smooth end, and adjust the sliders to control the acceleration and deceleration of the animation for natural movement.
Can I use this technique with any PowerPoint template?
Absolutely. While this tutorial uses a specific template for convenience, you can apply the same animation techniques to any slide design by creating or inserting the necessary shapes and placeholders.
Where can I find free photos and icons to enhance my slides?
Websites like Freepik offer a wide range of free photos and vector graphics that you can legally use to improve your presentations.
How do I avoid animations playing automatically on slide load?
Set animations to start On Click or use triggers linked to specific objects to prevent them from playing automatically when the slide loads.
Can I add multiple animations to one object?
Yes. PowerPoint allows you to add multiple animations to a single object, such as entrance, emphasis, and exit effects. Use the Animation Pane to manage and sequence these animations.
Is it possible to reverse an animation?
Yes. Many animation effects, like motion paths, have an Auto Reverse option to play the animation forward and then reverse it automatically, useful for simulating button presses or toggle effects.
How do I group animations under the same trigger?
In the Animation Pane, drag each animation into the same group associated with a trigger so they play simultaneously when the trigger is activated.
Can I preview animations without running the full slideshow?
Yes. PowerPoint’s Animation Pane offers a preview feature, and you can also press Shift + F5 to start the slideshow from the current slide to test animations in context.
Conclusion
PowerPoint animation is a versatile tool that can transform your presentations from static to interactive, making your message more memorable and engaging. By following this step-by-step tutorial, you’ve learned how to create a clickable button that launches a photo and spins decorative stars, all with smooth, professional animations.
Mastering animation triggers, motion paths, and effect options will allow you to customize your presentations to suit any audience or purpose. So why settle for boring slides when you can create interactive experiences that truly impress?
If you want to take your PowerPoint animation skills even further, consider exploring specialized courses and templates that offer deeper insights and professional techniques.
Happy animating!


