
Welcome to this comprehensive guide on creating beautiful full-screen slides with captivating parallax effects using PowerPoint. In this article, you will learn step-by-step how to transform your presentations by incorporating dynamic parallax animations with high-quality illustrations. Whether you are a designer, educator, or presenter, these techniques will elevate your slides to an entirely new level of professionalism and engagement.
The methods shared here are inspired by the incredible works of Studio VOR and brought to life with PowerPoint’s versatile animation tools. We’ll explore two main approaches to achieve the parallax effect: one using Motion Path animations and the other leveraging PowerPoint’s Morph transition. Along the way, you will discover where to find free, high-quality SVG illustrations perfect for this purpose, and how to customize them inside PowerPoint.
Let’s dive in and unlock the power of parallax animation in PowerPoint!

Table of Contents
- What is Parallax Animation and Why Use It in PowerPoint?
- Where to Find Quality Illustrations for Parallax Slides
- Understanding the Structure of a Parallax Slide
- Method 1: Creating Parallax Animation Using Motion Paths
- Method 2: Creating Parallax Animation Using Morph Transition
- Putting Your Skills into Practice: Building a Complete Parallax Slide
- Additional Tips and Enhancements
- Frequently Asked Questions (FAQ)
- Conclusion
What is Parallax Animation and Why Use It in PowerPoint?
Parallax animation is a visual effect where different layers of an image move at different speeds, creating an illusion of depth and immersion. In presentations, this technique can dramatically enhance the viewer’s experience by making slides more dynamic and visually engaging.
Imagine a forest scene where the trees in the foreground move faster than distant mountains and the sky in the background moves the slowest. This subtle movement brings the slide to life, captivating your audience and making your message more memorable.
PowerPoint, often underestimated for its animation capabilities, offers powerful tools that enable you to create this professional parallax effect without the need for advanced software.
Where to Find Quality Illustrations for Parallax Slides
The foundation of a great parallax slide is a full-screen illustration composed of multiple layers or groups. Each layer represents different depths in the scene — for example, forests, mountains, and sky.
One excellent resource for free, high-quality illustrations is Vecteezy.com. Many of their vector illustrations are available in SVG format, which is ideal for importing into PowerPoint while preserving editability and layer structure.
Here are some useful links to the specific illustrations used in this tutorial:
- Colorful Landscape Illustration
- Red Sunset Landscape
- Beautiful Camping Illustration
- Landscape Illustration
- Blue Forest Background
You can use these illustrations as-is or customize them to suit your presentation style. Remember, the key is to have multiple layers or grouped elements that you can animate independently to create the parallax effect.

Understanding the Structure of a Parallax Slide
Before animating, it’s crucial to understand how your illustration is structured. A typical parallax slide consists of several layers stacked on top of each other:
- Foreground Layer: This is usually the closest element to the viewer, such as trees or a forest.
- Middle Layers: These can be mountains, hills, or other mid-distance elements.
- Background Layer: Often the sky or distant landscape.
Each layer should be grouped separately in PowerPoint, enabling you to move them independently during animation. The closer the object is to the viewer, the faster it should move to simulate depth.
When selecting or creating your illustration, ensure it covers the entire slide for a full-screen immersive effect. If your illustration doesn’t cover the whole slide, you can extend it by duplicating and attaching elements at the bottom or top as needed.

Method 1: Creating Parallax Animation Using Motion Paths
The first technique to create a parallax effect involves using PowerPoint‘s Motion Paths animation feature. This method gives you precise control over how each layer moves.
Here’s how to do it step-by-step:
Step 1: Prepare Your Slide and Layers
Import your full-screen illustration into PowerPoint. Convert the SVG illustration to shapes by right-clicking and selecting Convert to Shape. This allows you to ungroup and manipulate individual elements.
Next, duplicate your background layer and attach it at the bottom of your slide to extend the scene. You can copy the color from a forest layer and fill a rectangle to match, then group these two elements into one big forest group. This will ensure the forest layer covers the entire slide when animated.

Step 2: Applying Motion Path Animations
Select the forest group and go to the Animations tab. Choose the Motion Paths animation and select the Line path. Set the direction upwards so the forest moves up and covers the initial illustration.
Adjust the ending position of the motion path carefully to make sure the forest covers the entire slide without leaving gaps. You can temporarily change the fill color of elements to help visualize the coverage.

Step 3: Animate Other Layers with Different Speeds
Use the Animation Painter tool to copy the forest animation to other layers like mountains. However, adjust the motion path distance for each layer to simulate depth:
- Close layers (e.g., forest) move the farthest and fastest.
- Middle layers (e.g., red mountains) move less distance and slower.
- Distant layers (e.g., orange mountains) move the least and slowest.
This differential movement creates the parallax illusion. You can experiment with distances and speeds to find what looks best for your scene.

Step 4: Preview and Fine-Tune
Play the animation to preview the effect. You should see the layers moving smoothly at different speeds, creating a realistic depth effect. If some elements move beyond the slide boundaries, don’t worry — PowerPoint hides anything outside the slide area during presentation.
To enhance the visual polish, you can add white bars or masks at the top and bottom to frame the slide neatly.
This method is straightforward and gives you detailed control over each layer’s movement. However, it has a limitation: the animation resets when you go back to the previous slide, so reverse animations are not seamless.
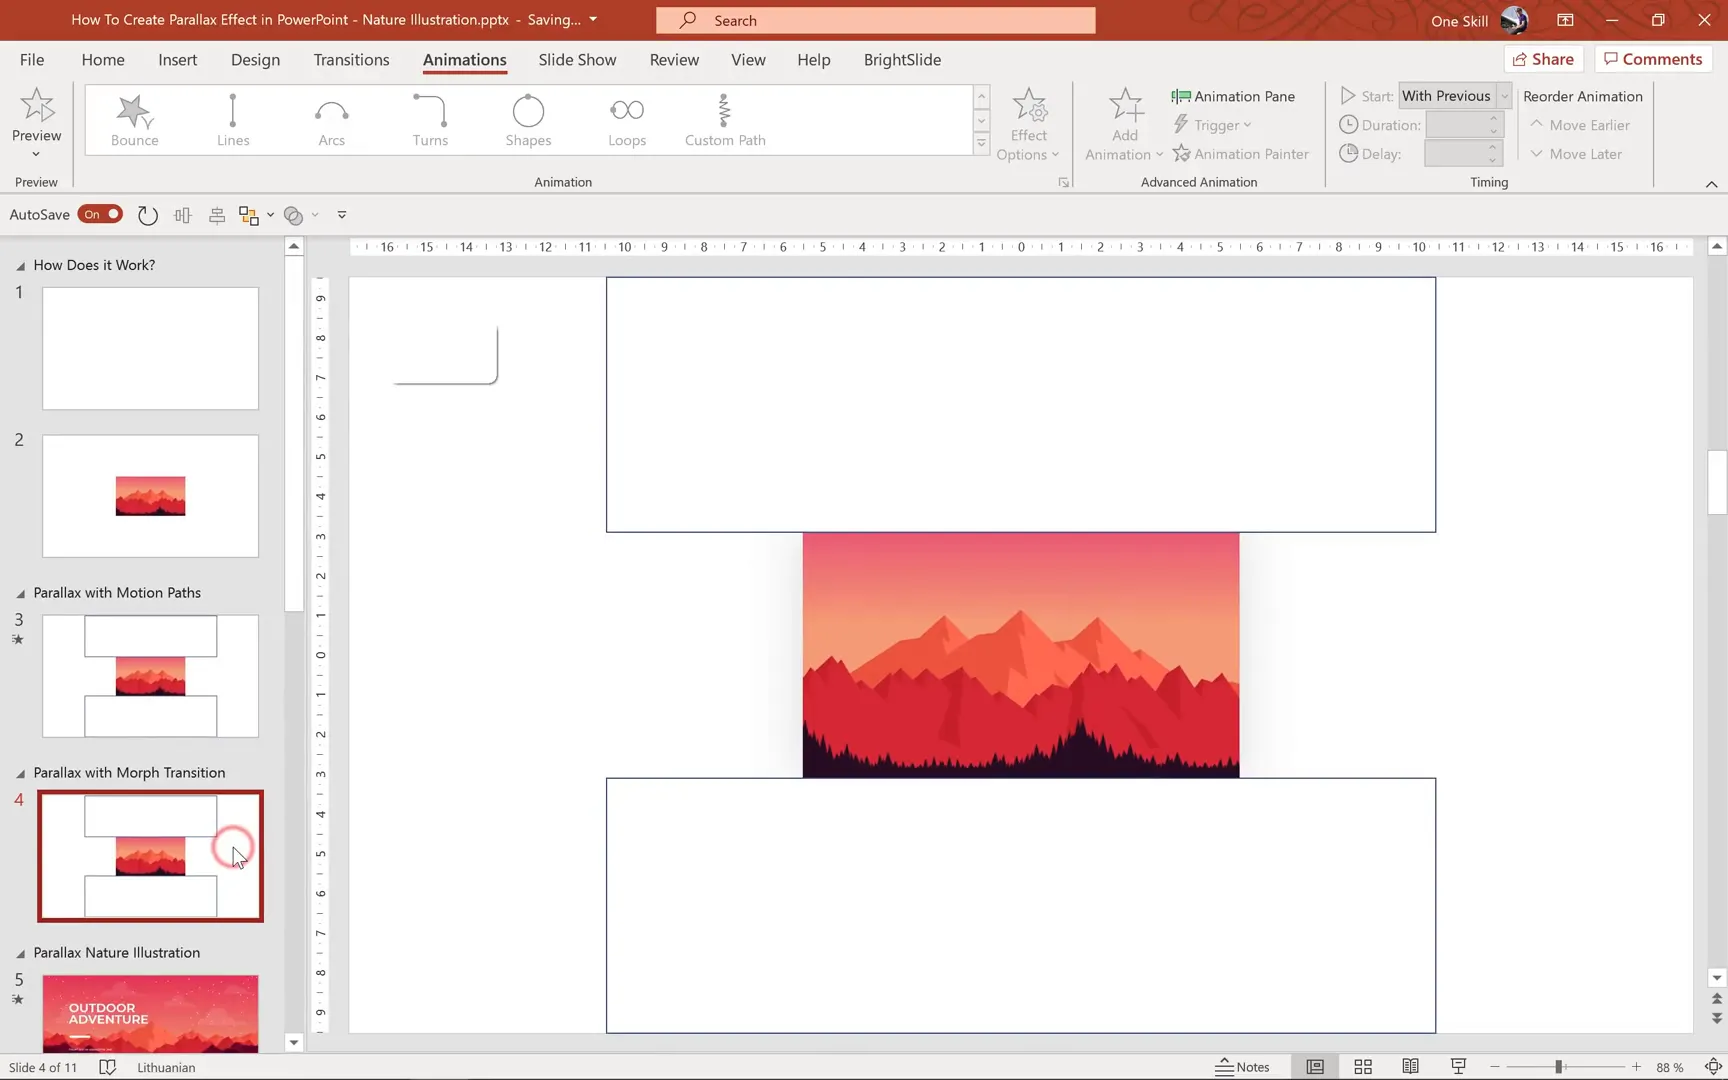
Method 2: Creating Parallax Animation Using Morph Transition
The second method uses PowerPoint‘s Morph Transition, a powerful feature that automatically animates smooth movement between two slides.
This technique is especially useful if you want a more flexible and reversible parallax effect.
Step 1: Set Up Two Slides
Create your starting slide with the grouped illustration layers properly arranged. Duplicate this slide to create the ending slide, where you will move the layers to new positions.
Delete any existing animations on these slides, as Morph will handle the movement.
Step 2: Activate Morph Transition
On the ending slide, apply the Morph transition from the Transitions tab. This will automatically animate the movement of objects between the two slides.

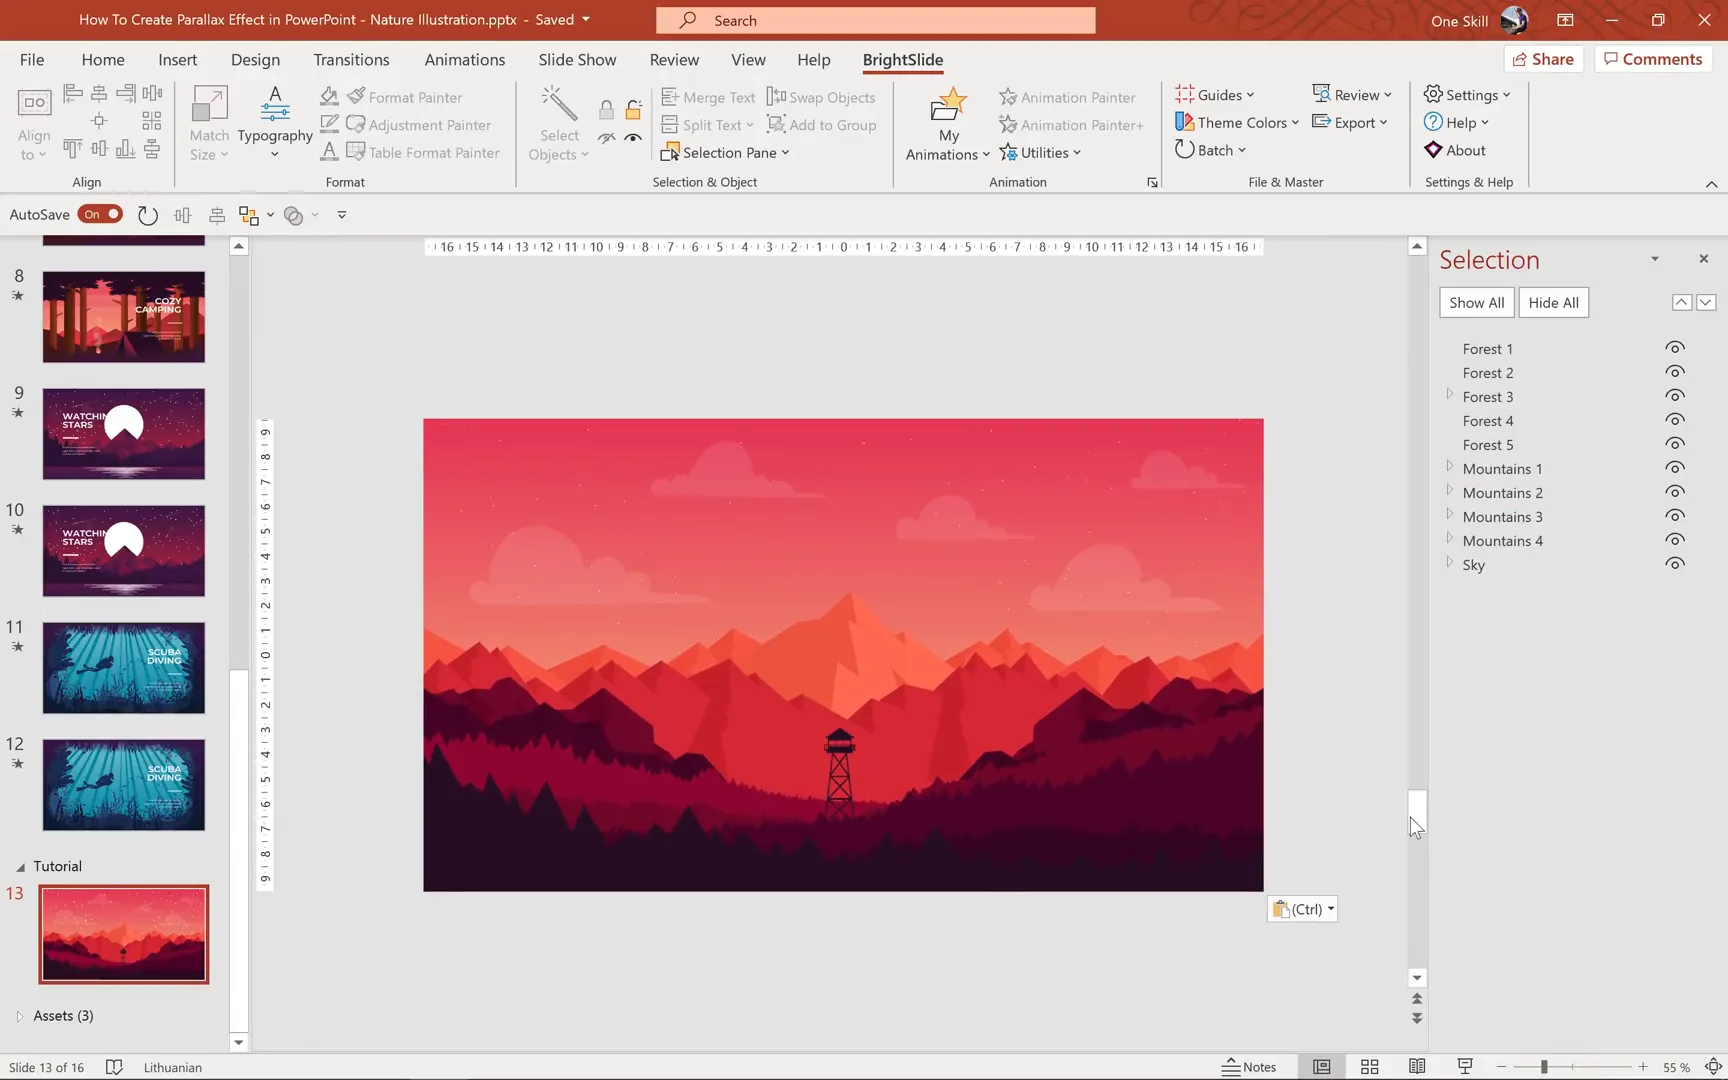
Step 3: Move Layers to Create Depth Movement
Using the Selection Pane, you can individually select and move layers:
- Move the forest layer upwards the most, as it is the closest and should move fastest.
- Move the red mountains up less.
- Move the orange mountains up the least.
Hide layers temporarily if needed to see underlying elements clearly.
Step 4: Preview the Morph Animation
Play the Morph transition to see the parallax effect in action. The layers move smoothly at different speeds, creating a dynamic depth illusion.
One major advantage of the Morph method is that when you navigate back to the previous slide, the animation reverses smoothly without resetting abruptly. This makes Morph ideal for presentations that require interactive navigation.

Putting Your Skills into Practice: Building a Complete Parallax Slide
Now that you understand the theory and animation methods, let’s walk through how to build a complete parallax slide from scratch.
Step 1: Choose and Insert Your Illustration
Pick a beautiful full-screen illustration with multiple layers. Insert the SVG file into PowerPoint and convert it to shapes for full editability.
Note that converting to shapes may alter some colors or transparency, so be prepared to make adjustments.

Step 2: Organize Your Layers
Ungroup the illustration multiple times until you can select individual elements. Use the Selection Pane to rename and organize layers logically (e.g., Forest1, Forest2, Mountains1).
Remember the rule: closer layers move faster during animation.
Step 3: Extend Your Scene
If your illustration does not cover the entire slide, extend it by attaching another illustration or shape at the bottom. For example, add a second illustration like a camping scene with a tent and campfire.
To blend the two illustrations seamlessly, add tree tops or other elements with matching colors to create a smooth transition between scenes.

Step 4: Group and Name Combined Layers
Select the forest layer from the first illustration, the added tree tops, and the rest of the second illustration. Group them into one unified forest group and name it accordingly (e.g., Forest1).
This grouping ensures you can animate the combined elements as one layer during the parallax effect.
Step 5: Duplicate Slide and Apply Morph Transition
Duplicate the slide and apply Morph transition on the second slide. Move the grouped layers upwards to create the parallax effect.
Use the Selection Pane to hide and move other layers like Forest2, Forest3, and mountain layers to different heights, ensuring each layer moves at a speed corresponding to its depth.

Step 6: Preview and Refine
Unhide all layers and preview the animation. Adjust layer movements as needed for smoothness and natural flow.

Additional Tips and Enhancements
- Add Small Animations: Enhance your slides with subtle animations like flickering campfires or floating objects to add more life.
- Use Animation Painter: Quickly copy animations from one layer to another to maintain consistency.
- Experiment with Speeds: Adjust motion path distances or slide layer movements until the parallax effect feels natural.
- Mask Edges: Use white bars or shape masks at the top or bottom to hide any unwanted overlapping elements.
Frequently Asked Questions (FAQ)
What software version do I need to create parallax animations in PowerPoint?
You need Microsoft 365 or PowerPoint 2019 and later versions that support Morph transition and advanced animation features.
Where can I find free illustrations suitable for parallax animations?
Vecteezy.com offers a wide range of free SVG vector illustrations perfect for this purpose. Always check the license for commercial use.
Can I create parallax animations using only PowerPoint without external plugins?
Yes! PowerPoint’s built-in Motion Paths and Morph transition allow you to create stunning parallax effects without any additional software or plugins.
Which method is better: Motion Paths or Morph transition?
Morph transition is more flexible and allows smooth reverse animations. Motion Paths provide precise control but reset when navigating backward. Choose based on your presentation needs.
Are there any tips for blending multiple illustrations?
To blend illustrations seamlessly, add overlapping elements with matching colors, such as treetops or clouds, to mask harsh edges and create a natural transition.
Can I customize the colors and elements of the illustrations?
Yes, after converting SVG to shapes, you can edit colors, transparency, and individual elements to better fit your presentation style.
How can I make my parallax slides more engaging?
Add small animations like flickering campfires, floating objects, or subtle color changes to add life and interest beyond the parallax movement.
Conclusion
Creating parallax illustration slides in PowerPoint is a powerful way to captivate your audience and elevate your presentations. By leveraging free SVG illustrations and mastering either Motion Path animations or Morph transitions, you can produce professional, dynamic slides that stand out.
Remember, the key to a successful parallax effect lies in organizing your illustration layers properly and animating them at different speeds to simulate depth. Experiment with various scenes and animation settings to find the style that best fits your message.
With the techniques shared in this guide, you’re now equipped to bring stunning parallax animations to your next PowerPoint presentation. Happy animating!
Check out the full video: PowerPoint Animation Tutorial 🔥 Parallax Illustration 🔥


