

PowerPoint presentation skills are essential for anyone who wants to captivate an audience with stunning visuals and smooth animations. One creative way to elevate your slides is by using modern design trends like the glassmorphic effect. In this detailed guide, we will walk you through how to create an impressive animated glassmorphic effect in PowerPoint using simple shapes, gradients, and transitions.
This tutorial is perfect for PowerPoint users who want to add a presentation-service-maximizing-impact” target=”_blank”>professional, elegant touch to their presentations without needing advanced graphic design software. Whether you’re a beginner or an experienced user, this step-by-step process will boost your PowerPoint presentation skills and help you craft visually captivating slides.
Table of Contents
- What Is Glassmorphic Design?
- Preparing Your Slide Design
- Creating Beautiful Gradient Fills for Text and Shapes
- Converting Slide Elements to a Picture for Effects
- Applying Picture Effects for the Glassmorphic Look
- Cropping the Blurred Picture and Adding Frosty Effects
- Animating the Effect Using Morph Transition
- Adding the Glow Effect for Extra Polish
- Tips for Advanced Glassmorphic Designs
- FAQs About PowerPoint Presentation Skills
- Conclusion
What Is Glassmorphic Design?
Glassmorphic design is a modern UI trend characterized by translucent, frosted glass-like surfaces that create depth and layering effects. It often uses blurred backgrounds with subtle shadows and highlights, giving a sleek, futuristic appearance. In PowerPoint, you can mimic this effect by combining gradients, transparency, blurs, and shadows.
By mastering this design technique, you can create slides that look polished, professional, and visually engaging, helping your presentations stand out.
Preparing Your Slide Design
Before diving into advanced effects, it’s important to set up the basic slide elements. Here’s how to start:
- Open a blank slide: Start with a clean canvas in PowerPoint Microsoft 365 (the version used here).
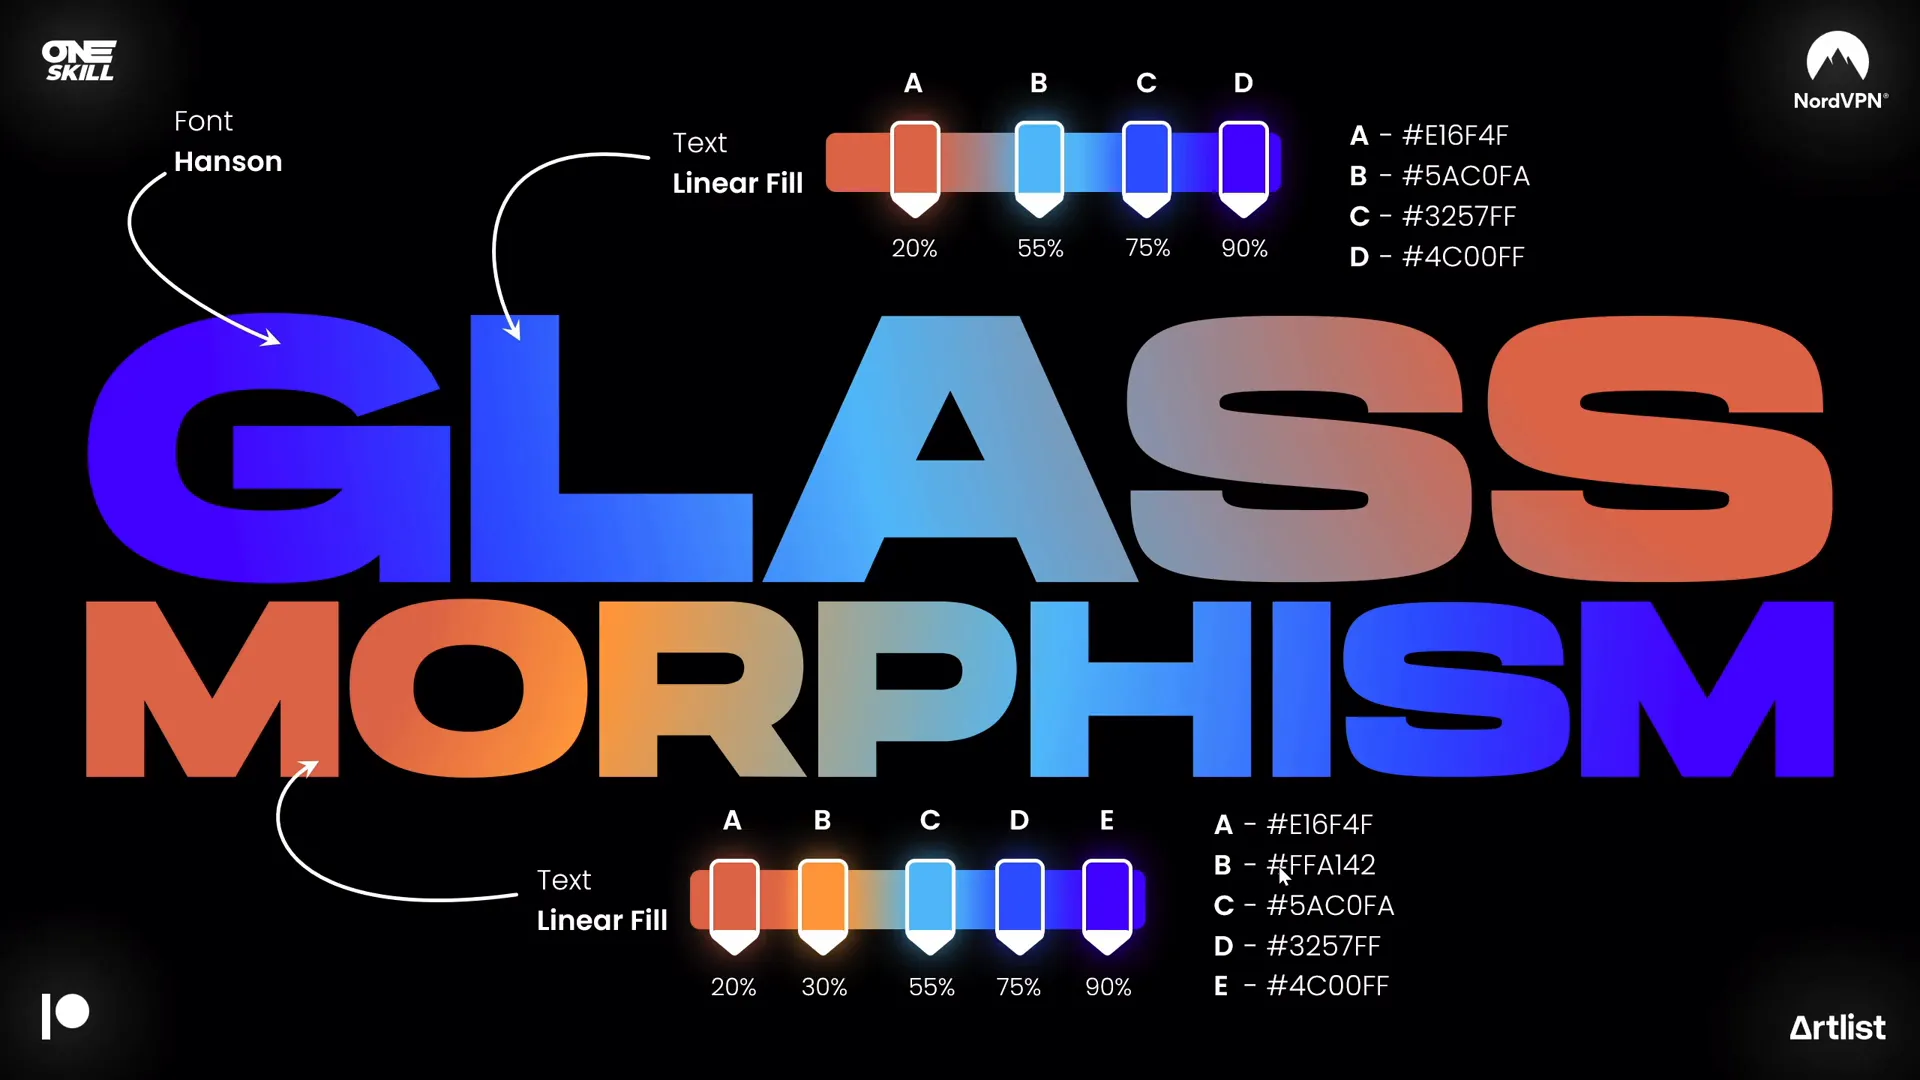
- Insert text boxes: Add two text boxes for your main text elements. Use the Hanson font, a free and beautiful font that complements the glassmorphic style. You can download it here.
- Set font sizes: For the first text box, use a large font size of 190 pt. For the second, use 125 pt to create hierarchy and visual interest.
- Insert circles: Add two circles to your slide. Hold the Shift key while drawing to make perfect circles. These will be used as background elements to enhance the glass effect.
These steps set the foundation for your glassmorphic design.
Creating Beautiful Gradient Fills for Text and Shapes
Gradient fills are essential to the glassmorphic aesthetic. Here’s how to apply them effectively:
- Radial gradient for circles: Select your circles and apply a radial gradient fill with two color stops. Use transparency on the first color stop to create a soft, glowing look. The exact hex codes and transparency settings are crucial for the best effect, so refer to the video or use your own gradient with similar transparency.
- Linear gradient for text: For your text boxes, apply a linear gradient fill. The first text box uses four color stops to create a rich blend of colors, while the second text box uses five color stops for even more depth.
- Copy and paste styles: To speed up the process, use
Ctrl + Shift + Cto copy the gradient style from one text box, andCtrl + Shift + Vto paste it onto others.
Grouping the text boxes and aligning them centrally helps maintain a balanced and visually appealing layout.
Converting Slide Elements to a Picture for Effects
Once your text and circle elements are ready, select all of them (hold Shift and click each item). Then:
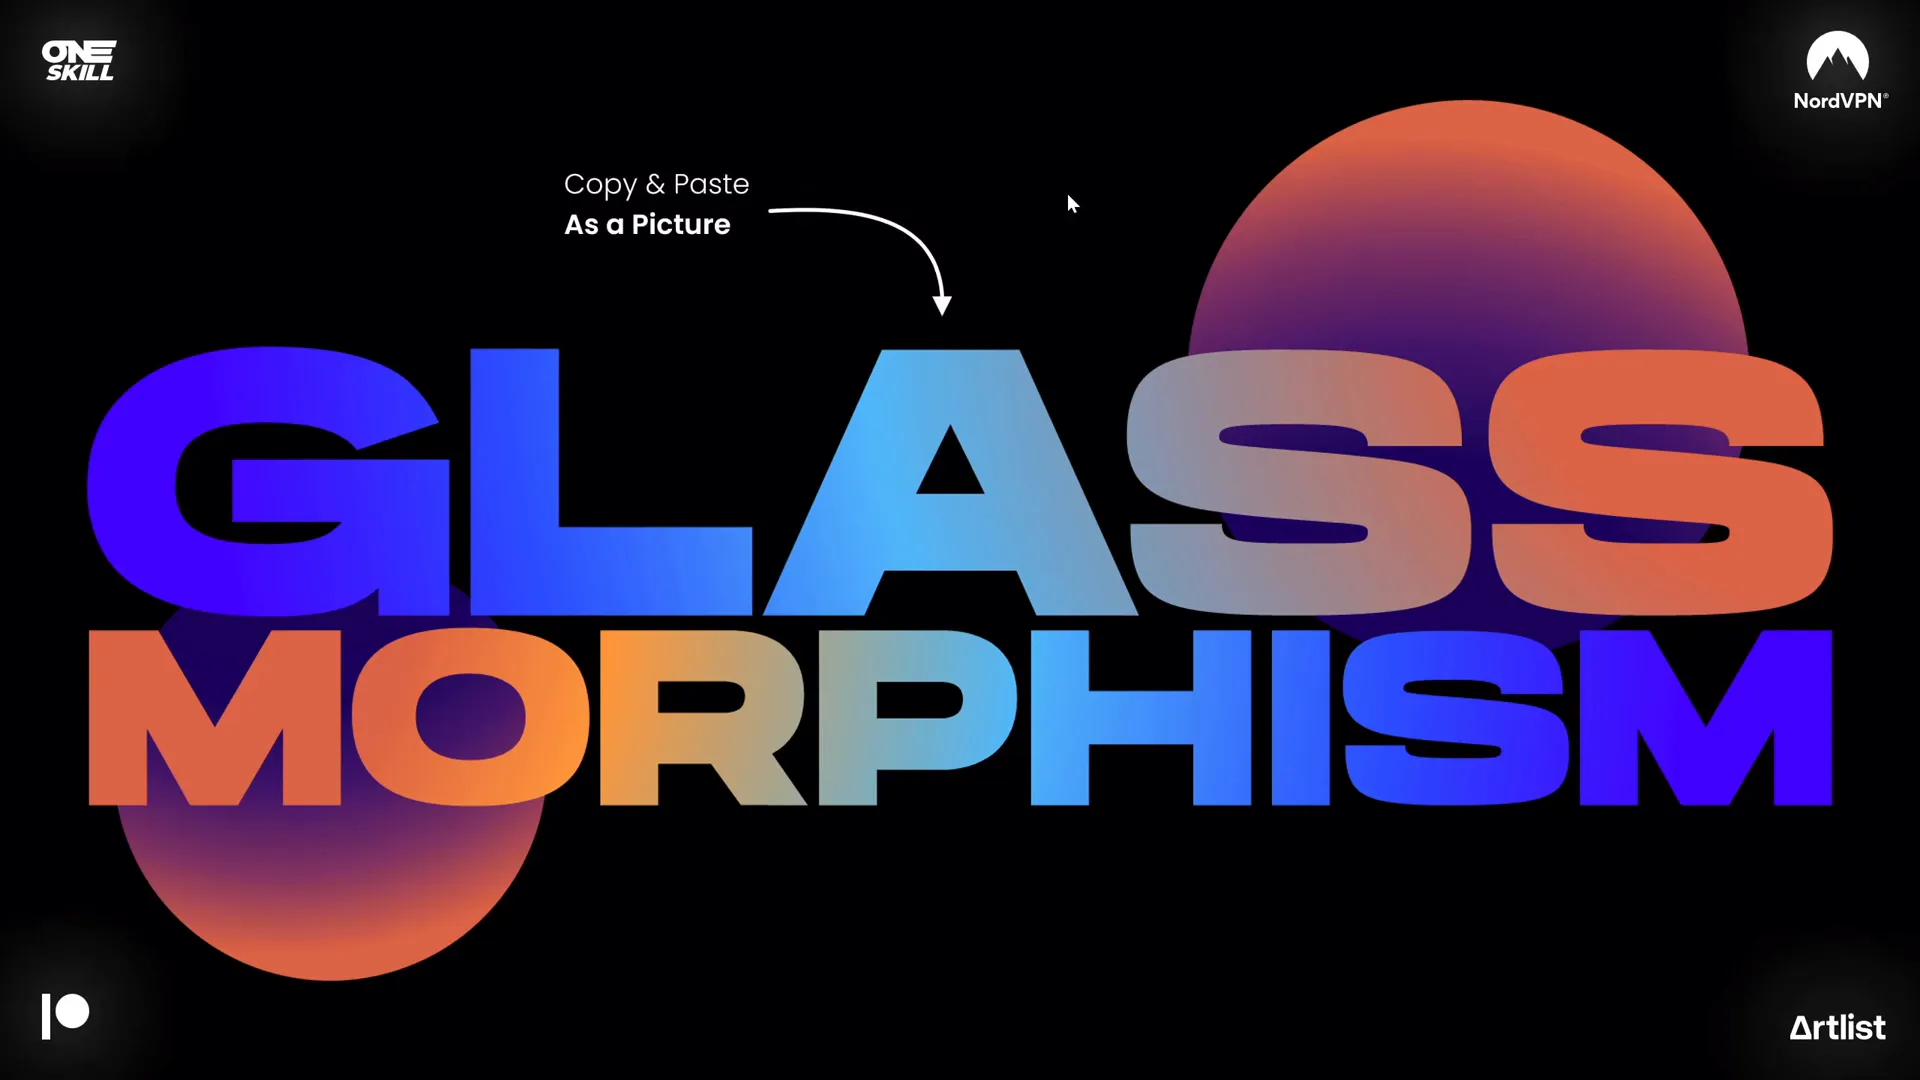
- Cut and paste as picture: Press
Ctrl + Xto cut, thenCtrl + Vto paste. When pasting, choose the option to paste as a picture. - Why paste as picture? By converting your design to a picture, you unlock the ability to apply picture effects such as artistic filters, saturation boosts, and color temperature adjustments that aren’t available on standard shapes or text.
This technique is a game-changer for PowerPoint presentation skills, allowing you to add texture and effects that elevate your slide’s look.
Applying Picture Effects for the Glassmorphic Look
Now that your slide design is a picture, it’s time to add effects that create the glassmorphic vibe:
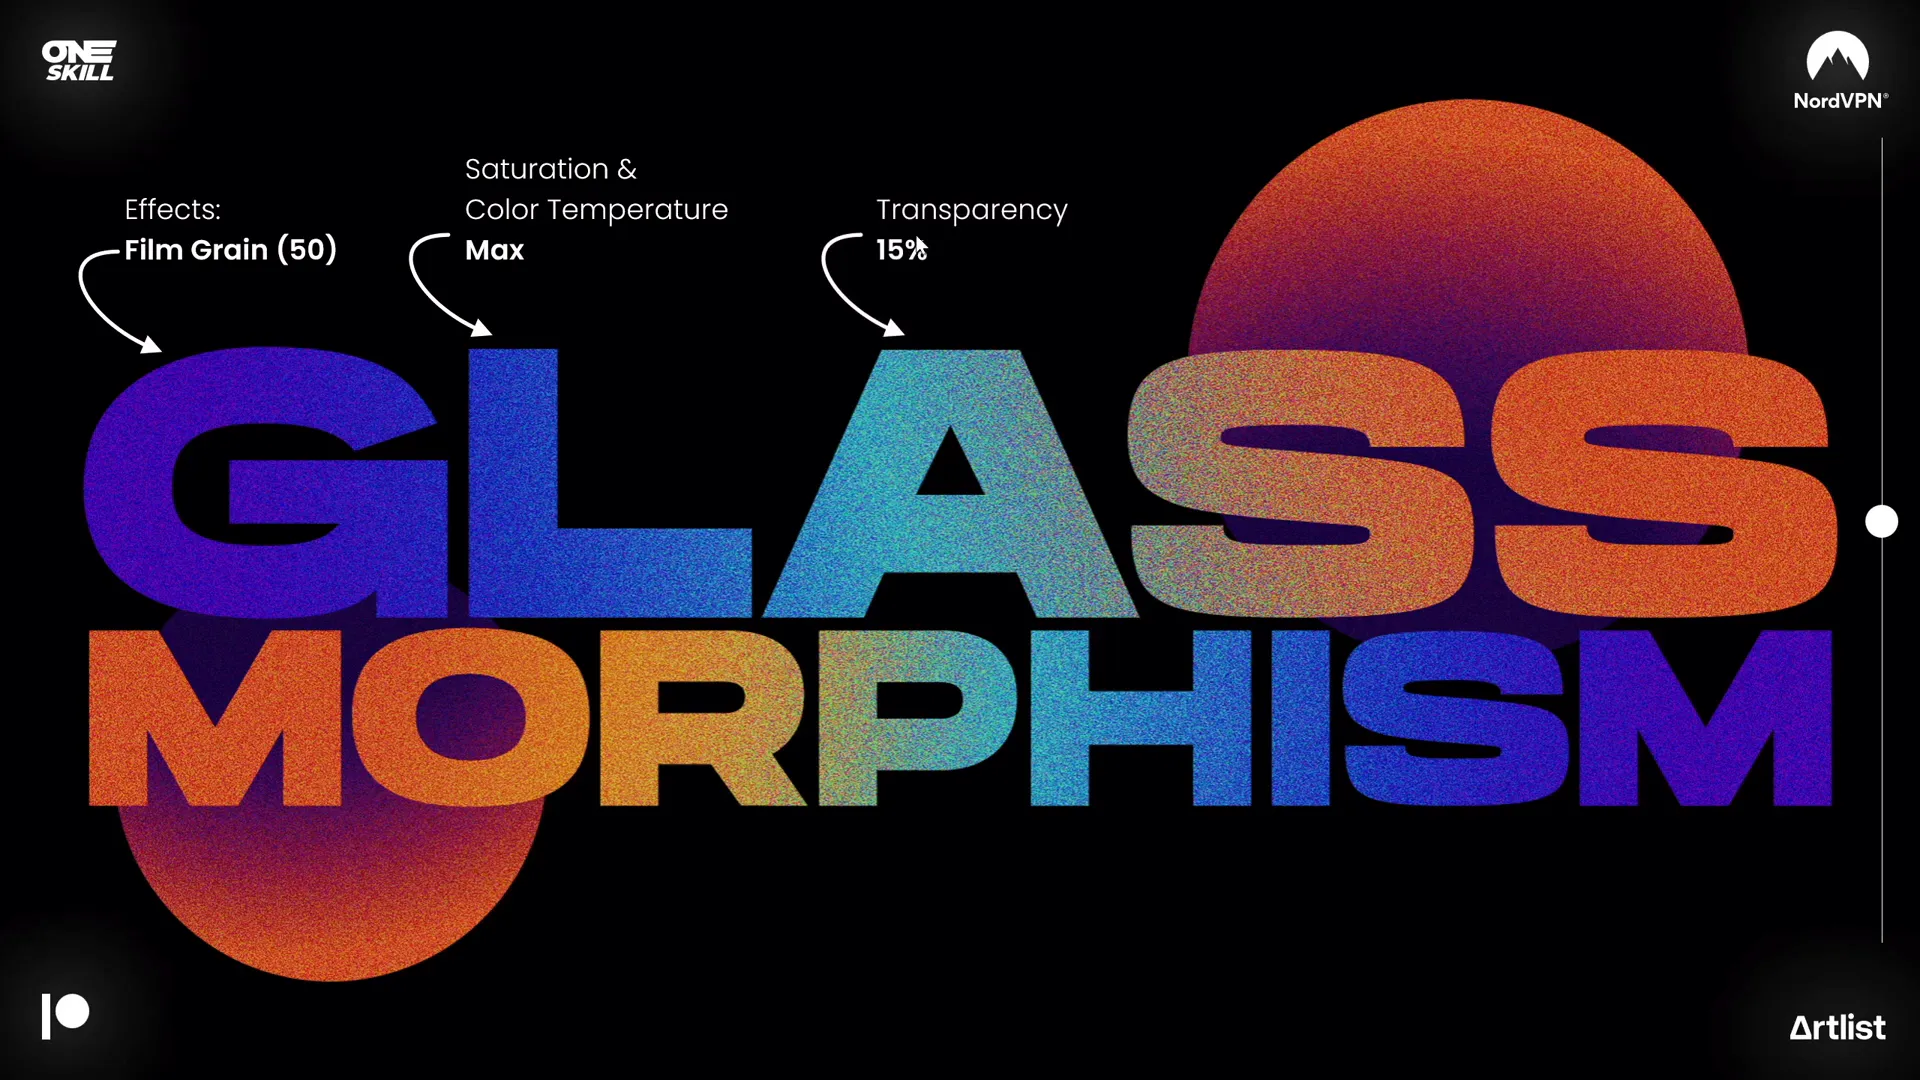
- Film grain effect: Go to the Artistic Effects menu and select the Film Grain filter. Adjust the grain size to 50 for a subtle texture.
- Boost saturation and temperature: Increase the picture’s saturation and color temperature to their maximum to intensify the colors and warmth.
- Apply transparency: Reduce the opacity slightly to soften the effect, preventing it from overwhelming the design.
Once satisfied, save the entire slide as a picture. You can do this by playing the presentation and using the Print Screen key or the Shift + Windows + S shortcut to capture a screenshot.
Cropping the Blurred Picture and Adding Frosty Effects
To create the signature frosted glass look:
- Paste your screenshot: Paste the screenshot onto a new slide, centered exactly over the original slide.
- Apply maximum blur: Select the pasted picture and apply the maximum blur effect to create a soft, frosty background.
- Insert a circle: Add a simple circle shape over the blurred picture. Position it where you want the glassmorphic window to appear.
- Intersect shapes: Select the blurred picture first, then the circle, go to Merge Shapes and choose Intersect. This crops the blurred picture to the shape of the circle.
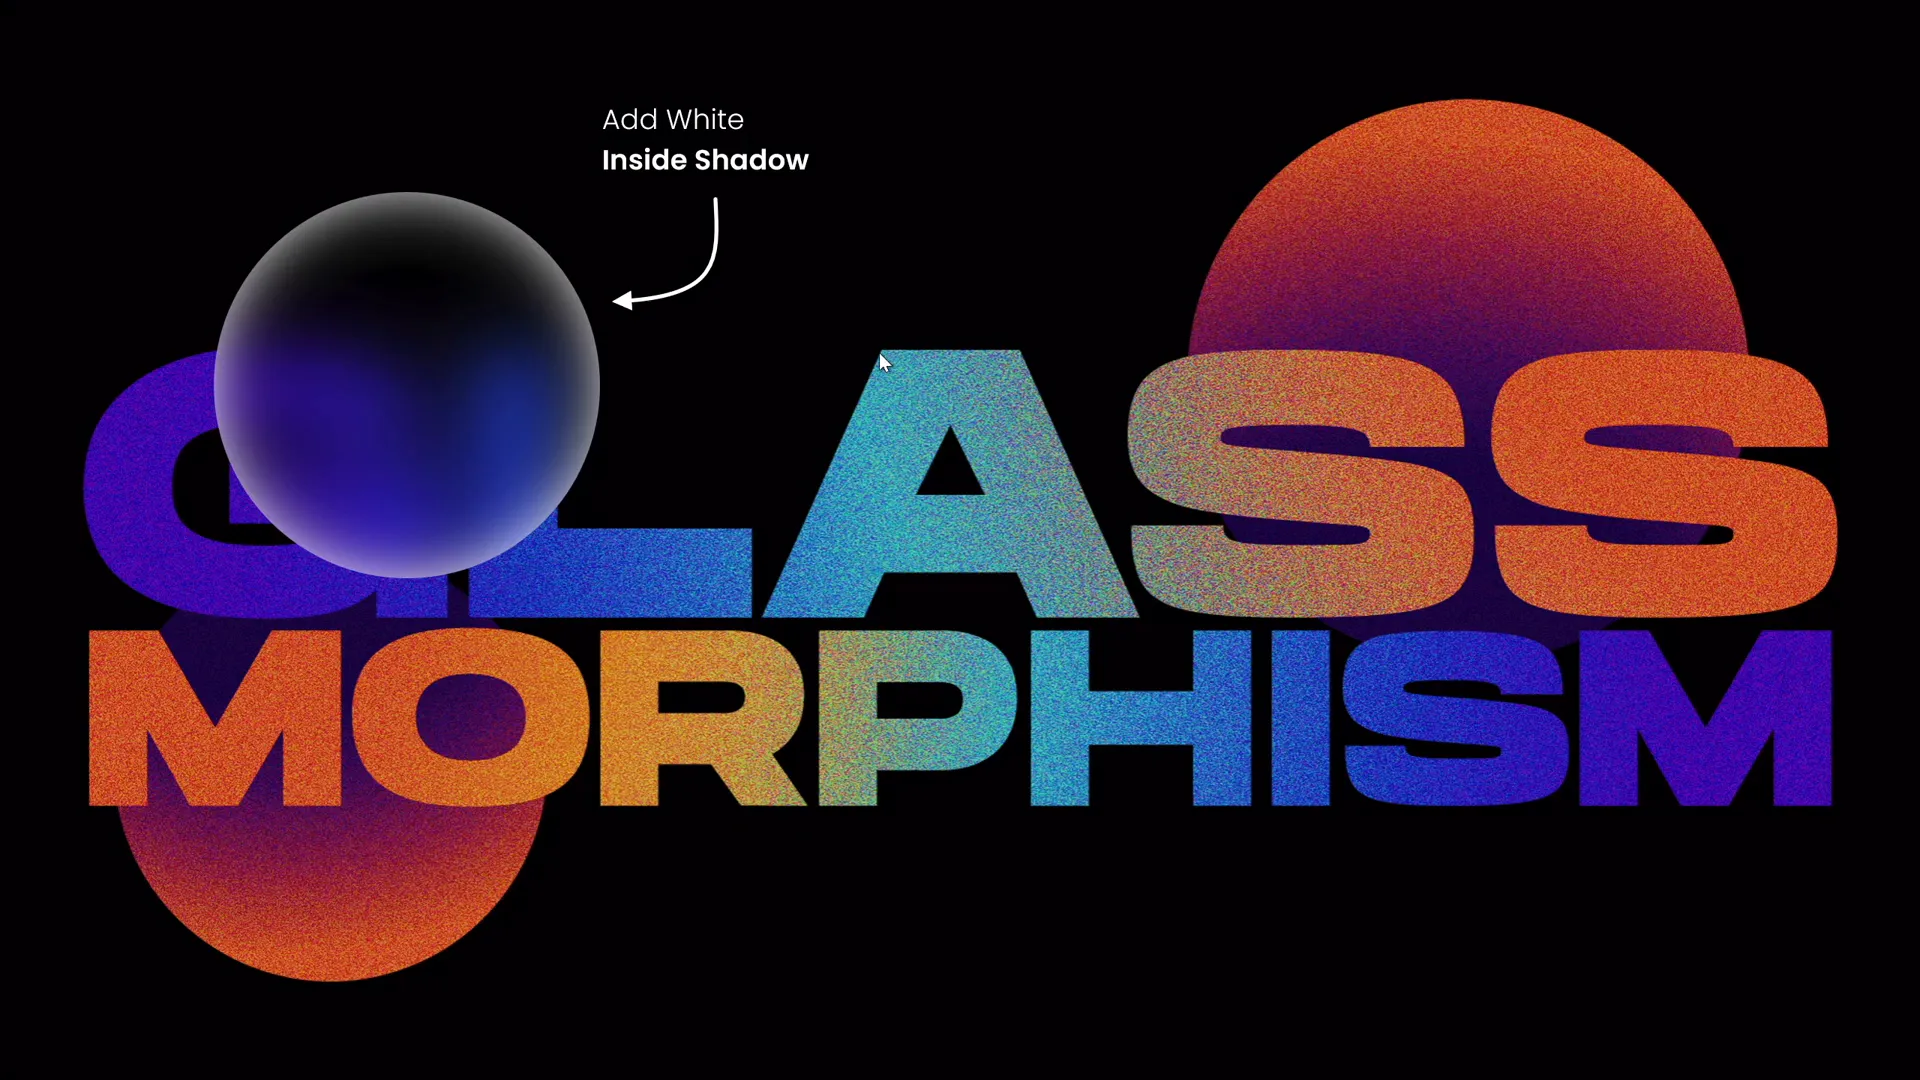
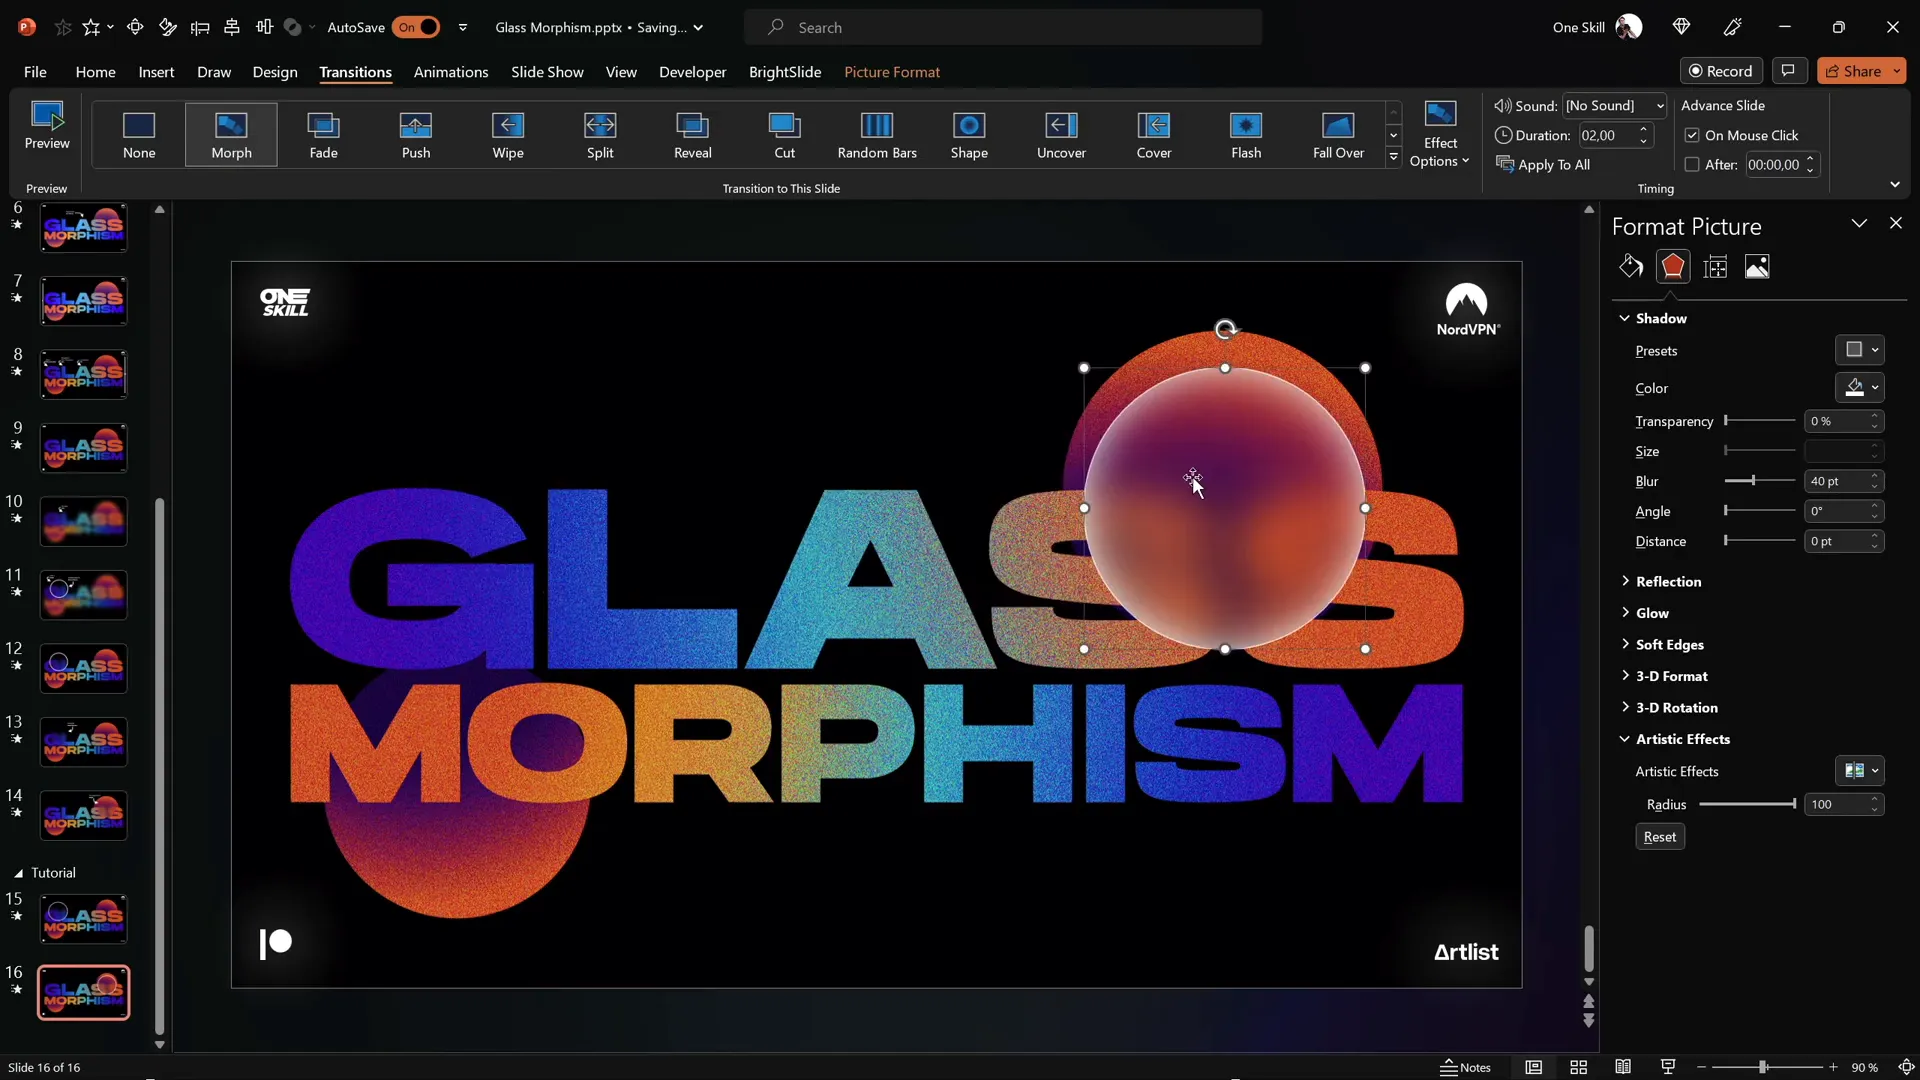
- Add white inside shadow: To simulate frosty edges, add a white inside shadow to the cropped circle.
- Add a subtle white border: Set the circle’s outline to white with 1 pt width and 20% transparency for a delicate highlight.
This process creates a visually compelling frosted glass effect that looks modern and professional.
Animating the Effect Using Morph Transition
Animation brings your glassmorphic design to life. Here’s how to animate the effect smoothly:
- Duplicate your slide: Right-click the slide in the left pane and select Duplicate Slide or press
Ctrl + D. - Crop and reposition the circle: On the duplicated slide, select the glassmorphic circle, click Crop in the Picture Format tab, and reposition the circle to a new location on the slide.
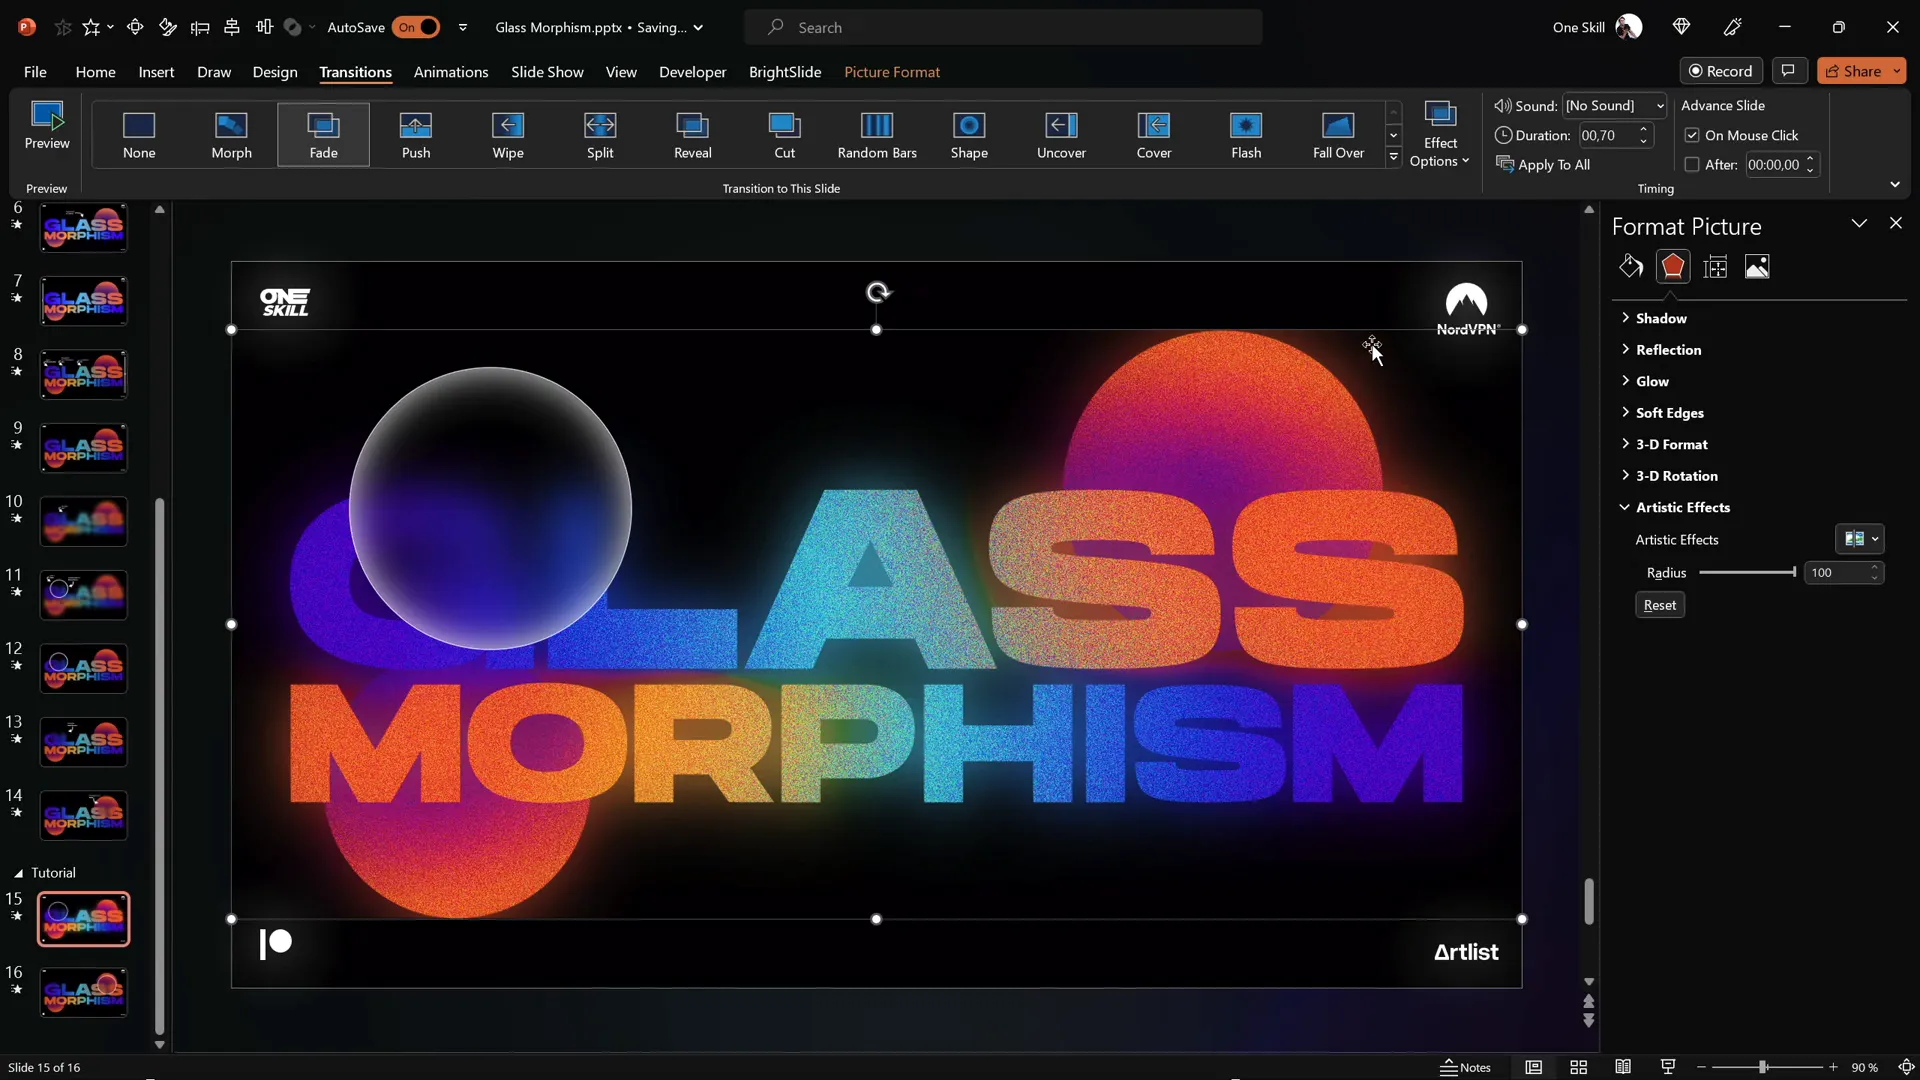
- Apply Morph transition: Select the duplicated slide, go to the Transitions tab, and choose Morph. This transition animates the movement of the circle seamlessly between the two slides.
Now, when you run your presentation, the glassmorphic circle will animate smoothly from one position to another, creating an elegant, modern effect.
Adding the Glow Effect for Extra Polish
To make your glassmorphic design even more striking, add a glowing layer:
- Duplicate the slide design picture: Select the picture (the slide design), duplicate it, and place the duplicate directly on top of the original.
- Apply maximum blur: Apply a maximum blur effect to the top duplicate. This creates a glowing aura around your design.
- Send blurred layer backward: Send the blurred duplicate to the back so the grainy, detailed design remains visible on top with the glow softly radiating underneath.
- Copy the glow to the second slide: Copy and paste this glowing blurred image onto the second slide and send it to the back there as well to maintain a consistent glow during the morph animation.
This layering technique adds depth and polish, making your glassmorphic design truly pop.
Tips for Advanced Glassmorphic Designs
- Use multiple circles: Feel free to add more than two circles to create complex layered glassmorphic effects. Just manage the layers carefully.
- Use Selection Pane: Use the Selection Pane (found under the Home tab > Arrange > Selection Pane) to manage overlapping shapes and pictures easily.
- Custom fonts: Experiment with stylish fonts like Hanson or others that complement the modern look.
- Consistent color palette: Stick to a harmonious color palette for gradients to maintain a cohesive design.
- Practice morph animations: Morph is powerful but subtle; try different object movements for smooth transitions.
FAQs About PowerPoint Presentation Skills
What version of PowerPoint do I need to create the glassmorphic effect?
This tutorial uses Microsoft PowerPoint 365 on Windows. While some features like Morph transition and advanced picture effects are available in recent versions, older versions may lack these tools.
Where can I get the Hanson font used in the tutorial?
Hanson is a free font and can be downloaded from various font websites, including this link.
How do I apply the Morph transition?
After duplicating your slide and repositioning objects on the second slide, select the second slide, go to the Transitions tab, and click Morph. This will animate the changes between slides.
Can I use this glassmorphic effect with other shapes?
Absolutely! While circles are common, you can use rectangles or custom shapes with the same principles of blurring, intersecting, and shadowing to achieve glassmorphic effects.
Is the glassmorphic effect suitable for all presentations?
Glassmorphic design works best for creative, modern, and tech-related presentations. For formal or data-heavy presentations, use it sparingly to avoid distracting from content.
Conclusion
Mastering PowerPoint presentation skills means knowing how to combine creativity with the software’s features to craft engaging visuals. The animated glassmorphic effect is a stunning example of what’s possible with just a few simple tools in PowerPoint.
By following this step-by-step guide, you can create beautiful, animated slides that impress your audience and elevate your presentations. Remember to experiment with gradients, picture effects, and Morph transitions to customize the effect to your unique style.
Whether you’re a student, professional, or content creator, adding glassmorphic slides to your deck will set you apart and demonstrate advanced PowerPoint skills.
Happy presenting!


