If you’re looking to elevate your PowerPoint presentation skills and create visually stunning slides, mastering advanced design techniques is a game changer. One such trend that’s gaining traction in presentation design is the glassmorphic effect—a sleek, frosted glass look with smooth animations that captivate your audience.
In this comprehensive guide, I’ll walk you through how to create an awesome animated glassmorphic effect in Microsoft PowerPoint. Using simple tools and features available in PowerPoint Microsoft 365, you’ll learn how to design, stylize, and animate this effect step-by-step. Whether you’re a beginner or an experienced presenter, this tutorial will add a fresh, professional edge to your slides.
Let’s dive into the details and boost your PowerPoint presentation skills with this modern design technique!
Table of Contents
- What Is the Glassmorphic Effect?
- Designing the Slide: Text and Circles
- Applying Beautiful Gradient Fills
- Turning Slide Elements Into a Picture
- Adding Picture Effects for Texture and Color
- Creating the Frosty Glass Circle
- Animating the Slide with Morph Transition
- Adding a Subtle Glow Effect
- Additional Tips and Tricks
- Frequently Asked Questions (FAQ)
- Conclusion
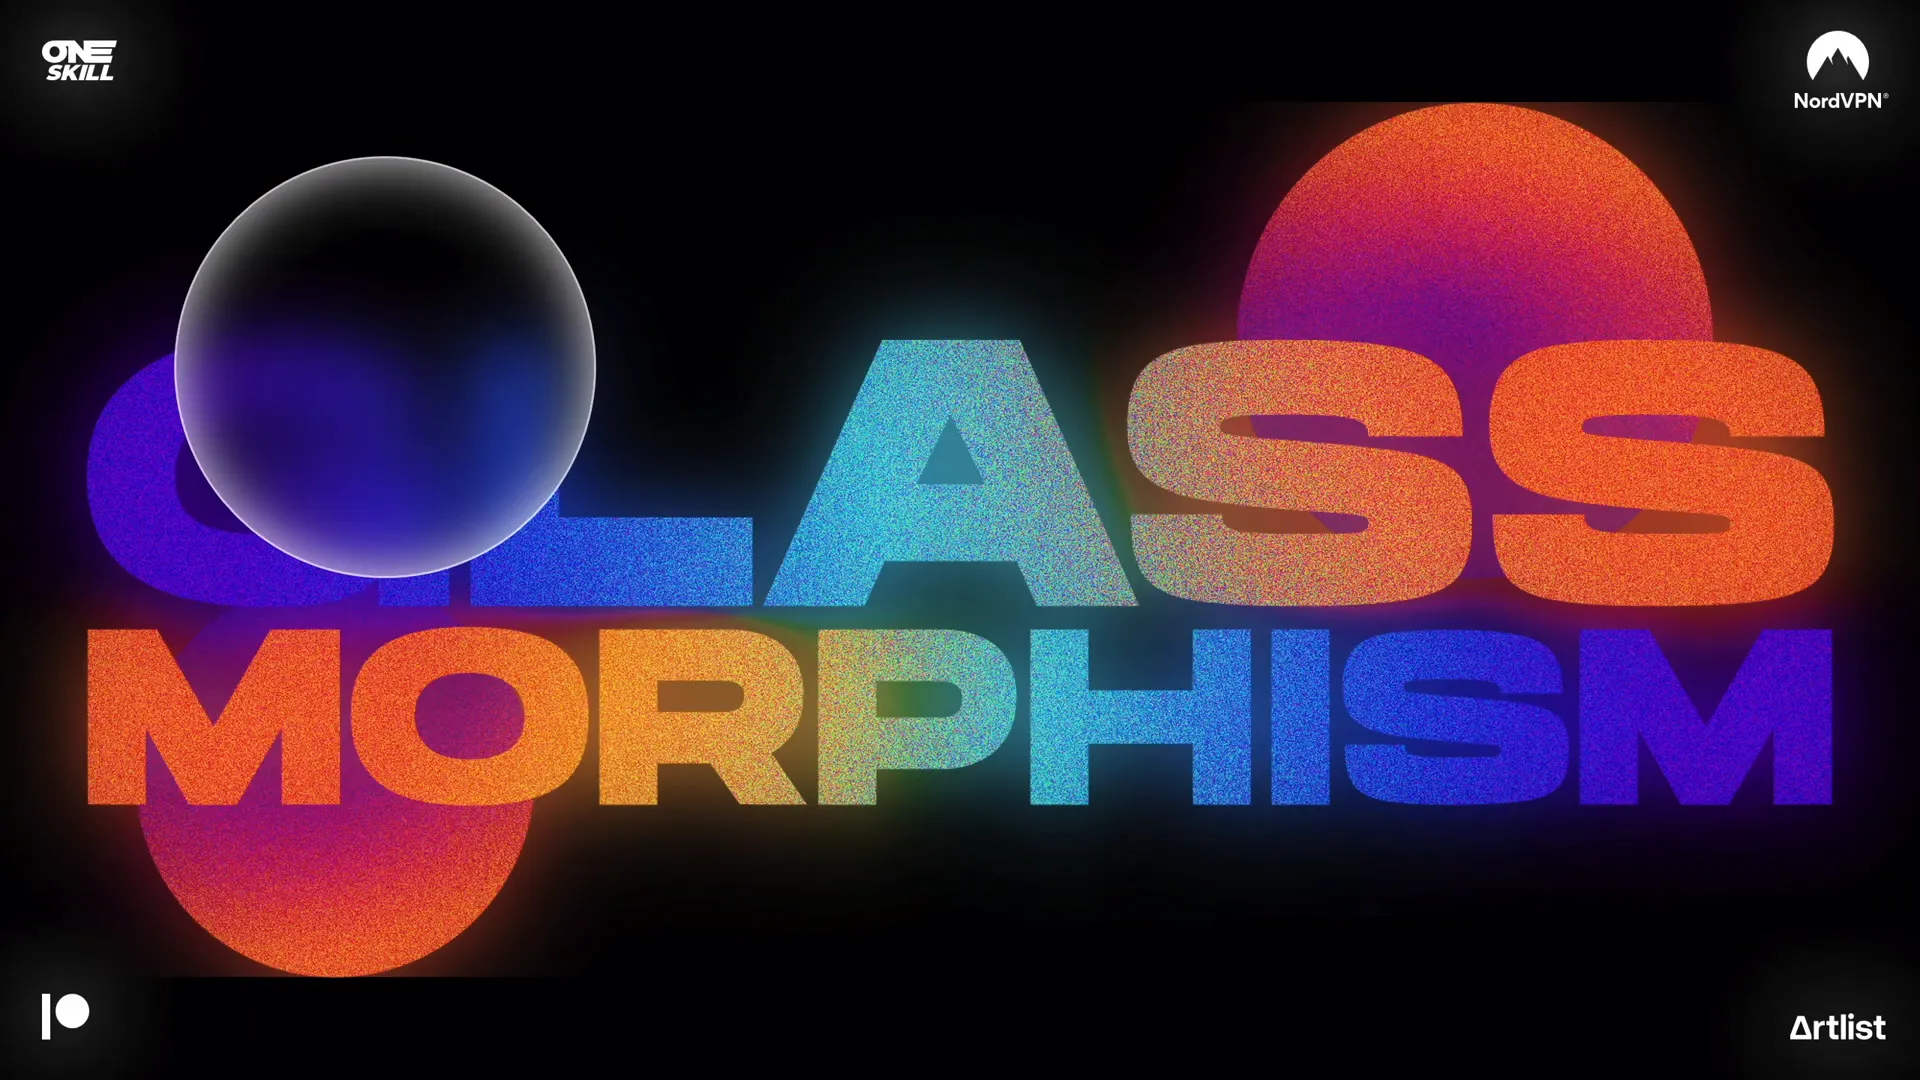
What Is the Glassmorphic Effect?
The glassmorphic effect is a contemporary design style that mimics the look of frosted or translucent glass. It typically features:
- Blurred backgrounds that hint at the content behind the translucent surface
- Subtle shadows and inner glows to give depth
- Soft gradients and transparency to enhance the glassy feel
- Clean, modern typography often paired with the effect
This style is popular in UI/UX design and is now making its way into presentation design to add sophistication and polish. When animated, it creates an engaging visual experience that holds your audience’s attention.
Designing the Slide: Text and Circles
Let’s start by setting up the basic slide design. The process is straightforward:
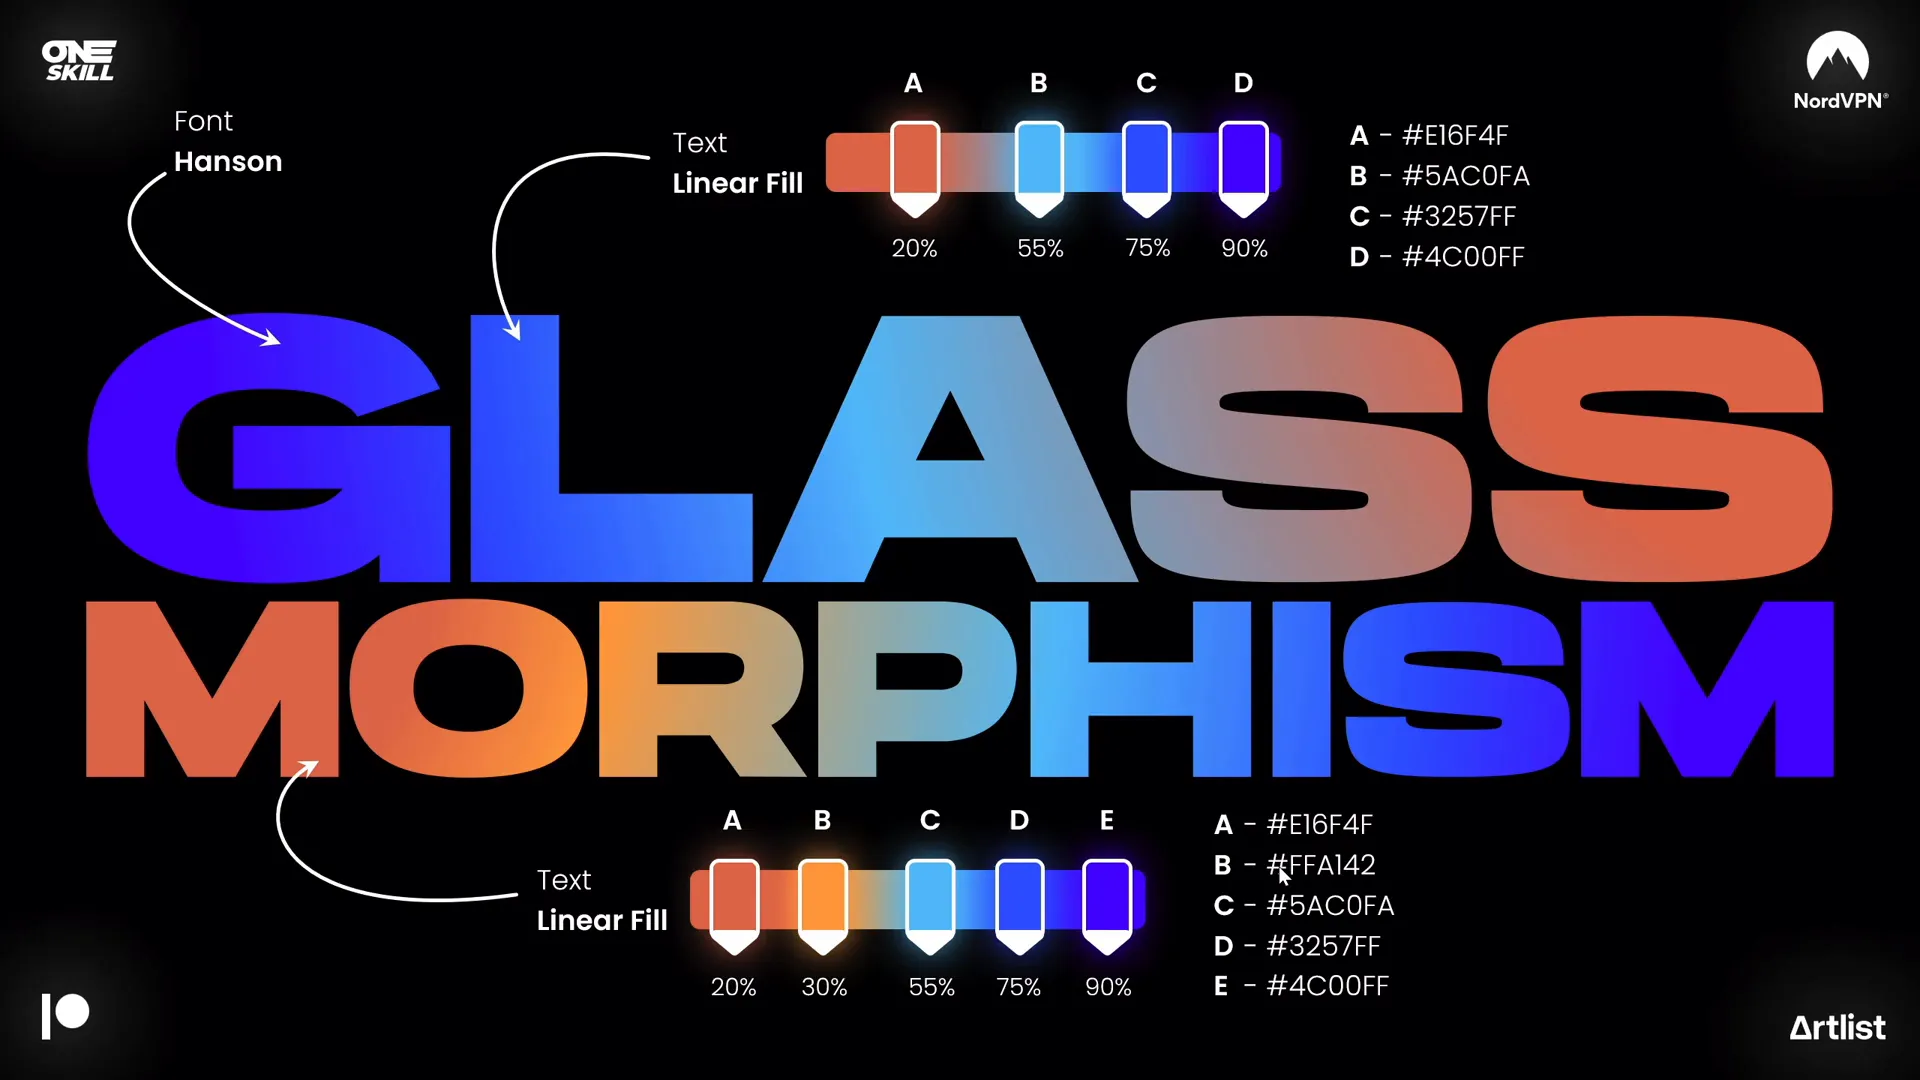
- Insert two text boxes: These will contain your main text elements. For this design, I used the beautiful Hanson font, which you can download for free. It adds a modern, bold look to the text.
- Insert two circles: These circles will serve as the background shapes with gradient fills to create the glassmorphic vibe.
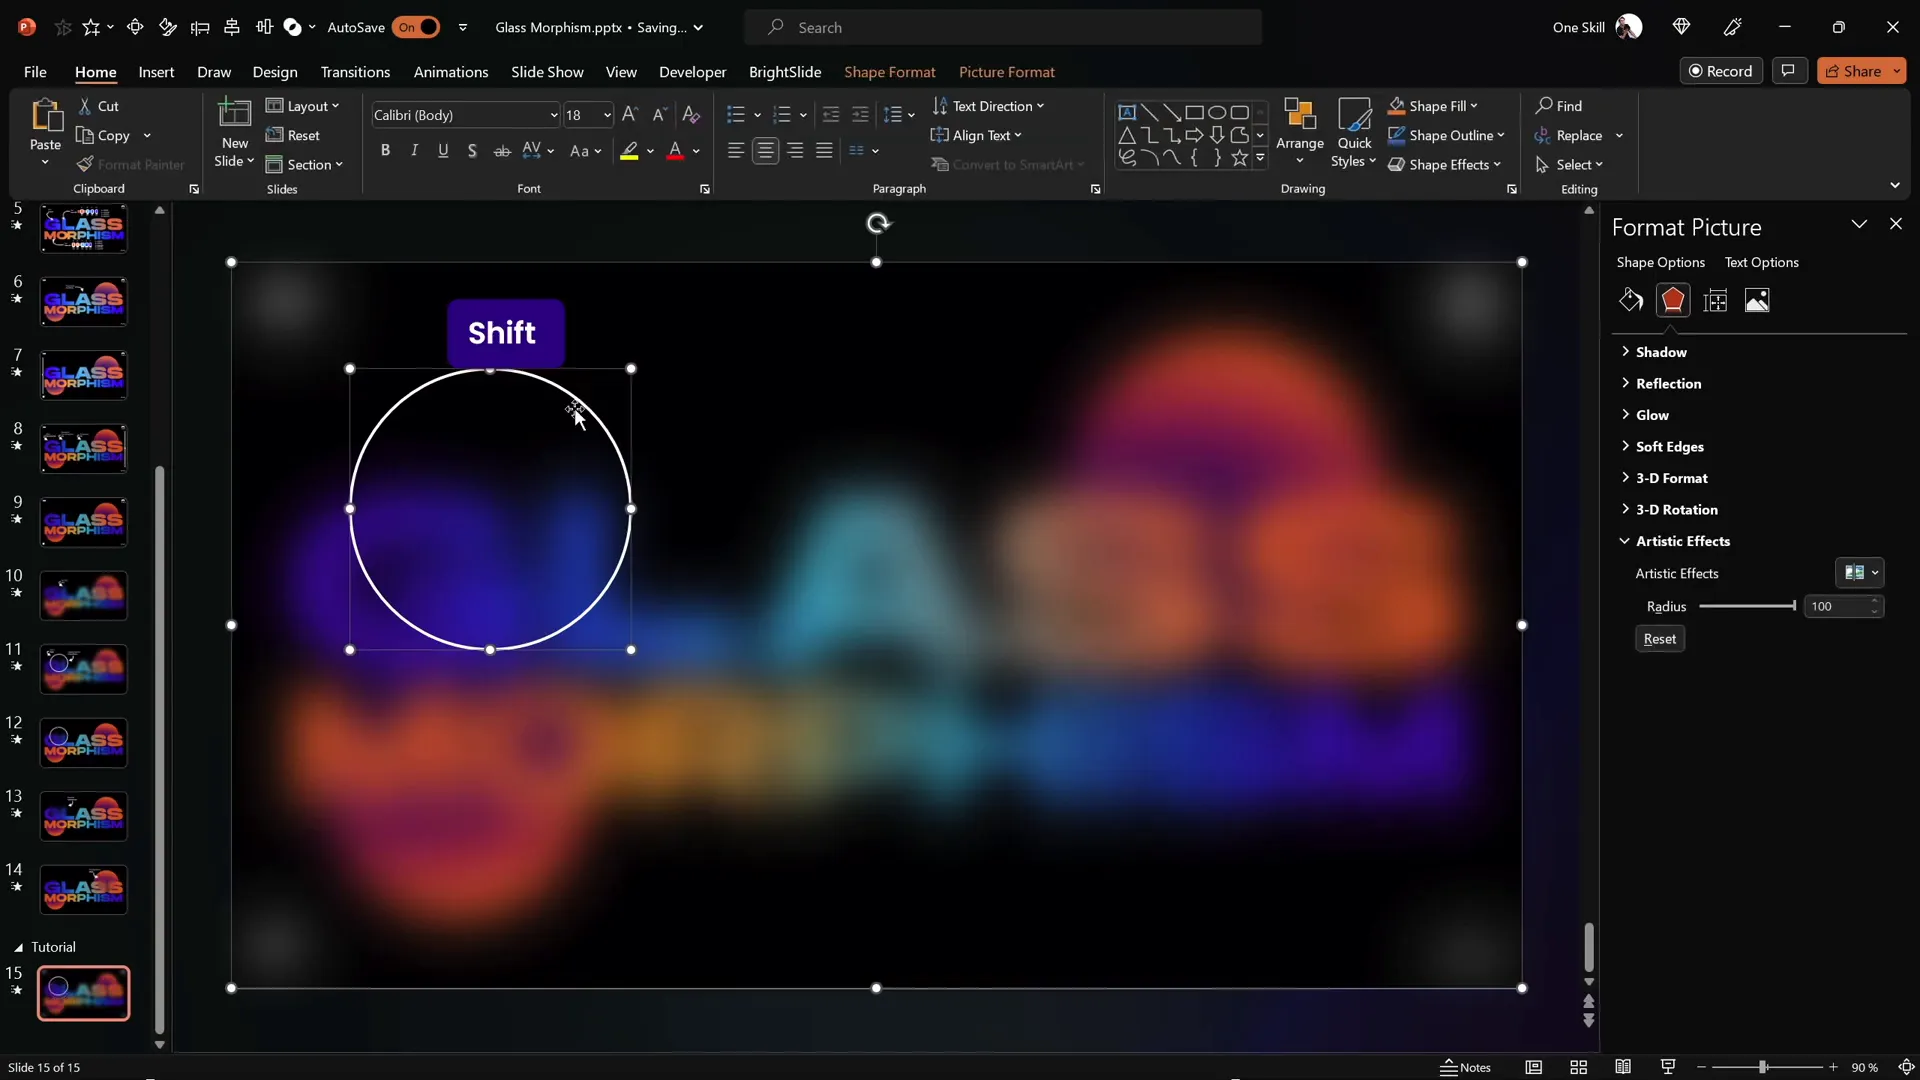
Drawing perfect circles in PowerPoint is easy—just hold down the Shift key while drawing the shape to keep it perfectly round.
Choosing the Right Font and Sizes
The font choice is critical for maintaining the modern aesthetic. I recommend using the Hanson font, which is bold and clean, perfect for glassmorphic design.
- For the main headline text box, I used font size 190 pt.
- For the secondary text box, I used font size 125 pt.
These sizes ensure that the text is prominent and readable even with the frosted glass overlay.
Applying Beautiful Gradient Fills
Next, let’s bring life to our circles and text boxes by filling them with gradient colors. Gradients add depth and richness that flat colors lack, which is essential for the glassmorphic effect.
Creating the Radial Gradient for Circles
For the circles, I used a radial gradient fill with two color stops. Here’s how to do it:
- Open the Format Shape pane.
- Choose Fill → Gradient fill.
- Select Radial gradient type.
- Add two color stops with specific hex color codes and transparency settings (the exact codes are shown on the screen in the video).
- The first color stop has a little transparency to create a subtle glow effect.
This gradient gives the circles a soft, glowing appearance that blends well with the glass effect.
Applying Linear Gradient to Text Boxes
For the text, I applied a linear gradient fill with multiple color stops:
- The main text uses a gradient with four color stops to create a smooth, delicious blend of colors.
- The bottom text box uses a gradient with five color stops, adding an extra color for more vibrancy.
To speed up the process, you can copy the gradient style from one text box and paste it onto the other using PowerPoint’s Ctrl + Shift + C (copy style) and Ctrl + Shift + V (paste style) shortcuts.
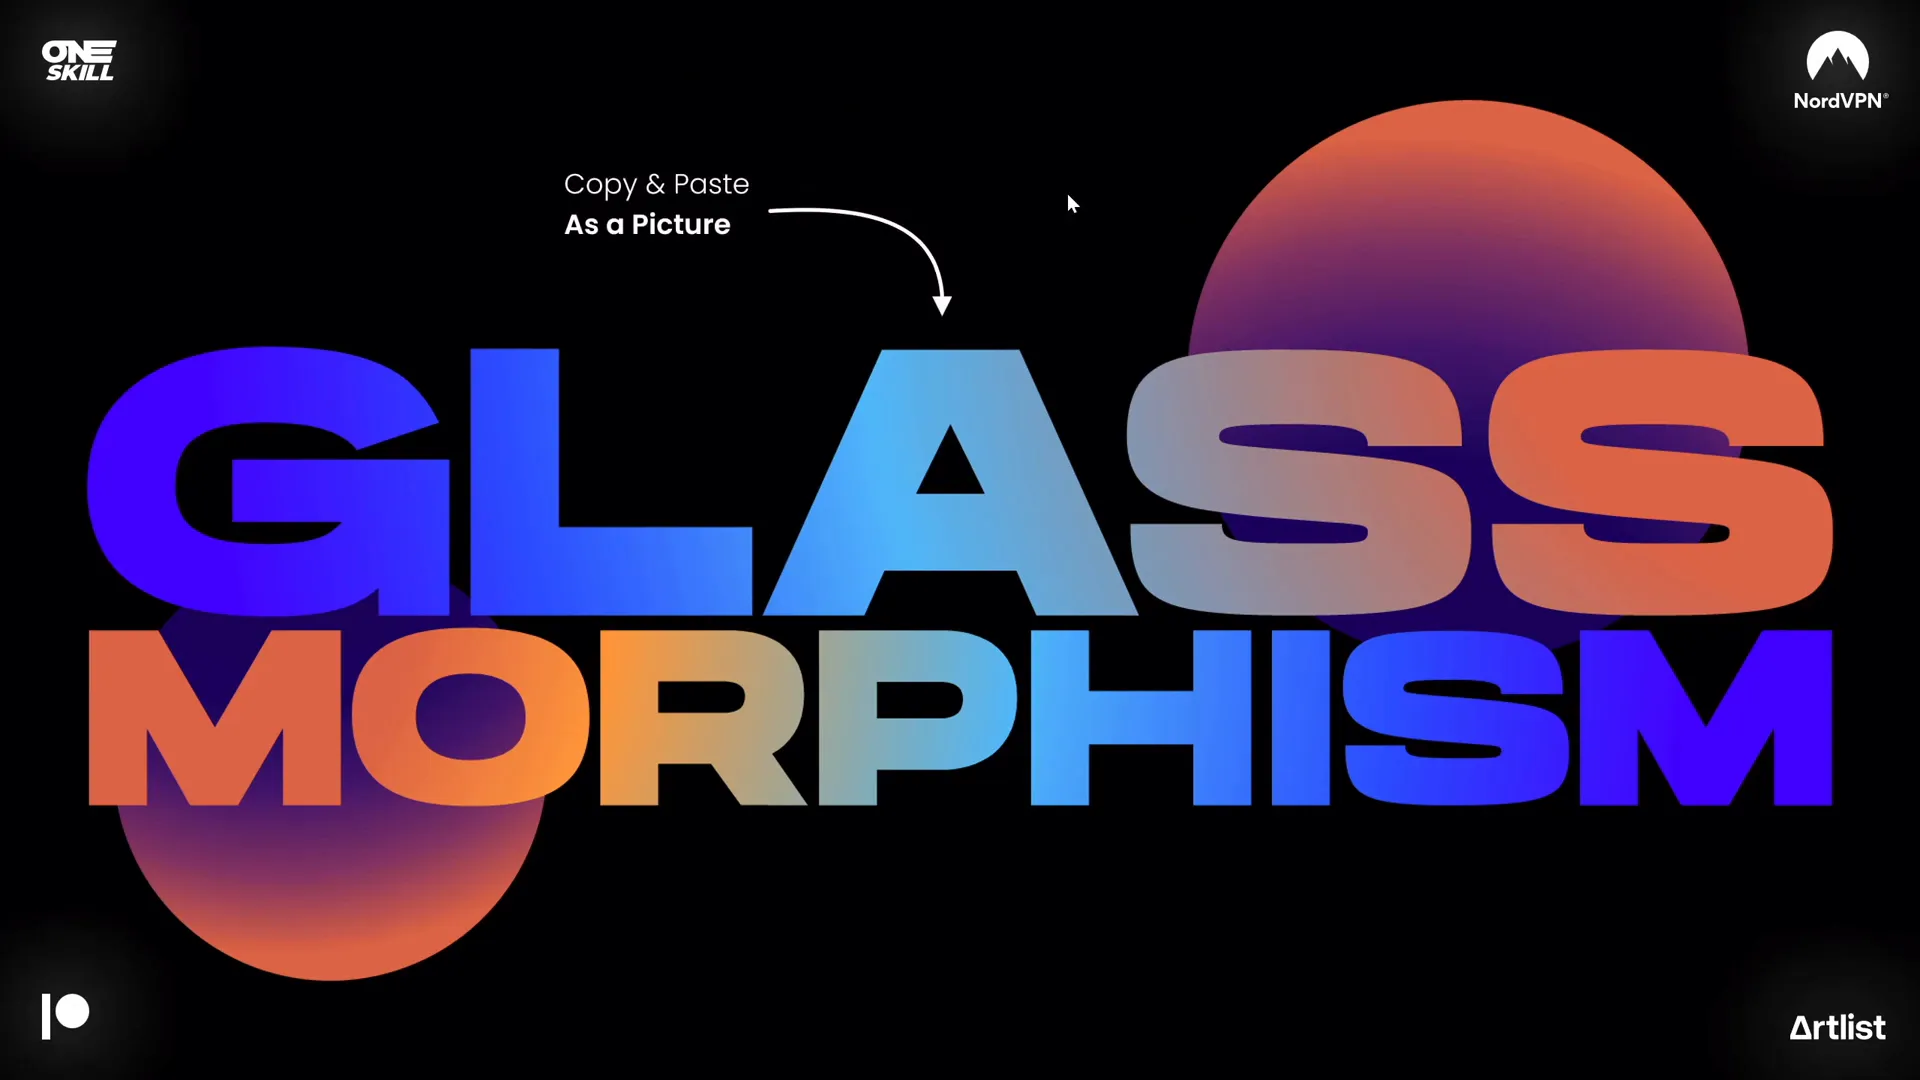
Turning Slide Elements Into a Picture
Once the text boxes and circles are styled, select all the elements together (hold Shift and click each element), and then copy and paste them back as a picture.
Why do this? Because once your slide design is a picture, you can apply various picture effects that are otherwise unavailable for individual shapes and text boxes.
This includes effects like grain, saturation boosts, color temperature adjustments, and blurring—all crucial for the glassmorphic style.
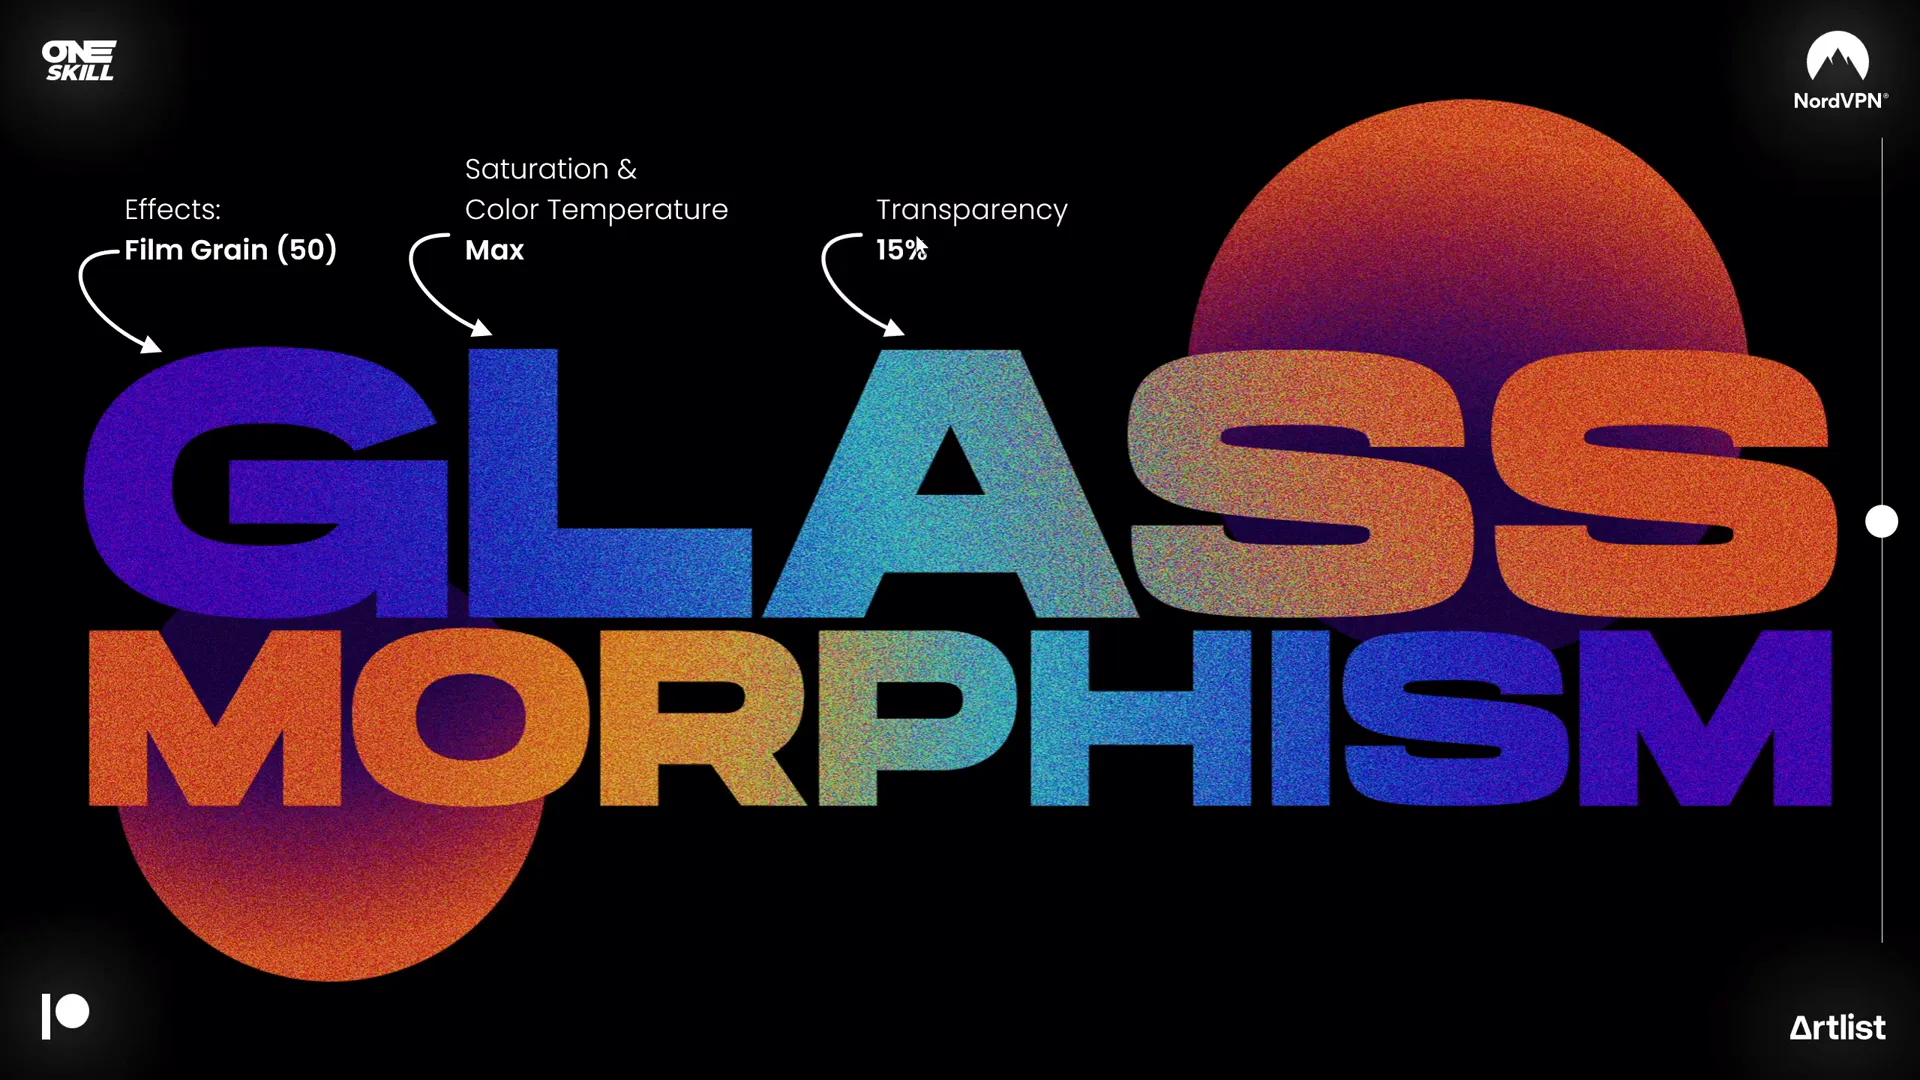
Adding Picture Effects for Texture and Color
With the slide design converted into a picture, it’s time to add texture and color effects:
- Apply Film Grain Effect: Go to Artistic Effects and choose Film Grain. Set the grain size to 50 to add a subtle, textured look.
- Boost Saturation and Color Temperature: In the picture color options, maximize both saturation and temperature to make colors pop.
- Add Transparency: To avoid an overly intense effect, add some transparency to the picture. This softens the look and maintains the glassy feel.
Creating the Frosty Glass Circle
Now we’re going to isolate a frosted glass circle from the blurred, grainy slide picture:

- Save the entire slide as a picture. You can do this quickly by taking a screenshot during presentation mode (Print Screen key or Shift + Windows Key + S).
- Paste the screenshot onto the slide and center it.
- Apply a maximum blur effect to this picture.
- Insert a new circle shape anywhere on the slide.
- Select the blurred screenshot first, then the circle.
- Use the Merge Shapes → Intersect tool to crop the blurred image to the shape of the circle.
This creates a perfect frosted glass circle with a blurred background.
Adding Frosty Details
To enhance the frosted look:
- Add a white inside shadow to the circle shape, giving it depth and a frosty edge.
- Add a subtle white outline with 1 pt width and 20% transparency for a clean border.
These finishing touches help the circle look like a polished piece of frosted glass.
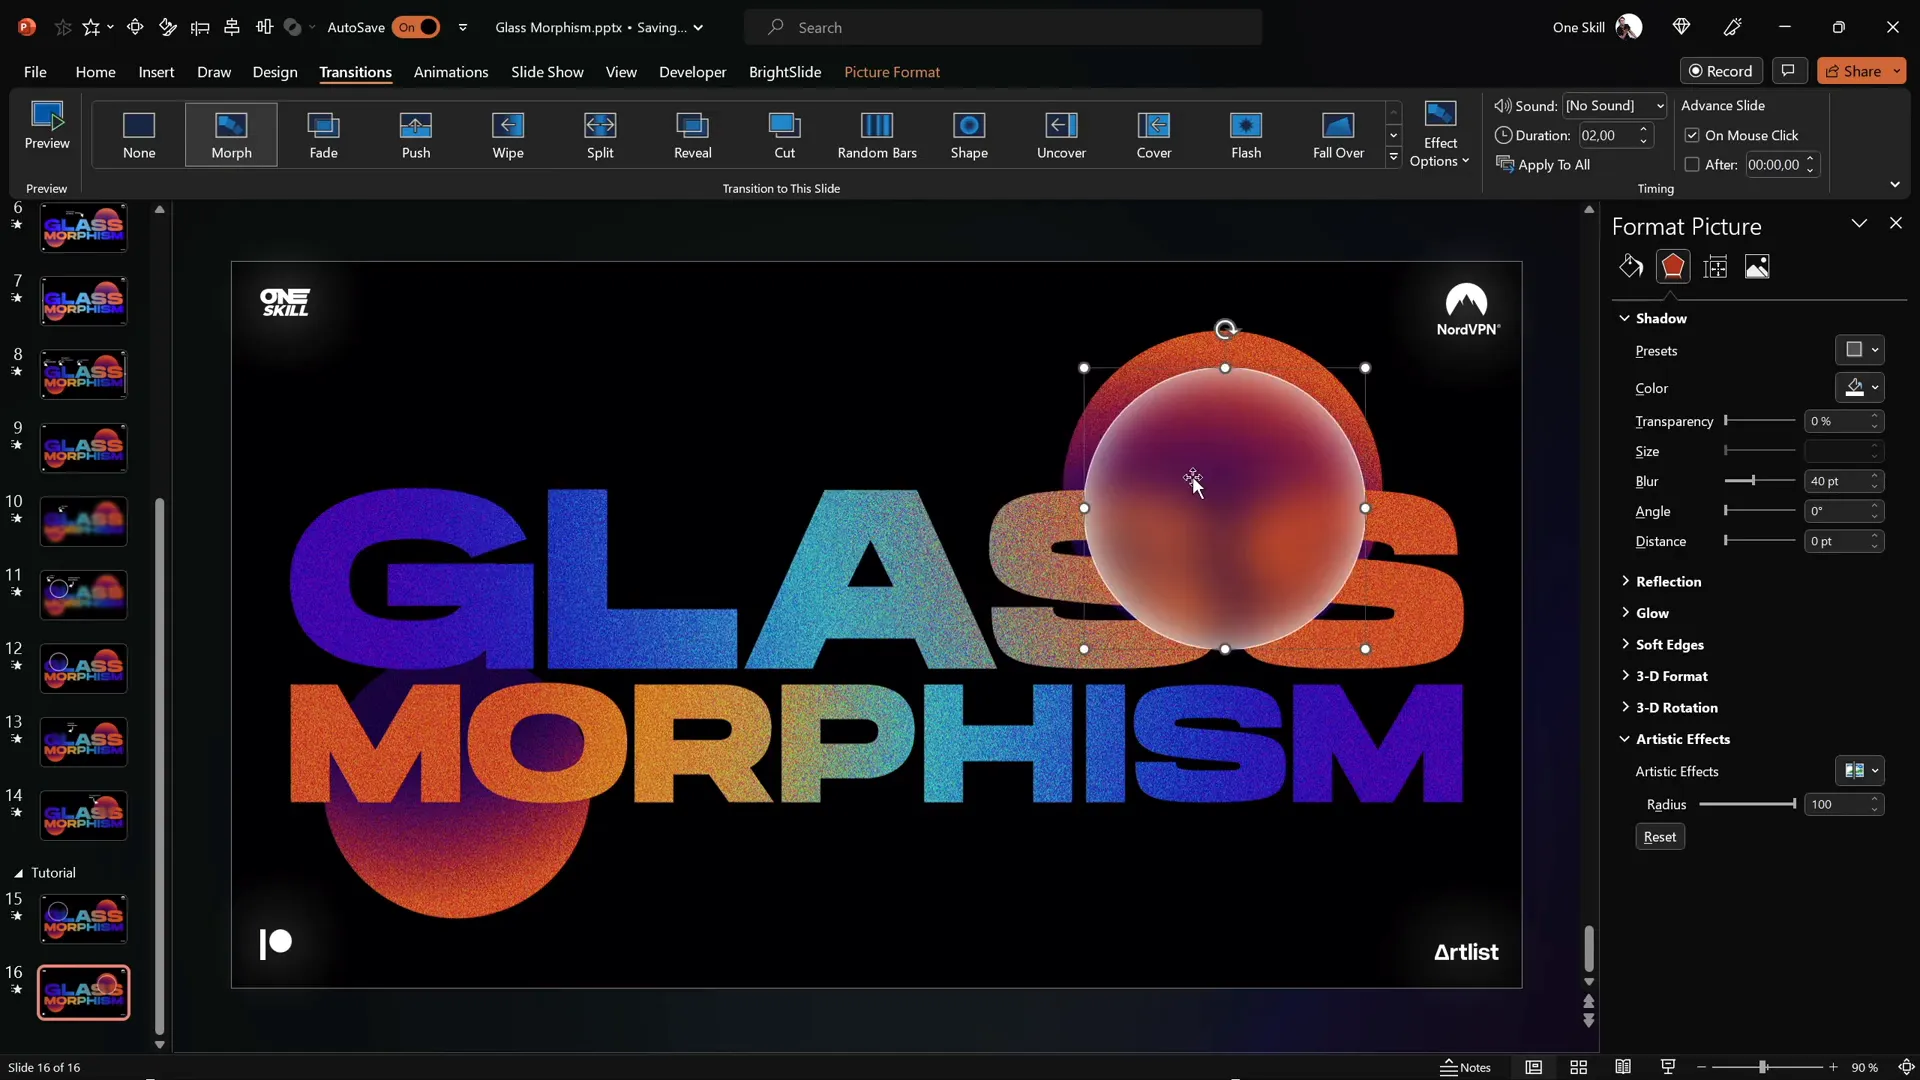
Animating the Slide with Morph Transition
Now for the magic—animation! PowerPoint’s Morph Transition will create a slick, animated effect that moves the frosted glass circle smoothly across the slide.
Here’s how to set it up:
- Duplicate the slide with the frosted glass circle (Ctrl + D or right-click → Duplicate Slide).
- On the duplicate slide, select the frosted circle and use the Crop tool to reposition it to a new location.
- Apply the Morph Transition to the second slide.
When you play the presentation, the circle will animate from its first position to the second, creating a smooth glassmorphic movement.
Adding a Subtle Glow Effect
To make the glassmorphic design even more eye-catching, add a glow effect:
- Duplicate the picture of the slide design (remember, it’s a picture with grain effect applied).
- Place the duplicate directly on top of the original.
- Apply the Blur artistic effect at maximum to the top picture.
- Send the blurred picture to the back so that the grainy picture remains on top.
- Copy and paste this blurred design onto the second slide and send it to the back as well.
This layering creates a beautiful glowing aura around the glassmorphic elements, enhancing the overall aesthetic without overwhelming the design.
Additional Tips and Tricks
- Insert Multiple Circles: Feel free to add as many frosted circles as you want for a richer layout. Just be mindful of clutter.
- Use the Selection Pane: To manage multiple elements more easily, use PowerPoint’s Selection Pane (Home → Arrange → Selection Pane) to hide/unhide or rename objects.
- Font Choice: Use the Hanson font or similar clean, bold fonts to complement the glassmorphic style.
- PowerPoint Version: This tutorial uses PowerPoint Microsoft 365 on Windows. Some features like Morph Transition might not be available in older versions.
- Practice Makes Perfect: Experiment with different gradient colors, transparency levels, and animation timings to find the look that best fits your presentation theme.
Frequently Asked Questions (FAQ)
What is the Morph transition in PowerPoint?
The Morph transition is a powerful animation tool in PowerPoint that allows smooth movement, resizing, and transformation of objects between slides. It’s perfect for creating dynamic effects like the animated glassmorphic circles.
Can I use this glassmorphic effect in older versions of PowerPoint?
The Morph transition and some artistic effects used here are only available in PowerPoint Microsoft 365 and PowerPoint 2019 or later. However, you can still create static glassmorphic designs in older versions but without the smooth animation.
How do I get the Hanson font?
Hanson is a free font that you can download from many font websites. It’s linked in the resources section of this tutorial. Once downloaded, install it on your system to use in PowerPoint.
Can I customize the colors used in the gradients?
Absolutely! The glassmorphic effect relies on gradients with transparency, so feel free to experiment with different hex color codes and opacities to match your branding or presentation theme.
Is this effect suitable for all types of presentations?
This effect works best for modern, creative, or tech-focused presentations. For more formal or text-heavy presentations, use it sparingly to avoid distraction.
Conclusion
Mastering the animated glassmorphic effect is a fantastic way to enhance your PowerPoint presentation skills and create eye-catching slides that impress your audience. By combining gradient fills, picture effects, and the Morph transition, you can build a sleek, modern design with smooth animations all within PowerPoint.
The process is surprisingly straightforward once you break it down step-by-step:
- Design your slide with text boxes and circles
- Apply rich gradient fills for color depth
- Convert elements to pictures to unlock artistic effects
- Add grain, saturation, and blur for texture
- Create frosted circles by cropping blurred images
- Animate with Morph transition for dynamic movement
- Enhance with glow effects for polish
With these techniques in your PowerPoint toolbox, you’re well-equipped to add a professional, modern edge to your presentations. Keep practicing and experimenting with different colors, shapes, and animations to make your slides truly unique.
Happy designing, and stay creative!
Check out the full video: PowerPoint Presentation Skills: Creating the Glassmorphic Effect! ✨


