If you’re looking to elevate your PowerPoint presentation skills and captivate your audience with dynamic and engaging slides, this comprehensive tutorial will take you through creating a stunning looping sticker animation with a video background, animated text, and hand-drawn illustrations. Whether your presentation is about summer vibes, your favorite travel destination, or even your country, the techniques shared here are versatile and sure to impress.
In this detailed guide, we’ll break down the entire process of crafting an eye-catching PowerPoint slide using Microsoft PowerPoint 365, covering everything from inserting and looping a background video to animating text with a wavy effect and adding motion path animations on beautiful summer-themed illustrations. By the end, you’ll have the know-how to create a professional and visually appealing animated slide that loops seamlessly, perfect for presentations that need a creative flair.
Table of Contents
- Getting Started: Preparing Your Assets
- Creating a Looping Video Background
- Animating the Wavy Text Title
- Adding and Looping Summer Illustrations
- Final Touches and Preview
- Frequently Asked Questions (FAQs)
- Conclusion
Getting Started: Preparing Your Assets
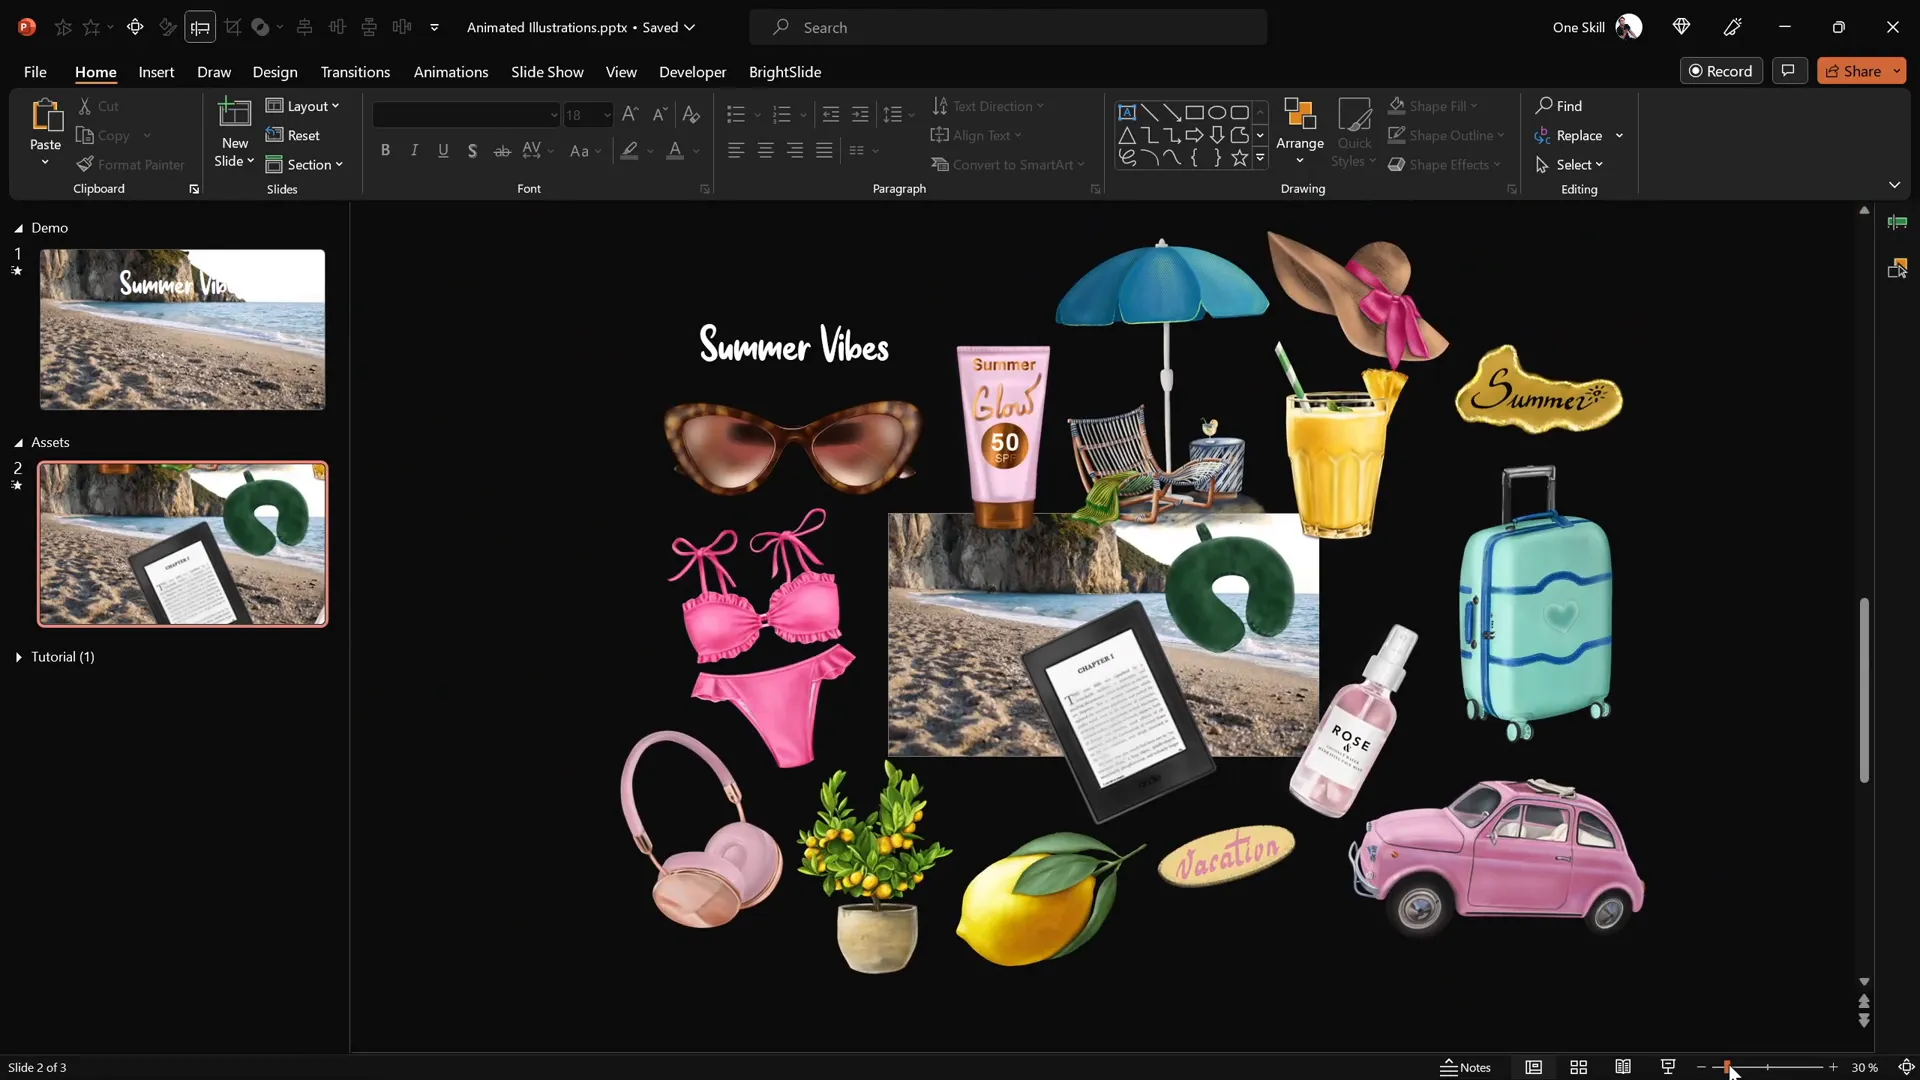
The foundation of a great animated PowerPoint slide starts with the right assets. In this tutorial, we use a collection of vibrant summer-themed illustrations, a looping video background, and a custom font to create a bright, engaging slide. Here’s a breakdown of the assets you’ll need:
- Summer Illustrations: A set of hand-drawn PNG illustrations with transparent backgrounds, including sunglasses, headphones, lemons, stickers, luggage, cars, a Kindle reader, cocktail glasses, sunscreen bottles, and umbrellas. These were beautifully crafted by the talented digital artist Raminta. You can find her illustrations on her Etsy store. These illustrations are affordable and perfect for presentations.
- Looping Video Background: A 23-second video clip of a beach shoreline, downloaded from Artlist.io. This video sets the mood and adds a dynamic backdrop to your slide.
- Font: The title uses the “Sweet Purple” font, sized at 115 pt, which adds a playful and wavy look to the text. You can download this font for free from Dafont.com.
Before diving into PowerPoint, ensure you have these assets downloaded and ready. Having transparent PNGs allows for easy layering and animation without background clashes.
Creating a Looping Video Background
One of the highlights of this animation technique is the use of a beautiful, looping video as the slide background. This adds motion and visual interest without distracting from the main content. Here’s how to set it up:
- Insert the Video: Open a fresh blank slide in PowerPoint 365. Copy your downloaded video (in this case, the beach shoreline clip) and paste it directly onto the slide. The video will appear as the background.
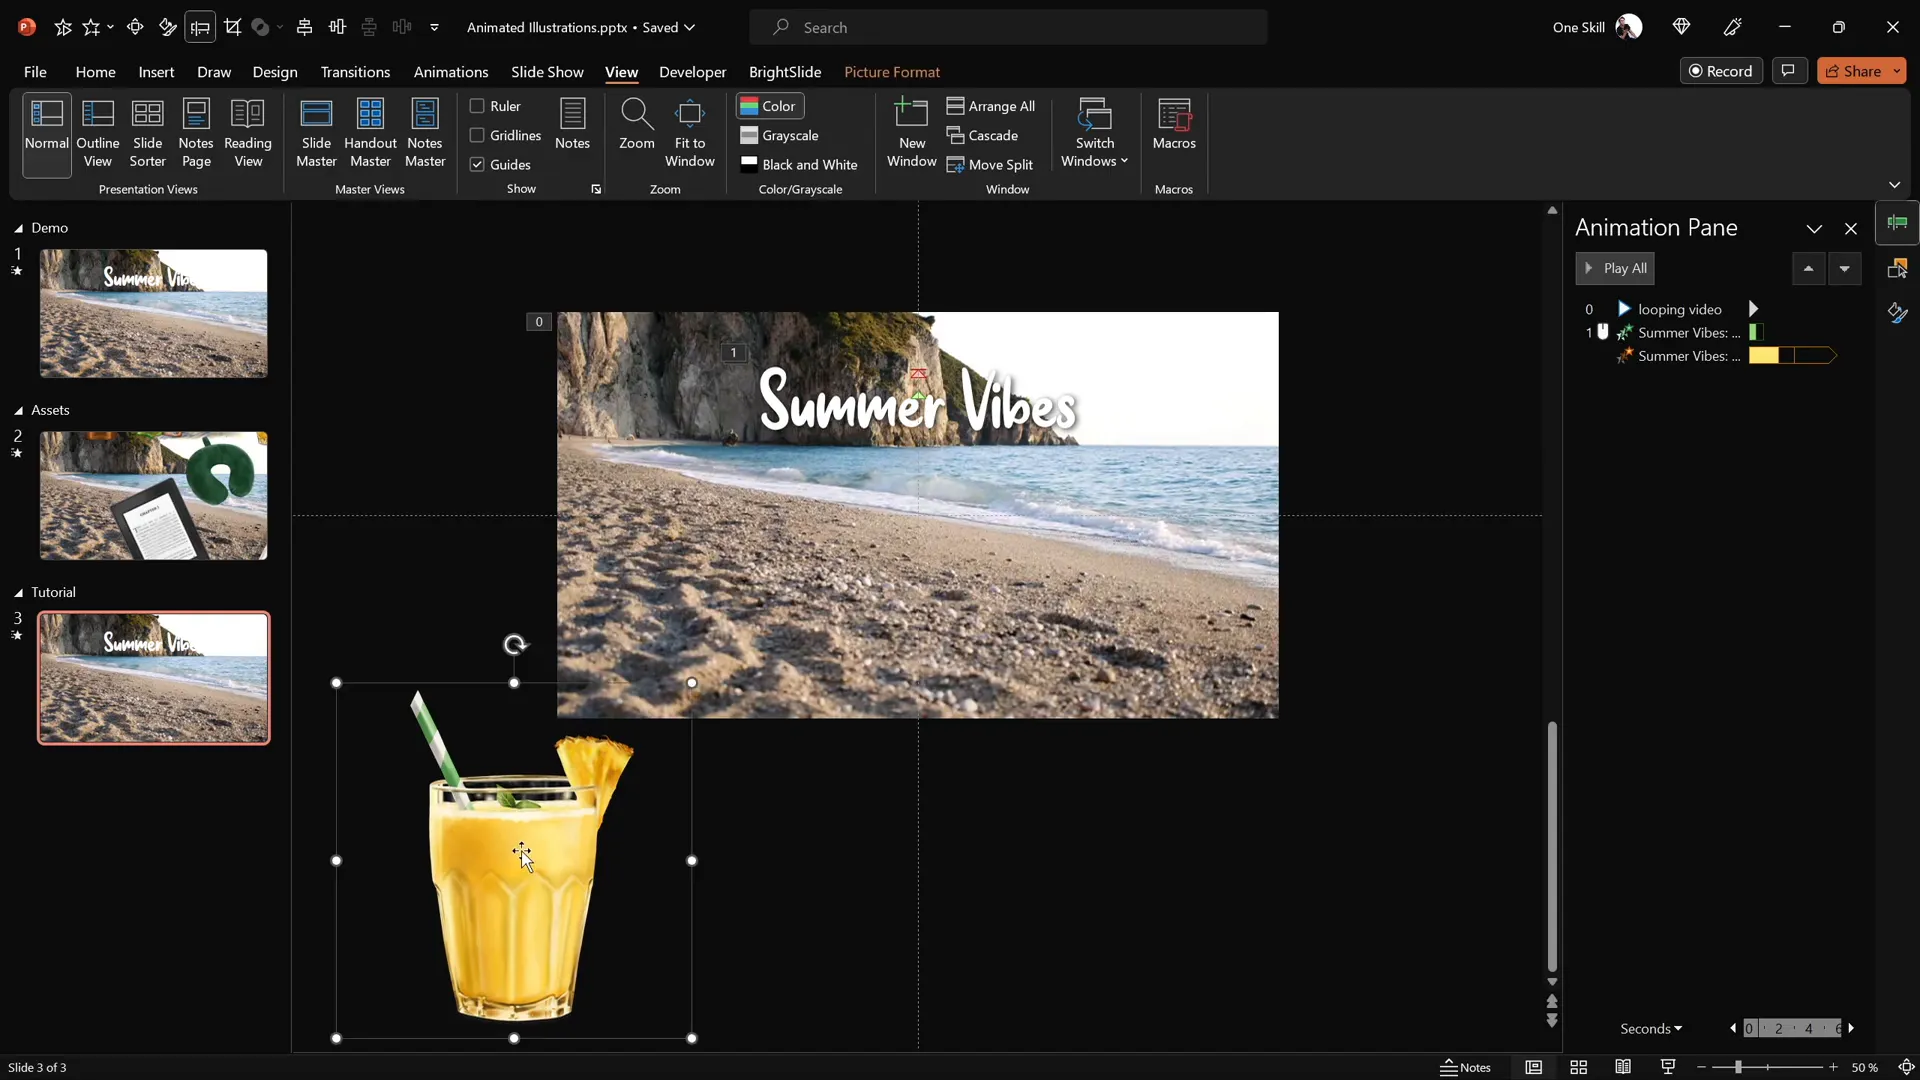
- Set Video Playback Options: Select the video, then go to the Animations tab and add a Play animation.
- Configure Automatic Playback: In the Animation Pane, set the Play animation to start With Previous. This ensures the video starts playing as soon as the slide loads, without needing a click.
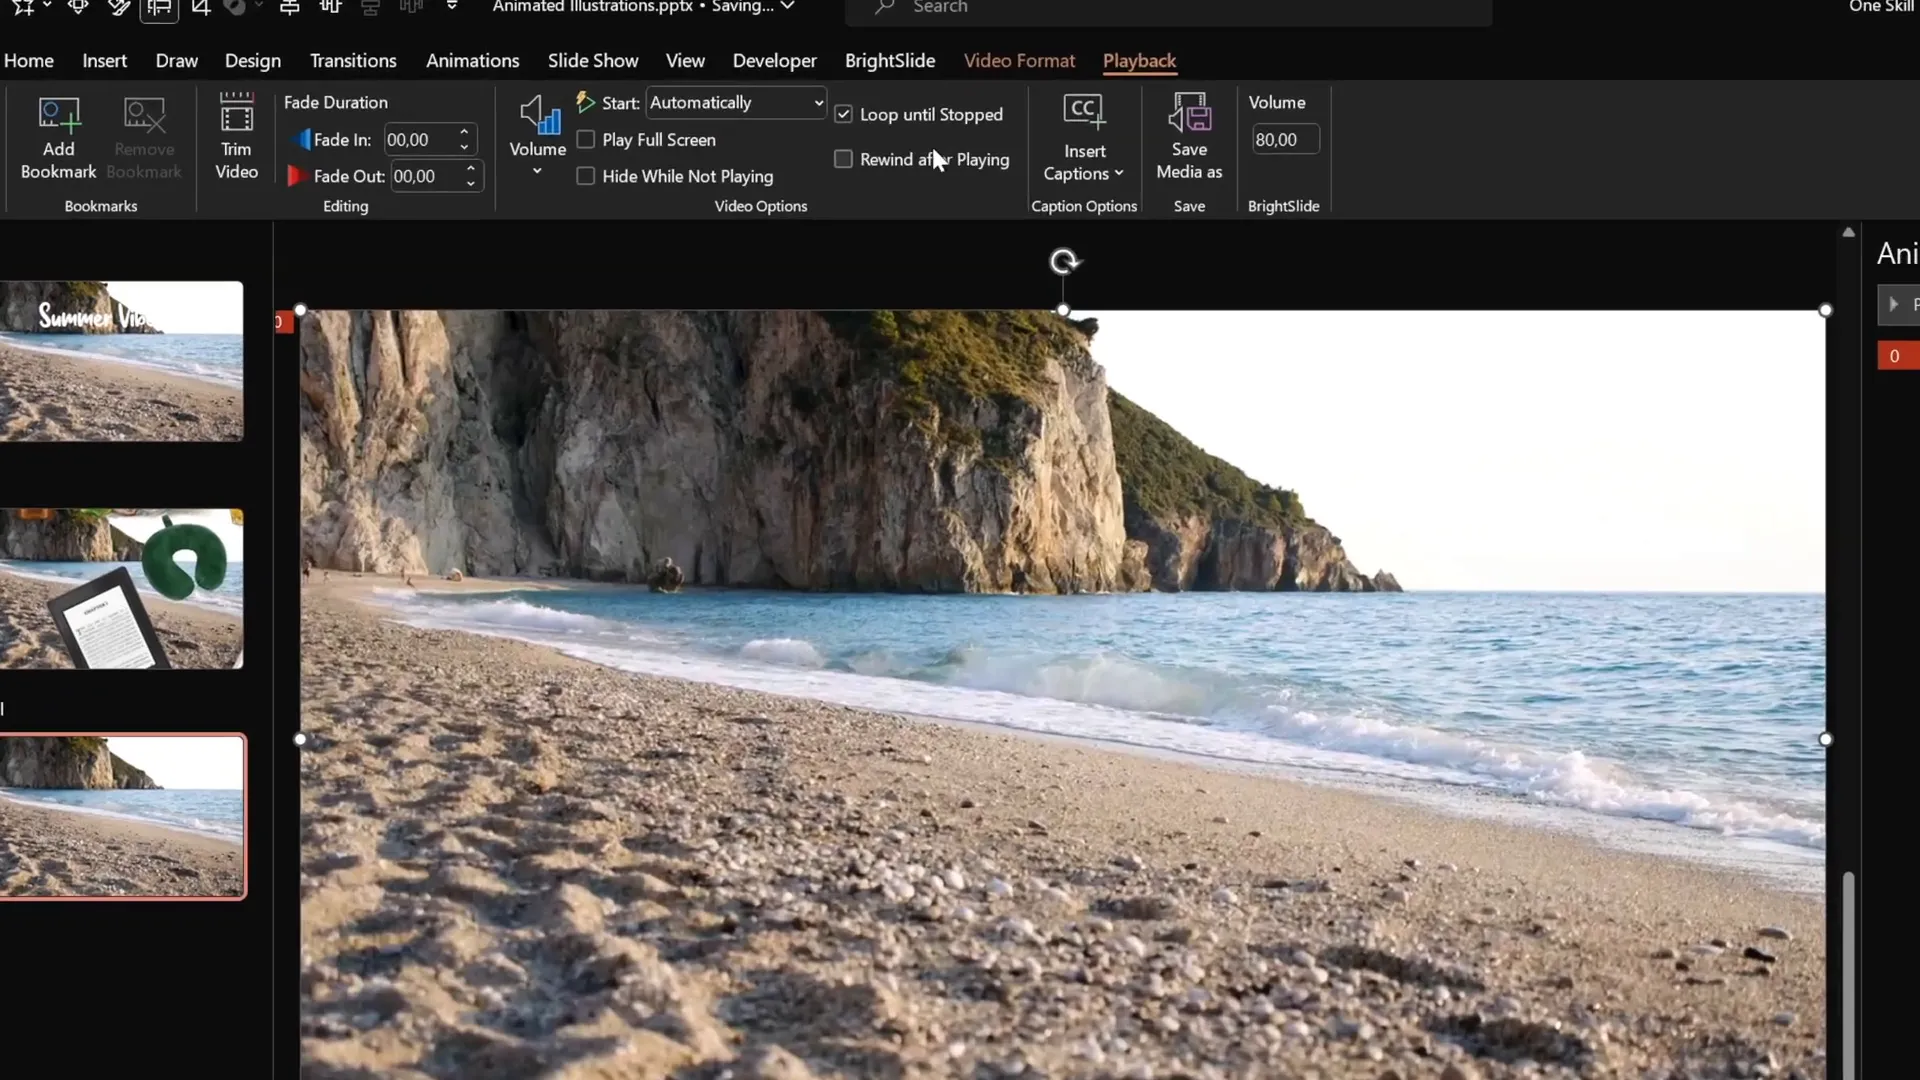
- Enable Looping: In the Playback tab, check the option Loop until Stopped. This makes the video loop continuously during the slide.
- Hide Video Controls: To keep the slide clean and distraction-free, go to the Slideshow tab and uncheck Show Media Controls. This removes the play/pause bar at the bottom of the video.
- Prevent Video Reset on Click: By default, clicking the video resets it. To disable this, insert a transparent rectangle shape covering the entire slide. Remove its outline and set the fill transparency to 100%. This shape will block clicks from reaching the video, preventing resets.
Now when you run your slideshow, the video background will play automatically, loop endlessly, and remain non-interactive, allowing you to focus on animating other slide elements.
Animating the Wavy Text Title
Next, let’s create an animated, wavy text title that adds personality and movement to the slide. This title will zoom in letter by letter and then continuously wave to simulate a summer breeze. Here’s the step-by-step process:
- Add the Text Box: Insert a text box and type your slide title (e.g., “Summer Vibes”). Use the Sweet Purple font at size 115 pt for a bold, playful look. Position it near the top center of the slide, just above the water in the video background.
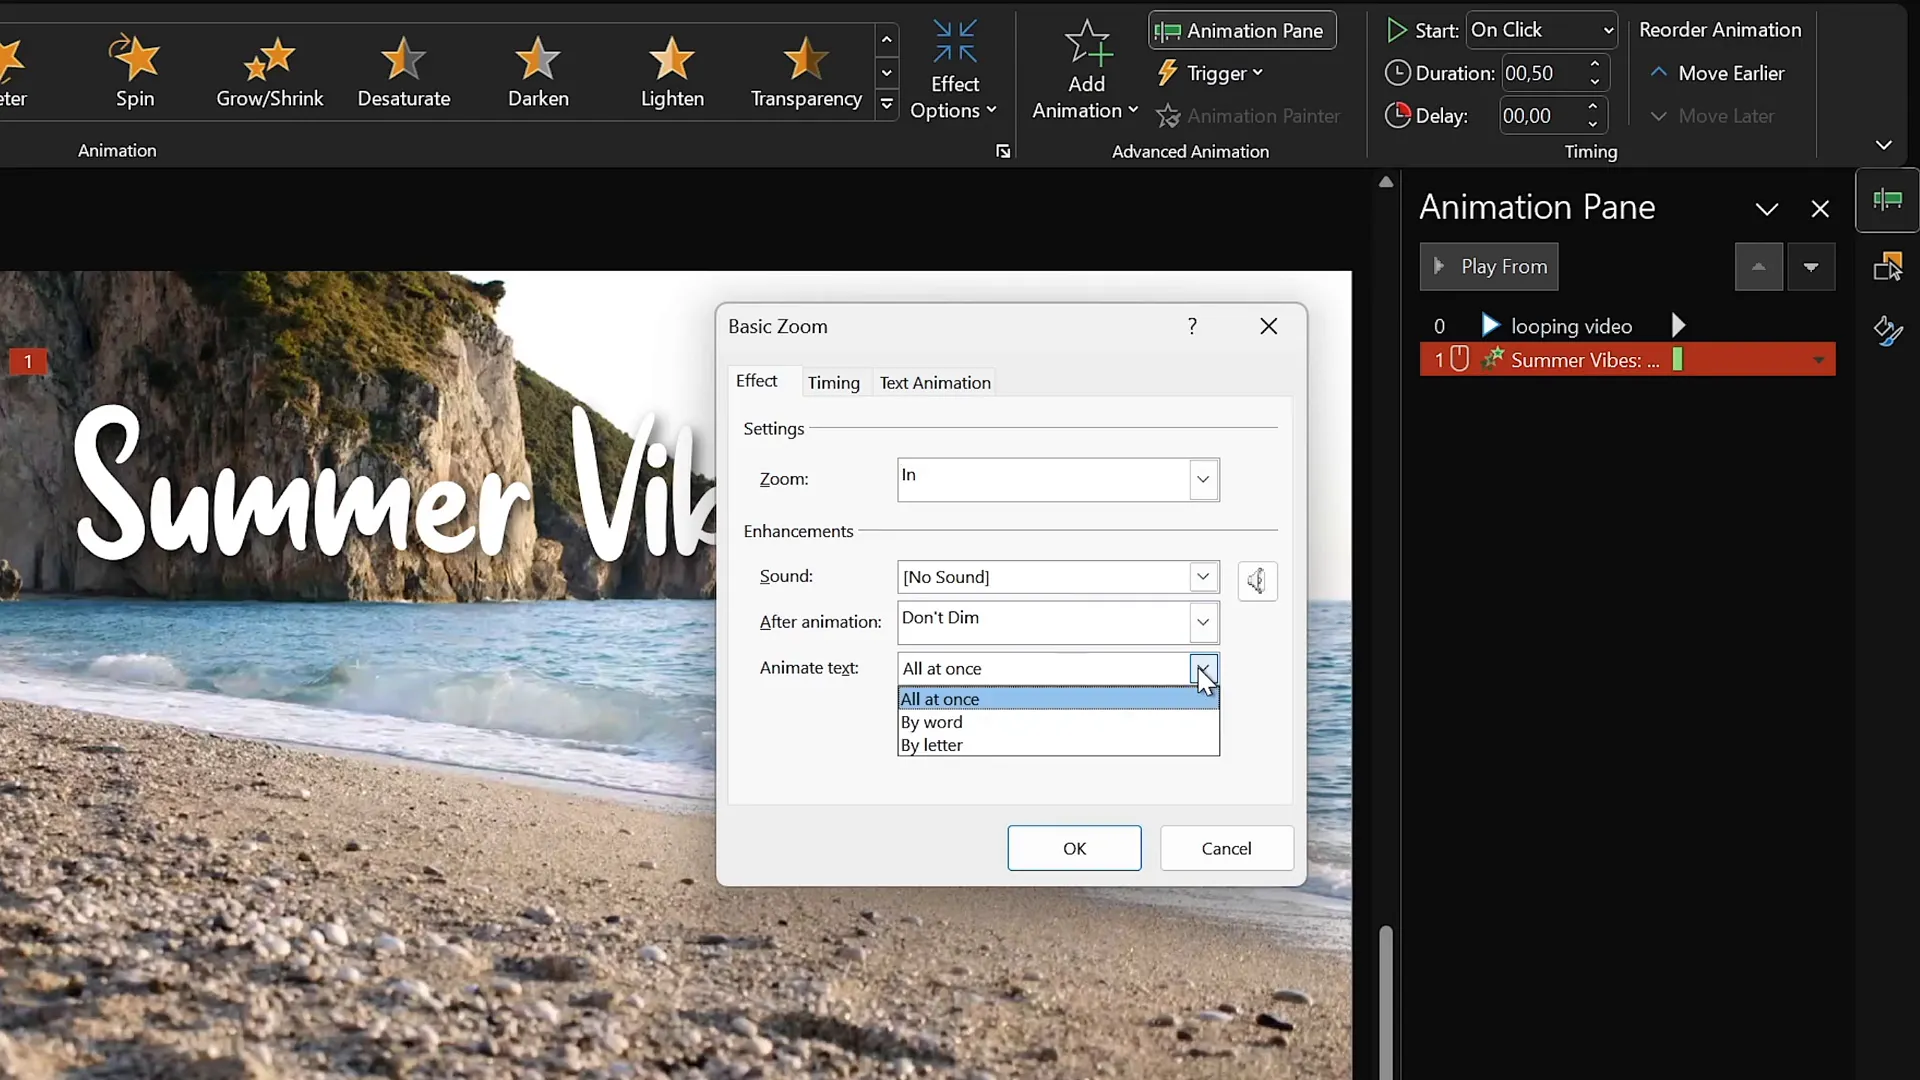
- Add Basic Zoom Animation: Select the text box, go to Animations, click Add Animation, then select More Entrance Animations. Choose Basic Zoom and click OK.
- Customize Zoom Animation: In the Animation Pane, set the zoom animation to start On Click, duration 0.5 seconds. Click Effect Options and animate the text By Letter with a 10% delay between letters.
- Add Wave Animation: With the text box still selected, add a second animation: Wave (found in Emphasis animations). Set this animation to start With Previous, duration 2 seconds, and animate By Letter with a 5% delay.
- Loop the Wave Animation: Go to the timing tab of the wave animation and select Repeat Until End of Slide. This makes the wavy movement continue indefinitely while the slide is active.
When you run the slide, the title will zoom in one letter at a time on click, then continuously wave, creating a lively and attention-grabbing effect that complements the summer theme.
Adding and Looping Summer Illustrations
To bring the slide to life even further, we’ll add several summer-themed illustrations and animate them to move in looping paths across the slide. This section covers how to insert these elements and create smooth, continuous motion animations.
Step 1: Insert and Position Illustrations
- Copy your chosen PNG illustrations from your asset folder or a previous slide.
- Paste each illustration into the slide and position them strategically around the bottom corners or edges. For example, place a cocktail glass in the bottom-left corner, an umbrella in the bottom-right, a sunscreen bottle near the umbrella, and a hat overlapping the umbrella area.
- Use PowerPoint’s slide guides to help you align and center objects relative to the slide.
- Rotate or resize illustrations as needed for natural placement and visual balance.
Step 2: Animate Illustrations with Motion Paths
We’ll animate each illustration using a motion path animation combined with a basic zoom entrance to simulate floating or drifting movements.
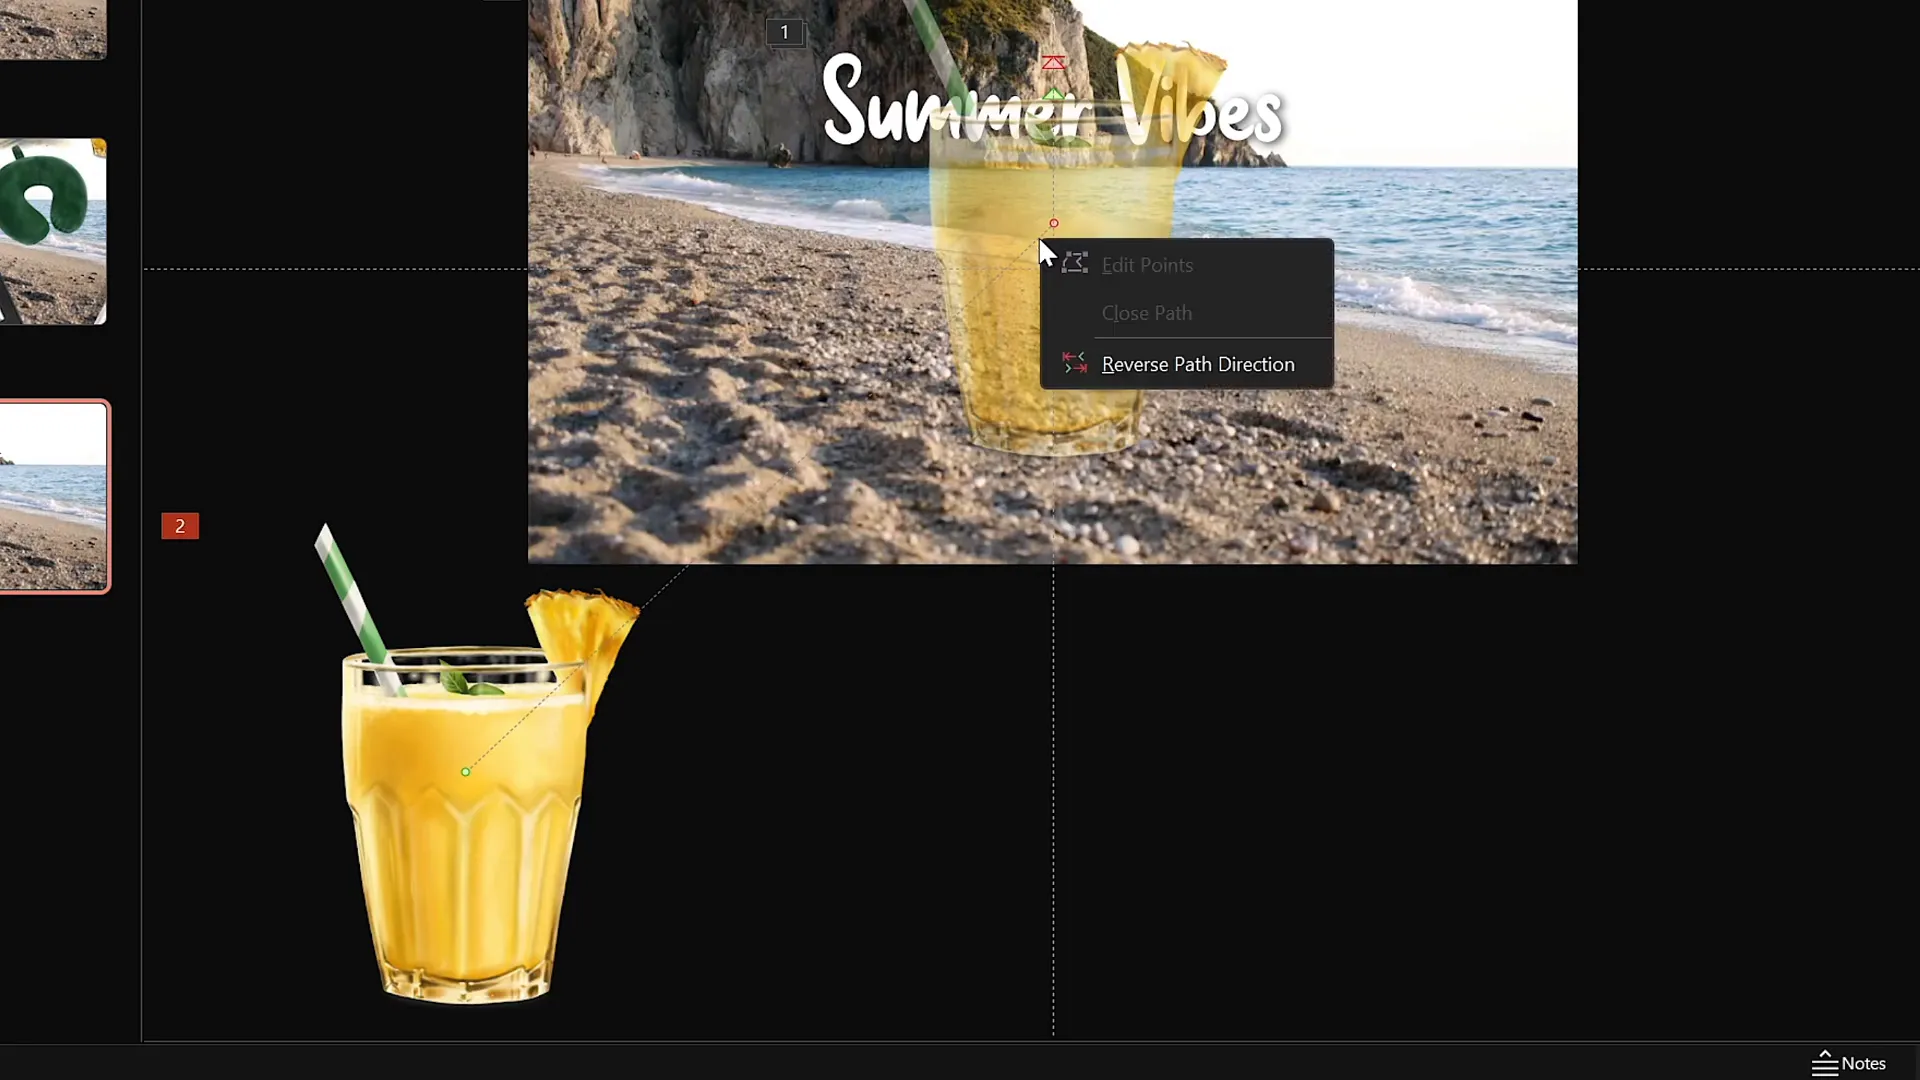
- Add Motion Path Animation: Select an illustration (e.g., the cocktail glass) and go to Animations. Add a Motion Path – Line animation.
- Adjust Motion Path: Drag the red endpoint of the motion path to a position just above the slide’s center. This sets the path along which the illustration will move.
- Reverse Motion Path: Reverse the path so that the animation starts at the slide center and moves outward to the edge.
- Set Animation Timing: Configure the motion path to start With Previous, duration 4 seconds, and set a smooth start for natural movement.
- Loop the Animation: Set the animation to repeat Until End of Slide, creating a continuous floating effect.
- Add Basic Zoom Entrance: Add a Basic Zoom entrance animation to the illustration, starting With Previous, duration 4 seconds, and repeat until the end of the slide. This makes the illustration grow gradually as it moves.
Step 3: Duplicate and Offset Animations for Variety
To create a natural and dynamic scene, apply the same two animations (basic zoom and motion path) to other illustrations like the umbrella, sunscreen bottle, and hat. Use the Animation Painter tool to copy animations quickly.
- Position each new illustration in its place on the slide.
- Adjust the starting point of the motion path to slide center for each illustration.
- Add delays of 1, 2, and 3 seconds to the umbrella, sunscreen bottle, and hat animations respectively to stagger their movement and avoid simultaneous motion.
- In the Selection Pane, arrange the stacking order of the illustrations to ensure proper layering (e.g., cocktail glass above umbrella).

Step 4: Preview and Fine-Tune
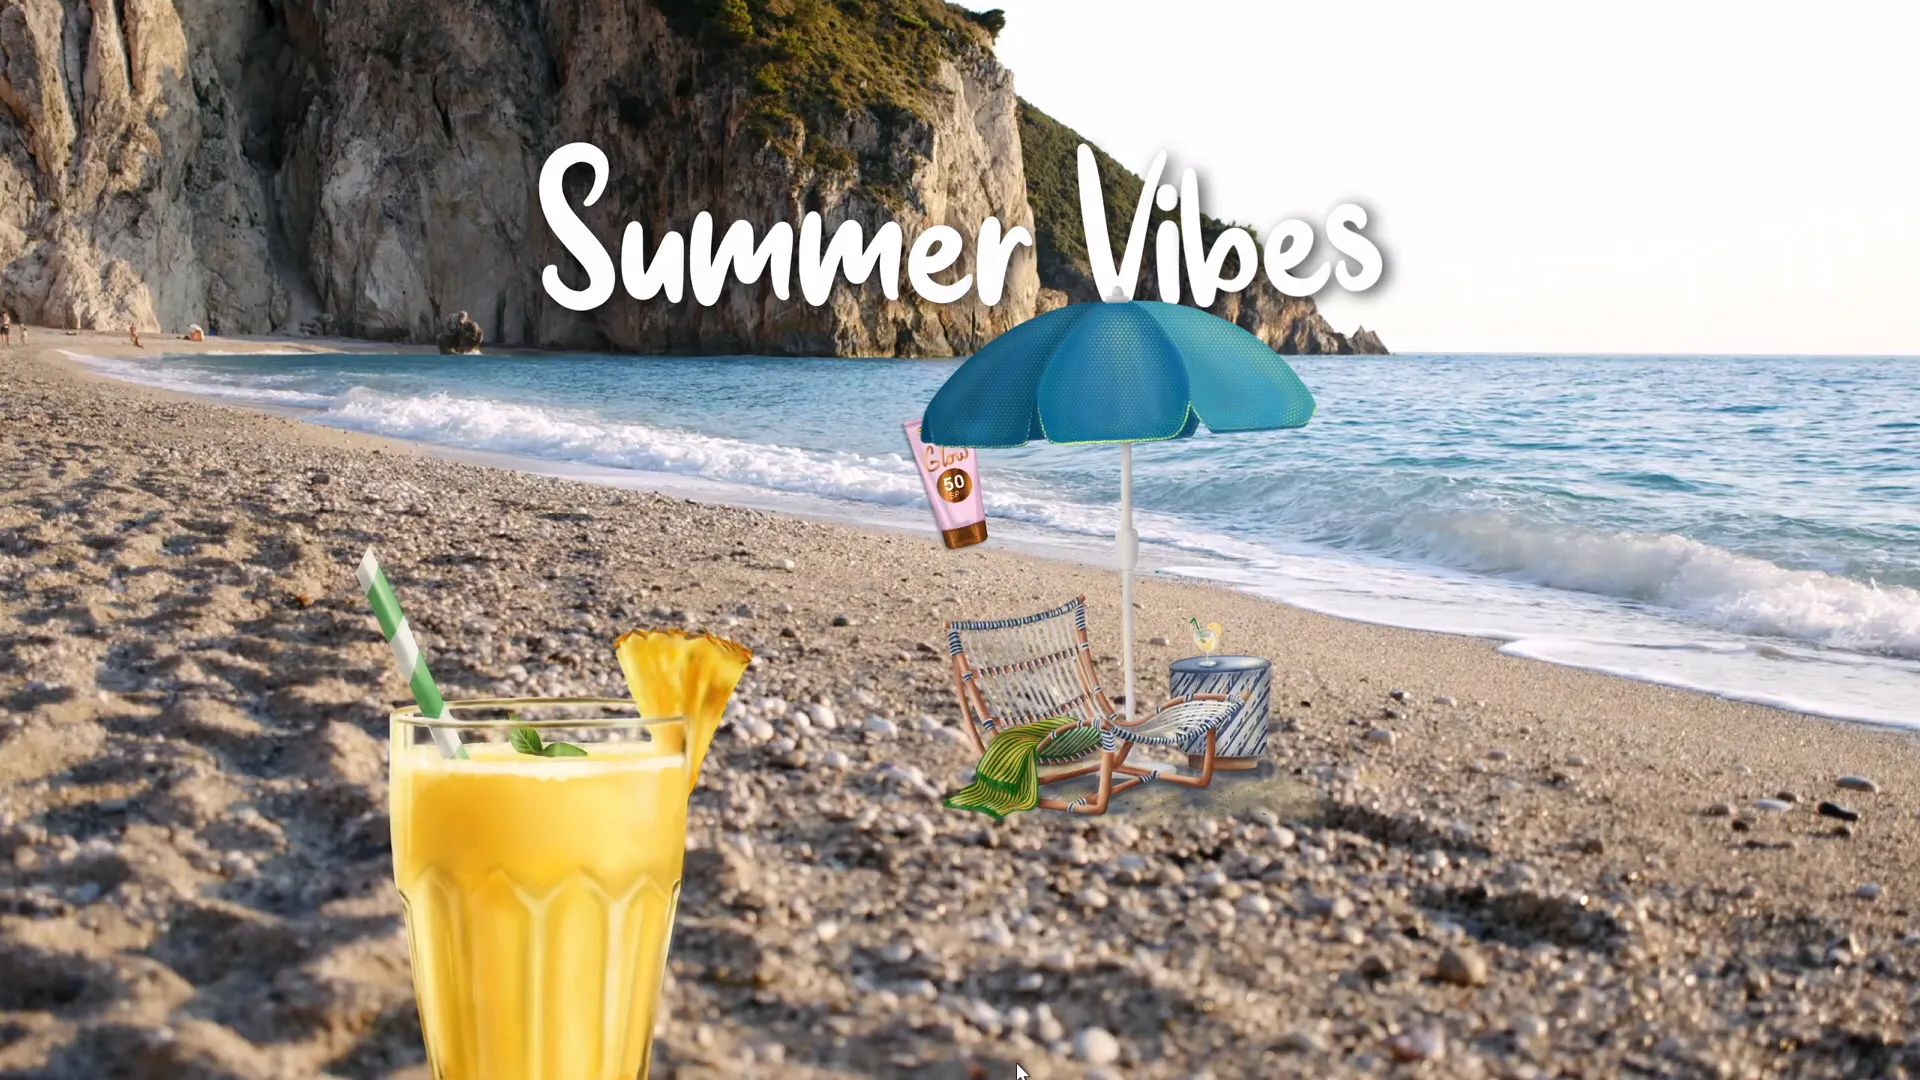
Run the slide in full-screen mode to see the animations in action. You should see:
- The video background playing and looping automatically.
- The title text zooming in on click and then waving continuously.
- Summer illustrations gradually zooming and floating away from the center in a smooth, looping pattern, with staggered timing for a natural effect.
If any animations feel too fast or too slow, adjust their durations and delays accordingly. You can also tweak the wave height of the text animation for more or less movement.
Final Touches and Preview
Congratulations! You’ve now created a visually compelling PowerPoint slide with a looping video background, animated wavy text, and floating summer illustrations that loop seamlessly. Here are some final tips to polish your slide:
- Check Layering: Use the Selection Pane to manage the order of objects, ensuring nothing important is hidden behind others.
- Test Interactivity: Confirm that the transparent rectangle shape is blocking video clicks, so the video doesn’t reset when you click.
- Adjust Animation Timing: Experiment with delays and durations to create a balanced and natural flow.
- Save Your Presentation: Save your PowerPoint file regularly to avoid losing your work.
- Consider Exporting: If sharing your presentation, consider exporting it as a video or PDF (note that animations won’t transfer to PDF).
By mastering these animation techniques, you can create engaging slides that hold your audience’s attention and add a professional touch to your presentations.
Frequently Asked Questions (FAQs)
1. What version of PowerPoint do I need to create these animations?
This tutorial uses Microsoft PowerPoint 365, which supports advanced animations and video playback features. While some animations may work in older versions, PowerPoint 365 ensures the smoothest experience.
2. Where can I get the summer illustrations used in this tutorial?
The summer-themed PNG illustrations with transparent backgrounds were created by the digital artist Raminta. You can purchase and download them from this link. They are affordable and perfect for presentations.
3. How do I make a video background loop automatically in PowerPoint?
Insert the video onto the slide, add a Play animation set to start With Previous, and enable the Loop until Stopped option in Playback settings. Also, hide media controls in the Slideshow tab for a clean look.
4. Can I use other fonts besides Sweet Purple for the wavy text?
Yes! While Sweet Purple adds a playful vibe, you can use any font you prefer. Just make sure the font supports animation by letter and fits your slide’s theme.
5. How do I prevent the video from resetting when clicked?
Insert a transparent rectangle shape that covers the entire slide, set its fill transparency to 100%, and remove the outline. This shape blocks mouse clicks from reaching the video, preventing it from restarting.
6. Can I use this animation technique for other themes besides summer?
Absolutely! The animation methods shown here are versatile and can be adapted for any theme or topic by swapping out illustrations, video backgrounds, and text.
7. How do I loop animations continuously in PowerPoint?
In the Animation Pane, select the animation, go to Timing options, and set Repeat to “Until End of Slide.” This will loop the animation as long as the slide is active.
8. What if my video background shows media controls during the presentation?
Go to the Slideshow tab and uncheck the “Show Media Controls” option. This hides the video playback bar for a cleaner presentation.
9. Can I export this animated slide as a video?
Yes, PowerPoint 365 allows you to export presentations as videos, which will preserve animations and video backgrounds. Go to File > Export > Create a Video.
10. Are there any performance considerations when using video backgrounds and animations?
Yes, video backgrounds and multiple animations can increase file size and may cause lag on older or slower computers. Test your presentation on the actual device you’ll use and optimize video resolution if needed.
Conclusion
Mastering PowerPoint presentation skills today means knowing how to create engaging, animated slides that go beyond static text and images. This tutorial has walked you through creating a captivating looping sticker animation slide with a video background, animated wavy text, and motion path animations on colorful summer illustrations.
These techniques not only make your presentations more visually appealing but also help keep your audience engaged and impressed. With some creativity and practice, you can adapt these animation skills to suit any topic or theme, enhancing the storytelling aspect of your presentations.
Special thanks to the digital artist Raminta for providing the beautiful illustrations that brought this slide to life. For anyone interested, her Etsy store is linked in the resources below.
Ready to start animating your own slides? Gather your assets, fire up PowerPoint 365, and create presentations that truly stand out!
Thank you for reading, and stay tuned for more PowerPoint tutorials to sharpen your presentation skills.


