
Welcome to an exciting tutorial that will elevate your PowerPoint presentation skills to a whole new level! If you’ve ever wanted to add dynamic, eye-catching transitions that captivate your audience, you’re in the right place. Today, we’ll dive deep into how to create a cool rotating transition effect in PowerPoint, transforming ordinary slides into visually engaging stories.
This guide is inspired by the creative expertise of Dream Liu, a PowerPoint enthusiast and educator who shares practical, innovative techniques for enhancing presentations. Following this detailed walkthrough, you’ll learn how to combine images, shapes, shadows, and morph transitions to produce a smooth, rotating effect that adds flair and professionalism to your slides.
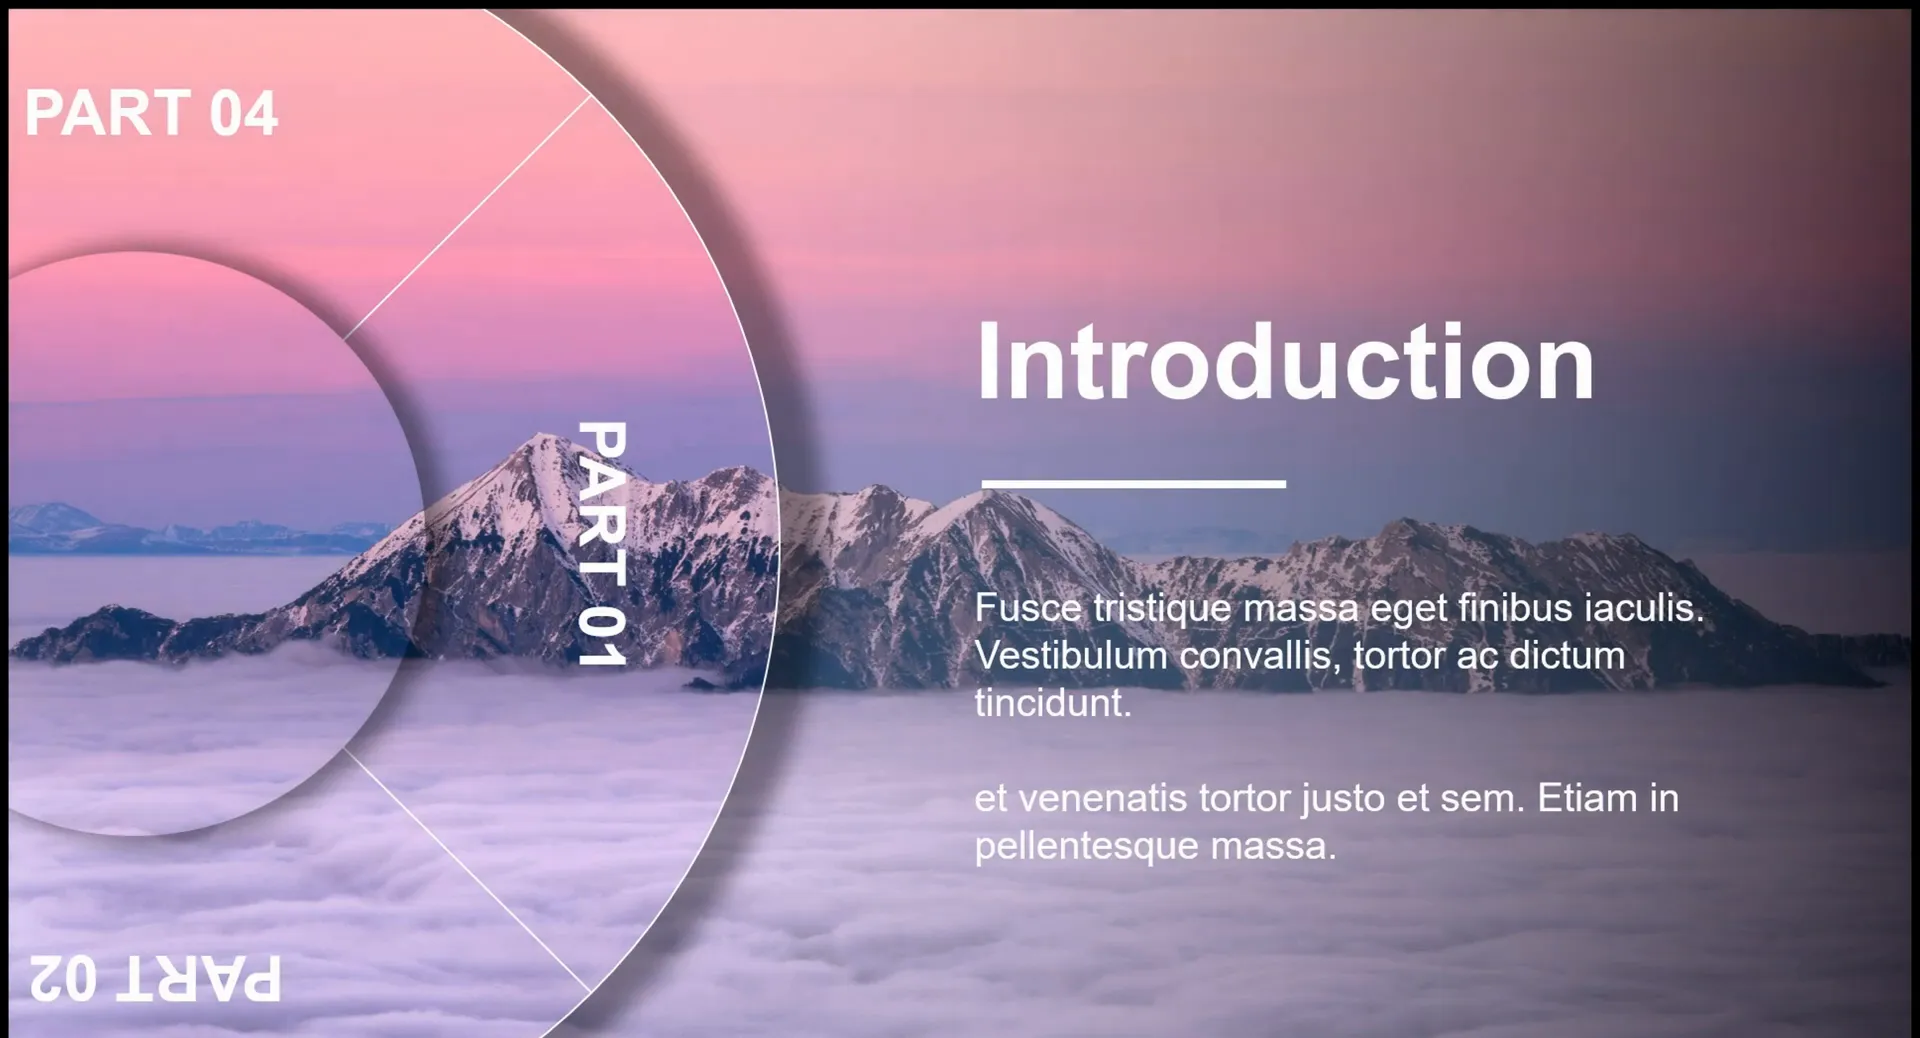
Table of Contents
- Why Use Rotating Transitions in PowerPoint?
- Step 1: Preparing Your Canvas with a Background Image
- Step 2: Creating the Rotating Element — The Flowchart Circle
- Step 3: Creating Multiple Slides with Rotating Components
- Step 4: Applying Morph Transitions to Animate the Rotation
- Tips and Tricks for Perfecting Your Rotating Transition
- Advanced Ideas and Customizations
- Conclusion: Bringing Your PowerPoint Presentations to Life
- Frequently Asked Questions (FAQ)
Why Use Rotating Transitions in PowerPoint?
Before jumping into the how-to, it’s worth understanding why rotating transitions are a smart addition to your presentation toolkit. Traditional slide transitions can sometimes feel static or predictable, especially in longer presentations. Rotating transitions, on the other hand, add a dynamic movement that helps:
- Engage your audience: The visual intrigue of rotation grabs attention and keeps viewers focused.
- Enhance storytelling: Transitions can reflect thematic changes or signify shifts in content, making your message clearer.
- Improve flow: Smooth morphing effects create seamless slide changes, maintaining momentum.
By mastering this technique, you’ll be able to give your presentations a modern, polished look that stands out at meetings, conferences, or classrooms.
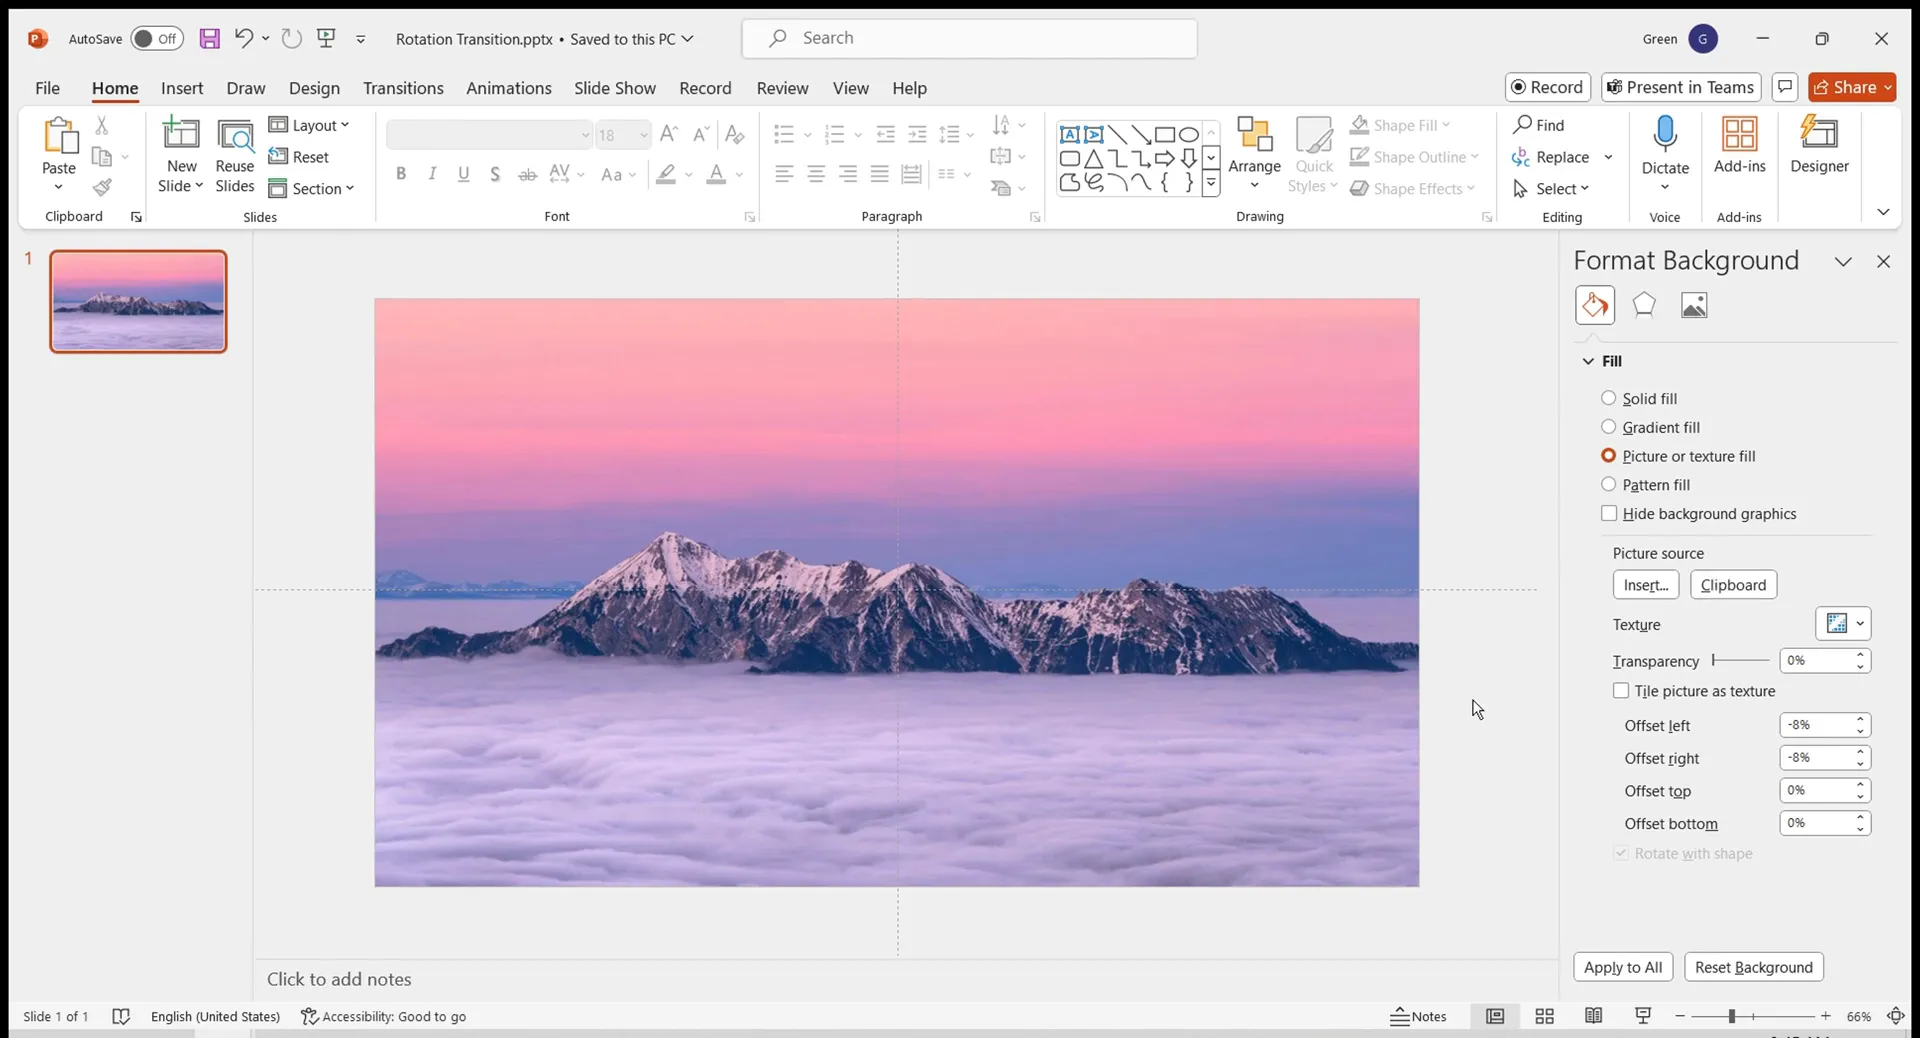
Step 1: Preparing Your Canvas with a Background Image
The foundation of any great slide is the background, and for this rotating transition effect, it all starts with inserting a prepared image that sets the tone and texture of your canvas.
- Insert Your Image: Begin by placing your chosen image into the slide. This could be a photo, texture, or graphic that complements your presentation’s theme.
- Cut and Set as Background: Select the image and cut it using Ctrl + X (Cmd + X on Mac). Then, right-click on the slide background and choose Format Background.
- Apply Picture or Texture Fill: In the format options, select Picture or texture fill and then choose Clipboard to paste the image as the background.
This technique ensures that your image perfectly fills the slide and acts as a stable backdrop for the rotating elements you’ll add next.
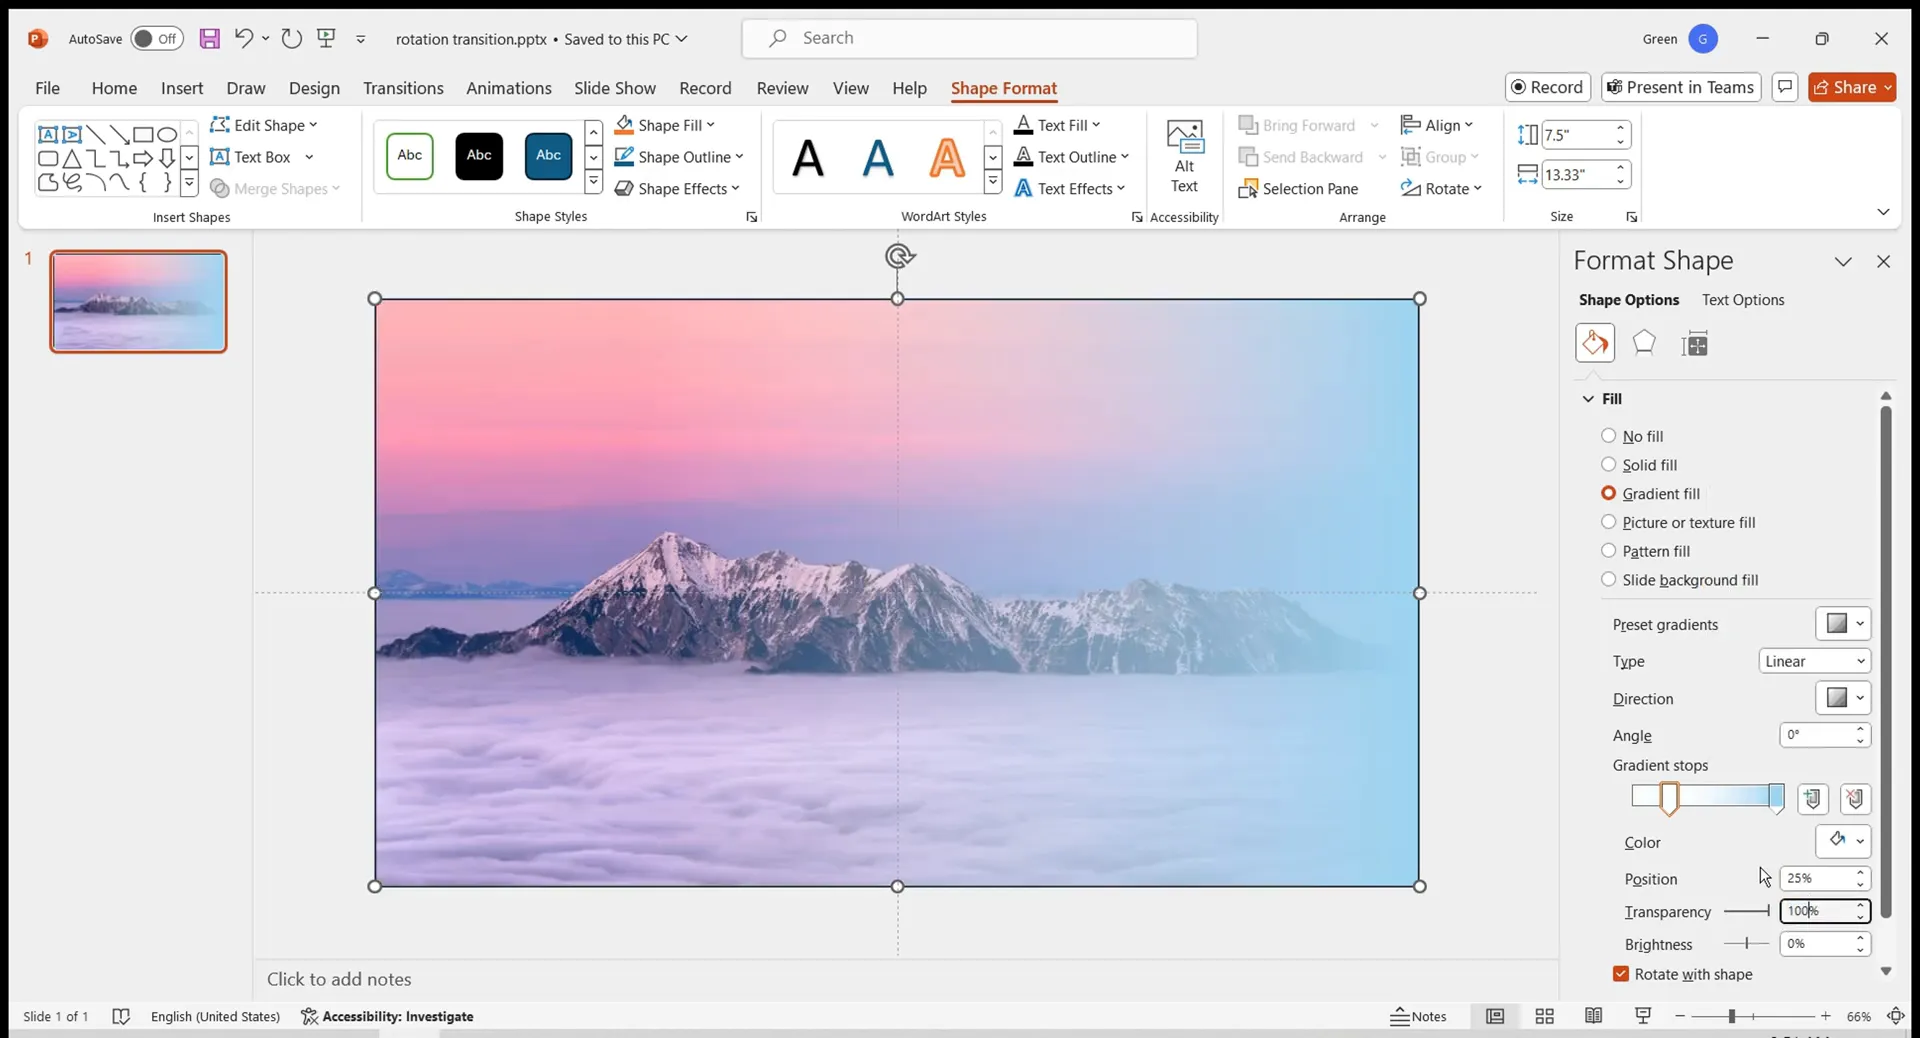
Enhancing the Background with a Gradient Layer
To add depth and texture, it’s effective to overlay a subtle gradient on top of your background image. This softens the image and creates visual contrast for the rotating elements to pop.
- Insert a Rectangle: Draw a rectangle that covers the entire slide.
- Apply Black Gradient Fill: Fill the rectangle with a black gradient.
- Modify Gradient Stops: Delete the middle two gradient stops, leaving only two stops.
- Set Transparency Levels: Set the first stop to white with 100% transparency (fully transparent) and the second stop to black with 30% transparency.
- Remove Outline: Set the rectangle’s outline to no line so it blends seamlessly.
This gradient overlay adds a smooth vignette effect that enhances the perception of depth and focuses attention toward the center of the slide.
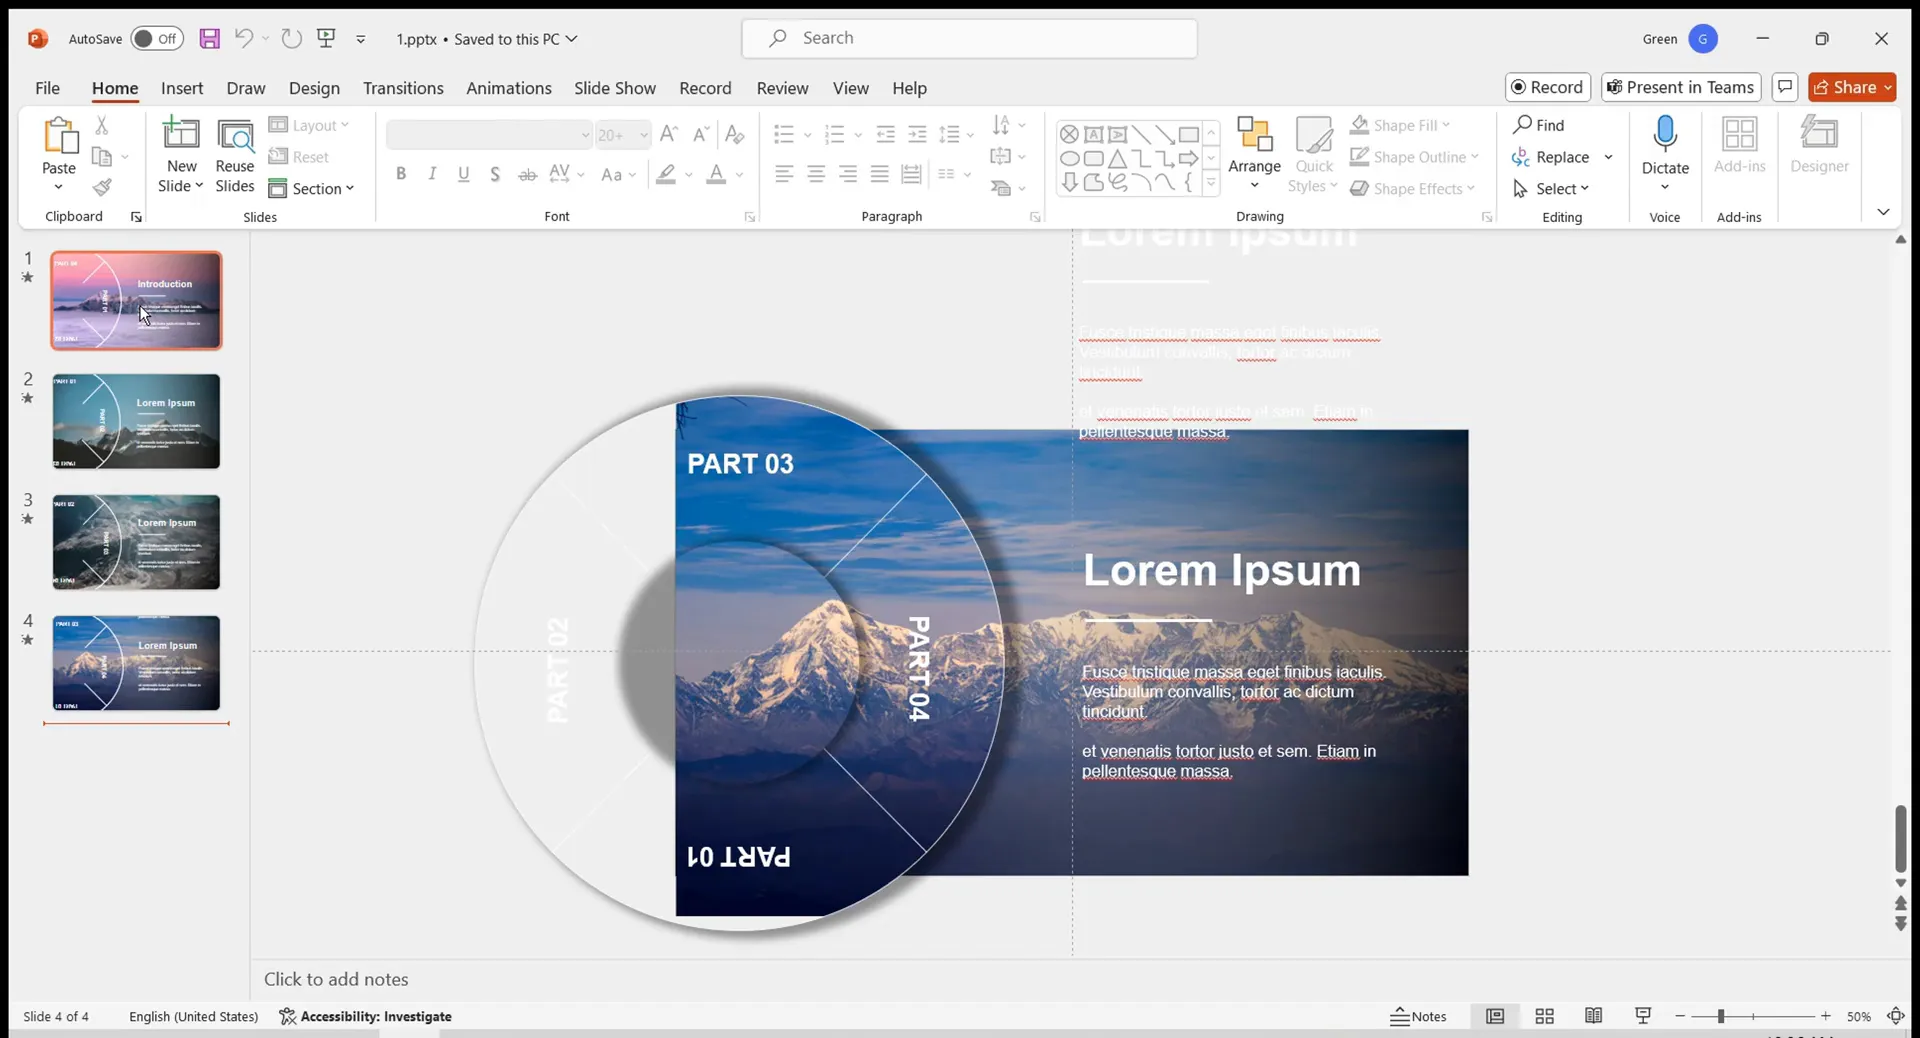
Step 2: Creating the Rotating Element — The Flowchart Circle
Now that your canvas is set, the next key component is to create the rotating element. For this tutorial, a flowchart shape is used, but you can apply the same principles to other shapes or icons.
Using Shapes to Build the Rotating Disc
- Insert a Flowchart Shape: Go to the Insert tab, select Shapes, and pick a flowchart element to use as your rotating piece.
- Create a Perfect Circle: A handy tip: hold down the Shift key while dragging the shape to constrain proportions and create a perfect circle.
- Fill and Outline: Set the shape’s fill to Slide Background Fill so it matches the slide background seamlessly. Then, set the outline to white with a thickness of 1 point.
- Add Shadow Effects: Open the effects options and add a rightward shadow with size 103 and blur 12. This adds subtle depth and a sense of realism to the shape.
These steps result in a clean, elegant circle that will serve as the rotating disc in your transition effect.

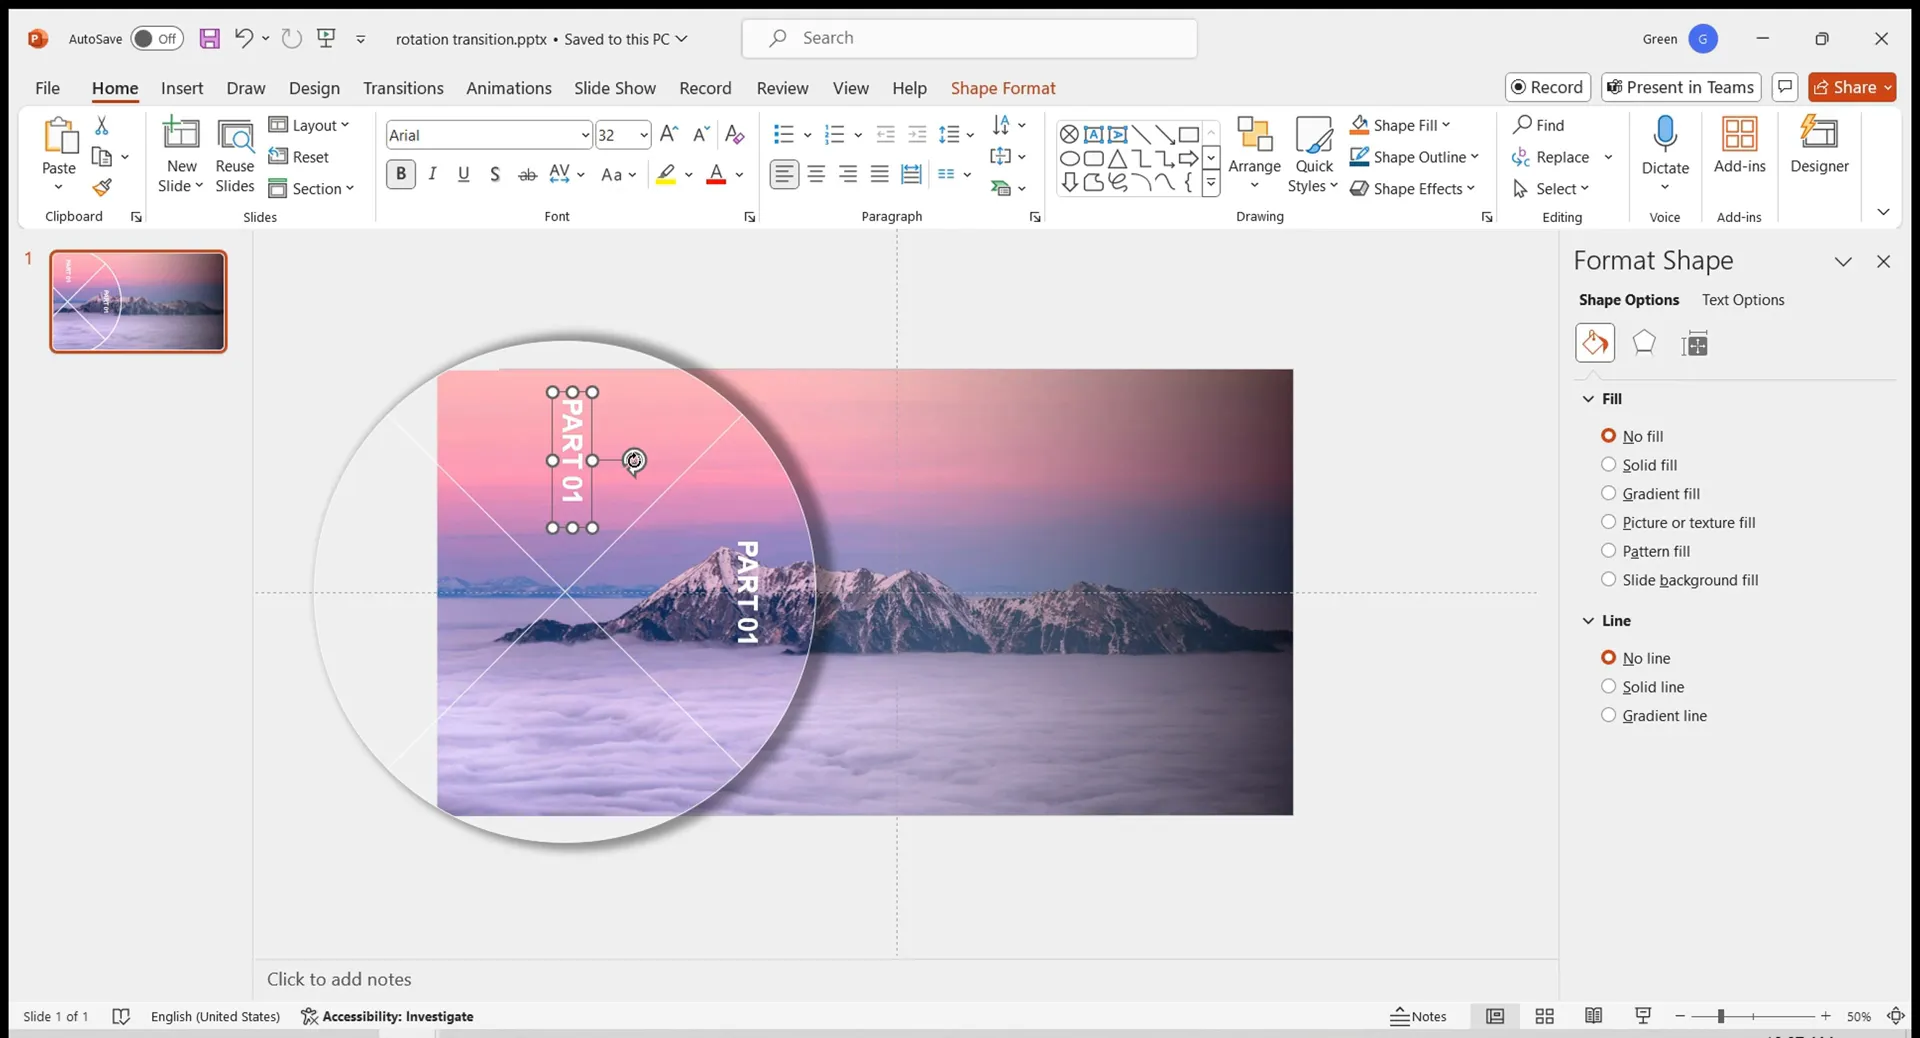
Adding Text Boxes to the Rotating Disc
To make the rotating disc informative and visually balanced, add text boxes around it. This can be used for titles, labels, or any relevant content.
- Insert Text Boxes One Area at a Time: Place individual text boxes around the circle, each representing a segment of the rotating disc.
- Adjust Orientation: Drag and rotate the text boxes to align properly with the circular layout. This ensures that the text follows the flow of the disc.
Arranging text in this manner enhances readability and integrates the content smoothly with the rotating design.
Center Circle and Grouping Elements
- Insert a Center Circle: Add a smaller circle in the center of the rotating disc using the same slide background fill and no outline.
- Apply Shadow: Use the same shadow effect as the flowchart shape to maintain visual consistency.
- Group Elements: Select the text boxes and flowchart shape, then group them together using Ctrl + G. Grouping makes it easier to manage the rotating elements as a single unit.
Grouping is a crucial step for efficient editing and applying rotation effects uniformly.

Step 3: Creating Multiple Slides with Rotating Components
To achieve the rotating transition effect, you’ll need to create multiple slides where the key elements rotate in opposite directions. This creates a dynamic movement during the transition.
- Copy the Current Slide: Duplicate your slide to maintain the layout and components.
- Change Background: On the duplicated slide, set the background to your prepared image again to keep consistency.
- Rotate Elements: Rotate the flowchart shape counterclockwise by 90 degrees and the center circle clockwise by 45 degrees. This opposing rotation adds a compelling visual interplay.
- Add and Adjust Text Content: Insert the relevant text content for this slide and position it appropriately to fit the page layout.
- Adjust Text Boxes: Drag the text boxes to display the corresponding content clearly on the second slide.
This process can be repeated for as many slides as needed, creating a seamless rotating effect across your presentation.
Step 4: Applying Morph Transitions to Animate the Rotation
The magic of the rotating transition lies in the use of the Morph transition effect in PowerPoint. Morph smoothly animates the changes between slides, including rotation, movement, and resizing of elements.
- Set Morph Transition: Select the slides where you want the rotation to animate and apply the Morph transition effect.
- Preview the Effect: Play the slideshow to see the rotating disc and text boxes smoothly morph between positions.
- Repeat for Additional Slides: For presentations with more than four pages, repeat the rotation and morph transition steps to maintain continuity.
- Ensure Smooth Transitions: Select all slides and check that transitions are set to smooth for a professional finish.
This step is where your hard work comes to life, delivering an impressive, fluid rotating animation that enhances your presentation’s impact.


Tips and Tricks for Perfecting Your Rotating Transition
- Use High-Quality Images: Choose clear, high-resolution images for your background to avoid pixelation when projecting or zooming.
- Consistent Color Scheme: Match your flowchart and text colors with your overall presentation palette for a cohesive look.
- Shadow Effects: Subtle shadows add depth but avoid overdoing it to keep the design clean and professional.
- Keyboard Shortcuts: Utilize shortcuts like Ctrl + G for grouping and Ctrl + X for cutting to speed up your workflow.
- Hold Shift for Perfect Shapes: Remember to hold the Shift key when drawing shapes to keep proportions perfect.
- Preview Often: Frequently preview your slides in slideshow mode to ensure smooth transitions and proper alignment.
Advanced Ideas and Customizations
Once you master the basics of this rotating transition, consider experimenting with these ideas to further enhance your presentations:
- Multiple Rotating Elements: Add more shapes or icons rotating at different speeds or directions to create complex animations.
- Interactive Elements: Combine rotating transitions with hyperlinks or triggers for interactive presentations.
- Color Gradients and Textures: Use custom gradients or textured fills on your shapes for unique visual effects.
- Sound Effects: Add subtle audio cues synchronized with the rotation to engage multiple senses.
- Extended Slide Decks: For presentations exceeding four slides, plan your rotations carefully to maintain smoothness and avoid jarring transitions.
Conclusion: Bringing Your PowerPoint Presentations to Life
Transforming your PowerPoint slides with rotating transition effects is a fantastic way to stand out and keep your audience engaged. By following this step-by-step guide, you can easily create polished, professional animations that add a dynamic touch to your storytelling.
From preparing a textured background to designing rotating shapes and applying Morph transitions, each step builds toward a seamless and captivating visual experience. Take advantage of the tips and customization ideas to tailor the effect to your unique presentation style.
Remember, creativity and practice are your best tools. So don’t hesitate to try this effect yourself and experiment with different shapes, rotations, and text arrangements. Your audience will surely appreciate the extra effort and flair!
For more inspiration and tutorials, keep exploring innovative PowerPoint techniques to make every slide count.
Frequently Asked Questions (FAQ)
Q1: What version of PowerPoint do I need to create this rotating transition effect?
The rotating transition effect relies heavily on the Morph transition feature, which is available in PowerPoint 2016 and later versions, including Microsoft 365. Make sure your PowerPoint supports Morph for the smoothest results.
Q2: Can I use any shape for the rotating element?
Absolutely! While the tutorial uses a flowchart shape, you can use circles, polygons, icons, or even custom shapes. Just ensure they are grouped properly and filled with slide background fill for the best visual integration.
Q3: How do I ensure my text stays readable during rotation?
Carefully position and orient text boxes around the rotating shape, and consider adjusting font size and weight to maintain clarity. Preview the transition frequently to check readability.
Q4: Can I add this rotating transition to an existing presentation?
Yes, but it may require some slide duplication and reformatting to incorporate the rotating elements and morph transitions. It’s often easier to plan the effect early in your slide design process.
Q5: How can I extend this effect for presentations with many slides?
Repeat the rotation and morph transition process for additional slides, gradually rotating elements in consistent increments. Consider maintaining a rotation pattern to keep transitions smooth.
Q6: Is it possible to customize the speed of the rotation?
Yes, you can adjust the duration of the Morph transition in the Transitions tab. A longer duration slows the rotation, while a shorter duration speeds it up.
Q7: What if my PowerPoint doesn’t support Morph?
Without Morph, creating this effect is more challenging. You might simulate rotation with multiple slides and careful alignment, but it won’t be as smooth. Consider updating PowerPoint or using alternative animation software.
Q8: Any recommendations for images to use as backgrounds?
Use high-quality, subtle textures or abstract images that don’t overpower your content. Avoid overly busy or bright images that can distract from the rotating elements and text.
Q9: Can I use this effect for professional business presentations?
Definitely! When done tastefully, rotating transitions can add a modern and sophisticated touch to corporate presentations. Just tailor the design to match your company’s branding and the presentation’s tone.
Q10: Where can I find templates or resources to get started quickly?
Many creative platforms offer PowerPoint templates with built-in rotating transitions. Additionally, you can download the rotation morph transition template shared by Dream Liu at this link to jumpstart your projects.
Check out the full video: Rotate & Transform Your PowerPoint Presentations!


