
Creating engaging and visually appealing PowerPoint Slides is essential for capturing your audience’s attention and delivering your message effectively. In this comprehensive tutorial, I’ll walk you through how to craft a dynamic slide featuring three callout options with photographic and geometric elements, complete with smooth animations. This design technique is perfect for showcasing multiple ideas, quotes, or features in a clean and professional way.
Whether you’re a seasoned PowerPoint user or just starting, this tutorial breaks down the process into clear, actionable steps. By the end, you’ll know how to create customizable callout shapes with text, images, and animations that can be adapted to fit any presentation need.
Let’s dive in and transform your PowerPoint Slides into eye-catching, interactive visuals that make an impact!
Table of Contents
- Overview of the 3 Callout Options Slide
- Preparing the Slide and Background
- Creating the Callout Shape with Geometric Elements
- Adding Text and Icons
- Customizing Colors and Images
- Grouping and Duplicating Callouts
- Adding Animations for Interactive Effects
- Tips and Tricks for PowerPoint Slide Design
- Frequently Asked Questions
- Conclusion
Overview of the 3 Callout Options Slide
This slide design features three distinct callout options that appear sequentially when you click during your presentation. Each callout consists of a unique geometric shape combined with a photographic texture or pattern, a title, detailed text, and quotation icons to highlight the content.
The callouts switch between different color combinations and image fills, providing a fresh and engaging way to present multiple points without cluttering the slide. You can easily increase or decrease the number of options to suit your presentation’s requirements.
Preparing the Slide and Background
The first step is to set up a clean and subtle background to make your callouts stand out. Here’s how:
- Add a new slide in your PowerPoint presentation.
- Change the slide background to a light gray color. This neutral backdrop provides good contrast without overpowering your callout elements.
- Insert a rectangle shape to act as the base for your callout. Draw a rectangle roughly the size you want your callout box to be.
- Remove the shape outline by setting it to “No Outline” for a cleaner look.
- Fill the rectangle initially with a placeholder color (white or any color you prefer). You can adjust this later as you add design elements.
Starting with a simple shape and background sets a solid foundation for your callout design.
Creating the Callout Shape with Geometric Elements
The callout shape is a combination of basic shapes merged together to create a custom, eye-catching design. Follow these steps:
- Insert an oval shape from the basic shapes menu. Draw it roughly where you want the curved part of the callout to be.
- Format the oval by right-clicking and selecting Format Shape. Adjust the transparency to create a subtle effect.
- Insert a triangle shape and rotate it to align with the oval. This will form the pointed part of the callout bubble.
- Edit the triangle’s points by right-clicking and selecting Edit Points. Adjust the shape by bending points to create a smooth transition between the oval and triangle.
- Select both the oval and triangle while holding the Shift key, then use the Merge Shapes > Union option to combine them into one shape.
- Remove the outline from the combined shape for a clean finish.
- Insert a rectangle or square shape to overlay part of the callout, then select both shapes and use Merge Shapes > Fragment. Delete the overlapping parts to create a distinct geometric cutout effect.
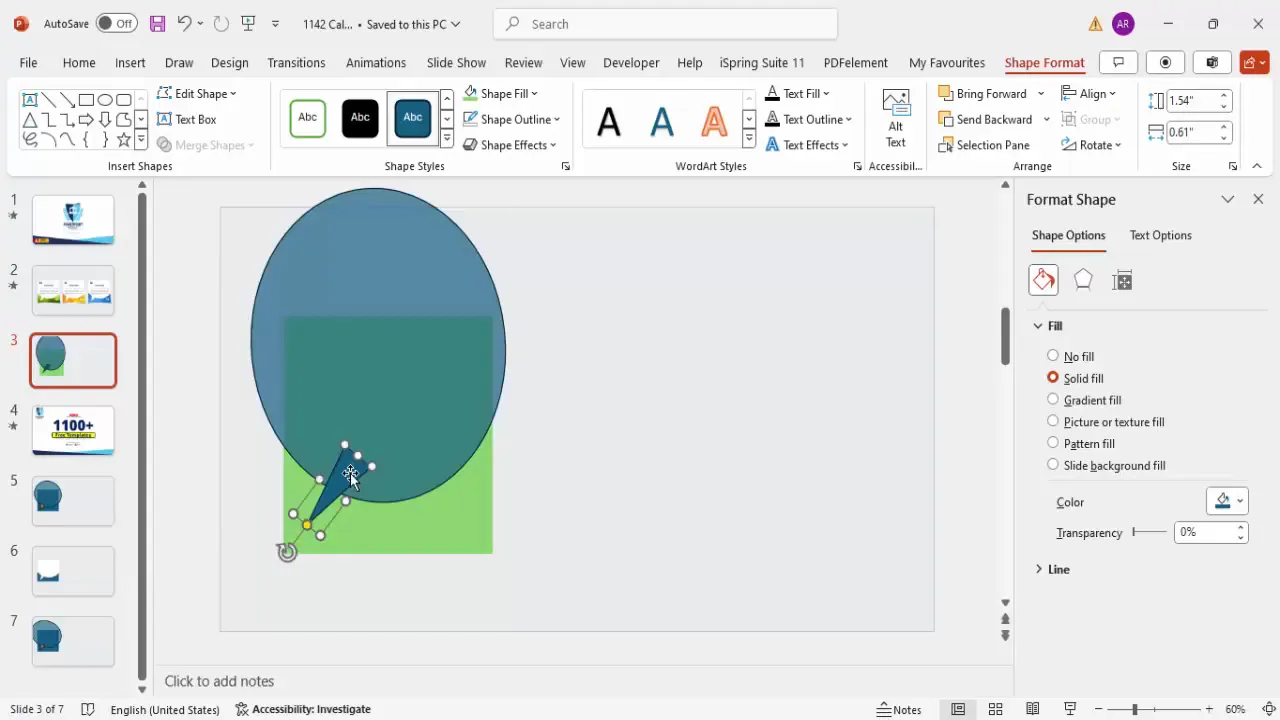
This process results in a callout shape that is both functional and visually appealing, perfect for highlighting your message.
Adding Text and Icons
With your callout shape ready, it’s time to add the content that conveys your message. This includes the title, descriptive text, and decorative icons.
- Insert a text box inside the callout shape for the title. Set the font to bold and increase the size to around 20pt for emphasis.
- Change the title color to complement the design colors you plan to use.
- Add another text box below the title for the detailed description. Use a smaller font size, such as 14pt, and justify the text for a neat appearance.
- Set the description text color to a dark gray to maintain readability without distracting from the overall design.
- Insert quotation mark icons from the icon menu to frame the text as a quote or testimonial. Place one at the top-left and duplicate it for the bottom-right, rotating and flipping as needed.
- Adjust the icon colors to white or another color that fits your design palette.
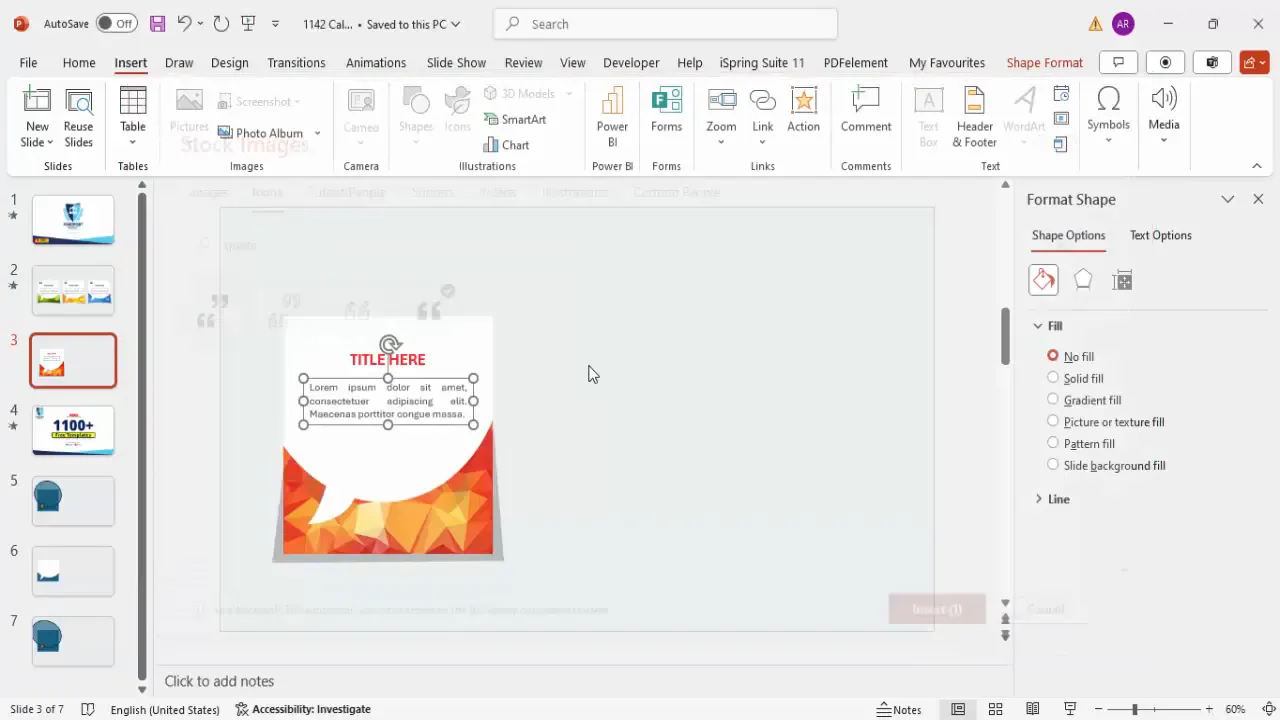
This combination of text and icons adds context and style to your callout, making the content more engaging and easier to absorb.
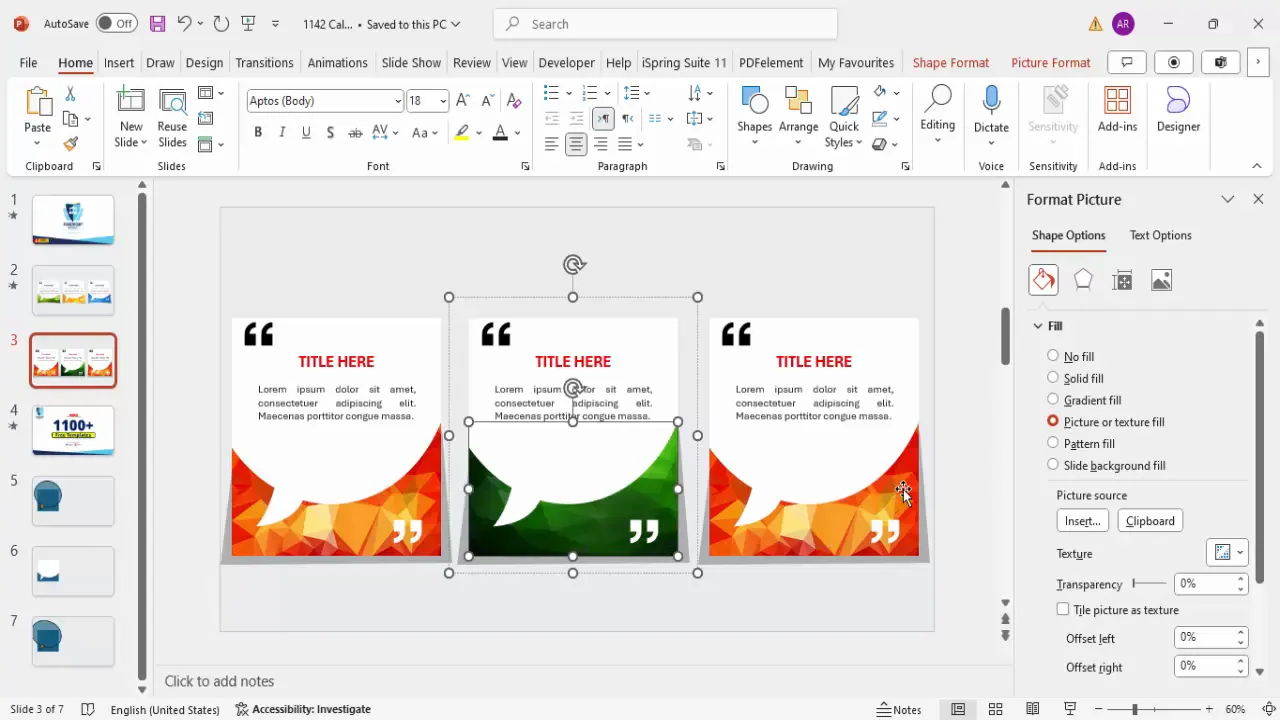
Customizing Colors and Images
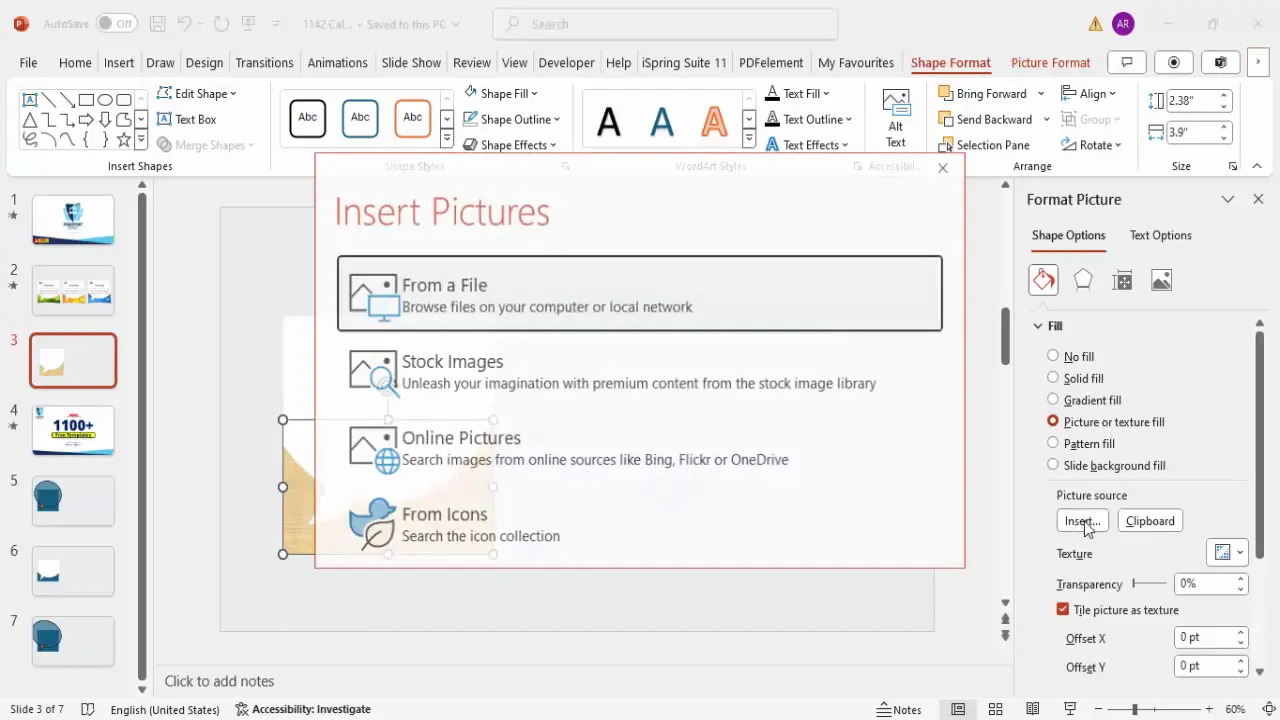
One of the key features of this slide design is the use of photographic and geometric textures to fill parts of the callout shape, giving it a modern and vibrant look.
- Select the geometric cutout area of your callout shape.
- Format the shape fill by choosing Picture or Texture Fill.
- Click Insert and select Online Pictures to search for geometric patterns or shapes.
- Search keywords like “geometric orange,” “geometric green,” or “geometric blue” depending on your color preference.
- Choose an image that fits your design and insert it into the shape fill.
- Duplicate the shape to create a shadow effect by copying it (Ctrl+D), filling it with black, and increasing its transparency to around 70-75%.
- Edit the shadow shape points to slightly offset and soften the shadow, then send it behind the original shape.
These customizations give your callout depth and visual interest, making the slide stand out professionally.
Grouping and Duplicating Callouts
To efficiently manage your callout elements and create multiple options, grouping and duplicating are essential techniques.
- Select all elements of your first callout, including text, icons, shapes, and shadows.
- Group them by pressing Ctrl+G. This makes it easier to move and resize as one unit.
- Duplicate the grouped callout twice to create the second and third callout options.
- Adjust the images and colors in each duplicated callout to create distinct looks. For example, change the geometric image fill to green or blue and update the text colors accordingly.
- Ungroup and regroup specific parts if you want to fine-tune individual elements separately.
- Resize callouts if they don’t fit well on the slide, maintaining consistent proportions.
Grouping keeps your slide organized and makes it easy to maintain consistent formatting across multiple callouts.

Adding Animations for Interactive Effects
Animations enhance the interactivity of your slide by revealing each callout option sequentially, keeping your audience engaged.
- Group elements for animation including the callout shape, text, and shadow for each option.
- Open the Animations pane to manage animation effects.
- Apply the “Fly In” animation to the grouped callout, setting the first callout to fly in from the top and the second from the bottom.
- Set animations to trigger on click and ensure they happen simultaneously for elements within the same callout.
- Adjust animation timing to speed up the effect, using 0.3 to 0.5 seconds for a smooth bounce-in appearance.
- Use the Animation Painter tool to copy animations to other callouts, ensuring consistent motion effects.
- Test the animation sequence by playing the slide and clicking through the callout options.
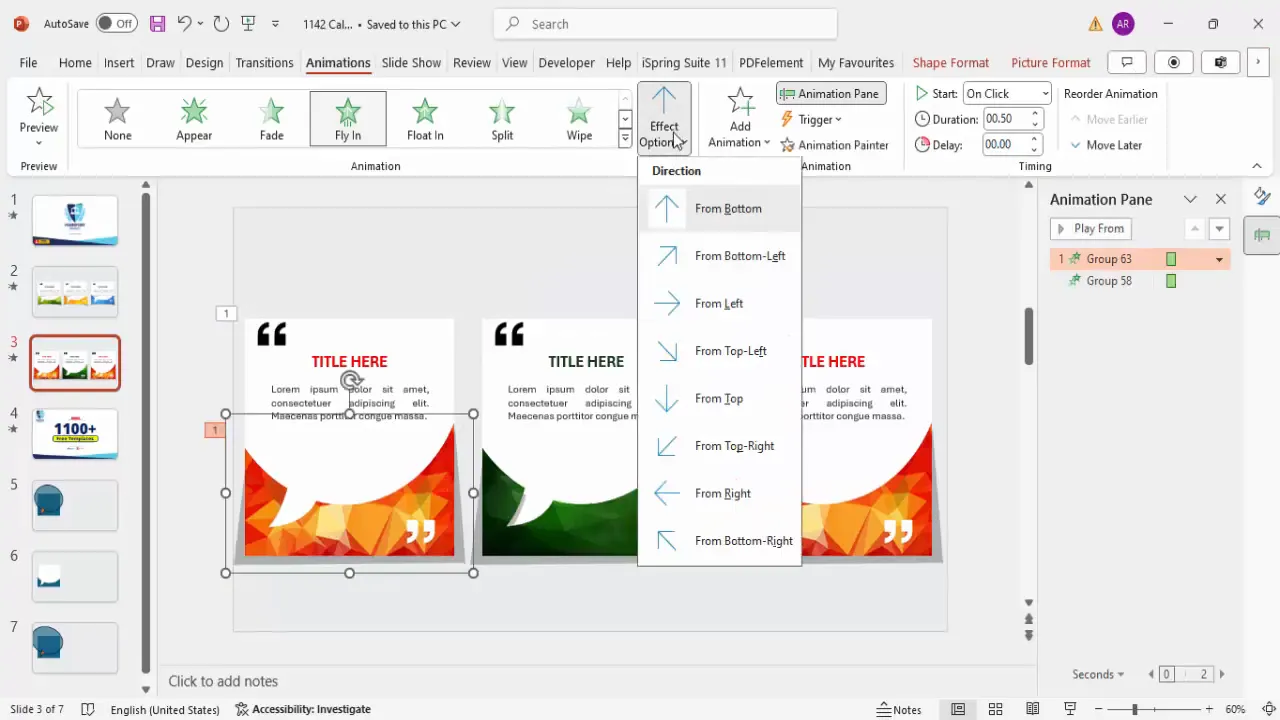
Effective animations bring your PowerPoint Slides to life, making your presentation more dynamic and memorable.
Tips and Tricks for PowerPoint Slide Design
Here are some additional tips to enhance your slide design and workflow:
- Use consistent color schemes: Choose a palette that matches your brand or presentation theme to maintain a cohesive look.
- Keep text concise: Limit detailed text to 30 words or less to improve readability and audience retention.
- Leverage shape editing: Use the “Edit Points” feature to customize shapes uniquely for your needs.
- Group elements strategically: Group related elements for easy editing but ungroup when you need to tweak individual parts.
- Use online pictures responsibly: Search for Creative Commons images or your own assets to avoid copyright issues.
- Test your animations: Always preview animations to ensure timing and effects are smooth and professional.
- Duplicate slides or elements: Save time by duplicating rather than recreating similar designs.
Frequently Asked Questions
How many callout options can I create on one slide?
You can create as many callout options as you need, but for clarity and visual appeal, it’s best to limit it to three to five options per slide. Too many callouts can make the slide cluttered and hard to read.
Can I use my own images instead of online pictures?
Absolutely! You can insert any image or texture you prefer into the geometric shape fill. Just use the “Picture or Texture Fill” option and insert your image from your device.
How do I make sure the callouts are aligned properly?
Use PowerPoint’s alignment tools found under the “Format” tab. Select multiple objects and use options like “Align Left,” “Align Center,” or “Distribute Horizontally” to keep your callouts evenly spaced and aligned.
Can I change the animation effects?
Yes, PowerPoint offers a variety of animation effects. While “Fly In” with bounce is effective here, you can experiment with other entrances like “Fade,” “Zoom,” or “Wipe” depending on your presentation style.
Is this slide design suitable for business presentations?
Definitely. The clean geometric shapes combined with photographic textures and smooth animations make this design highly professional and versatile for business, education, marketing, or creative presentations.
Conclusion
Mastering the creation of interactive and visually appealing callout slides is a great way to make your PowerPoint Slides stand out. By combining custom geometric shapes, photographic textures, well-placed text, and thoughtful animations, you can present multiple ideas clearly and attractively.
This tutorial equips you with the skills to design a three-option callout slide, but the techniques learned here can be expanded to other creative slide designs. Remember, the key to great slide design is balancing aesthetics with clarity and engagement.
Feel free to experiment with colors, shapes, and animations to best fit your brand and presentation style. With practice, you’ll be able to produce professional slides that captivate your audience and deliver your message effectively.
Happy presenting!
Check out the full video: Create 3 Callout Options Slide in PowerPoint


