
Creating visually captivating PowerPoint slides is an essential skill for anyone looking to make a strong impression during presentations. One of the most effective ways to add flair and professionalism to your slides is by using custom shapes combined with gradient colors and animations. In this comprehensive guide, we’ll explore how to design gradient color options using hexagon shapes, complete with icons, option numbers, and detailed text. This step-by-step tutorial will help you craft dynamic, engaging slides that not only look polished but also communicate your message clearly and stylishly.
This article draws upon expert techniques shared by POWERPOINT UNIVERSITY, a leading creator of PowerPoint tutorials and free templates, to help you design slides like a pro. Whether you’re a beginner or an experienced user, mastering these design elements will boost your PowerPoint slides design skills and help you stand out in any presentation setting.
Table of Contents
- Why Use Gradient Hexagon Shapes in PowerPoint Slides?
- Creating Hexagon Shapes: Two Methods Explained
- Applying Gradient Colors to Your Hexagon Shapes
- Adding Icons, Option Numbers, and Detailed Text
- Duplicating and Customizing Multiple Options
- Animating Your Gradient Hexagon Options
- Best Practices for PowerPoint Slides Design
- Frequently Asked Questions (FAQ)
Why Use Gradient Hexagon Shapes in PowerPoint Slides?
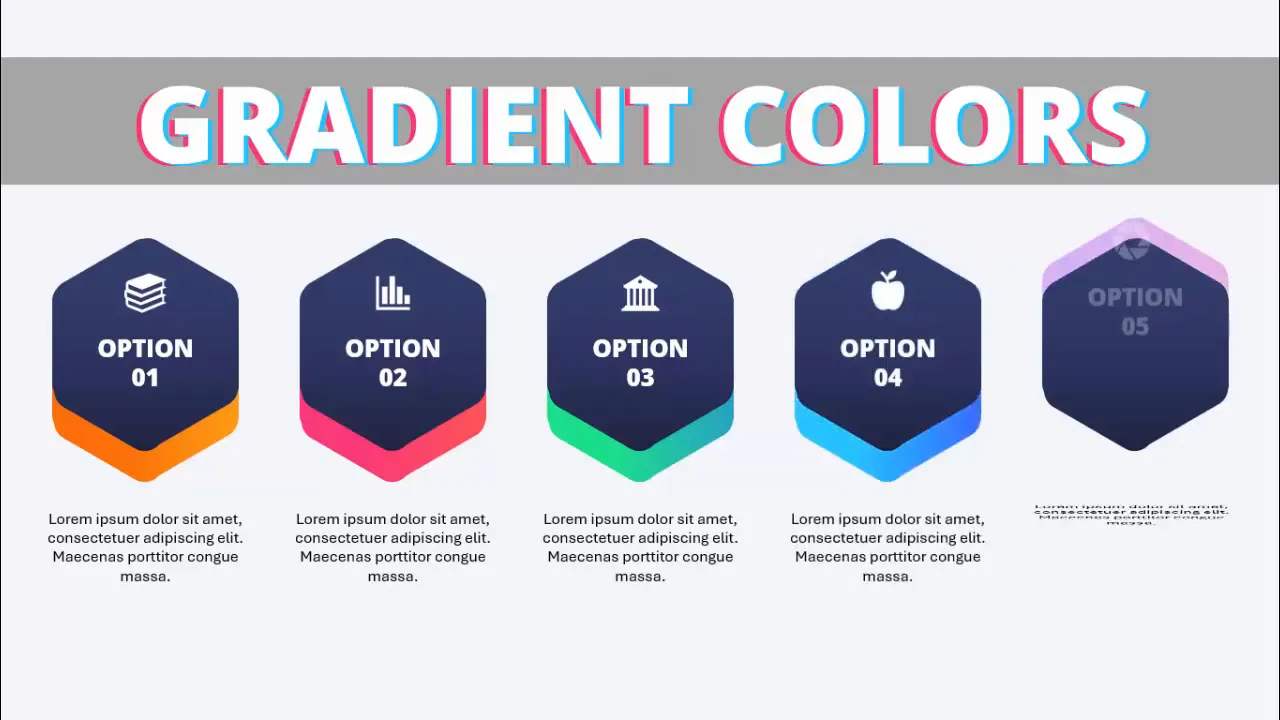
Hexagon shapes are increasingly popular in modern presentation design due to their balanced geometric appeal and versatility. When paired with gradient colors, they add a sophisticated depth and visual interest that flat shapes cannot match. Using gradient hexagons allows you to:
- Highlight Options or Steps: Perfect for showcasing multiple choices, processes, or stages in a visually organized manner.
- Enhance Visual Hierarchy: The combination of shape and color gradients guides the viewer’s eye and emphasizes important content.
- Incorporate Branding: Custom colors and icons allow for alignment with your brand’s identity.
- Increase Engagement: Interactive elements like clickable hexagons with animations keep your audience attentive.
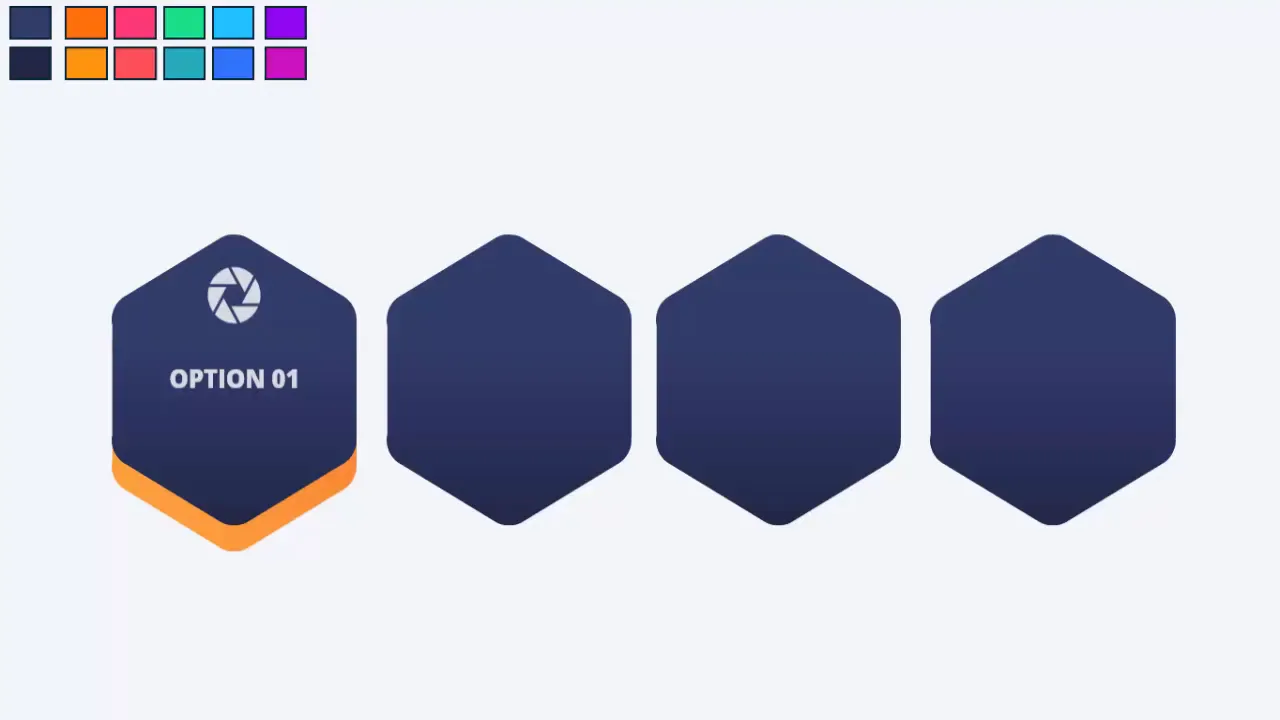
For example, in a slide with five hexagons, each hexagon can represent an option with unique gradient colors, icons, and descriptive text. Clicking each hexagon dynamically presents the corresponding content, making your presentation interactive and memorable.
Creating Hexagon Shapes: Two Methods Explained
There are two primary ways to create hexagon shapes in PowerPoint, each with its own advantages depending on your design needs:
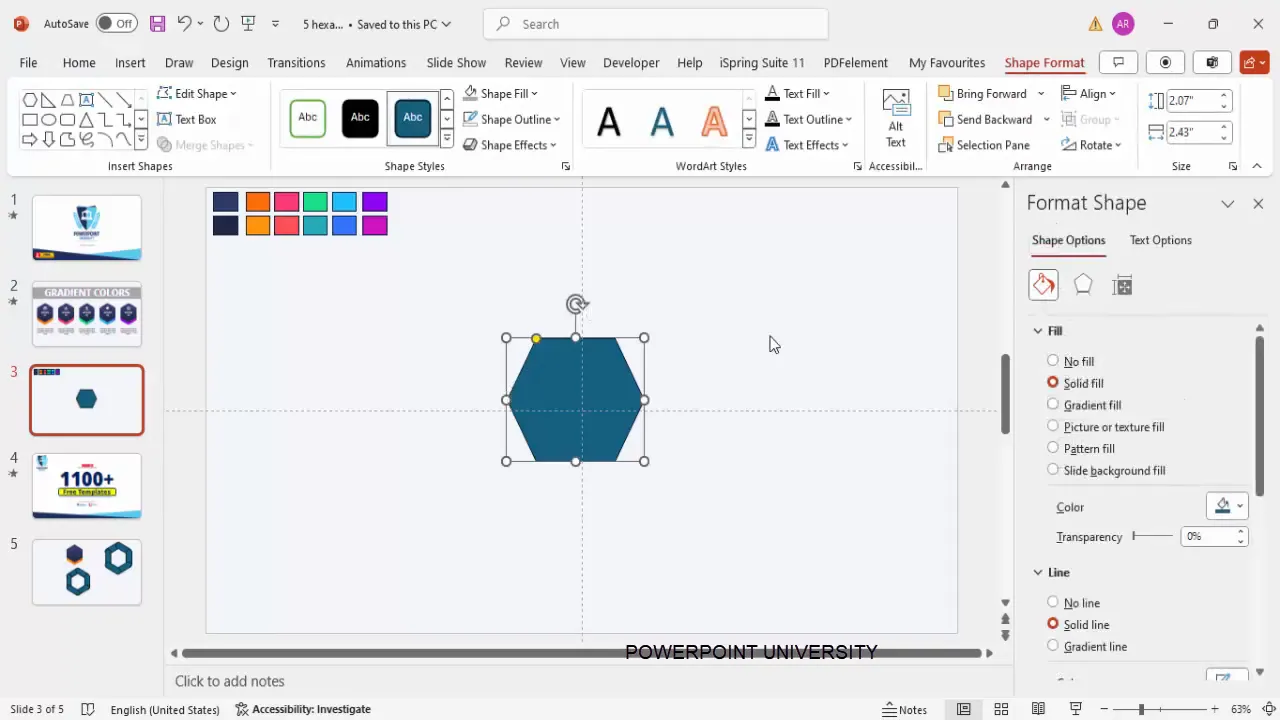
1. Using PowerPoint’s Built-in Hexagon Shape
The simplest method is to use the pre-made hexagon shape available in PowerPoint’s shapes library:
- Go to Insert > Shapes.
- Select the Hexagon shape from the Basic Shapes section.
- Click and drag on the slide to draw your hexagon.
- Rotate the hexagon so that a pointed corner is at the top by pressing Alt + Right Arrow key multiple times or by using the rotation handle.
This method is quick and straightforward but results in a standard hexagon with sharp corners.
2. Creating a Custom Hexagon with Rounded Corners
If you prefer a softer, more modern look with rounded corners, you can build your own hexagon using rounded rectangles:
- Insert a Rounded Corner Rectangle from Insert > Shapes.
- Remove the outline by setting Shape Outline to No Outline.
- Adjust the corner radius by dragging the small orange adjustment handle inside the shape to create a curve that approximates the hexagon corner.
- Set the height and width to precise values (e.g., height ~2.1 inches, width ~0.65 inches) for uniformity.
- Rotate the shape by pressing Alt + Left Arrow key four times to tilt it.
- Duplicate the shape multiple times (using Ctrl + D) and rotate each duplicate by the same amount to form the six sides of the hexagon.
- Align all pieces carefully so the corners meet perfectly, creating a neat hexagon with rounded edges.
Once aligned, select all shapes and use the Merge Shapes > Union feature under the Shape Format tab to combine them into a single hexagon shape.
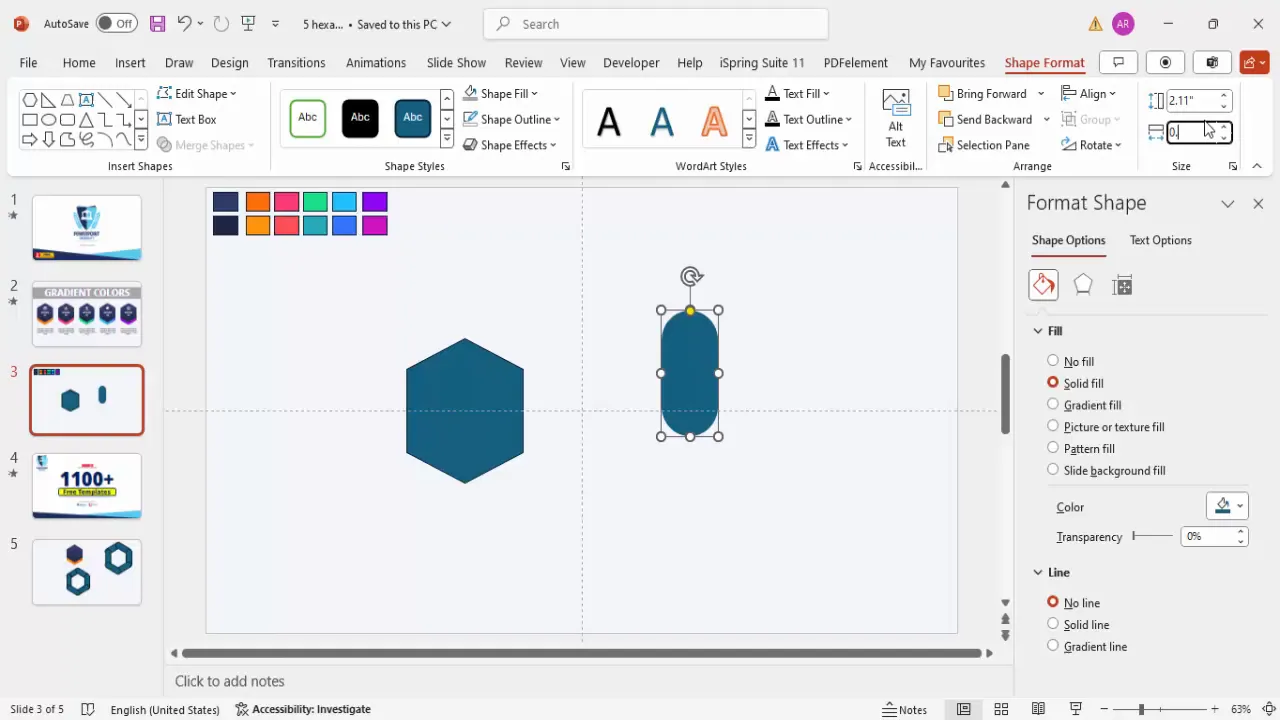
This custom method provides a cleaner, more polished hexagon that stands out in presentations.
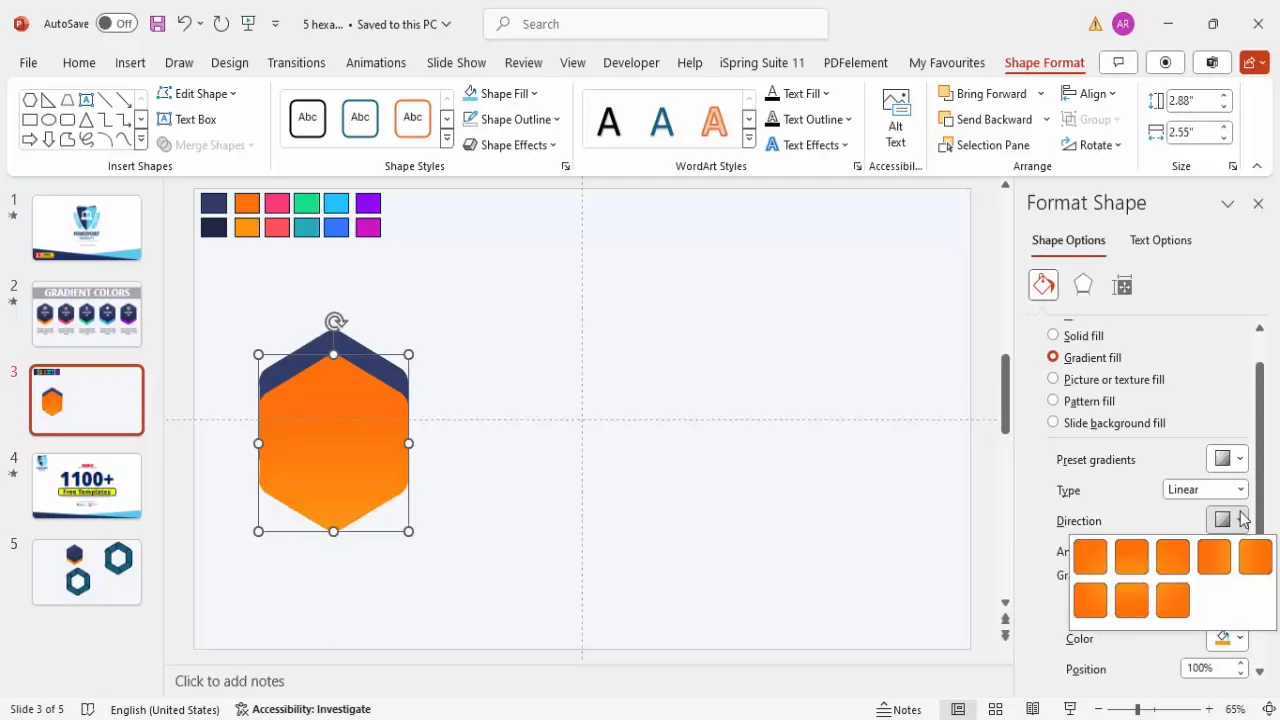
Applying Gradient Colors to Your Hexagon Shapes
Adding gradient fills to your hexagon shapes enhances depth and visual appeal. Here’s how to apply and customize gradient colors:
- Select your hexagon shape.
- Go to the Shape Format tab and open the Format Shape pane.
- Under Fill, choose Gradient fill.
- By default, PowerPoint provides preset gradients, but you can customize the gradient stops.
- Use the Eyedropper tool to pick colors from other shapes or your brand palette for consistency.
- Set your gradient stops to create a smooth transition from a lighter shade at the top to a darker shade at the bottom (or vice versa), depending on your desired effect.
- Adjust the gradient direction to control how the colors flow.
For example, a light blue fading into a darker blue with the darker color at the bottom creates a subtle 3D effect that makes the hexagon pop on the slide.

To create multiple options with different color schemes, duplicate the original hexagon (Ctrl + Shift + drag) and adjust the gradient colors accordingly. Changing the gradient direction or the color stops can create varied looks while maintaining a cohesive style.
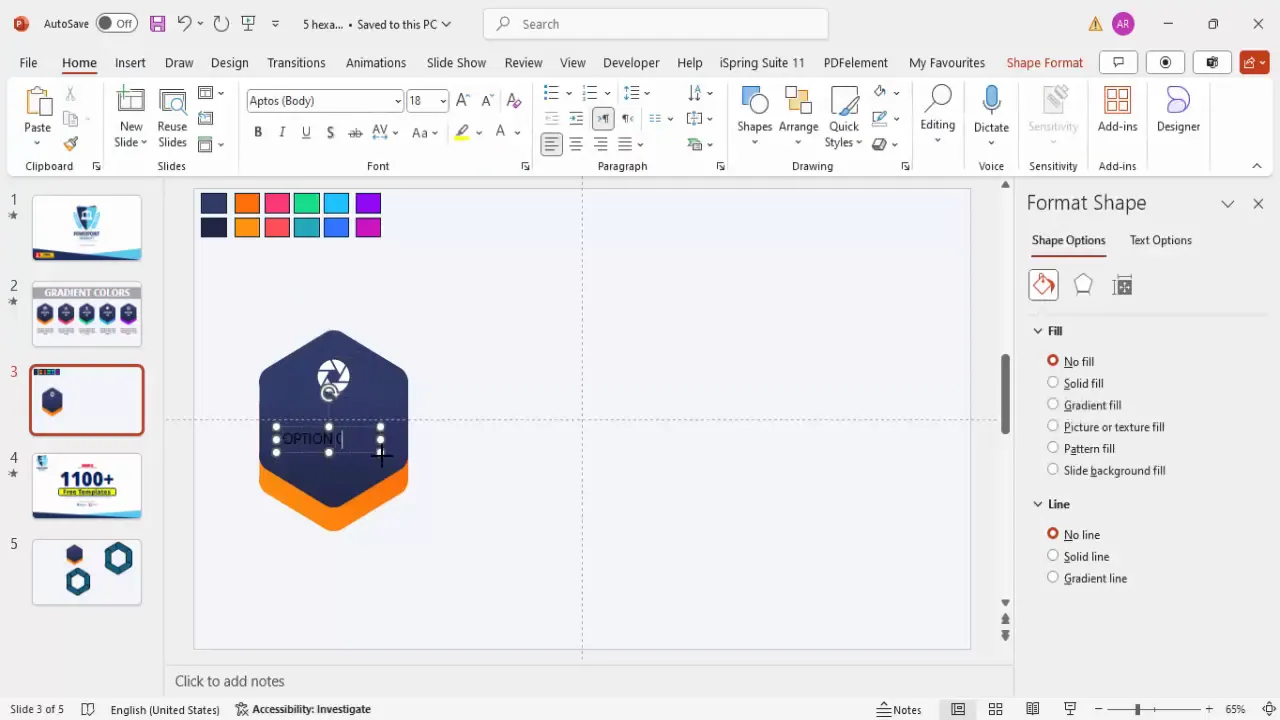
Adding Icons, Option Numbers, and Detailed Text
Once your hexagon shapes are ready and styled, it’s time to add meaningful content that complements the design:
1. Adding Icons
- Go to Insert > Icons and select icons relevant to your presentation’s theme or the option the hexagon represents.
- Insert the icon and position it in the center of the hexagon.
- Fill the icon with white or a contrasting color for visibility.
- Resize the icon proportionally (e.g., scale down to around 70% of original size) and align it precisely to the center.
2. Adding Option Numbers
- Insert a Text Box and type the option number (e.g., “Option 1”).
- Use a bold, clean font such as Open Sans Extra Bold for clarity and impact.
- Set the font color to white or a color that contrasts well with the gradient background.
- Center-align the text and place it just below the icon.
3. Adding Detailed Text
- Insert another text box below the option number for detailed descriptions.
- Keep the text concise, clear, and centered.
- Use a smaller font size (between 12 and 14 points) for readability without clutter.
- Adjust the text to fit neatly within the hexagon boundaries.
This combination of iconography, numbering, and text makes each hexagon a self-contained visual unit that communicates effectively.
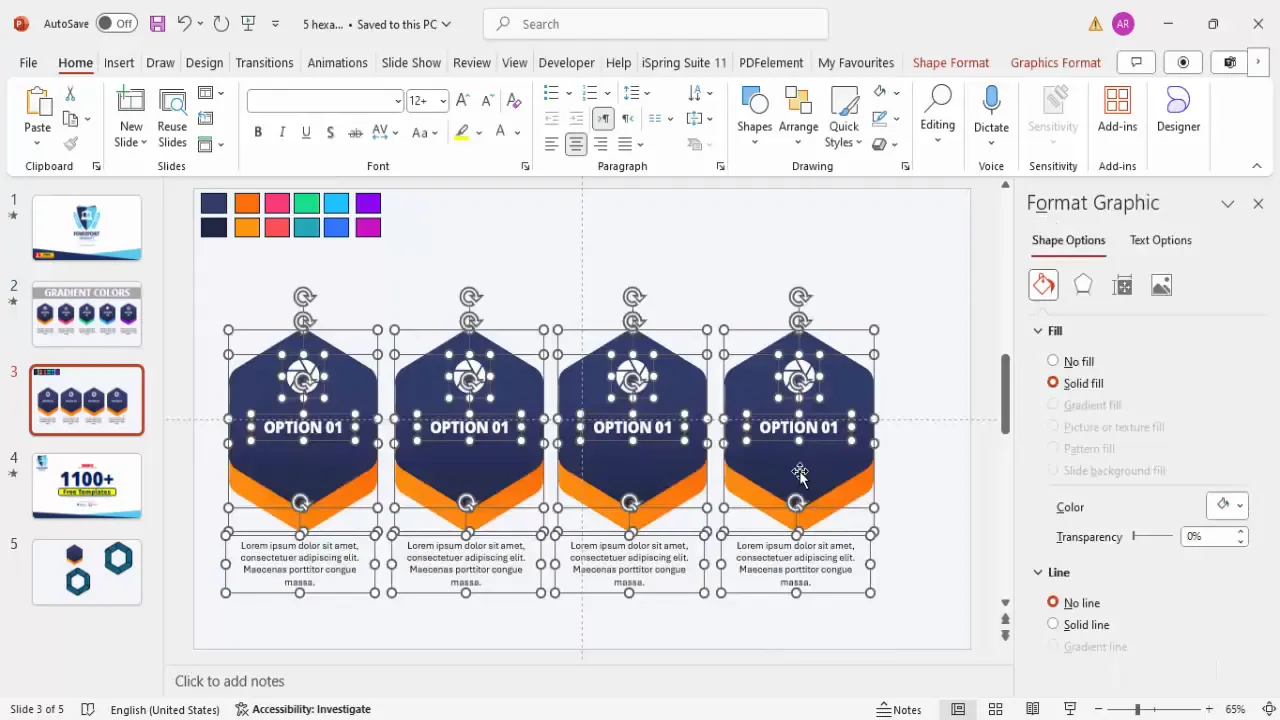
Duplicating and Customizing Multiple Options
To create a slide with multiple hexagon options, follow these steps:

- Duplicate the fully designed hexagon group (icon + text + shape) by holding Ctrl + Shift and dragging it sideways.
- Depending on your slide layout, create four or five options. Larger hexagons may limit you to four to maintain spacing and clarity.
- Align all hexagons horizontally or in your preferred layout using PowerPoint’s alignment guides.
- Change the gradient colors for each hexagon to differentiate the options. Use the Eyedropper tool to pick colors that complement each other.
- Replace icons for each option by selecting the icon, going to Graphics Format > Change Graphic, and choosing a new icon relevant to that option.
- Edit the option numbers and detailed text to reflect the new content.
By customizing colors and icons, your slide maintains a consistent style while clearly distinguishing each option.
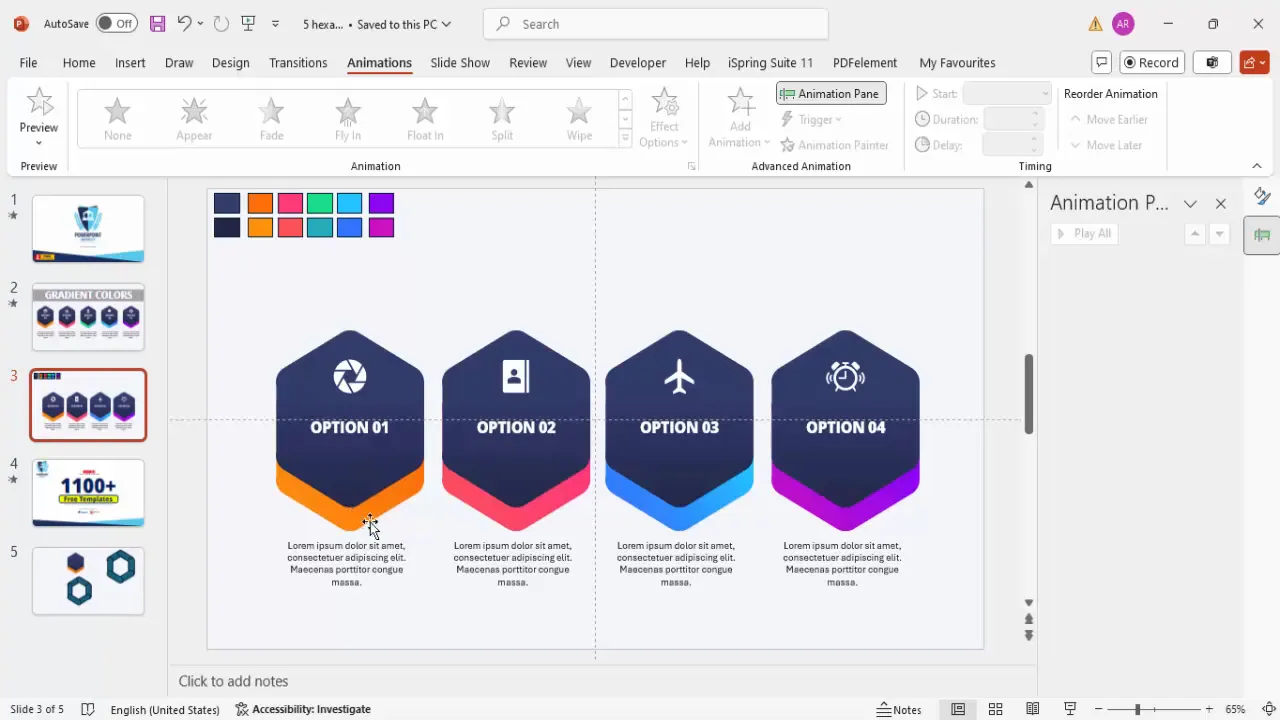
Animating Your Gradient Hexagon Options
Animation adds interactivity and professionalism to your PowerPoint slides design. Here’s how to animate your gradient hexagon options effectively:
Grouping Elements for Animation
- Select the hexagon shape and its corresponding icon and text boxes.
- Group them together by pressing Ctrl + G. This ensures that animations apply uniformly to the entire option.
- Repeat this for all your option groups.
Applying Entrance Animations
- Select the first grouped option.
- Go to the Animations tab and open the Animation Pane.
- Click Add Animation > More Entrance Effects to explore a variety of animation styles.
- Choose an entrance animation such as Float Down, Peek In, or Stretch to introduce the option dynamically.
- Set the animation timing to be fast (e.g., 0.3 seconds) for smooth transitions.
- Configure the animation to start With Previous or After Previous depending on the sequence you want.
Animating Additional Text Elements
Apply entrance animations to the option number and detailed text separately, using the Animation Painter tool to copy animation effects quickly across similar elements.
Sequence and Timing Tips
- Ensure animations for the hexagon shape and text appear simultaneously or in a logical sequence.
- Avoid overly slow animations; keep them snappy to maintain audience engagement.
- Test your animations in slideshow mode to verify smoothness and timing.
Best Practices for PowerPoint Slides Design
While creating gradient hexagon options, keep these best practices in mind to optimize your PowerPoint slides design:
| Design Aspect | Best Practice | Benefit |
|---|---|---|
| Color Usage | Use complementary gradient colors with subtle transitions. | Enhances visual appeal without overwhelming viewers. |
| Shape Consistency | Maintain uniform size and alignment for hexagons. | Creates a balanced and professional slide layout. |
| Text Clarity | Keep text concise; use readable fonts and sizes. | Improves audience comprehension and retention. |
| Iconography | Choose icons that clearly represent the option’s theme. | Supports quick visual understanding. |
| Animation | Use subtle entrance animations with consistent timing. | Keeps the presentation dynamic without distraction. |
Additionally, always test your slides on different screens to ensure colors and animations render as expected. Avoid cluttering the slide with too many options; four to five is an ideal number for clarity.
Frequently Asked Questions (FAQ)
Q1: Can I use these gradient hexagon options in any version of PowerPoint?
Yes, these techniques are compatible with most modern versions of PowerPoint that support shape formatting, gradient fills, and animations.
Q2: How do I ensure my hexagon shapes are perfectly aligned?
Enable PowerPoint’s guides and snap-to-grid features from the View tab to help you align shapes precisely. Use the Align tools under the Shape Format tab for distributing shapes evenly.
Q3: Can I customize the icons used inside the hexagons?
Absolutely. PowerPoint offers a vast library of icons accessible via Insert > Icons. You can also import custom SVG icons if needed.
Q4: How do I make the hexagons clickable to show different options?
Use PowerPoint’s Action or Hyperlink features to link hexagons to different slides or sections within your presentation, creating an interactive experience.
Q5: Is it possible to save these hexagon designs as templates for future use?
Yes. After creating your hexagon options, save the slide or the entire presentation as a template (.potx) to reuse and customize in future projects.
Conclusion
Mastering gradient hexagon shapes in PowerPoint offers a powerful way to elevate your slides design and captivate your audience. By combining custom shapes, gradient fills, meaningful icons, concise text, and polished animations, you create presentations that are not only visually stunning but also highly effective in communication.
Remember, the key to professional PowerPoint slides design lies in attention to detail—from shape creation to color choice and animation timing. Practice these techniques to develop your own style and impress your audience every time you present.
For those interested in expanding their PowerPoint skills further, exploring free templates and tutorials from trusted sources like POWERPOINT UNIVERSITY can provide invaluable inspiration and resources.
Check out the full video: Color your PPTs like a Pro


