
Creating visually appealing and informative PowerPoint slides is essential when explaining complex concepts like cloud computing. In this comprehensive guide, I’ll walk you through the process of designing an interactive cloud computing slide that not only looks professional but also effectively communicates data flow and device connectivity. Whether you’re a beginner or an experienced presenter, this tutorial will help you master the art of crafting PowerPoint slides that captivate and educate your audience.
This guide is inspired by a detailed tutorial from POWERPOINT UNIVERSITY, a trusted resource for PowerPoint enthusiasts looking for creative templates and easy editing techniques. Let’s dive into the step-by-step process of building an animated cloud computing slide from scratch.
Table of Contents
- Why Create a Cloud Computing Slide?
- Step 1: Setting Up the Slide Background
- Step 2: Designing the Cloud Shape
- Step 3: Adding Relevant Icons Inside the Cloud
- Step 4: Creating Device Shapes
- Step 5: Connecting the Cloud to Devices with Lines
- Step 6: Adding Animations for Interactivity
- Tips for Effective PowerPoint Slides
- Frequently Asked Questions
- Conclusion
Why Create a Cloud Computing Slide?
Cloud computing is a foundational technology in today’s digital world, supporting everything from data storage to application hosting. Visualizing cloud computing concepts can be challenging, but well-crafted PowerPoint slides can simplify this by illustrating the flow of data between the cloud and various devices.
Creating an interactive slide that shows data icons inside a cloud transmitting information to devices like mobiles, laptops, and gaming consoles helps your audience grasp how cloud computing works in real life. This approach is especially valuable in business presentations, educational settings, and technical demonstrations.
By following this tutorial, you will learn how to:
- Design custom cloud shapes or use built-in icons
- Incorporate meaningful icons representing data types
- Create device graphics that complement your cloud illustration
- Use lines and animations to depict data transmission
Step 1: Setting Up the Slide Background
Start your slide by setting a suitable background that enhances the cloud computing theme. A blue color palette works well as it symbolizes technology and trust.
- Add a new slide in your PowerPoint presentation.
- Change the slide background to a blue shade of your choice. This sets a professional and tech-friendly tone.
The blue background serves as a perfect canvas for the cloud and device elements you will add later.
Step 2: Designing the Cloud Shape
You have two options for creating the cloud shape:
- Design your own cloud using PowerPoint shapes
- Use a pre-built cloud icon from PowerPoint’s icon library
Option 1: Creating a Custom Cloud
To design your own cloud:
- Go to Insert > Shapes and select the Rounded Corner Rectangle.
- Draw a rectangle and adjust the corner radius to make it fully curved.
- Insert several small oval shapes (Insert > Shapes > Oval) and scatter them around the rectangle to mimic the cloud’s fluffy appearance.
- Duplicate the ovals using Ctrl+D and adjust their sizes and positions randomly.
- Select all shapes (rectangle and ovals), go to Shape Format > Merge Shapes, and choose Union to combine them into a single cloud shape.
Option 2: Using a Cloud Icon
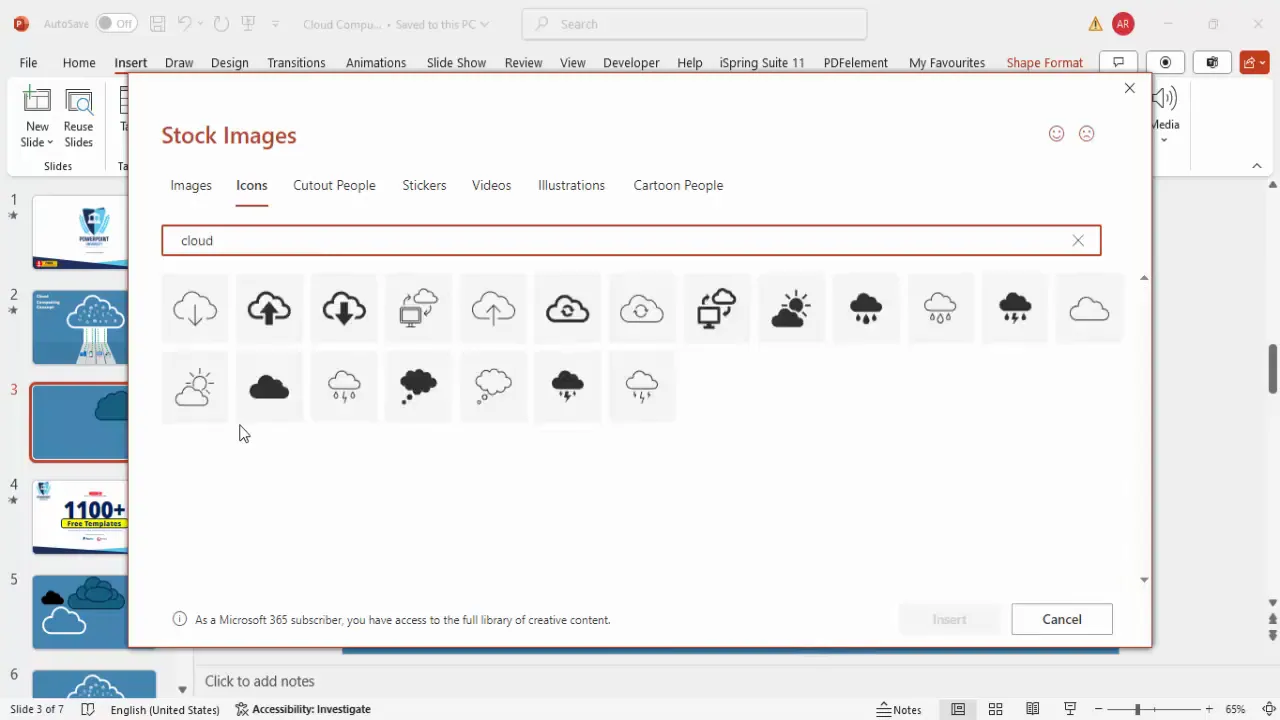
Alternatively, you can quickly insert a cloud icon:
- Go to Insert > Icons and search for “cloud.”
- Select a cloud icon that fits your style and click Insert.
- Resize the icon as required, then right-click and select Convert to Shape for further customization.
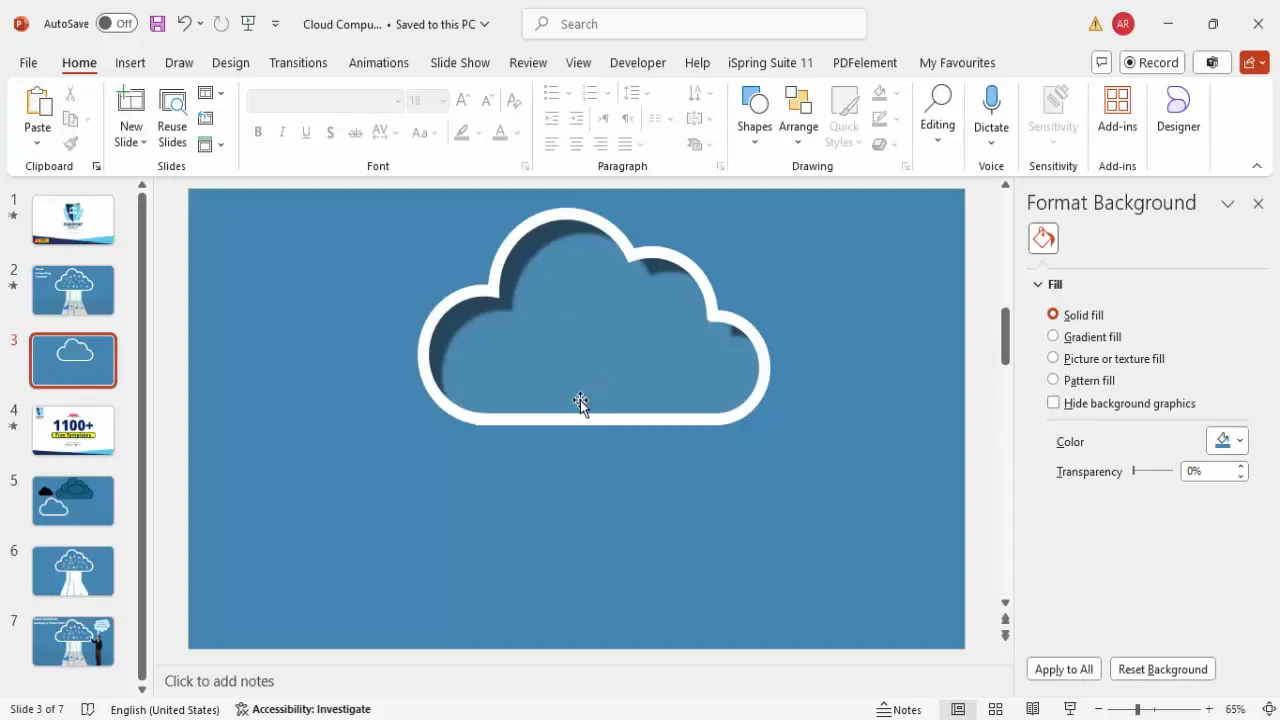
Styling the Cloud
Once your cloud shape is ready, enhance its appearance:
- Fill the cloud with a light blue color using the Format Shape pane.
- Add a white outline and increase the outline width (e.g., 14 pts) for better visibility.
- Apply a shadow effect (e.g., inside top left shadow) to add depth.
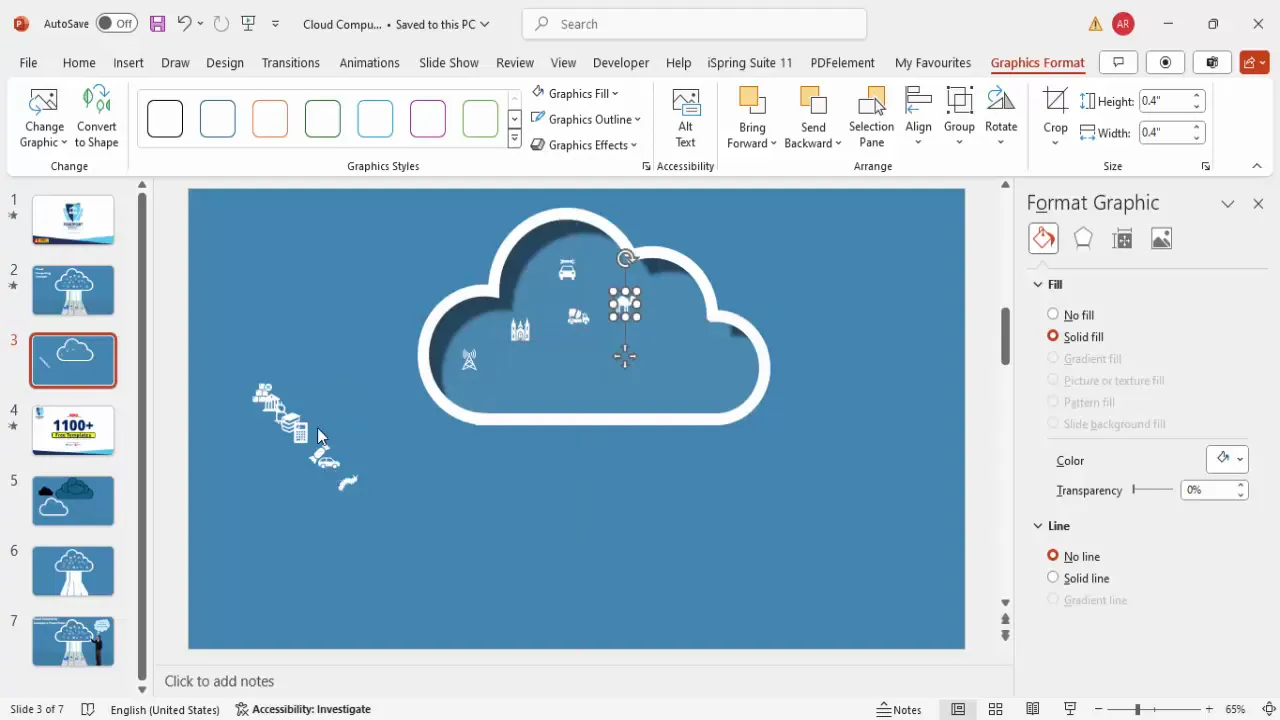
Step 3: Adding Relevant Icons Inside the Cloud
To represent the different types of data stored and processed in the cloud, insert small icons inside the cloud shape. This visual cue helps communicate the concept of diverse data types flowing through the cloud.
- Go to Insert > Icons and select icons relevant to cloud computing (e.g., bitcoin, dollar signs, books, calculators).
- Avoid unrelated or abstract icons such as aliens or random shapes.
- Insert the selected icons and resize them uniformly (e.g., height and width of 0.4 inches).
- Change the fill color of the icons to white for a clean, cohesive look inside the blue cloud.
- Arrange the icons randomly but neatly within the cloud boundaries to avoid overlap.
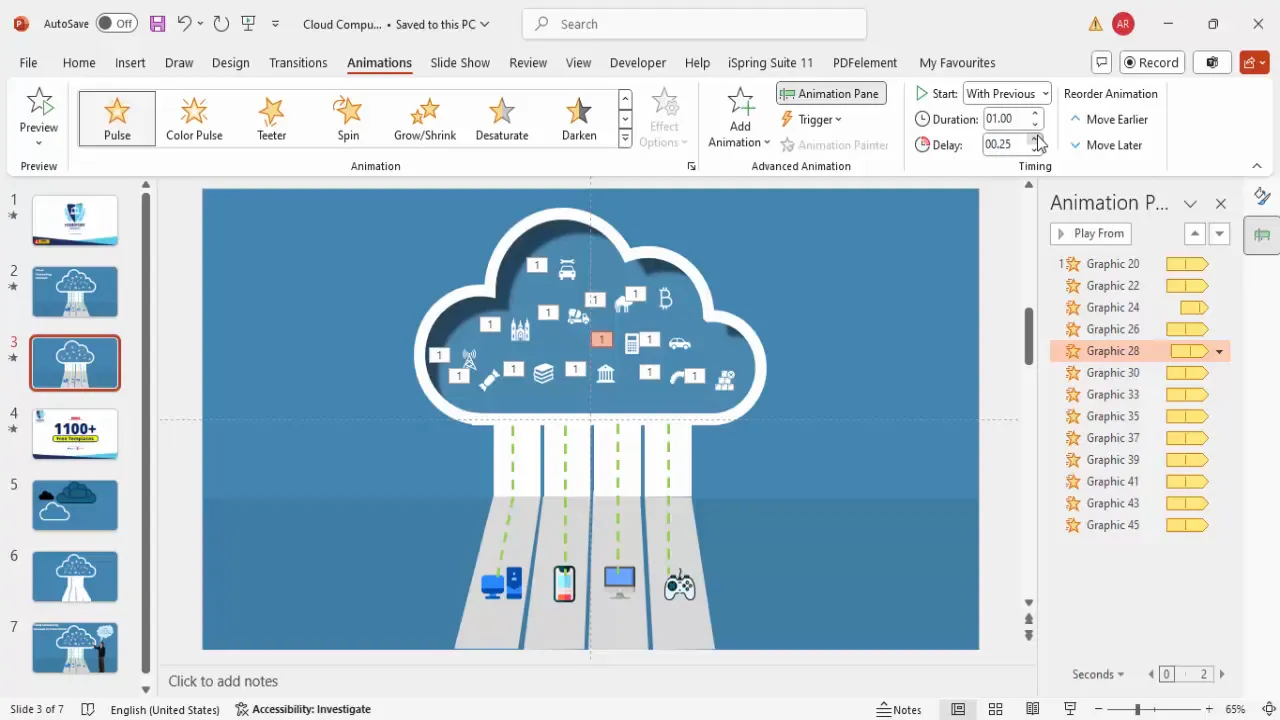
Step 4: Creating Device Shapes
Next, represent the devices that receive data from the cloud. You’ll create simple device shapes such as mobiles, gaming consoles, and laptops.
- Insert rectangles (Insert > Shapes > Rectangle) to represent devices.
- Set the rectangle fill to white and remove the outline for a clean look.
- Duplicate rectangles using Ctrl+D and resize as needed to represent different device sizes.
- Align the devices horizontally below the cloud, using guides (View > Guides) to ensure proper alignment.
You can also download colorful device icons from websites like flaticon.com and insert them on top of these rectangles for a more polished look.


Step 5: Connecting the Cloud to Devices with Lines
To visually illustrate the transmission of data from the cloud to devices, connect the cloud to each device using lines. Here’s how:
- Go to Insert > Shapes > Lines > Freeform Shape.
- Draw lines from the bottom of the cloud to the top of each device shape.
- Use Edit Points (right-click line > Edit Points) to adjust curves or angles for smooth connections.
- Set the line fill to a light gray color and remove the outline.
- Create multiple lines for all device connections.
- For the final touch, add a rectangle behind the devices to serve as a base or platform, filled with a subtle contrasting color.

Step 6: Adding Animations for Interactivity
Animations transform your static slide into an engaging visual experience, showing data pulsing and flowing from the cloud to devices.
Animating the Data Icons
- Select all the icons inside the cloud.
- Go to Animations > Add Animation > More Emphasis Effects.
- Choose the Pulse effect and click OK.
- Open the Animation Pane for better control.
- In the effect options, set the timing to Fast and repeat Until End of Slide.
- Apply different delay times to each icon to create a staggered pulsing effect.
Animating the Connecting Lines
- Select all the lines connecting the cloud to devices.
- Apply the Wipe animation.
- Set the direction to From Top.
- Configure the animation to start On Click or After Previous, depending on your preference.
- Set the timing to Fast or Very Fast and repeat Until End of Slide.
- Add different delay times for each line to mimic data flowing at different intervals.
Final Touches
- Ensure that device icons are always on top by selecting them and choosing Bring to Front.
- Add any relevant text labels or titles to enhance clarity.
Tips for Effective PowerPoint Slides
Creating impactful PowerPoint slides goes beyond just adding shapes and animations. Here are some expert tips to ensure your slides are polished and professional:
- Keep Designs Simple: Avoid clutter. Use minimal but meaningful icons and shapes.
- Consistent Color Palette: Stick to a cohesive color scheme that aligns with your theme or brand.
- Align Objects Precisely: Use guides and alignment tools to ensure everything is neatly placed.
- Use High-Quality Icons: Download icons from reputable sources like Flaticon to maintain visual quality.
- Test Animations: Run through your animations several times to ensure smooth transitions.
- Readable Text: If adding text, use legible fonts with adequate size and contrast.
- Backup Your Work: Save your presentation frequently and consider exporting a PDF version as a backup.
Pro Tip: Use Templates
If you want to save time or need inspiration, explore free PowerPoint templates offered by trusted sources. These templates often come with professionally designed elements and layouts that you can customize to fit your needs.
Frequently Asked Questions
1. Can I use pre-made icons instead of creating my own shapes?
Absolutely! PowerPoint offers a wide range of icons, and websites like Flaticon provide free and paid icon sets. Using pre-made icons saves time and ensures a professional look.
2. How do I make sure animations run smoothly during the presentation?
Use the Animation Pane to manage timing and order. Avoid overly complex animations and test the slide in Slide Show mode multiple times before presenting.
3. Can I customize the cloud shape after converting an icon to a shape?
Yes, after converting an icon to a shape, you can ungroup it and edit individual points or elements to customize the shape further.
4. What if I want to add more devices or data types later?
You can easily duplicate existing shapes and lines, then adjust their positions. Remember to update animations accordingly to maintain consistency.
5. Is there a way to download this cloud computing slide template?
Yes, free downloadable templates are available from various PowerPoint tutorial channels and websites. For instance, POWERPOINT UNIVERSITY provides free templates linked in their video descriptions.
Conclusion
Designing an effective cloud computing slide in PowerPoint is a rewarding process that combines creativity with technical skills. By following this step-by-step guide, you can create a dynamic and visually appealing slide that clearly communicates how data flows from the cloud to various devices.
Remember to balance design and functionality, use relevant icons, and leverage animations to enhance understanding. Whether you’re delivering a business pitch or teaching cloud technology, these PowerPoint slides will help you make a lasting impression.
For continuous learning, explore more tutorials and templates from trusted sources like POWERPOINT UNIVERSITY to refine your PowerPoint skills and presentation impact.
Check out the full video: Cloud Computing Slide in PowerPoint


