
If you’re looking to enhance your PowerPoint presentations with clear, engaging step-by-step graphics, you’re in the right place. This comprehensive guide will walk you through the process of creating a professional and visually appealing four-step infographic slide in PowerPoint. Whether you’re presenting a project workflow, a process, or a sequence of tasks, this slide design will help you communicate your ideas effectively.
In this tutorial, you’ll learn how to build a dynamic 4-step graphic slide from scratch, customize colors, add icons, and animate the steps for a smooth presentation flow. The instructions are easy to follow and perfect for all skill levels. Plus, you’ll get tips to make your slide look polished and professional.
This design approach is inspired by PowerPoint University, a fantastic resource where you can also find over a thousand free PowerPoint templates to elevate your presentations. Let’s dive right in and create a slide that will impress your audience and keep them engaged.
Table of Contents
- Preparation: Setting Up Your Slide
- Creating the Step Shapes
- Cutting the Shapes for Titles
- Coloring and Grouping the Shapes
- Adding Text and Icons
- Duplicating Steps for the Full Slide
- Adding Shadows and Visual Effects
- Finalizing with Animations
- Frequently Asked Questions
- Conclusion
Preparation: Setting Up Your Slide
Start by adding a new slide to your PowerPoint presentation. To ensure your design stands out and is easy to read, choose a light-colored background for the slide. This choice provides a clean canvas for your step graphics and makes colors pop.
Next, enable the guides for precise alignment:
- Go to the View tab.
- Check the box for Guides to display alignment helpers on your slide.
Having guides visible is essential for creating balanced and evenly spaced graphics, especially for a multi-step design like this one.
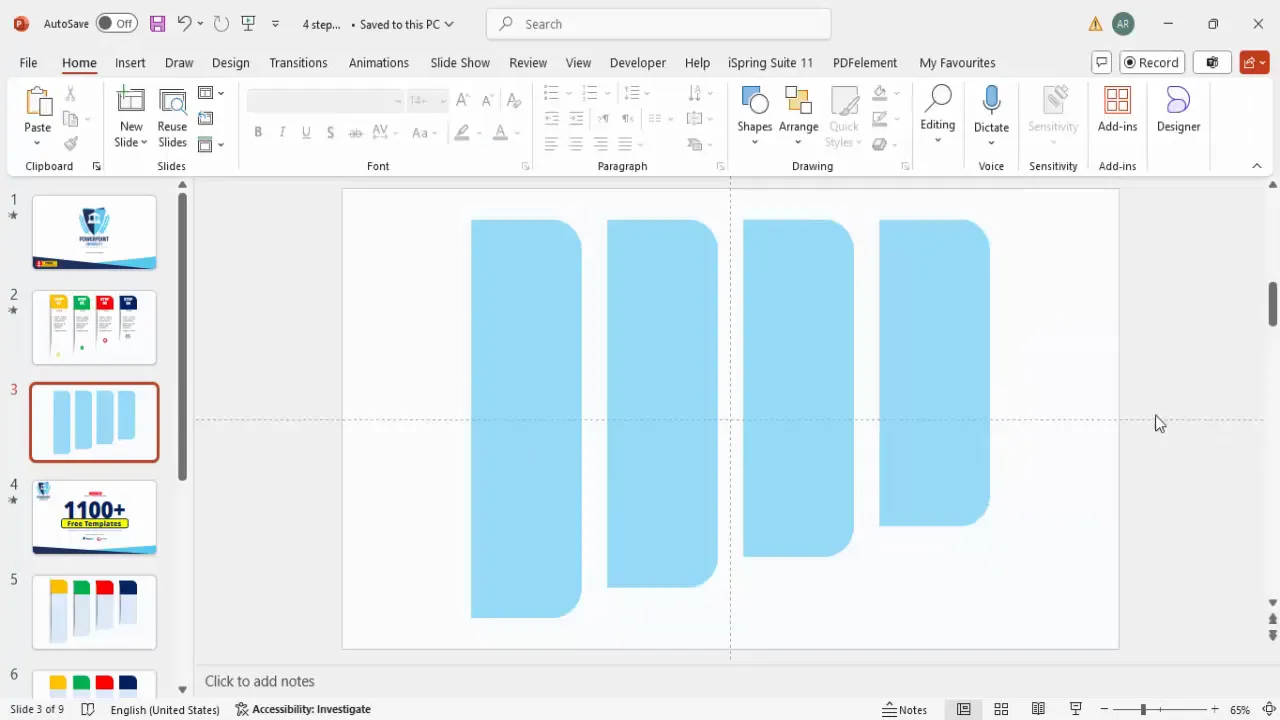
Creating the Step Shapes
Now, let’s create the base shapes for the four steps:
- Go to Insert > Shapes and select a Rounded Rectangle with the top corners rounded.
- Draw a small rectangle on your slide.
- Rotate the rectangle 90 degrees to the right:
- Click on the shape.
- Go to the Shape Format tab.
- Select Rotate > Rotate Right 90°.
- Set the size of the shape:
- Width: 6.5 inches
- Height: 1.9 inches
- Adjust the corner roundness by dragging the small orange handle inside the shape to make it more curved.
- Remove the outline of the shape by selecting No Outline.
- Fill the shape with any color of your choice; this can be changed later.
Once you have the first shape ready, duplicate it three times by holding Ctrl + Shift and dragging the shape to create copies. Adjust the height of each duplicate to create a gradual decreasing effect:
| Step | Height (inches) |
|---|---|
| Step 1 (original) | 1.9 |
| Step 2 | 1.6 |
| Step 3 | 1.5 |
| Step 4 | 1.4 |
After resizing, you might notice uneven spacing between the shapes. To fix this:
- Select all four shapes.
- Go to the Shape Format tab.
- Click Align > Distribute Horizontally to space them evenly across the slide.
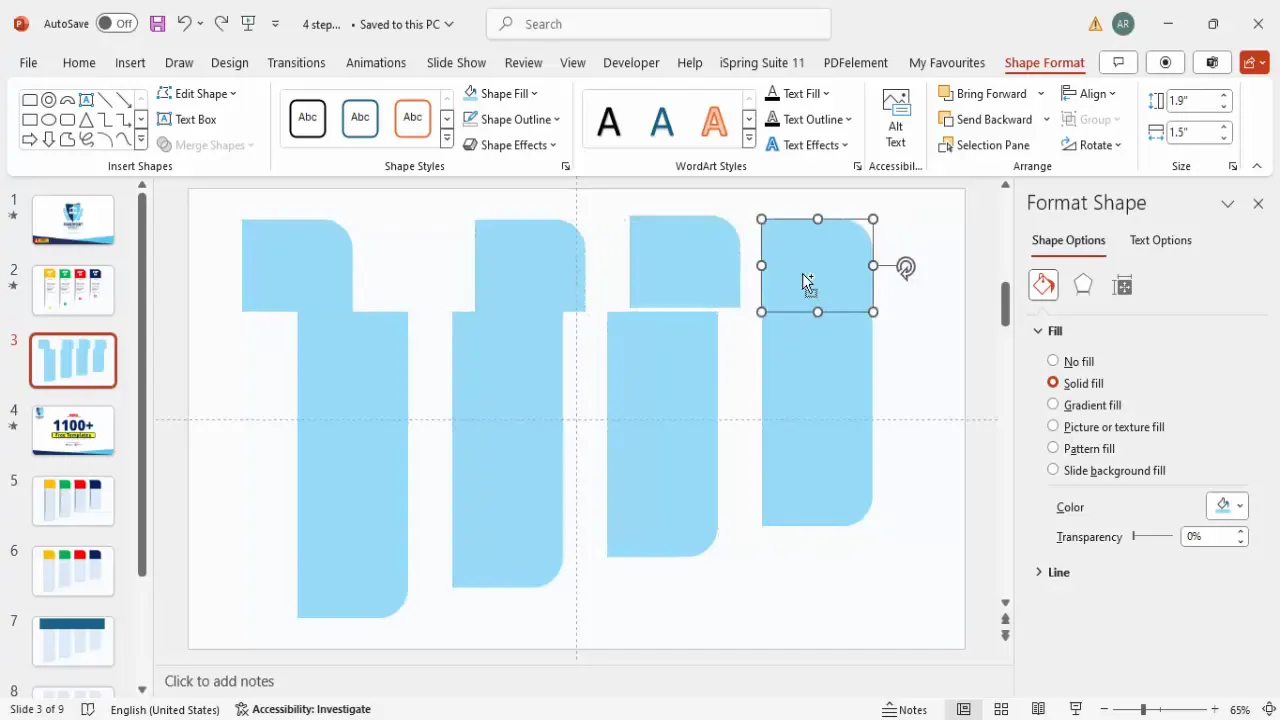
Cutting the Shapes for Titles
To add titles to the top part of each step, you need to split the rectangles into two parts: the main body and the title section.
Follow these steps to cut the top part of each rectangle:
- Insert a standard rectangle shape that will act as a cutting mask for the top part of the step shapes.
- Make this rectangle transparent by setting the fill to No Fill and the outline to No Outline, so you can see the shapes underneath.
- Duplicate this rectangle to match the number of step shapes (four in total).
- Position each transparent rectangle over the top part of each step shape where you want to cut.
- Select one step shape and one transparent rectangle together.
- Go to the Shape Format tab, click Merge Shapes > Fragment.
- Delete the unwanted top parts created by the fragment tool, leaving you with two separate parts for each step shape.
- Repeat this process for all four step shapes.
You should now have four main step shapes with their top portions separated, allowing you to add distinct titles above each step.
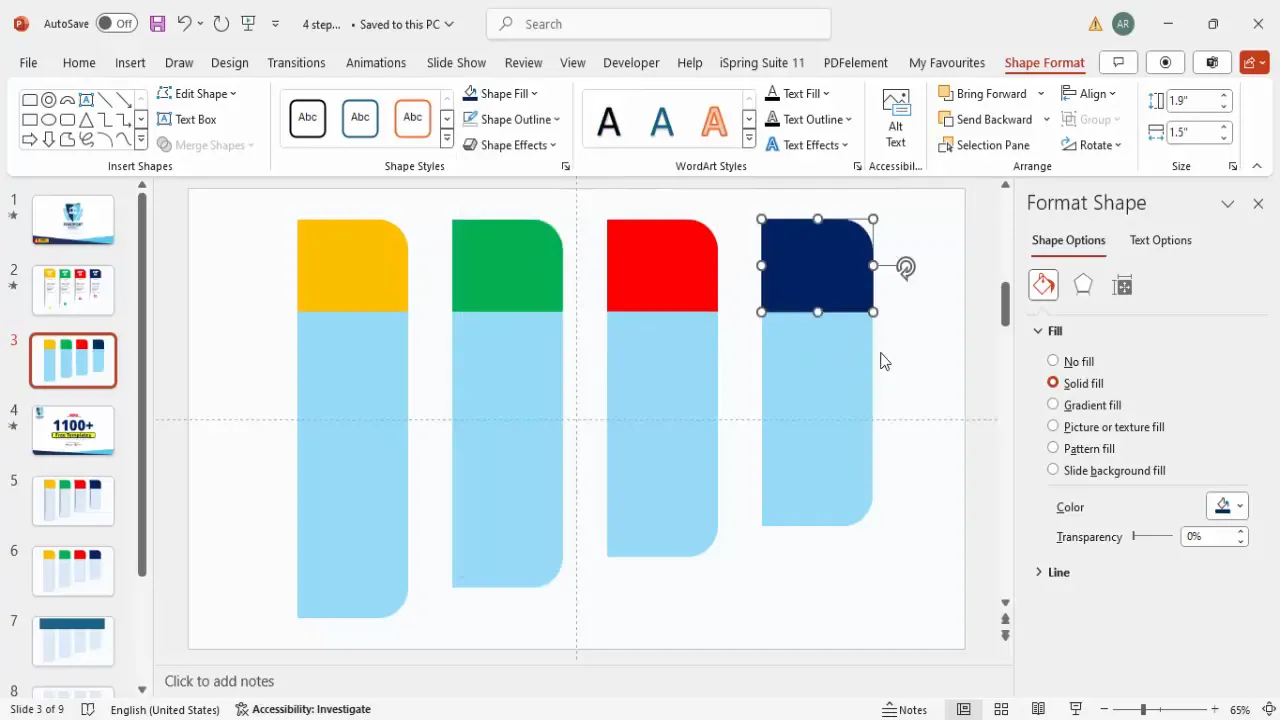
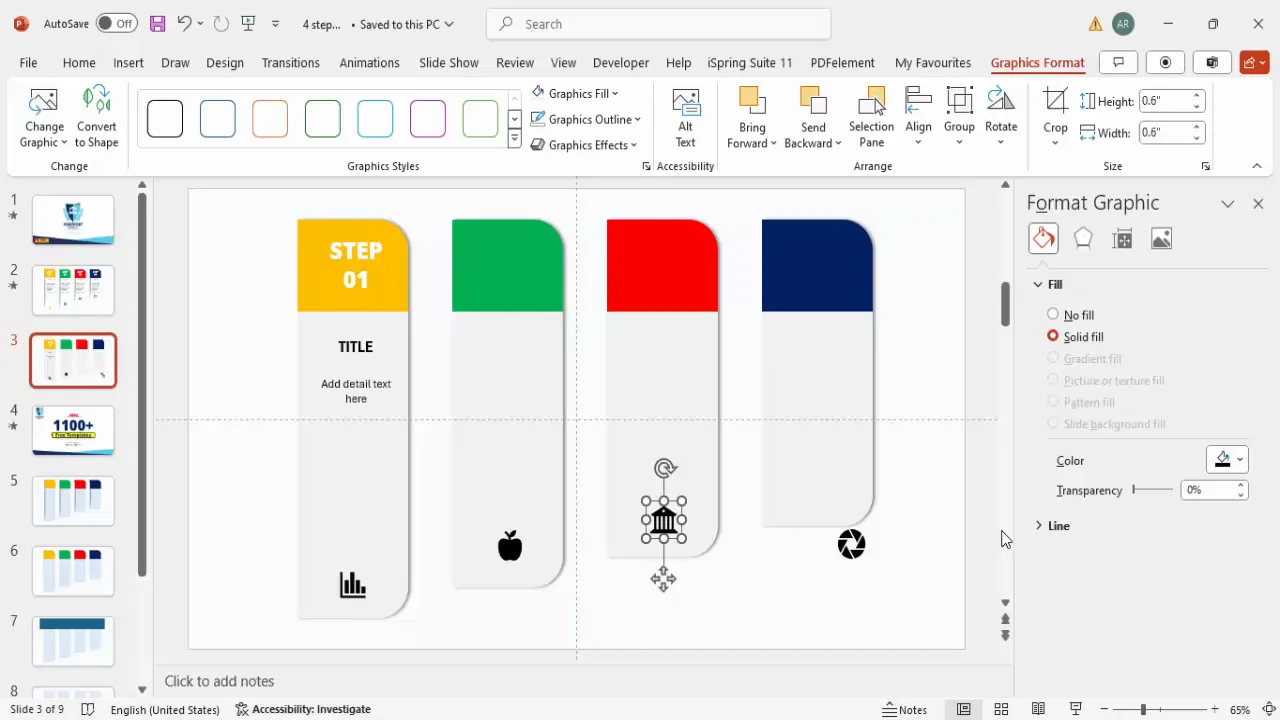
Coloring and Grouping the Shapes
Now, it’s time to add colors to your step shapes. Choose a unique color for each step to help your audience distinguish between different phases or options. Here’s a sample color scheme you can use or modify as per your branding:
| Step | Color | Color Description |
|---|---|---|
| Step 1 | Orange (#FF6F00) | Bright and energetic |
| Step 2 | Green (#43A047) | Calm and growth-oriented |
| Step 3 | Red (#E53935) | Bold and urgent |
| Step 4 | Blue (#1E88E5) | Trustworthy and professional |
After applying colors, group each pair of shapes (main body + top title part) together:
- Select the two parts of Step 1 and press Ctrl + G to group.
- Repeat for Steps 2, 3, and 4.
Grouping makes it easier to move and edit each step as a single object later.
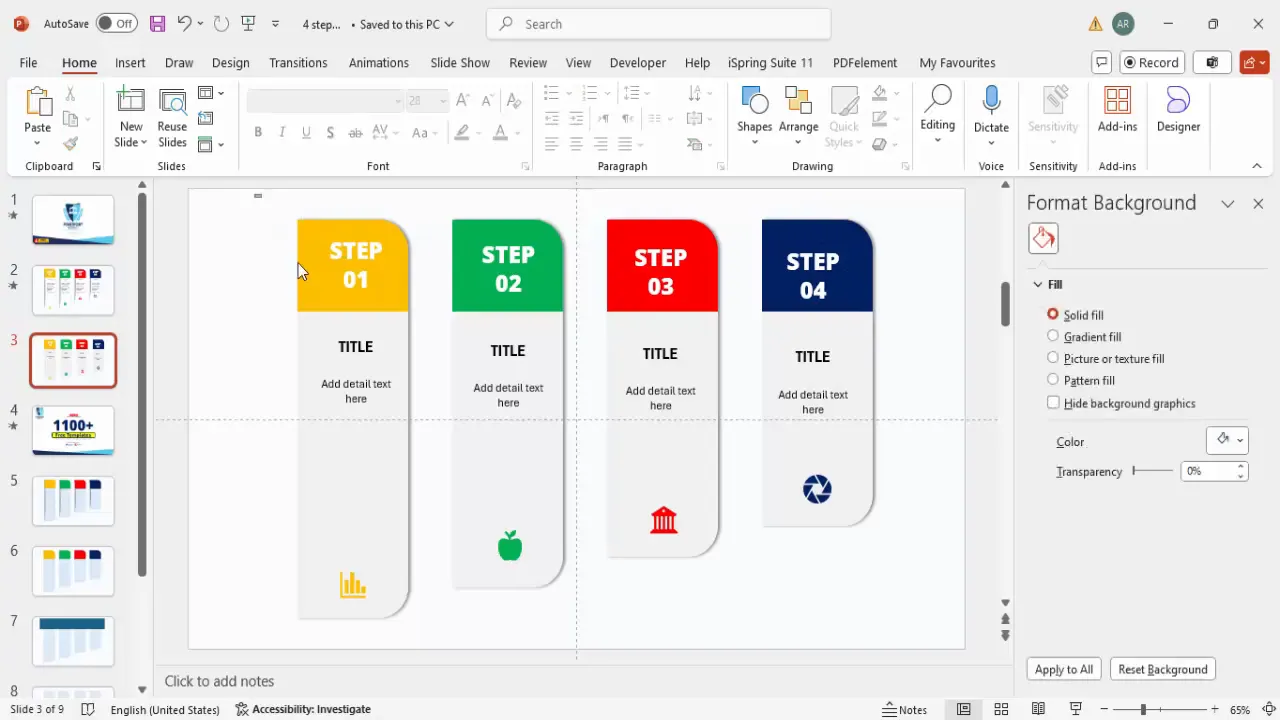
Adding Text and Icons
With your colored shapes ready, it’s time to add meaningful content: step numbers, titles, detailed descriptions, and icons.
Adding Step Numbers
- Insert a text box over the top title area of each step.
- Type the step number, e.g., “Step 01”.
- Format the text using a bold font such as Open Sans Extra Bold, center-aligned, and increase the font size for visibility.
- Set the font color to white or a contrasting color to ensure readability.
Adding Titles
- Insert another text box below the step number for the step title.
- Type a concise and descriptive title for the step.
- Use a bold font, center alignment, and adjust the font size to visually balance with the step number.
Adding Detailed Text
- Below the title, insert a smaller text box for detailed text or a brief description.
- Reduce the font size to differentiate it from the title and step number.
- Center align the text and keep it succinct for clarity.
Inserting Icons
Icons add a visual cue and improve comprehension. To add icons:
- Go to Insert > Icons.
- Choose icons that relate to each step’s content or theme.
- Insert the icons and resize them to approximately 0.6 inches in height and width for consistency.
- Place the icons near the bottom of each step shape.
- Optionally, color the icons to match the step’s color scheme for a cohesive look.
Duplicating Steps for the Full Slide
After designing the first step with its shapes, colors, text, and icons, you can efficiently create the remaining steps by duplicating the entire group:

- Select the entire grouped first step.
- Press Ctrl + D to duplicate it.
- Move the duplicated step to the right, aligning it with the other steps.
- Repeat this process to create Steps 3 and 4.
- Update the text and icons for each duplicated step to reflect the correct step number, title, and description.
This method saves time and ensures visual consistency across steps.
Adding Shadows and Visual Effects
To give your step graphics a polished and professional look, add subtle shadow effects:
- Select each grouped step shape.
- Go to Shape Format > Shape Effects > Shadow.
- Choose Offset Right or a similar shadow style that fits your design.
- Adjust shadow transparency and blur to keep it subtle and not overpower the content.
You can also soften the edges of shapes or add gradient fills for additional depth and visual interest.
To create a cutout effect that makes it look like the steps are emerging from the slide, use oval shapes with gradient fills:
- Insert an oval shape positioned beneath the steps.
- Remove the outline.
- Apply a gradient fill with two stops:
- One stop matching the slide background color.
- One stop with a soft gray to simulate shadow or depth.
- Adjust the gradient direction and soft edges to create a smooth fade effect.
- Duplicate and position these ovals under each step as needed.
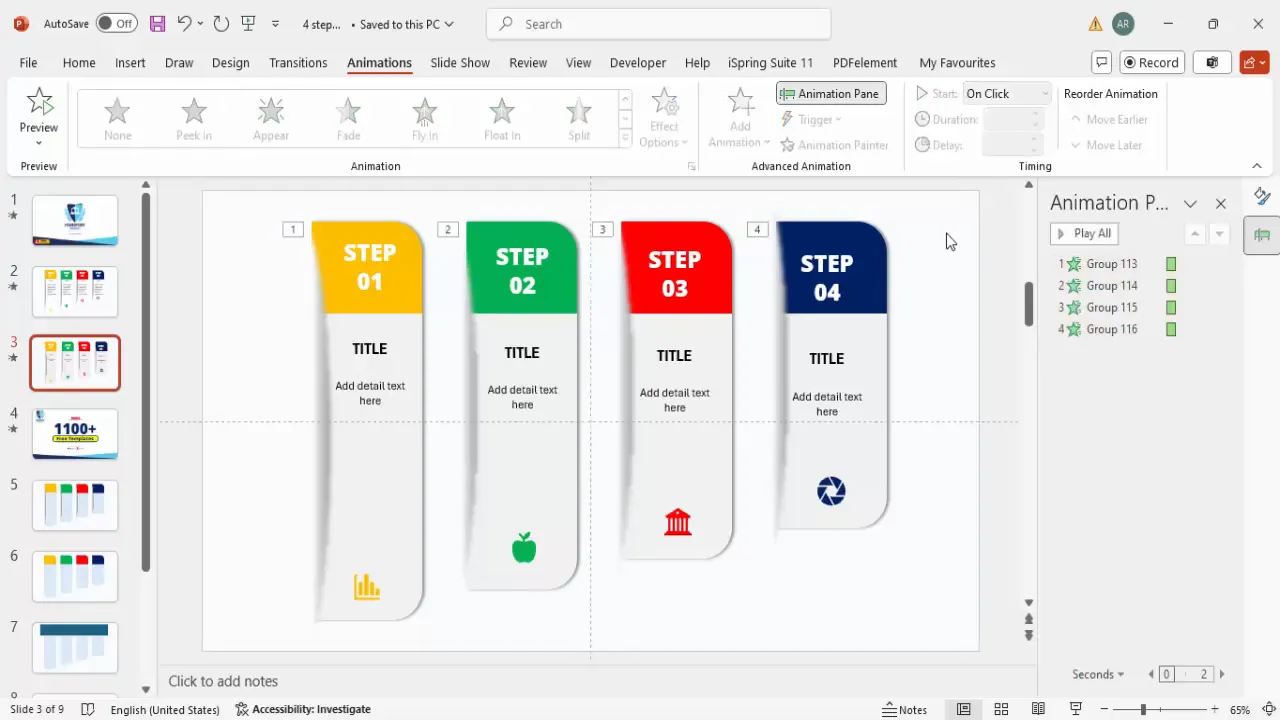
Finalizing with Animations
Animations can make your presentation more dynamic and engaging. Here’s how to animate your 4-step slide:
- Open the Animations tab and enable the Animation Pane.
- Select each grouped step shape individually.
- Click Add Animation and choose More Entrance Effects.
- Select the Peek In effect, which animates the step sliding in from the left.
- Set the animation to Start On Click to control the flow during your presentation.
- Repeat for all four steps in sequence.
Now, when you present, each step will appear one by one on mouse click, helping your audience focus on each part of the process.
Frequently Asked Questions
Can I customize the colors of the steps?
Yes! You can easily change the fill colors of each step shape to match your brand colors or presentation theme. Just select the shape, go to Shape Format > Shape Fill, and choose your preferred color.
How do I add icons to my steps?
PowerPoint provides a built-in icon library. Go to Insert > Icons, search for icons that fit your topic, insert them, and resize as needed. You can also upload your own icons if you prefer.
Can I add more than four steps?
Absolutely. While this tutorial focuses on four steps, you can duplicate and resize shapes to add more steps. Just ensure you maintain consistent spacing and alignment for a professional look.
Is it possible to animate the steps differently?
Yes, PowerPoint offers a variety of animation effects. You can choose fade-ins, fly-ins, zooms, or custom paths depending on your presentation style. Just make sure the animations enhance rather than distract from your message.
Where can I find free PowerPoint templates?
There are many resources online, including PowerPoint University, where you can download thousands of free templates to jumpstart your design process. Using templates can save time and give your slides a professional edge.
Conclusion
Creating an engaging 4-step infographic slide in PowerPoint is straightforward when you follow a systematic approach. By carefully designing your step shapes, adding clear text, incorporating meaningful icons, and applying subtle animations, you can effectively communicate complex processes in a visually appealing way.
This tutorial empowers you with the tools and techniques to build slides that captivate your audience and clearly convey your message. Whether for business presentations, educational purposes, or project updates, the 4-step design template is a versatile and powerful tool in your PowerPoint arsenal.
Remember, the key to great slides lies in simplicity, consistency, and clarity. Use this guide as a foundation, then customize it to fit your unique style and presentation needs.
For more creative PowerPoint templates and tutorials, be sure to explore resources like PowerPoint University and keep experimenting with new designs and animations to keep your presentations fresh and impactful.
Check out the full video: 4 Steps PPT Design | Free PowerPoint Template


