
Delivering a PowerPoint presentation can sometimes feel like a routine task, but it doesn’t have to be boring or forgettable. Whether you are a seasoned presenter or just starting out, making your slides look polished and engaging is key to capturing your audience’s attention and leaving a lasting impression. In this comprehensive guide, I’ll share seven powerful tips that will help you transform your PowerPoint presentations from ordinary to extraordinary.
These tips are designed to be practical, easy to implement, and effective in making your presentations stand out. From using the right cursor during your presentation to adding live polls, you’ll learn how small changes can make a big difference in your delivery and your audience’s experience.
Let’s dive right in and explore how you can make your next PowerPoint presentation truly awesome!
Table of Contents
- 1. Change the Cursor Pointer to Engage Your Audience
- 2. Align All Your Slide Objects for a Professional Look
- 3. Animate Text or Images to Add Subtle Movement
- 4. Use Morph Transitions to Wow Your Audience
- 5. Remove Image Backgrounds for Cleaner Visuals
- 6. Add a Countdown Timer to Manage Breaks and Exercises
- 7. Create Live Polls Inside PowerPoint to Boost Engagement
- Conclusion
- Frequently Asked Questions (FAQ)
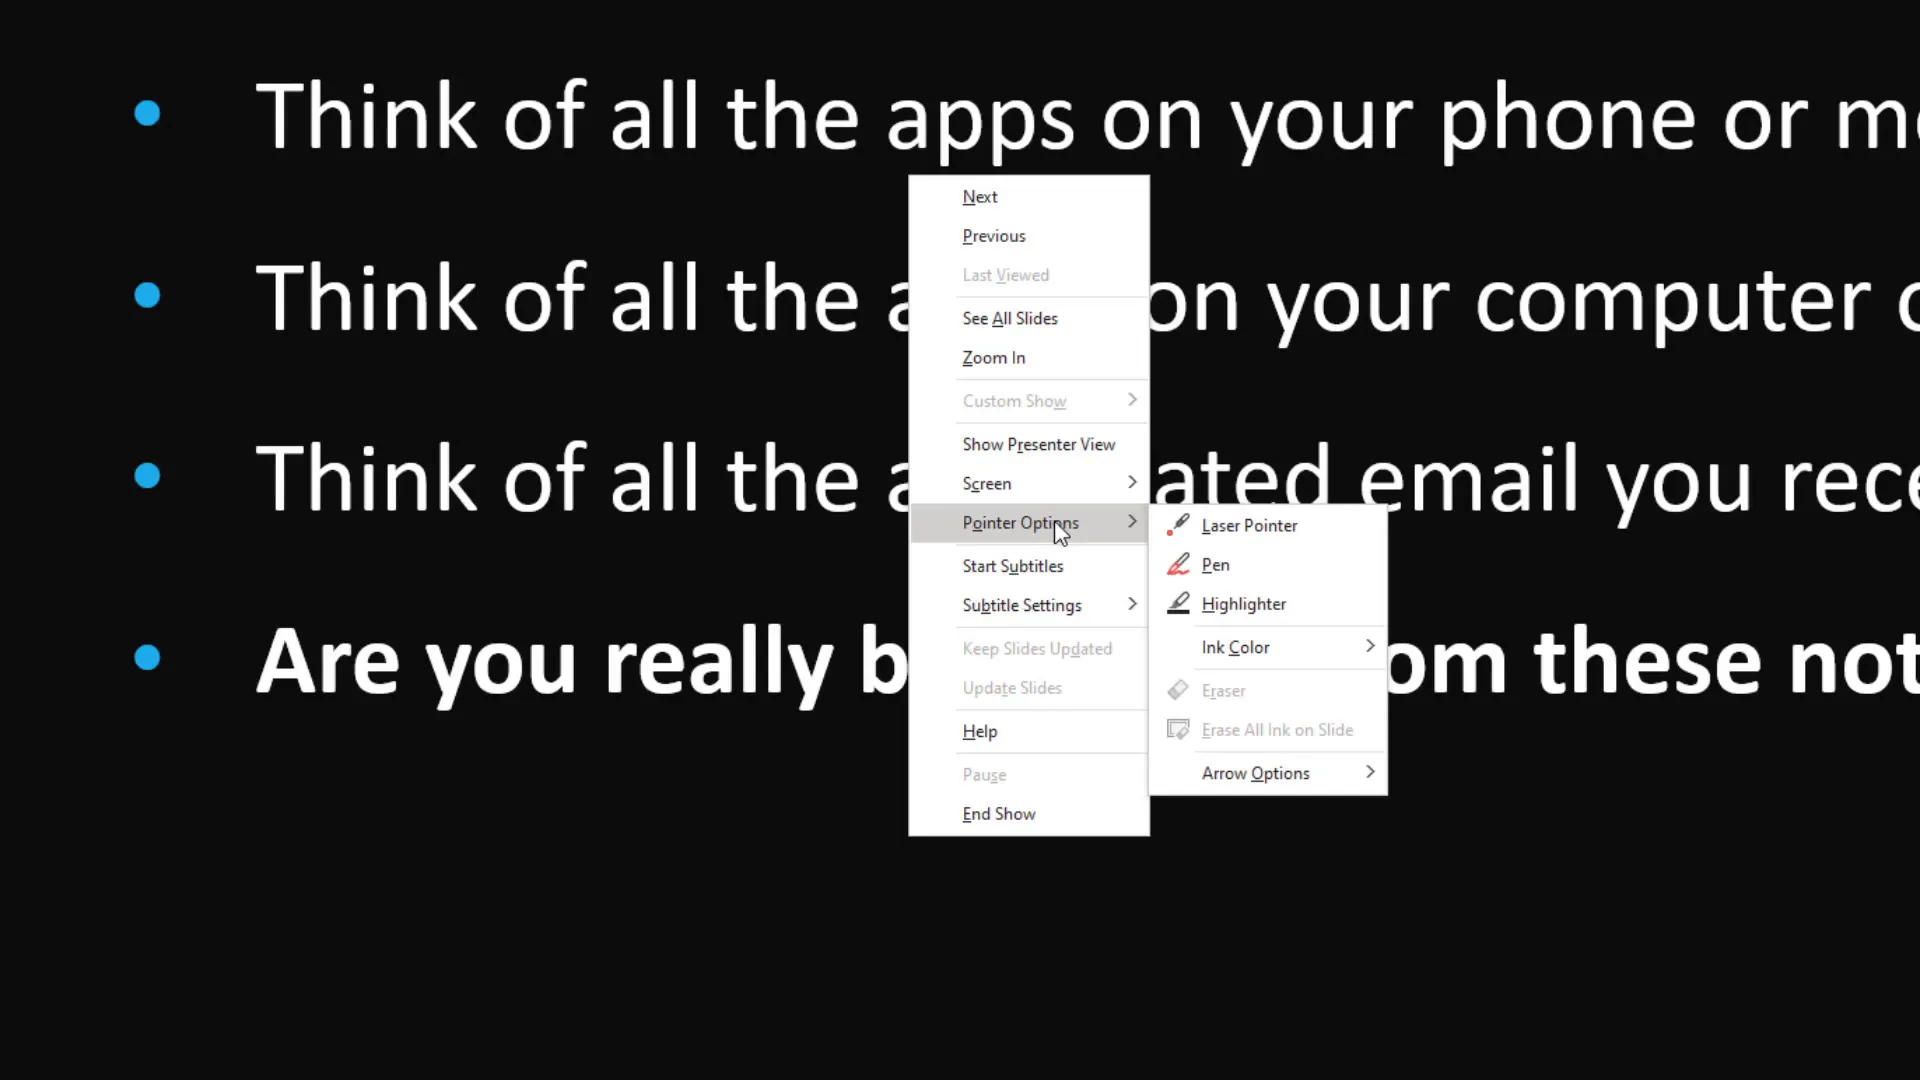
1. Change the Cursor Pointer to Engage Your Audience
How often have you sat through a presentation where the speaker just moves around the standard mouse cursor, trying to draw your attention? It’s common, but not very effective. The standard arrow cursor can be hard for your audience to follow, especially when you’re pointing out specific words, images, or diagrams.
A simple yet powerful tip is to change your cursor during the presentation to something more visually engaging. PowerPoint offers several pointer options that can help your audience focus exactly where you want.
Here’s how to do it:
- Start your presentation in Slide Show mode.
- Right-click anywhere on the slide and look about halfway down the menu for Pointer Options.
- Choose from the available options:
- Laser Pointer: Turns your cursor into a red laser pointer, perfect for highlighting specific words or images.
- Pen: Allows you to draw on the slide during your presentation, great for underlining or circling key points.
- Highlighter: Highlights text or images in a translucent color, which you can customize.
Using these pointer options not only makes your presentation more dynamic but also helps your audience follow along more easily. For example, you can underline an important word or highlight a phrase multiple times to emphasize your message.
By making this small change, your presentation will feel more interactive and visually engaging, ensuring your audience stays focused on your key points.
2. Align All Your Slide Objects for a Professional Look
One of my biggest pet peeves when watching presentations is seeing slides with misaligned text boxes, images, or other objects. When elements are out of place, it looks unprofessional and can distract your audience from the content.
Fortunately, aligning objects on your slides is quick and easy using PowerPoint’s built-in tools. Here’s how you can fix alignment issues and make your slides look polished:
- Select all the objects you want to align by holding down the Shift key and clicking each item.
- Go to the Arrange menu on the ribbon.
- Click Align and choose your preferred alignment option, such as Align Middle to line everything up vertically.
- To space objects evenly, return to Align and select Distribute Horizontally or Distribute Vertically.
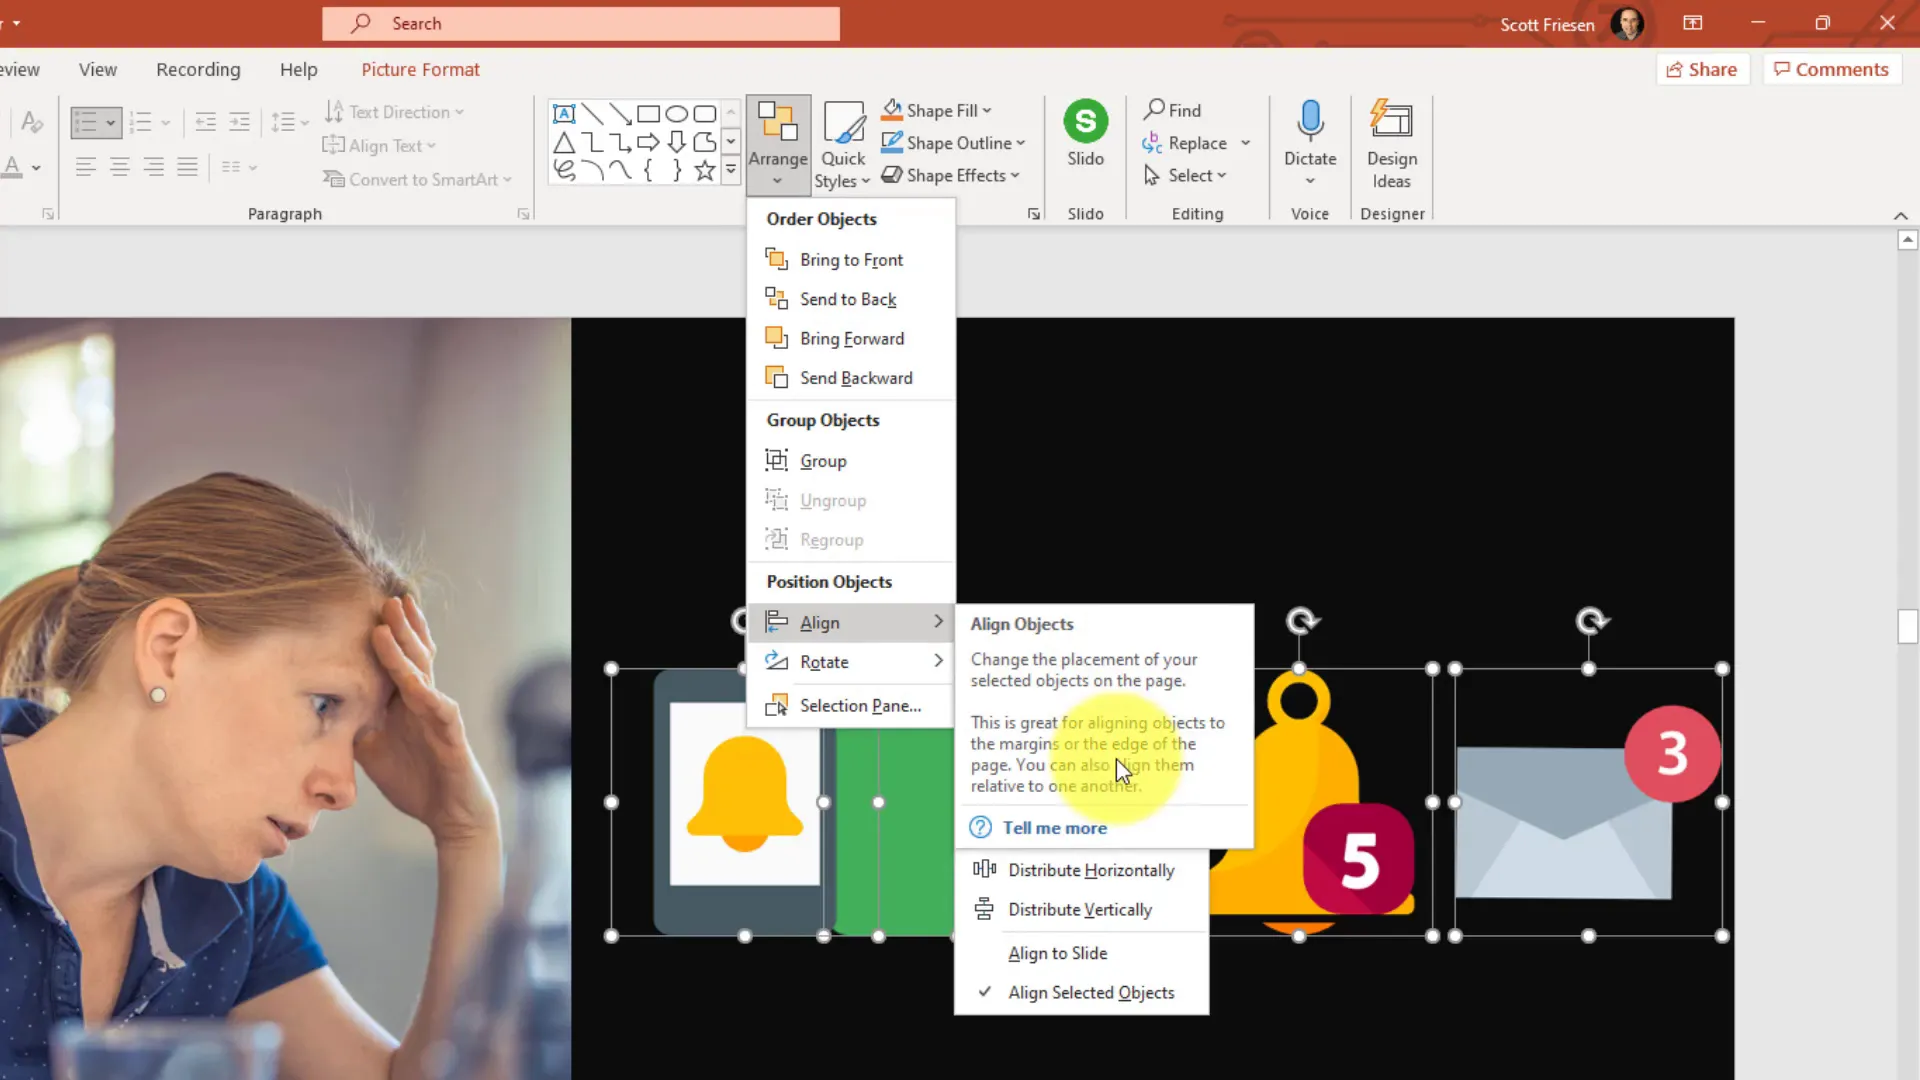
For example, if you have four images scattered across your slide, selecting all and choosing Align Middle will line them up perfectly along the center. Then, using Distribute Horizontally spaces them evenly across the slide. This method takes just a few clicks but instantly elevates the professionalism of your presentation.
Well-aligned slides are easier to read and more visually appealing, which helps keep your audience engaged and focused on your message.
3. Animate Text or Images to Add Subtle Movement
Static slides can sometimes feel dull, especially if you’re spending several minutes on a single slide. Adding subtle animations to images or text can bring your slides to life without overwhelming your audience.
One of my favorite animations is the Teeter effect, which gently rocks an image back and forth. It’s perfect for emphasizing an icon or visual element related to your topic.
Here’s how to add and customize animations in PowerPoint:
- Select the image or text you want to animate.
- Go to the Animations tab and open the animation gallery.
- Click on More Emphasis Effects to see options beyond the basics.
- Choose Teeter or any other subtle emphasis effect.
- Open the Animation Pane to fine-tune your animation.
- Change the start option to Start After Previous so the animation begins automatically when the slide loads.
- Adjust the Duration to slow (around 3 seconds) for a gentle effect.
- Set the animation to Repeat Until End of Slide so it continues while you speak.
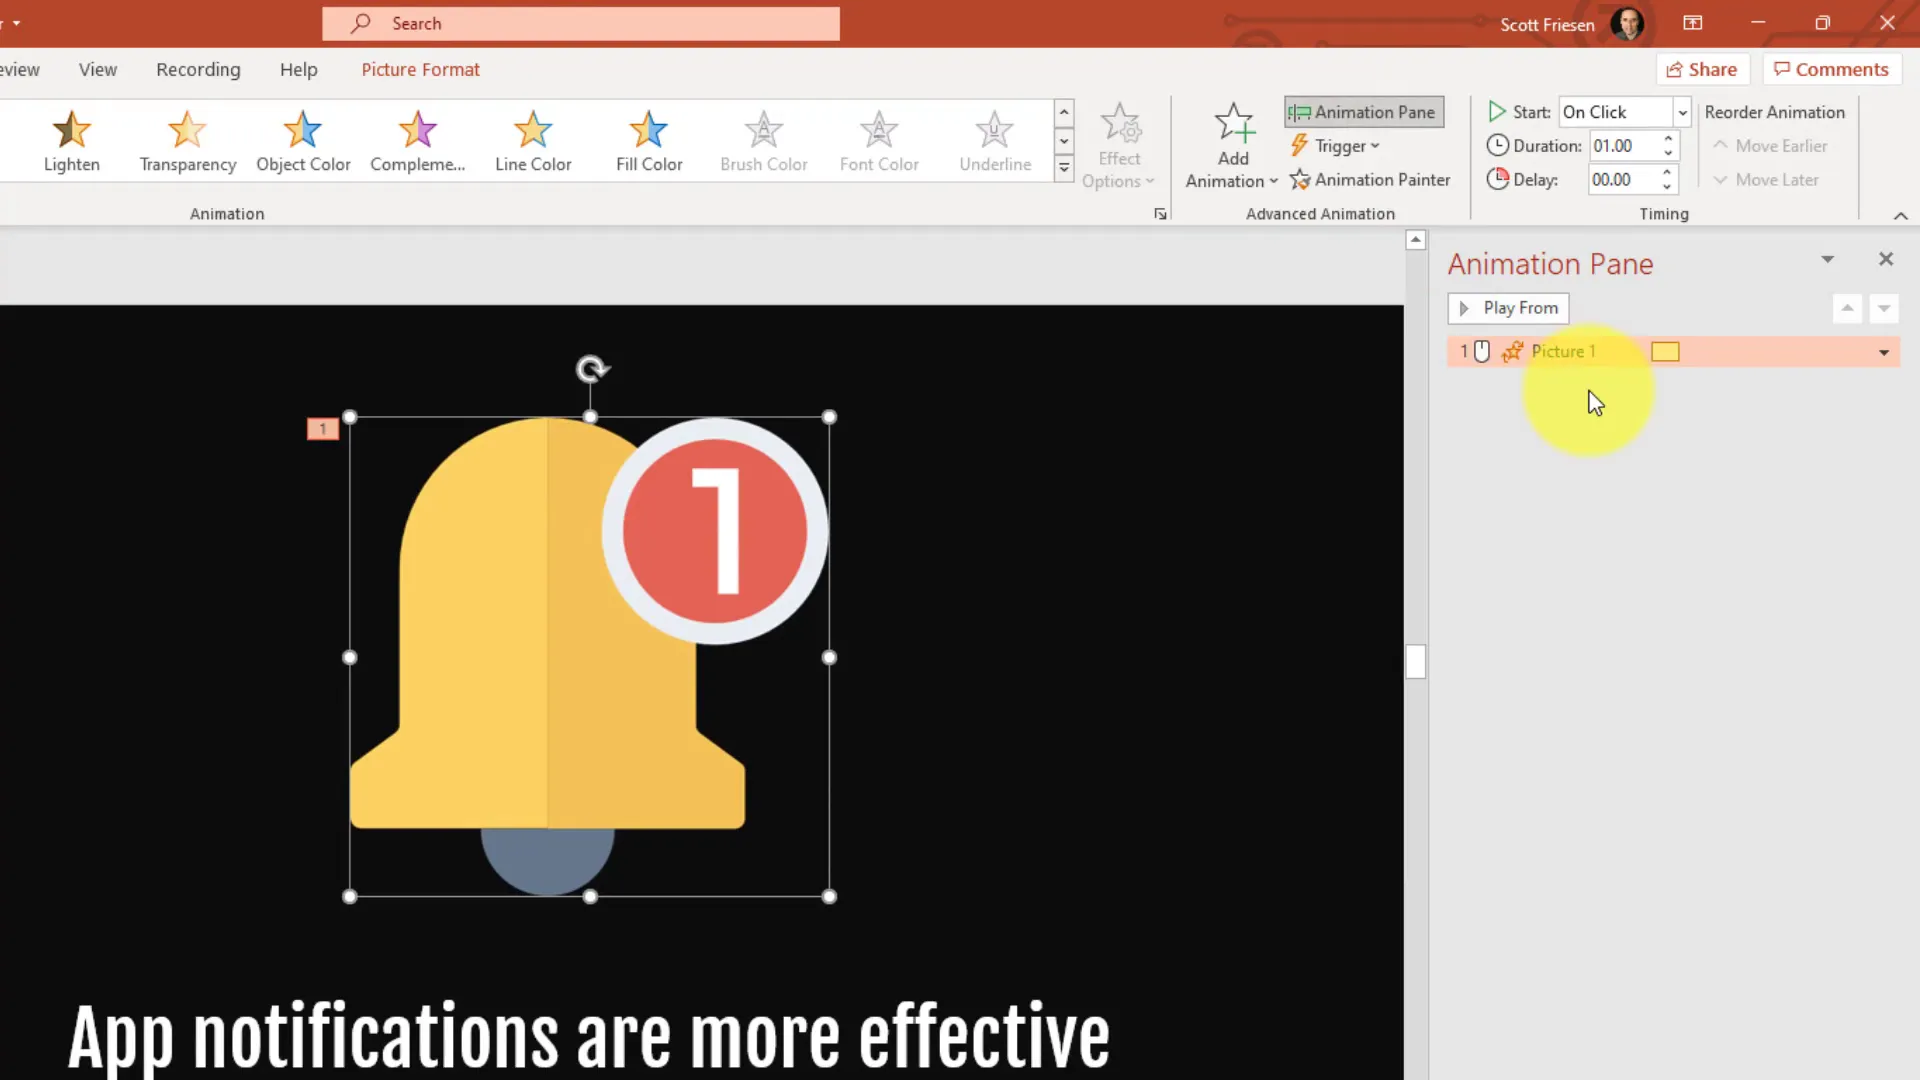
This setup creates a continuous, gentle movement that adds visual interest without distracting from your speech. It’s a great way to keep your slides dynamic and your audience engaged.
4. Use Morph Transitions to Wow Your Audience
If you want to truly impress your audience, mastering the Morph transition is a game-changer. Morph lets you animate smooth movement and resizing of objects between two slides, creating a cinematic effect that highlights key changes or comparisons.
Here’s how to create a morph transition:
- Duplicate the slide you want to morph.
- On the second slide, move and resize the objects you want to emphasize. For example, enlarge an icon or reposition text.
- Select the first slide and go to the Transitions tab.
- Choose Morph as the transition effect.
- Make sure both slides have the Morph transition selected.
- Run your presentation and watch the smooth animation as you move from the first to the second slide.

For example, you can have a bell icon grow larger and move to the right while the text shifts to the left and increases in size—drawing attention to important information in a visually stunning way. This technique is perfect for emphasizing points or showing progression without overwhelming your slides with multiple animations.
Using Morph transitions adds polish and professionalism to your presentation, making it memorable and engaging.
5. Remove Image Backgrounds for Cleaner Visuals
Many presentations use images with distracting backgrounds that don’t blend well with the slide’s layout. Instead of searching for transparent images online or using external software, PowerPoint offers a built-in tool to quickly remove backgrounds from your pictures.

Here’s how to remove an image background in PowerPoint:
- Select the image on your slide.
- Go to the Picture Format tab on the ribbon.
- Click Remove Background on the left side.
- PowerPoint will shade the background areas in purple, indicating what will be removed.
- Use Mark Areas to Keep or Mark Areas to Remove to fine-tune the selection.
- Once satisfied, click Keep Changes.
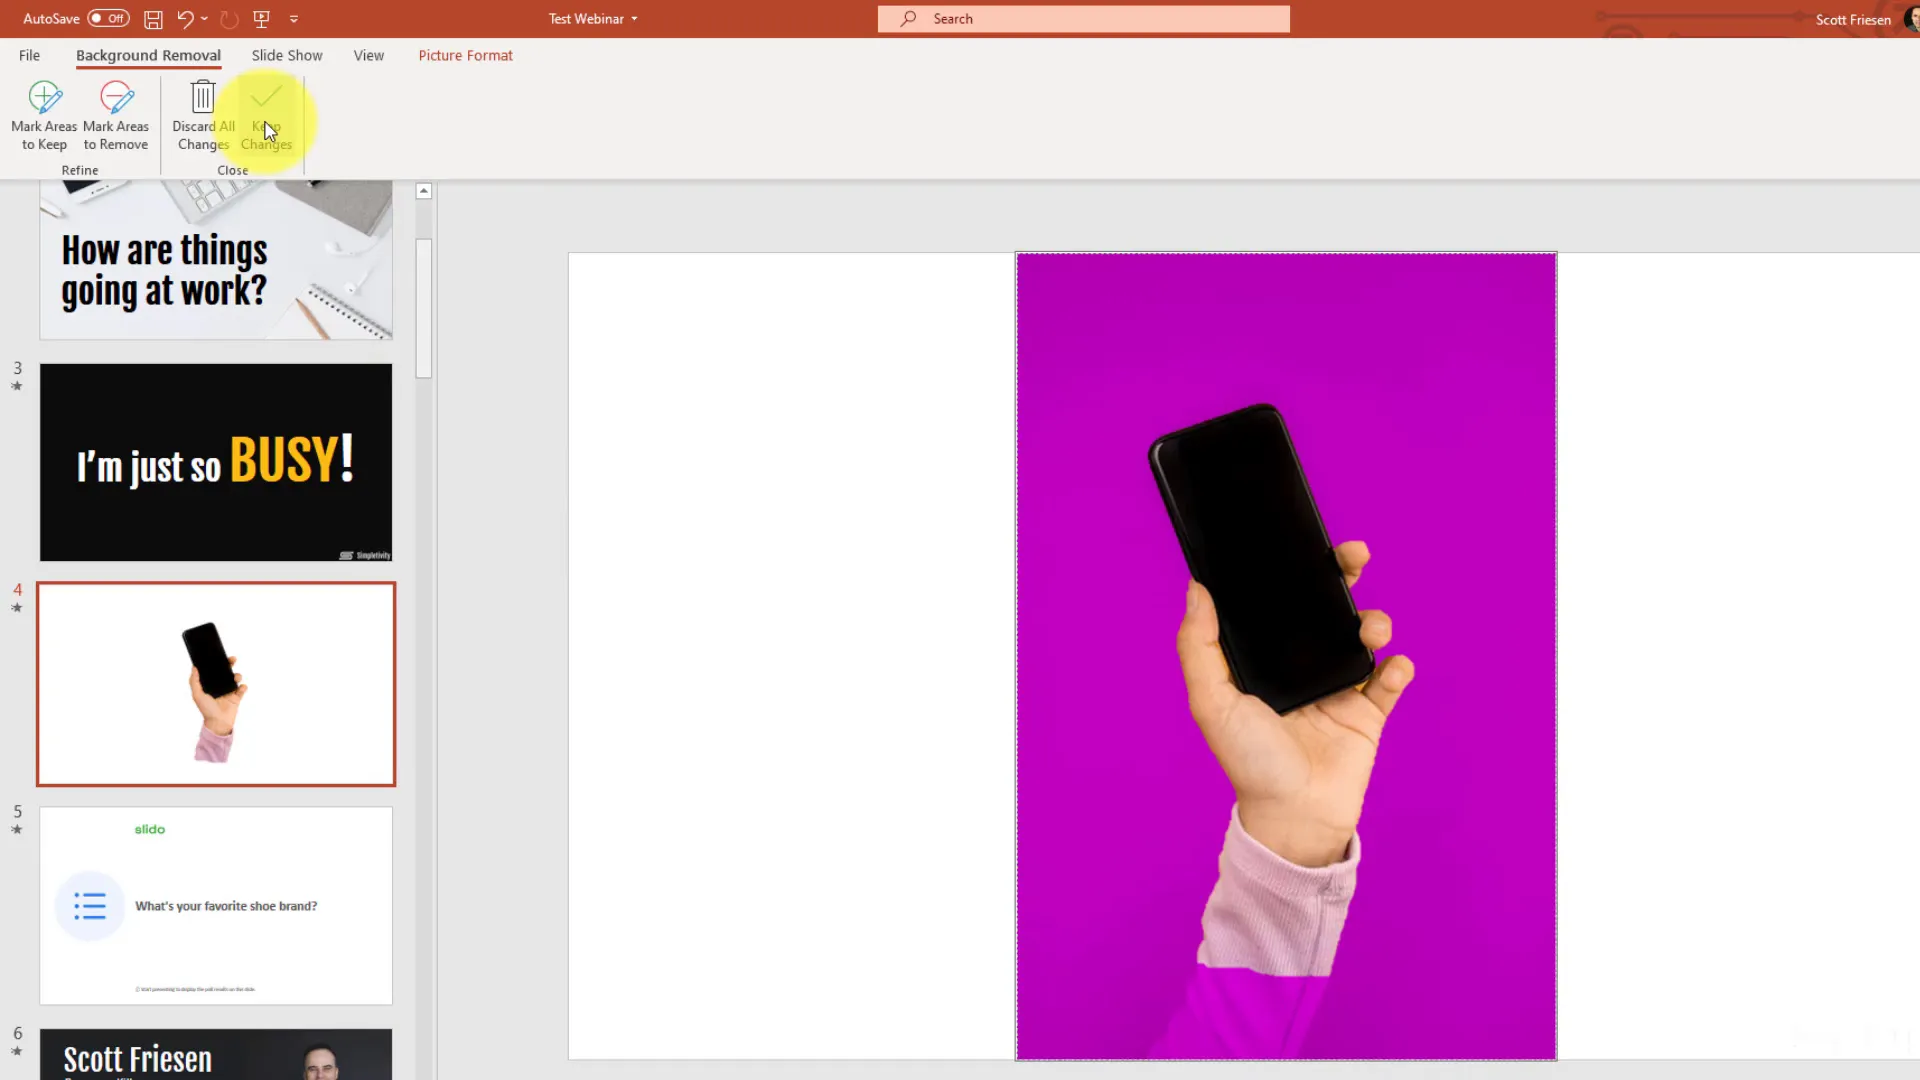
For example, if you have an image of a hand holding a phone, you can remove the background so only the hand and phone remain. This allows you to place the image seamlessly on any part of your slide, creating a cleaner and more professional look.
Using images without distracting backgrounds helps your slides look modern and uncluttered, enhancing the overall visual appeal.
6. Add a Countdown Timer to Manage Breaks and Exercises
Managing breaks or timed exercises during a presentation can be tricky, especially if you want everyone to stay on schedule. Watches might not be synchronized, and not all rooms have visible clocks. A simple solution is to add a countdown timer directly into your PowerPoint slides.
PowerPoint allows you to insert add-ins that provide customizable timers. Here’s how you can add a countdown timer:
- Go to the Insert tab and click Get Add-ins.
- Search for “countdown” or “timer” in the Office Add-ins store.
- Select an add-in like Break Time and click Add.
- Give the add-in the necessary permissions.
- Customize the timer duration (e.g., 5 or 10 minutes) and choose a theme or icon to display.
- Place the timer on your slide where it’s clearly visible.
- Start the timer during your presentation to let everyone know exactly how much time remains.
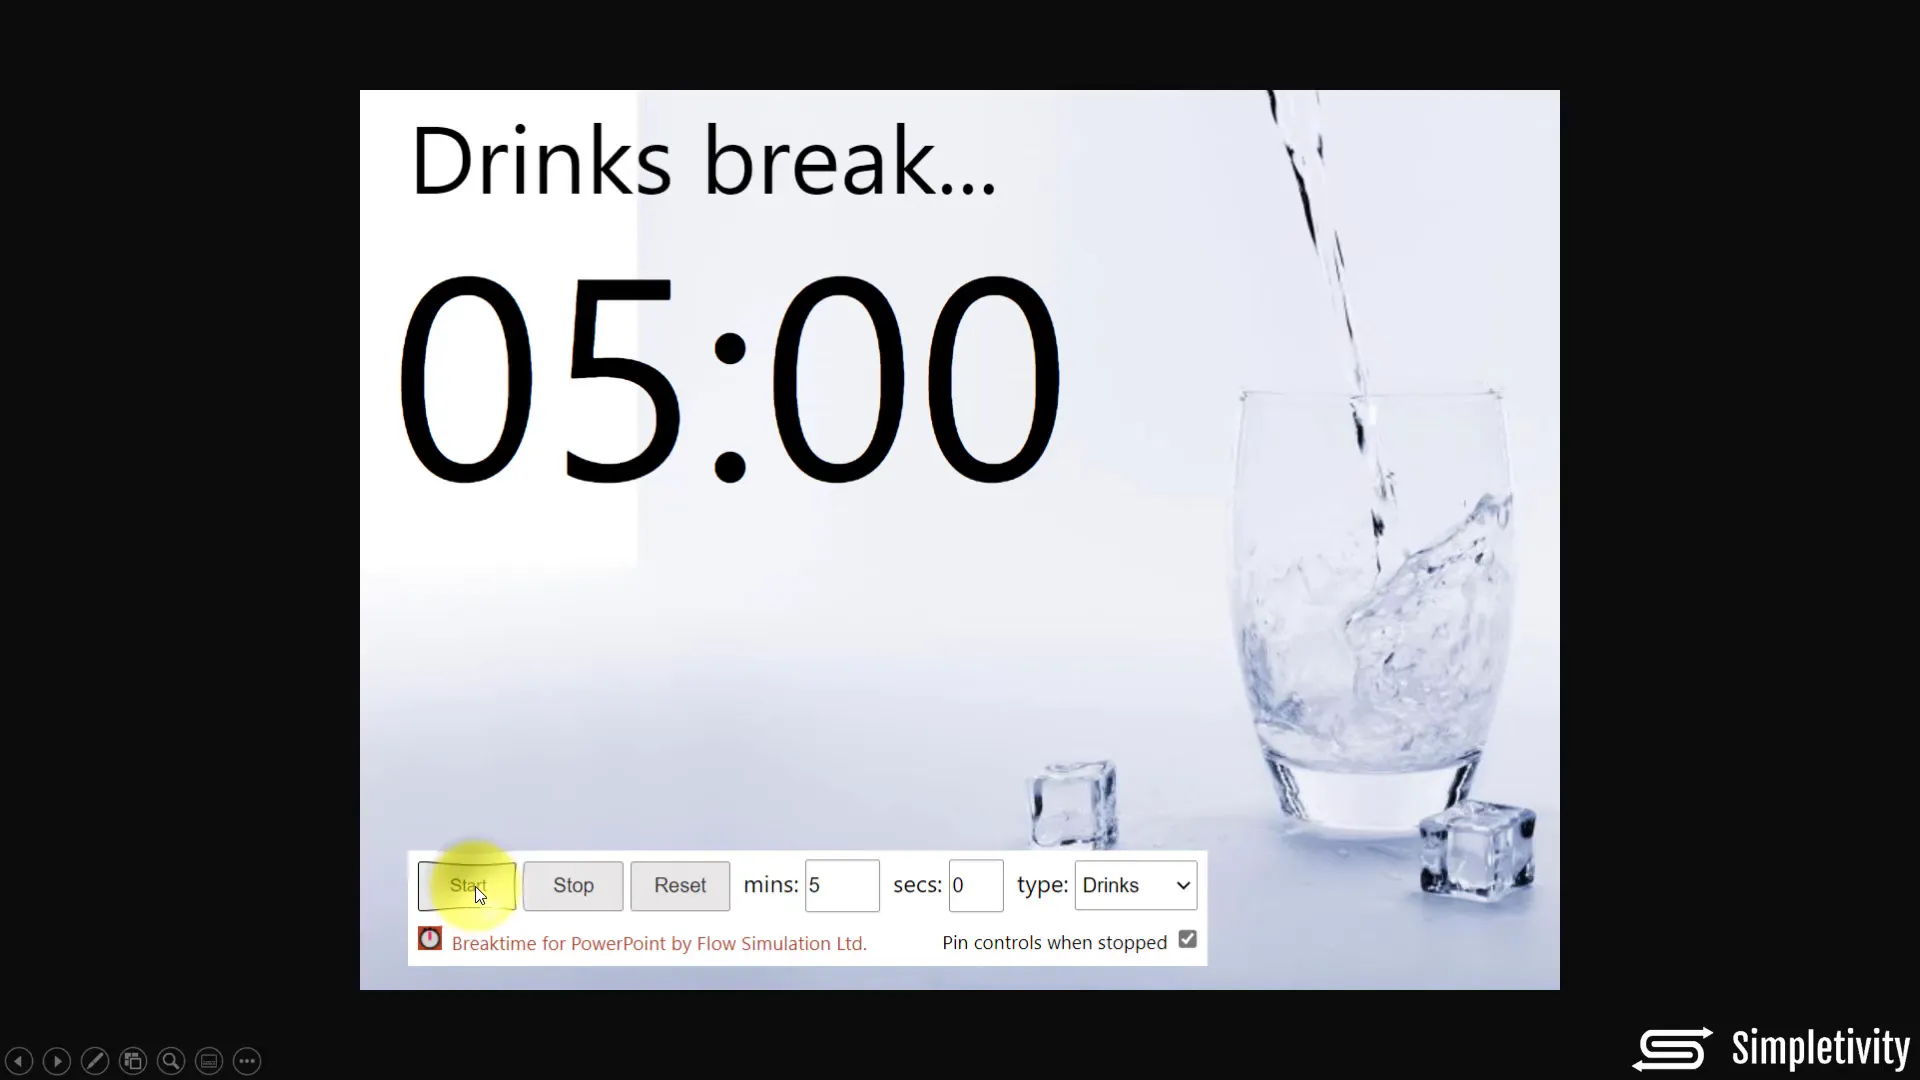
This feature keeps your presentation running smoothly and helps your audience stay on track without needing to constantly check their watches or phones. It looks clean and professional, making your break or exercise time feel organized and intentional.
7. Create Live Polls Inside PowerPoint to Boost Engagement
Engaging your audience is crucial, and it becomes even more important when delivering presentations virtually. One of the best ways to keep your audience involved is by incorporating live polls directly into your PowerPoint slides.
Using an extension like Slido, you can add interactive polls without leaving PowerPoint. Here’s how it works:
- Install the Slido add-in for PowerPoint.
- Create a poll question inside your slide deck, such as “What’s your favorite shoe brand?”
- During your presentation, transition to the poll slide.
- Your audience can participate in real-time by visiting a website or scanning a QR code displayed on the slide.
- Results update live, allowing you to discuss the feedback immediately.
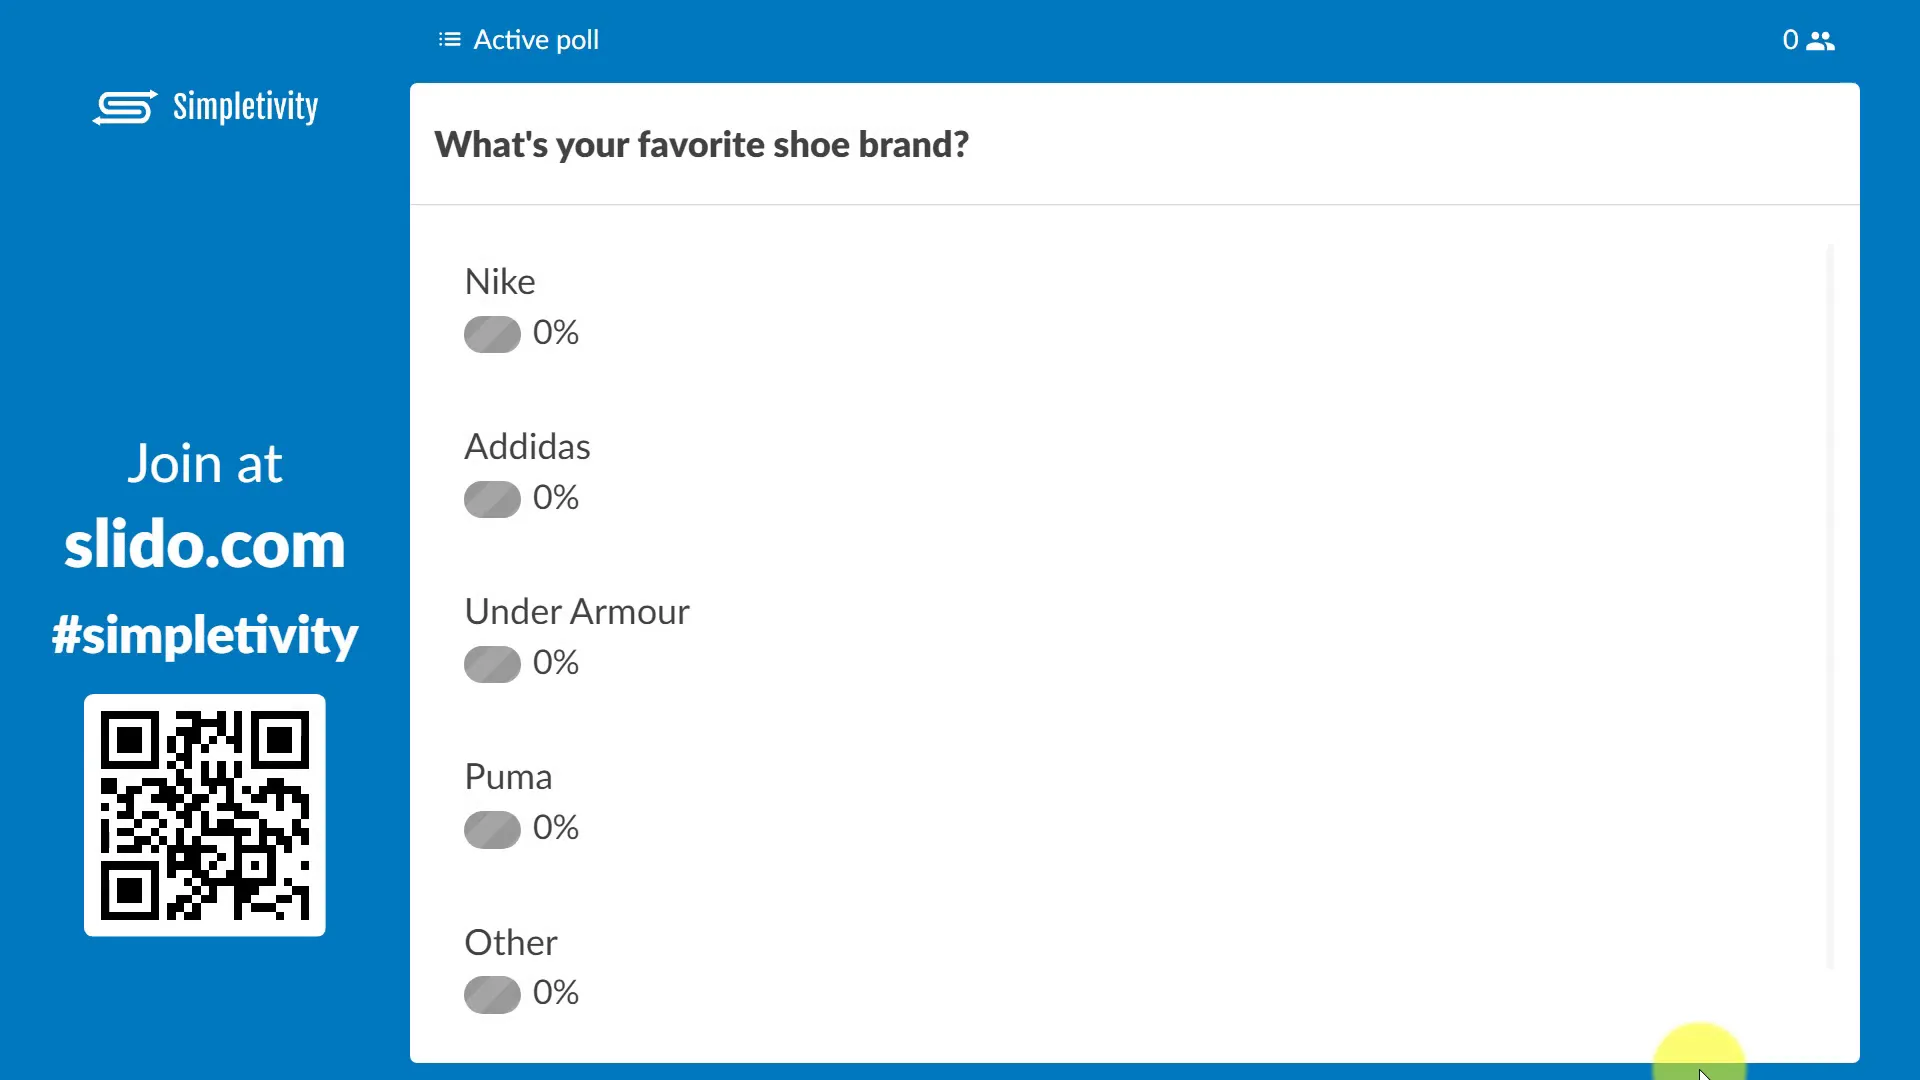
This interactive approach not only makes your presentation more fun but also encourages active participation. It helps your audience feel involved and connected, which increases retention of the information you’re sharing.
If you want to dive deeper into integrating live polling with PowerPoint, there are dedicated tutorials available that walk you through the entire process.
Conclusion
PowerPoint presentations don’t have to be dull or uninspired. By applying these seven tips, you can create slides that look professional, feel dynamic, and truly engage your audience.
- Change your cursor pointer to make your on-screen movements clear and engaging.
- Align all slide elements for a clean, polished look.
- Add subtle animations to keep your slides visually interesting.
- Use Morph transitions to create smooth, impressive slide changes.
- Remove image backgrounds to make visuals blend seamlessly.
- Add countdown timers to manage breaks and exercises professionally.
- Incorporate live polls to boost interaction and participation.
Remember, great presentations aren’t just about the content—they’re about how you deliver it. With these tips, you’ll be able to captivate your audience, communicate your ideas clearly, and stand out as a confident, skilled presenter.
Frequently Asked Questions (FAQ)
Q1: How do I change the mouse cursor during a PowerPoint presentation?
You can change the cursor by right-clicking on the slide during presentation mode, selecting Pointer Options, and choosing from options like Laser Pointer, Pen, or Highlighter. This helps highlight specific parts of your slide effectively.
Q2: What is the Morph transition and how can I use it?
The Morph transition smoothly animates movement and resizing of objects between two slides. To use it, duplicate a slide, rearrange objects on the second slide, and apply the Morph transition to both slides. This creates a dynamic visual effect that emphasizes changes.
Q3: Can I remove backgrounds from images directly in PowerPoint?
Yes! Select the image, go to the Picture Format tab, click Remove Background, and then refine the selection by marking areas to keep or remove. This feature lets you create cleaner, more professional visuals without external tools.
Q4: How can I add a countdown timer to my PowerPoint slides?
Use the Get Add-ins feature in PowerPoint to find and insert countdown timer add-ins like Break Time. Customize the duration and appearance, then start the timer during your presentation to keep everyone on schedule.
Q5: What tools can I use to add live polls to my presentation?
Slido is a popular extension that integrates live polling directly into PowerPoint. It allows your audience to respond to polls in real-time via a website or QR code, making your presentation interactive and engaging.
Q6: Are animations and transitions important in professional presentations?
Yes. When used thoughtfully, animations and transitions enhance the flow and visual appeal of your presentation. They can emphasize key points and keep your audience engaged without distracting from your message.
Q7: How do I ensure my slides look professional and well-organized?
Align all objects using the Arrange > Align tools in PowerPoint. Distribute objects evenly and maintain consistent spacing. Avoid clutter, and use clean images with backgrounds removed when necessary.
Check out the full video: 7 PowerPoint Tips to Make Your Presentation Look Awesome!


