
Creating a presentation about skills that captivates, informs, and engages is an art—and PowerPoint’s slide zoom feature is one of the most dynamic tools at your disposal to elevate your slides beyond the ordinary. Whether you’re presenting a skill set, training, or showcasing expertise, adding interactive zooms to your presentation lets you break free from the traditional linear slide flow and introduce a fresh, immersive experience.
In this comprehensive guide, based on insights from One Skill PPT, you’ll discover five essential tips to unleash the full potential of PowerPoint’s slide zoom feature. Plus, there’s a bonus tip at the end that will take your skills to the next level, making you an unstoppable PowerPoint pro.
Table of Contents
- Introduction to Slide Zooms
- Tip 1: Inserting Slide Zooms – Two Simple Methods
- Tip 2: Understanding Slide, Section, and Summary Zooms
- Tip 3: Mastering the Return to Zoom Feature
- Tip 4: Creating Transparent Slide Zoom Backgrounds for Depth
- Tip 5: Using Custom Thumbnails to Control Slide Zoom Appearance
- Bonus Tip: Animation Triggers for Interactive Zooms
- Conclusion
- Frequently Asked Questions (FAQ)
Introduction to Slide Zooms
PowerPoint’s slide zoom feature is a game changer when it comes to creating interactive and engaging presentations about skills. Instead of moving slide-by-slide in a linear fashion, slide zooms allow you to zoom into specific slides or sections dynamically. This creates a presentation flow that’s more like navigating a dashboard or map than flipping pages, which can make your message more memorable and easier to follow.
By using slide zooms, you can emphasize particular parts of your presentation, drill down into details, and then zoom back out—all while maintaining audience engagement and control over the narrative flow.

Tip 1: Inserting Slide Zooms – Two Simple Methods
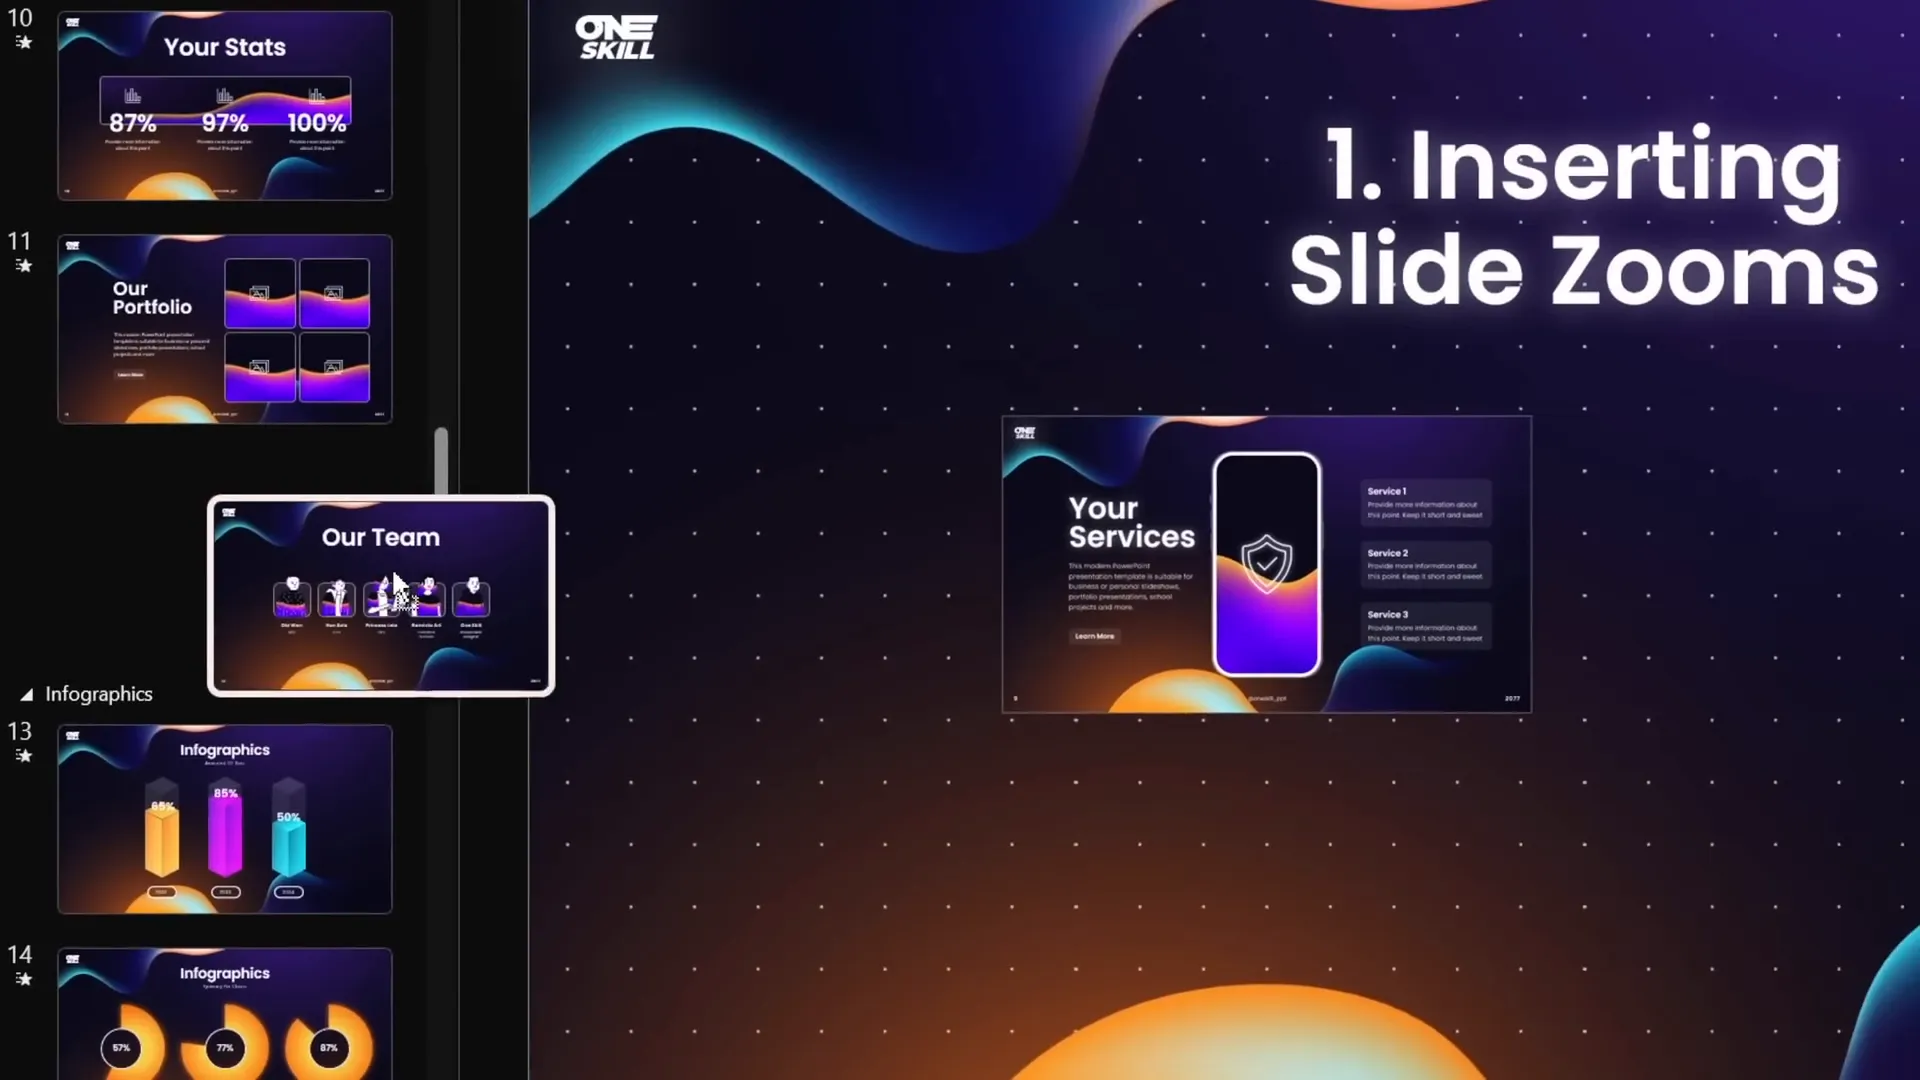
Getting started with slide zooms is straightforward, and there are two main ways to insert them into your presentation:
Method 1: Using the Insert Tab Zoom Button
- Go to the Insert tab on the PowerPoint ribbon.
- Click on the Zoom button and select Slide Zoom.
- A window will appear showing thumbnails of all slides in your presentation.
- Select the slide you want to zoom into and click Insert.
And just like that—skadoosh—your slide zoom is inserted.
Method 2: Drag and Drop from the Slide Thumbnail Pane
Alternatively, you can:
- Locate the slide you want to zoom into in the left-hand slide thumbnail pane.
- Click and drag the slide thumbnail directly onto your current slide.
This action automatically creates a slide zoom linked to that slide.
Polishing Your Slide Zooms
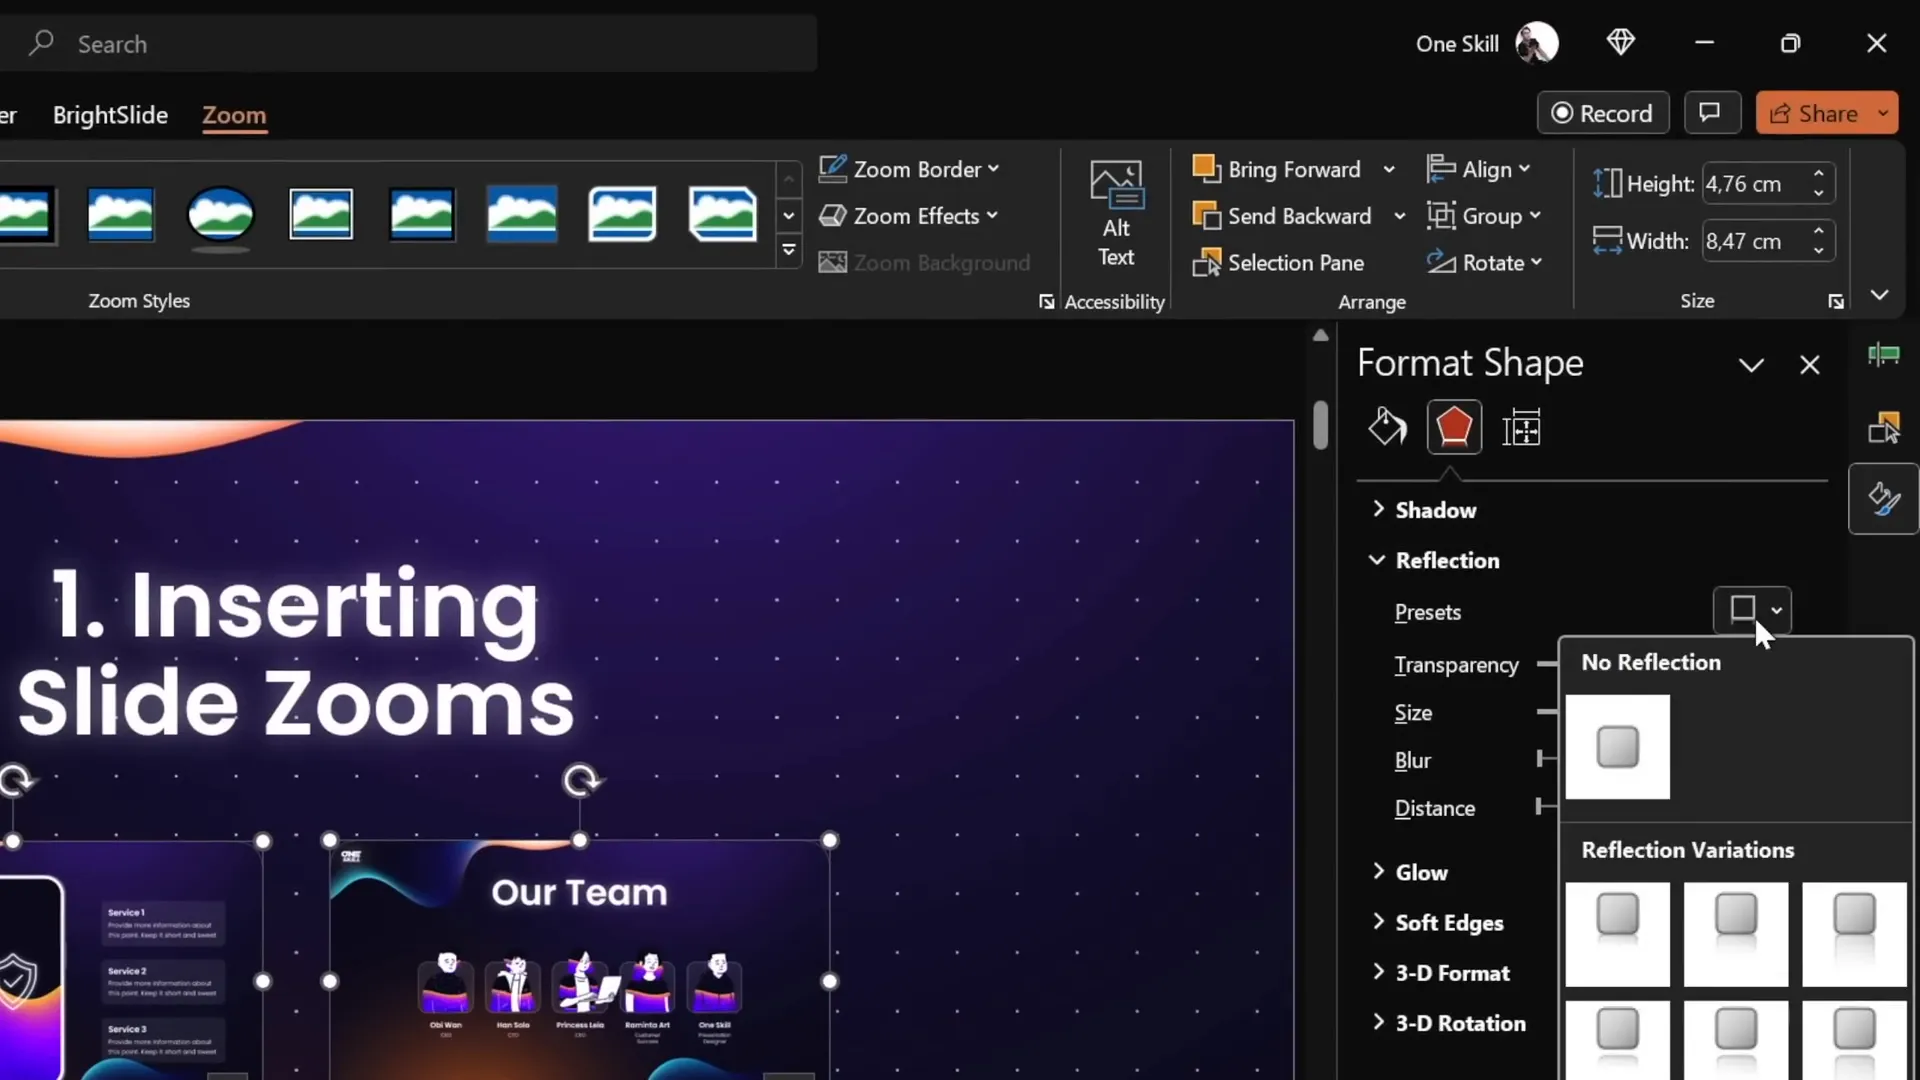
By default, slide zooms have a thin outline. To make your zooms look cleaner:
- Select your slide zoom(s).
- Go to the Zoom tab and under Zoom Border, select No Outline.
- For a modern look, apply the Reflected Rounded Rectangle style to add rounded corners and reflections.
- If reflections feel too flashy, disable them through the Format Pane by selecting None under reflections.
Tip 2: Understanding Slide, Section, and Summary Zooms
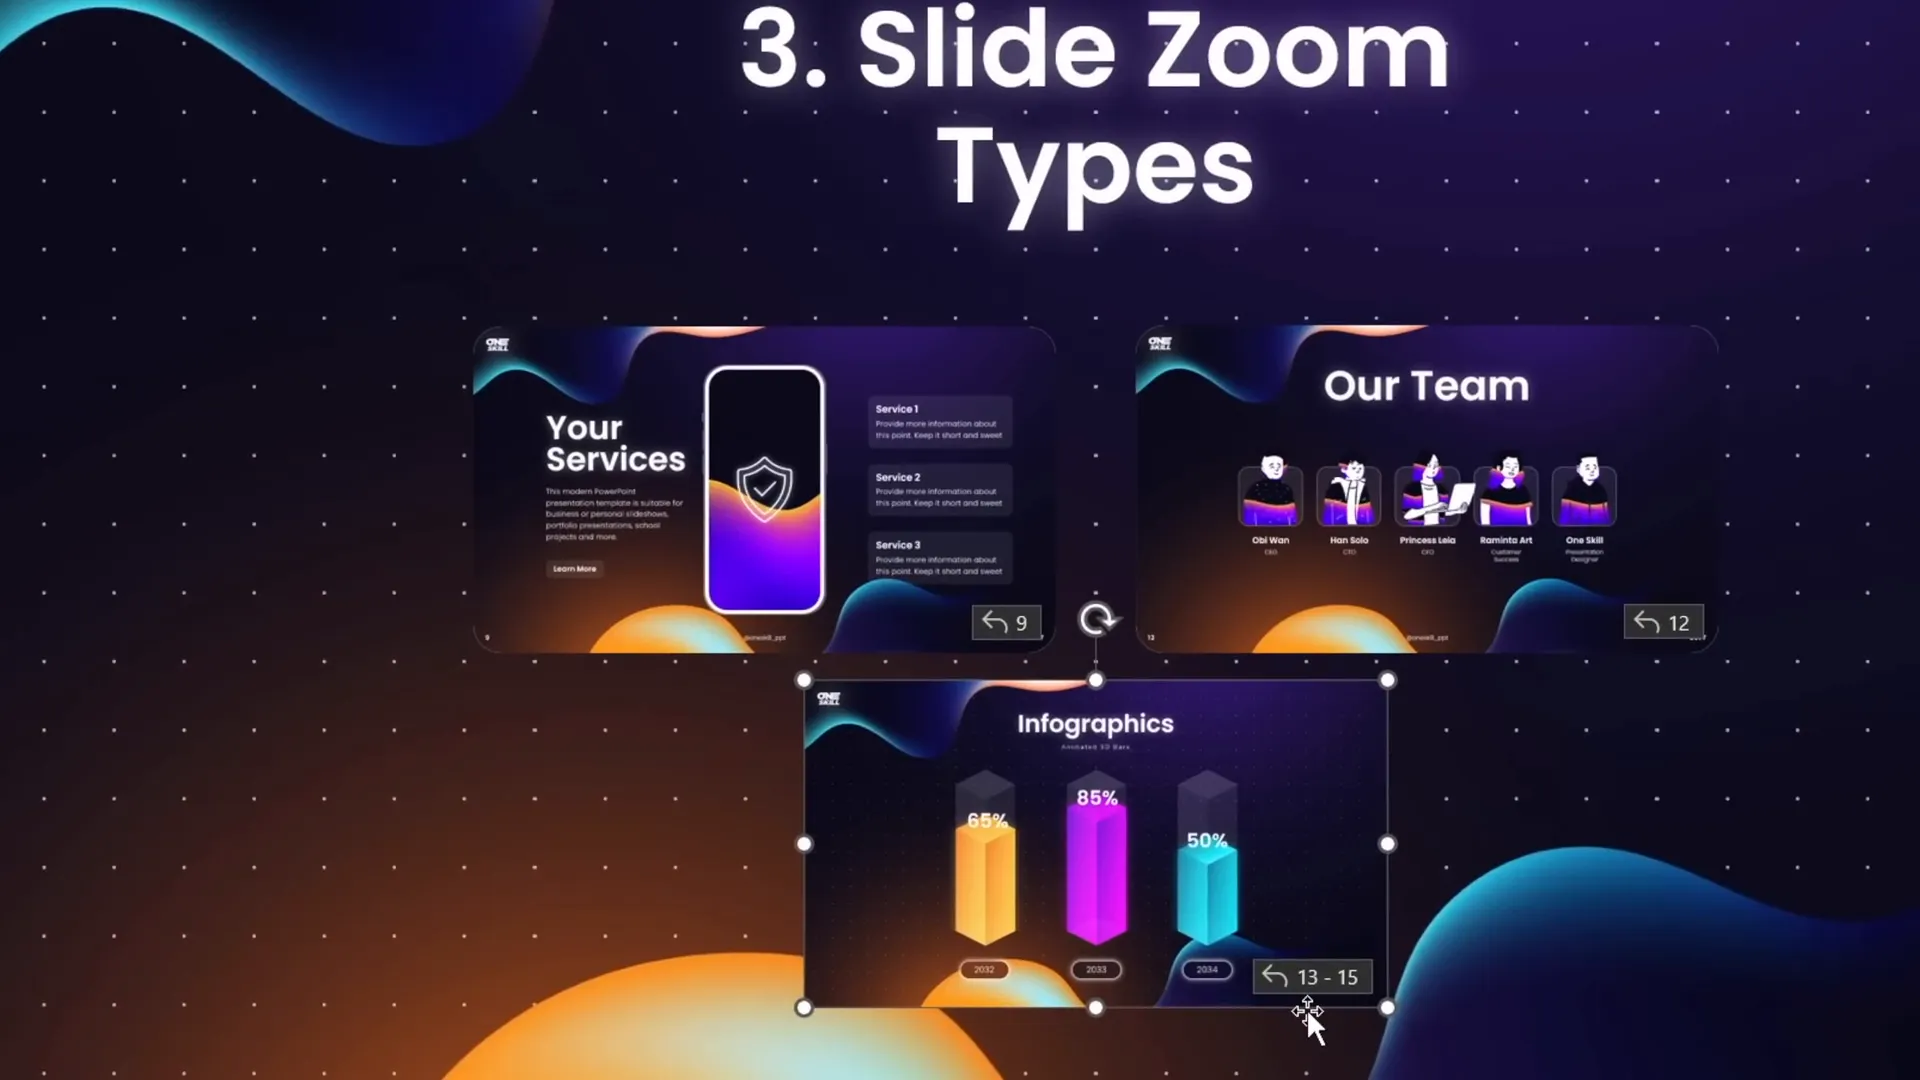
PowerPoint offers three types of zooms, each serving a distinct purpose:
| Zoom Type | Description | Use Case | Example |
|---|---|---|---|
| Slide Zoom | Zoom into a single slide and zoom back to the original slide. | Highlight or deep dive into one slide. | Zooming into a specific skill detail slide. |
| Section Zoom | Zoom into a section containing multiple slides, navigate through the slides, then zoom back. | Present a cluster of related slides, such as a skill category. | Zooming into a “Technical Skills” section with several slides. |
| Summary Zoom | A navigational dashboard collecting multiple section zooms on a new summary slide. | Provide a bird’s eye view for navigating between different skill sections. | A summary slide linking to “Soft Skills,” “Technical Skills,” and “Leadership Skills” sections. |
Creating Section Zooms
Before inserting a section zoom, ensure your presentation is divided into sections:
- Go to the slide pane, right-click between slides, and select Add Section to organize your content.
- Once you have sections, go to Insert > Zoom > Section Zoom.
- Select the section you want to zoom into and click Insert.
Using Summary Zooms for Navigation
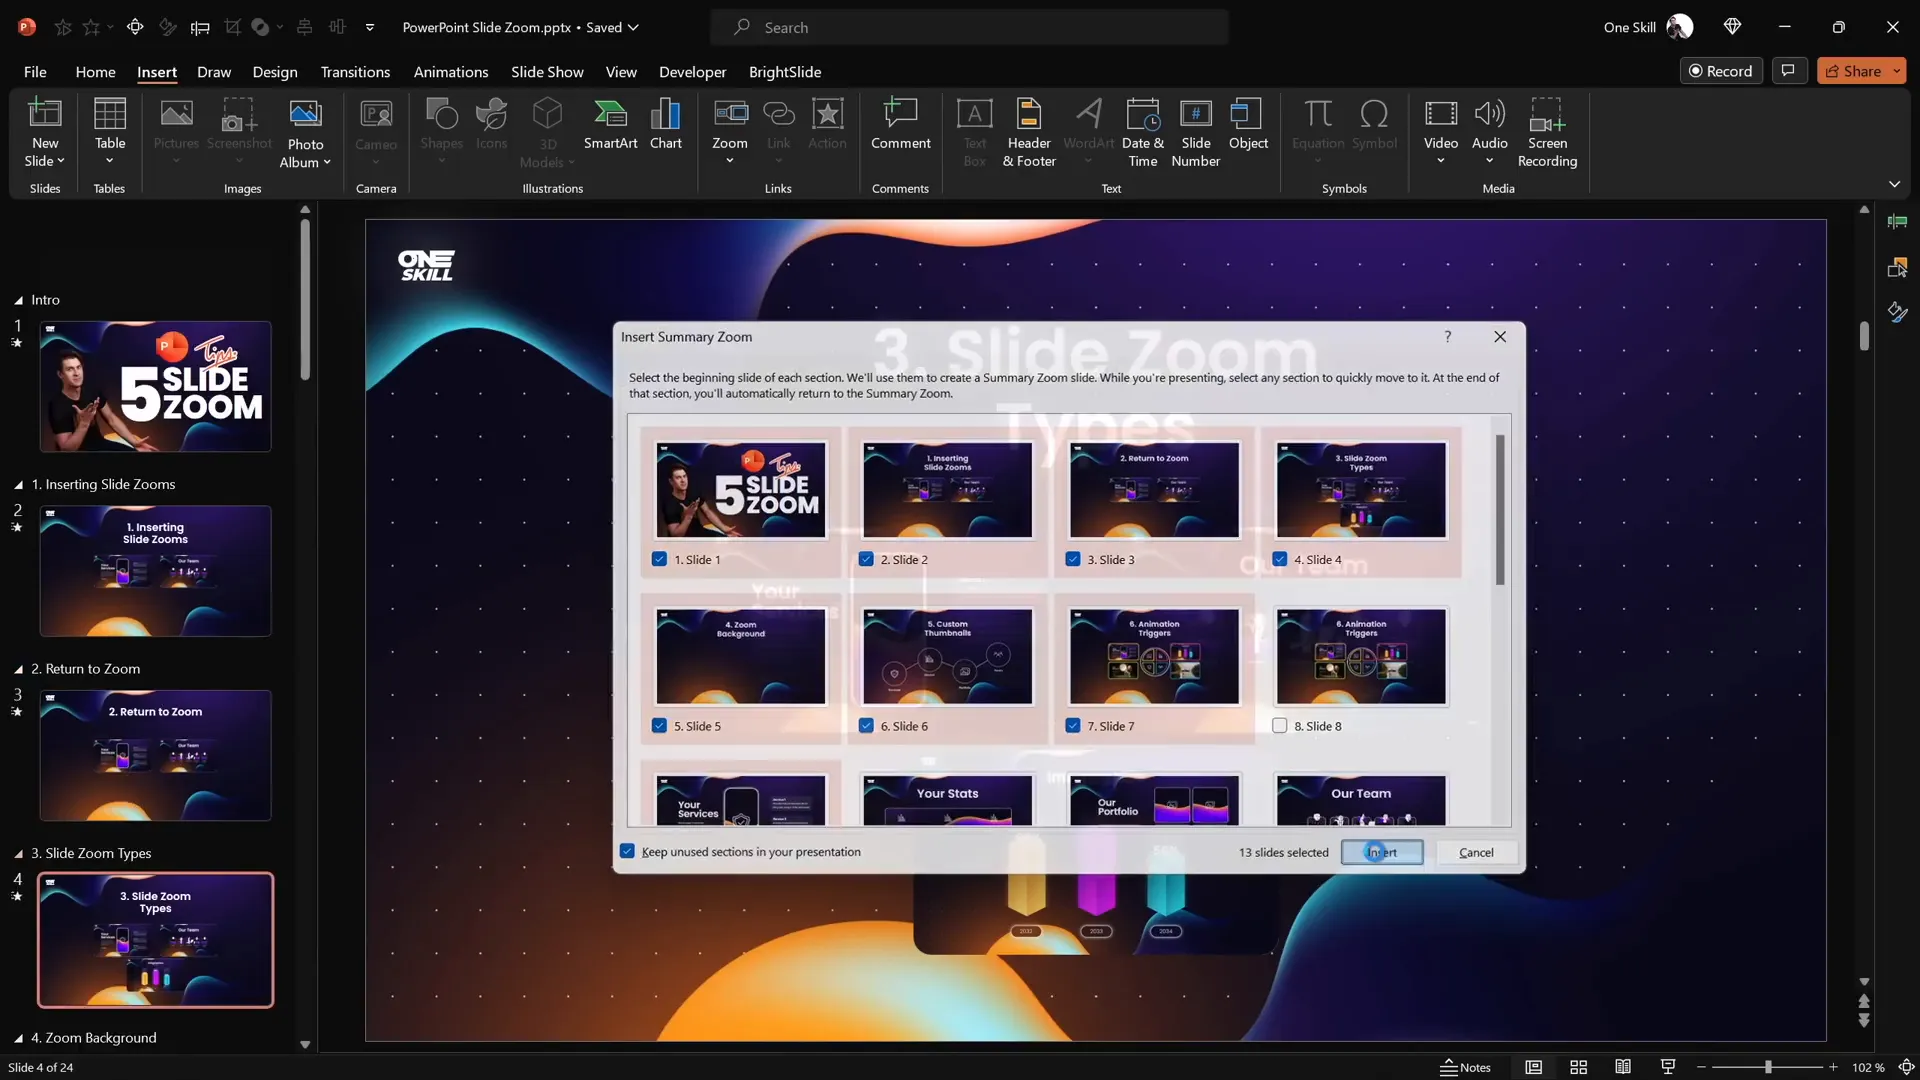
Summary zooms collect all your sections for easy navigation:
- Go to Insert > Zoom > Summary Zoom.
- PowerPoint will automatically create a new summary slide with section zooms laid out in a grid.
- Customize the layout by resizing and aligning the zoom thumbnails.
- Add a title like “Summary Zoom” for clarity.
Tip 3: Mastering the Return to Zoom Feature
A crucial feature for interactive presentations is Return to Zoom, which allows you to zoom back to the original slide after viewing the zoomed-in slide or section.
To enable this:
- Select the slide or section zoom.
- Go to the Zoom tab.
- Check the box for Return to Zoom.
Now, when you click a slide zoom, you zoom in; clicking again zooms you back to the “home” slide, maintaining a smooth, non-linear presentation flow.
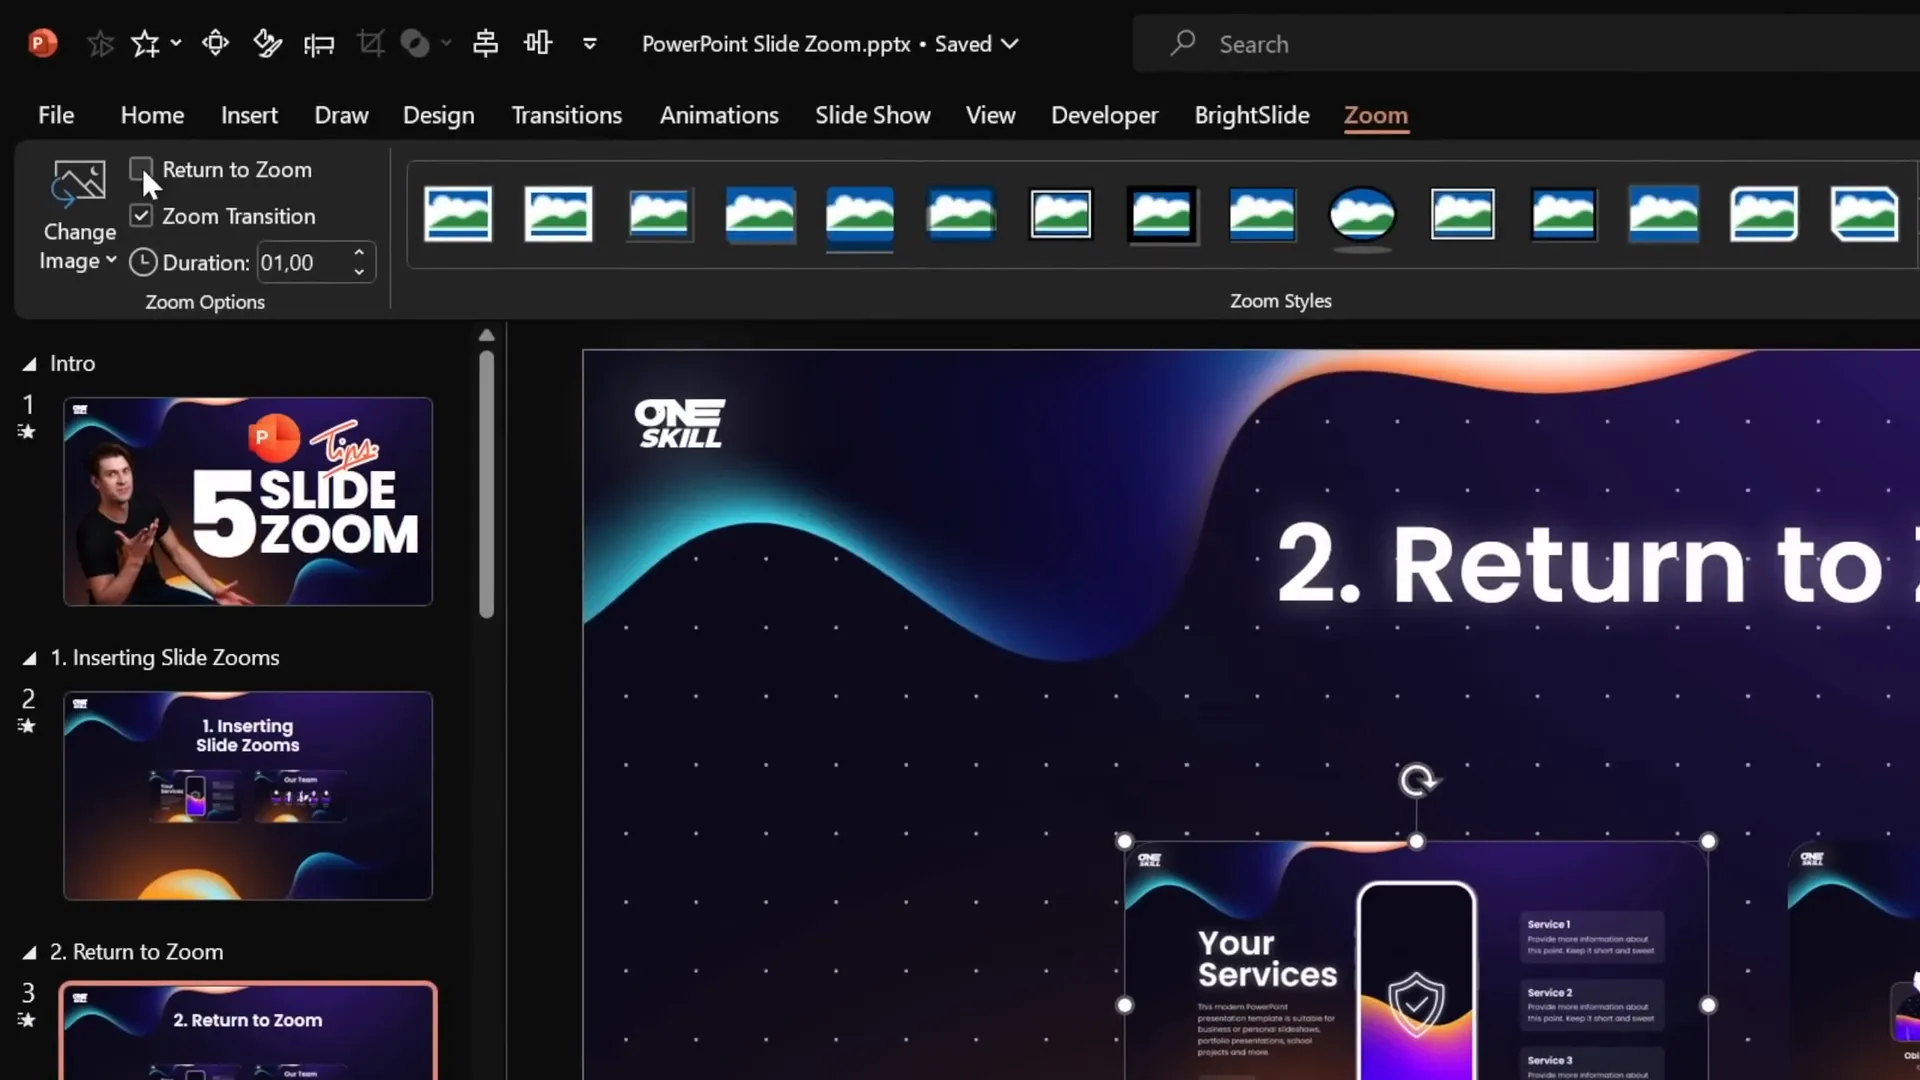
This feature is especially useful in a presentation about skills where you want to drill into details and then quickly return to the overview without confusing your audience.
Tip 4: Creating Transparent Slide Zoom Backgrounds for Depth
One subtle but powerful visual trick is making the background of your slide zooms transparent. This creates a beautiful depth effect, giving the illusion that everything happens on the same canvas but at different zoom levels.
To make a slide zoom background transparent:
- Select the slide zoom.
- Go to the Zoom tab.
- Click the Zoom Background button to activate transparency.
If you see a white background instead of transparency, ensure the slide itself uses a picture, solid, or gradient fill for its background.
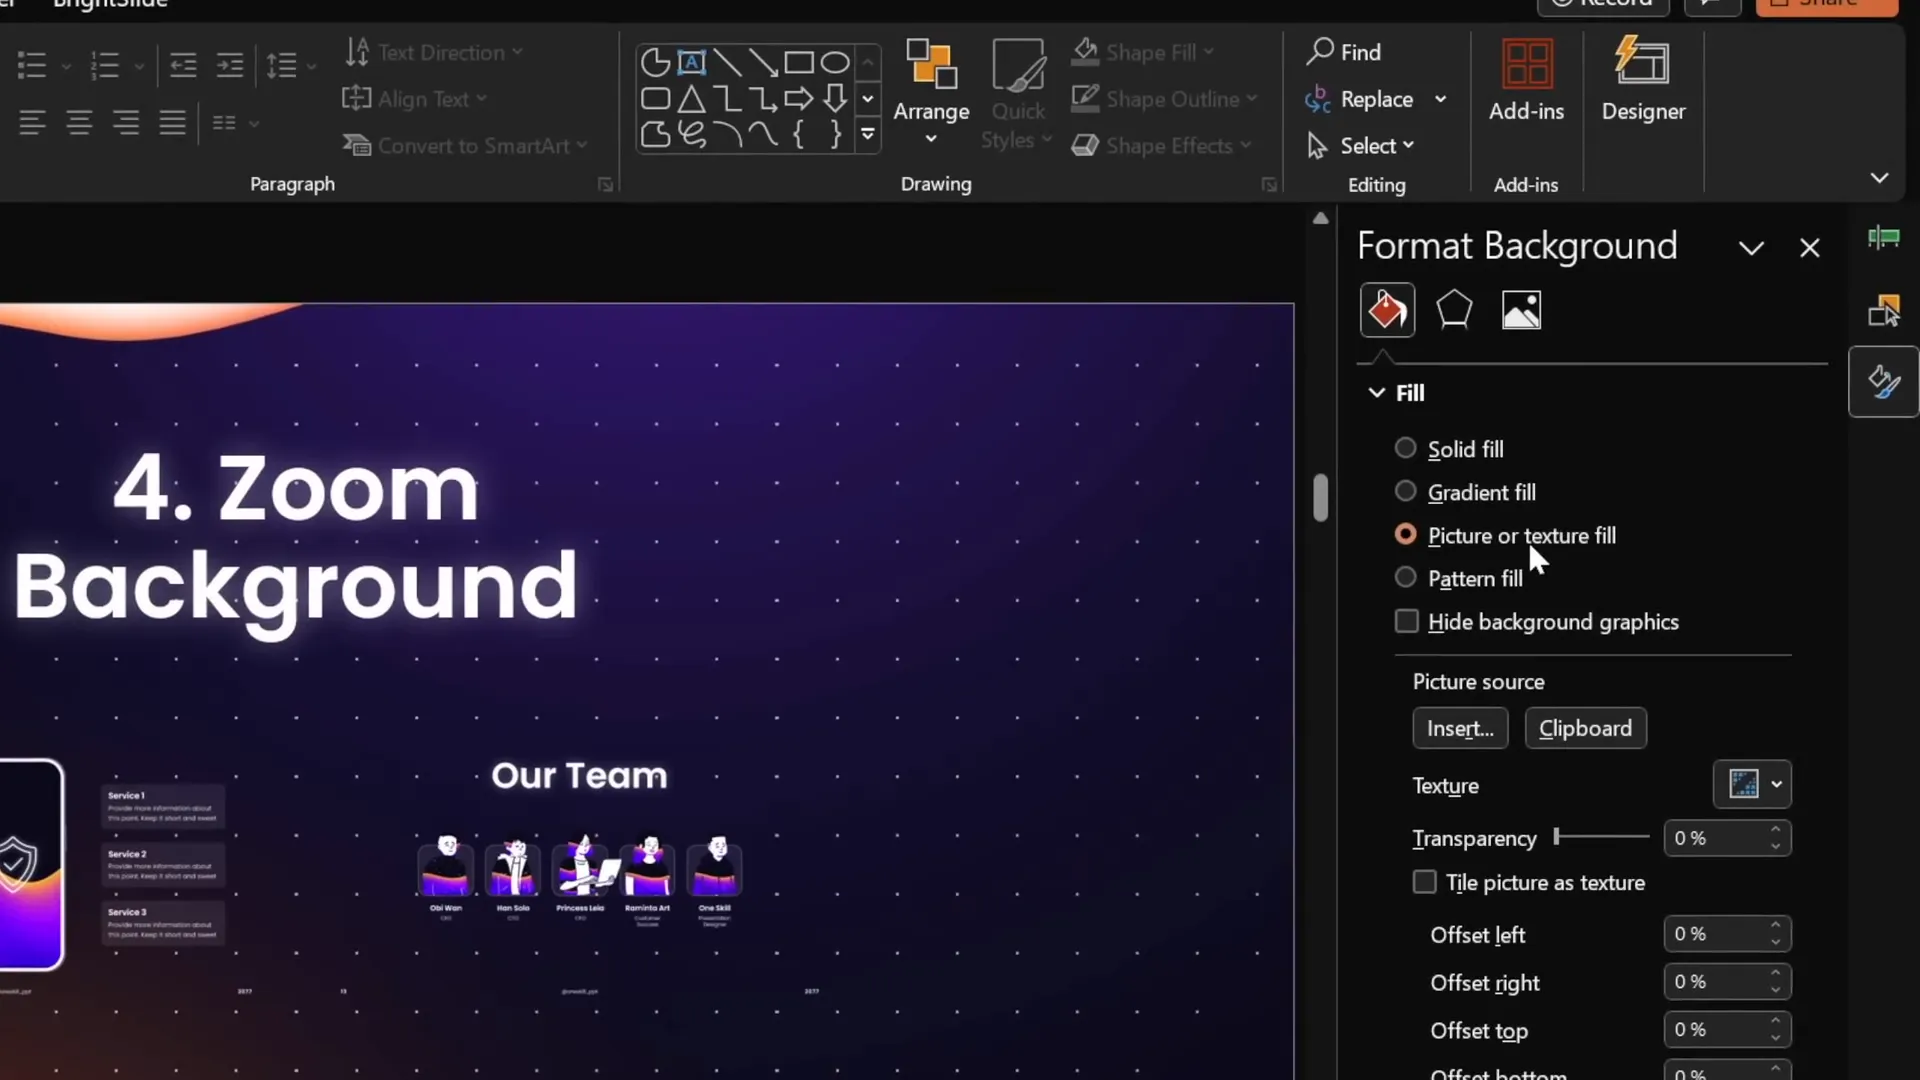
This technique is perfect for presentations about skills, giving a polished, layered look to your content that helps your audience visually connect different parts.
Tip 5: Using Custom Thumbnails to Control Slide Zoom Appearance
By default, a slide zoom displays all the content of the target slide, regardless of animations or layering you might have set up. Sometimes, you might want to control exactly what appears on the zoom thumbnail to avoid revealing too much too soon or to better fit your slide design.
How to Set Custom Thumbnails
- Select the slide zoom.
- Go to the Zoom tab.
- Click Change Image.
- Insert any image you prefer as the thumbnail.
Creating Transparent Thumbnails
For example, if you have icons or circles on your slide and want the zoom to be invisible (so the icons show through), create a fully transparent image:
- Insert a rectangle shape.
- Fill it with solid color and set transparency to 100%.
- Right-click the rectangle and select Save as Picture in PNG format (to preserve transparency).
- Use this transparent PNG as the custom thumbnail for your slide zoom.
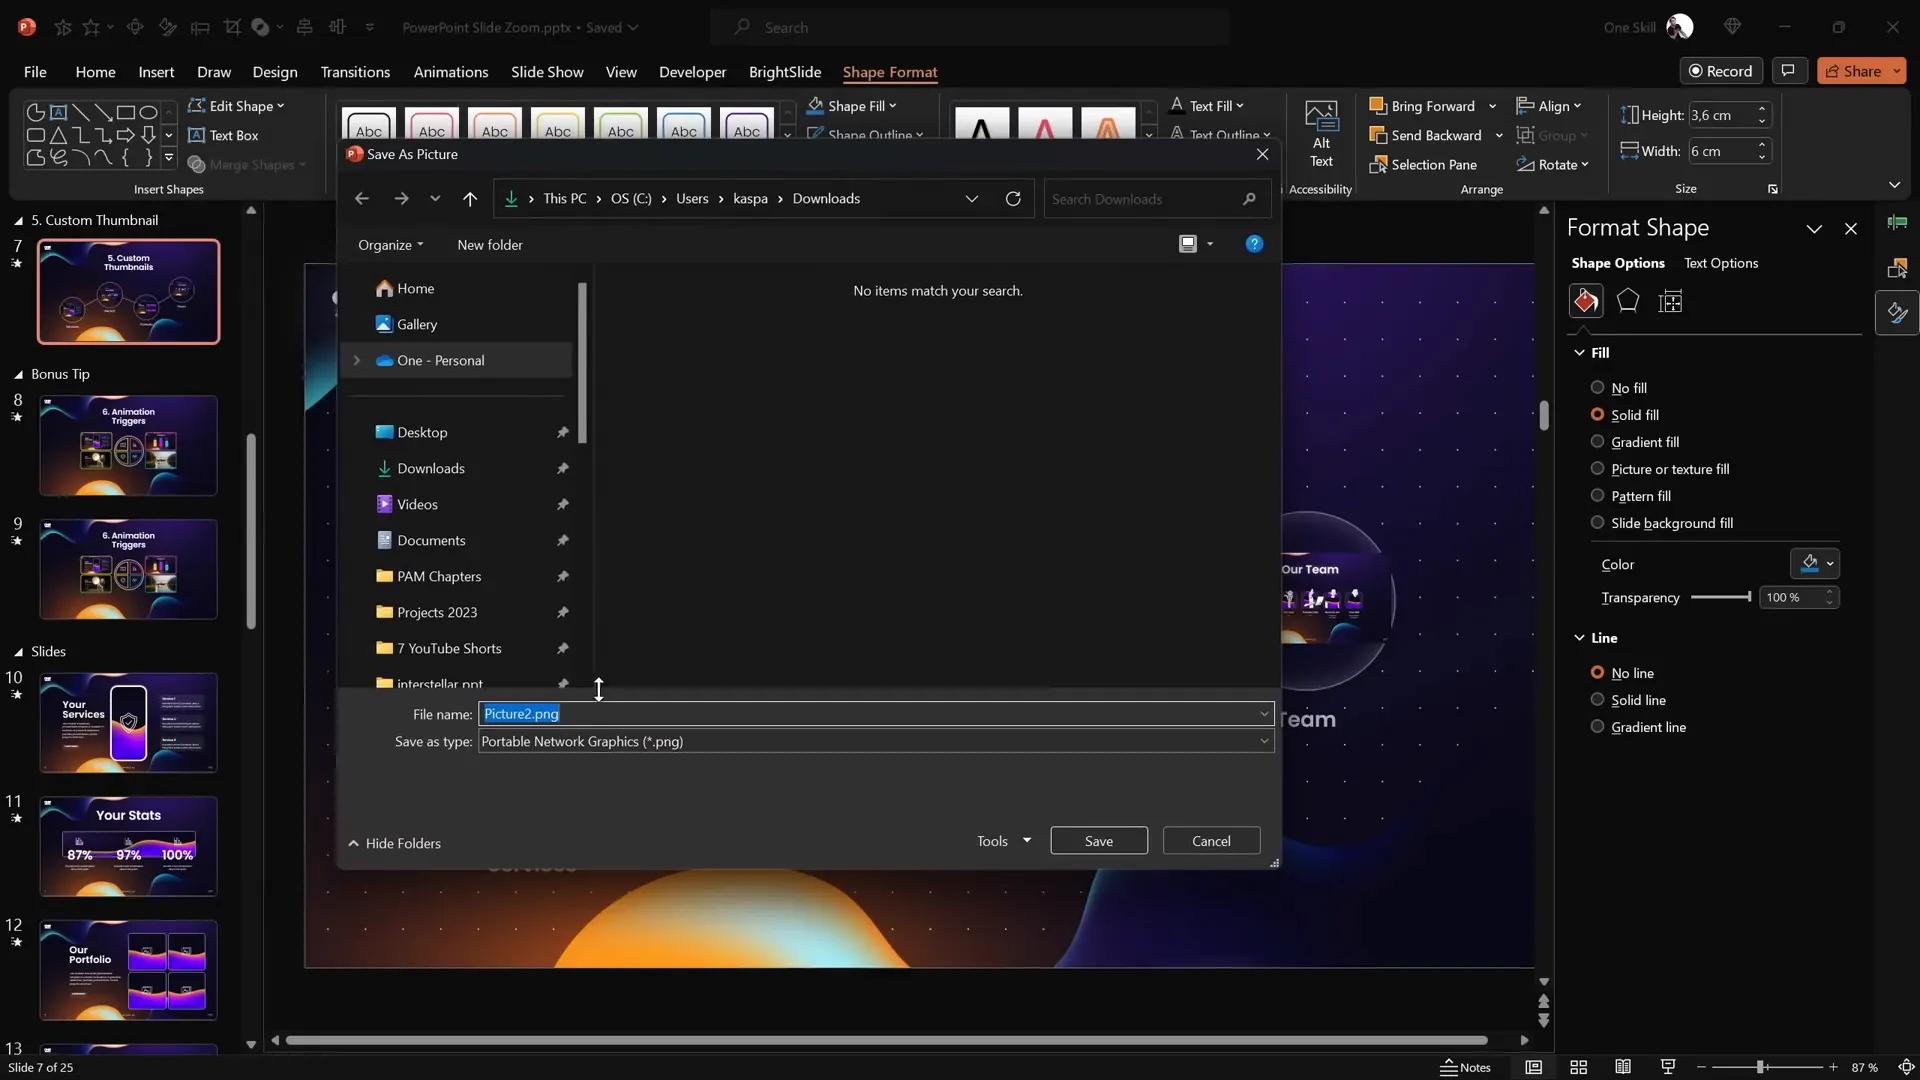
Now your slide zoom is invisible, allowing you to place it over icons or other design elements without covering them up, while still keeping the zoom fully functional.
Bonus Tip: Animation Triggers for Interactive Zooms
Want to add an extra layer of interactivity to your presentation about skills? Use PowerPoint’s animation triggers with your slide or section zooms. This lets you control zoom animations triggered by clicking specific buttons, adding polished and engaging navigation.
How to Set Up Animation Triggers with Section Zooms
- Insert your section zooms and place interactive buttons on your slide.
- Open the Animation Pane.
- Select your section zoom and add an entrance animation (e.g., Basic Zoom).
- Add a motion path animation to simulate zooming from the button location.
- Set the animation trigger to the corresponding button (e.g., “Button 1”).
- Add a growth/shrink animation to the button for a pressing effect.
- Repeat these steps for exit animations to close the zoom using the same button.
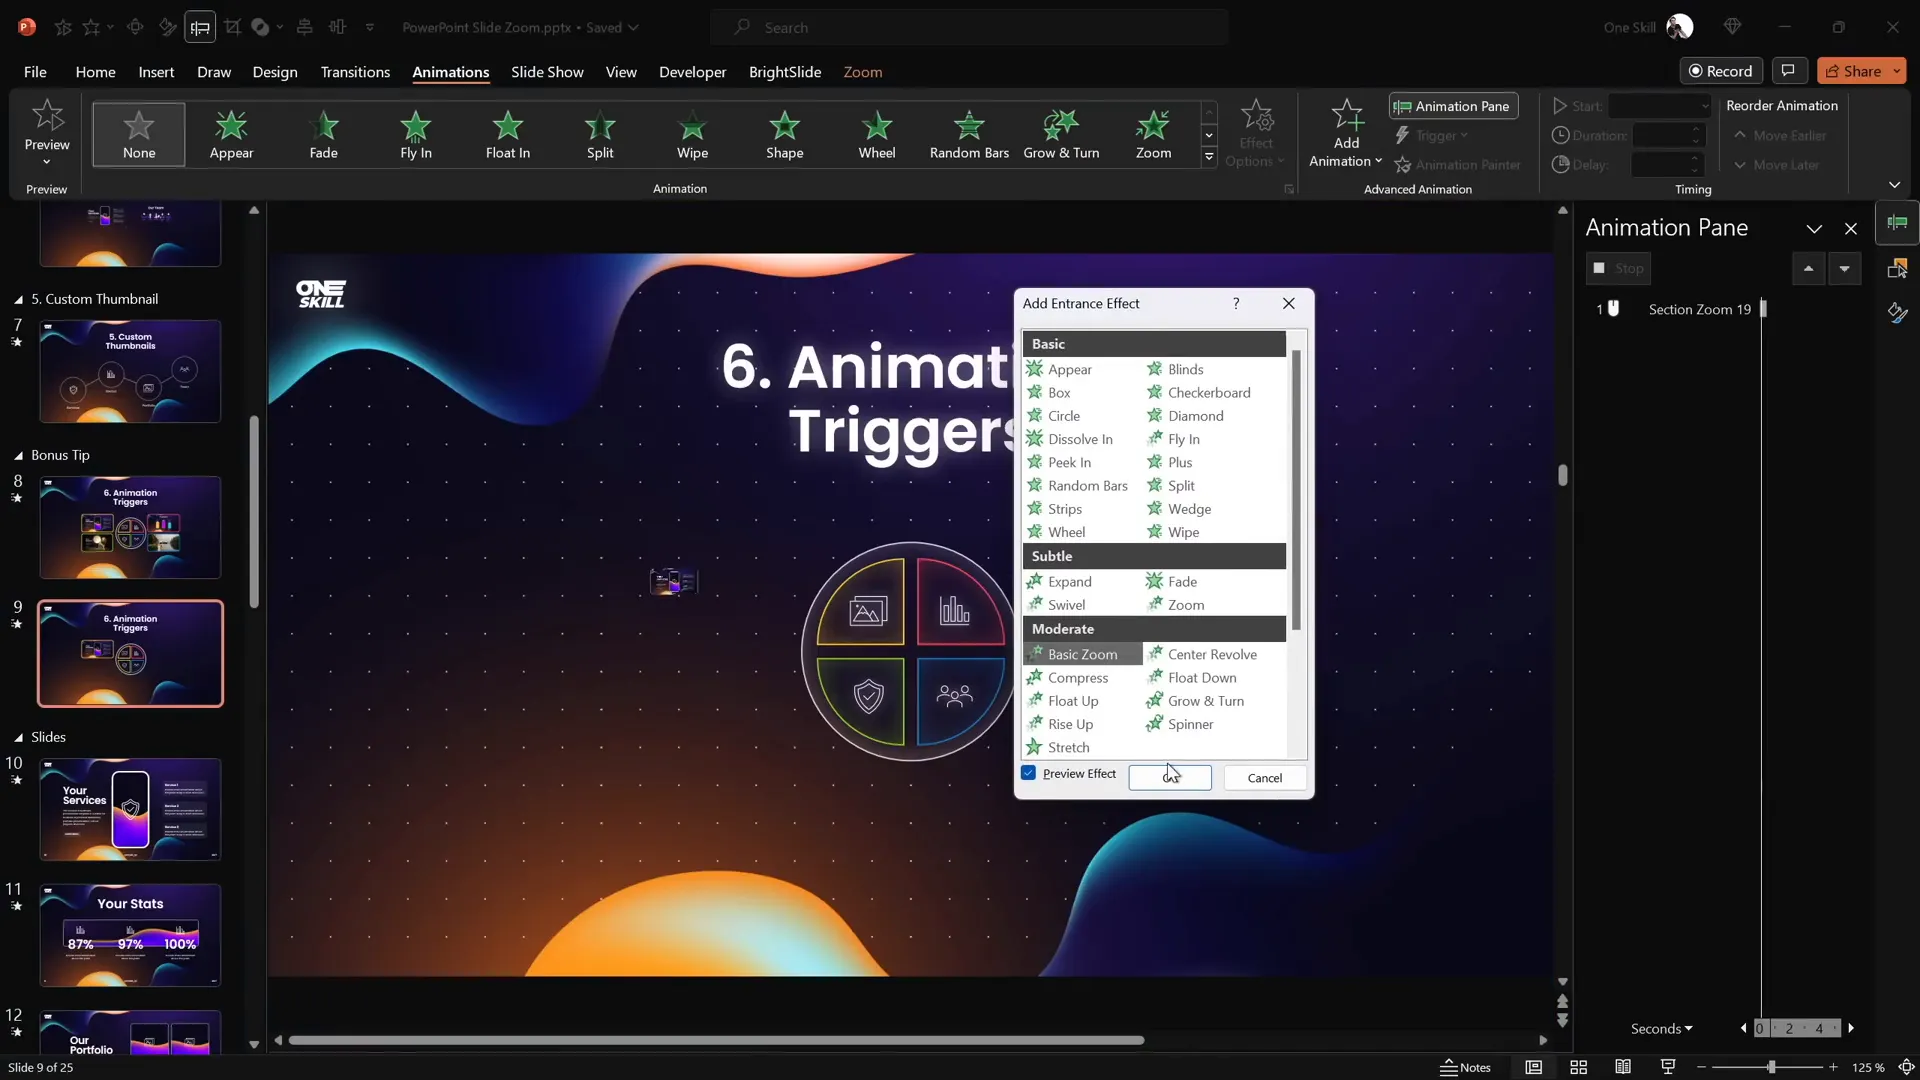
This setup allows you to open and close zooms by clicking buttons, making your presentation feel more like a professional app or website navigation experience.
Benefits of Using Animation Triggers
- Increased interactivity and audience engagement.
- Cleaner navigation without relying on linear slide progression.
- Custom visual effects that enhance the storytelling of your skills presentation.
For a deeper dive into animation techniques, consider exploring courses like the PowerPoint Animation Mastery course mentioned by One Skill PPT, which provides detailed lessons on advanced zoom and animation effects.
Conclusion
Mastering PowerPoint‘s slide zoom feature is an essential skill for anyone looking to create dynamic, interactive, and memorable presentations about skills. By moving beyond the traditional linear slide flow, you can engage your audience with zooms that highlight key points, allow deep dives into sections, and provide an intuitive navigation experience.
Here’s a quick recap of the five essential tips to help you become a slide zoom pro:
- Insert slide zooms using either the zoom button or drag-and-drop method.
- Understand the differences between slide, section, and summary zooms and use each appropriately.
- Enable return to zoom to create smooth navigation back to your main slide.
- Make slide zoom backgrounds transparent to create a layered, depth effect.
- Use custom thumbnails to control what your audience sees before zooming in.
Plus, don’t forget the bonus tip—use animation triggers to add interactive buttons that open and close zooms, taking your presentation to a professional level of interactivity.
With these techniques in your toolkit, you’ll be ready to deliver presentations about skills that are not only informative but also visually stunning and engaging. Dive in, experiment, and watch your PowerPoint presentations transform!
Frequently Asked Questions (FAQ)
What is a slide zoom in PowerPoint?
A slide zoom is a feature in PowerPoint that allows you to create interactive links that zoom into a specific slide or section within your presentation, breaking the typical linear flow.
How do I insert a slide zoom in my presentation?
You can insert a slide zoom by going to the Insert tab, clicking Zoom, and selecting Slide Zoom. Alternatively, drag the slide thumbnail from the left pane onto your current slide.
What is the difference between slide, section, and summary zooms?
Slide zooms target single slides. Section zooms zoom into a group of slides within a section. Summary zooms create a dashboard slide that links to multiple sections for easy navigation.
How does the ‘Return to Zoom’ feature work?
When enabled, after zooming into a slide or section, clicking again will zoom you back to the original slide where you started, allowing seamless navigation.
Can I customize the appearance of slide zoom thumbnails?
Yes, you can replace the default thumbnail with any image, including transparent PNGs, to better fit your slide design or hide content until zoomed in.
How can animation triggers enhance slide zooms?
Animation triggers let you control zoom animations with buttons or other objects, allowing you to open and close zooms interactively, improving audience engagement.
Are these slide zoom features available in all versions of PowerPoint?
Slide zoom features are generally available in recent versions of PowerPoint (Office 365 and PowerPoint 2019 onward). Make sure your software is updated to access these features.


