

If you want a visually striking way to present a set of images inside a single slide, this tutorial will show you exactly how to create a polished, interactive 360 Degree Photo Album in Powerpoint. I walk you through every step — from building the concentric circle layout to inserting photos, applying gradients and blur effects, grouping, and adding subtle zoom animations so your album comes to life during presentation.
This guide is written in the same clear, practical style I use in my tutorials at POWERPOINT UNIVERSITY so you can follow along and reproduce the result, even if you’re not a design expert. The downloadable PowerPoint template for this exact effect is available if you’d like to fast-track the process.
Keyphrase: This article is optimized for the search term “360 Degree Photo Album in Powerpoint” and uses that phrase throughout so you can find and reuse the steps easily.
Table of Contents
- Why build a 360 Degree Photo Album in Powerpoint?
- What you’ll need before you start
- High-level workflow
- Step-by-step tutorial
- Slide setup and guides
- Create the concentric circles
- Cut the circles into segments
- Fill segments with pictures and textures
- Apply gradients, blur, and visual touches
- Group shapes and add center text
- Add animations
- Design tips to make the album look professional
- Performance and export considerations
- Common mistakes and troubleshooting
- FAQ
- Final thoughts and next steps
Why build a 360 Degree Photo Album in Powerpoint?
A 360 Degree Photo Album in Powerpoint is an elegant way to showcase multiple photos in a single slide while preserving a clean, modern layout. Instead of using multiple slides for each picture, this radial approach places photos in concentric circular rings and slices them into segments that together form a compact, visually consistent album.
Use cases include portfolio presentations, event recaps, product galleries, team slides, family photo compilations, and sales collateral. The design is versatile — you can mix portraits, landscapes, texture fills, and gradient overlays to match your brand or mood.
Advantages of this method:
- All pictures are visible at a glance without scrolling through many slides.
- Customizable — segment count, ring sizes, image treatments, and animation timing are all under your control.
- It’s built purely with PowerPoint shapes and picture fills — no external software required.
- Easy to reuse and adapt for different presentations or templates.
What you’ll need before you start
Gather these items to ensure a smooth build process:
- Microsoft PowerPoint (desktop version recommended for full Shape Format and Merge Shape features)
- A folder with the images you want to use (high-resolution is best but avoid unnecessarily huge files)
- Optional: internet connection if you plan to insert online images from PowerPoint’s online picture feature
- Basic familiarity with PowerPoint’s ribbon: View, Insert, Shape Format, Picture Format, Animations
- Optional: downloadable template for the 360 Degree Photo Album in Powerpoint if you want a ready-made starting point
High-level workflow
Before diving into detailed steps, here’s the workflow you’ll follow to create your 360 Degree Photo Album in Powerpoint:
- Set up a blank slide and enable guides for precise alignment.
- Create concentric circles (one filled circle + several hollow circle shapes) to form the rings.
- Cut each hollow circle into the number of segments you want using oversized rectangles and the Merge Shapes → Fragment feature.
- Delete the unwanted fragments so only the ring segments remain.
- Fill each segment with an image using Format Shape → Picture or Texture Fill and adjust offsets to crop for best composition.
- Add gradient fills, blur effects, or texture layers where desired for depth.
- Group segments for each ring, add center text or labels, and position everything centrally.
- Add entrance/zoom animations with staggered delays for a dynamic reveal.
Step-by-step tutorial
The following section breaks the workflow down into detailed, sequenced steps so you can recreate the effect exactly. Follow each mini-step in order, and use the screenshots (placed at relevant timestamps) to confirm your progress.
Slide setup and guides
Start with a blank slide so you have full control over positioning. Guides help keep everything perfectly centered and aligned.
- Insert a new blank slide.
- Go to the View tab and enable Guides (this shows a vertical and horizontal guide by default).
- Use the guides to center your shapes on the slide.
Why guides matter: When you build concentric shapes and fragment them into segments, exact central alignment makes the slices line up perfectly. This reduces editing time later and ensures the final 360 Degree Photo Album in Powerpoint looks symmetrical.
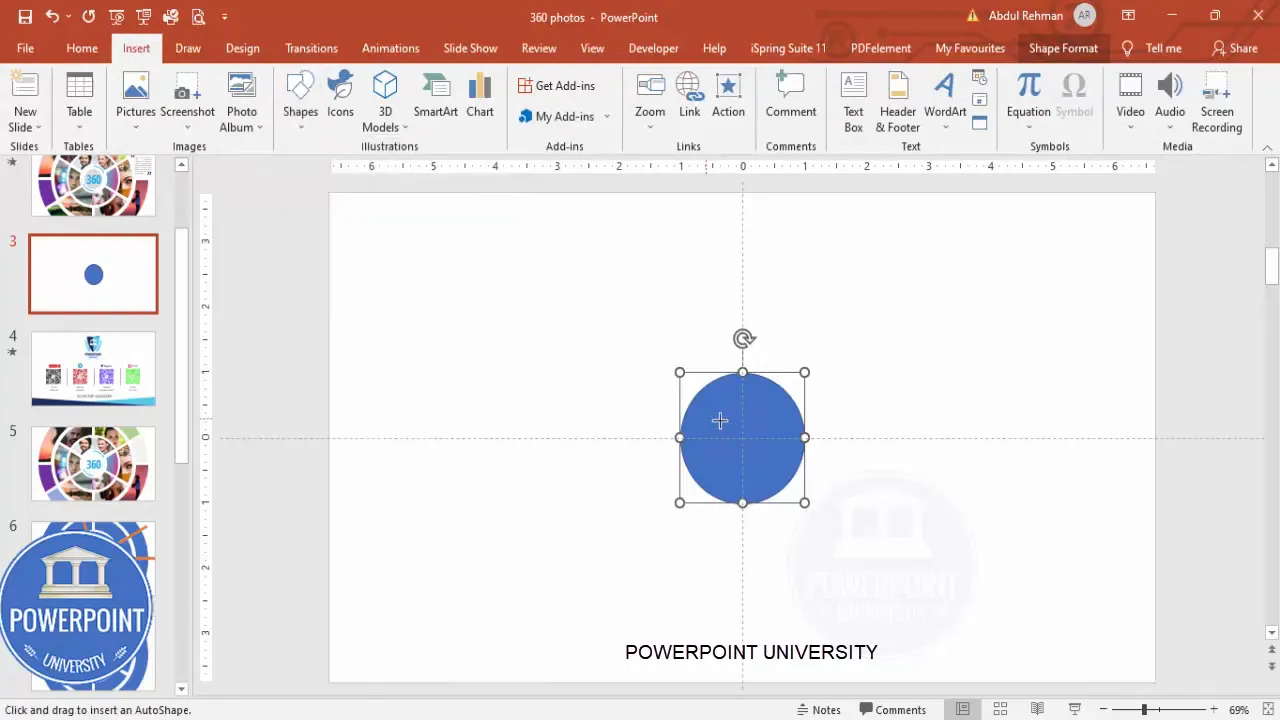
Create the concentric circles
The concentric ring design is the visual backbone of the 360 Degree Photo Album in Powerpoint. We’ll start with a small filled circle and then add hollow circles (rings) around it.
- Insert → Shapes → Oval. Click-drag to drop an oval, then set Height and Width precisely (for consistency I often use 2.2 × 2.2 cm or inches depending on your unit settings).
- Align center and align middle using Home → Arrange → Align or right-click → Align.
- Insert three circle hollows (or as many rings as you want) using Insert → Shapes → Donut or hollow circle shape. If your version of PowerPoint doesn’t have a hollow circle, create a ring by subtracting a smaller circle from a larger one.
- For the hollow circles, set consistent sizes; for example the first hollow might be 5.3 × 5.3, the next 8 × 8, and so on — align each to center/middle after changing sizes.
- Use Ctrl+D to duplicate a shape and Ctrl+Shift while resizing to keep proportions uniform as you scale outward.
Small tips while sizing rings:
- Hold Shift while resizing to maintain perfect circles (unless you want elliptical rings).
- Use the orange adjustment points on PowerPoint shapes if you want to change the hole size in a donut/hollow circle.
- Group temporary versions if you want to test different ring counts before committing.
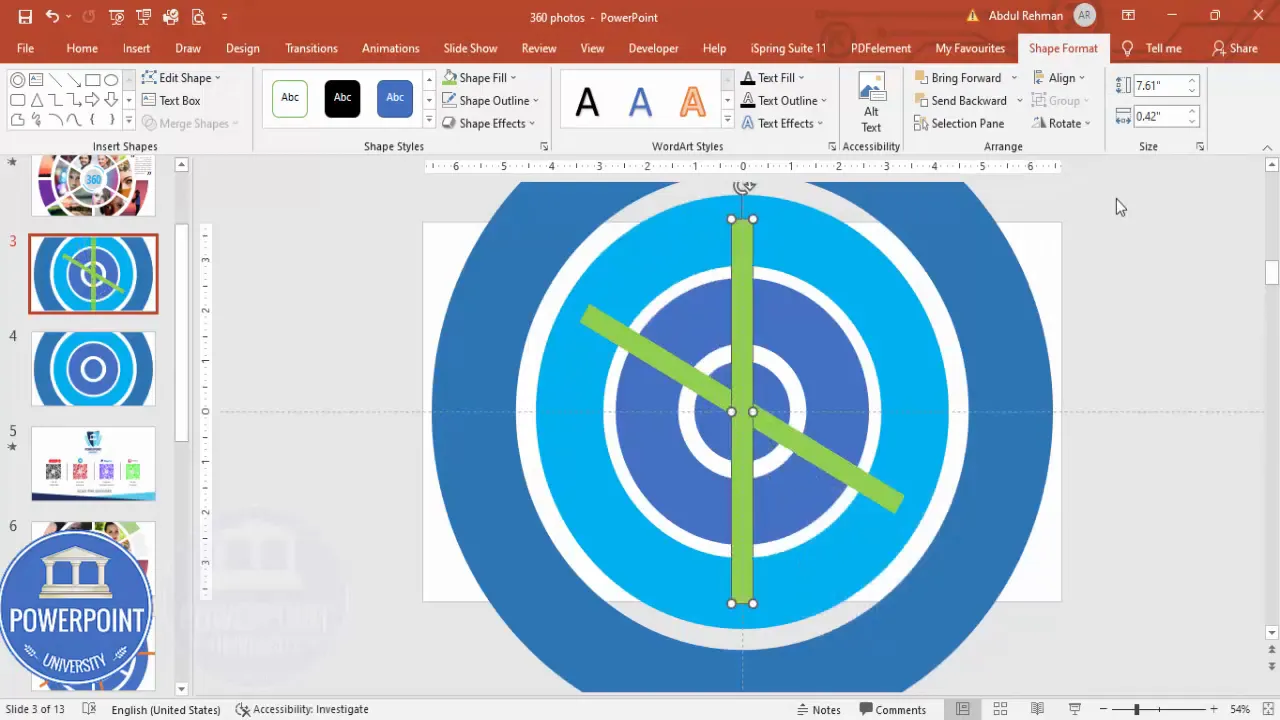
Cut the circles into segments
To turn each ring into multiple image slots, we’ll “cut” the hollow circle into fragments. The technique uses oversized rectangles and the Merge Shapes → Fragment command to split the ring precisely.
- Duplicate the slide as a backup (right-click the slide thumbnail → Duplicate Slide). This makes it easy to recover if something goes wrong.
- Insert → Shapes → Rectangle. Draw a rectangle that is larger than the hollow ring you plan to cut. Remove its outline and set a temporary fill color so you can see it.
- Align the rectangle to center/middle so it crosses the center of the ring.
- With the rectangle selected, hold Alt and press the Right Arrow key two or three times to nudge it precisely to the right. Press Ctrl+D to duplicate the rectangle.
- Repeat duplication and nudging to get a set of crossing rectangles. For a four-segment split, you might place two rectangles at 45-degree offset (forming a cross); for three segments, adjust accordingly. You can rotate rectangles if needed to create angled cuts.
- Select only the outer hollow circle (one ring) and the rectangles you used to cut it (hold Shift while selecting the ring and then the rectangles).
- Go to Shape Format → Merge Shapes → Fragment. This operation will cut the hollow ring into many small fragments where shapes intersect.
- Delete the unwanted fragments so the ring is left as the number of slices you intended (for example, 4 slices around the ring).
Notes and variations:
- If you want a ring split into three parts, create three rectangles rotated around the center (120-degree spacing) before fragmenting.
- Make sure the cutting rectangles are larger than the ring itself — otherwise Fragment might miss splitting the edge properly.
- It’s often easier to cut each ring separately, then tidy fragments, rather than cutting multiple rings at once.
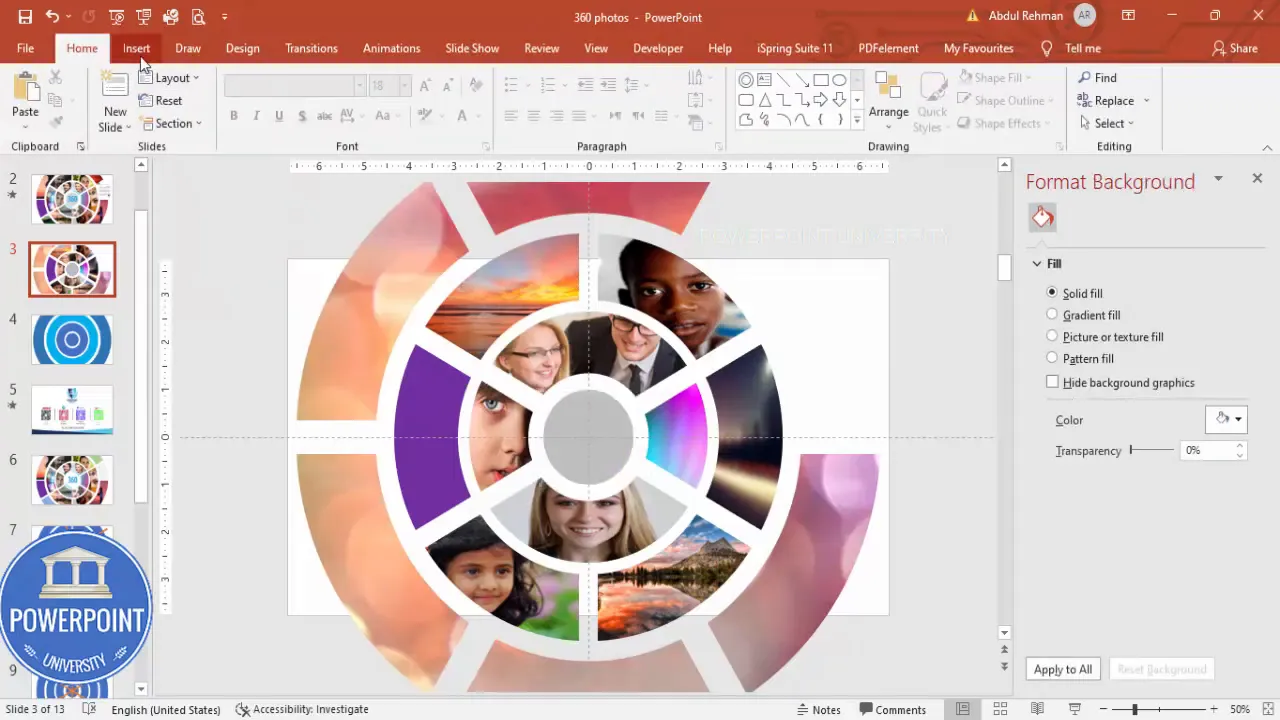
Fill segments with pictures and textures
Once you have the ring segments cleaned up, the fun part begins — placing images into each segment. We’ll use Format Shape → Picture or Texture Fill so each fragment becomes a cropped image frame.
- Select a ring segment. Right-click → Format Shape (or use Shape Format on the ribbon).
- Under Fill, choose Picture or Texture Fill → Insert → From File or Online Pictures.
- If using Online Pictures, type a search term (for example: business people, landscape, bokeh) and insert the image you like. An Internet connection is required for online images.
- Untick Rotate with shape if necessary so the image orientation remains upright when rotating the slice (this is useful when slices have been rotated during layout).
- Use Offset X and Offset Y to shift the image inside the shape so the subject sits in the best position; adjust Zoom (or Scale) to crop closer or further away.
- Repeat for every fragment.

Design tips for overlays and blur:
- Avoid over-blurring important subject matter — blur works best on background or supporting images.
- Gradients are useful to subtly darken the outer edge, making center text pop.
- Use consistent gradient directions across slices where possible for a unified appearance.
Group shapes and add center text
When all segments are filled and styled, time to group them for easier movement, add center text, and finalize layout spacing.
- Select all segments that form a ring (hold Shift and click each slice) and press Ctrl+G to group them. Repeat for each ring.
- Group the inner circle and any decorative elements you’ve added.
- Create a central text box: Insert → Text Box, type your heading (for example “360°”), set font (Open Sans is clean and readable), center align the text, and use a larger font size with bold weight.
- Position the central text, then select the text and the grouped rings and press Ctrl+G to create a single grouped object if you plan to animate the album as a single unit.
Why grouping matters:
Create Slides in Seconds with ExpertSlides AI |
|
Generate AI Presentations today: |
| TRY NOW! |
- Grouping keeps relative positions fixed so when you resize or animate the album, the layout stays intact.
- It simplifies copying the entire album to another slide or template.
- Un-group only when you need to edit individual slices or swap images.
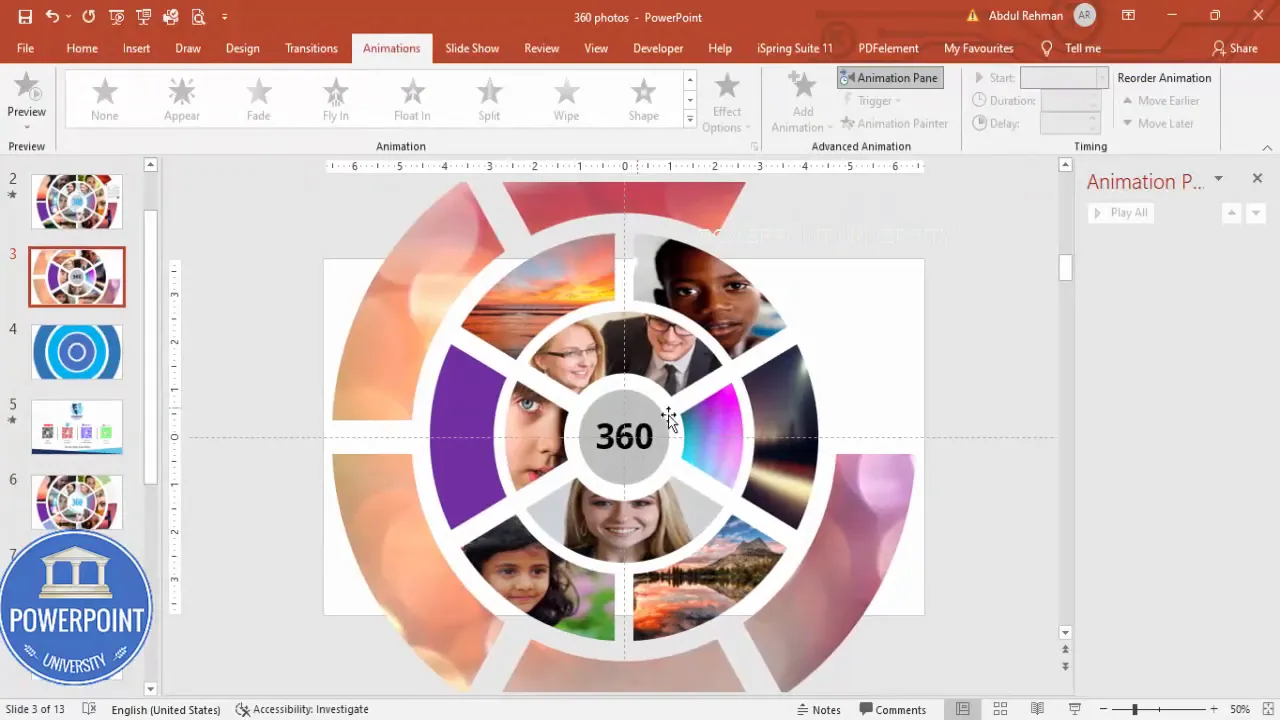
Add animations
Subtle animations bring the 360 Degree Photo Album in Powerpoint to life. I recommend gentle zoom-ins for inner ring slices and staggered timing so the album builds in stages.
- Go to Animations → Animation Pane to open the pane for precise control.
- Select the grouped object for the second ring, third ring, and fourth ring separately (or select individual segments if you prefer).
- Click Add Animation → Emphasis or Entrance effects and choose a subtle Zoom or Grow/Shrink. Keep movement minimal for a professional appearance.
- Adjust Timing: Right-click the animation in the pane → Timing. Set Start to With Previous or After Previous depending on intended sequencing. Add a small Delay (e.g., 0.2–0.6 seconds) between rings to create a cascading reveal.
- Preview the animation using the Play button in the Animation Pane and tweak durations or delays to taste.
Animation tips:
- Less is more — avoid overly flashy animations that distract from the photos.
- Keep durations short (0.4–0.8s) for entrance effects to feel snappy and modern.
- Use Fade + Zoom combinations for smoother transitions.
Design tips to make the album look professional
Design decisions are what separate an amateur collage from a curated 360 Degree Photo Album in Powerpoint. Use these practical tips to refine the appearance:
- Consistent crop language: Keep subject placement consistent if the album is portrait-heavy — place faces toward the center of the slice when possible.
- Mind the visual hierarchy: Emphasize 1–2 key slices (larger or brighter) and treat the rest as supporting imagery.
- Color consistency: Apply a tint or preset color grade to all photos for a cohesive palette — this is especially useful if your photos are from multiple sources.
- Typeface choices: Use a clean sans-serif for the center label (Open Sans, Montserrat, or Lato) and keep font sizes large enough to be legible from a distance.
- Spacing and breathing room: Leave enough gap between rings and the slide edges so the album doesn’t feel cramped.
- Accessibility: Add descriptive alt text to important images and ensure contrast between text and any background shapes.
Performance and export considerations
Large images and multiple effects can bloat file size and slow down PowerPoint on older machines. Use these practical strategies:
- Compress images: After inserting images, go to File → Info → Compress Pictures (or Picture Format → Compress Pictures) and choose an appropriate target resolution (e.g., 150–220 ppi for screen presentations).
- Use optimized image formats: PNG for images with transparency, JPEG for photos. Avoid TIFF or PSD layers inside your PPTX.
- Avoid excessive artistic effects: PowerPoint’s effects can increase rendering time during playback, particularly on slower hardware.
- Test playback on the presentation machine: Always test before the event to ensure animations and transitions run smoothly.
- Export options: If you want to share a static view, export the slide as an image (File → Export → Change File Type → PNG/JPEG). For preserving animations, export to MP4 (File → Export → Create a Video).
Common mistakes and troubleshooting
Even experienced users can run into issues. Here’s how to handle the most common problems:
- Fragment didn’t cut properly: Ensure cutting rectangles are fully overlapping the ring and are larger than the ring’s outer boundary. Select only the ring and the rectangles before choosing Fragment.
- Image orientation is wrong: Untick “Rotate with shape” in Format Picture so the fill orientation remains upright despite the slice rotation.
- Blurry images inside slices: Use higher-resolution photos or increase the Zoom/Scale in the Fill options. Compress images only after finalizing cropping and positioning.
- Animations out of sync: Fine-tune delays and duration in the Animation Pane. Use the Preview button frequently.
- Shapes misaligned after resizing: Ungroup, adjust individual pieces, then regroup. Use Align → Align Center and Align Middle to re-center everything.
FAQ
Q: Can I create a 360 Degree Photo Album in Powerpoint on PowerPoint for Mac or PowerPoint Online?
A: Most desktop versions of PowerPoint for Windows and Mac support Shape Merge operations and Format Shape picture fills. PowerPoint Online may not include Merge Shapes → Fragment or all Picture Format options, so building the album is easiest on the desktop app. If you only have PowerPoint Online, consider pre-cutting images in an image editor and using shaped masks or PNG segments imported and arranged manually.
Q: How many images can I fit into a 360 Degree Photo Album in Powerpoint?
A: The number of images is limited primarily by legibility and the visual scale of your slide. Practically, 6–16 images work well depending on ring count and slice size. If you want many thumbnails, increase ring count and slice count but remember that smaller slices reduce recognizability of individual photos.
Q: Do I need to use online images or can I use my own photos?
A: Use your own photos whenever possible for branding and quality. Online pictures are handy for quick mockups or placeholders, but your local, curated images will deliver the best results and avoid licensing issues.
Q: How do I make sure the photos look consistent?
A: Apply a consistent color correction or filter to all images before importing, or use PowerPoint’s Picture Corrections and Color tools to match brightness and color balance. Overlaying a subtle gradient or color tint can also unify mixed-image sets.
Q: Can the 360 Degree Photo Album in Powerpoint be interactive (click a segment to jump to another slide)?
A: Yes. After creating the album, you can add hyperlinks to each grouped segment (right-click → Link → Insert Link) that jump to specific slides in the presentation. This turns your album into a navigable hub for deeper content.
Q: How do I export the animated 360 Degree Photo Album in Powerpoint as a video?
A: Use File → Export → Create a Video. Choose the desired resolution (e.g., 1080p) and set slide timings to match your animation duration. This preserves animations as a playable MP4 file.
Q: Any accessibility tips for a 360 Degree Photo Album in Powerpoint?
A: Add alt text to important images (right-click picture → Edit Alt Text), ensure high contrast for readable center text, and avoid flashing or strobe-like transitions. Provide a text-based slide with image descriptions for audiences needing assistive technology.
Final thoughts and next steps
Creating a 360 Degree Photo Album in Powerpoint is a rewarding way to present multiple photos in a single, polished visual. The approach uses PowerPoint’s native shapes and picture fills, so you can build it without leaving the application. With careful attention to alignment, consistent image treatment, and subtle animations, your album will look professional and engaging.
Suggested next steps:
- Download the template if you want a ready-made file to modify — this saves the shape-building time and lets you focus on images and styling.
- Experiment with different slice counts and ring sizes to find the best arrangement for your images.
- Try combining the album with hyperlinks to create an interactive gallery within a presentation.
- Share your version with colleagues, and solicit feedback on image selection and pacing.
If you want, you can also support continued free tutorials and templates by following POWERPOINT UNIVERSITY, or by downloading and adapting the free template for the 360 Degree Photo Album in Powerpoint.
Additional resources
- Free download: 360° photo album template (available from the creator)
- Quick reference: PowerPoint Merge Shapes and Fragment documentation
- Image optimization guide: Compress photos and choose appropriate file formats
More screenshots for reference
Closing
I hope this comprehensive walkthrough helps you build a beautiful 360 Degree Photo Album in Powerpoint that looks custom-made and delivers impact. Follow the steps, experiment with styling, and keep a backup copy of your slide while editing. When in doubt, use grouping and the Animation Pane to control behavior precisely.
If you’d like the exact template I used in my demonstration, grab the free download and adapt it to your photos — it’s a big time-saver and a great learning resource for the techniques covered here.
Happy designing, and enjoy creating your own 360 Degree Photo Album in Powerpoint!
Check out the full video: Create 360 degree Photo Album in PowerPoint. Tutorial No.: 993


