
When it comes to making your PowerPoint presentations stand out, mastering the art of PowerPoint slide design is essential. Creating interactive, animated slides not only captures your audience’s attention but also makes your content more memorable and engaging. In this comprehensive guide, you’ll learn how to create an awesome clickable and scrollable animated slide design using Microsoft PowerPoint 365, based on a step-by-step process that transforms a static photo into an interactive visual experience.
This tutorial walks you through everything from setting up a beautiful gradient background to cutting out objects from photos, positioning them precisely, and adding seamless morph animations to create a professional and dynamic slide deck. Whether you’re a beginner or an experienced PowerPoint user, this guide will equip you with the skills to elevate your presentation game.
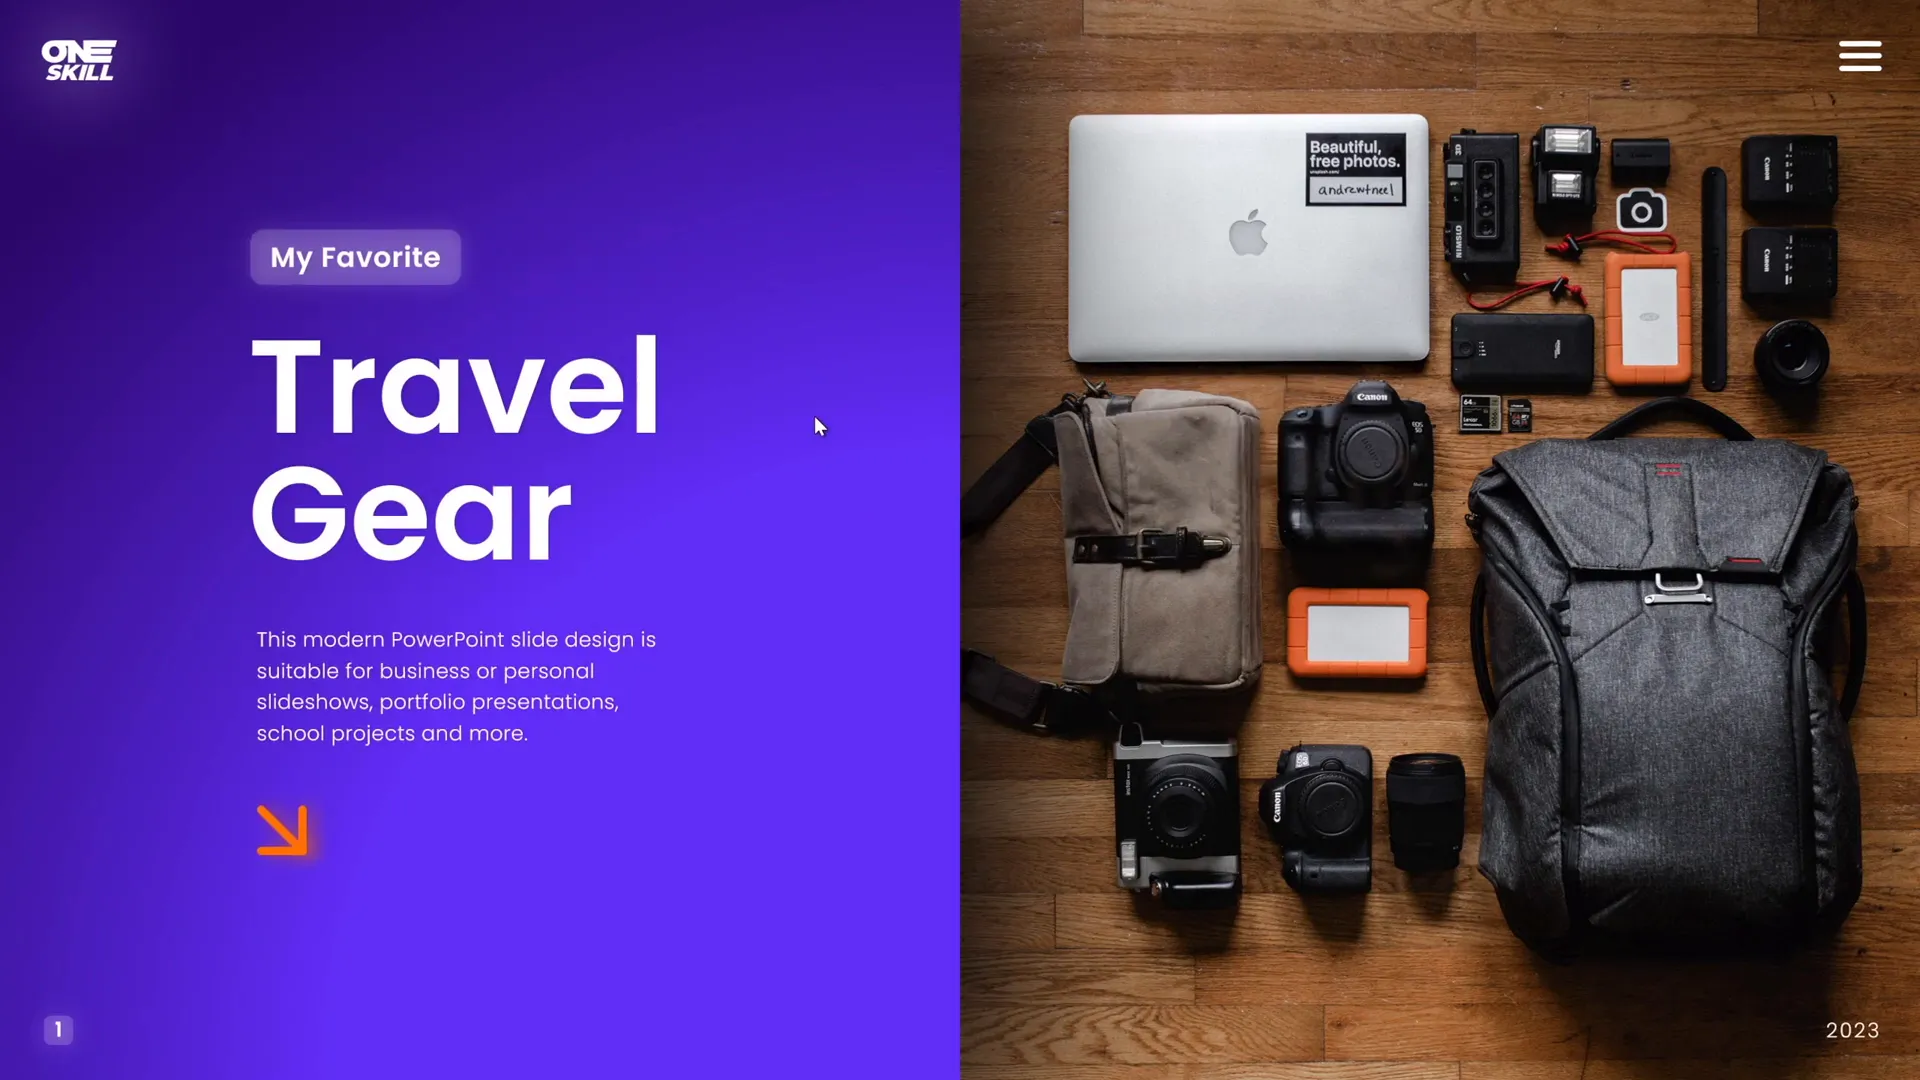
Table of Contents
- Creating a Stunning Gradient Background
- Inserting and Cropping Photos
- Adding Text Boxes with Style
- Cutting Out Objects from Photos for Layered Animation
- Positioning Cutouts Precisely Over the Original Photo
- Making Objects Clickable with Hyperlinks
- Applying Morph Transition for Smooth Animations
- Final Slide Design Adjustments
- Fixing Morph Transition Issues
- Frequently Asked Questions (FAQ)
- Conclusion
Creating a Stunning Gradient Background
Starting with a visually appealing background sets the tone for your entire slide. Here’s how to create a beautiful gradient background that complements your slide design:
- Open a new slide: Begin with a blank slide in Microsoft PowerPoint 365.
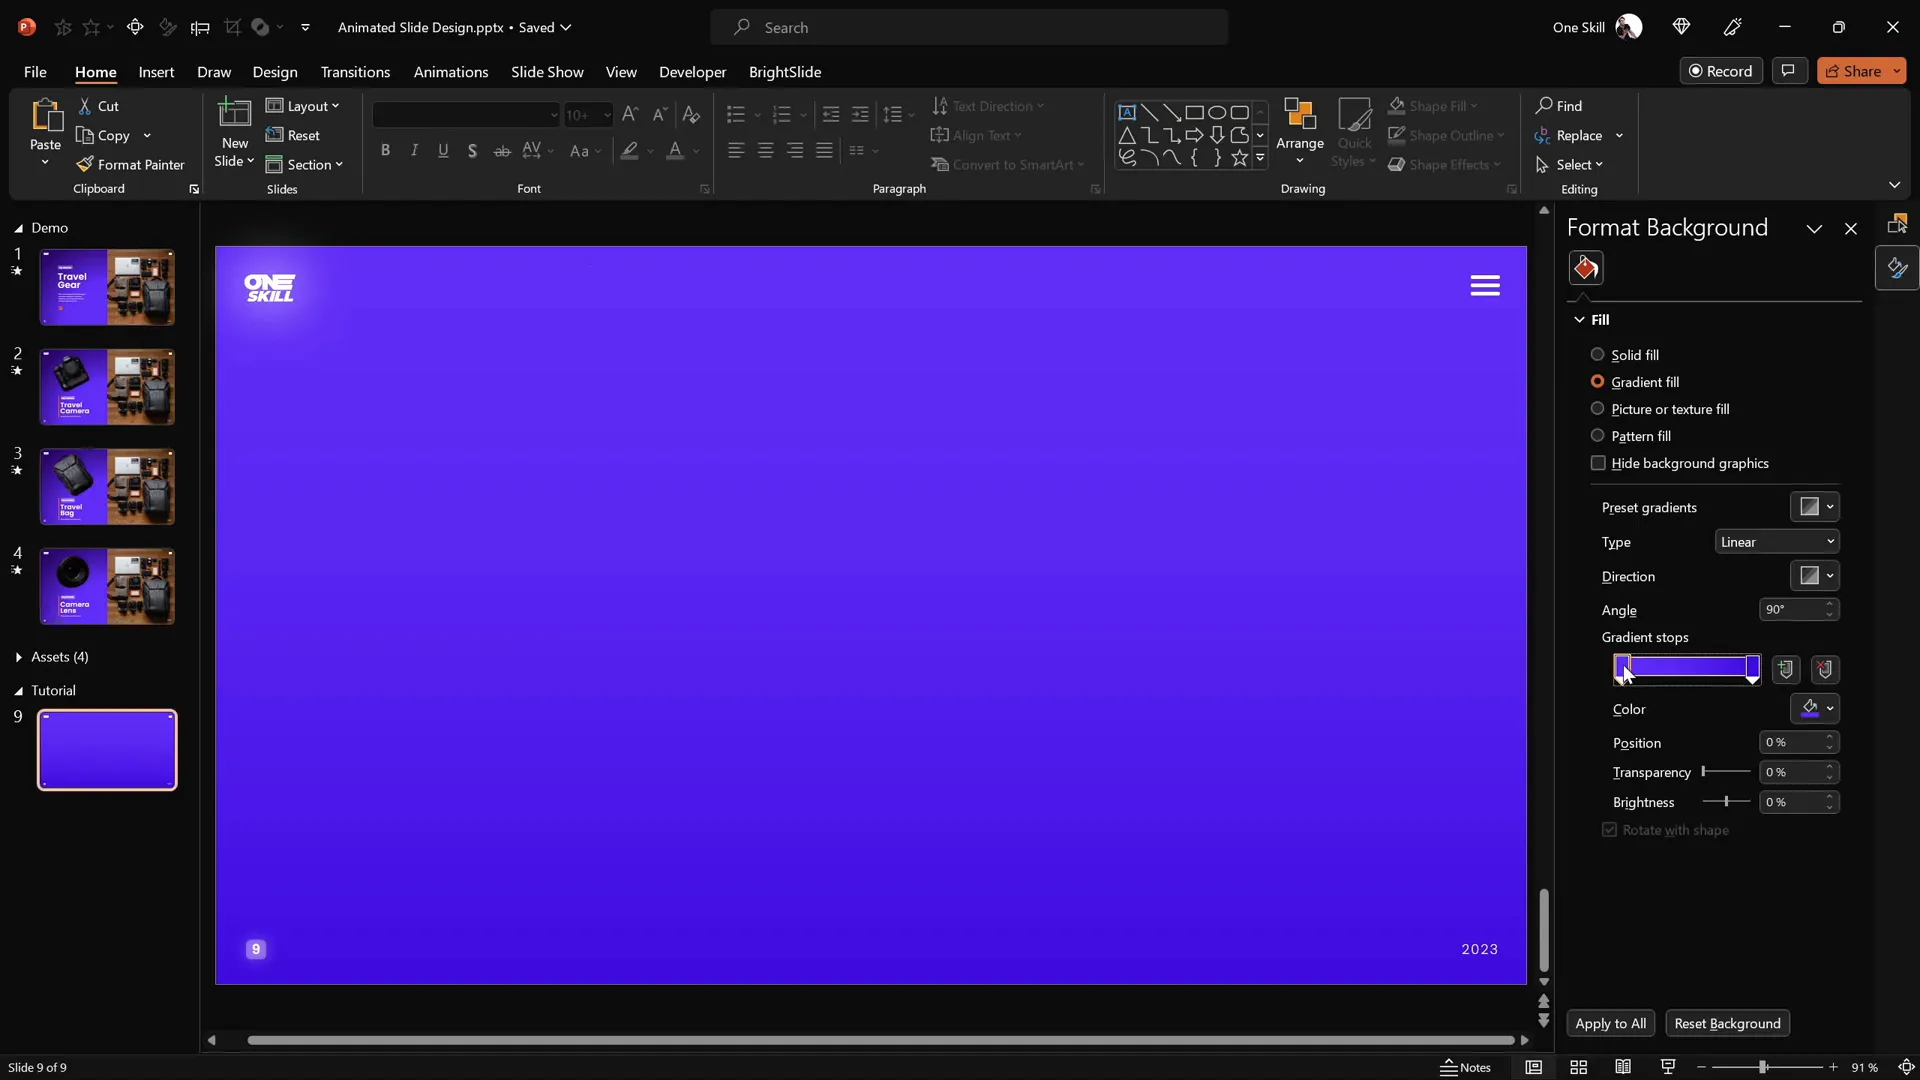
- Apply a gradient fill: Navigate to the slide’s background formatting options and choose a linear gradient fill.
- Set color stops: Use two specific color stops to create a smooth gradient effect. For accuracy, use these hex color codes:
- First color stop:
#2E3A59 - Second color stop:
#7B8CB6
- First color stop:
- Adjust gradient direction: Set the gradient direction to linear for a clean, elegant look.
- Hide the format pane: To maximize your working space, close the format pane after setting the gradient.
This gradient background provides a subtle yet professional backdrop that enhances the text and images you’ll add later.
Inserting and Cropping Photos
Adding a high-quality photo is next. For this tutorial, we use a beautiful image sourced from Unsplash, a platform offering free, high-resolution photos.
- Insert the photo: Go to Insert > Pictures, locate the photo on your device, and click Insert.
- Position the photo: Move the photo to the right side of the slide to balance the layout.
- Send photo to back: Right-click the photo and select Send to Back to layer it behind other slide elements.
- Crop the photo: Crop the right side of the photo to ensure it fits perfectly within the slide boundaries, avoiding overflow.
- Adjust photo inside crop: Move the photo inside the crop area as needed for optimal framing.
- Final adjustments: Send both the photo and the left-side rectangle shape to the back so logos and slide numbers remain visible.

Proper cropping and positioning ensure your photo integrates seamlessly with your slide layout.
Adding Text Boxes with Style
Text boxes provide context and descriptions for your clickable items. To ensure consistency and style, use the following approach:
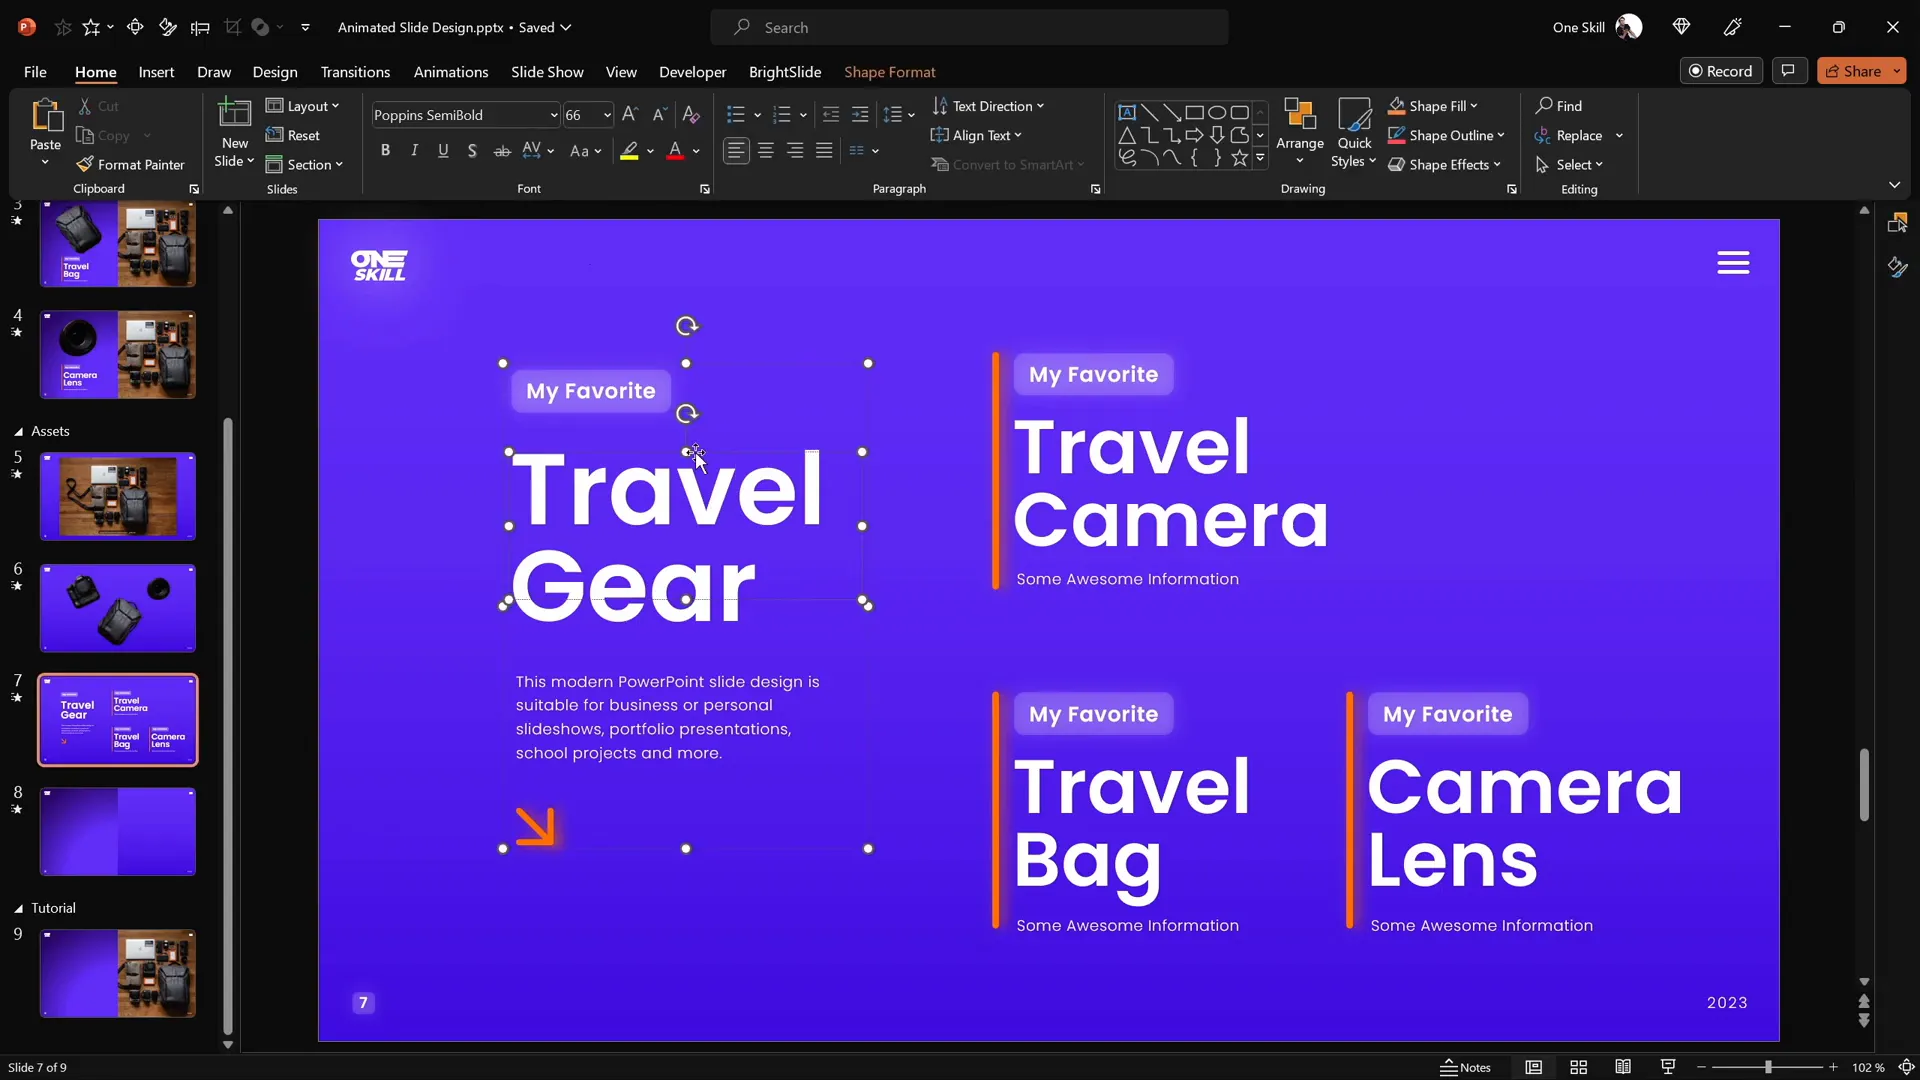
- Fonts: Use Poppins Semi Bold for headings and Poppins Light for body text to maintain a modern and clean look.
- Grouping: Group related text boxes (title, subtitle, description) for easy manipulation.
- Alignment: Use alignment shortcuts or manual alignment tools to center text vertically and horizontally within the rectangle. If you don’t have the BrightSlide add-in, select the rectangle and text box, then use Shape Format > Align > Align Center and Align Middle.
- Replicate groups: Copy and paste text groups to create multiple text sections for each clickable item (e.g., travel camera, travel bag, camera lens).
- Spacing: Ensure all text groups are left-aligned and maintain equal vertical gaps for a balanced layout.
Consistent typography and alignment are crucial for professional slide design and readability.
Cutting Out Objects from Photos for Layered Animation
One of the most exciting parts of this design is making objects within the photo clickable and animated. To do this, you need to separate those objects from the photo into individual layers. You can do this directly in PowerPoint using the Remove Background feature, but for more precision, follow these steps using a free online photo editor:
Using Photopea for Precision Cutouts
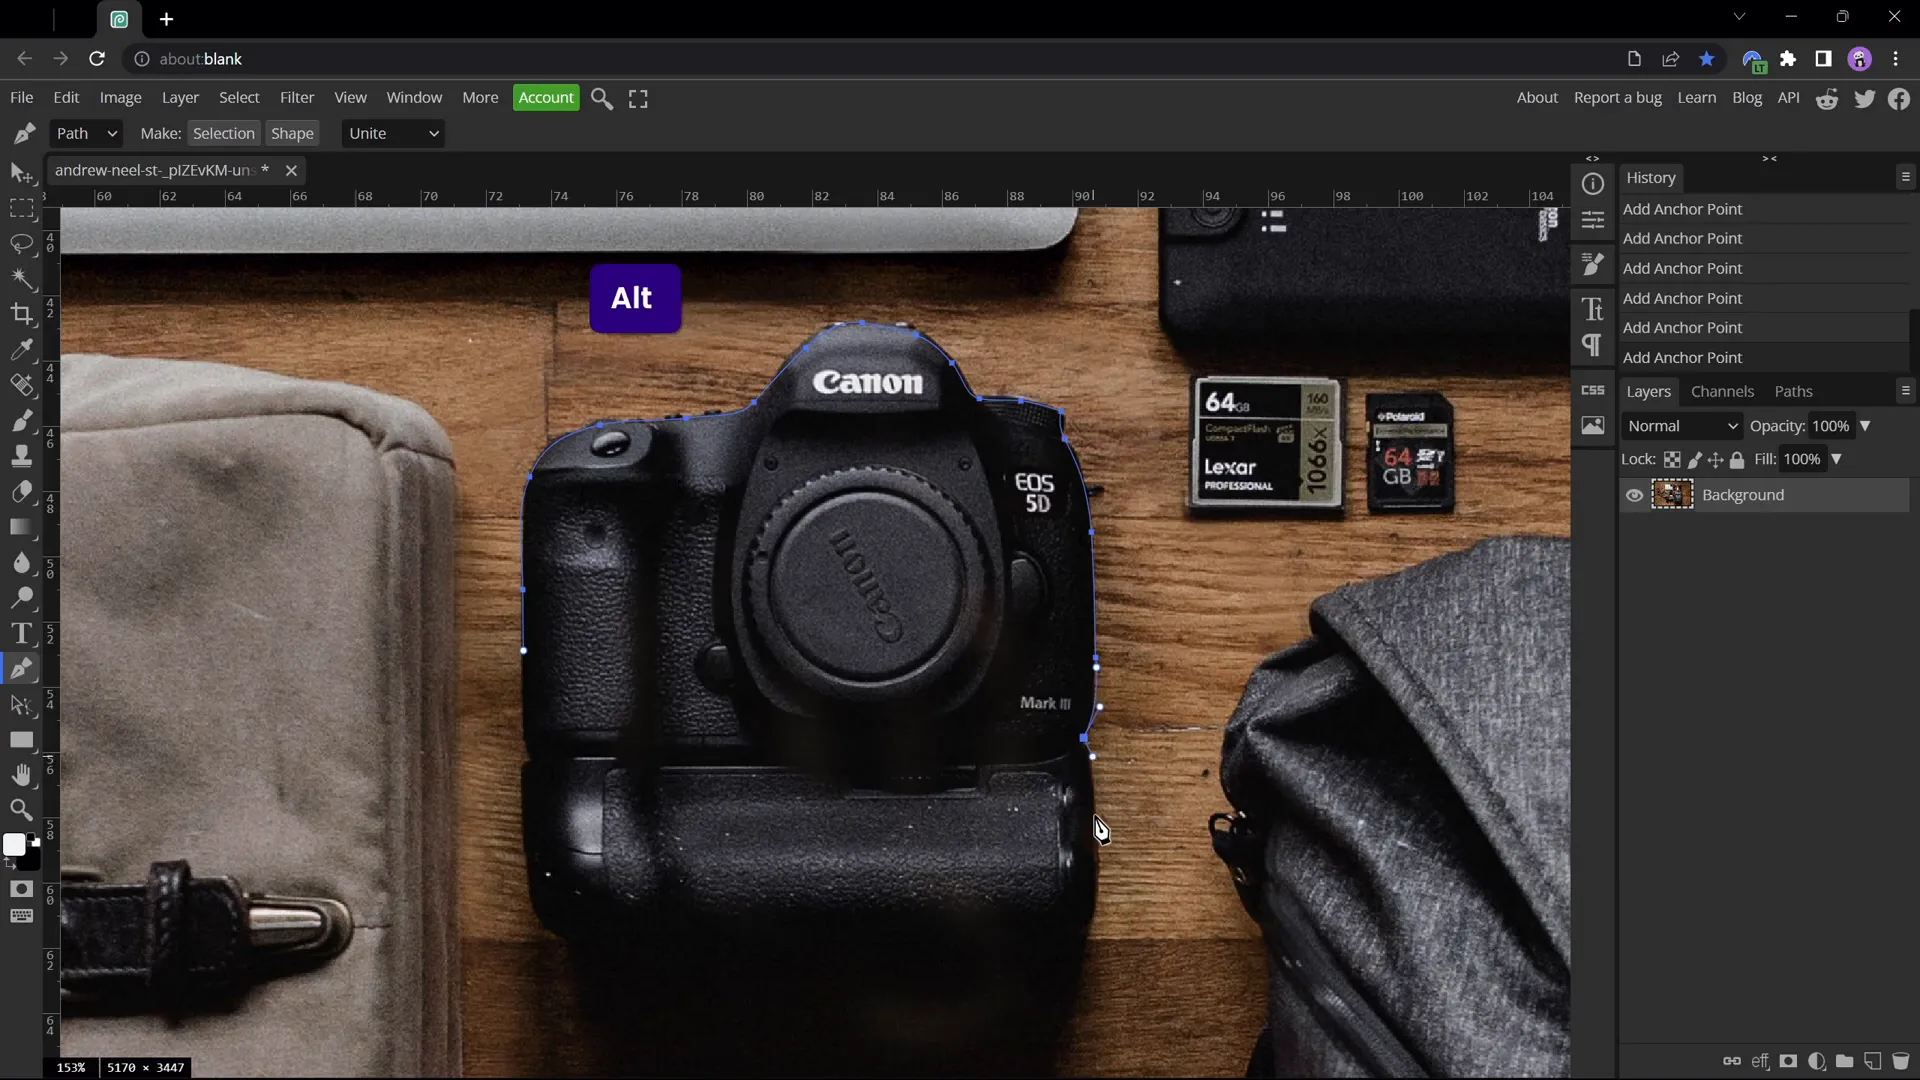
Photopea is a free, browser-based photo editor that mimics Photoshop’s interface and tools, perfect for detailed cutouts.
- Open your photo in Photopea.
- Zoom in: Hold Alt and scroll to zoom closer to the object you want to cut out.
- Select Pen Tool: Activate the pen tool and ensure it’s in Path Mode.
- Trace the object: Click around the edges of the object to create a path. Adjust points by hitting the space bar or holding Alt for sharp turns.
- Close the path: Click near the starting point to close the path.
- Create selection: Click the “Create Selection” button and confirm the pop-up window.
- Apply mask: Click the mask button to hide everything except the selected object.
- Trim the image: Go to Image > Trim to remove excess transparent space.
- Export: Export the cutout as a PNG with transparency.
Repeat this process for each object you want to animate separately. For this tutorial, the cutouts include a travel camera, travel bag, and camera lens.
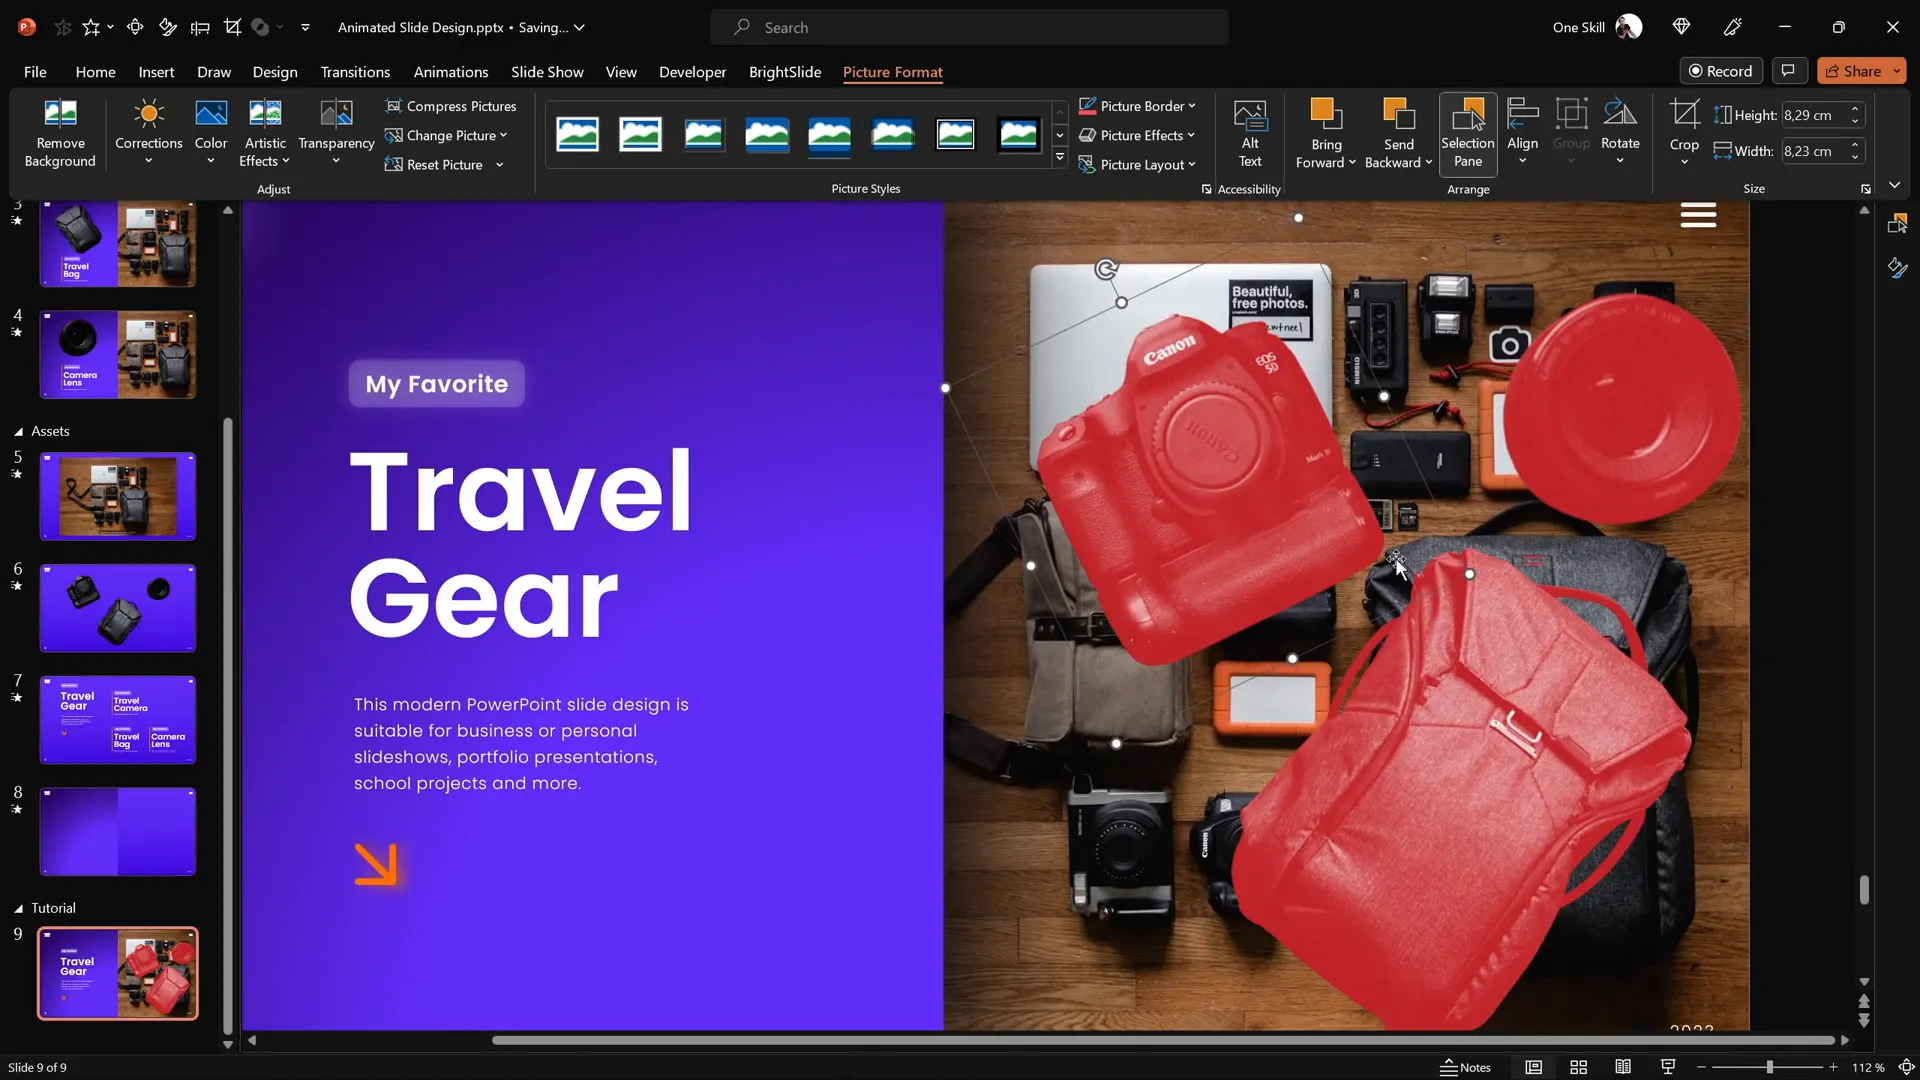
Positioning Cutouts Precisely Over the Original Photo
Once you have your cutouts, it’s time to bring them back into PowerPoint and position them perfectly over the original photo to create the illusion that they are part of the image but ready to animate.
- Paste cutouts: Copy all cutout PNGs and paste them onto your slide.
- Recolor for alignment: Temporarily recolor all cutouts to a bright red using Picture Format > Color. This makes it easier to see if they align perfectly with the photo underneath.
- Adjust each object:
- Use arrow keys for fine positioning.
- Use Ctrl + Shift to resize proportionally from the center.
- Adjust rotation as needed for a perfect fit.
- Reset color: Once positioned, select all cutouts and choose Picture Format > Reset Picture to restore their original appearance.
Accurate placement is key to making the upcoming animations look natural and smooth.
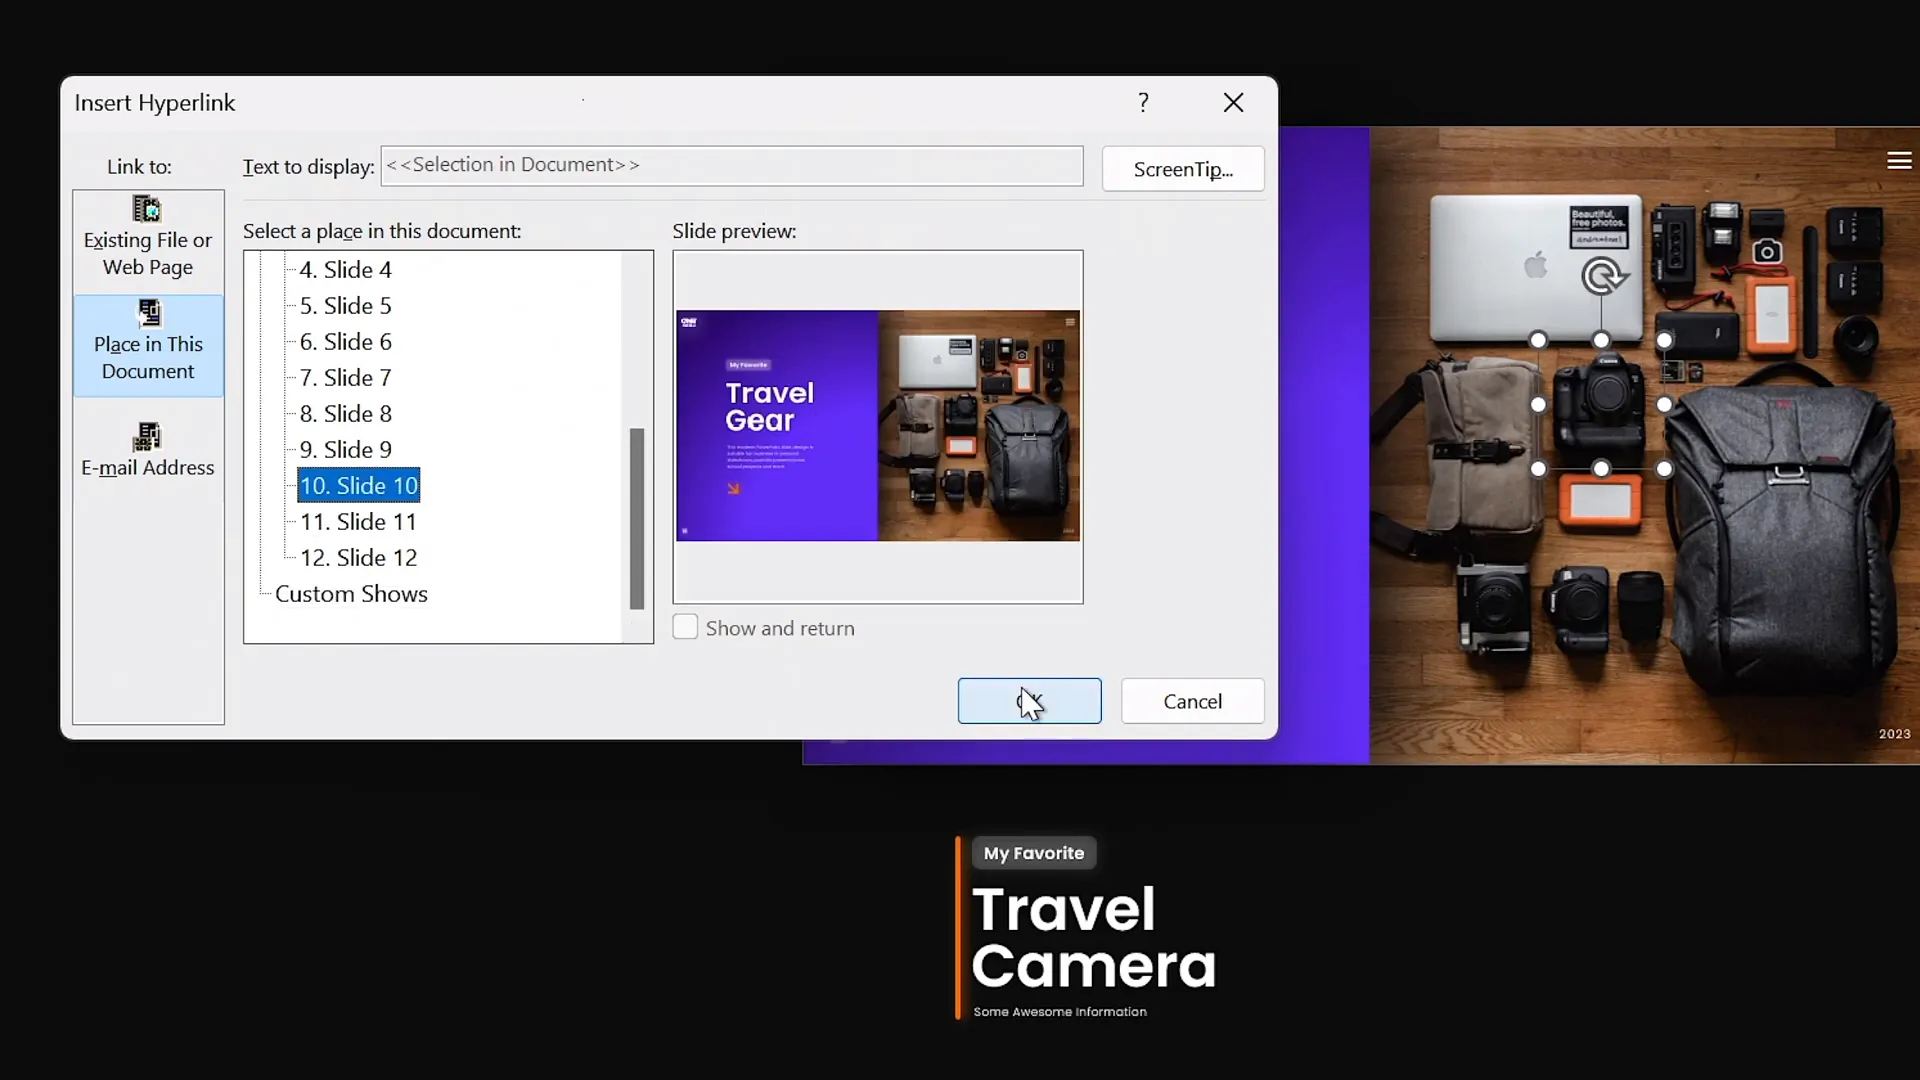
Making Objects Clickable with Hyperlinks
To enable interactivity, you’ll add clickable hyperlinks to each cutout that link to separate slides dedicated to each object’s detailed animation.
- Duplicate slides: Duplicate your main slide three times so you have four slides total:
- Introduction slide
- Camera slide
- Travel bag slide
- Camera lens slide
- Add hyperlinks: On the introduction slide, select each cutout and press Ctrl + K to insert a hyperlink.
- Link the camera cutout to the camera slide.
- Link the travel bag cutout to the travel bag slide.
- Link the camera lens cutout to the lens slide.
- Copy cutouts with hyperlinks: Copy the hyperlinked cutouts and paste them onto their respective slides, replacing the original cutouts.
Now, clicking on each object will navigate to the corresponding detailed slide, setting the stage for animated transitions.
Applying Morph Transition for Smooth Animations
The Morph transition is a powerful PowerPoint feature that animates smooth transformations between slides. Here’s how to apply it for your clickable slide design:
- Select all slides: Highlight all four slides in the slide sorter view.
- Apply Morph transition: Go to the Transitions tab and select Morph. This will animate the cutouts and text boxes smoothly between slides.
- Adjust timing: You can customize the duration of the Morph transition for optimal effect (e.g., 0.75 to 1.0 seconds).

The Morph transition creates the illusion of objects moving, resizing, and rotating seamlessly as you navigate through the slides.

Final Slide Design Adjustments
Each detailed slide should highlight the selected object while hiding or minimizing the others for focus. Here’s how to finalize each slide:
| Slide | Adjustments | Object Focus |
|---|---|---|
| Camera Slide |
|
Camera |
| Travel Bag Slide |
|
Travel Bag |
| Camera Lens Slide |
|
Camera Lens |

These adjustments ensure that each slide tells its own story while maintaining consistency across the presentation.
Fixing Morph Transition Issues
Sometimes the Morph transition can struggle when animating objects that look very similar across slides. For example, the camera lens animation may morph incorrectly from the camera object. Here’s a quick fix:
- Rename objects: In the Selection Pane (Home > Select > Selection Pane), rename all lens cutouts with a prefix of double exclamation marks, e.g., !!Lens.
- Consistency: Use the same name for all lens objects across all slides.
- Reapply Morph: After renaming, Morph will recognize the objects distinctly and animate them correctly.
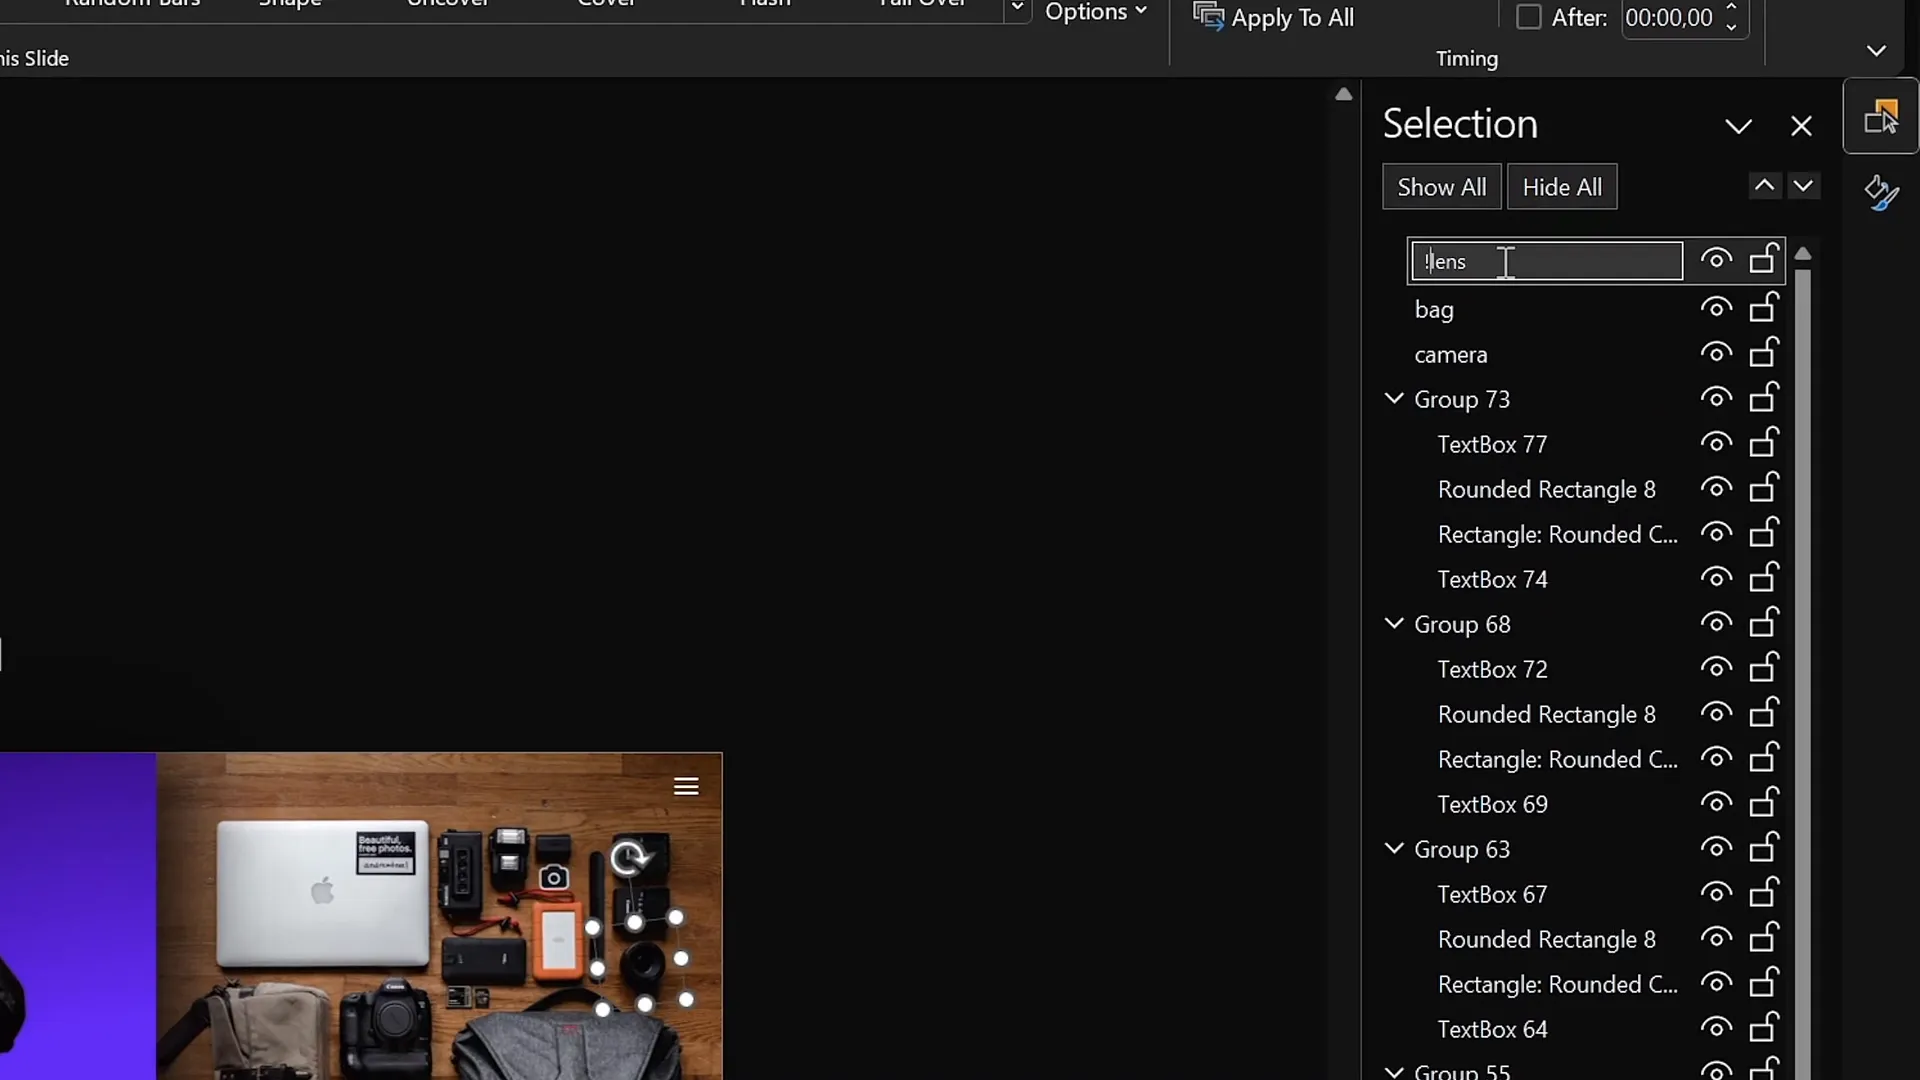
This simple naming trick resolves most Morph transition glitches, ensuring smooth and professional animations.
Frequently Asked Questions (FAQ)
What is the Morph transition in PowerPoint?
The Morph transition animates smooth transformations between slides by moving, resizing, and changing objects’ appearances. It creates a dynamic, seamless animation effect without complex setup.
Can I use any photo for this clickable slide design?
Yes! You can use any photo you like. However, for best results, choose high-resolution images with clear objects that you want to animate separately.
Do I need additional software to cut out objects from photos?
While PowerPoint offers basic background removal tools, using a free online editor like Photopea provides better precision and control for detailed cutouts.
Is the BrightSlide add-in necessary?
No, BrightSlide is optional. It offers productivity features like quick alignment shortcuts, but you can achieve the same results manually through PowerPoint’s built-in alignment tools.
Can I customize the fonts and colors used in this slide design?
Absolutely. The tutorial uses Poppins fonts and specific hex colors for consistency, but feel free to adapt fonts and colors to match your brand or presentation theme.
How do I make my clickable objects return to the main slide?
You can add a “Back” button on each detailed slide with a hyperlink that returns to the introduction slide. Insert a shape or icon, right-click, select Hyperlink, and link it to the first slide.
Conclusion
Mastering PowerPoint slide design goes beyond just adding text and images. By incorporating interactive clickable elements and smooth animations using the Morph transition, your presentations become dynamic, engaging, and professional. This tutorial provides a clear, step-by-step roadmap to creating a visually stunning clickable and scrollable animated slide design that you can customize with your own photos and content.
Remember to start with a solid gradient background, carefully insert and crop your photos, add styled text boxes, meticulously cut out objects for layered animations, and finally link everything together with hyperlinks and Morph transitions. Troubleshooting tips like renaming objects in the Selection Pane help you avoid common animation glitches.
With these skills, your PowerPoint presentations will not only look amazing but also offer a captivating user experience that keeps your audience engaged from start to finish.
Happy designing!
Check out the full video: ANIMATED PowerPoint Slide Design ✨FREE✨


