

If you want to elevate your PowerPoint presentations with smooth, engaging animations, mastering the Morph Transition is a game-changer. This tutorial guides you through creating a dynamic morph transition slide featuring rotating world cities—Paris, Dubai, London, New York, Tokyo, and Hong Kong—showcasing how you can bring your slides to life with seamless movement and eye-catching visuals.
Whether you’re a beginner or an intermediate PowerPoint user, this detailed walkthrough will empower you to build professional, animated slides that captivate your audience. Let’s dive into creating a morph transition slide step-by-step, leveraging free high-quality images and advanced PowerPoint tools.
Table of Contents
- What is Morph Transition in PowerPoint?
- Preparing Your Assets: Images and Shapes
- Building the Hexagon Layout for City Images
- Adding City Images to Hexagon Segments
- Designing the Background and Overlay
- Creating the Morph Slides and Setting Transitions
- Highlighting Cities with Text and Visual Effects
- Tips for Polishing Your Presentation
- Frequently Asked Questions (FAQ)
- Conclusion
What is Morph Transition in PowerPoint?
The Morph Transition in PowerPoint is a powerful animation effect that allows you to create smooth, fluid movement between slides by matching objects across slides and animating their changes in position, size, and appearance. Unlike traditional animations, Morph automatically animates the transformation, making your presentations look professional with minimal effort.
This transition is perfect for:
- Rotating objects or shapes
- Zooming in and out on specific elements
- Moving content seamlessly from one slide to the next
- Creating dynamic storytelling effects
In this tutorial, we’ll use Morph to rotate a hexagon-shaped layout featuring six world cities, each with its corresponding image and detailed text, creating an engaging slideshow experience.
Preparing Your Assets: Images and Shapes
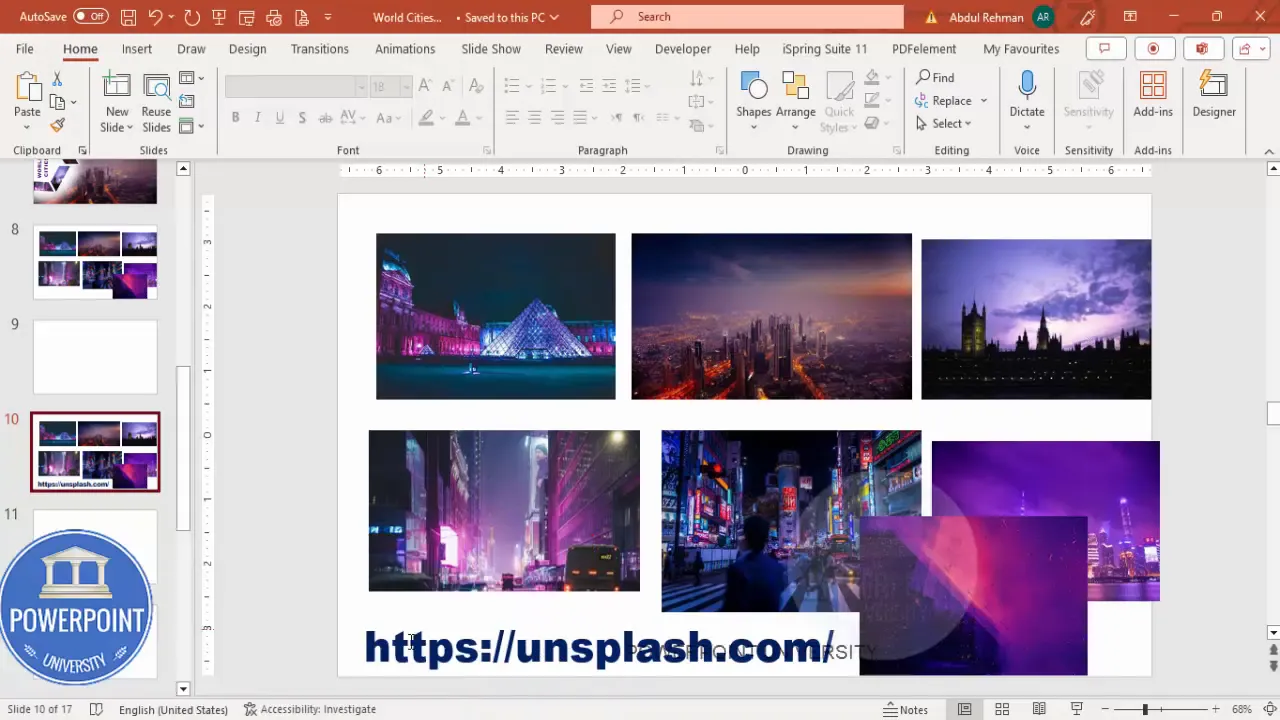
Before we start building the slides, it’s essential to gather your assets. For this project, high-quality images of world cities were sourced from Unsplash.com, a free platform offering beautiful, royalty-free photos.
The cities featured in this example are Paris, Dubai, London, New York, Tokyo, and Hong Kong. You can replace these with any cities or images of your choice to customize the presentation.
Here’s a checklist of what you need before you start:
- High-resolution images of the cities or topics you want to feature
- PowerPoint installed with access to the Morph Transition feature (PowerPoint 2019 or later)
- Basic familiarity with PowerPoint’s shape and formatting tools
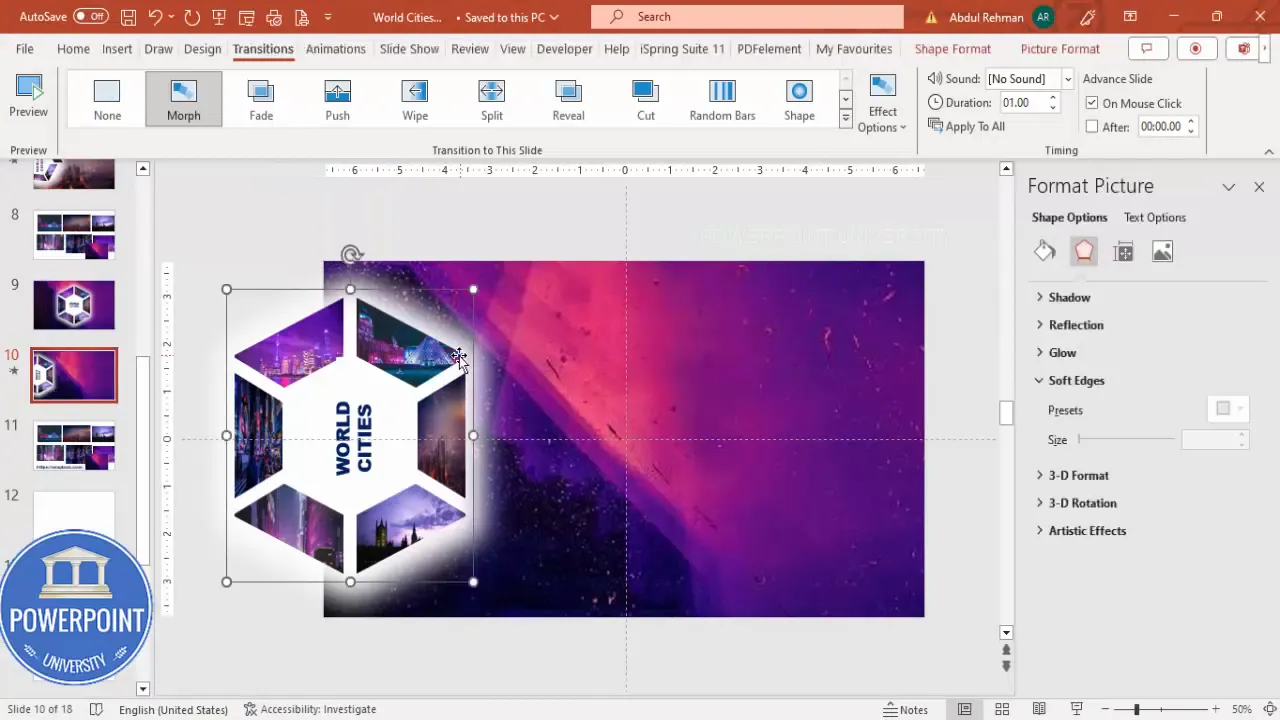
Building the Hexagon Layout for City Images
The core visual component of this tutorial is a hexagon divided into six equal parts, each segment representing a city with its image. Let’s build this step-by-step:
Step 1: Insert a New Slide and Enable Guides
- Open PowerPoint and insert a new blank slide.
- Go to the View tab and enable Guides to help with alignment.
Step 2: Draw the Hexagon Shape
- Go to Insert > Shapes and select the Hexagon from Basic Shapes.
- Hold the Shift key while drawing to keep the proportions uniform.
- Adjust the size to your preference (a medium to large size works best for visibility).
- Remove the shape outline by selecting No Outline.
- Rotate the hexagon so one point faces upwards by pressing Alt + Right Arrow or using the rotate handle.
- Center align the hexagon horizontally and vertically using the Align Center and Align Middle commands.
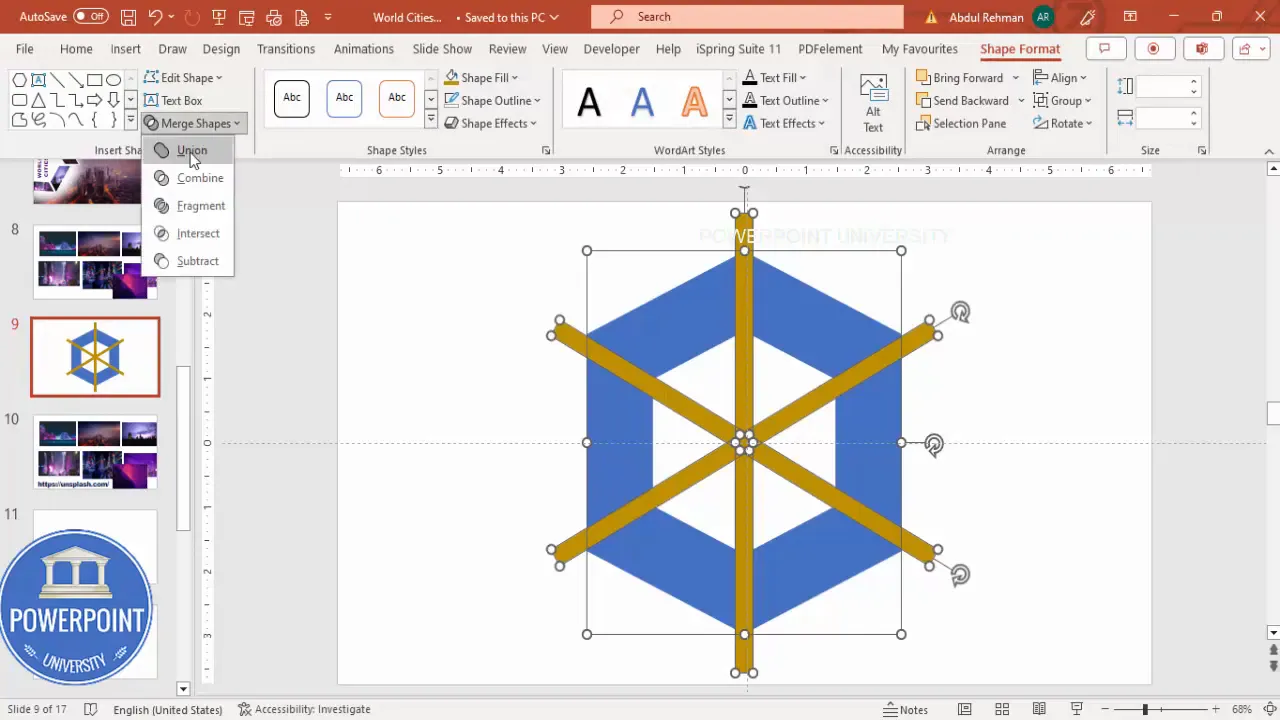
Step 3: Create a Hollow Hexagon
- Duplicate the hexagon by pressing Ctrl + D.
- Change the duplicate’s color to a lighter shade.
- Align it perfectly on top of the original hexagon using Align Center and Align Middle.
- Hold Ctrl + Shift and drag the duplicate inward to create a smaller hexagon inside the original, forming a hollow effect.
- Select both hexagons, go to the Shape Format tab, click Merge Shapes and choose Subtract to cut the smaller hexagon out of the larger one.
Step 4: Divide the Hexagon into Six Equal Parts
- Insert a rectangle shape, align it centrally over the hexagon, and change its color for visibility.
- Duplicate this rectangle multiple times, rotating each by 60 degrees using Alt + Right Arrow key (four times for each duplicate) to cover all six segments.
- Select the hexagon and all the rectangles, then use Merge Shapes > Fragment to cut the hexagon into six equal triangular segments.
- Delete any unwanted fragments to keep only the six hexagon parts.
Adding City Images to Hexagon Segments
With your hexagon segments ready, it’s time to fill each part with the city images:
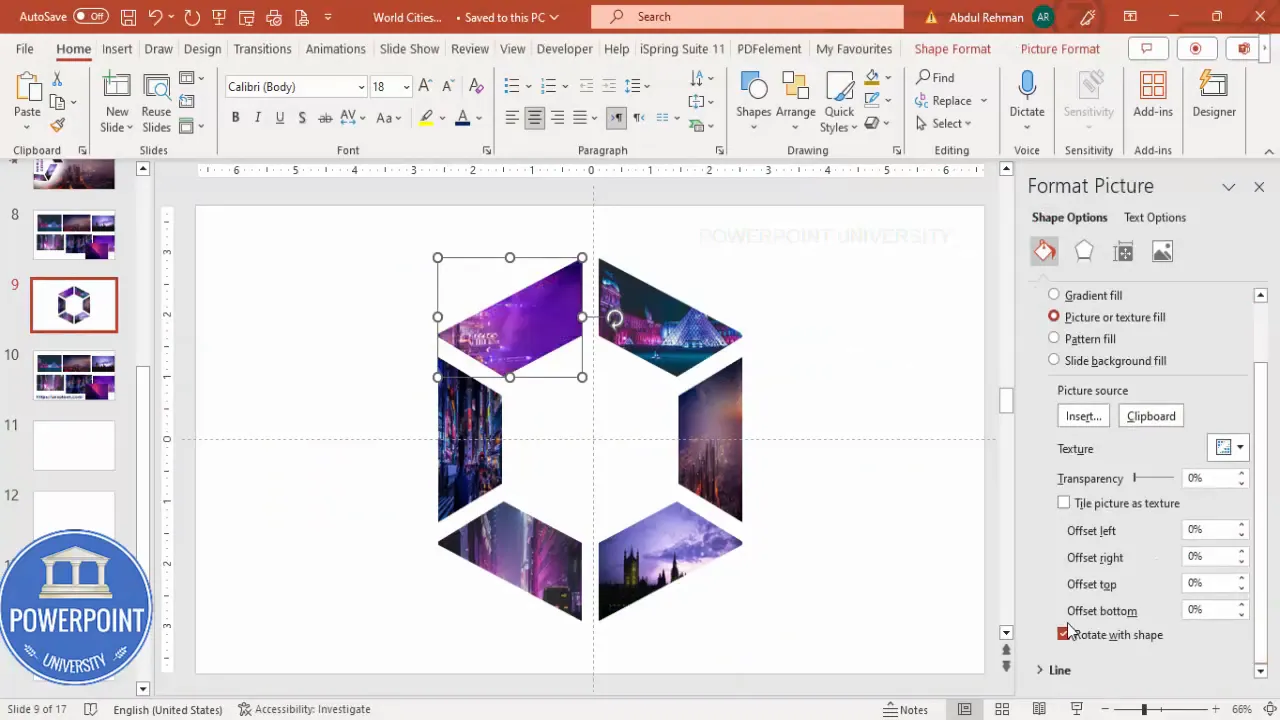
Step 1: Copy and Paste the Images as Fill
- Select the image of the city you want to add (e.g., Paris) and copy it (Ctrl + C).
- Click on the corresponding hexagon segment.
- Right-click and select Format Shape.
- Under Fill, choose Picture or Texture Fill.
- Click Clipboard to paste the copied image as the fill.
- Uncheck Rotate with Shape to keep the image orientation consistent.
Step 2: Repeat for Each City
- Repeat the above steps for Dubai, London, New York, Tokyo, and Hong Kong, applying each image to its respective segment.
Designing the Background and Overlay
To enhance the slide’s aesthetics and ensure the city images stand out, we’ll add a background image and a soft overlay:
Step 1: Add the Background Image
- Copy the background image you want to use.
- Paste it onto the slide and resize it to cover the entire slide area.
- If the image extends beyond the slide boundaries, use Picture Format > Crop > Aspect Ratio > 16:9 to fit it properly.
- Send the background image to the back using Send to Back.
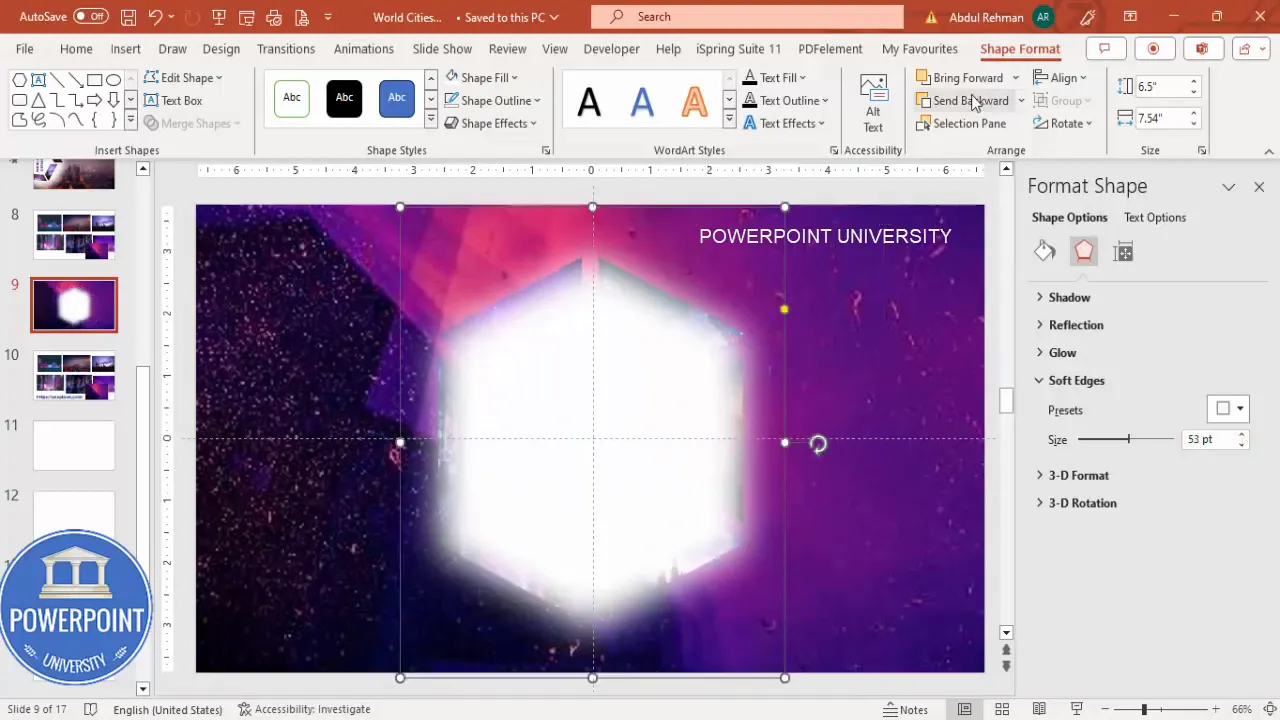
Step 2: Add a Soft Overlay Shape
- Insert a hexagon or oval shape over the background, centered where the city images will be displayed.
- Remove the outline and fill it with white or a light color.
- Apply Soft Edges effect (increase softness) to create a subtle vignette effect.
- Send this shape behind the hexagon segments but above the background image.
Creating the Morph Slides and Setting Transitions
The magic of morph transitions comes from duplicating slides with slight modifications and using the Morph transition to animate between them.
Create Slides in Seconds with ExpertSlides AI |
|
Generate AI Presentations today: |
| TRY NOW! |
Step 1: Group the Hexagon Segments
- Select all six hexagon segments (but not the background or overlay) and group them (Ctrl + G).
- This makes it easier to rotate and move the entire hexagon layout.
Step 2: Duplicate the Slide
- Duplicate the slide you just created.
- On the duplicated slide, rotate the grouped hexagon so the next city moves to the front (e.g., from Paris to London).
- Move and adjust the overlay and any text elements accordingly.
Step 3: Apply Morph Transition
- On the duplicated slide, go to the Transitions tab.
- Select Morph as the transition effect.
- Set the duration to 1 second for a smooth and fast rotation effect.
Step 4: Repeat for All Cities
- Continue duplicating slides, rotating the hexagon group each time to bring the next city forward.
- Apply the Morph transition to every duplicate to create a seamless rotating slideshow.
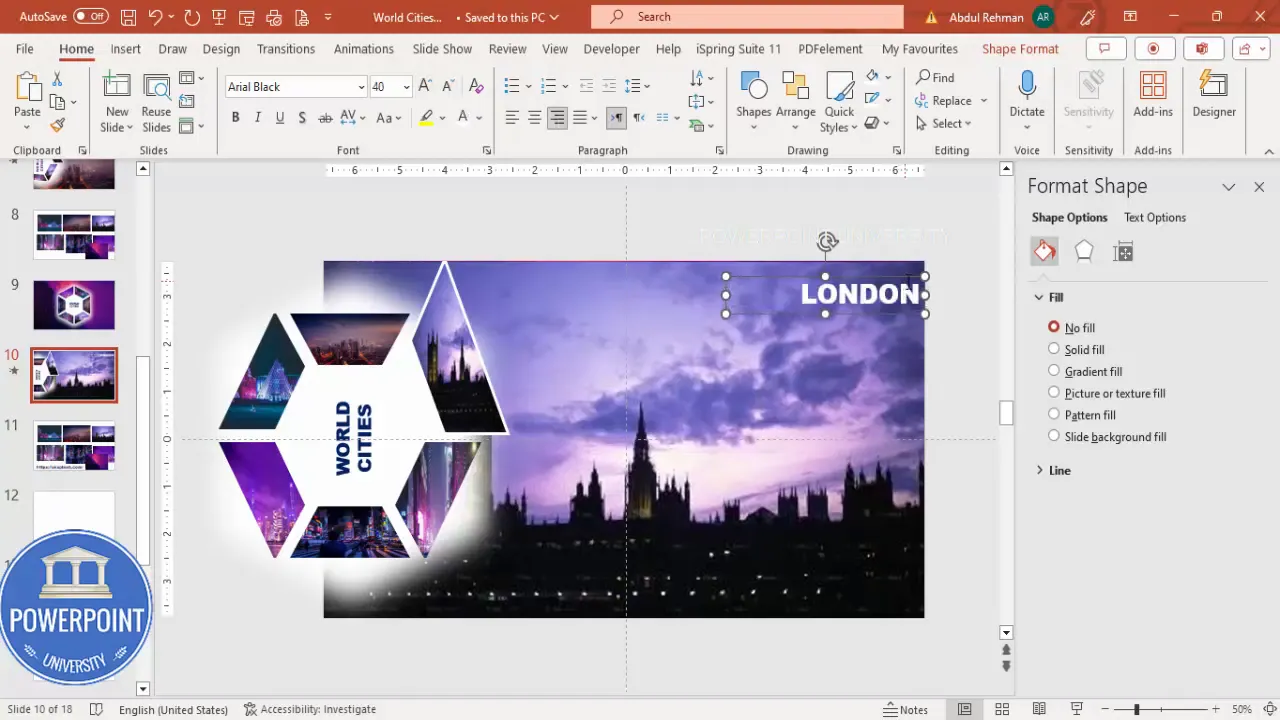
Highlighting Cities with Text and Visual Effects
To draw attention to the city in focus during each rotation, add visual enhancements and descriptive text:
Step 1: Enlarge the Focused Hexagon Segment
- On the slide where a city is at the front, select its hexagon segment.
- Hold Shift and increase its size slightly to make it stand out.
- Position it centrally or slightly offset for emphasis.
Step 2: Add the City Image as a Separate Element
- Copy the city’s full image and paste it onto the slide.
- Crop or resize it to fit nicely near the enlarged hexagon segment.
- Send this image behind the enlarged hexagon segment but above the background.
Step 3: Add Text Labels and Descriptions
- Insert a text box with the city’s name using a bold font such as Arial Black.
- Use white or light-colored font for contrast.
- Position the text near the enlarged hexagon segment, aligning it right or center as desired.
- Add any detailed description or additional text below the city name to provide more context.
Step 4: Add Outlines to the Focused Segment
- Select the enlarged hexagon segment.
- Go to Shape Format > Shape Outline and choose white or another contrasting color.
- Increase the outline weight to make it more prominent.
Step 5: Use Selection Pane to Name Objects
- Open the Selection Pane (Home > Select > Selection Pane).
- Name the city name text box with a prefix like
!!city_nameto avoid morph transition issues when editing text.
Tips for Polishing Your Presentation
To make your morph transition slides look professional and work smoothly, consider these additional tips:
- Keep Slide Size Consistent: Ensure your slide size is set to 16:9 aspect ratio for proper image fitting and cropping.
- Use High-Quality Images: Avoid pixelated or low-resolution images to maintain a polished look.
- Group and Name Objects: Group related shapes and name them in the Selection Pane for easier editing and morph transition reliability.
- Use Fast Transition Duration: Set Morph transition duration to 1 second for smooth but quick animations.
- Delete Unused Images: Remove any background or duplicate images not in use to reduce file size.
- Align Elements Precisely: Use PowerPoint’s alignment tools to center and distribute objects evenly.
- Test Your Presentation: Run the slideshow multiple times to ensure transitions and animations work as expected.
Frequently Asked Questions (FAQ)
What versions of PowerPoint support Morph Transition?
Morph Transition is available in PowerPoint 2019, PowerPoint for Microsoft 365, and PowerPoint Online. Older versions like PowerPoint 2016 or 2013 do not support Morph.
Can I use any shape with Morph Transition?
Yes, Morph works best when the same shape or object exists on consecutive slides but with different positions, sizes, or formatting. Custom shapes like hexagons, circles, or rectangles are fully compatible.
How do I add images as fills to shapes?
Select the shape, right-click and choose Format Shape. Under the Fill options, select Picture or Texture Fill and then choose an image from your clipboard or file.
Why does the image rotate with the shape and how do I fix it?
By default, images fill shapes and rotate with them. To prevent this, uncheck the Rotate with Shape option in the Fill settings, so the image remains upright even if the shape rotates.
How can I ensure smooth rotation with Morph?
Make sure to group your shapes consistently across slides before applying Morph. Also, minimize the transition duration (around 1 second) for a more natural and fluid effect.
Conclusion
Using the Morph Transition in PowerPoint creatively can transform your presentations from static to dynamic storytelling experiences. By following this step-by-step tutorial, you can create a rotating hexagon slide featuring world cities, complete with high-quality images, smooth animations, and professional design elements.
Remember, the key steps include building a hollow hexagon divided into six parts, applying city images as shape fills, designing a clean background with overlays, duplicating slides with rotated groups, and applying Morph transitions with highlighted city segments and descriptive text.
With practice, you can adapt these techniques for various presentation topics beyond world cities—whether showcasing products, timelines, team members, or data points. The Morph Transition unlocks endless possibilities for engaging, visually compelling presentations.
Happy presenting!
Check out the full video: Best use of Morph Transition in PowerPoint | Tutorial 1032 | #morphtransition


