Creating engaging and interactive presentations can be a game-changer when it comes to captivating your audience. Imagine having a map where you can hover over cities, see them light up, and even play videos showcasing those locations — all within PowerPoint! This comprehensive guide will walk you through the process of creating such an interactive video map of Thailand, inspired by a fantastic tutorial from One Skill PowerPoint.
Whether you’re a beginner or an experienced PowerPoint user, by the end of this article, you’ll be empowered to build your own clickable, interactive video map with custom animations, smooth transitions, and even background music. Let’s dive in!
Table of Contents
- Introduction to Interactive Video Maps in PowerPoint
- Understanding the Structure of the Presentation
- Creating Mouse-Over Effects in PowerPoint
- Enhancing Transitions for a Polished Look
- Creating a Detailed City Marker Slide with Video and Music
- Testing and Final Touches
- Additional Tips for Creating Interactive Video Maps
- Frequently Asked Questions (FAQ)
- Conclusion
Introduction to Interactive Video Maps in PowerPoint
Interactive maps are a visually compelling way to present geographic information and multimedia content in one place. In this project, we’ll create a map of Thailand where city markers react to mouse movements. Hovering over a city marker changes its color, and clicking it plays a relevant video with accompanying background music. This kind of interactivity makes your presentation more dynamic and engaging.
The main components of this project include:
- A base map of Thailand with city markers
- Mouse-over effects to highlight cities
- Clickable city markers that link to slides featuring videos
- Custom music backgrounds synchronized with videos
- Smooth slide transitions for a polished look
Throughout this tutorial, we’ll use Microsoft PowerPoint 365, but many features discussed are available in other modern versions of PowerPoint as well.
Understanding the Structure of the Presentation
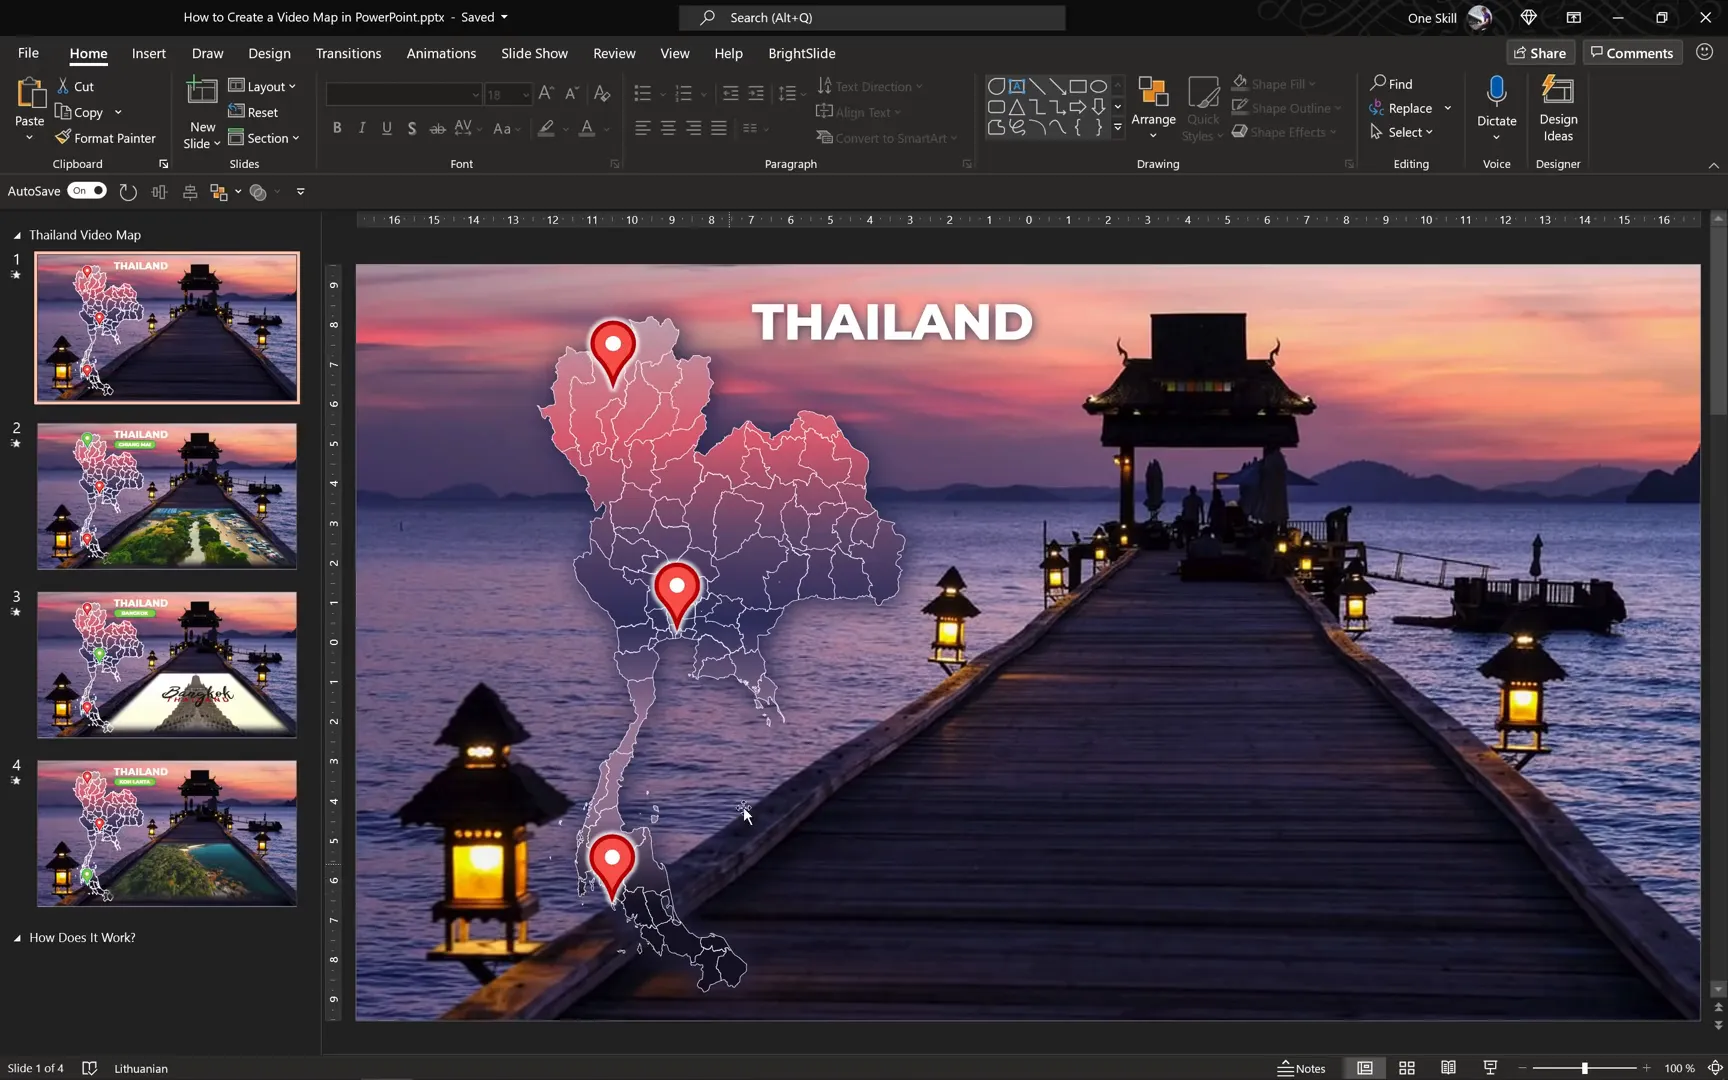
Before diving into creating the interactive map, it’s essential to understand the overall structure of the presentation. The project consists of four main slides:
- Slide 1: The map of Thailand with city markers colored orange.
- Slides 2-4: Individual slides for each city (Chiang Mai, Bangkok, and Koh Lanta) featuring a green city marker and a video related to that city on the right side.
The key feature is that hovering the mouse over a city on the map automatically jumps the viewer to that city’s slide. Clicking the city marker on that slide plays the associated video and music. This structure creates an immersive experience for viewers, blending navigation and multimedia seamlessly.
Creating Mouse-Over Effects in PowerPoint
One of the standout features of this interactive map is the mouse-over effect. When the mouse hovers over a city marker, the marker changes color and navigates to the corresponding city slide. Let’s break down how to create this effect step-by-step.
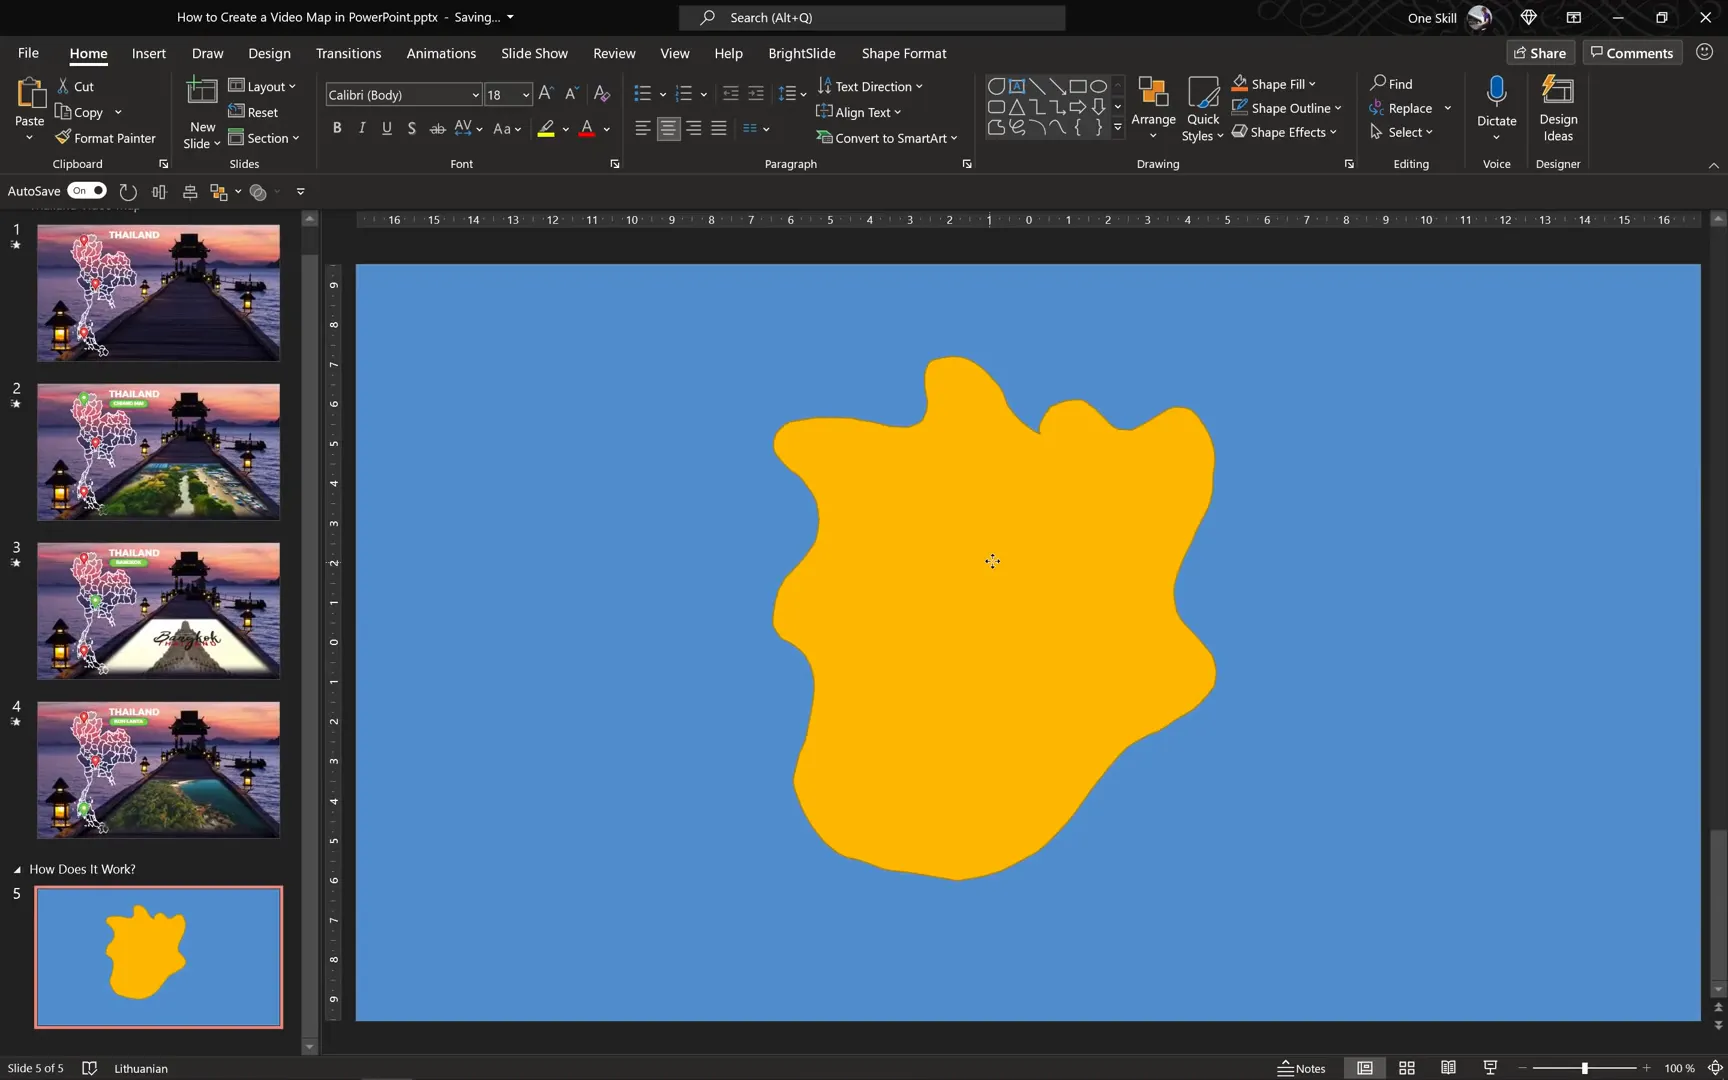
Step 1: Drawing a Simple Map
To demonstrate, start by inserting a blank slide. Use the scribble tool in PowerPoint to draw a simple shape that will act as an island or base map. For example, draw an irregular shape and fill it with a bright yellow color to distinguish it.
Next, add a blue rectangle or shape to fill the background, simulating the ocean. This contrast helps the island stand out clearly.
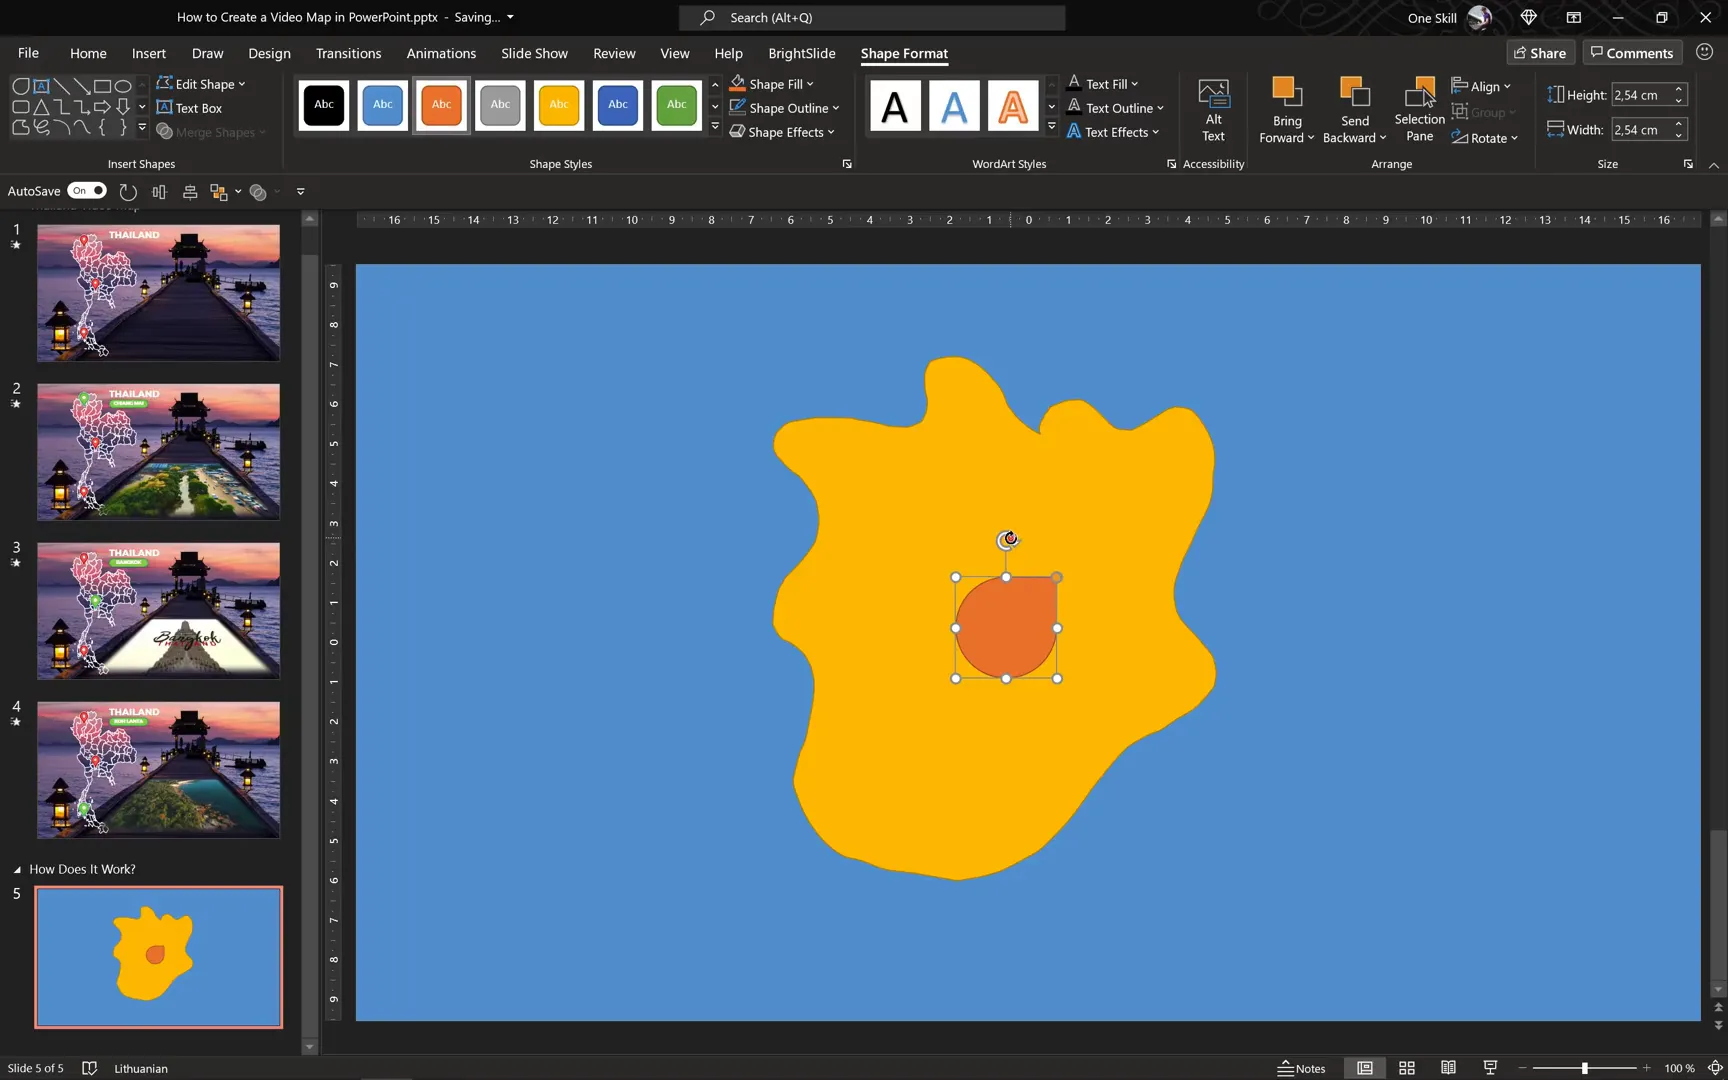
Step 2: Creating a City Marker
City markers are essential visual cues for interactive maps. Here’s how to create a custom city marker using PowerPoint shapes:
- Go to Insert > Shapes and select the Teardrop shape.
- Click on the slide to place it and then fill it with an orange color.
- Rotate or flip the teardrop so the pointy end faces downward.
- Adjust the sharpness of the pointy edge by dragging the small orange bubble on the shape.
- Insert a small white circle with no outline and place it inside the teardrop to add detail.
- Group the teardrop and circle together by selecting both and pressing Ctrl + G.
This creates a neat, visually appealing city marker that you can duplicate and customize.
Step 3: Adding Mouse-Over Navigation
Now, duplicate the slide to create a hover effect:
- On the second slide, select the city marker and enlarge it slightly using Ctrl + Shift to scale from the center.
- Change the teardrop’s fill color to green to indicate the hover state.
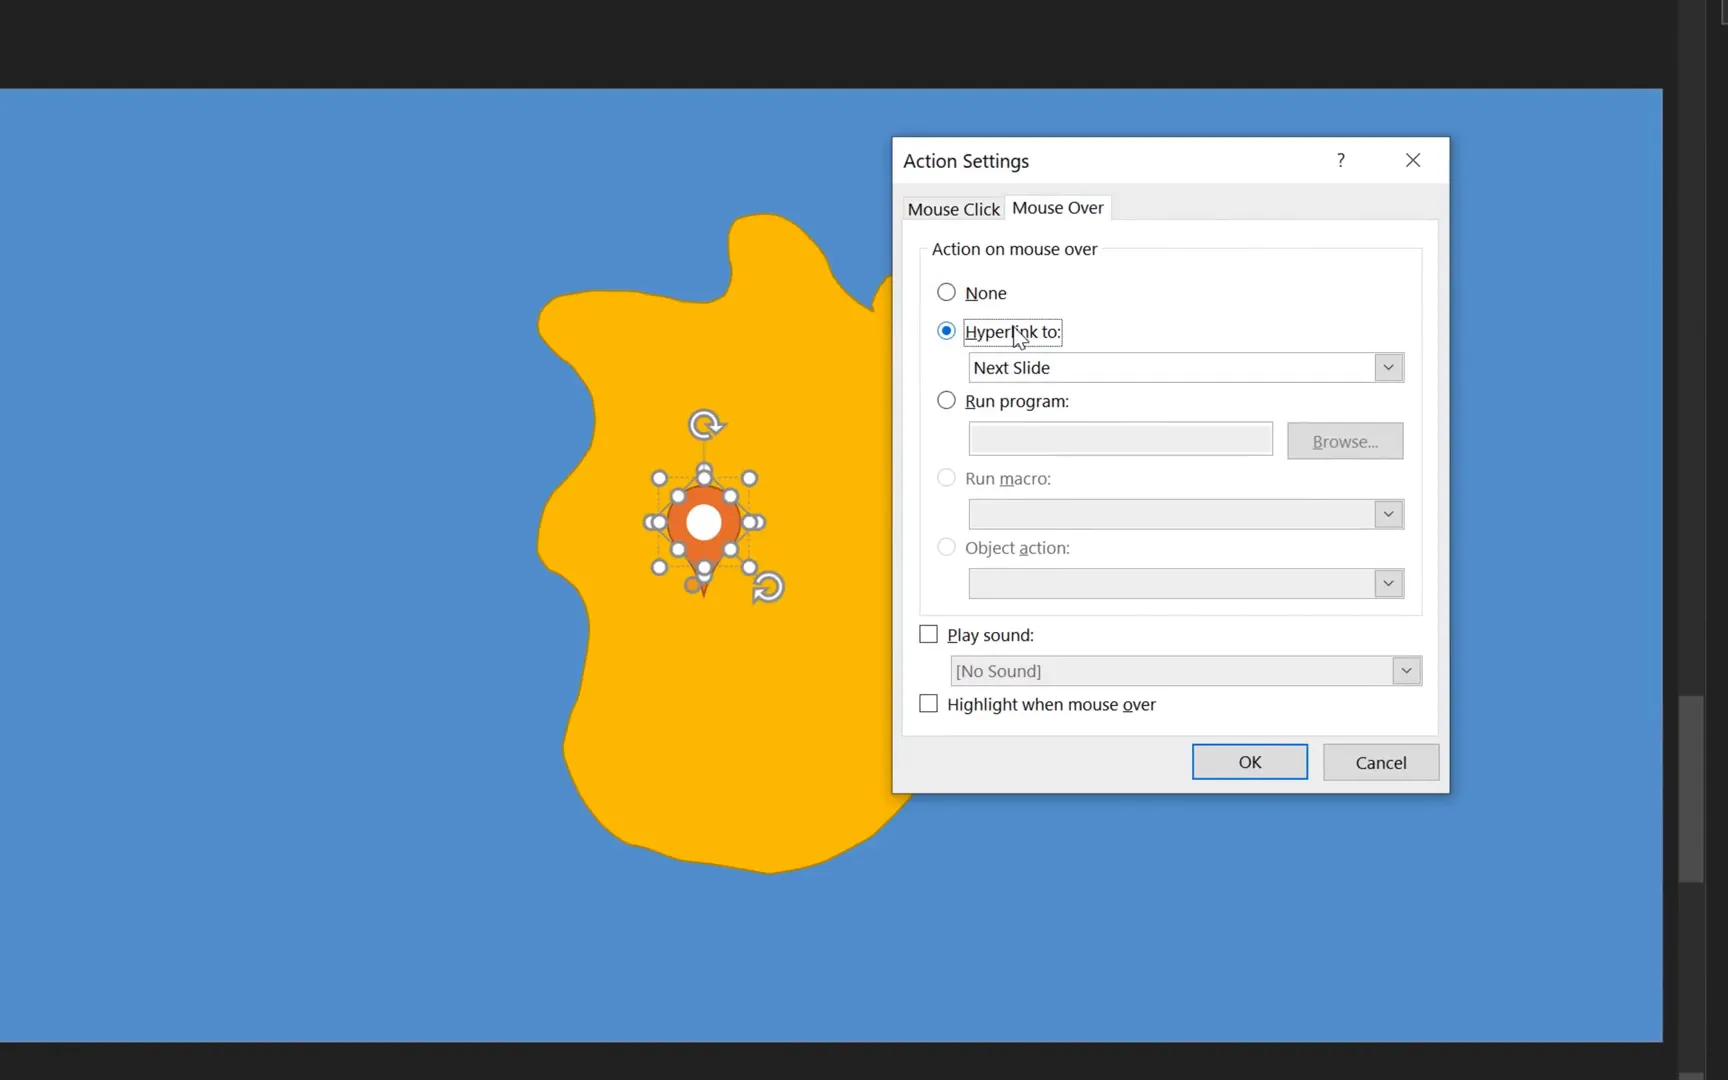
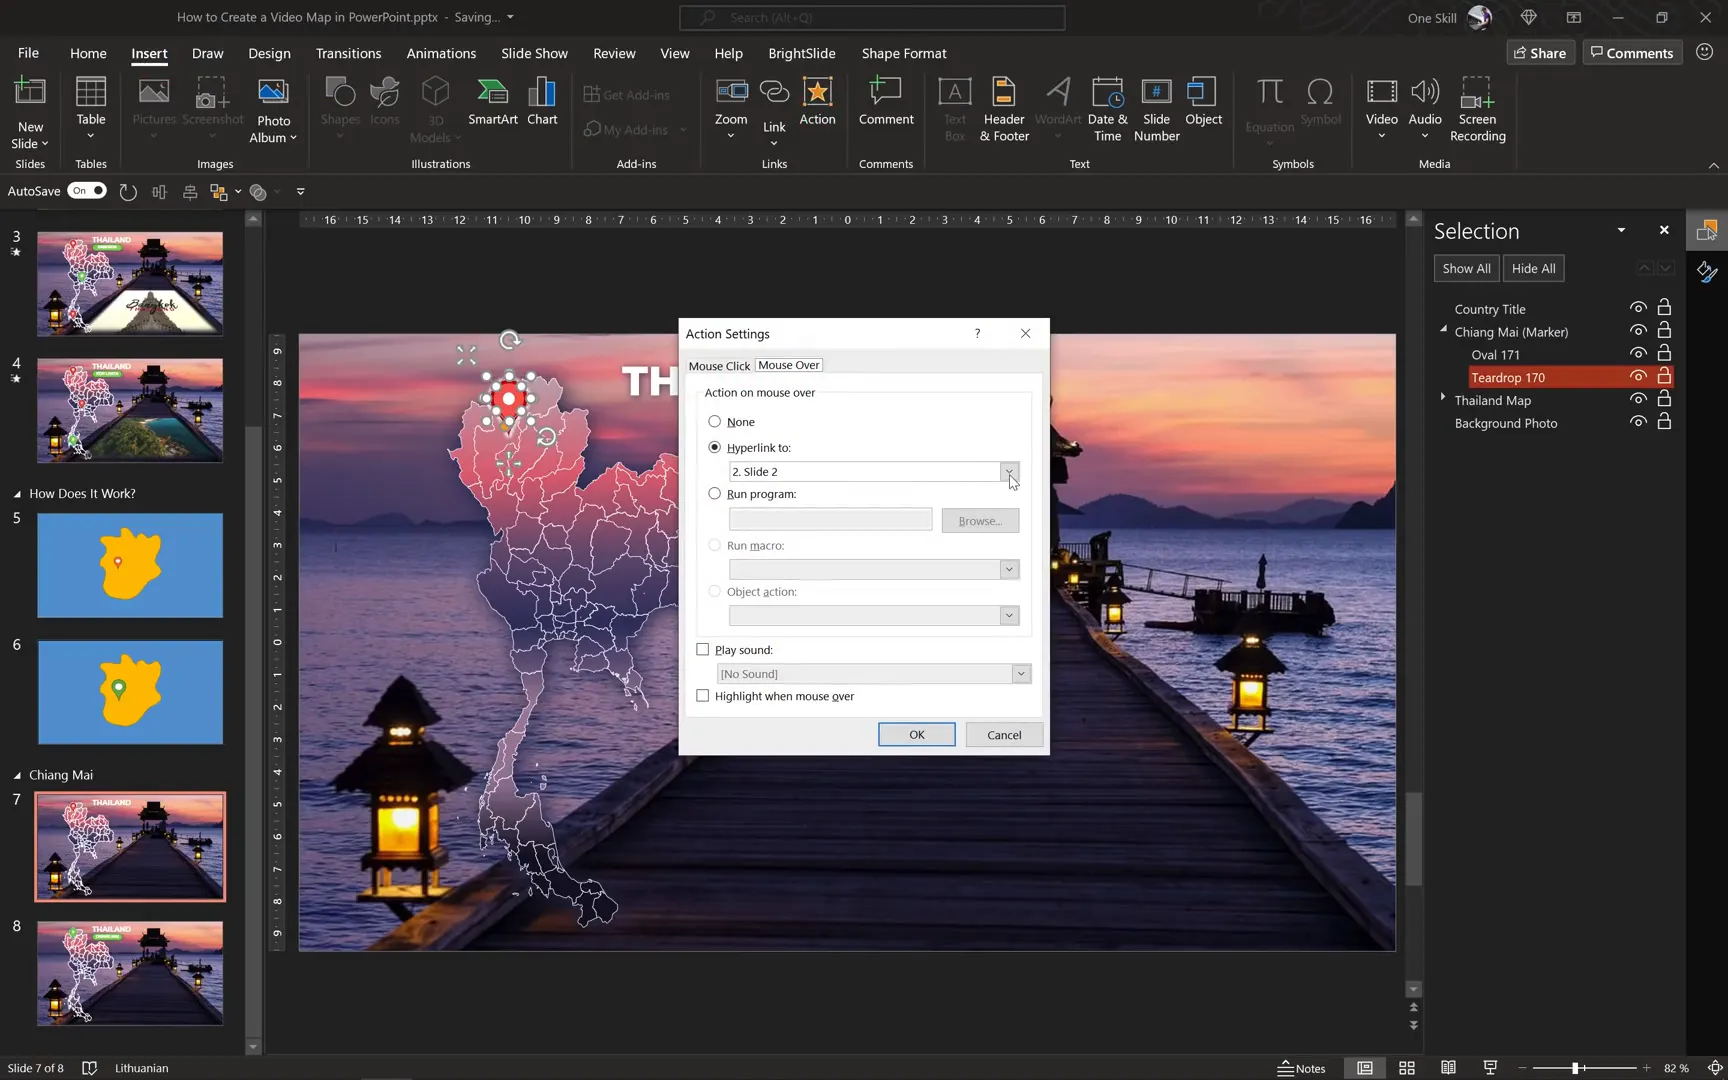
Next, to add the mouse-over action:
- Select only the teardrop shape (not the whole group) because PowerPoint disables actions on grouped objects.
- Go to Insert > Action.
- In the dialog box, select the Mouse Over tab.
- Choose Hyperlink to: Next Slide.
- Click OK.
This means when the mouse hovers over the orange marker, PowerPoint will automatically jump to the next slide where the green marker is visible.
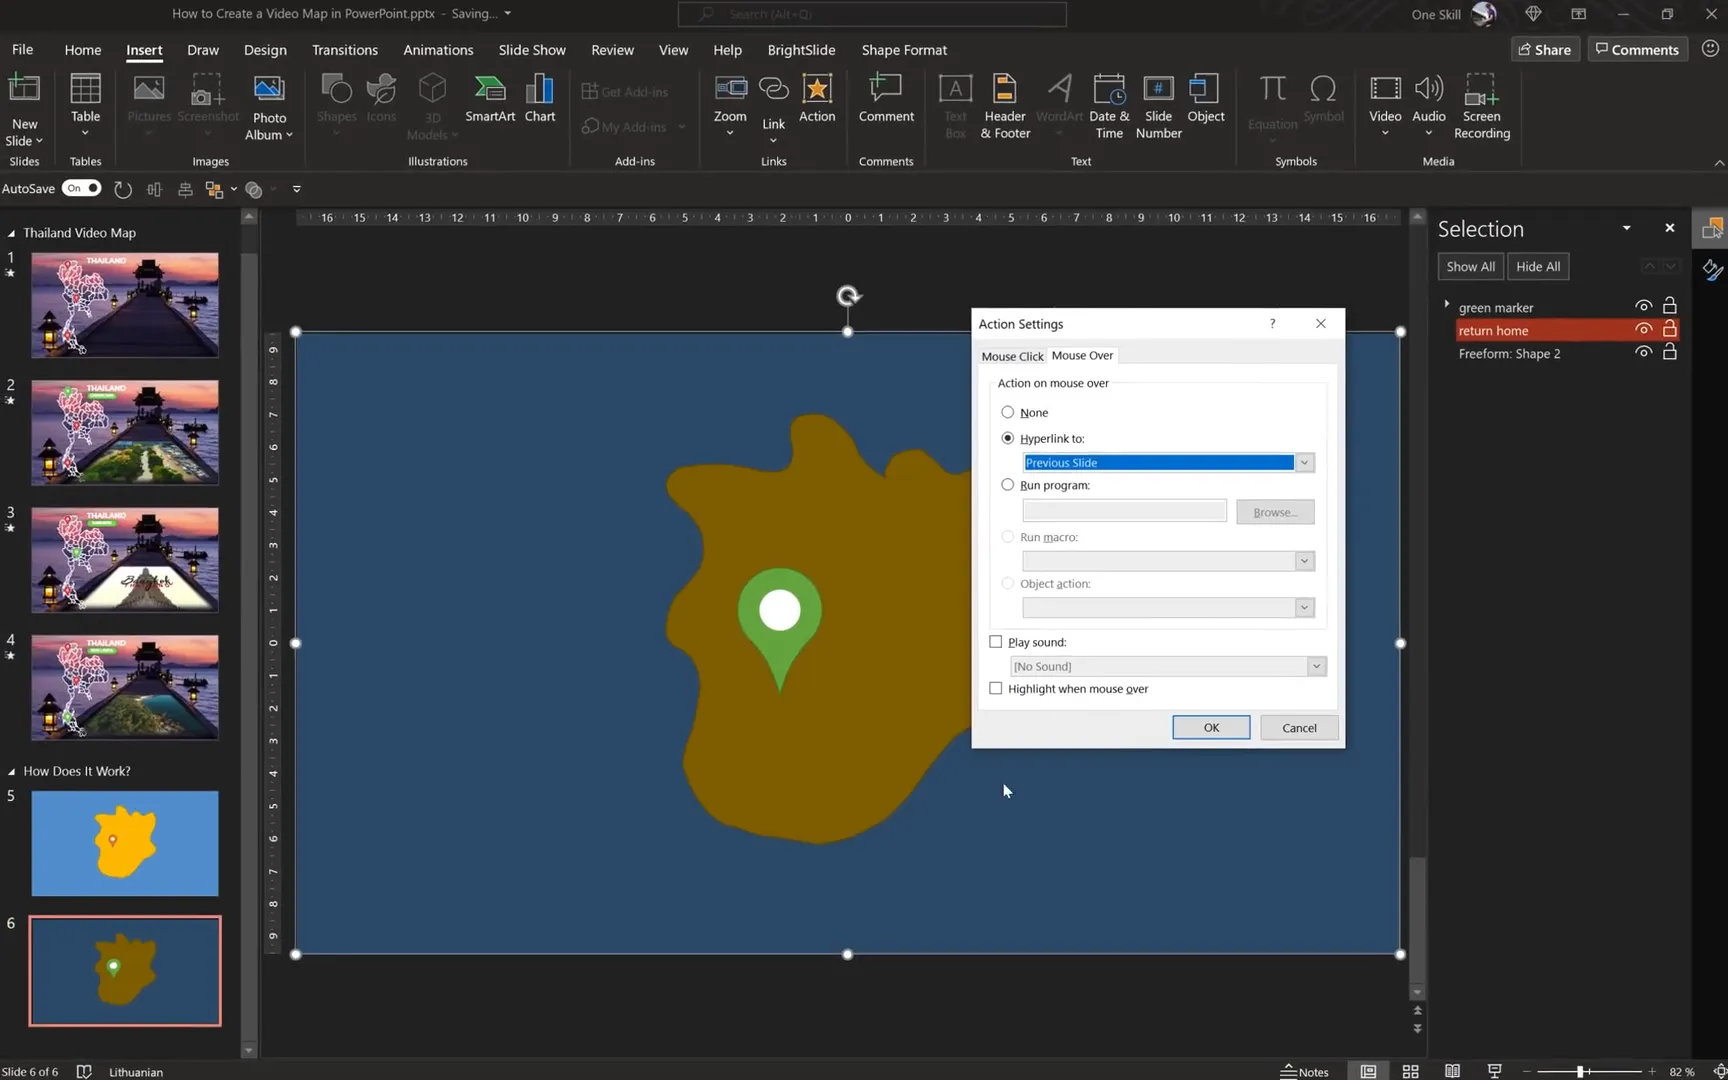
Step 4: Creating a Way Back
To navigate back to the original map slide, you can add a full-screen transparent rectangle that triggers a return to the previous slide.
- Insert a rectangle that covers the entire slide.
- Fill it with black and set transparency to 50% initially so you can see underlying elements.
- Rename this rectangle in the selection pane to something meaningful like Return to Home.
- Send the rectangle to the back, behind the city marker group.
- Select the rectangle, go to Insert > Action, and set the mouse-over action to hyperlink to the previous slide.
- Test the interaction in full-screen mode.
After confirming it works, increase the rectangle’s transparency to 100% to make it invisible but still functional.
Enhancing Transitions for a Polished Look
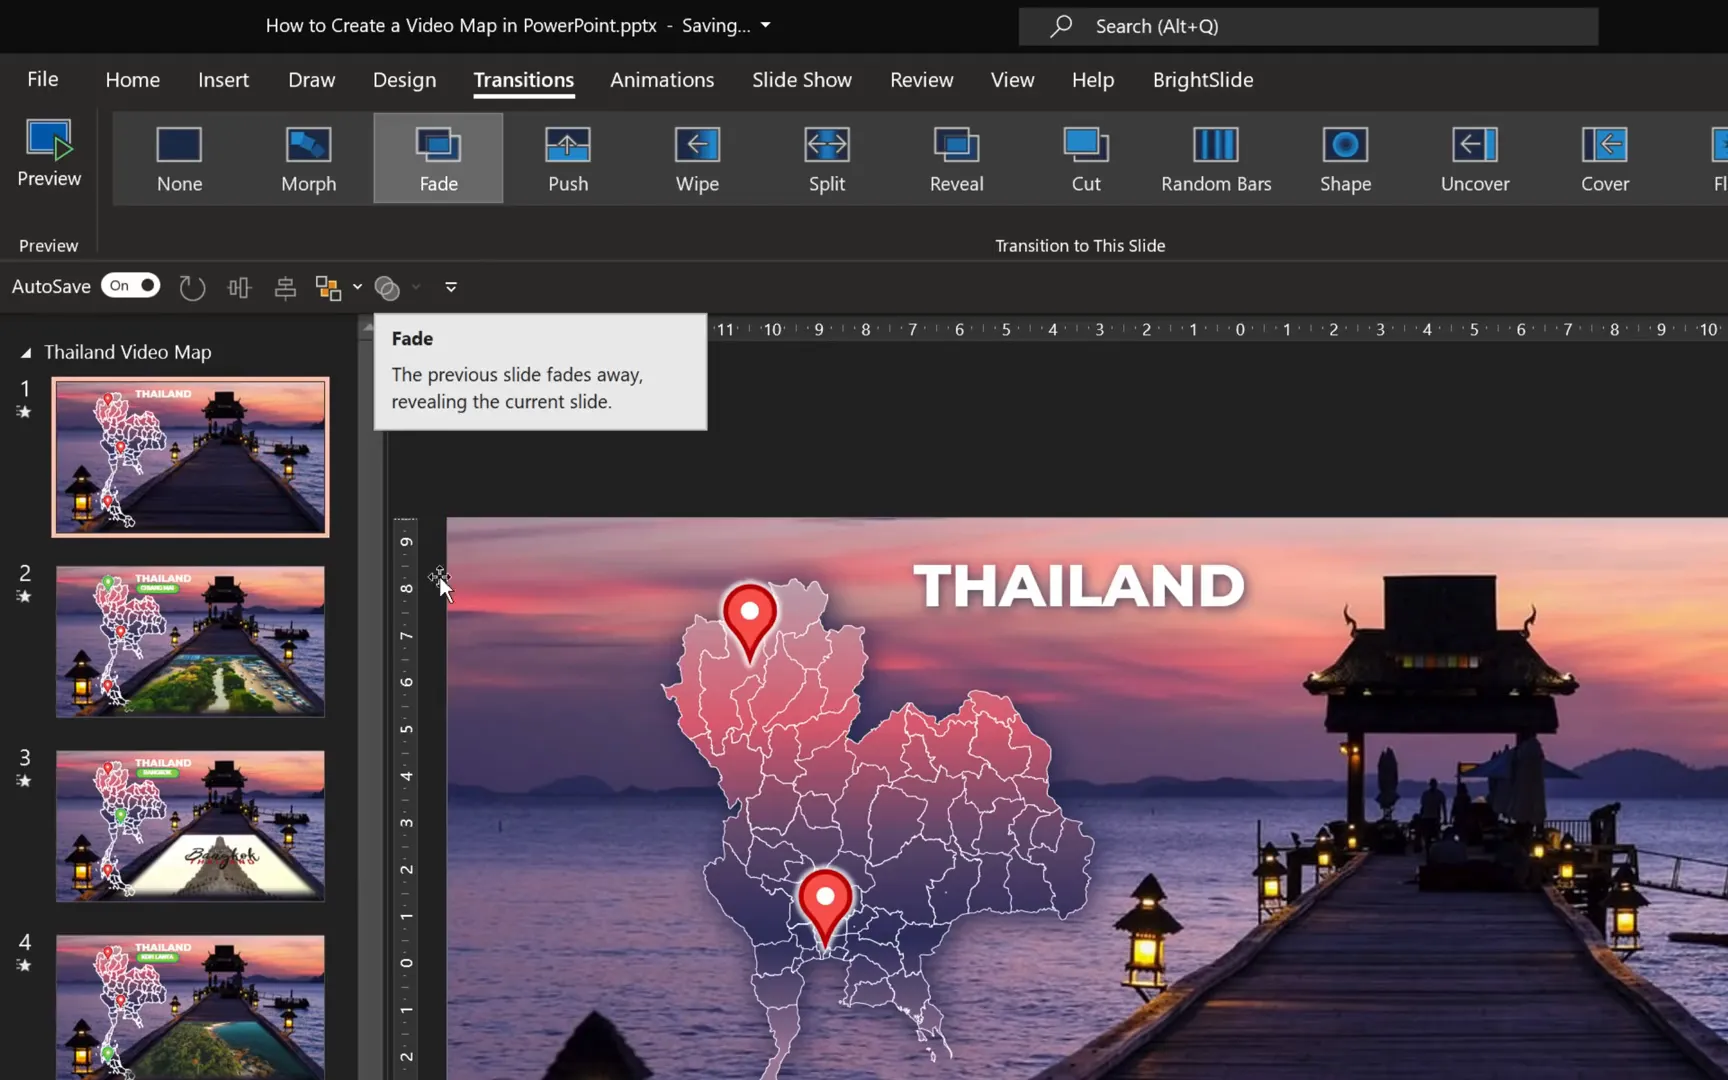
Transitions between slides can significantly impact the feel of your presentation. For this interactive map, subtle transitions enhance the user experience.
For example, using a Fade transition between city slides makes the shift smooth and visually appealing. On the other hand, no transition (None) between the map and certain slides creates an instant switch, which can be useful for quick navigation.
To set transitions:
- Select the slide in the slide sorter or normal view.
- Go to the Transitions tab.
- Choose Fade for smooth transitions or None for immediate changes.
Creating a Detailed City Marker Slide with Video and Music
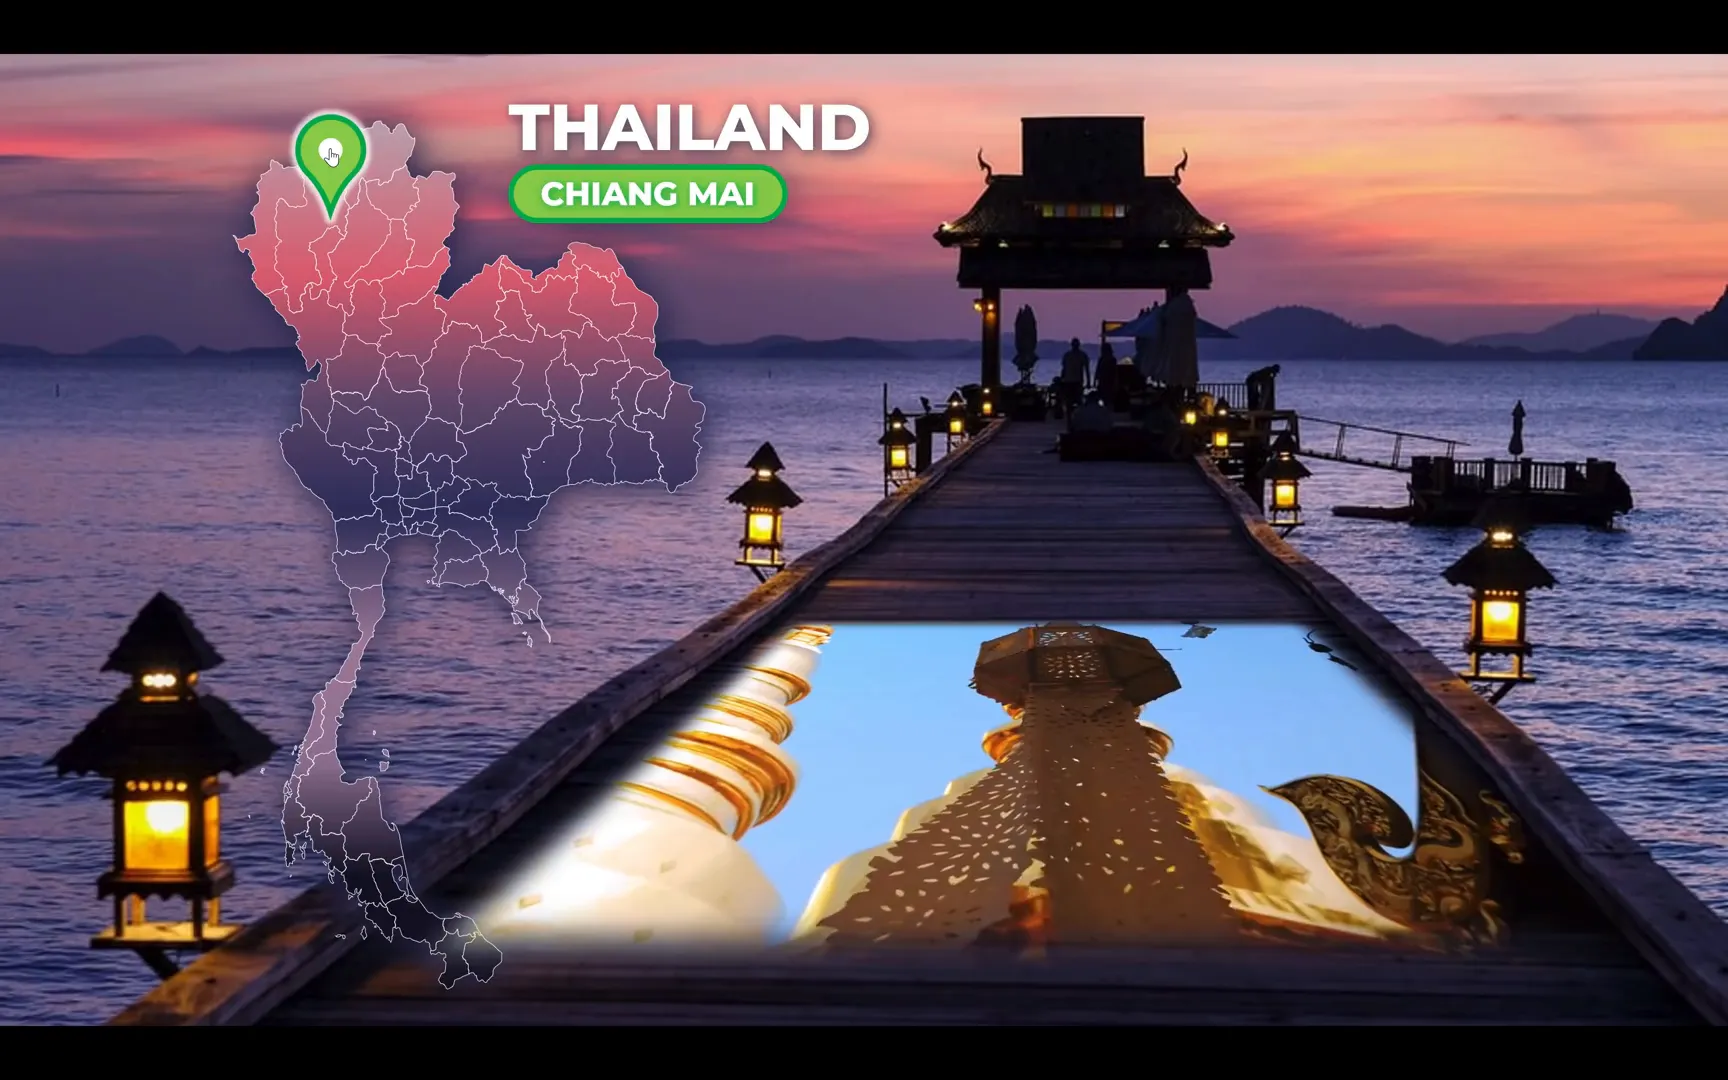
Now that you understand the basics, let’s create a detailed city slide for Chiang Mai featuring a video and custom background music. Here’s how to do it step-by-step.
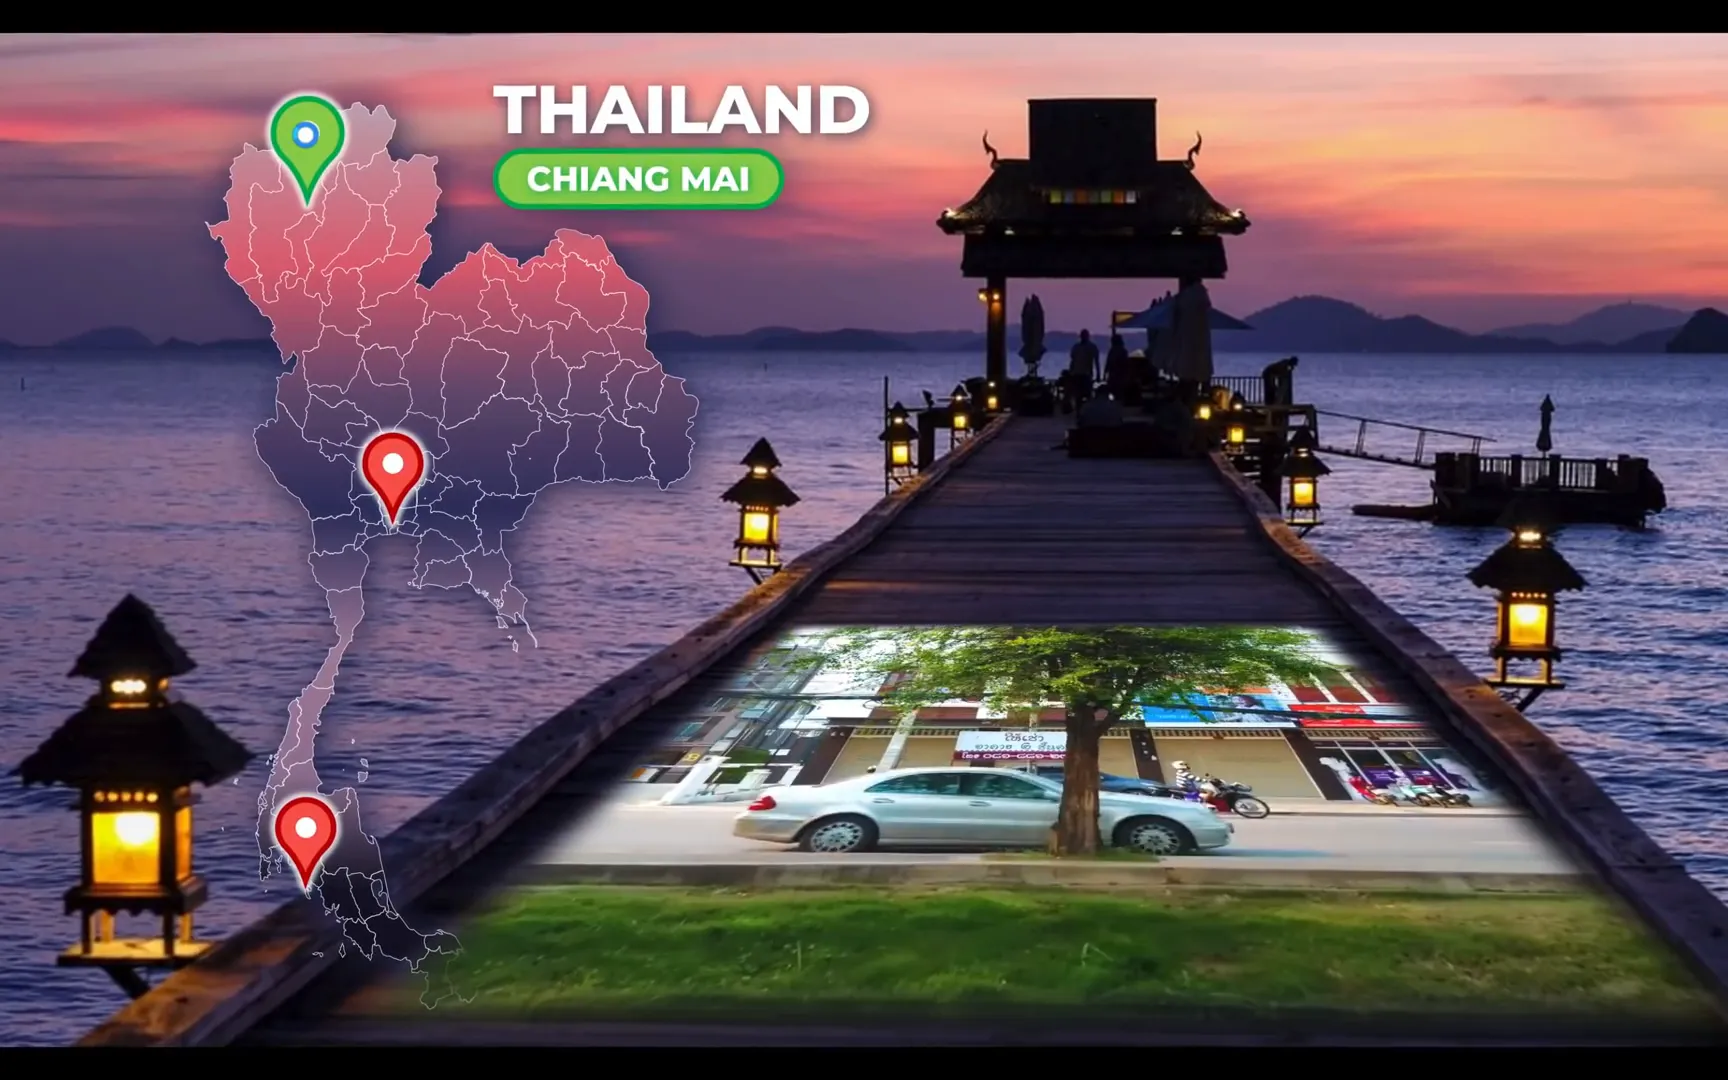
Step 1: Selecting a Background Photo
Choose a beautiful background photo that complements the city’s vibe. For Chiang Mai, you can find stunning photos on free stock sites like Unsplash. Once you have your image:
- Insert the photo into your slide.
- Crop it to fit the slide aspect ratio of 16:9 using the crop tool.
- Adjust the photo’s position and size to cover the entire slide.
Step 2: Adding the Thailand Map
Next, insert a vector map of Thailand. A free SVG map can be downloaded from resources like simplemaps.com.
- Drag and drop the SVG file into your slide.
- Use Graphics Format > Convert to Shape to access individual provinces if needed.
- Group all map elements into one group named Thailand Map.
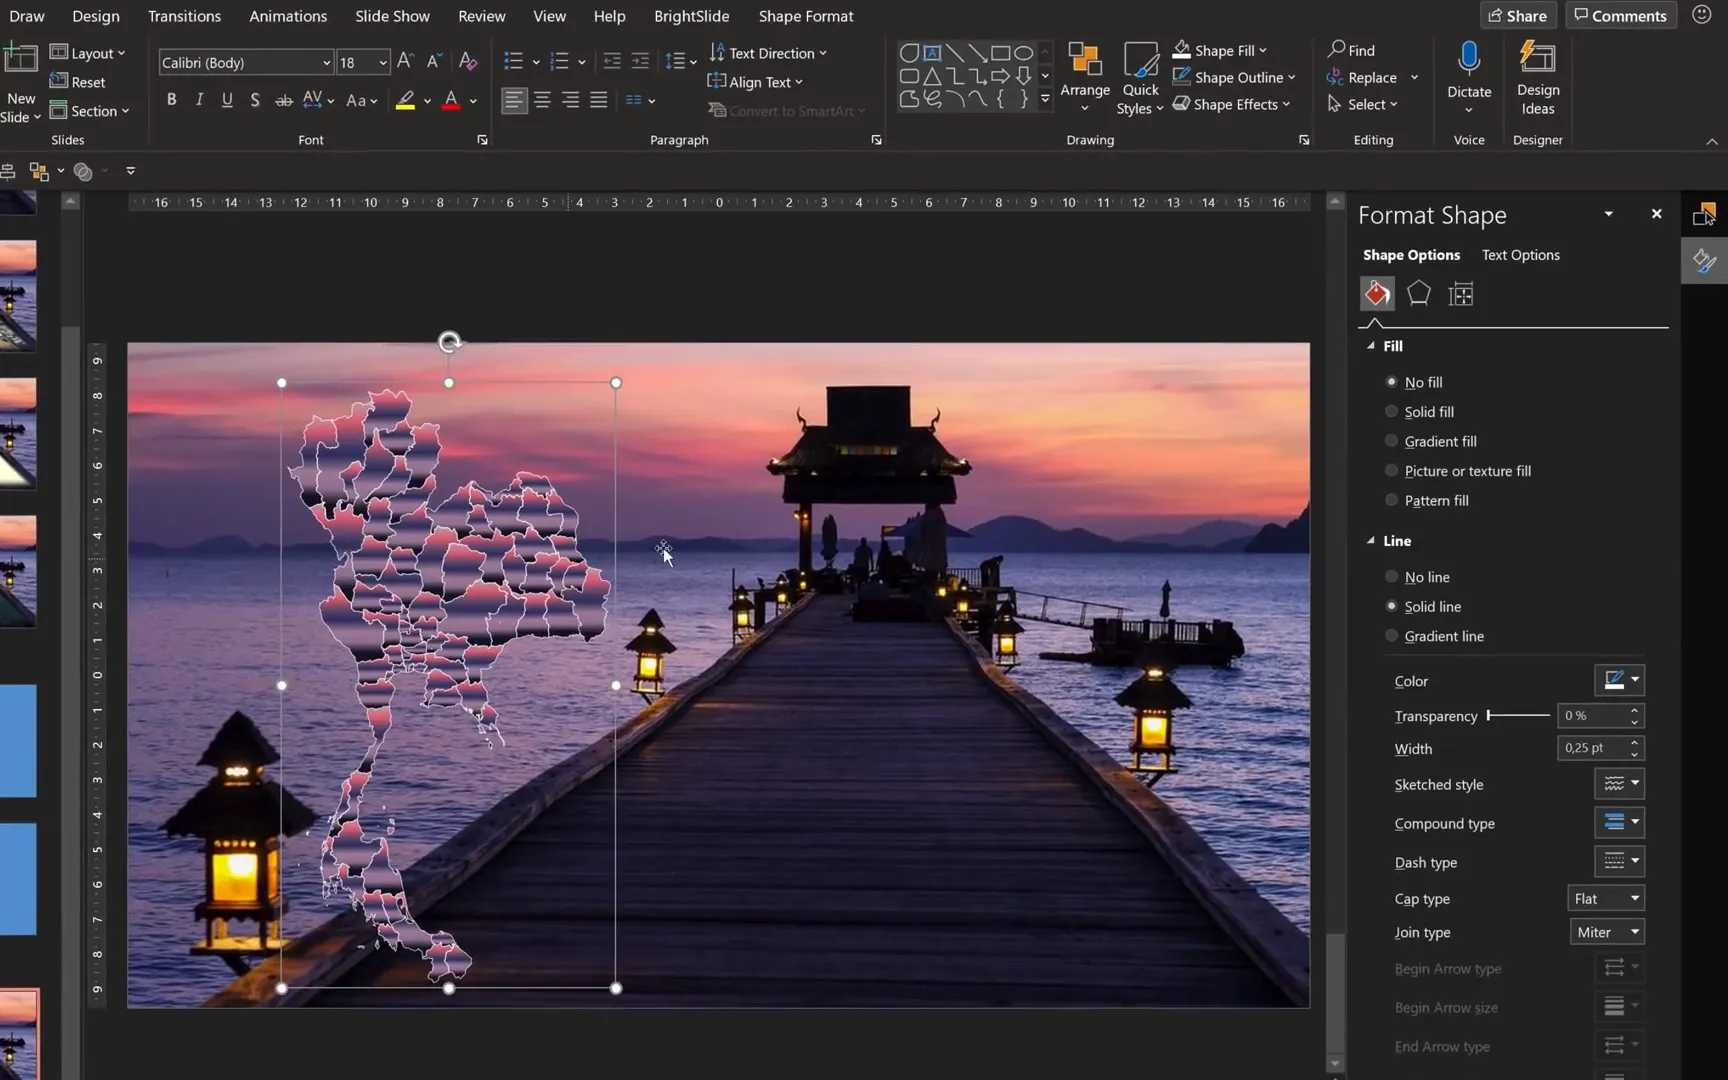
To add visual interest, apply a gradient fill to the map:
- Ungroup the map temporarily.
- Copy the gradient style from a reference map using Ctrl + Shift + C.
- Regroup the map and paste the style with Ctrl + Shift + V.
- Make sure the fill tab is set to gradient fill.
Add a subtle shadow for depth by applying a bottom-right shadow preset and color-matching it to a color from the background photo.

Step 3: Inserting City Markers and Titles
Copy your previously created city marker and text box for Chiang Mai onto the slide. Arrange elements logically:
- Country title on top
- City title below the country title
- Map and city marker beneath the text
Duplicate the slide to create a hover effect version with the city marker changing to green and slightly larger.
Step 4: Adding Mouse-Over Actions
On the original city slide (with the orange marker), select the teardrop shape and add a mouse-over action linking to the next slide (green marker slide). This creates the hover effect.
Similarly, add a full-screen transparent rectangle to the green marker slide to allow users to return to the original city slide.
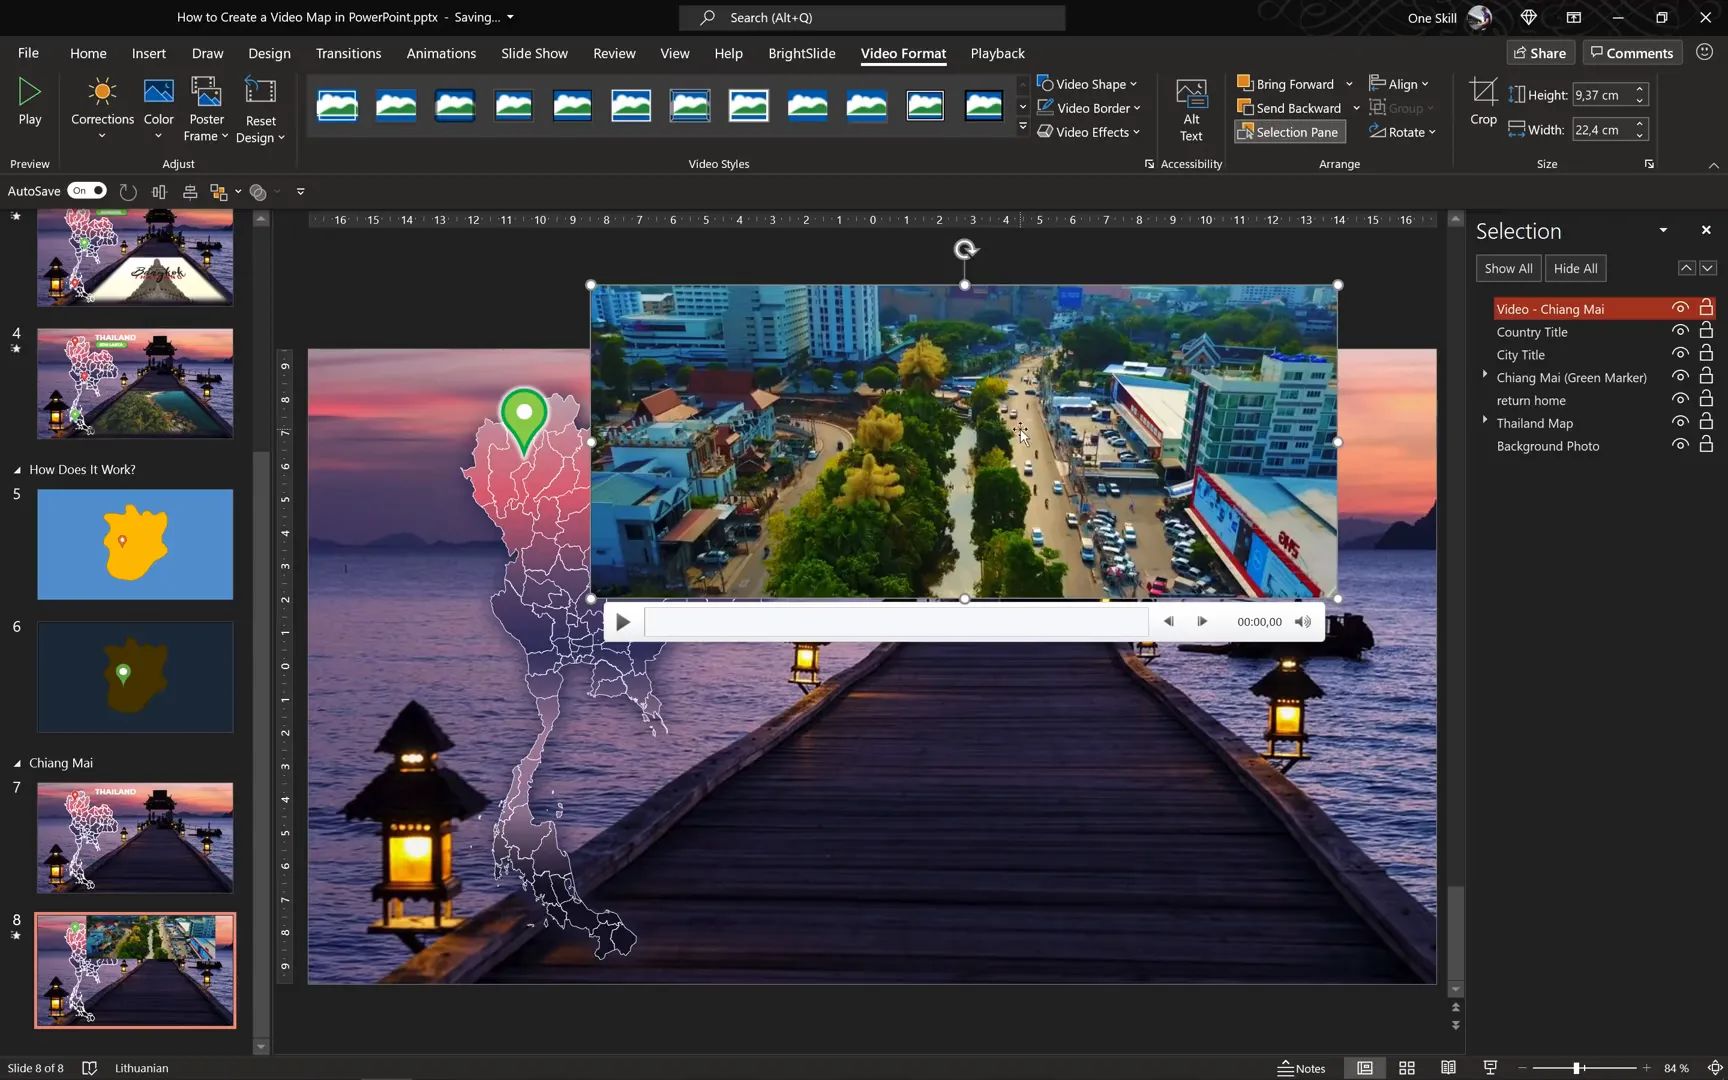
Step 5: Adding Video to the City Slide
Find a relevant video for Chiang Mai. Creative Commons licensed videos are a great resource; for example, a video by Pascal Basil can be used. Insert the video into the slide and trim it to a desired length, such as 14 seconds.
Crop the black bars from the video using the crop tool to better fit the video into the designated area (e.g., a pier). Add soft edges (25 points) to blend the video smoothly into the background.
Rotate the video using 3D rotation options to align it with the background perspective, such as using the “Perspective Relaxed” preset and adjusting the rotation angle.
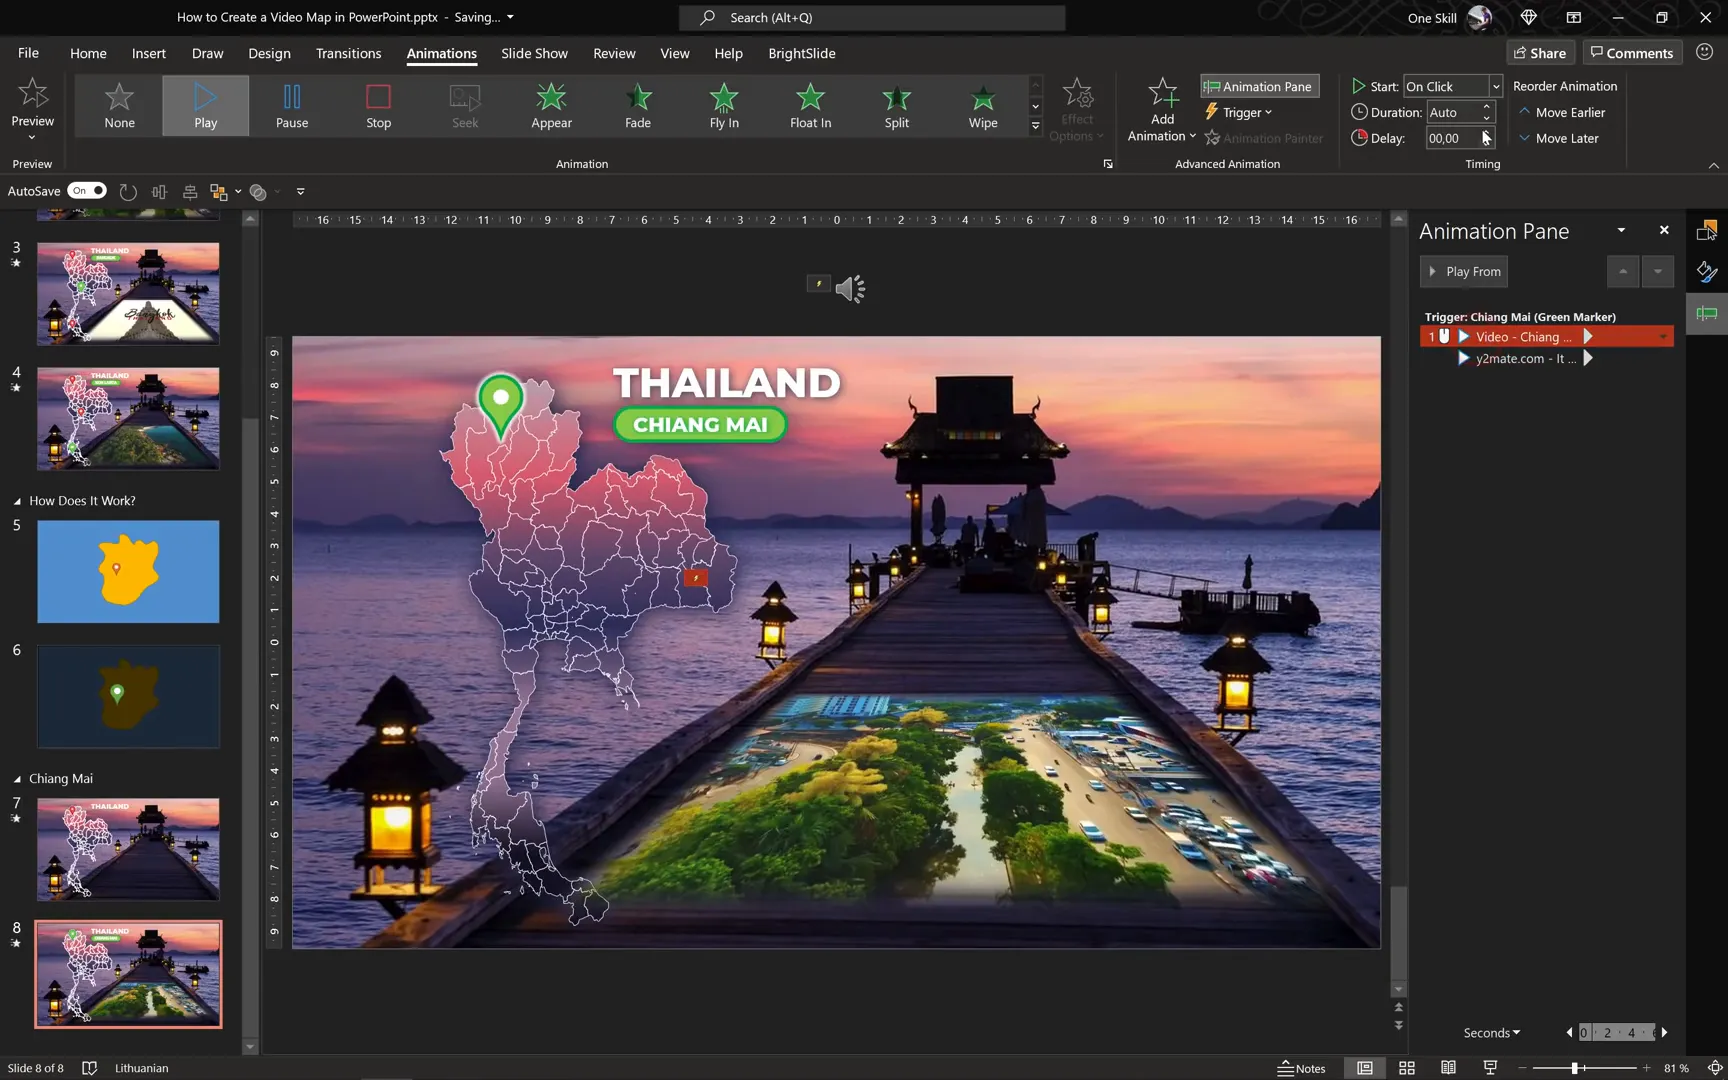
Step 6: Animating Video Playback
Remove any automatic animations PowerPoint adds to the video. Instead, add a play animation triggered by clicking the green city marker.
Set the video to loop until stopped in playback options for continuous play while the slide is active.
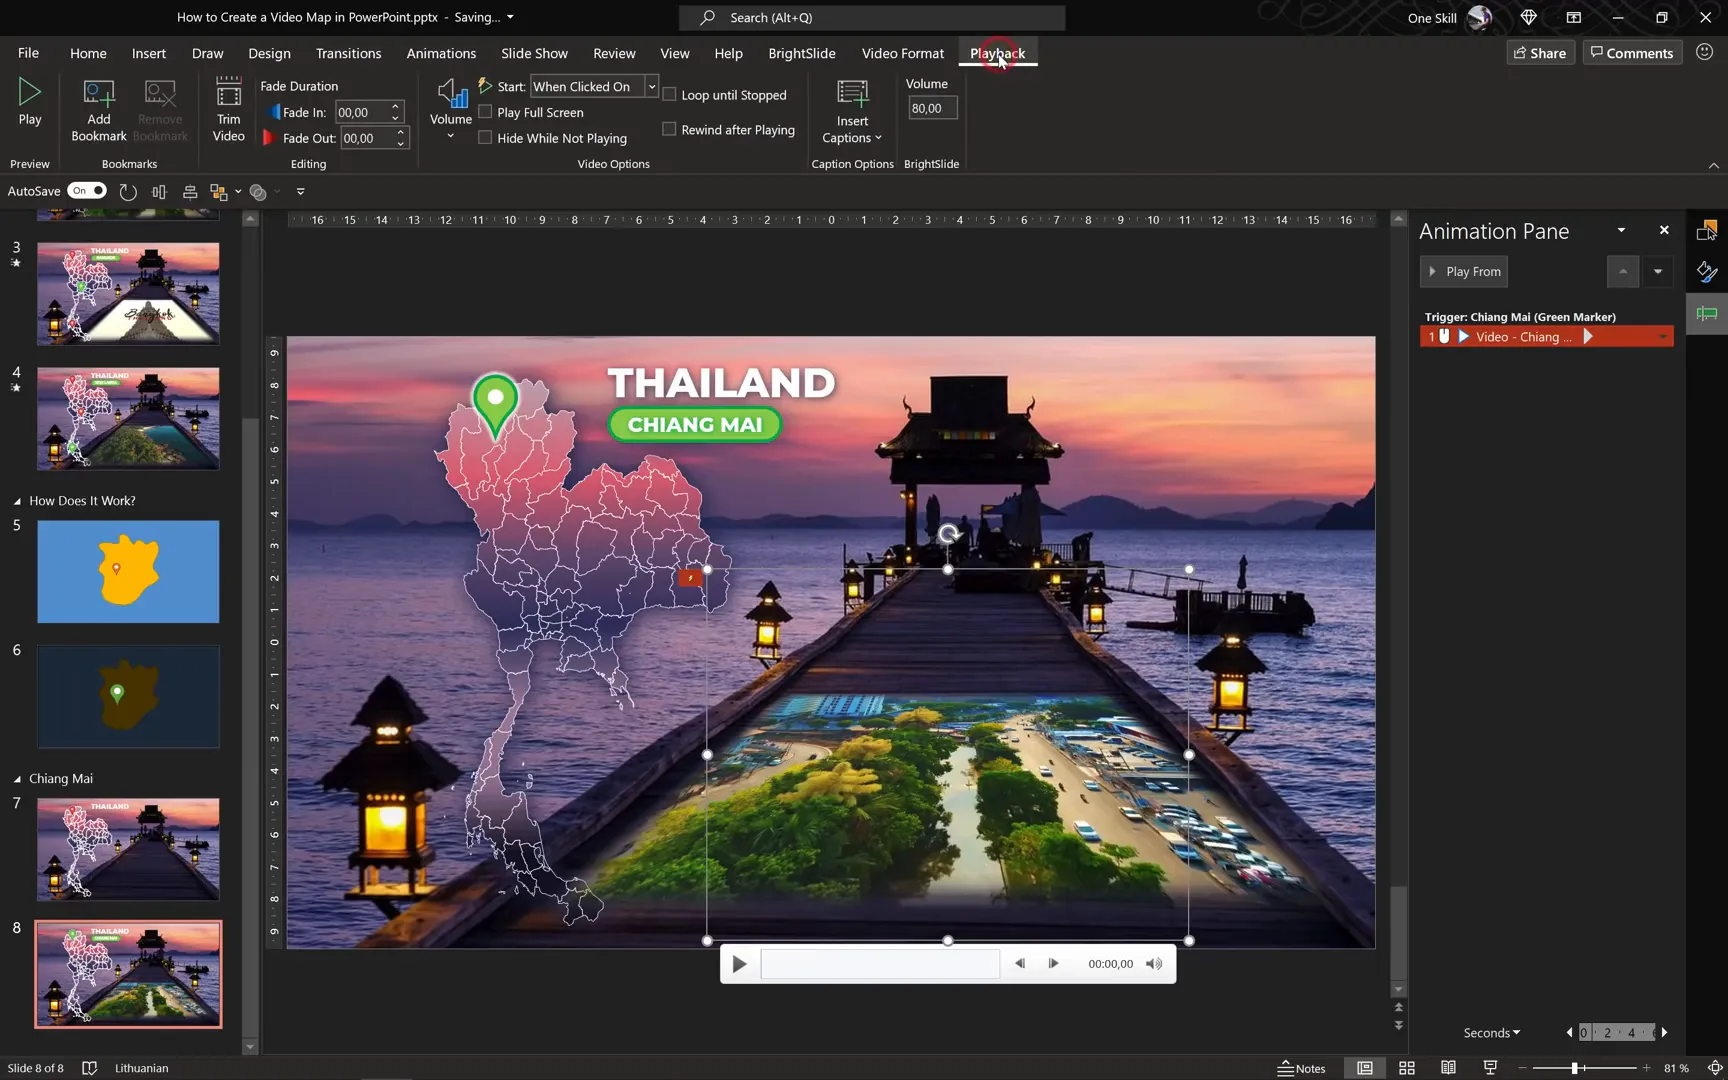
Step 7: Adding Custom Background Music
To enhance the atmosphere, add custom music that plays alongside the video:
- Insert an audio file of your choice.
- Trim the audio to match the video length (e.g., 14 seconds).
- Add fade-in and fade-out effects (2 seconds each) for smooth audio transitions.
- Set the audio to loop if desired.
- Trigger the audio to start playing on the same click as the video (green city marker).
Make sure both video and audio animations are set to start With Previous, so they start simultaneously when triggered.
Testing and Final Touches
Test the entire presentation in full-screen mode to ensure smooth navigation:
- Hovering over city markers jumps to the appropriate city slide.
- Clicking the green city marker plays the video and music.
- Moving the mouse away or clicking the transparent rectangle returns to the previous slide.
- Transitions are smooth and visually pleasing.
With everything working perfectly, you can replicate the process for additional cities or regions as needed.
Additional Tips for Creating Interactive Video Maps
- Use Consistent Design Elements: Maintain consistent colors, fonts, and shapes for markers and text to create a professional appearance.
- Optimize Video Files: Compress videos to avoid large file sizes and ensure smooth playback.
- Use Clear Navigation: Always provide a way to return to the main map or previous slides to avoid user confusion.
- Test on Multiple Devices: Check how the presentation behaves on different screens and PowerPoint versions.
- Leverage PowerPoint Features: Use the selection pane to organize elements and name them logically for easier editing.
Frequently Asked Questions (FAQ)
Can I use this interactive video map technique with other countries or regions?
Absolutely! The principles remain the same. Just replace the map, city markers, videos, and background photos with those relevant to your chosen location.
Is PowerPoint 365 required to create this interactive map?
While PowerPoint 365 offers the latest features and best compatibility, many of the techniques can be adapted to other recent versions of PowerPoint. However, some animation triggers and SVG handling might be limited in older versions.
How do I find suitable videos and images for my map?
Free resources like Unsplash for photos and Creative Commons videos on platforms like YouTube or Vimeo are excellent starting points. Always check the licensing terms before using any media.
Can I add more than three cities to the map?
Yes, you can add as many city markers and corresponding slides as you like. Just be sure to create consistent mouse-over actions and navigation for each.
What if I want the video to play automatically when the slide opens?
You can set the video to start automatically by adjusting the playback settings and removing trigger animations. However, triggering playback on click often improves user control and experience.
Can I add other interactive elements besides videos?
Yes, PowerPoint supports many interactive elements like hyperlinks, buttons, animations, and even embedded web content. You can customize your map with these to enhance engagement.
Conclusion
Creating an interactive video map in PowerPoint is an exciting way to elevate your presentations. By combining mouse-over effects, clickable city markers, embedded videos, and custom background music, you can craft a dynamic storytelling experience that captures your audience’s attention.
This tutorial focused on Thailand as a case study, but the techniques are universal and adaptable to any region or project. With patience and creativity, you can build your own interactive maps to showcase travel destinations, business locations, historical sites, or any other geographical content.
Remember to plan your narrative carefully, organize your slides logically, and test your presentation thoroughly. With these steps, you’ll be well on your way to creating stunning, interactive PowerPoint presentations that stand out.
Happy presenting and exploring new creative horizons!
Check out the full video: How to Create a Video Map in PowerPoint 🔥THAILAND 🔥


