Welcome to an exciting journey into the world of 3D models in PowerPoint! Today, we dive deep into how you can take a 3D laptop model and customize its screen with your own images, creating a stunning and animated final product. Whether you’re a PowerPoint enthusiast, a professional designer, or simply curious about adding a unique touch to your presentations, this tutorial will equip you with the tools and techniques to make your slides stand out.
In this guide, inspired by the expert insights of One Skill PowerPoint, we’ll explore traditional methods of inserting custom screens into device photos, move into the realm of 3D models, and even adjust advanced settings like lighting and animation to bring your presentations to life. Along the way, you’ll learn how to use free online tools, how to manipulate slide masters for reusable templates, and how to enhance your 3D models with smooth animations. Let’s get started!
Table of Contents
- Inserting a Custom Screen into a Laptop Photo: The Basics
- Handling Tilted Devices and Complex Perspectives
- Why Simple Grouping Won’t Work with 3D Models
- Introducing Vectoree: The Free Online Tool to Edit 3D Models
- Exporting the Customized 3D Model for PowerPoint
- Understanding and Adjusting 3D Model Lighting in PowerPoint
- Animating Your 3D Laptop Model
- Final Thoughts and Additional Resources
- Frequently Asked Questions (FAQ)
- Additional Resources
Inserting a Custom Screen into a Laptop Photo: The Basics
Before we jump into 3D models, let’s refresh our skills with a simple method of adding a custom image to the screen of a laptop photo. This approach is perfect for one-time presentations or quick edits.
Step 1: Insert a Shape Over the Laptop Screen
Start with a photo of a laptop. In PowerPoint, go to Insert > Shapes and draw a rectangle that perfectly covers the laptop’s screen. This shape will act as a mask for your custom image.
Step 2: Choose and Insert Your Image
If you have Microsoft 365, you can easily access stock images directly from PowerPoint. For example, search for “mountains” and select an image that fits your aesthetic.
After inserting the image, hold down Ctrl + Shift to resize the image proportionally so it fits the rectangle. Next, send the image one step backward so it sits just behind the rectangle.
Step 3: Merge Shapes to Create the Screen Mask
Select both the rectangle and the image while holding down the Shift key. Then, navigate to Shape Format > Merge Shapes > Intersect. This action trims the image to fit perfectly within the rectangle shape.
You can now go to Picture Format > Crop to zoom or reposition the image within the screen area for the best look. Once satisfied, click crop again to finalize the changes.
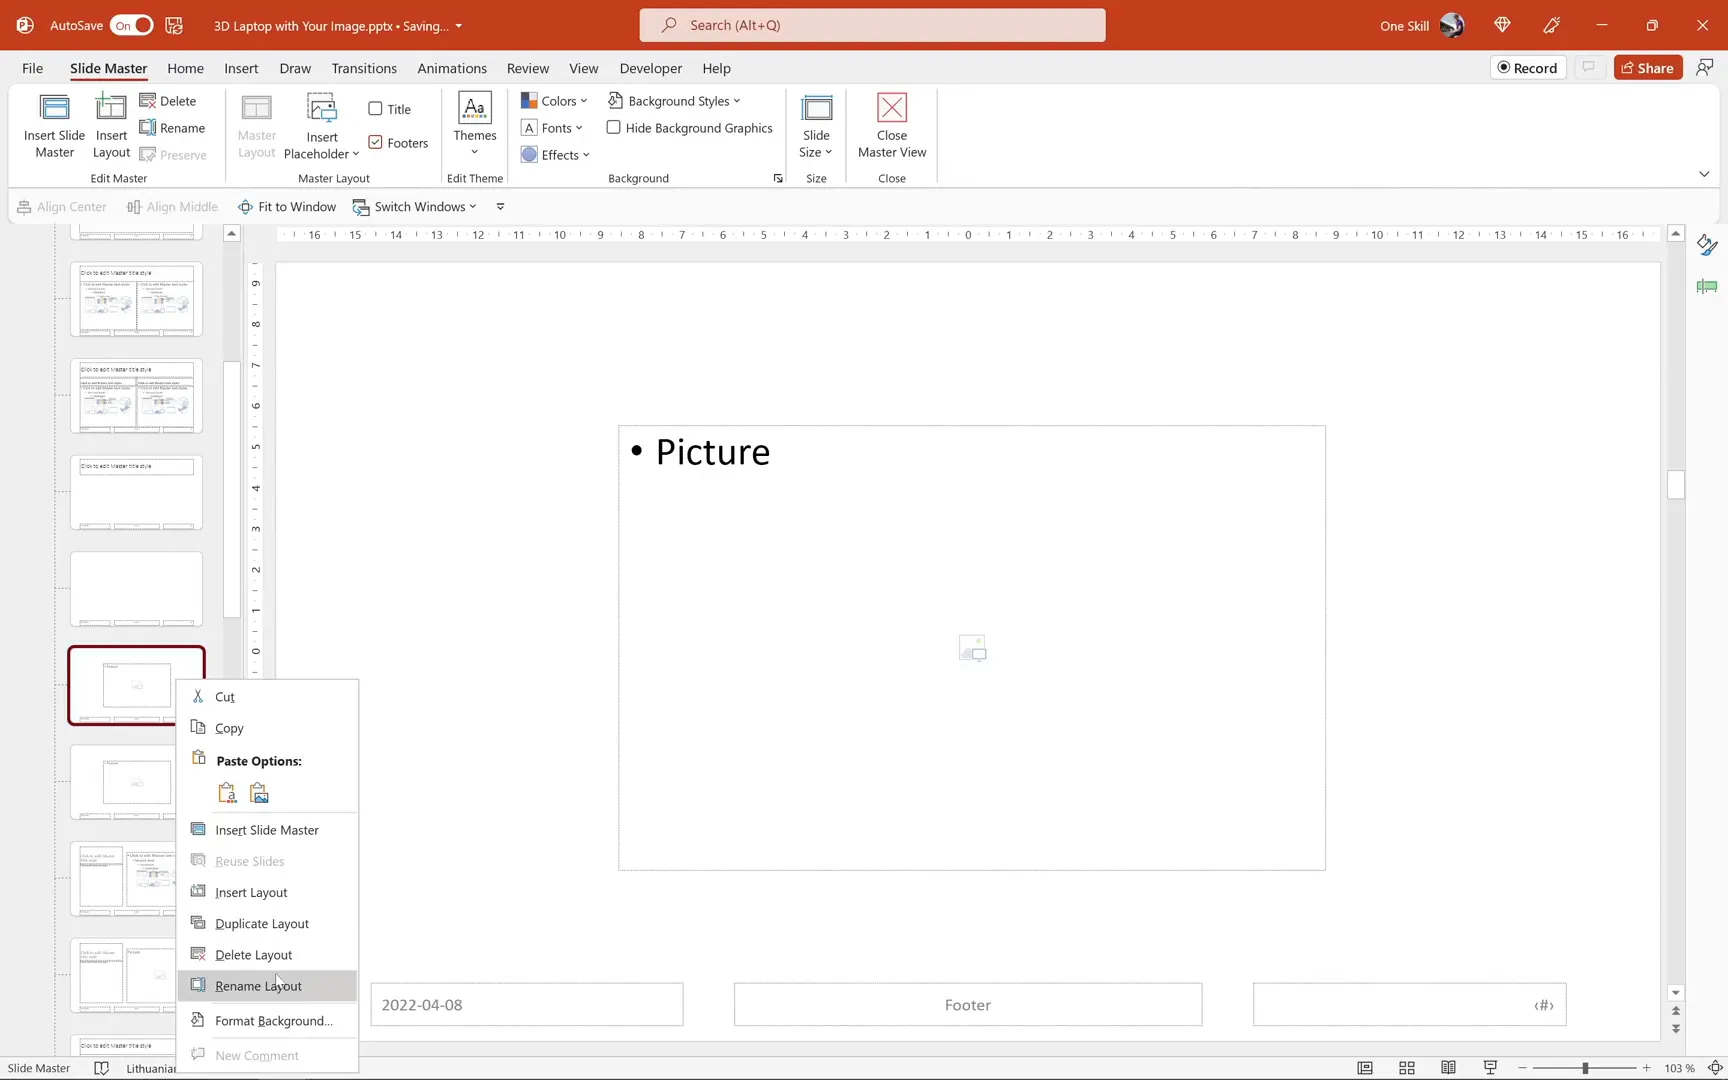
Creating a Template for Multiple Uses
If you plan to use this custom screen setup repeatedly, it’s better to create a reusable template in the Slide Master View:
- Cut the blue rectangle you created earlier.
- Go to View > Slide Master.
- Duplicate the slide layout you are using.
- Paste the rectangle onto the duplicated layout.
- Insert a picture placeholder that covers the rectangle completely and send it to the back.
- Select both the rectangle and the placeholder, then merge shapes by choosing intersect.
- Rename the layout (e.g., “Laptop 2”) and save.
Back in normal view, you can now apply this layout to any slide and simply click the image icon to insert any custom screen image you desire.
Handling Tilted Devices and Complex Perspectives
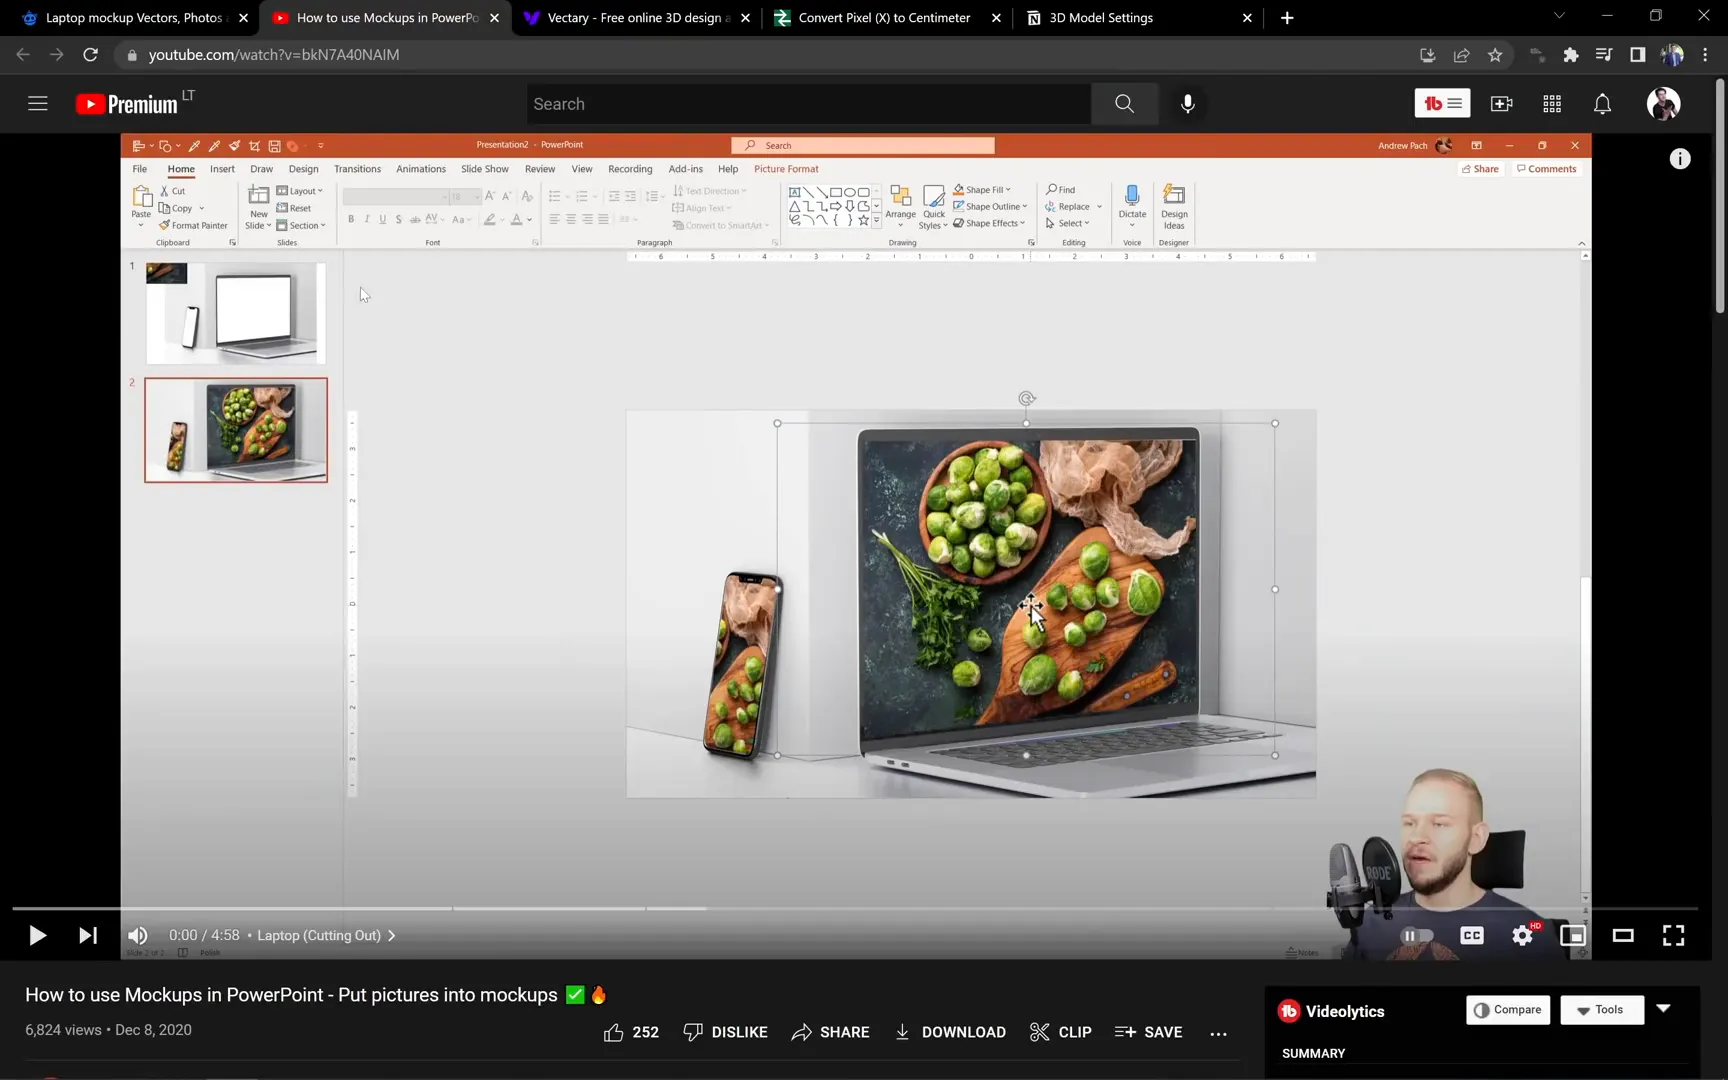
Sometimes, your device mockup might be tilted or have a perspective effect, making it tricky to insert a flat image that fits perfectly. For such cases, there is an excellent tutorial by Andrew Pach that teaches how to replace screens on tilted devices in PowerPoint. This tutorial covers phones, laptops, and other devices with perspective angles. Check out his video linked in the resource section for detailed instructions.
Why Simple Grouping Won’t Work with 3D Models
Now, the real magic begins with 3D models. You might think you can just place an image on top of a 3D laptop model and group them together. Unfortunately, this approach doesn’t work:
- The perspective of the screen image won’t match the 3D model’s angle.
- Grouping will cause PowerPoint to treat the combination as a flat image, losing all 3D animations.
3D models in PowerPoint have unique features such as a white rotation handle that lets you spin the model in any direction and a dedicated animation pane for 3D-specific animations. These features disappear if you group a 3D model with a regular image.
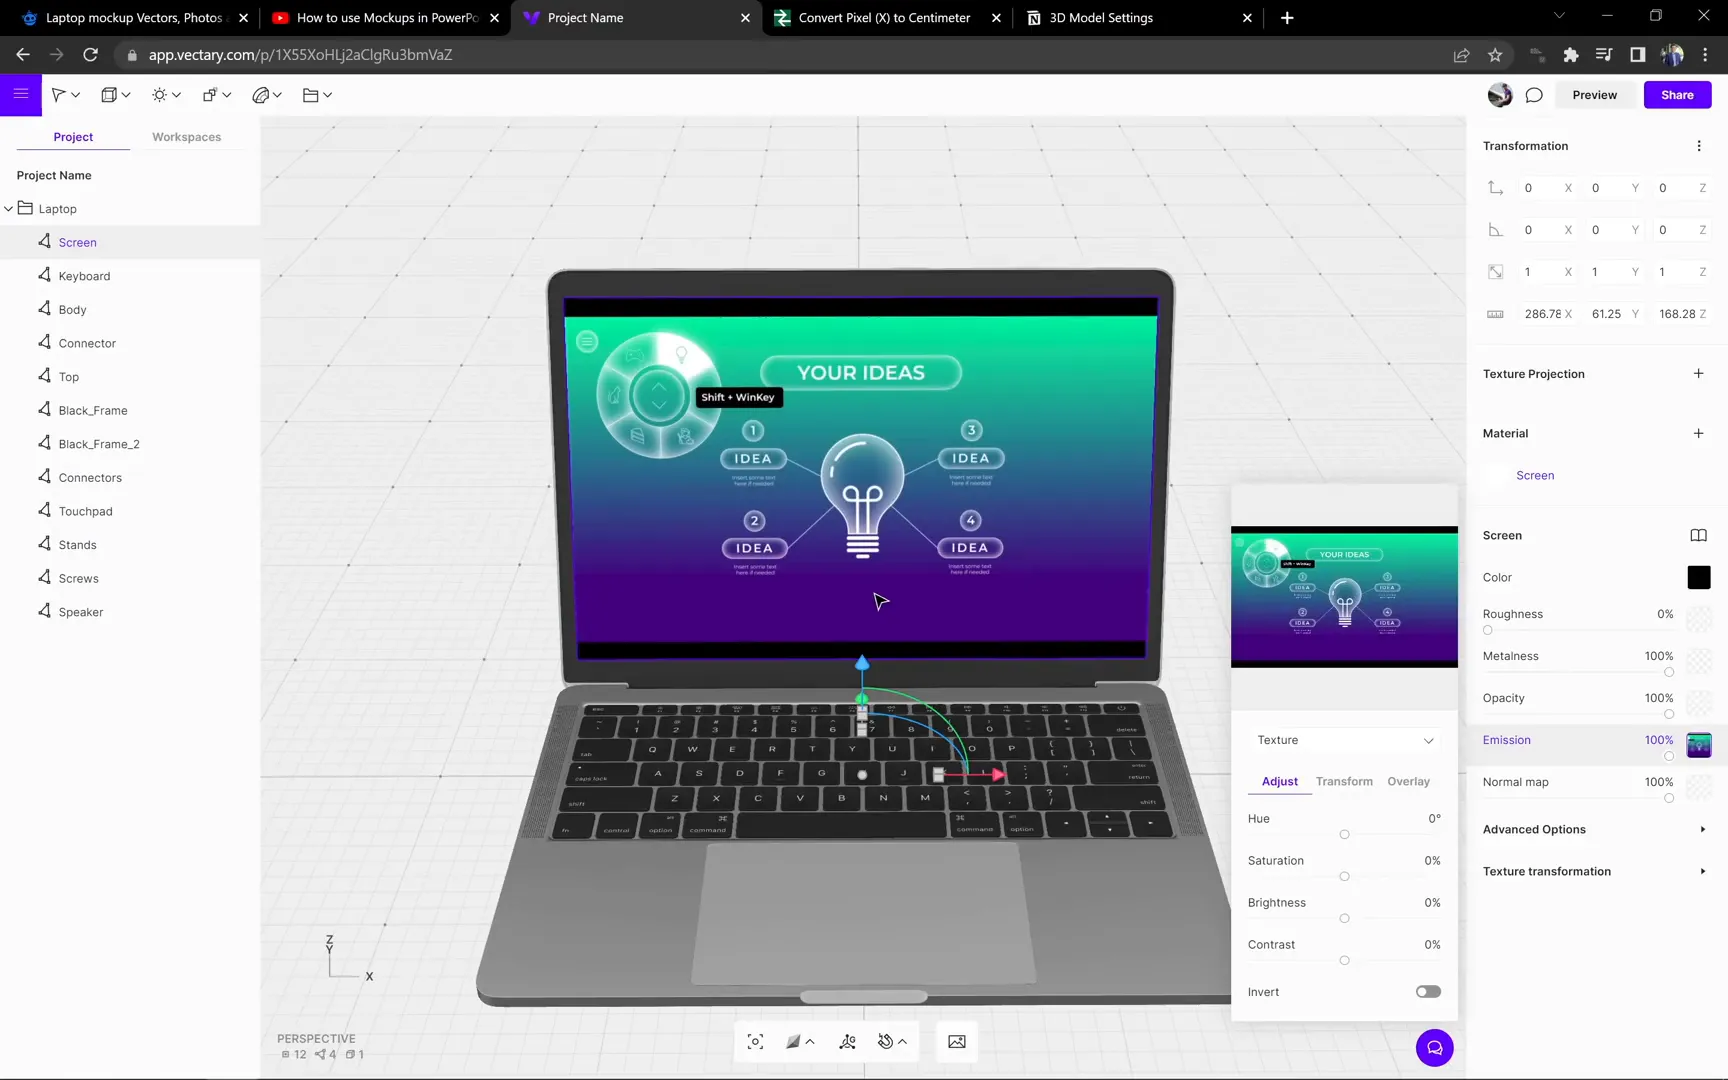
Introducing Vectoree: The Free Online Tool to Edit 3D Models
To overcome these limitations, we turn to Vectoree, a free online 3D model editor. This tool allows you to replace parts of a 3D model, such as the laptop screen, with custom images while preserving the 3D model’s integrity and animations.
Step 1: Insert the Laptop Model in Vectoree
Once you log in to Vectoree, deselect any default projects by clicking on the canvas, then navigate to the workspace. Here, you’ll find a variety of 3D models. Select the laptop model to insert it into your canvas.
Use the left mouse button to rotate the model and the right button to pan the view, similar to PowerPoint’s controls.
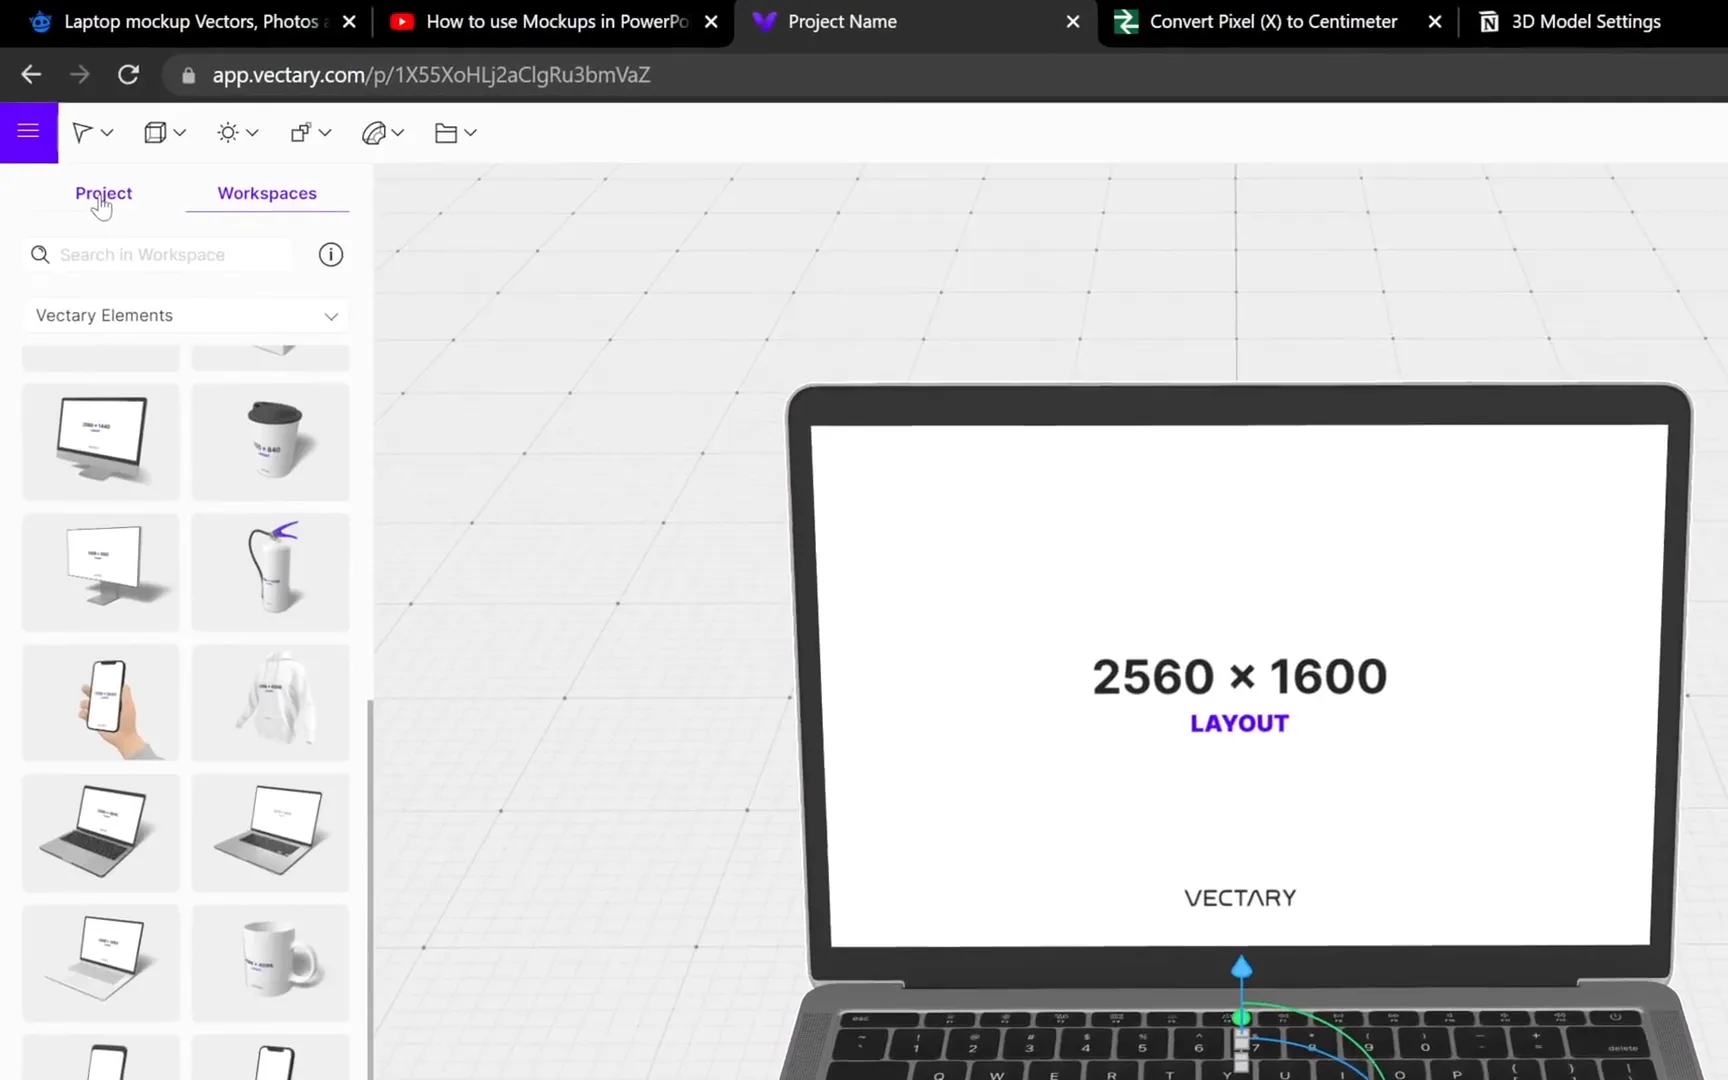
Step 2: Select and Replace the Screen
Open the project panel (selection pane) and select the laptop screen component. On the right side, under the emission settings, click the window icon to upload a new image for the screen.
Important: Your custom image must have precise dimensions: 2560 pixels width by 1600 pixels height. This ensures the image fits perfectly without distortion.
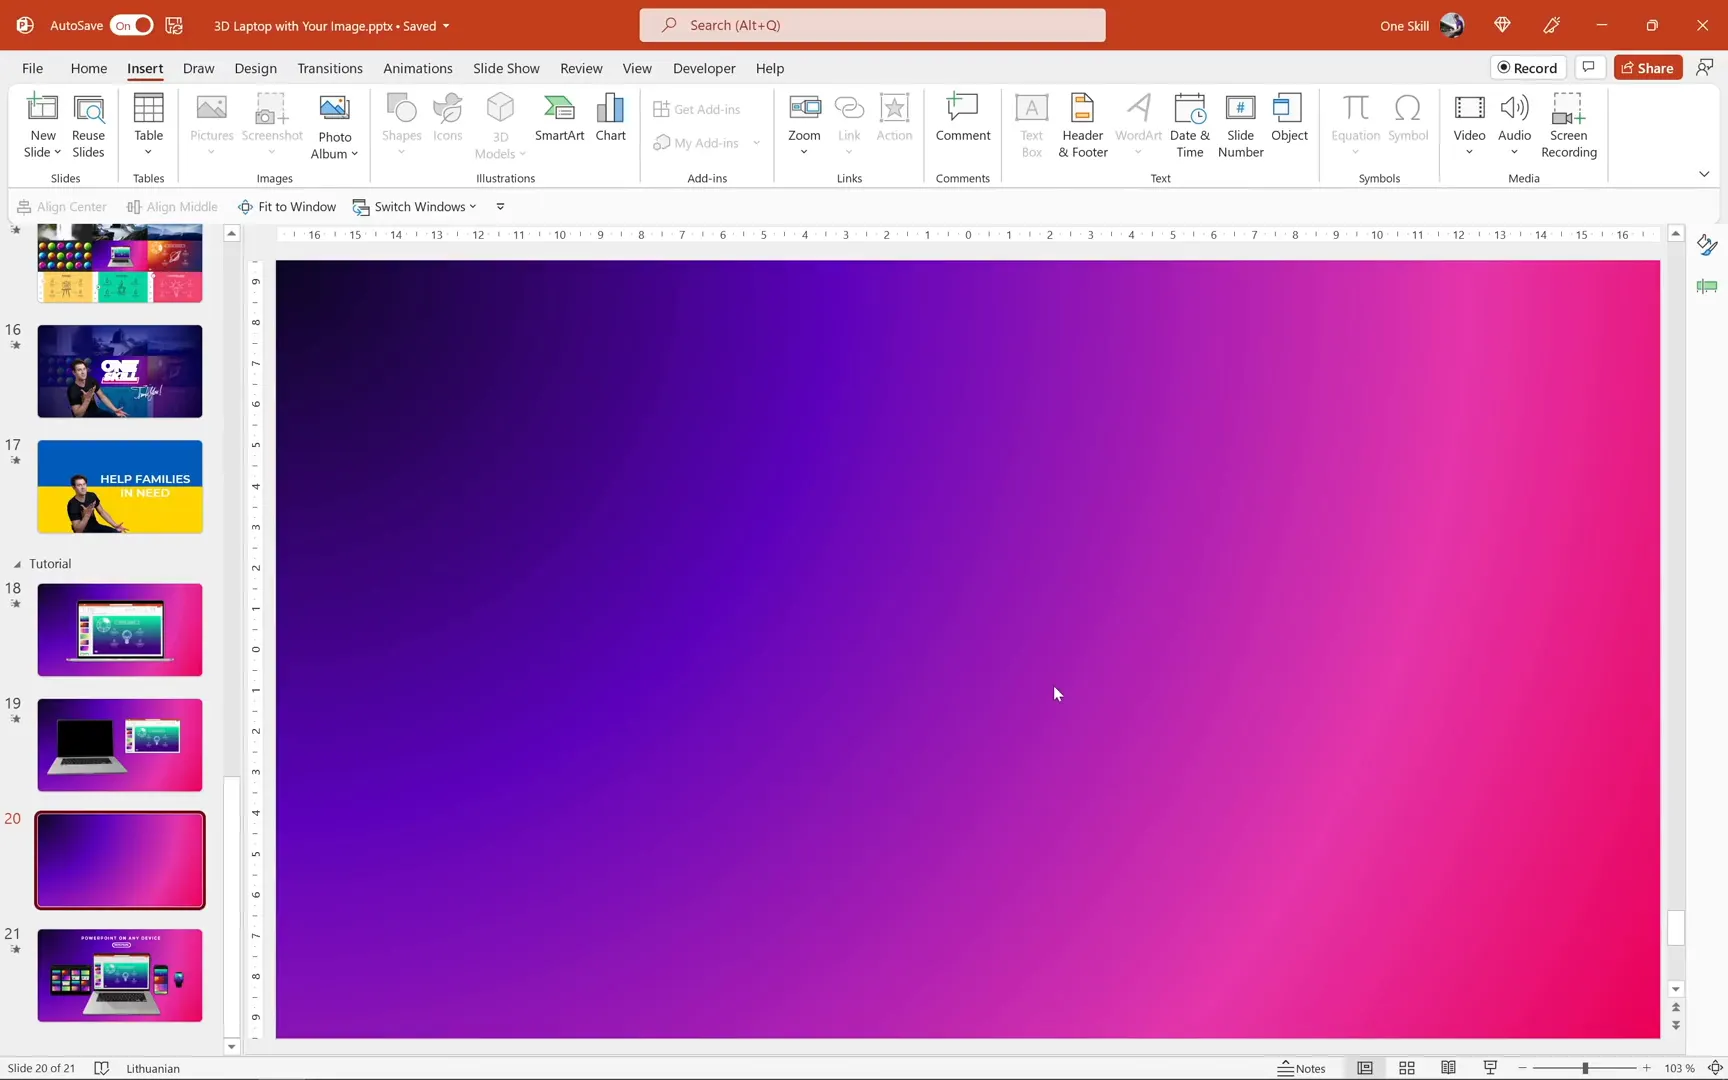
Step 3: Creating the Custom Screen Image in PowerPoint
To create an image with the correct dimensions, open a new blank PowerPoint presentation and:
- Go to Design > Slide Size > Custom Slide Size.
- Set the width to 67.73 cm (converted from 2560 pixels).
- Set the height to 42.33 cm (converted from 1600 pixels).
- Click Maximize to use the entire slide area.
- Set the background to black for better contrast.
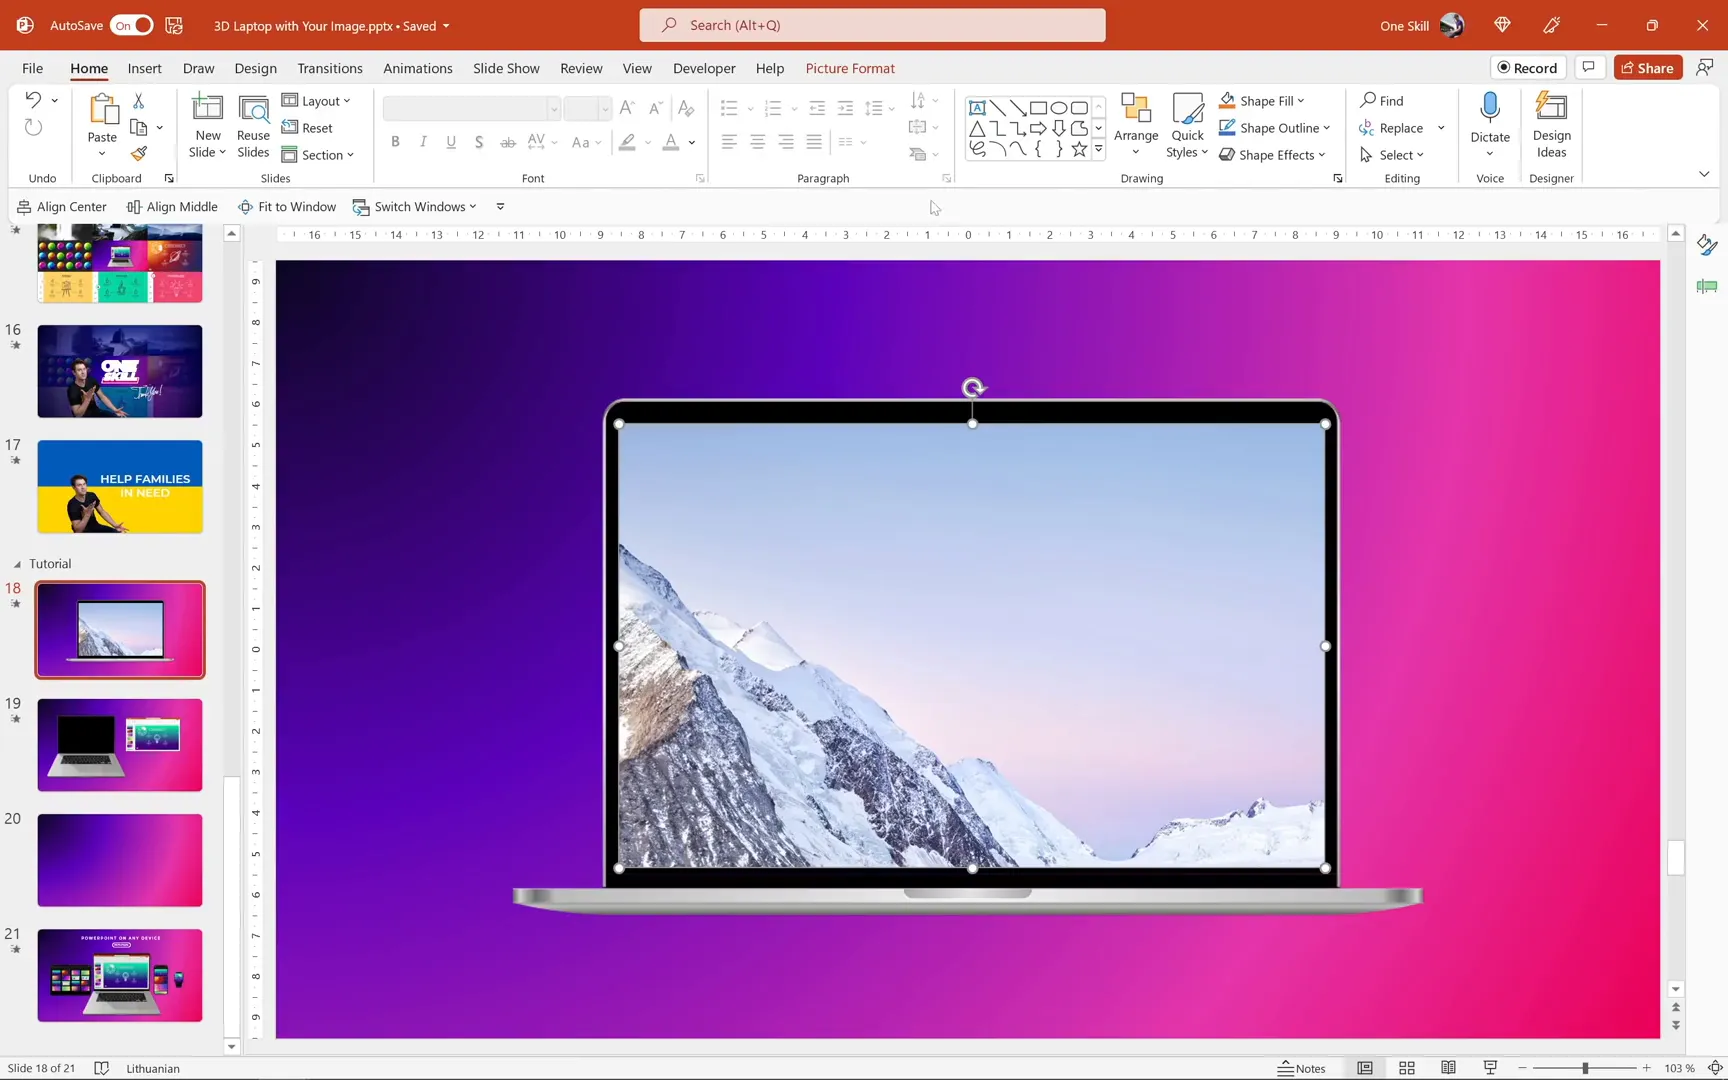
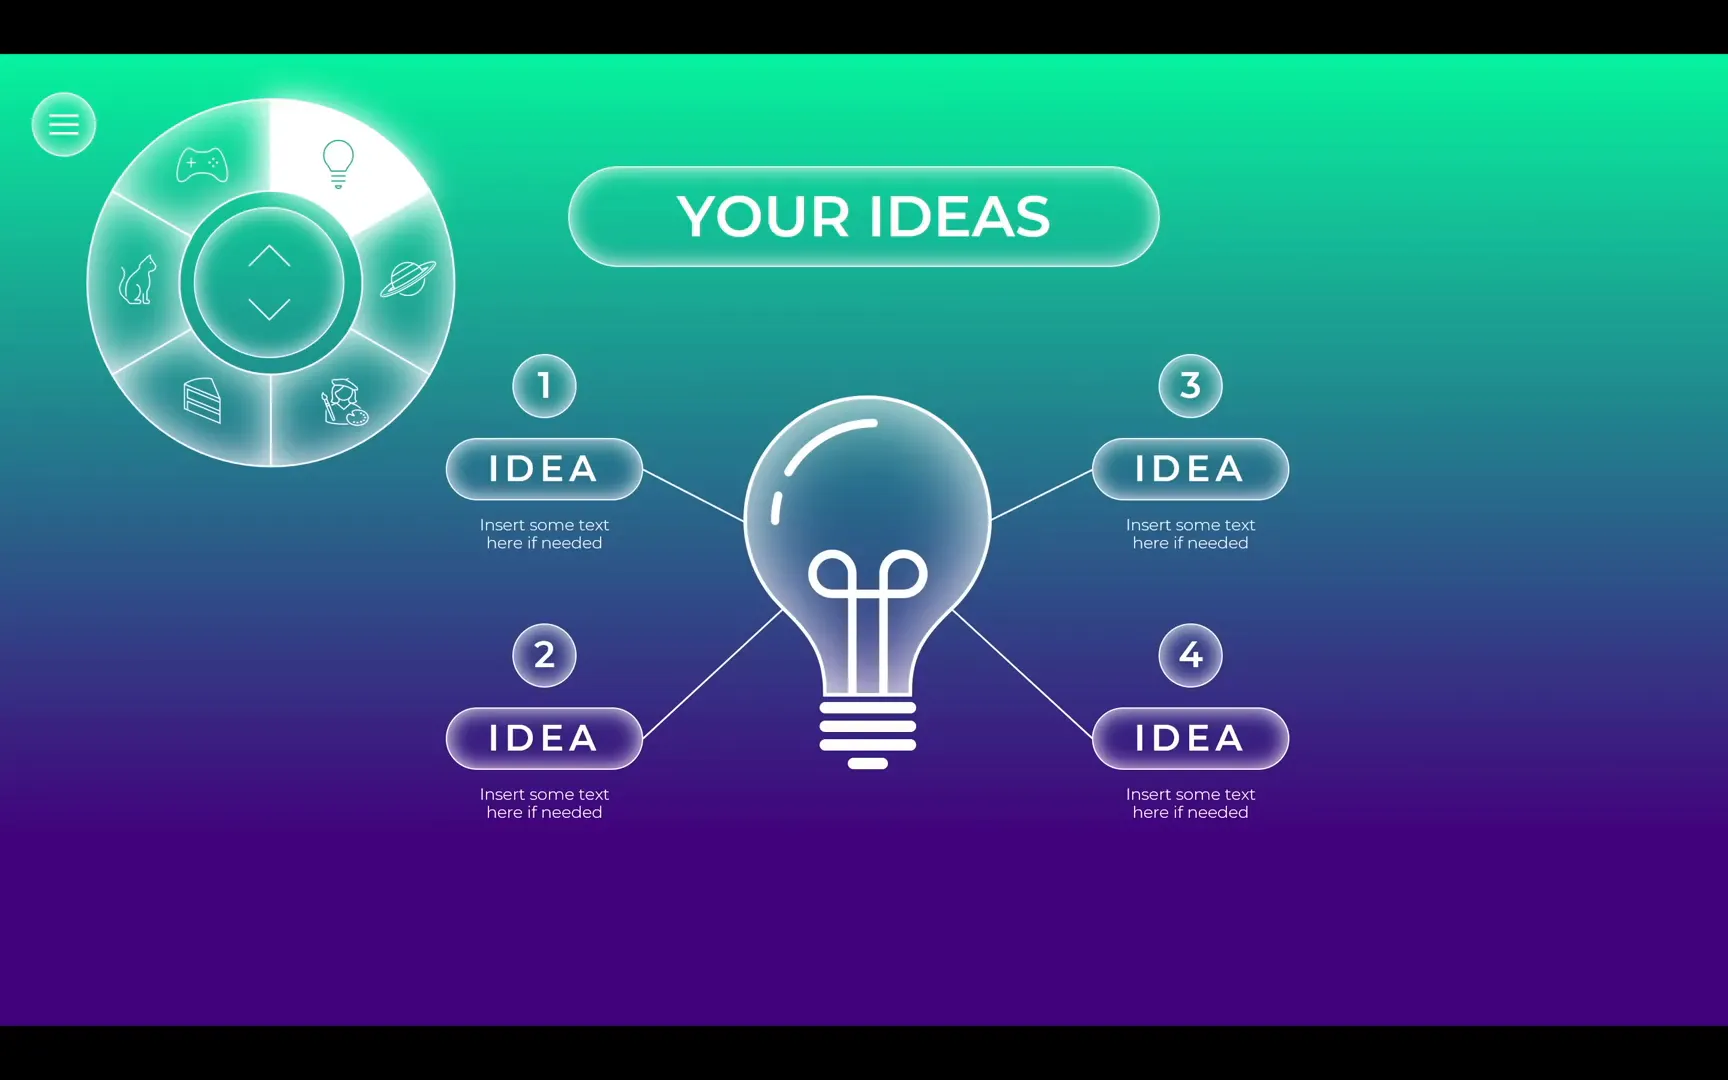
Now, insert any content you want on this slide. For example, you could reuse an existing slide or add your own images and text. Once ready, play the slide in full screen and take a screenshot using Shift + Windows Key + S on Windows.
Step 4: Import and Upload the Image to Vectoree
Paste the screenshot back into the PowerPoint slide, crop it to a 16:9 aspect ratio to remove any black bars, then center and resize it to fill the slide. Save this slide as a PNG image and ensure it exports the correct dimensions (2560×1600 pixels).
Back in Vectoree, upload this image as the new screen for the laptop model. The replacement is instant and seamless, providing you with a customized 3D laptop model ready for export.

Exporting the Customized 3D Model for PowerPoint
Once your 3D laptop model is customized, export it from Vectoree in the JLB format, which is compatible with PowerPoint. Simply click the export button and download your new 3D model file.
In PowerPoint, insert the 3D model by selecting Insert > 3D Models > From This Device and choosing your downloaded JLB file.
Understanding and Adjusting 3D Model Lighting in PowerPoint
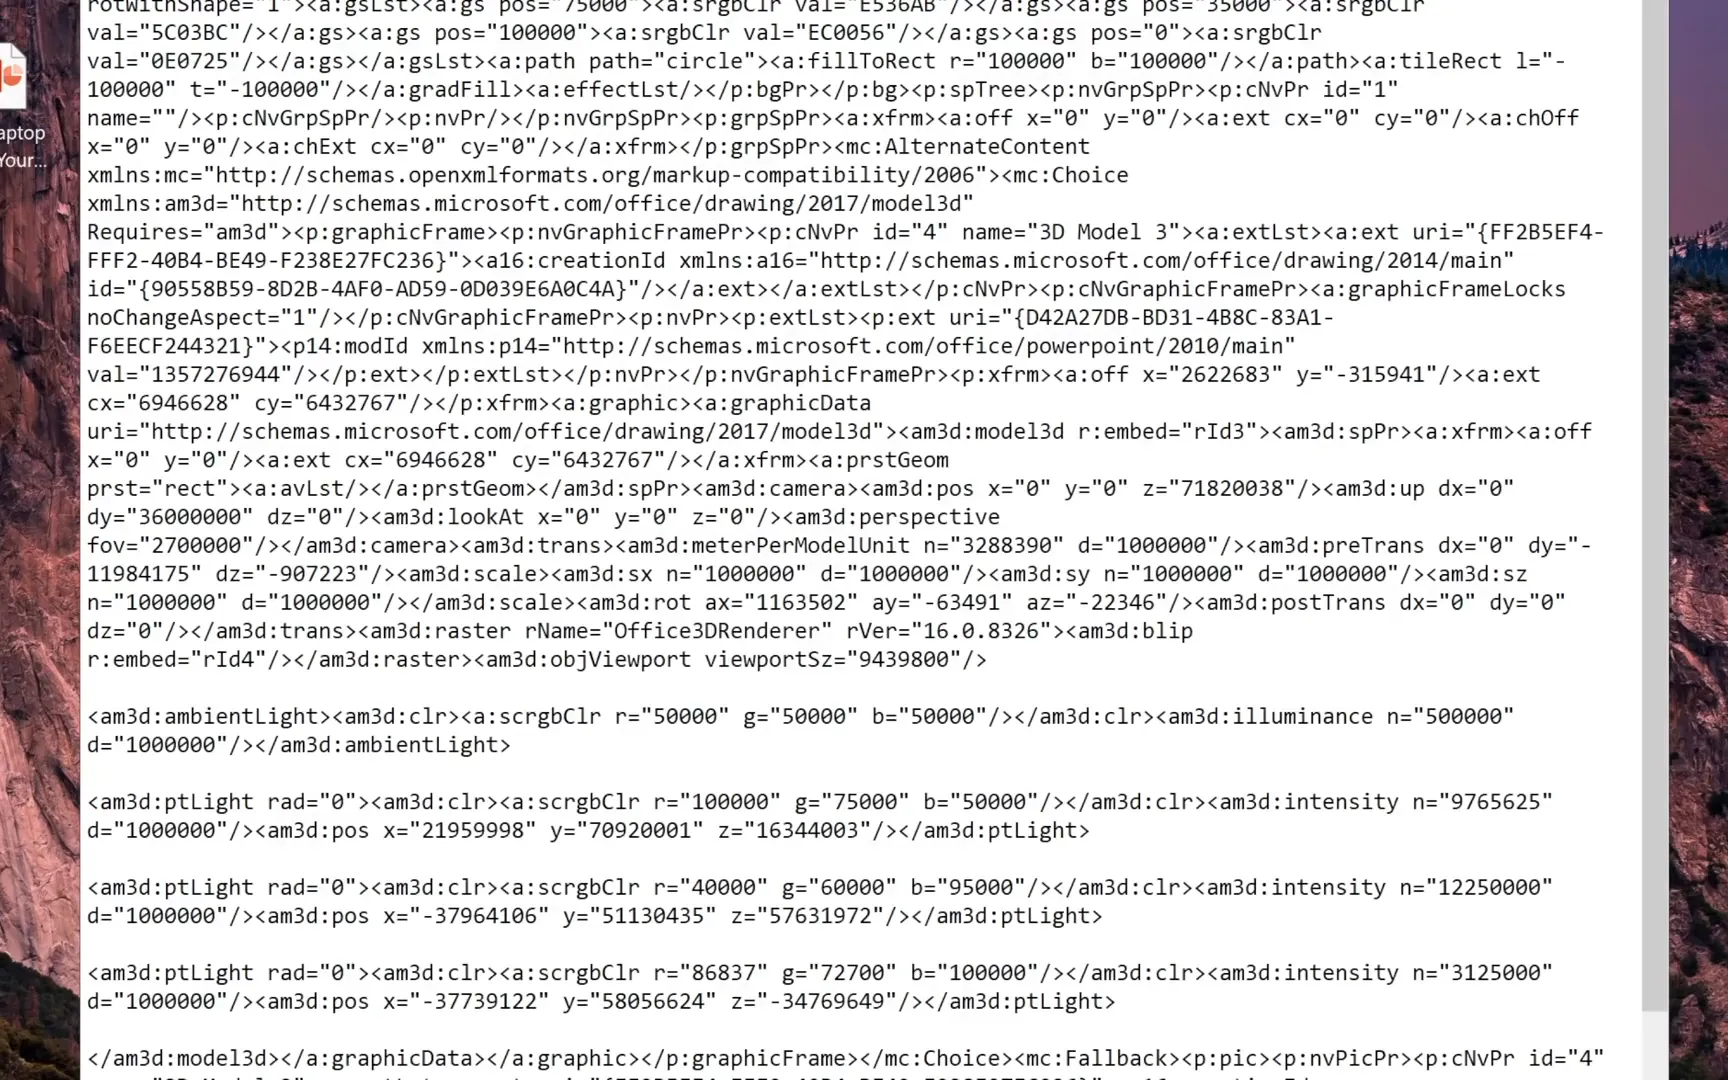
A common issue with 3D models imported into PowerPoint is the unexpected brightness or color shift. For example, your laptop might appear almost white in PowerPoint, while it looked gray in Vectoree.
This happens because PowerPoint automatically adds four additional lights to every inserted 3D model: one ambient light and three point lights. Unfortunately, PowerPoint does not provide options to adjust these lights directly within the interface.
Manual Editing of Lighting Settings
You can manually adjust the lighting by editing the PowerPoint file as an archive using a free tool like 7-Zip. Here’s how:
- Close your PowerPoint presentation.
- Locate your PPTX file, right-click it, and open it with 7-Zip as an archive.
- Navigate to the
ppt/slidesfolder and find the slide containing your 3D model. - Edit the slide’s XML file with a text editor and search for lighting-related code.
- You’ll find four lights defined: one ambient and three point lights.
- Delete or modify the RGB values of the point lights to reduce brightness.
- Save the changes and update the archive.
- Reopen your PowerPoint presentation to see the effect.
Removing all point lights can make the 3D model look flat, so it’s better to adjust the light intensities. You can find recommended lighting settings online, which you can copy and paste into your slide’s XML file for a balanced look.
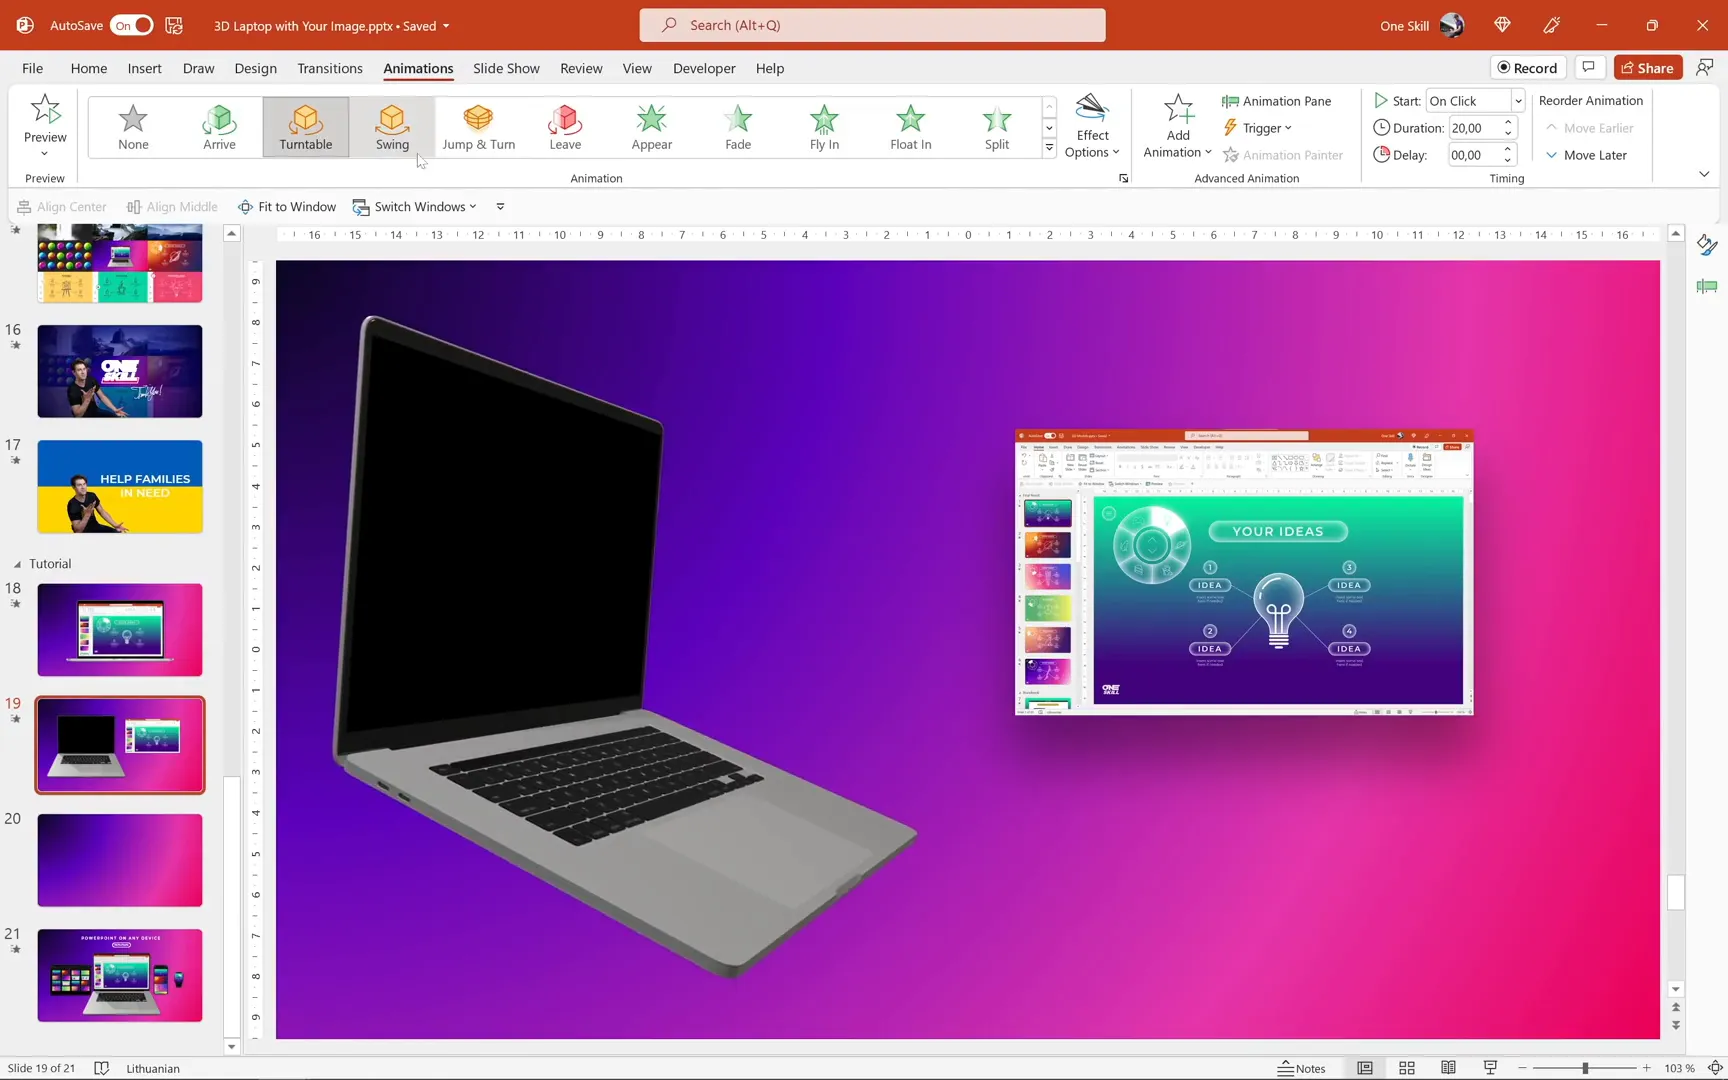
Animating Your 3D Laptop Model
With your customized 3D laptop model inserted and lighting adjusted, it’s time to add animation to make your presentation dynamic and engaging.
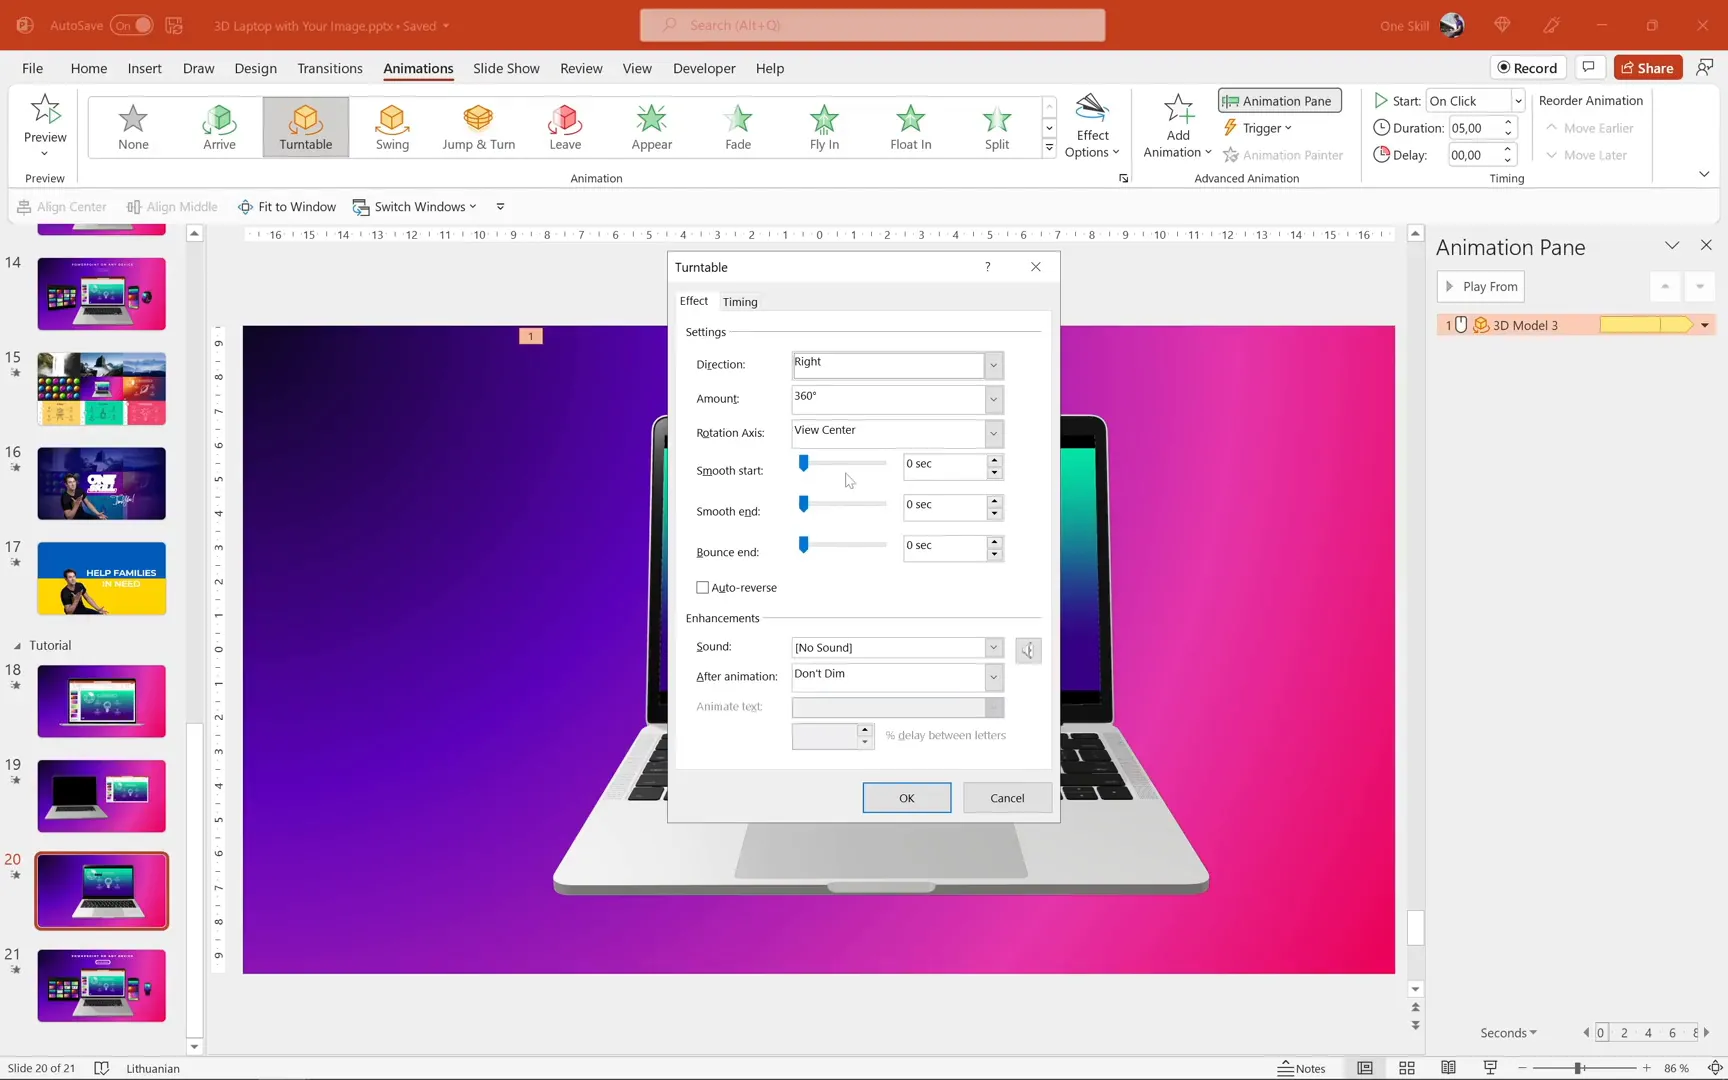
Adding a Turntable Animation
PowerPoint offers a Turntable animation that spins your 3D model around, showcasing all angles smoothly.
- Go to the Animations tab and select the laptop model.
- Choose the Turntable animation from the 3D animation options.
- Open the Animation Pane, right-click the animation, and select Effect Options.
- Set the spin to Continuous and choose the direction (clockwise or up/down).
- Set the duration to 5 seconds or your preferred time for a smooth rotation.
- Add Smooth Start and Smooth End of 2 seconds for a professional touch.
Now, run your slideshow to see your 3D laptop model spin gracefully, displaying your custom screen from every angle.
Final Thoughts and Additional Resources
Congratulations! You now know how to:
- Insert custom images into laptop photos using simple shape merging.
- Create reusable templates with image placeholders in Slide Master View.
- Customize 3D laptop models by replacing screens with your own images using Vectoree.
- Export and insert customized 3D models into PowerPoint.
- Edit lighting settings manually to perfect the appearance of 3D models.
- Add smooth animations like the turntable spin to showcase your models dynamically.
These skills open up endless possibilities for creating professional and visually stunning presentations with PowerPoint. You can apply these techniques to other devices such as tablets, phones, or custom 3D mockups.
For more 3D models, visit Vectoree. If you want to explore advanced tilted device mockups, check out tutorials by Andrew Pach, linked in the resources below.
Remember, practice makes perfect! Experiment with different images, lighting settings, and animations to find your unique style.
Frequently Asked Questions (FAQ)
Q1: Can I use any image size for the 3D laptop screen?
No. For the best fit, your image should be exactly 2560 pixels wide and 1600 pixels high. This ensures the image maps perfectly onto the 3D model’s screen without distortion.
Q2: Is Vectoree free to use?
Yes, Vectoree offers a free online platform to edit 3D models including the ability to replace textures like laptop screens. There are no sponsorships involved in this tutorial, and Vectoree is recommended for its ease of use and functionality.
Q3: Why does my 3D model look brighter in PowerPoint than in Vectoree?
PowerPoint automatically adds four lights (one ambient and three point lights) to every 3D model, which can increase brightness. You can edit these lighting settings manually by unpacking the PPTX file and adjusting the XML code as described above.
Q4: Can I animate 3D models in PowerPoint?
Absolutely! PowerPoint supports various 3D animations like Turntable, Swing, and Spin. These animations allow you to showcase your 3D models from different angles and add dynamic effects to your presentation.
Q5: How do I create reusable templates with custom screens?
Use the Slide Master View to insert an image placeholder over your device’s screen area, then merge shapes to create a mask. This placeholder allows you to swap images easily in any slide based on the template layout.
Q6: Can I apply these techniques on Mac versions of PowerPoint?
While most features are available on Mac versions, some tools like 3D model insertion and advanced merging options might have limitations. It’s best to check your version’s capabilities or use a Windows machine for full functionality.
Additional Resources
- Vectoree 3D Model Editor
- Andrew Pach’s Tutorial on Tilted Device Mockups
- 7-Zip File Archiver (Free Tool for Editing PPTX Files)
- PowerPoint 3D Model Lighting Settings Discussion
Thank you for exploring this comprehensive guide on creating and customizing 3D laptop models in PowerPoint. With these techniques, your presentations will surely impress and engage your audience like never before!
Check out the full video: 3D Laptop With Your Image 🔥PowerPoint Tutorial🔥


