
Welcome to this comprehensive guide on crafting a stunning animated PowerPoint presentation from scratch using the powerful Morph transition feature. Inspired by the elegance and dynamism of aviation, this tutorial will walk you through creating a sleek, minimalistic, yet highly engaging presentation that captures your audience’s attention and elevates your storytelling. Whether you’re a beginner or an experienced PowerPoint user, this step-by-step walkthrough will empower you to create presentations that soar above the rest.
Throughout this article, you’ll learn how to design a four-slide presentation featuring smooth animations, dynamic transitions, and creative use of shapes and images. The tutorial focuses on simplicity and accessibility, ensuring that anyone can replicate these effects to impress their audience.

Table of Contents
- Introduction: Why Use Morph Transitions in PowerPoint?
- Step 1: Setting Up the Background
- Step 2: Adding and Styling the Main Image
- Step 3: Incorporating the Airplane PNG
- Step 4: Adding Welcome Text with Style
- Step 5: Creating the First Morph Transition
- Step 6: Fixing Morph Transition Issues for Smoothness
- Step 7: Building the Third Slide with Text and Shapes
- Step 8: Applying Morph to Text and Shapes
- Step 9: Enhancing the Slide with Circular Image Masks
- Step 10: Integrating Circular Elements into Previous Slides
- Step 11: Adding Titles and Final Touches to the Third Slide
- Step 12: Creating the Closing Slide
- Step 13: Enhancing the Final Transition with a Fade Effect
- Step 14: Adding Final Animations
- Previewing the Complete Presentation
- Conclusion: Elevate Your Presentations with Morph Transitions
- FAQ: PowerPoint Morph Transition and Animation Tips
Introduction: Why Use Morph Transitions in PowerPoint?
The Morph transition in PowerPoint is a game-changer for creating smooth, cinematic slide animations without needing complex software or advanced technical skills. It allows you to seamlessly transition objects from one slide to another by animating their position, size, and shape changes. This results in fluid movements that keep your audience engaged and make your presentations more memorable.
In this tutorial, we’ll use Morph to simulate an airplane flying across the sky, shapes transforming, and text appearing with elegant effects. The result is a dynamic, professional presentation perfect for business proposals, educational content, or personal storytelling.
Step 1: Setting Up the Background
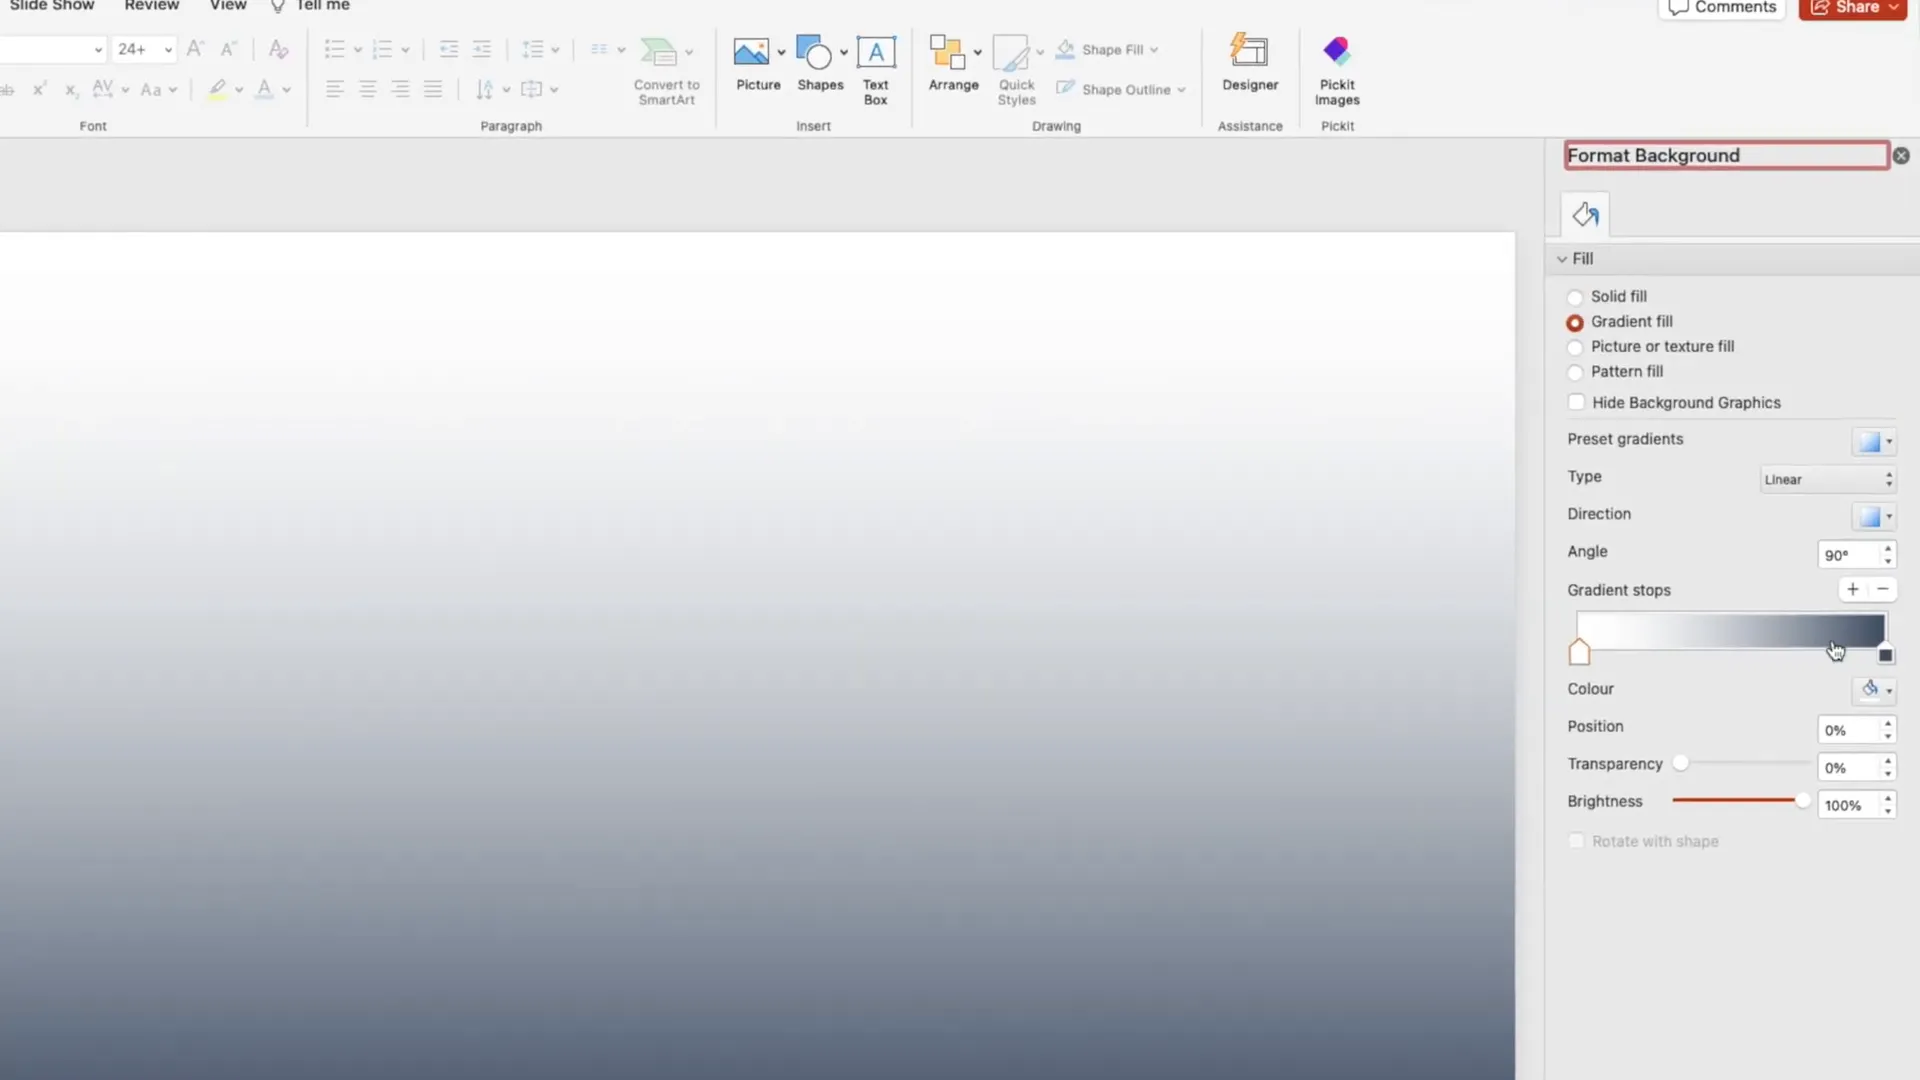
We begin with a blank slide to create a clean canvas for our design. The first step is to set a subtle, visually pleasing background that adds depth without distracting from the content.
- Right-click on the slide background and select Format Background.
- Choose Gradient Fill.
- Set the bottom color stop to a light gray to ground the slide.
- Set the top color stop to pure white to simulate a bright sky.
- Close the format background pane.
This gradient background provides a gentle transition from sky to clouds, setting the stage for the visuals to come.
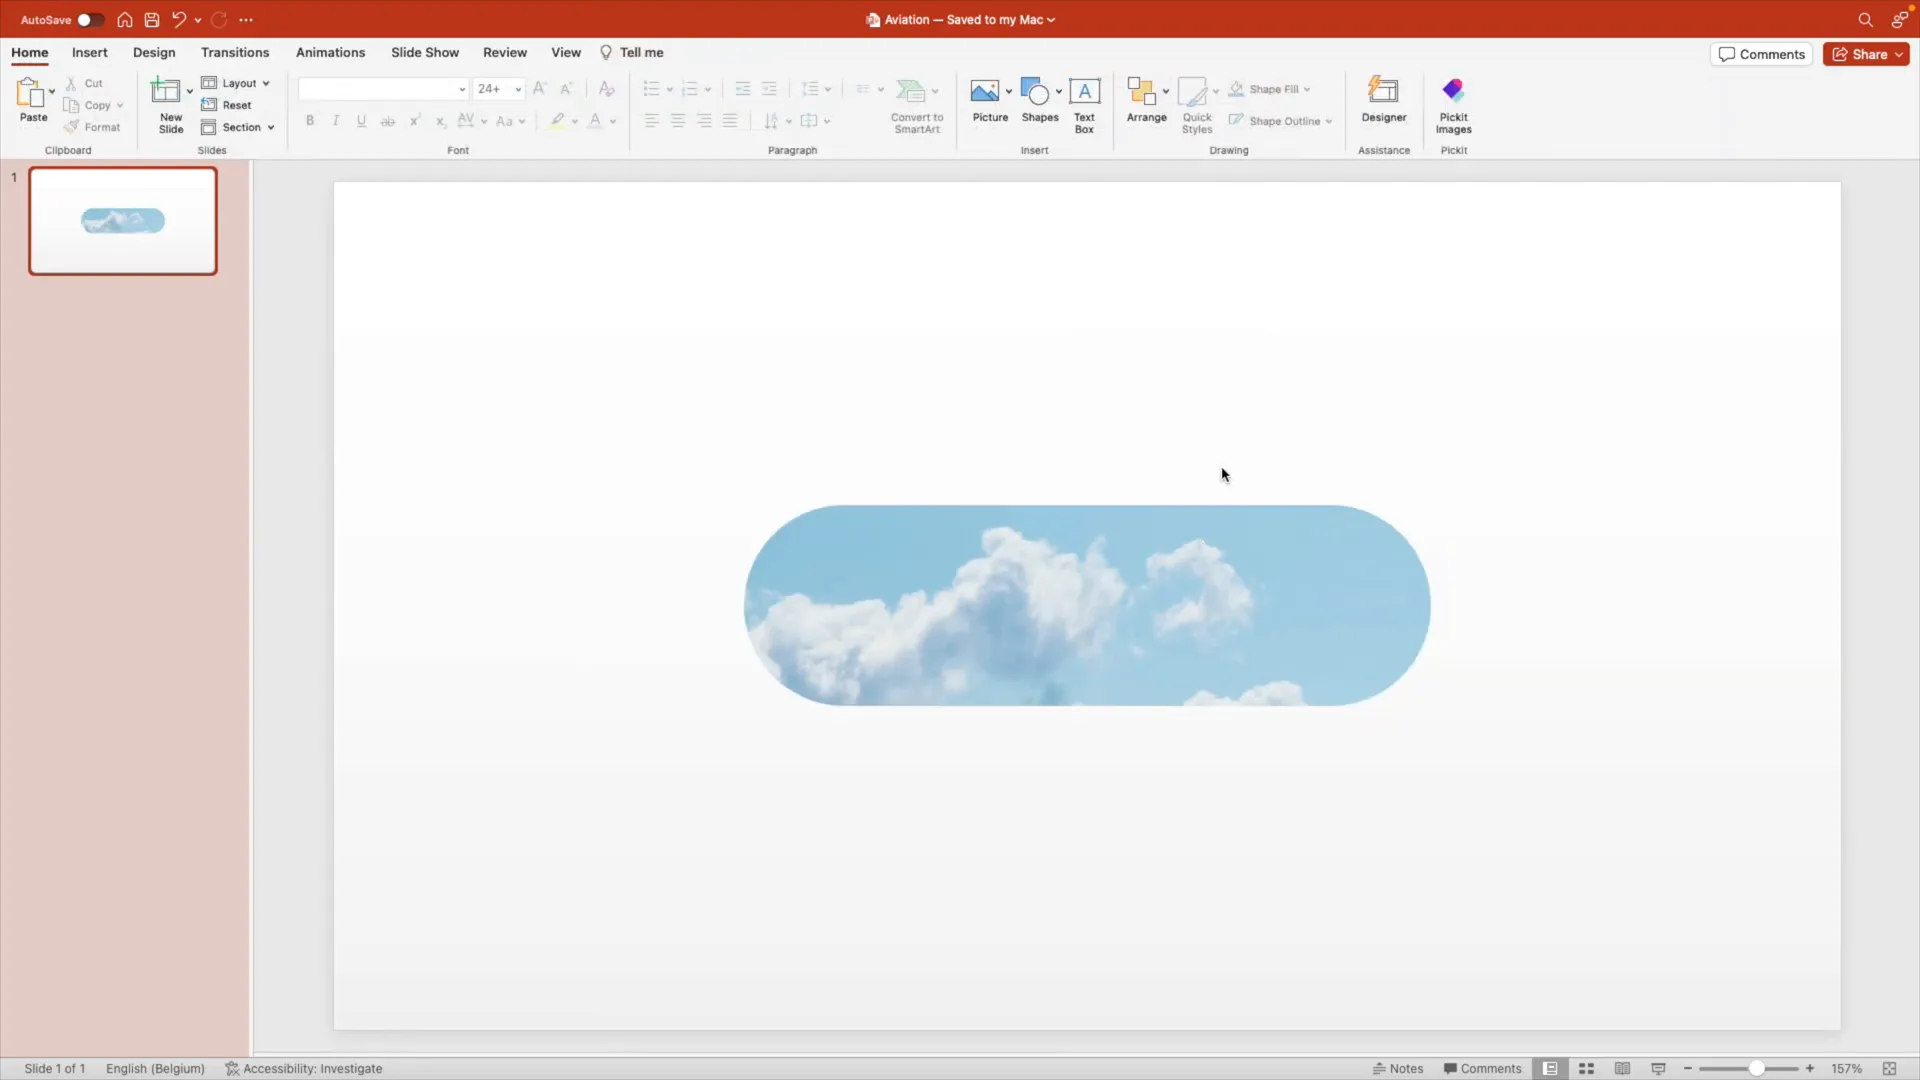
Step 2: Adding and Styling the Main Image
Next, we add a central image representing the sky with clouds, which will serve as the primary visual element on the slide.
- Drag your chosen sky photo onto the slide.
- Position it centrally but do not fill the entire slide—this allows room for other elements.
- Right-click the image, select Crop to Shape, and choose the Rounded Rectangle.
- Increase the roundness to make the rectangle fully rounded.
- Crop the image again to adjust the crop marks so it forms a perfect rounded rectangle.
- Resize slightly smaller and position it downward to show a balance of clouds and blue sky.
This rounded rectangle shape adds softness and modernity to the slide, enhancing the visual appeal.
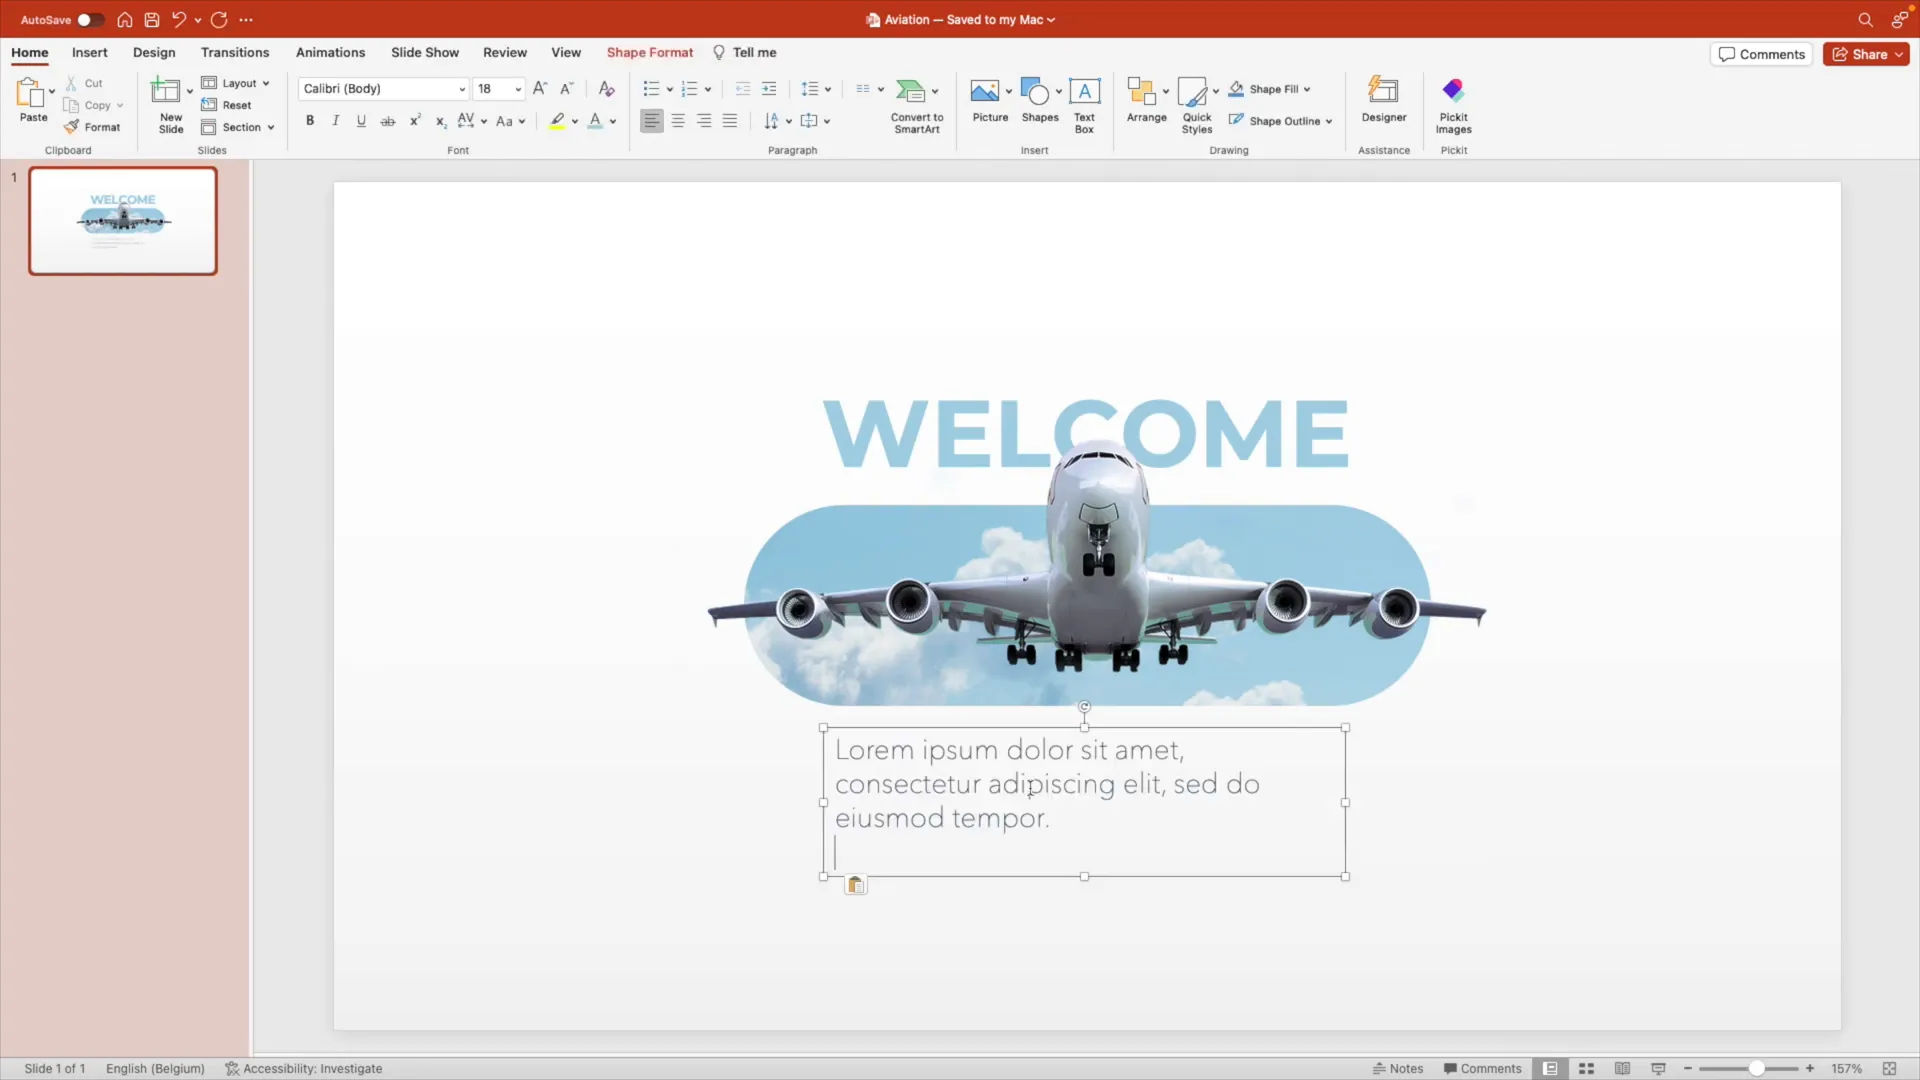
Step 3: Incorporating the Airplane PNG
To bring our aviation theme to life, we add a PNG airplane image with a transparent background. This image will be the focal point of the animation.
- Download a transparent PNG airplane image from a free resource online.
- Insert it onto the slide and increase its size so it overlaps the edges of the rounded rectangle shape.
- Position the airplane so it sits prominently over the sky background.
Having the airplane overlap the background shape adds depth and a sense of movement, setting up for the animations to come.
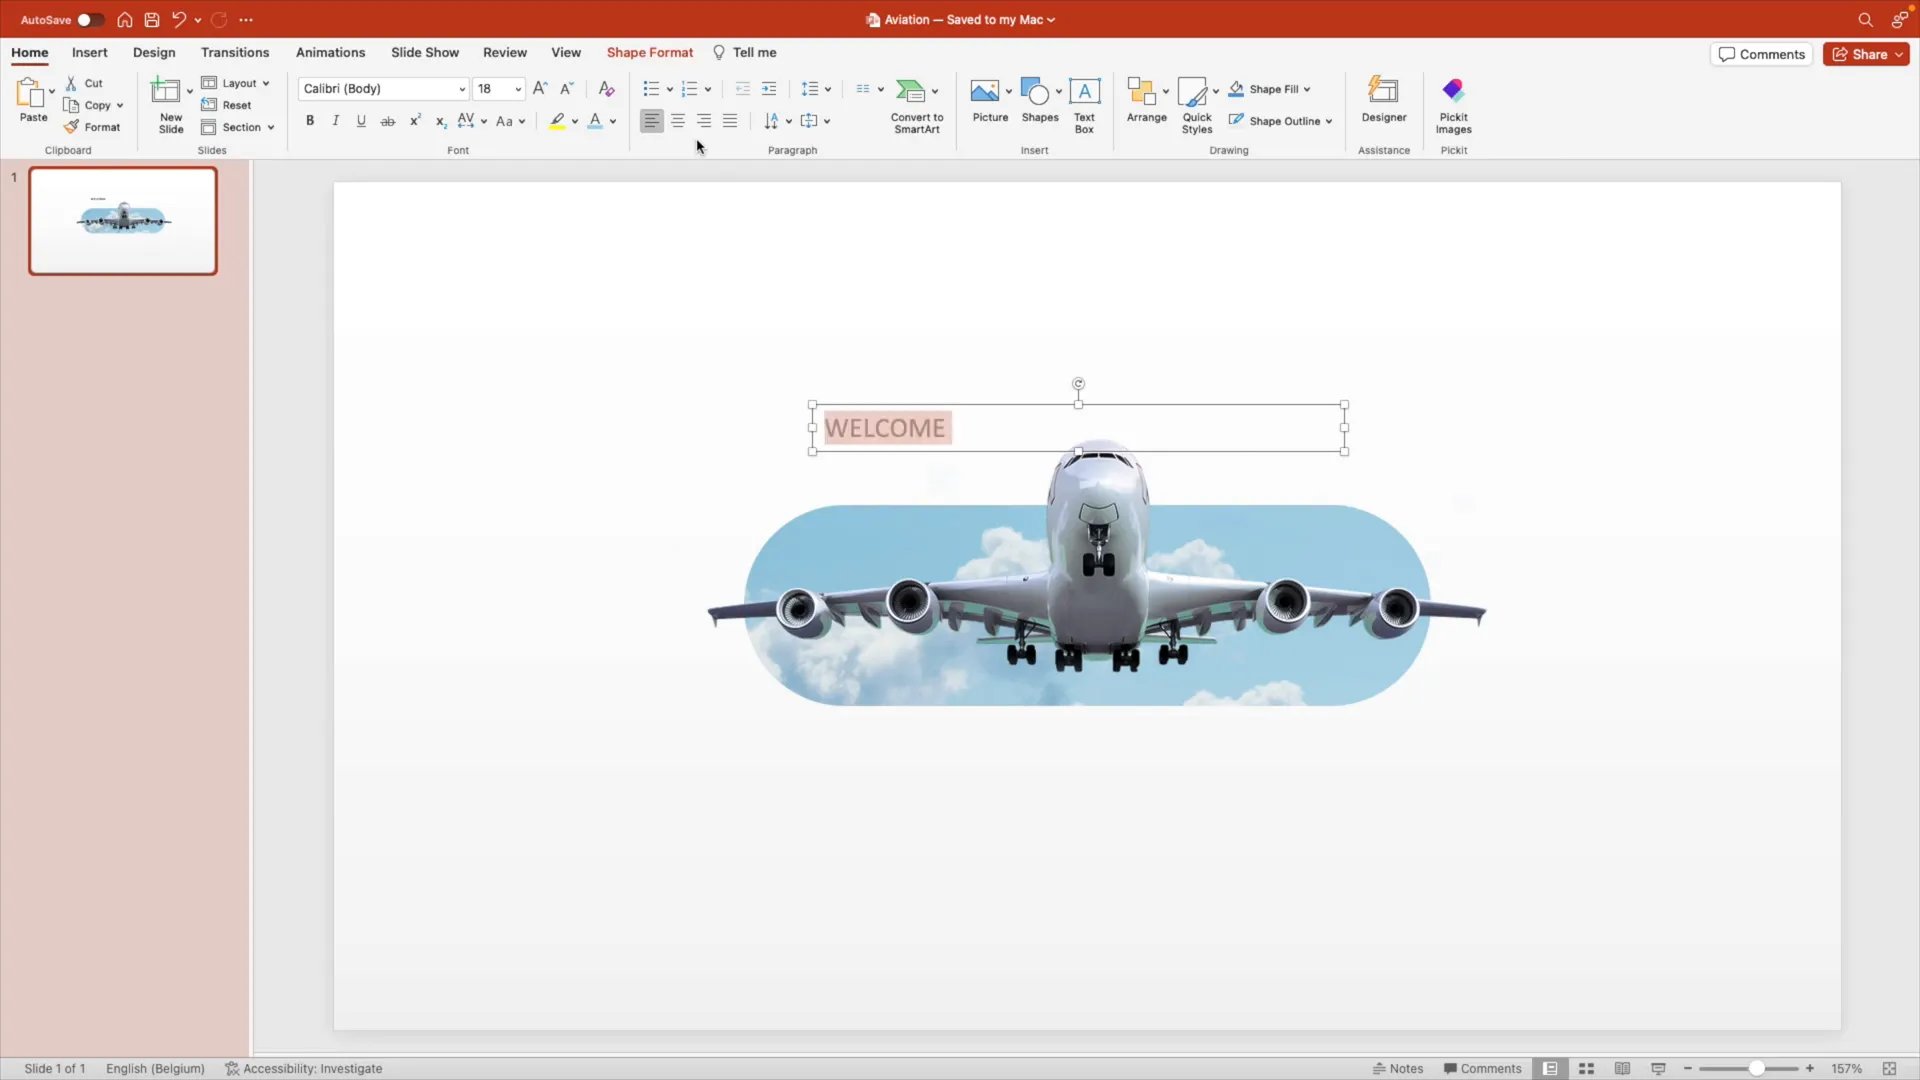
Step 4: Adding Welcome Text with Style
To greet your audience, add a welcoming text below the airplane.
- Insert a text box and type “Welcome.”
- Center the text alignment.
- Change the font to Lanzarote, make it bold, and increase the font size for impact.
- Use the eyedropper tool to pick a tint of blue from the background for the text color, creating harmony.
- Right-click the text box and choose Send to Back so the text sits behind the airplane.
- Adjust the font size as needed for balance.
- Add additional welcome text below, using dummy text if desired, and center it with a smaller font size.
This setup creates a warm, professional opening slide that immediately captures attention.
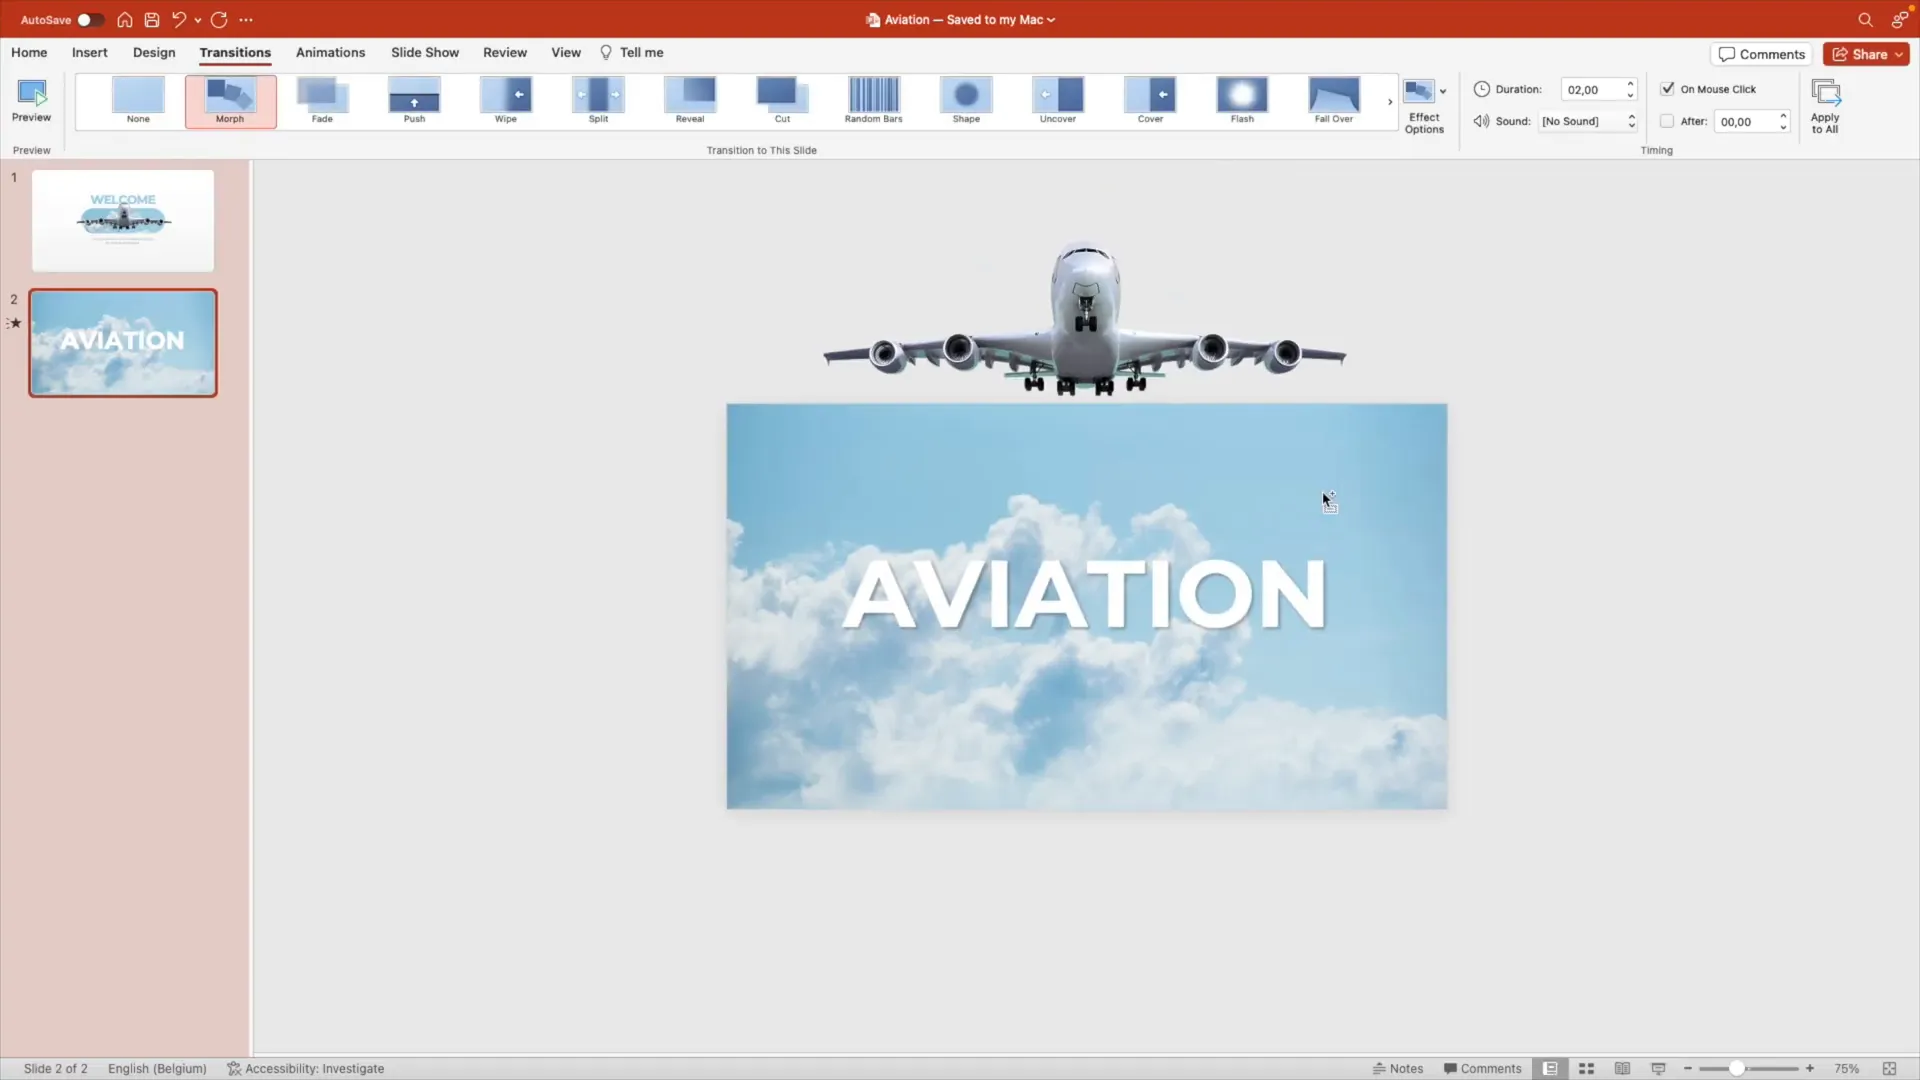
Step 5: Creating the First Morph Transition
Now that the first slide is complete, we prepare for the transition to the next slide, where the airplane will appear to take flight.
- Duplicate the first slide.
- Remove the welcome text and any additional dummy text.
- Zoom out to get an overview of the slide.
- Select the airplane and increase its size by holding Ctrl + Shift and dragging from the edges to scale from the center.
- Move the airplane off the screen to simulate flight.
- Hold Shift while moving to keep the movement aligned horizontally or vertically.
- Adjust the background image by removing the rounded rectangle crop, cropping it to fill the entire slide with a straight rectangle shape.
- Resize the background image to fit the slide perfectly.
- Add a new text box for the presentation title, e.g., “Aviation.”
- Set the font to Montserrat, bold, white color, and a large font size (around 125-150 pt).
- Add a subtle drop shadow to the text to improve readability against the background.
This sets up the elements for a smooth Morph transition that will animate the airplane flying upward and the background expanding.
Step 6: Fixing Morph Transition Issues for Smoothness
When applying the Morph transition between the first two slides, you might notice awkward shape changes, especially with the background’s rounded corners switching to straight edges.
To fix this:
- Go back to the background image on the second slide.
- Increase its size slightly.
- Right-click and choose Picture Format.
- Crop the image to a rounded rectangle shape again.
- Position this adjusted image between the two slides to smooth out the transition.
This adjustment ensures the morphing effect looks natural and seamless without jarring shape shifts.

Step 7: Building the Third Slide with Text and Shapes
Next, duplicate the second slide to create the third slide, where we’ll introduce text content and bullet points with custom shapes for a polished layout.
- Leave the airplane in place but remove the title text.
- Crop the background image to cover only about half of the slide, shifted slightly to the right.
- Resize the background image to fit this half-slide area.
- Position the airplane overlapping the edge of the cropped background for a dynamic look.
- Add a rectangle shape to serve as the title container.
- Set the font to Montserrat Semi Bold, dark blue color, and increase the font size appropriately.
- Add a subtitle in italic font, slightly smaller for hierarchy.
- Insert dummy paragraph text below the titles, using smaller font size and a matching color.
- Create multiple text boxes for bullet points, positioning them evenly with space between.
- Replace standard bullet points with small circles created as shapes to add a modern touch.
- Copy and position these circles next to the bullet text.
These design choices create a clean, readable slide with clear information hierarchy and visual interest.
Step 8: Applying Morph to Text and Shapes
Apply the Morph transition to the third slide to animate the elements smoothly from the previous slide.
- Use the Morph transition effect to animate the airplane, background crop, and text elements.
- If the morph effect causes distortion, adjust the angles and positions of shapes slightly to minimize visual glitches.
- Preview the transition to ensure everything moves fluidly and naturally.
Morphing text and shapes creates a captivating flow that keeps the audience engaged.

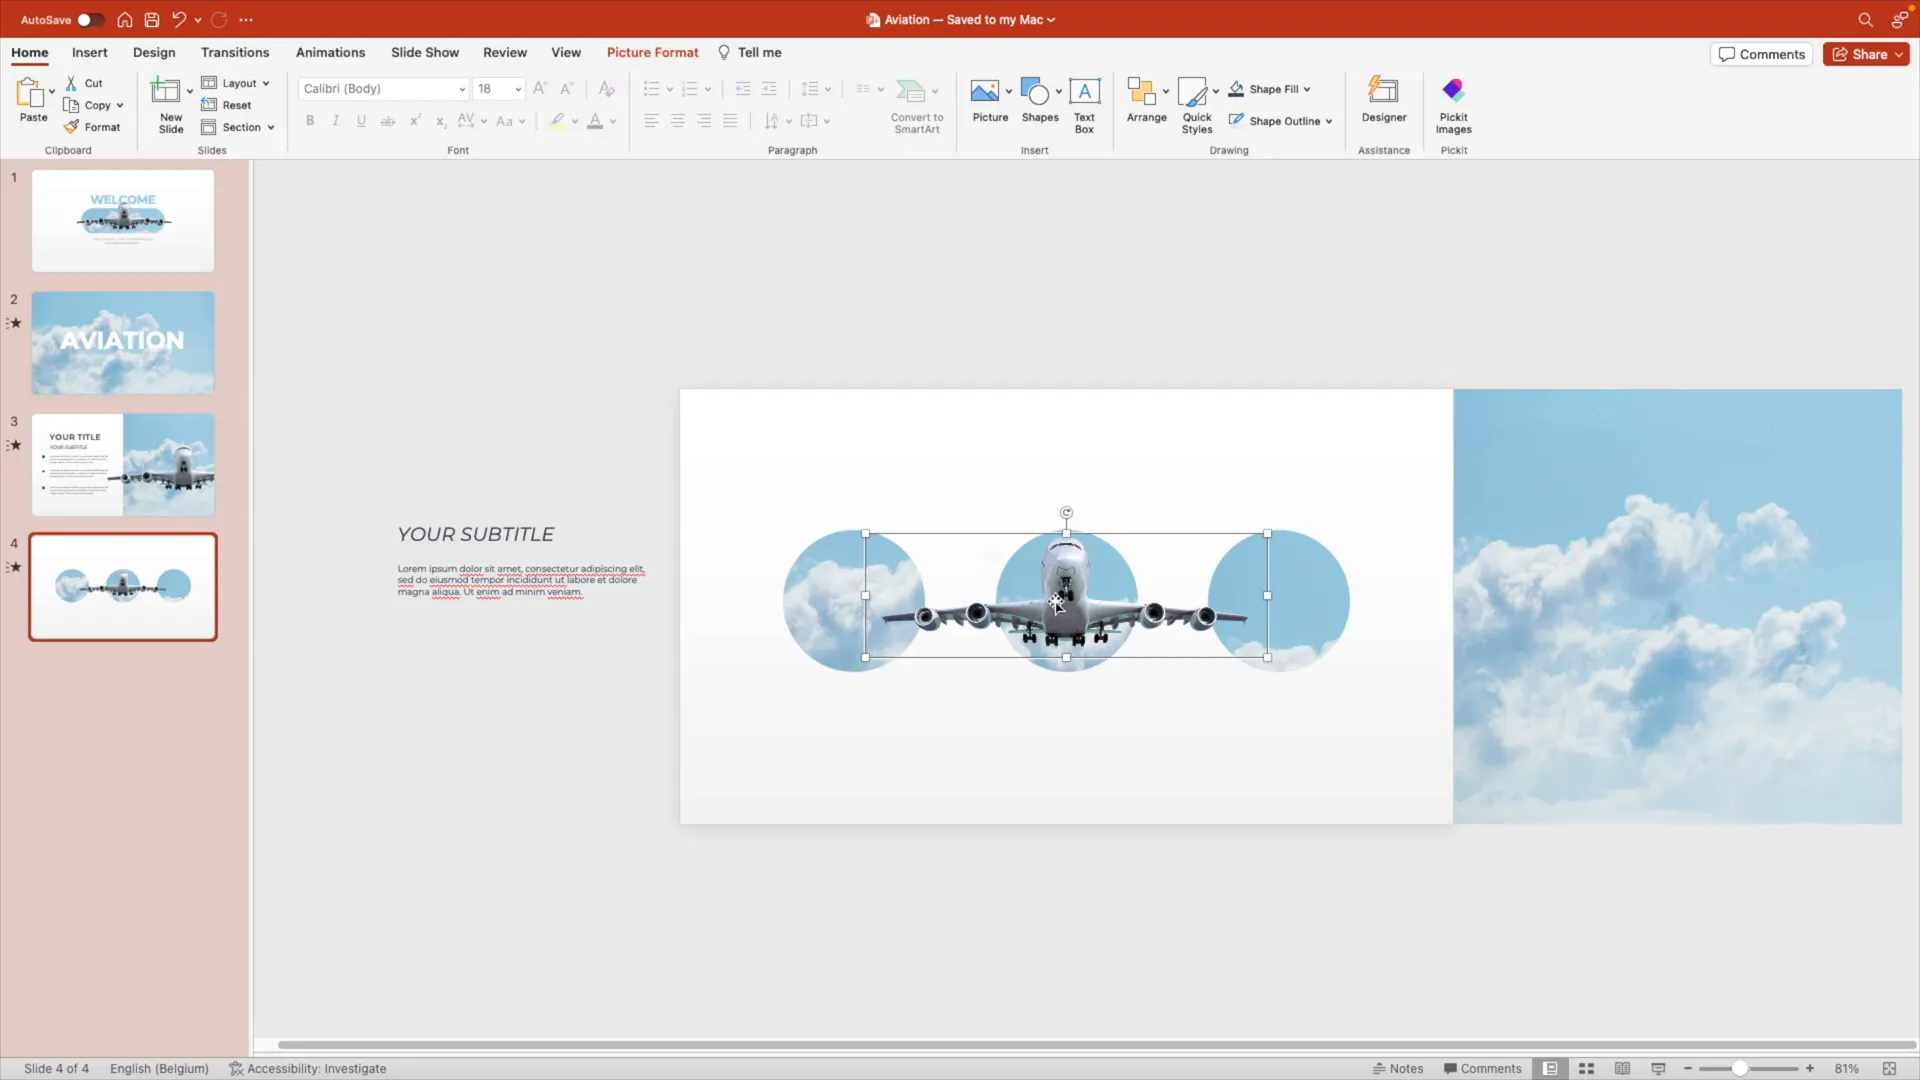
Step 9: Enhancing the Slide with Circular Image Masks
For an added creative touch, the next slide features circular shapes filled with parts of the background image, creating a unique visual effect.
- Duplicate the third slide.
- Move the background image fully to the right side of the slide.
- Remove unnecessary text elements like bullet points and titles, keeping only one subtitle and some dummy text.
- Create perfect circles by inserting shapes and holding Shift while dragging.
- Remove the outline of the circles.
- Copy the background image to the clipboard (Ctrl+C).
- Select each circle, right-click, choose Format Shape, and set the fill to Picture or texture fill.
- Choose the clipboard as the picture source to fill the circle with the background image.
- Adjust the tile picture as texture settings, such as offset, to create slight variations in each circle.
- Position the airplane in front of these circles, resizing and centering it between them.
- Add text boxes below each circle with centered, concise text descriptions.
- Group each circle and its text for easier management.
This effect adds depth and visual interest, breaking the monotony of rectangular images and text blocks.
Step 10: Integrating Circular Elements into Previous Slides
To maintain consistency and prepare for transitions, copy these circular groups back to the previous slide and arrange them evenly at the bottom.
- Drag the grouped circles downward and spread them horizontally with Shift held to keep alignment.
- Ensure the airplane remains in front of these circles for visual continuity.
- Apply the Morph transition to the previous slide to animate the introduction of these circles smoothly.
The airplane will animate flying to the left, the background image will shift right, and the circular elements will appear, creating a harmonious flow.


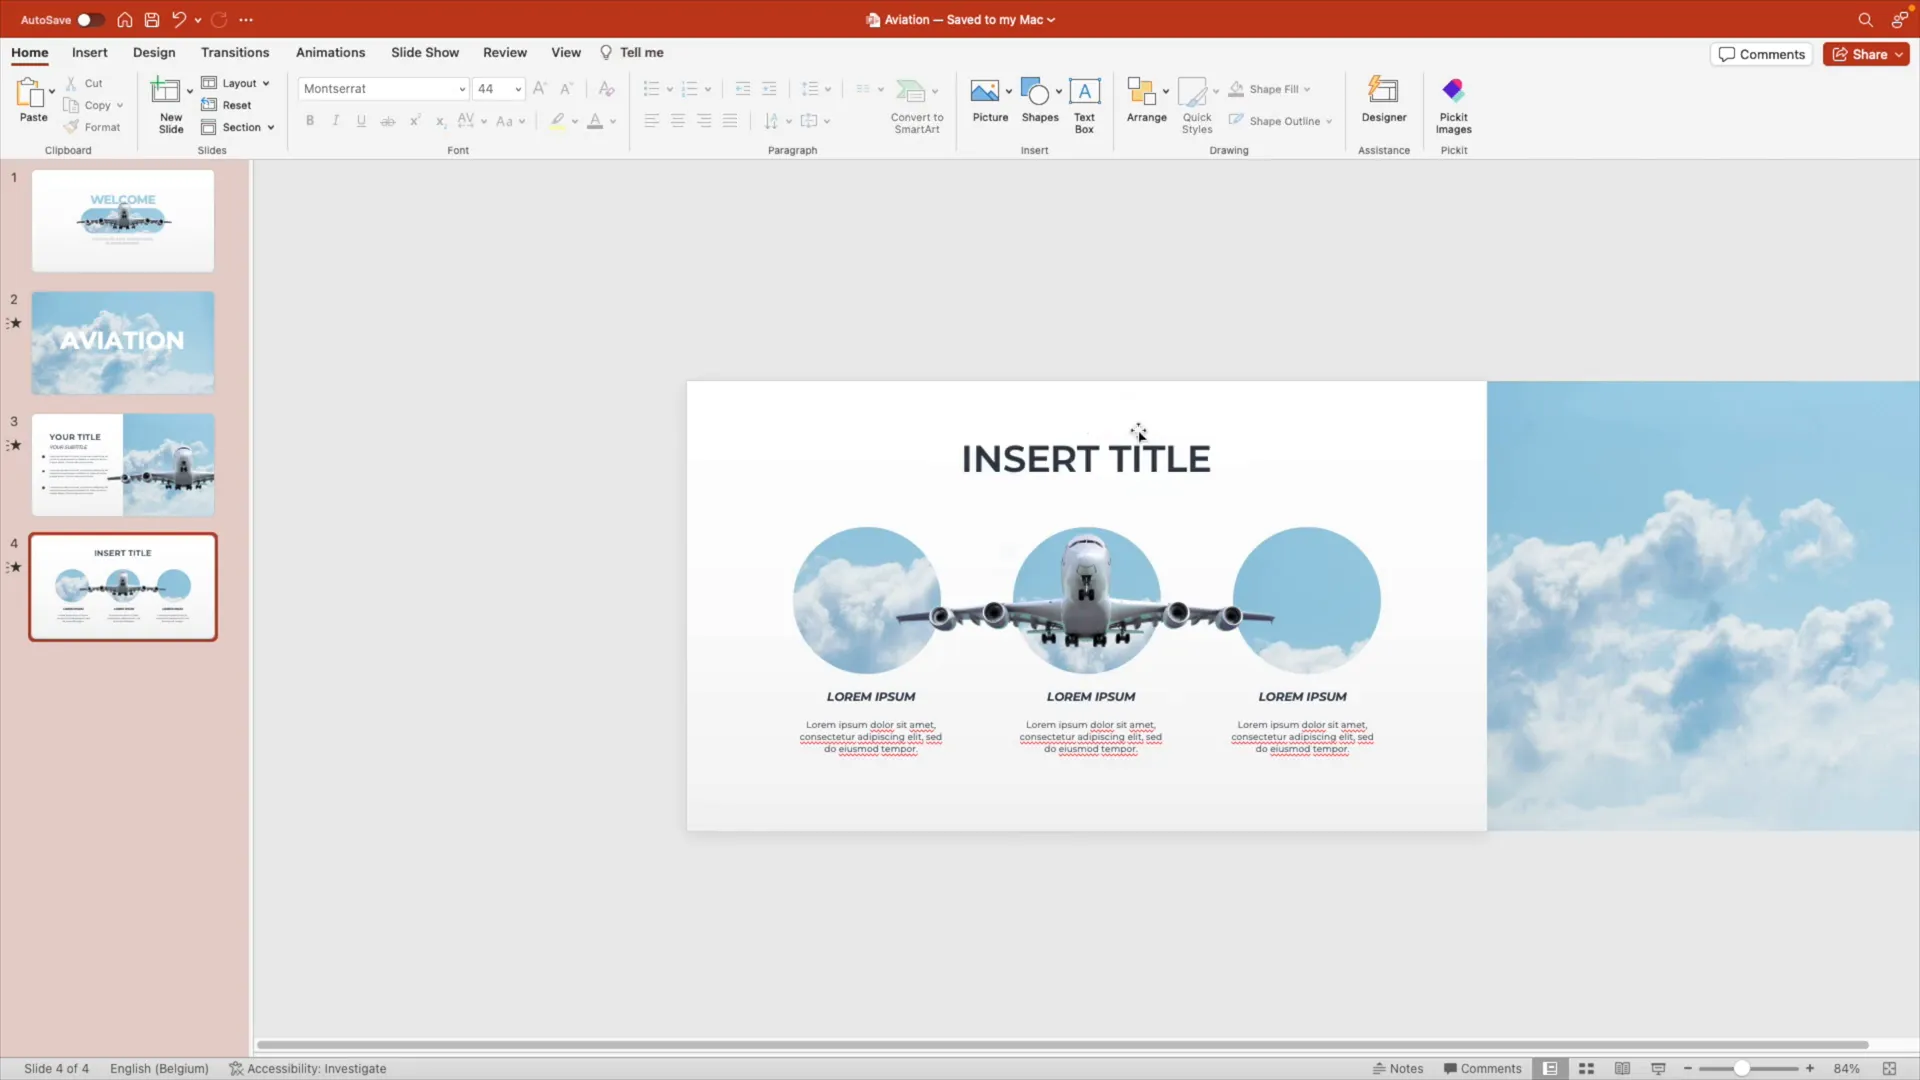
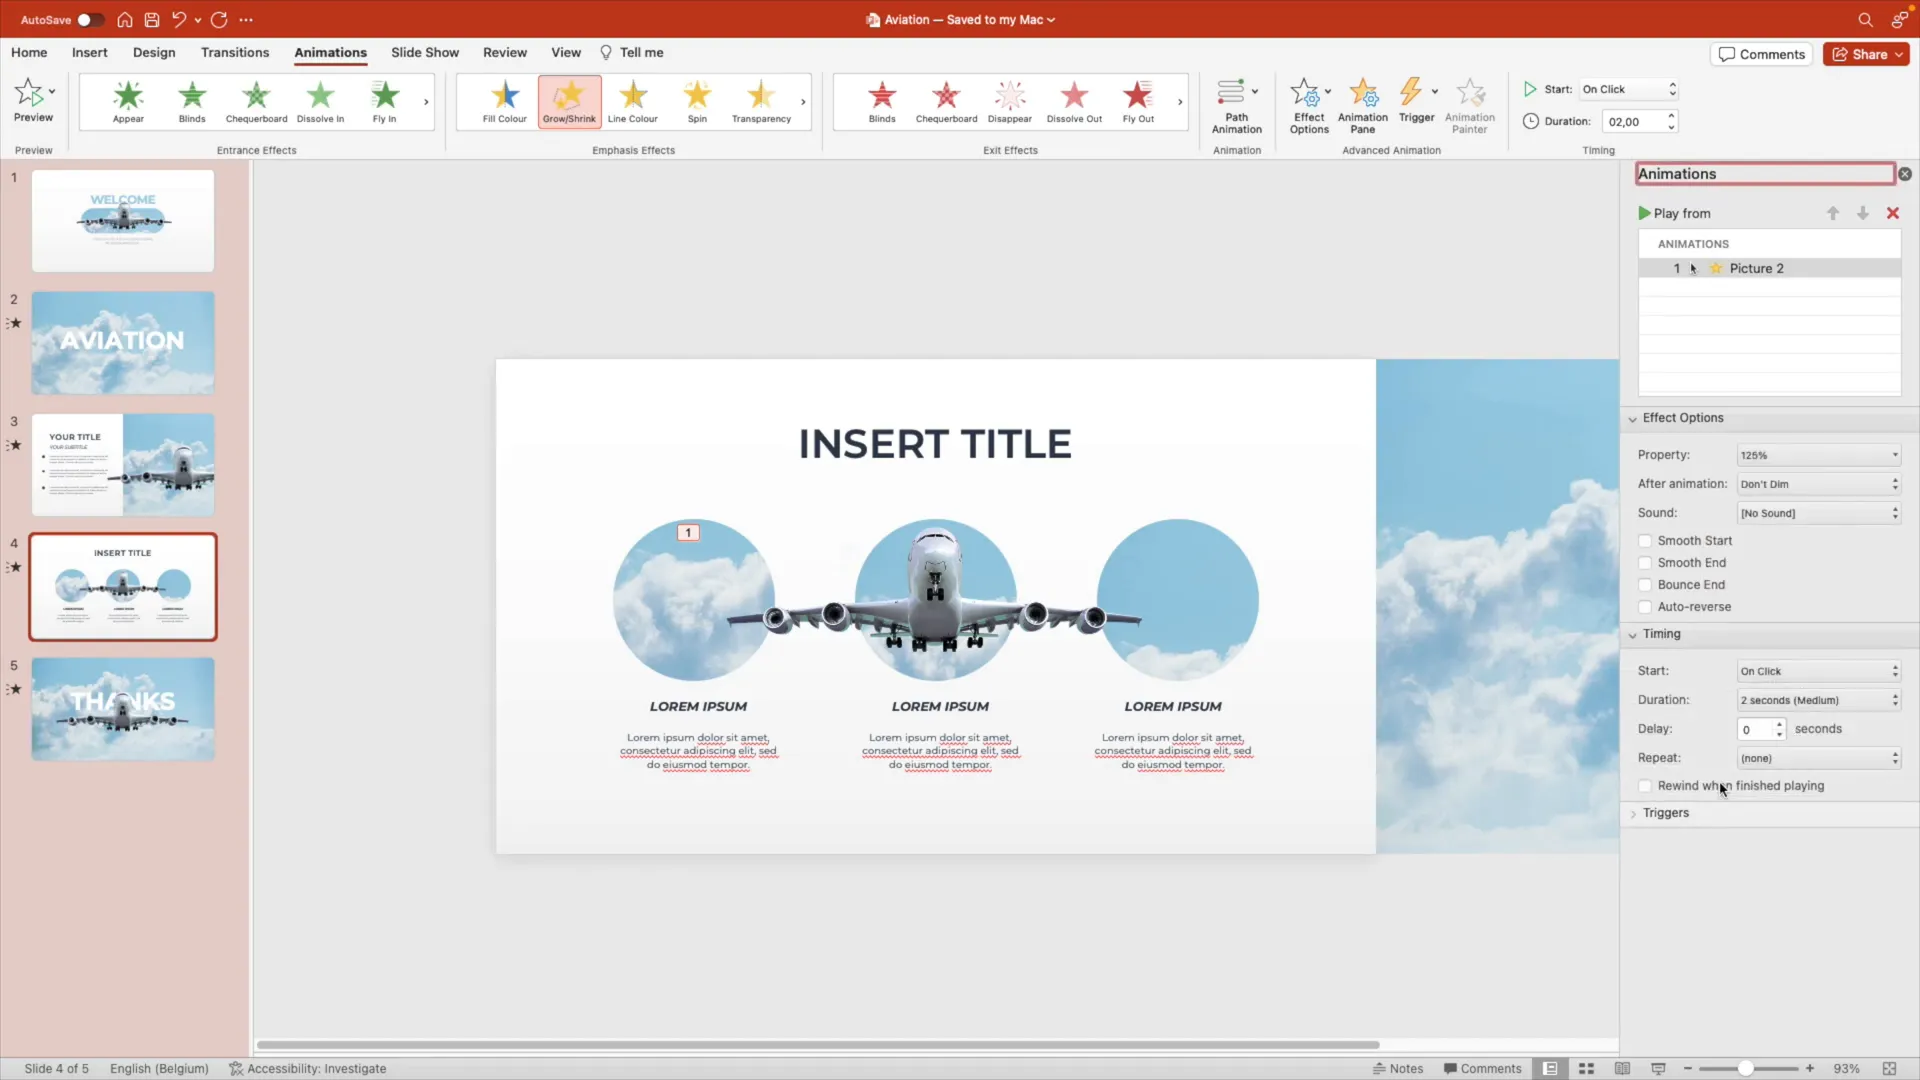
Step 11: Adding Titles and Final Touches to the Third Slide
Add a clear title to the third slide to enhance professionalism and clarify the slide’s purpose.
- Insert a title text box with a meaningful heading.
- Choose wording that aligns with your presentation’s theme.
- Position and style the title for easy readability.
These finishing touches make the slide feel complete and polished.
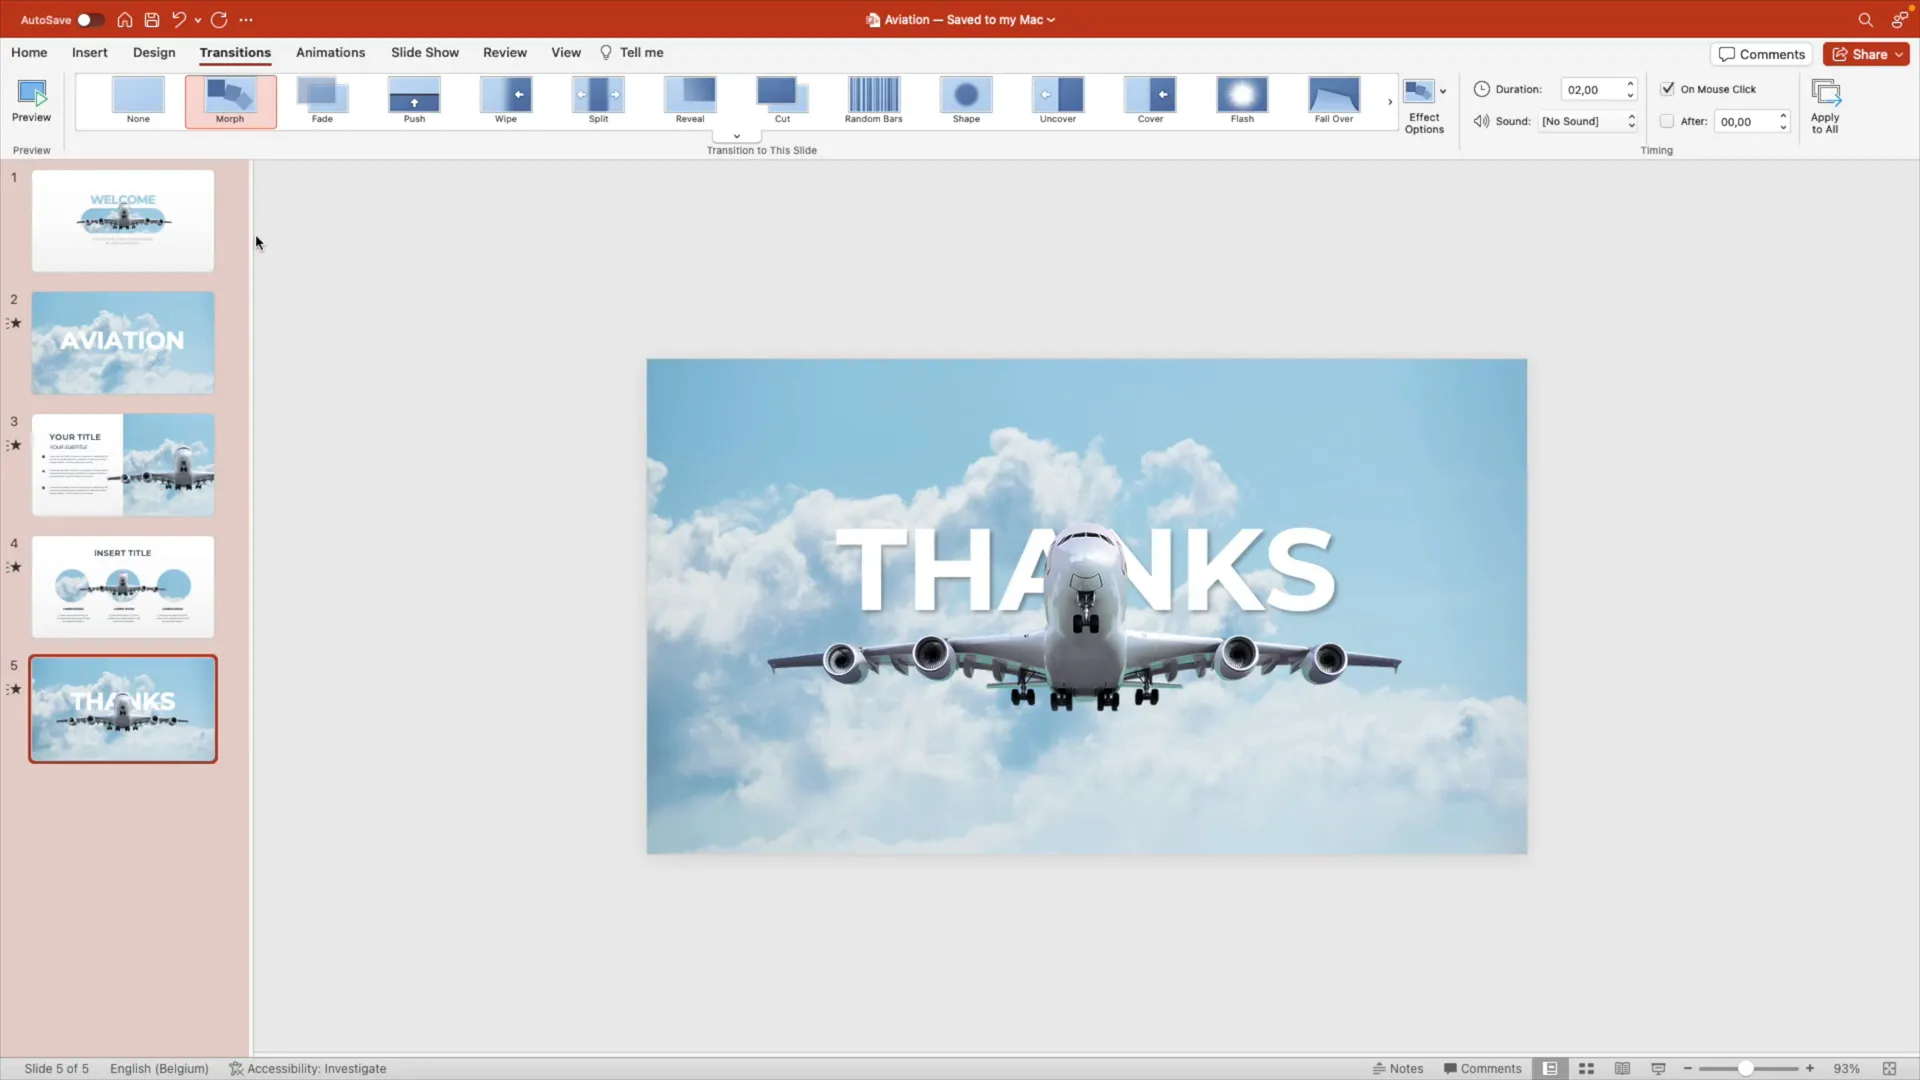
Step 12: Creating the Closing Slide
The final slide wraps up the presentation with a thank you message and a graceful ending animation.
- Create a new blank slide.
- Insert the sky background image again, this time dragging it in fresh rather than copying from previous slides to avoid morph glitches.
- Copy the airplane image, resize it larger, and position it near the bottom.
- Add a text box with a “Thank You” message or closing remarks.
- Bring the airplane to the front to maintain visual hierarchy.
- Apply the Morph transition to this slide to animate the airplane and background.
This slide concludes the presentation with a professional, visually appealing farewell.

Step 13: Enhancing the Final Transition with a Fade Effect
To improve the final slide’s transition, add a fade effect to the sky background:
- Copy the sky background image and paste it onto the previous slide.
- Send this copy to the back layer.
- Right-click the image, select Format Picture, then adjust the image transparency to 100%.
- Apply the Morph transition again between these slides.
This technique creates a smooth fade-in of the sky, making the ending feel clean and elegant.
Step 14: Adding Final Animations
For a subtle dynamic effect, add an animation to a specific element on the final slide:
- Select the element you want to animate (e.g., text or shape).
- Apply the Grow and Shrink animation.
- Open the animation pane to adjust effect options.
- Set the grow/shrink size to 125%.
- Adjust timing to around 2 seconds and set it to play once without repetition.
This final touch adds gentle movement that keeps the slide lively without distracting.
Previewing the Complete Presentation
Now that all slides and animations are set, preview the entire presentation from the beginning to ensure smooth transitions and flawless animations.
Watch as the airplane takes flight, the background shifts and morphs, text and shapes appear with style, and the closing slide fades gracefully. This dynamic aviation-themed presentation is sure to impress any audience.

Conclusion: Elevate Your Presentations with Morph Transitions
By following this tutorial, you’ve learned how to create a beautiful, dynamic animated PowerPoint presentation inspired by the world of aviation. Using simple tools like gradient fills, image cropping, custom shapes, and the Morph transition, you can design professional slides that captivate and engage your audience.
This tutorial demonstrates that you don’t need advanced software or complex skills to produce impressive animations. With creativity and a bit of practice, Morph transitions unlock endless possibilities for storytelling and presentation design.
Try applying these techniques to your own presentations, customize the colors, images, and text to fit your brand or message, and watch as your slides take off!
FAQ: PowerPoint Morph Transition and Animation Tips
What is the Morph transition in PowerPoint?
The Morph transition is a feature in PowerPoint that animates smooth movement, resizing, and transformation of objects between slides. It allows you to create cinematic effects without complex animations.
Can Morph be used with images and shapes?
Yes! Morph works great with images, shapes, text boxes, and even grouped objects, enabling you to animate them seamlessly across slides.
How do I fix awkward shape changes during Morph transitions?
If you notice strange shape shifts (like rounded corners turning into sharp edges), try adjusting the shape cropping or size on the slides involved to make the transition smoother.
Where can I find transparent PNG images like the airplane used here?
You can find free PNG images with transparent backgrounds on websites like FreePNGImg or Unsplash for high-quality photos.
How can I customize the colors and fonts in my presentation?
PowerPoint allows you to select any font installed on your computer and pick custom colors using the color picker or eyedropper tool to match your branding or preferred style.
Is the Morph transition available in all versions of PowerPoint?
Morph is available in PowerPoint 2019, PowerPoint for Microsoft 365, and later versions. It may not be available in older or web-based versions.
How do I add animations like Grow and Shrink to elements?
Go to the Animations tab, select the element, choose the Grow and Shrink animation, and then customize the size and timing in the Animation Pane for precise control.
Can I use these techniques for business presentations?
Absolutely! These dynamic transitions and clean designs are perfect for professional settings, helping your message stand out and keeping your audience engaged.
Ready to take your PowerPoint skills to new heights? Experiment with Morph transitions, custom shapes, and creative layouts to make every presentation a memorable journey.
Check out the full video: Dynamic PowerPoint Morph Tutorial ✈️ Easy tutorial


