

PowerPoint is an incredibly powerful tool for creating engaging presentations, but mastering its features and shortcuts can transform your slides from ordinary to extraordinary. Whether you’re a beginner or an experienced user, knowing the right techniques can save you time and help you design visually stunning and professional presentations. This comprehensive guide covers the top 20 PowerPoint tips and tricks, including essential PowerPoint shortcuts, that will elevate your presentation game and make your workflow smoother.
Let’s dive into these tips, packed with practical examples, step-by-step instructions, and creative ideas to help you unlock PowerPoint’s full potential.
Table of Contents
- 1. Glassmorphic Effect: Create Frosty, Blurred Shapes
- 2. Insert Photos and Videos into Any Custom Shape
- 3. Use Slide Grids for Perfect Alignment
- 4. Duotone Effect: Add Artistic Color to Your Photos
- 5. Master Text and Line Spacing for Readability
- 6. Convert Text to Vector Shapes for Creative Effects
- 7. Use Colorful Shadows to Highlight Elements
- 8. Harness the Power of Slide Master for Global Changes
- 9. Add Gradient Fill to Text for a Modern Look
- 10. Create Modern Gradient Area Charts
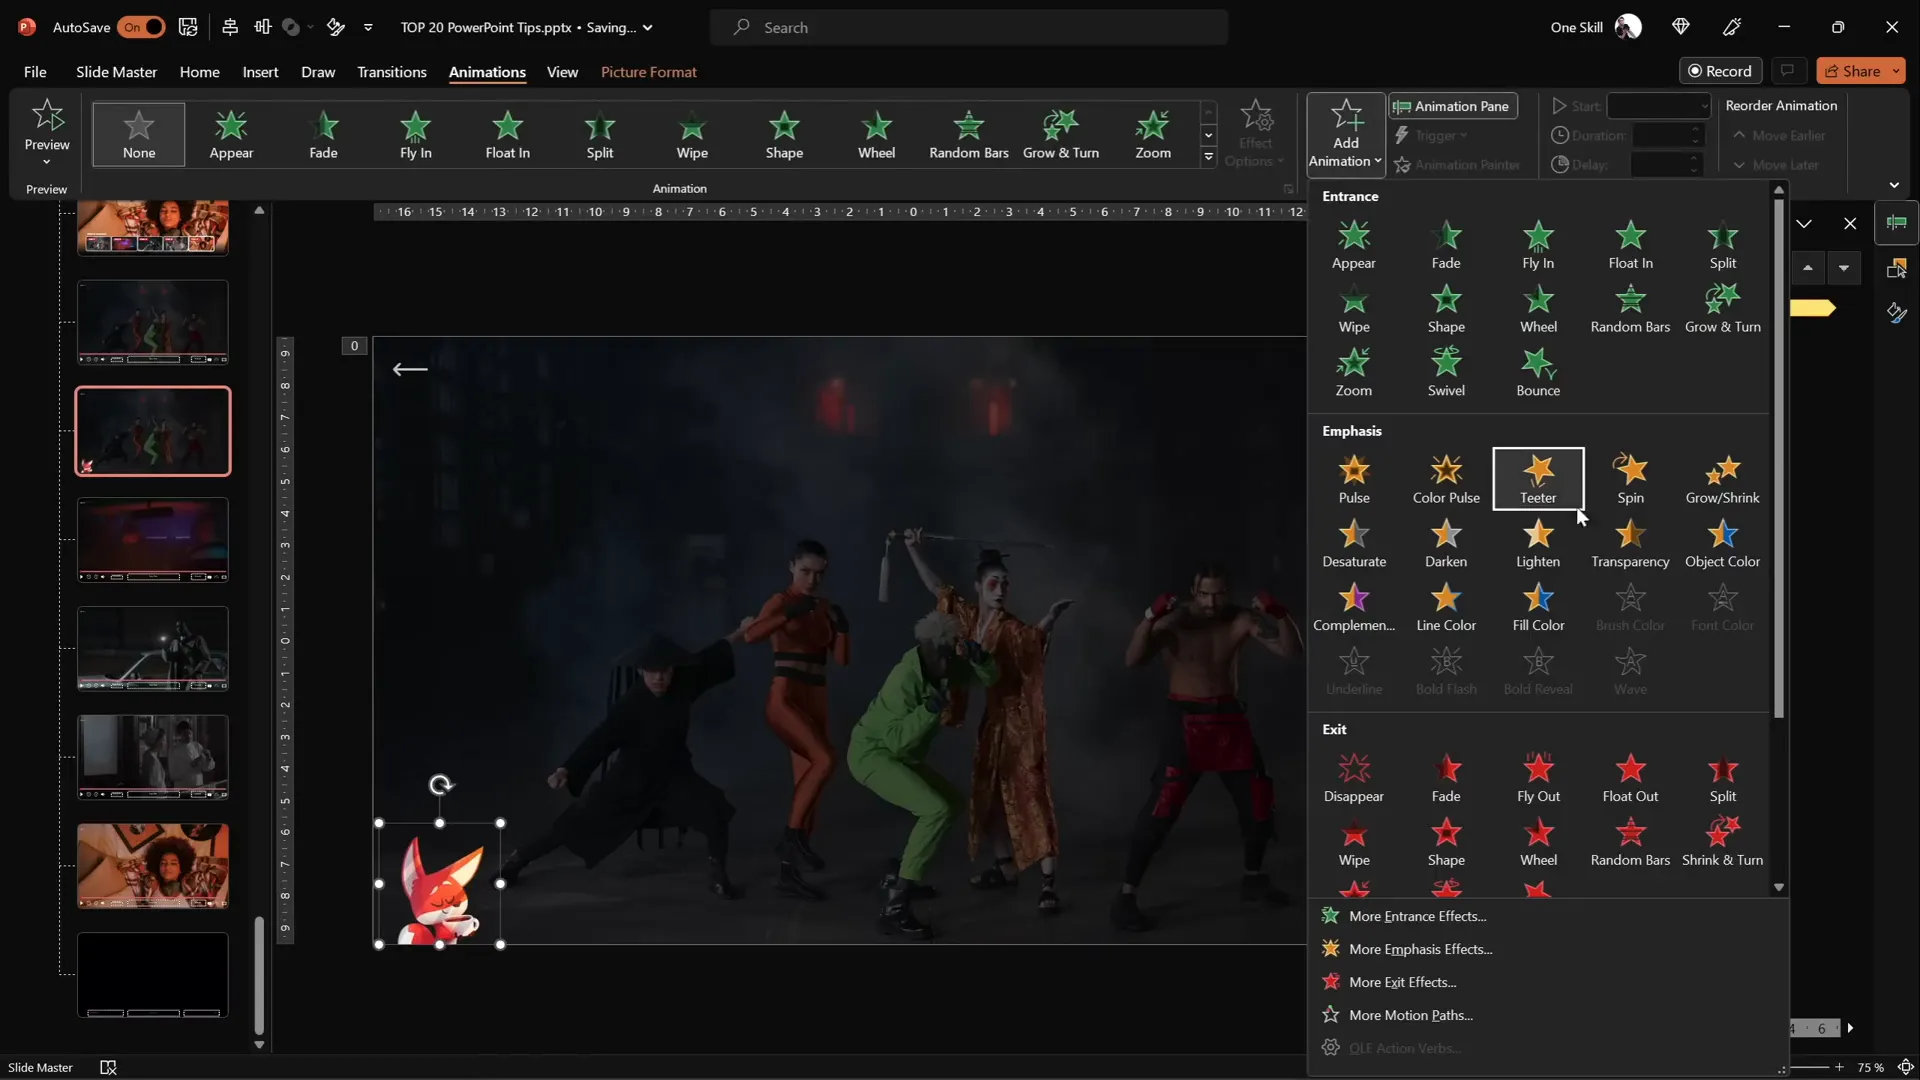
- 11. Add Repeatable Animations in Slide Master
- 12. Extend Animation Duration Beyond Limits
- 13. Set Custom Rotation Centers for Precise Animations
- 14. Combine GIFs and PowerPoint Animations
- 15. Loop Multiple Animations with Bookmark Triggers
- 16. Perfect Morph Transitions with Naming Tricks
- 17. Animate Photos Using Morph and Crop
- 18. Create Auto-Updating Donut Charts
- 19. Divide Pie or Donut Charts into Equal Parts
- 20. Essential PowerPoint Shortcuts to Boost Productivity
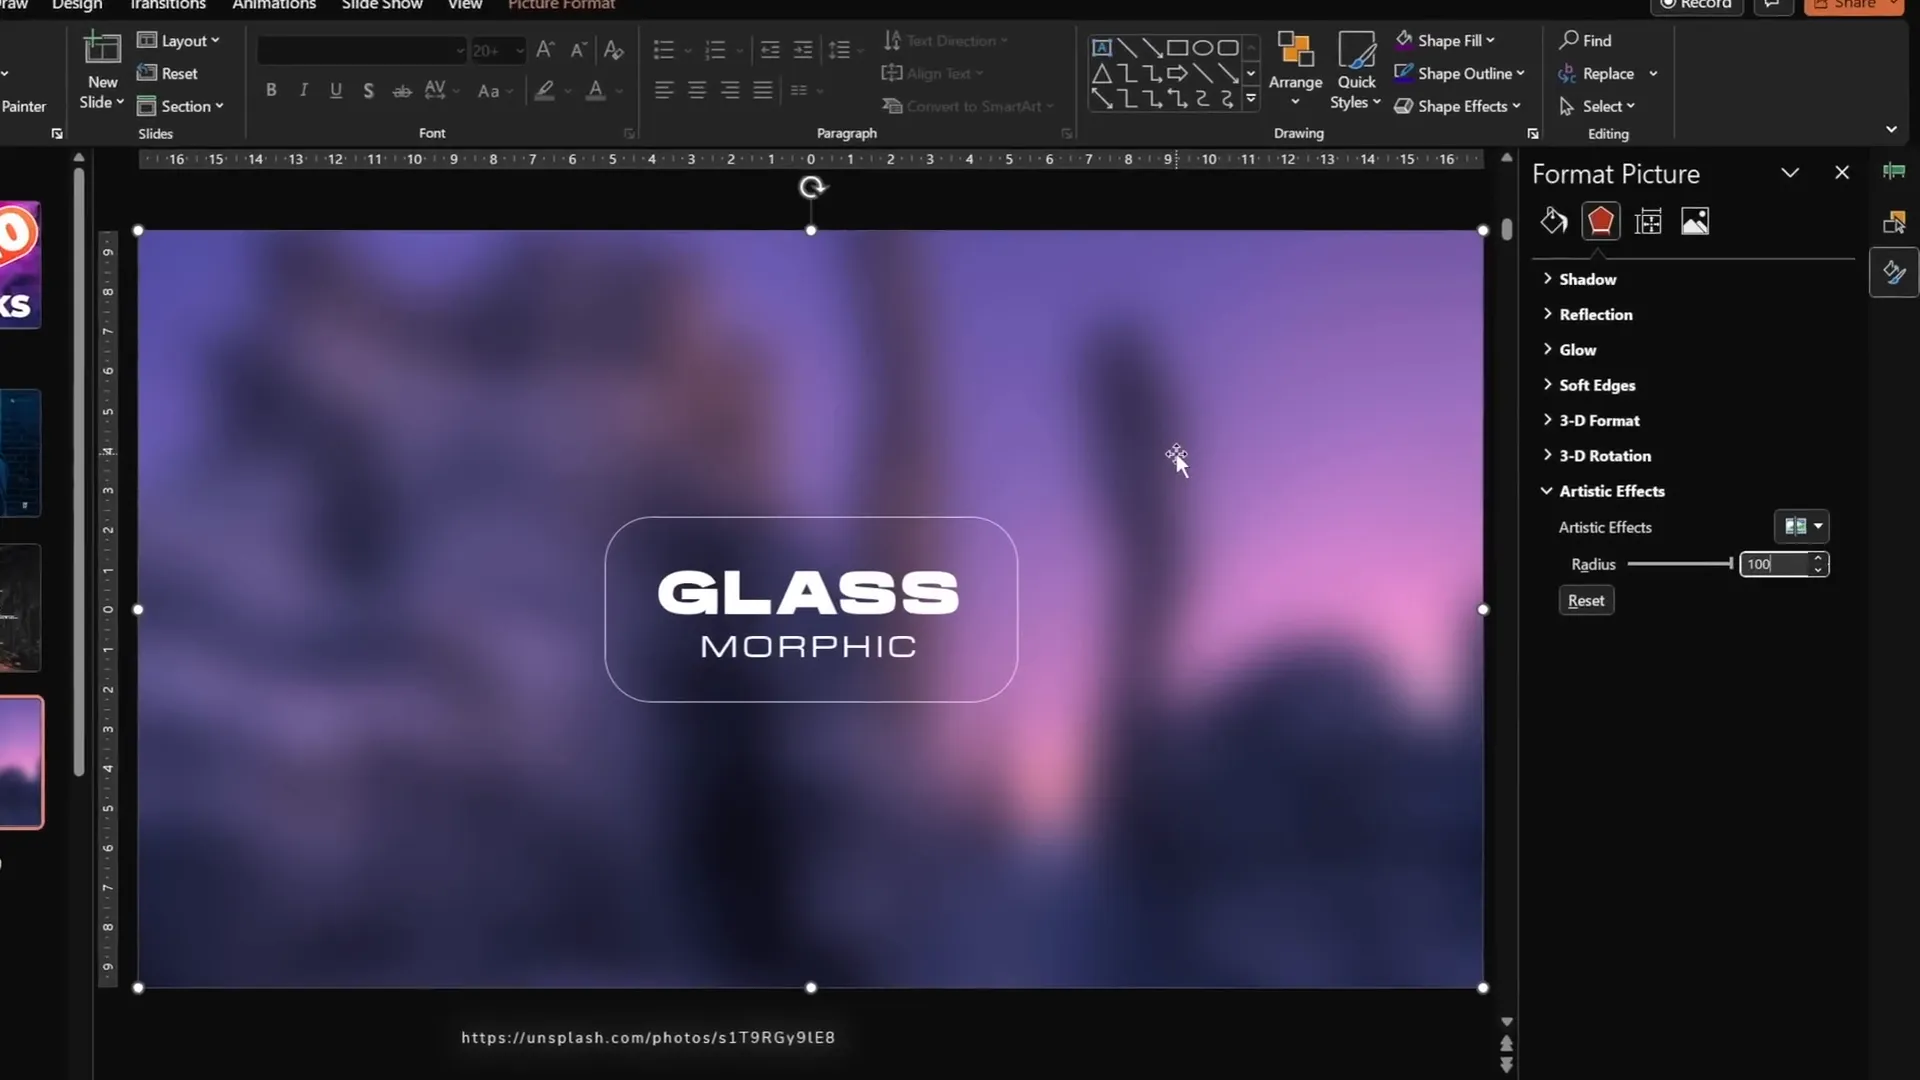
1. Glassmorphic Effect: Create Frosty, Blurred Shapes
The glassmorphic effect is a trendy design style that gives your shapes a frosted glass look by combining blur, transparency, and subtle shadows. It’s perfect for modern, elegant presentations.
Here’s how to create it quickly in PowerPoint:
- Start with a background photo and a shape (e.g., a rounded rectangle) with no fill and a thin outline.
- Select the photo and go to Format Picture > Artistic Effects, then choose the Blur effect.
- Set the blur radius to the maximum value (100) to make the photo completely blurred.
- Right-click the blurred photo and copy it.
- Reset the photo to its original (unblurred) state.
- Change the slide background fill from solid white to picture fill, then paste the blurred photo from the clipboard.
- Position the blurred background to align with the shape.
- Select the shape and fill it with Slide Background Fill so it takes the blurred photo as its fill.
- For extra realism, add a white inside shadow to give a frosty glow.
This method lets you apply the glassmorphic effect to any shape, adding depth and a modern aesthetic to your slides.
2. Insert Photos and Videos into Any Custom Shape
Placing photos or videos inside simple shapes like circles or rectangles is straightforward, but what if you want to use complex or custom shapes? PowerPoint’s Merge Shapes tool lets you create any vector shape and insert media inside it.
Here’s the step-by-step process:
Creating Custom Shapes
- Use the Curve Tool under Insert > Shapes to draw custom shapes (e.g., blobs) by clicking points to form curves.
- Close the shape by connecting the end point to the starting point.
- To create semicircles or other complex shapes, combine basic shapes (circles, rectangles) using Merge Shapes > Subtract.
- Add the Merge Shapes functions to your Quick Access Toolbar for faster access.
- Union multiple shapes to create a single custom shape.
Inserting Photos into Shapes
- Drag and drop your photo onto the slide.
- Resize and position the photo to cover the custom shape.
- Send the photo to back (Right-click > Send to Back).
- Select both the photo and the custom shape, then use Merge Shapes > Intersect.
- Your photo will now be cropped inside the custom shape.
- Use the crop tool to reposition the image inside the shape.
Inserting Videos into Custom Shapes
The process is almost identical to inserting photos:
- Make sure the video covers the custom shape.
- Send the video to back.
- Select both the video and the shape, then use Merge Shapes > Intersect.
- Optionally, add a gradient outline to help the video stand out on dark backgrounds.
Creating Custom Picture Placeholders in Slide Master
For reusable templates, create custom picture placeholders:
- Go to View > Slide Master.
- Combine your custom shapes into one shape using Merge Shapes > Union.
- Insert a picture placeholder and stretch it over the custom shape.
- Send the placeholder to back and intersect it with the custom shape.
- Exit Slide Master and apply the custom layout to your slides.
- Click the image icon to insert photos quickly into your custom-shaped placeholders.
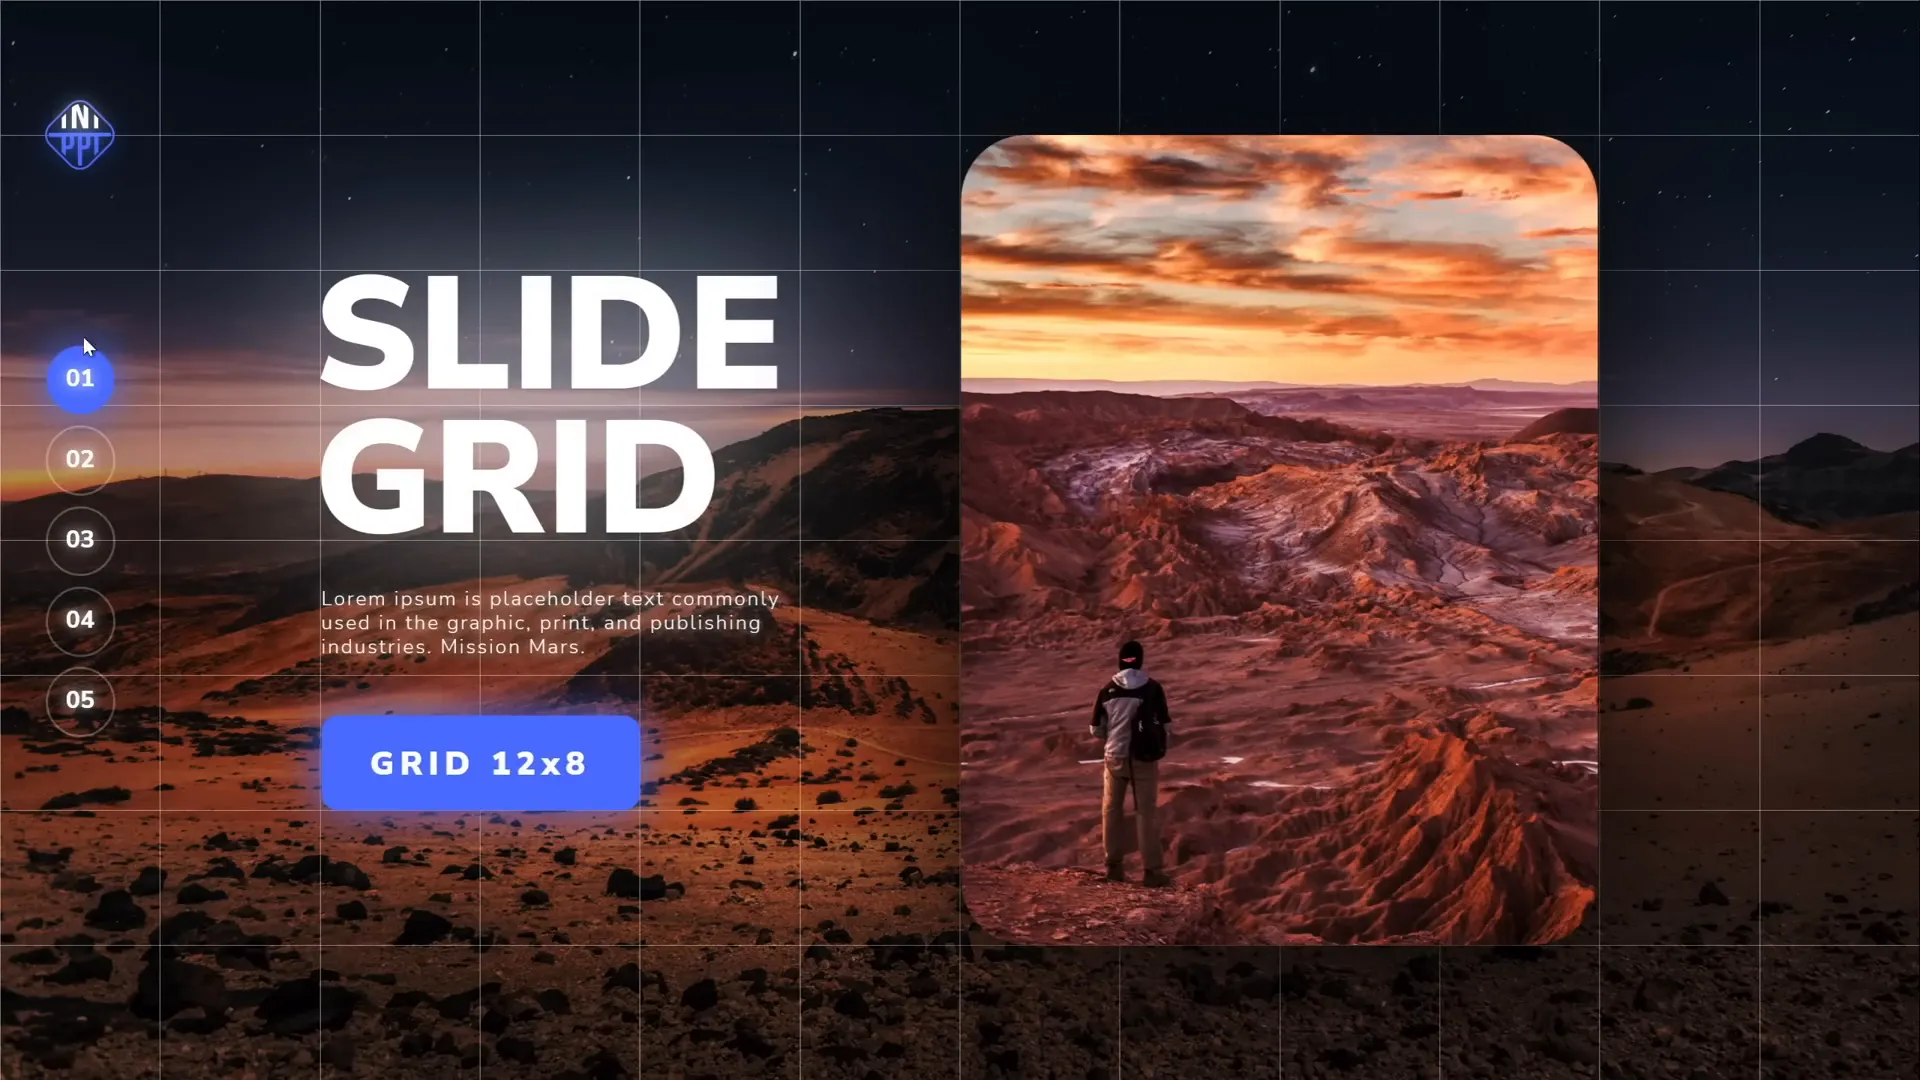
3. Use Slide Grids for Perfect Alignment
Alignment is a crucial design principle that can make or break the professionalism of your slides. Using slide grids helps you position elements consistently and maintain visual harmony.
Compare two slides with identical content but different alignments:
- Slide one has scattered elements with uneven spacing.
- Slide two uses a grid, resulting in balanced and clean layout.
PowerPoint lets you create custom grids with columns and rows:
How to Create a Slide Grid
- Insert rectangles for columns, stretching from top to bottom of the slide.
- Duplicate and position rectangles side by side to form the desired number of columns (e.g., 12).
- Select all columns and group them.
- Repeat the process for rows, using horizontal rectangles (e.g., 8 rows).
- Group all rows.
- Select both groups and group them into one to create the complete grid.
- Adjust transparency and remove fills for better visibility of slide content.
- Toggle grid visibility using the selection pane.
Use the grid as a guide to align logos, text, images, and buttons for a professional look.
4. Duotone Effect: Add Artistic Color to Your Photos
The duotone effect recolors your photos using two colors, often creating a striking, modern visual. Although PowerPoint doesn’t natively support duotone, you can achieve this with a free website called duotone.shapefactory.co.
How to Create a Duotone Effect
- Pick two colors, preferably one bright and one dark, to maintain contrast.
- Enter the hex color codes on the duotone website.
- Upload or select a photo from their gallery.
- Download the duotone image and insert it into your PowerPoint slide.
This method offers endless creative possibilities for backgrounds, headers, and thematic slides.
Bonus: Create Step-by-Step Guides for Duotone Creation
Want to share this process with colleagues or friends? Use the free Chrome extension Scribe to record your steps and generate an easy-to-follow guide.
- Install and pin the Scribe extension.
- Start recording and perform all steps on the duotone website.
- Stop recording to generate a shareable step-by-step walkthrough.
This saves time and helps others learn the process effortlessly.
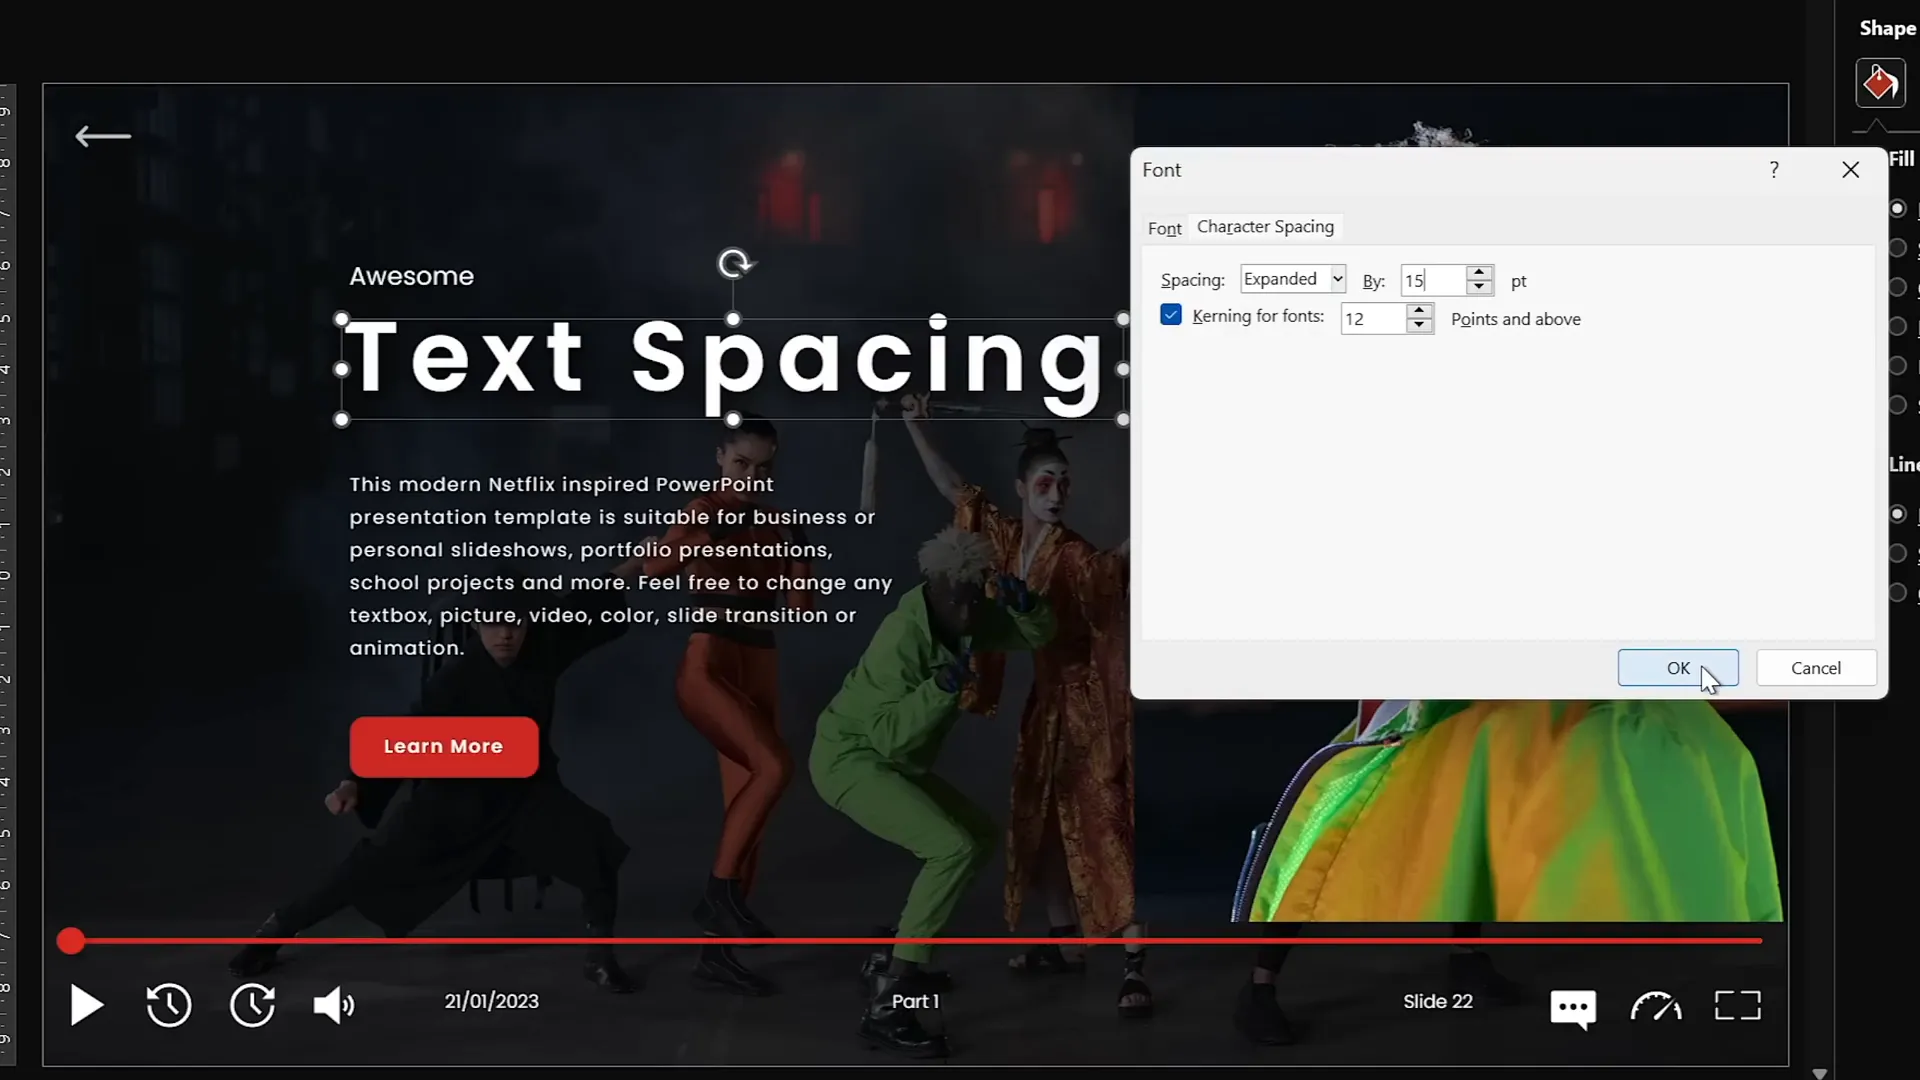
5. Master Text and Line Spacing for Readability
Spacing between letters and lines affects the clarity and aesthetics of your text. PowerPoint offers presets and custom settings to control these finely.
Adjust Letter Spacing
- Use the dropdown menu in the font section to select presets like Very Loose.
- For more control, click More Spacing and choose Expanded, then set points (e.g., 15 pt for very wide spacing).
- For subtle spacing, 1 pt expansion can improve readability without overdoing it.
Adjust Line Spacing
- Open paragraph settings and explore options like 1.5 lines or Multiple.
- Use custom values such as 0.8 to tighten line spacing when default presets are too wide.
- This prevents overlapping and improves the overall look of multi-line titles or paragraphs.
6. Convert Text to Vector Shapes for Creative Effects
PowerPoint lets you convert editable text boxes into vector shapes, allowing you to cut, merge, and manipulate text creatively.
How to Convert Text to Vector
- Create your text box with the desired font (e.g., Orbit font).
- Draw a shape you want to use for cutting or merging.
- Select the text box and shape together, then apply Merge Shapes (e.g., Subtract to cut).
- To convert the entire text box into vector without cutting, duplicate the text box, align both copies perfectly, select both, and choose Union in Merge Shapes.
Creative Use Case: Split Text Design
Use a shape to cut the text into parts (e.g., top and bottom), duplicate the slide, and apply different merge functions (Subtract and Intersect) to each part. Combine them with spacing to create dynamic text designs.
7. Use Colorful Shadows to Highlight Elements
By default, PowerPoint shadows are black, but you can customize shadow colors to add vibrancy and depth to your slides.
How to Add Colorful Shadows
- Select the shape or chart element.
- Go to Format Shape > Shadow options.
- Pick an outer shadow preset.
- Change shadow color to any soft or bright color.
- Adjust blur (e.g., 75 pt) for softness, distance for separation, and transparency for subtlety.
This technique works especially well for charts and highlighted text blocks to make them pop.
8. Harness the Power of Slide Master for Global Changes
The Slide Master is your best friend for consistent and efficient presentation design. Use it to apply logos, slide numbers, and other elements globally.
Using Slide Master
- Go to View > Slide Master.
- Insert or replace logos and other global elements.
- Align and resize elements as needed.
- Customize slide numbers by changing shape styles (e.g., rounded square to circle).
- Move slide numbers to preferred locations.
- Close Slide Master to apply changes to all slides.
Another quick way to access Slide Master is by holding Shift and clicking the slide master icon.
9. Add Gradient Fill to Text for a Modern Look
Gradient fills add a stylish flair to your text, making titles and headers more eye-catching.
How to Apply Gradient Text
- Select all text in your text box.
- Go to Text Fill > Gradient Fill.
- Add multiple color stops and adjust their positions to create the desired gradient.
- For emphasis, fill a specific word with solid white and add a white shadow for a glowing effect.
- Experiment with transparency stops to create fades or overlays.
Gradient text works well for slide titles and key phrases to draw attention.
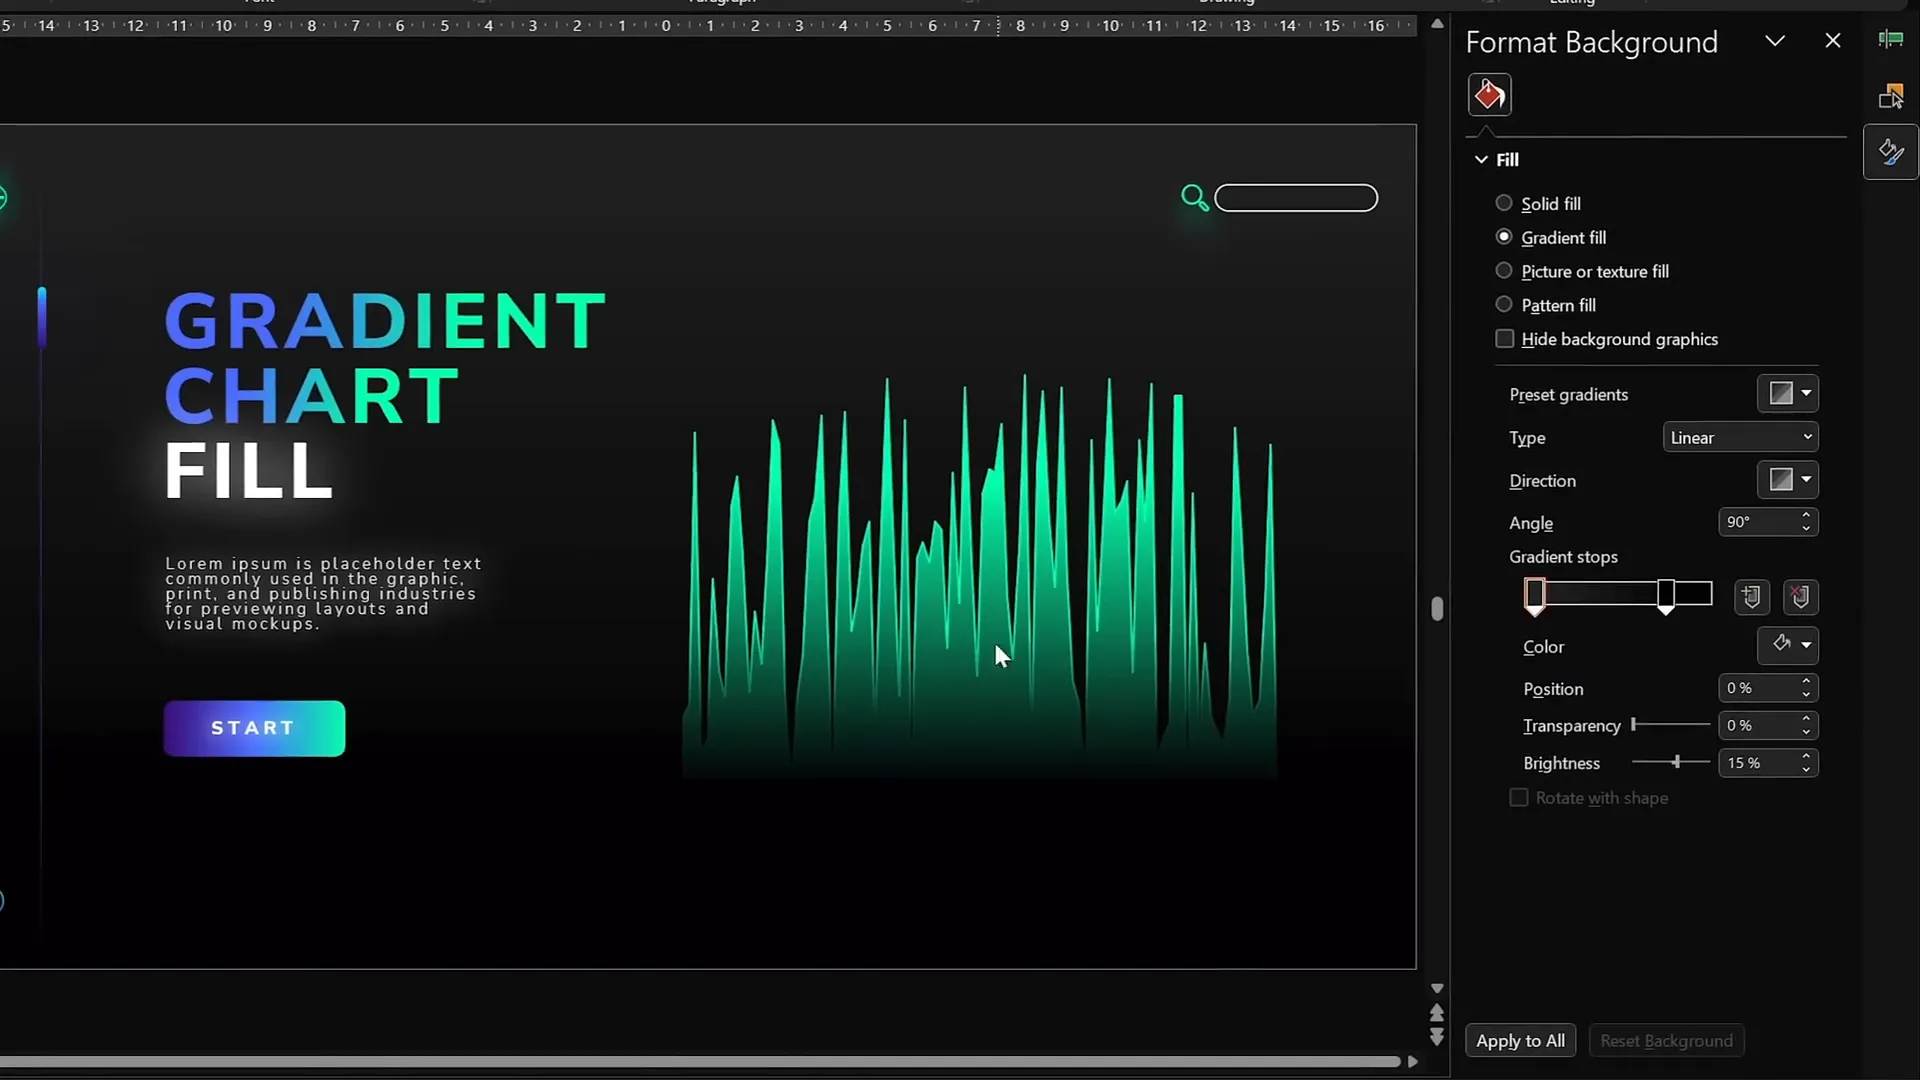
10. Create Modern Gradient Area Charts
Area charts look dynamic and modern with gradient fills and lines. Here’s how to make them in PowerPoint:
Create and Customize an Area Chart
- Insert an Area Chart from Insert > Chart.
- Resize and remove unnecessary elements like chart title, axis labels, and gridlines for a cleaner look.
- Edit chart data to have only one data series.
- Fill the X-axis with numbers (e.g., 1 to 100) and use the
=RANDBETWEEN(1,100)formula in the series column to generate random data. - Apply a gradient fill to the area with one fully opaque color and one fully transparent color to create a fade effect.
- Add a gradient line with similar opacity settings for a smooth outline.
This creates sleek, visually appealing charts for reports or dashboards.

11. Add Repeatable Animations in Slide Master
Did you know you can add animations in Slide Master? These animations appear on all slides using that layout, saving time and ensuring consistency.
How to Use Slide Master Animations
- Go to View > Slide Master.
- Add animations to objects (e.g., a playback icon or background photo).
- These animations won’t appear in the normal animation pane but will play on every slide using the layout.
- Duplicate slide layouts to create variations with different animations.
- Example: Add a motion path animation to a fox image to make it move across slides.
- Apply the custom layout to slides to see the animation in action.
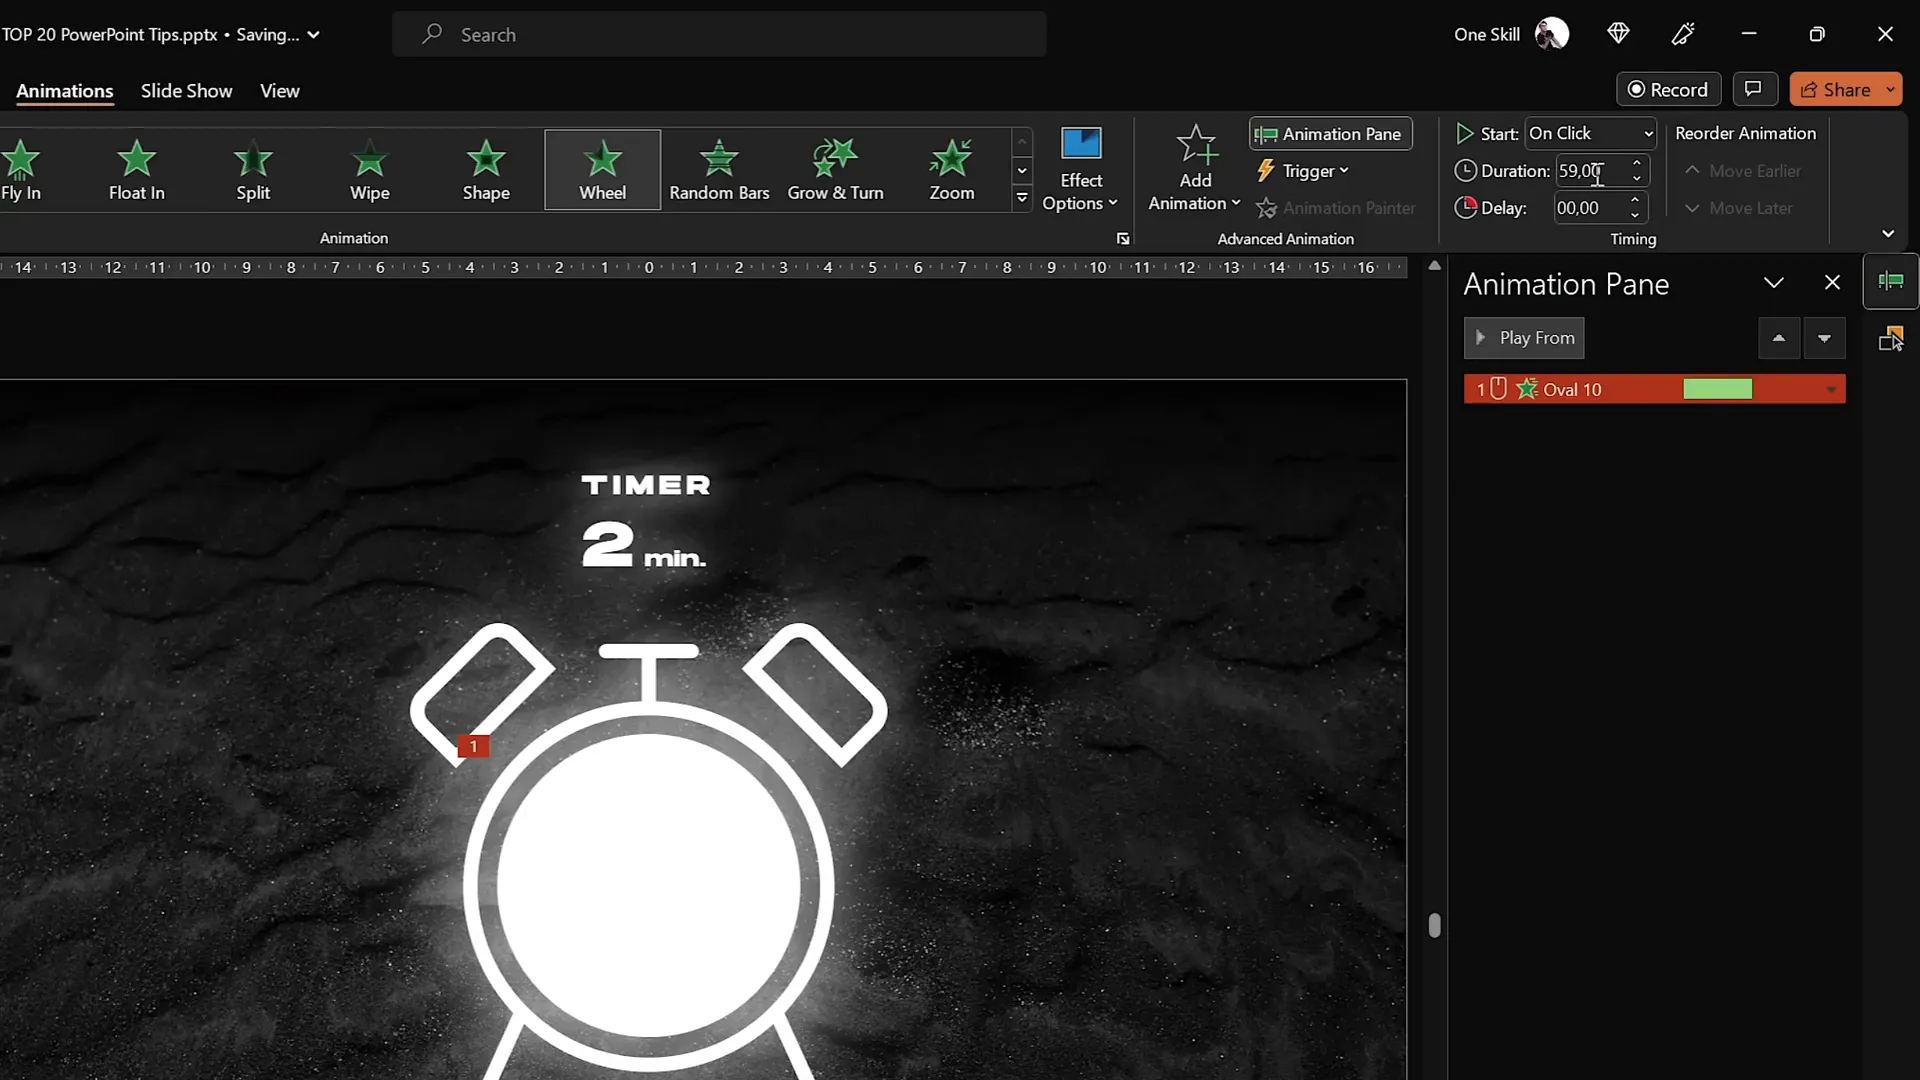
12. Extend Animation Duration Beyond Limits
PowerPoint limits animation durations to 59 seconds by default, but you can extend animations up to several minutes for timers or long effects.
How to Create Long Animations
- Apply your animation (e.g., wheel grow animation) and set duration to max (59 seconds).
- Double-click the animation to open settings.
- In the Timing tab, manually type a longer duration (e.g., 120 seconds for 2 minutes).
- Click OK; the duration field will change to “Auto” but the animation length is now extended.
- Preview your animation to confirm the longer duration.
This is perfect for countdown timers or progress indicators.
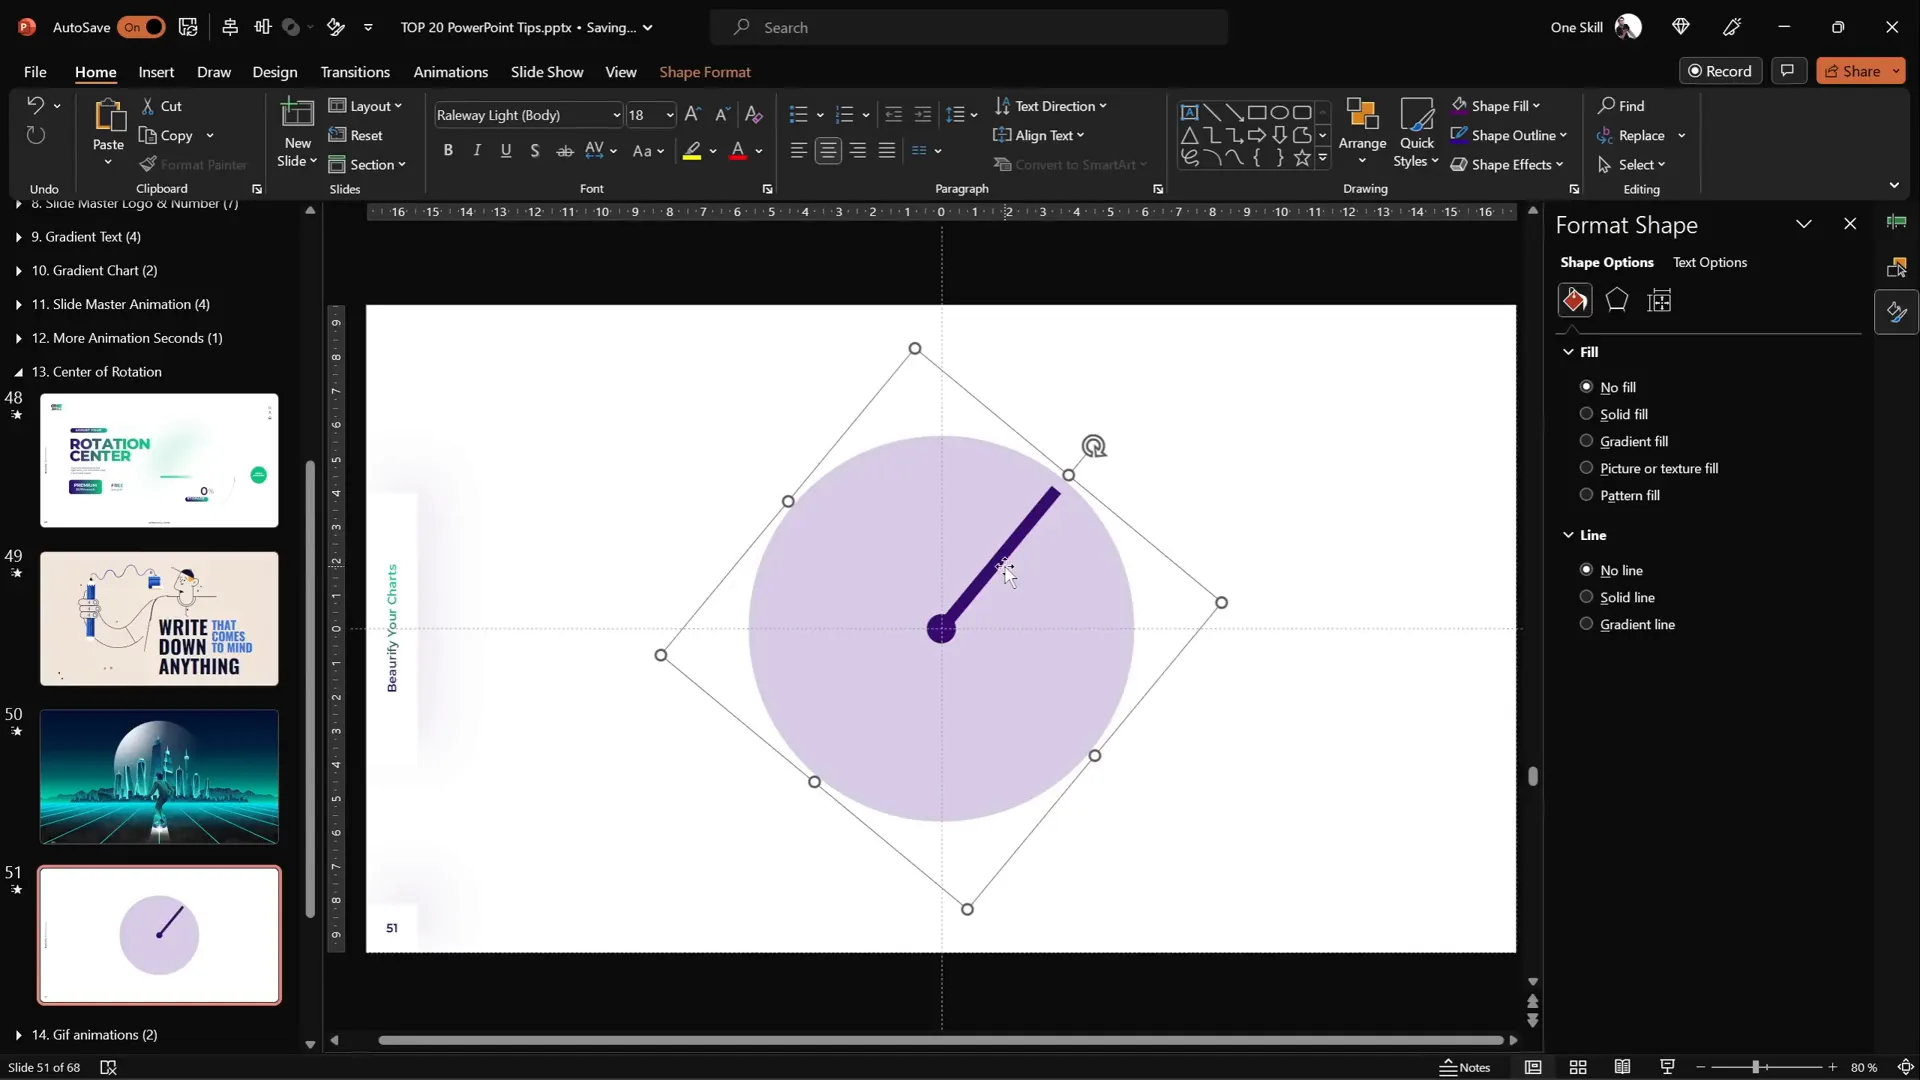
13. Set Custom Rotation Centers for Precise Animations
By default, grouped objects rotate around their center, but sometimes you want to rotate around a specific point (e.g., a shoulder or pivot). Here’s how to create custom rotation centers:
- Group your objects (e.g., a circle and rectangle).
- Insert a large shape (e.g., a big circle) that covers the grouped objects.
- Align the large shape’s center to the desired rotation center point.
- Select all shapes (including the big one) and group them.
- Remove fill from the large shape to keep it invisible.
- Now, when you rotate the group, it will rotate around the location of the large shape’s center.
This trick provides precise control for animation pivots.
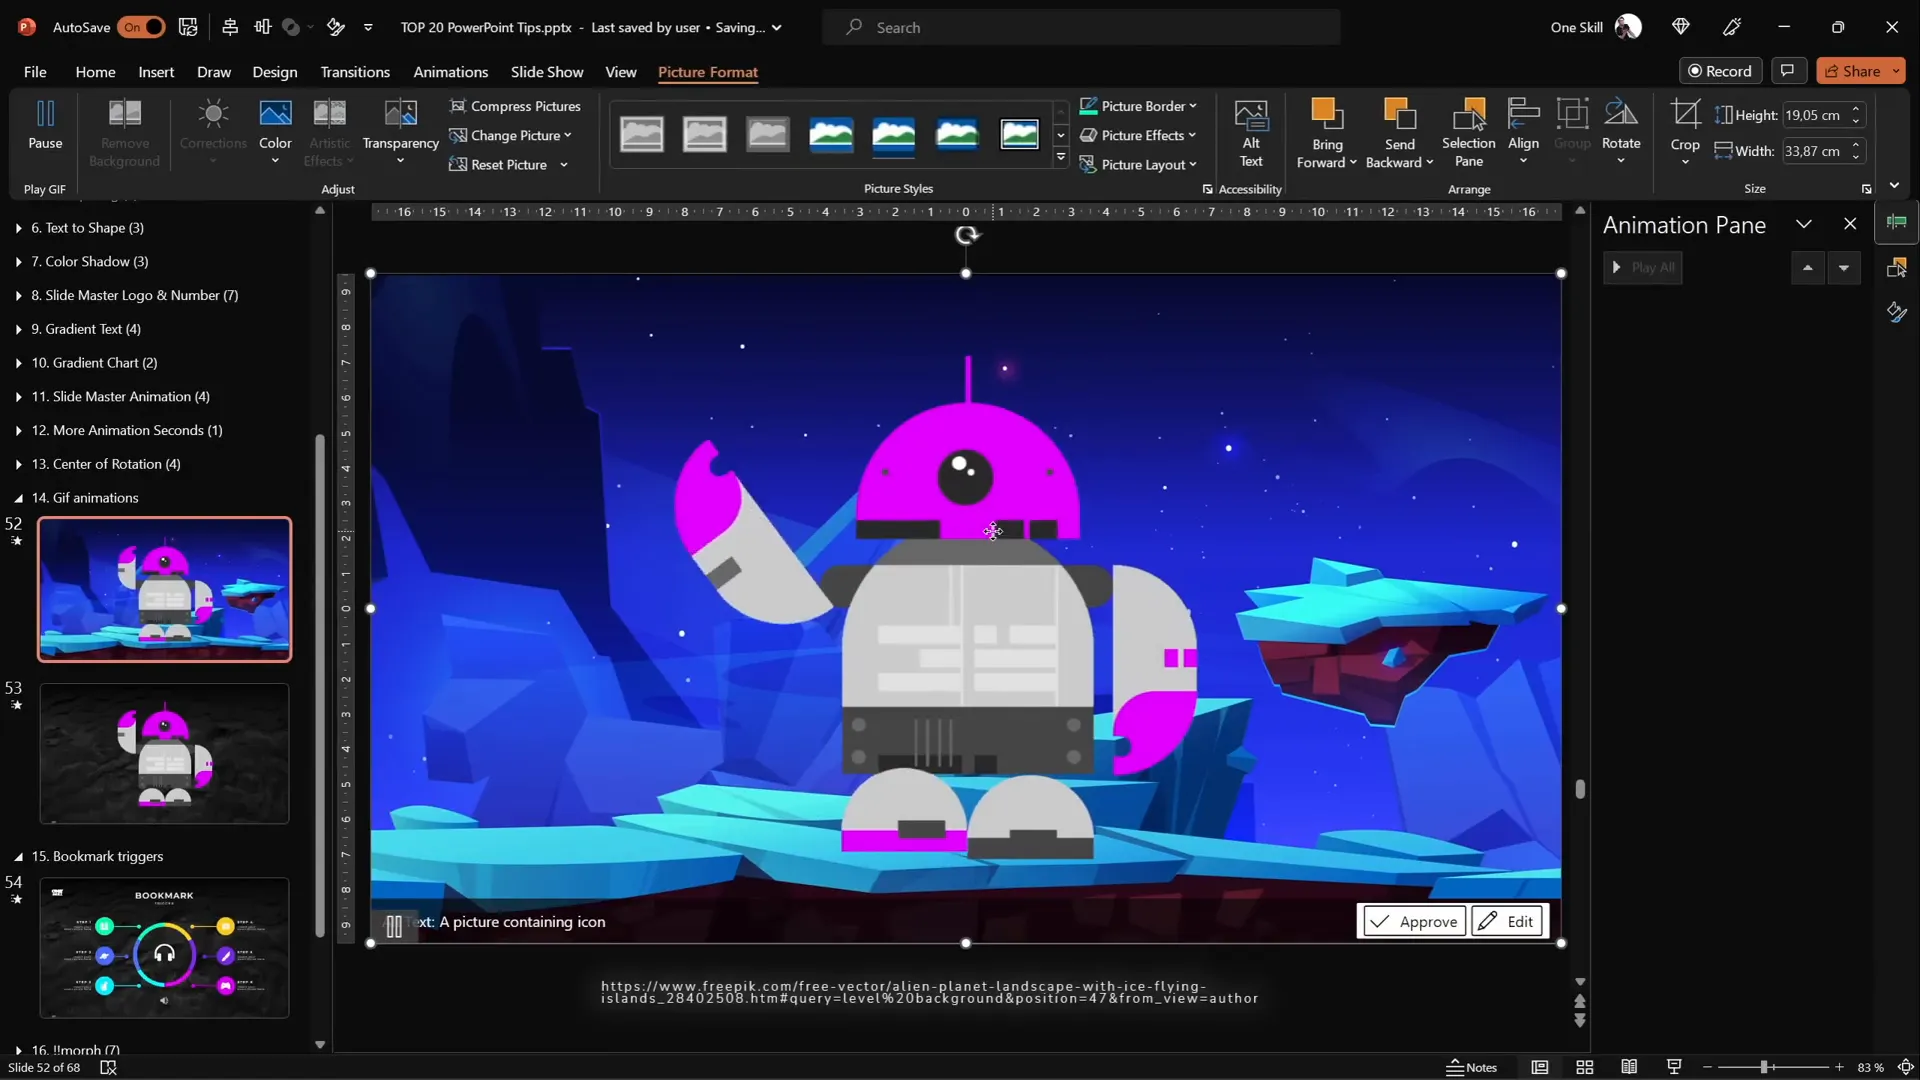
14. Combine GIFs and PowerPoint Animations
Complex animations like waving arms or walking robots are difficult to create entirely with PowerPoint animations. Combining GIFs with animations allows for smooth, detailed effects.
Steps to Create Combined Animations
- Find or create a GIF (e.g., animated robot) and insert it into your slide.
- Use stock illustrations converted to shapes for editable parts.
- Create custom rotation centers for movable parts (e.g., arm rotation at shoulder).
- Add PowerPoint animations like spin or motion paths to parts or the GIF.
- Use animation painter to copy animations between parts.
- Set animations to auto-reverse and adjust delays for natural movement.
- Export your slide as an animated GIF for smooth playback.
This approach combines the best of both worlds for creative and efficient animations.
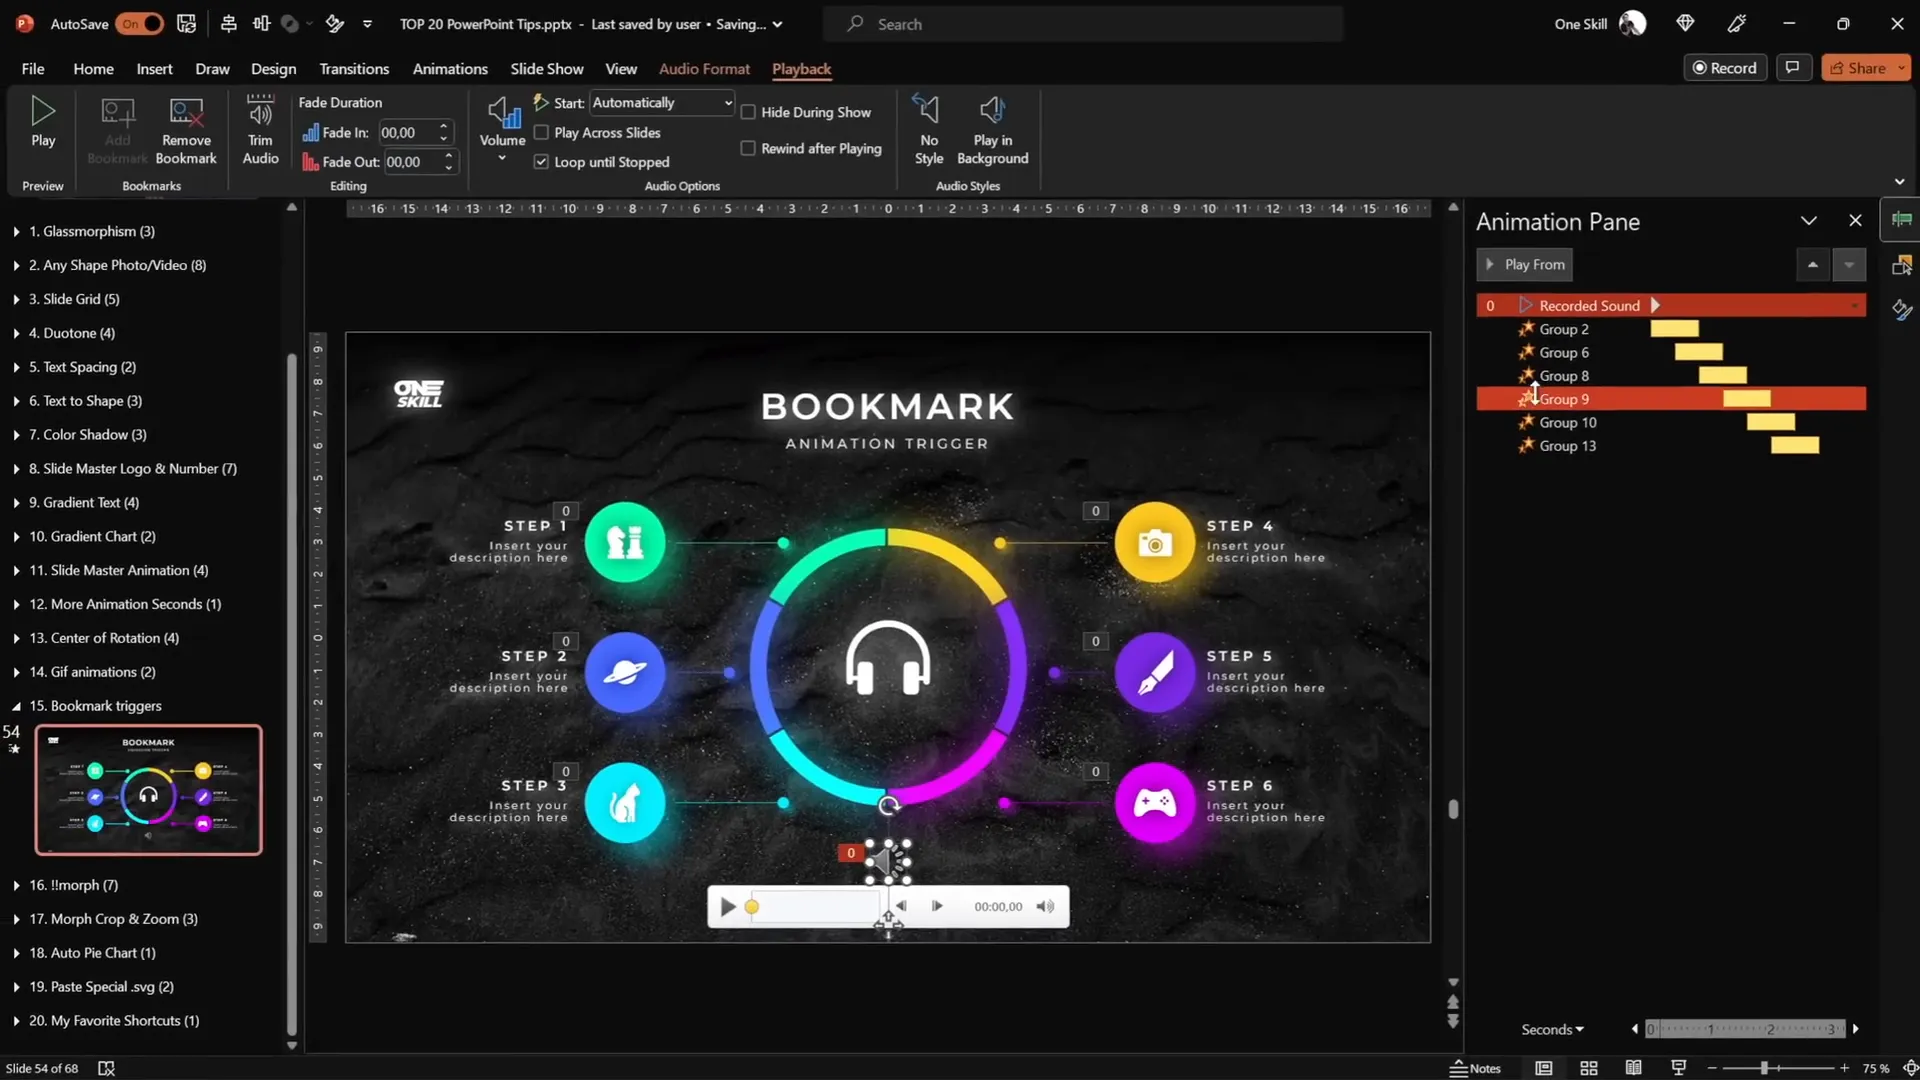
15. Loop Multiple Animations with Bookmark Triggers
Bookmark triggers allow you to loop animation sequences with precise timing, even when animations have delays.
How to Loop Animations Using Bookmark Triggers
- Apply animations to objects (e.g., pulsing bubbles) and note the end time of the last animation.
- Insert a silent audio clip slightly longer than the last animation (e.g., 3 seconds).
- Set audio to play automatically and loop until stopped.
- Add a bookmark at the start of the audio timeline.
- Select animations to loop and set their triggers to start at the bookmark.
- Play the slide to see animations loop in the correct order indefinitely.
This is a powerful method for continuous, timed animation sequences.
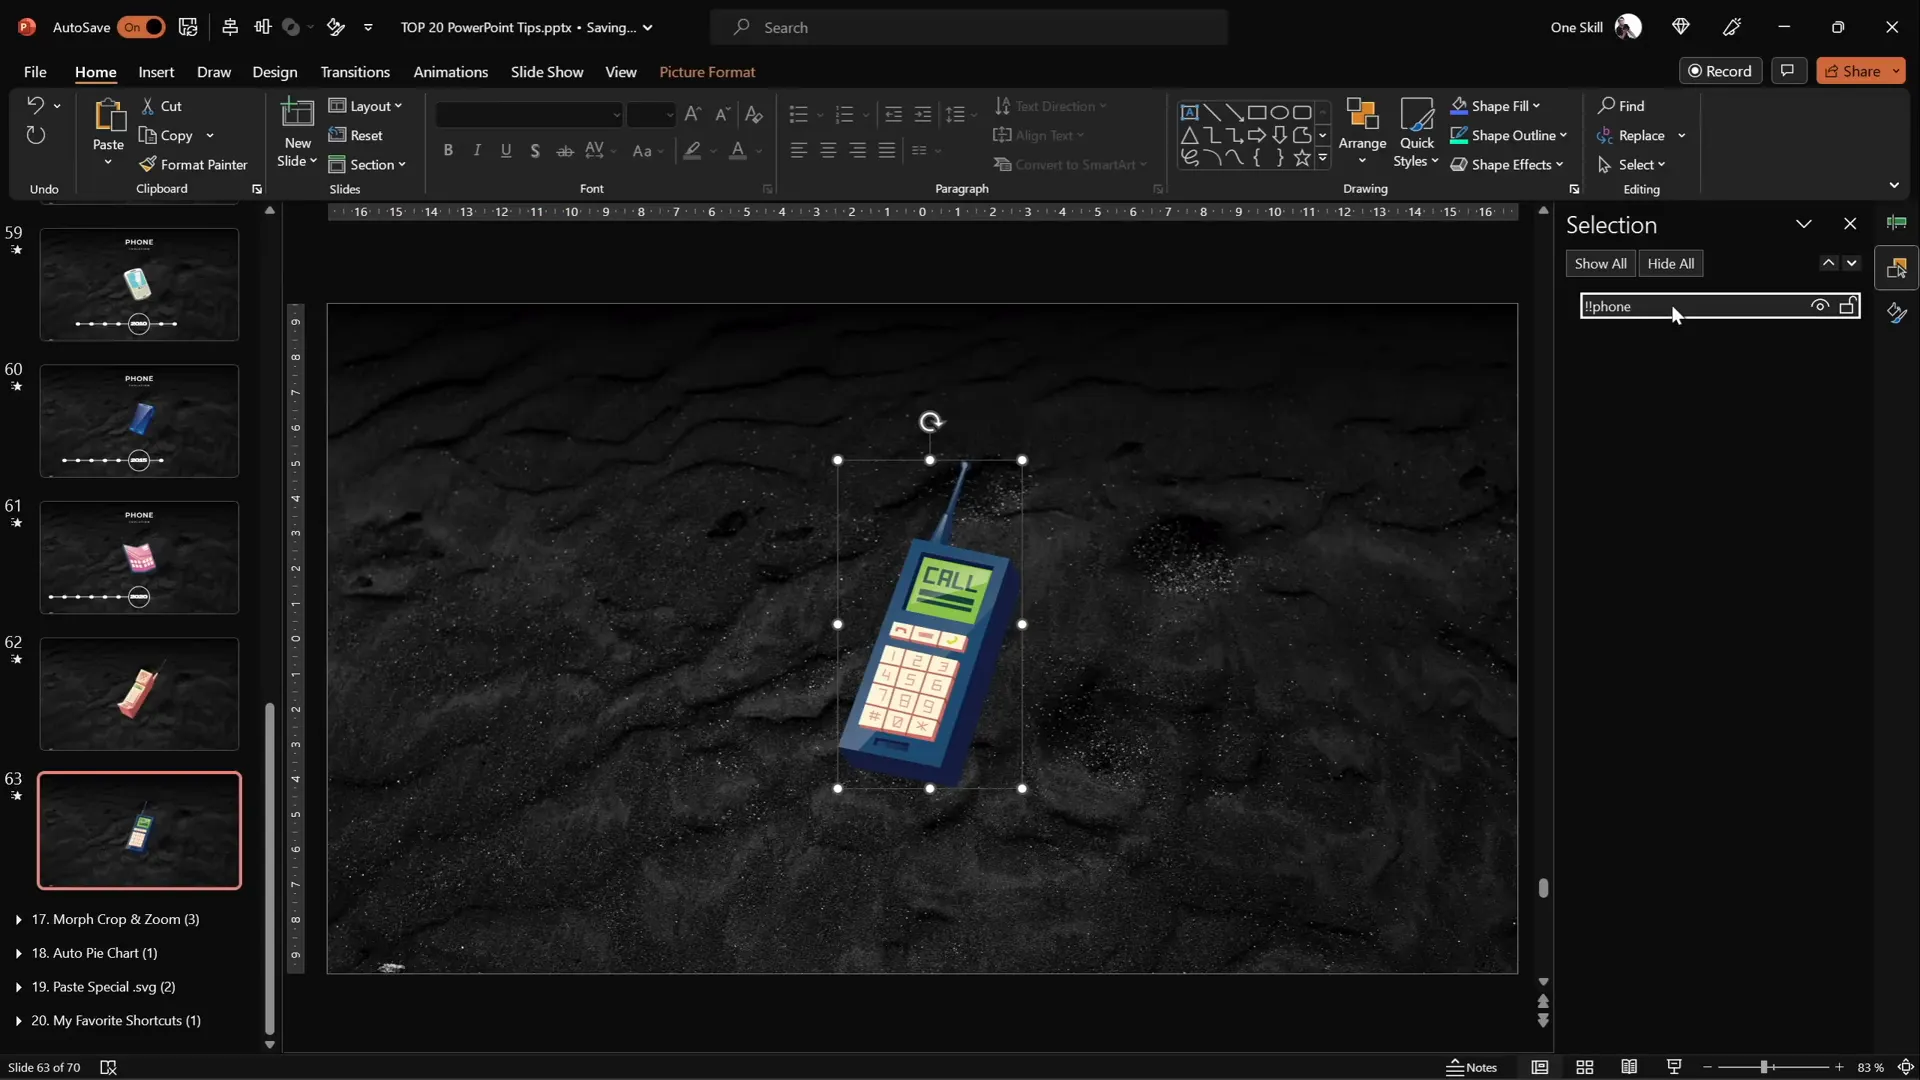
16. Perfect Morph Transitions with Naming Tricks
The Morph transition is a favorite for smooth object movement between slides, but sometimes it doesn’t work as expected.
Fix Morph Transition Issues
- Open the Selection Pane (Arrange > Selection Pane).
- Rename objects on both slides with the same name starting with double exclamation marks (e.g.,
!!phone). - This tells PowerPoint to treat these objects as the same shape for morphing.
- Preview the morph transition for smooth animation.
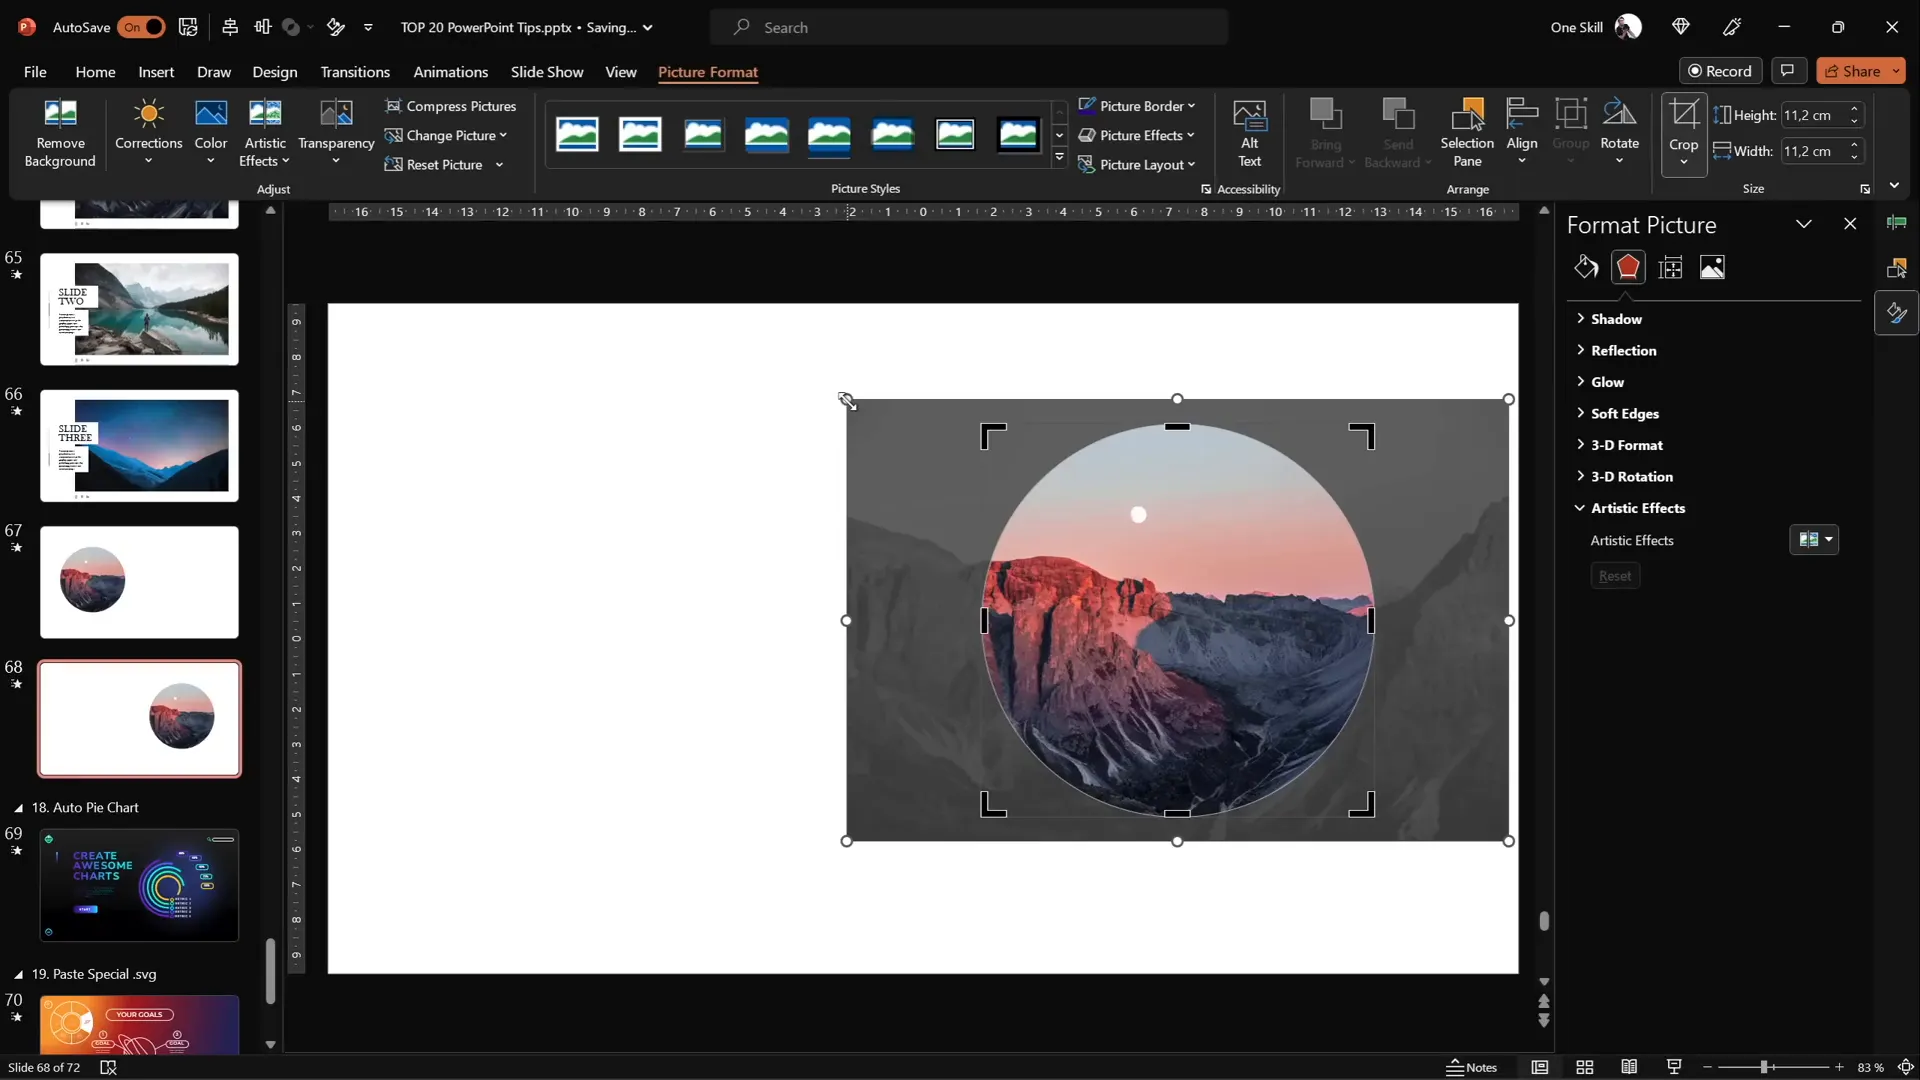
17. Animate Photos Using Morph and Crop
You can enhance morph animations by combining position changes and photo cropping for zoom effects.
How to Animate Photos with Crop and Morph
- Insert and crop your photo into a shape (e.g., circle).
- Duplicate the slide with the photo.
- Move the photo to a new position on the second slide.
- On the second slide, adjust the crop size to zoom in or out.
- Set the slide transition to Morph.
- Preview to see the photo move and zoom smoothly.
This technique adds visual interest to photo animations.
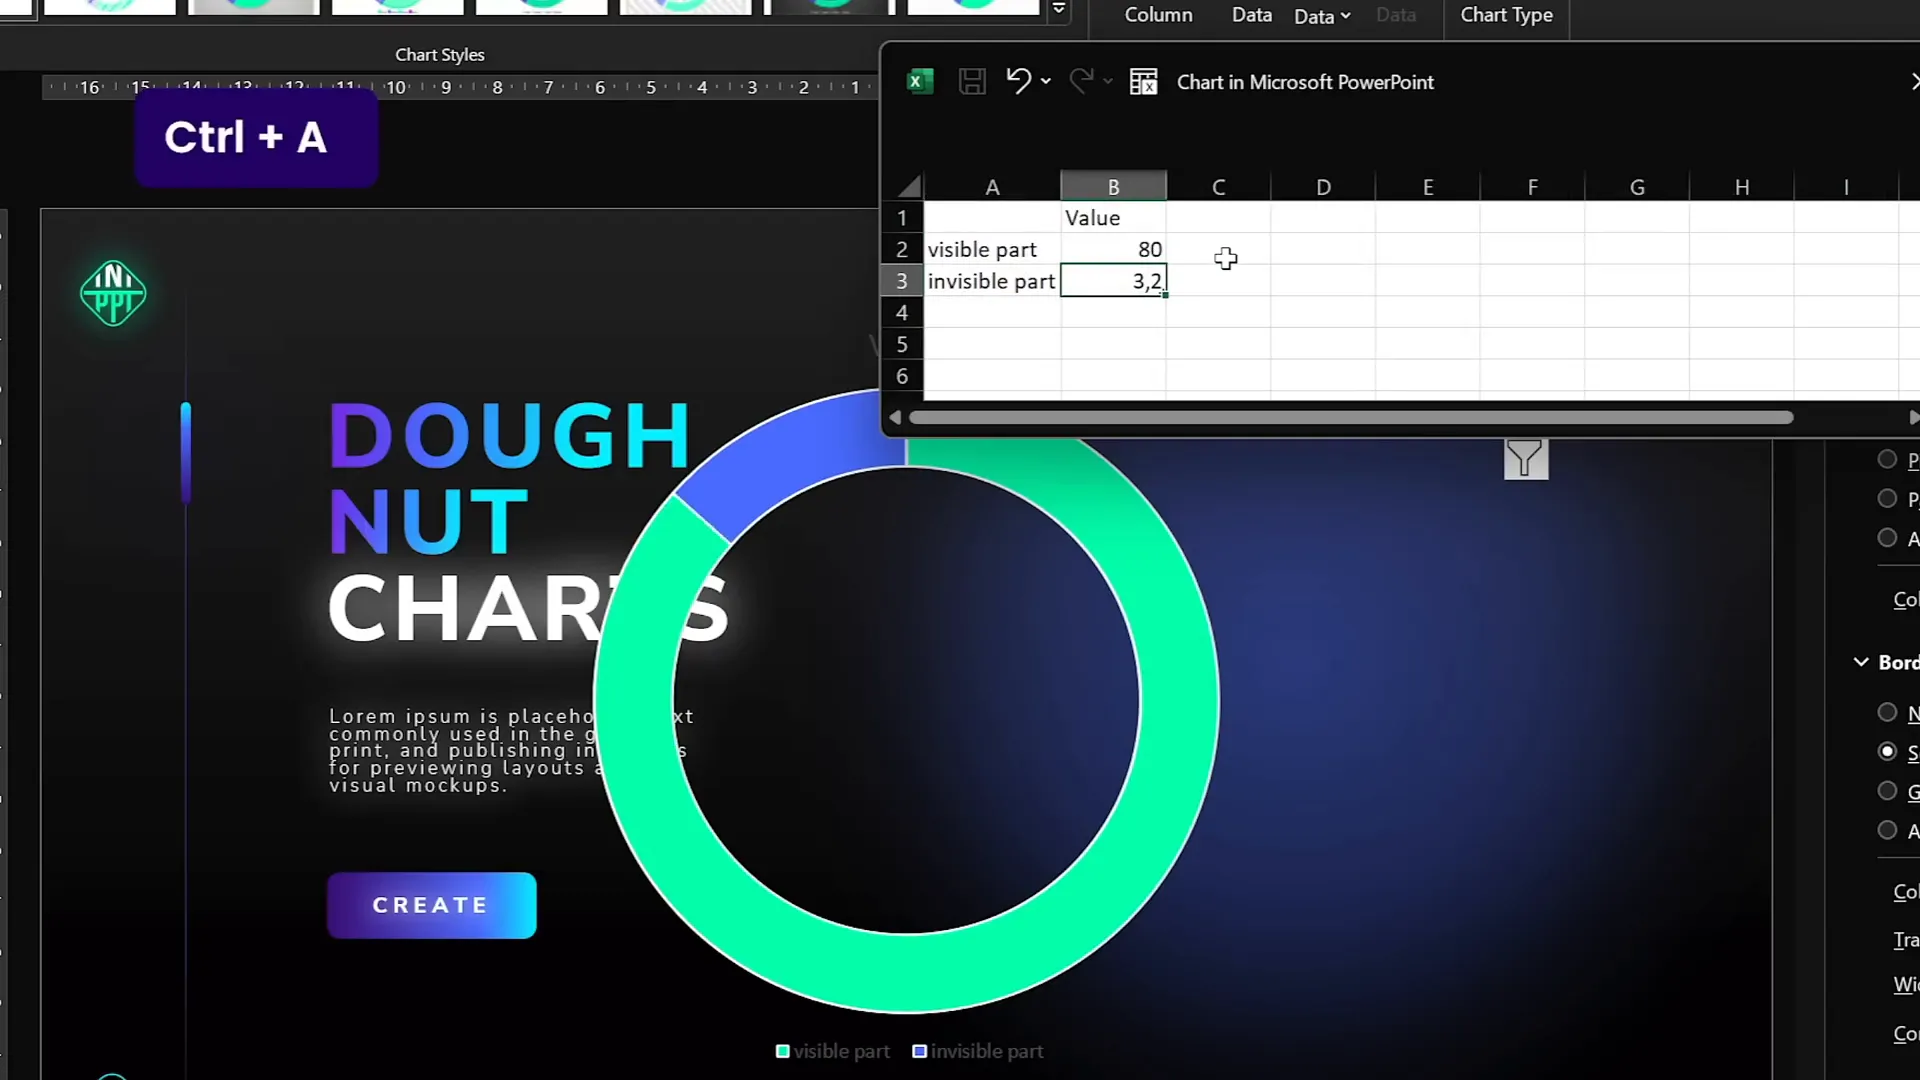
18. Create Auto-Updating Donut Charts
Donut charts are great for visualizing proportions. Here’s how to make one that updates automatically as you change data.
Steps to Create an Auto-Updating Donut Chart
- Insert a donut chart via Insert > Chart > Donut.
- Delete extra rows to keep only two data points: Visible Part and Invisible Part.
- Rename these rows accordingly.
- Enter the visible value (e.g., 80).
- For the invisible part, use the formula:
=100 - [visible value]to auto-calculate the remainder. - Update the visible value to see the chart update automatically.
- Style with colorful shadows or effects for a polished look.
19. Divide Pie or Donut Charts into Equal Parts
Dividing charts into equal segments is handy for UI design or infographics.
Method 1: Using Donut Chart Data
- Insert a donut chart.
- Add rows equal to the number of parts you want (e.g., 6).
- Set all row values to the same number (e.g., 10) for equal division.
- Remove unnecessary elements like chart titles and legends.
- Adjust hole size if needed.
Method 2: Convert to SVG and Edit Parts
- Copy the donut chart and use Paste Special to paste as SVG.
- Convert SVG to shapes and ungroup.
- Access and manipulate individual segments.
Method 3: Create Gaps Between Segments
- Insert a donut shape.
- Draw narrow rectangles crossing the donut to form gaps.
- Union the rectangles.
- Subtract the rectangles from the donut shape.
- Insert a square behind and use Fragment merge to split into individual parts.
- Delete the square and style segments independently.
20. Essential PowerPoint Shortcuts to Boost Productivity
Mastering keyboard shortcuts is one of the best ways to speed up your PowerPoint workflow and make editing slides effortless. Here are my favorite and most-used shortcuts:
| Shortcut | Function | Description |
|---|---|---|
| Ctrl + A | Select All | Select all elements on the slide. Hold Shift to deselect specific items. |
| Ctrl + G | Group | Group selected objects for easier movement and formatting. |
| Ctrl + C / Ctrl + V | Copy / Paste | Copy and paste objects or text. |
| Ctrl + Drag | Duplicate | Hold Ctrl and drag an object to quickly make a copy. |
| Ctrl + Shift + Drag | Duplicate in Straight Line | Hold Ctrl + Shift and drag to duplicate along a straight axis. |
| Ctrl + Shift + Resize | Resize from Center | Hold Ctrl + Shift while resizing to scale from the center. |
| Ctrl + Shift + C / Ctrl + Shift + V | Copy / Paste Formatting | Copy formatting from one object and apply it to another. |
| Ctrl + Shift + . (Period) | Increase Font Size | Quickly increase font size of selected text. |
Using these shortcuts consistently will save you significant time and effort when designing presentations.
Frequently Asked Questions (FAQ)
Q: How can I create a glassmorphic effect without external tools?
A: You can use PowerPoint’s built-in blur artistic effects on background images, then fill shapes with the slide background fill to mimic the frosted glass look. Adding a white inside shadow enhances the effect.
Q: Can I insert videos into custom shapes like photos?
A: Yes! The same merge shapes method works for videos. Cover your custom shape with the video, send the video to back, select both, and use Intersect to crop the video into the shape.
Q: What is the best way to ensure morph transitions work smoothly?
A: Rename the objects on consecutive slides with identical names starting with double exclamation marks (e.g., !!object). This helps PowerPoint recognize and animate the objects properly.
Q: How do bookmark triggers help with looping animations?
A: Bookmark triggers allow animations to restart precisely at a bookmark point in a looping audio clip. This enables complex animation sequences to loop smoothly even with delays.
Q: Are there any free tools to create duotone effects?
A: Yes, the free website duotone.shapefactory.co lets you pick colors and create duotone images, which you can download and use in PowerPoint.
Q: How can I speed up my PowerPoint workflow?
A: Learn and use essential PowerPoint shortcuts like Ctrl + A for select all, Ctrl + G for grouping, and Ctrl + Shift + C/V for copying and pasting formatting. These will save you a lot of time.
Conclusion
PowerPoint is more than just a slideshow tool; it’s a creative platform with powerful features waiting to be unlocked. From the stylish glassmorphic effect to advanced animation techniques like bookmark triggers, and from custom-shaped media to auto-updating charts, these 20 tips will elevate your presentations to new heights.
Remember, mastering PowerPoint shortcuts is key to working efficiently and designing with confidence. Experiment with these tips, customize them for your style, and watch your presentations transform into compelling stories that captivate your audience.
Happy presenting!
Check out the full video: TOP 20 PowerPoint TIPS & TRICKS!😁✨


