

- Table of contents
Introduction
Hi — I’m the creator behind POWERPOINT UNIVERSITY. In this tutorial-style guide I’ll walk you through how I build a rotating Morph transition slide in PowerPoint that showcases multiple images (I used world cities as an example). If you want a professional-looking, interactive slide that rotates through sections and highlights one area at a time, this technique is fast to build and very flexible.
Below you’ll find a detailed, step-by-step walkthrough with practical tips, keyboard shortcuts, and plenty of design advice so you can reproduce the exact animation. The same steps apply whether you’re showcasing cities, product photos, team members, or portfolio pieces.
What you’ll need
- PowerPoint (Windows) with the Morph transition available. Morph requires Office 365 / PowerPoint 2019 or later for the full experience.
- High-quality images. I used Unsplash (free) for city images: Paris, Dubai, London, New York, Tokyo, Hong Kong.
- Basic familiarity with shapes, grouping, the Selection Pane, and formatting tools in PowerPoint.
- A bit of patience — the technique is methodical but not difficult.
Quick overview of the effect
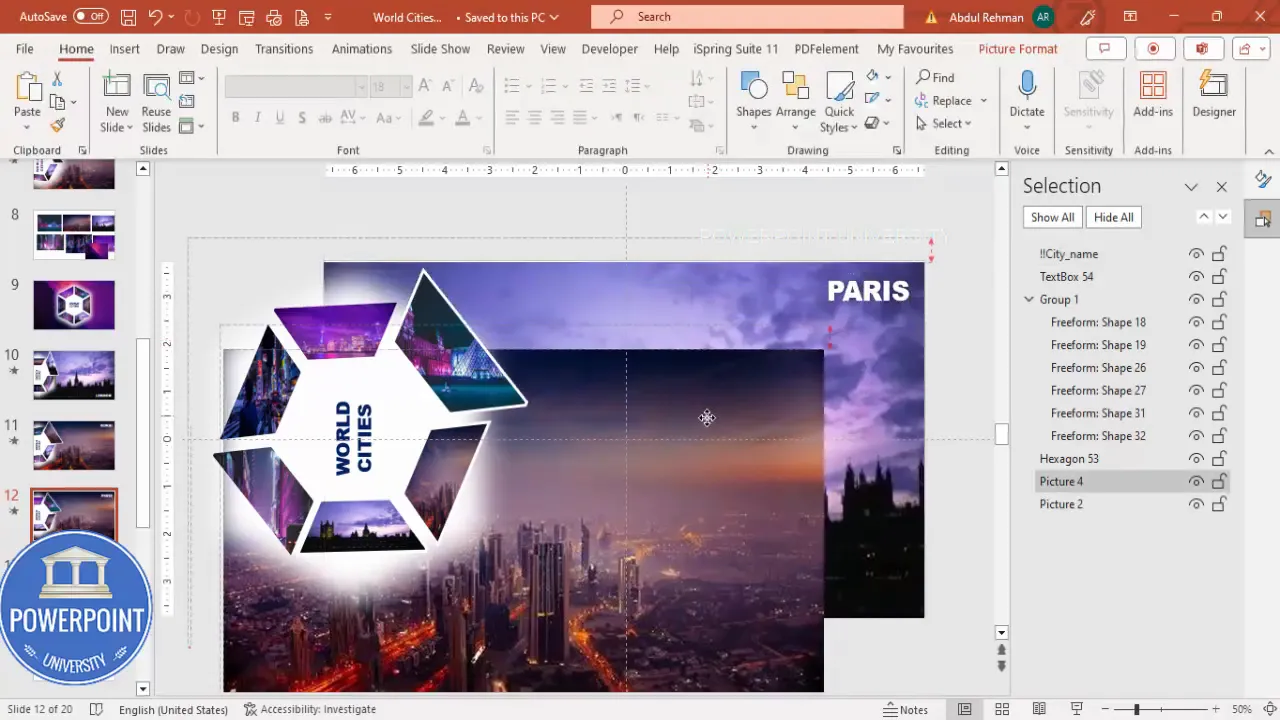
The core idea is simple: create a hexagon that’s been cut into six wedge-like pieces, fill each piece with a different image, then use duplicated slides and the Morph transition to rotate and highlight one wedge at a time. On each duplicated slide you resize or reposition one wedge (to “pop” it forward), add the larger background photo that corresponds, and label the highlighted city. Morph interpolates object movement, rotation, and size between slides, producing a smooth rotating carousel effect.
Step-by-step build (complete workflow)
Below is a linear, copy-and-paste-friendly build. I break this into smaller tasks: creating the hexagon slice layout, importing images into slices, preparing the background and title, grouping + duplicating slides, and fine-tuning the Morph transition. Follow each part in order and use the screenshots as checkpoints.
1. Prepare a new slide and enable guides
- Insert a new blank slide.
- Go to the View tab and enable Guides. These help align shapes perfectly while you build.
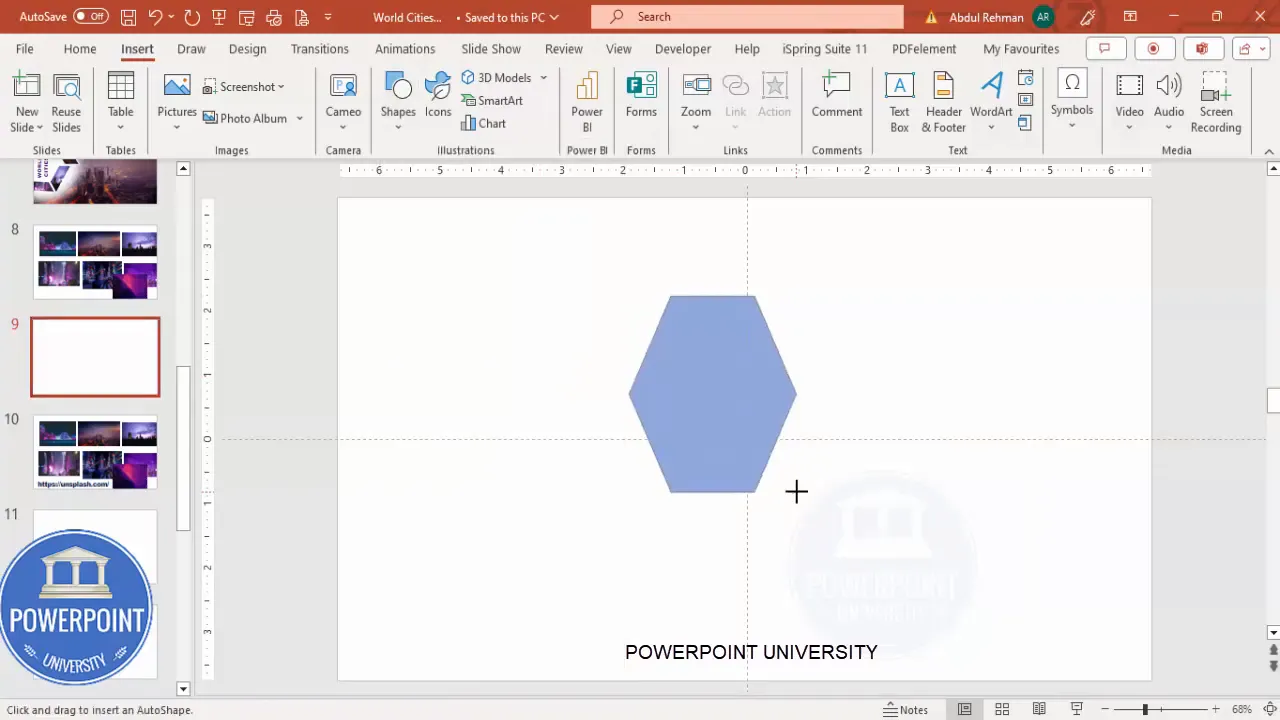
2. Draw a perfect hexagon
Insert > Shapes > Hexagon. Hold Shift while drawing to constrain proportions so it stays perfectly regular.
- Remove the outline: Shape Format > Shape Outline > No Outline.
- Rotate as needed: use the rotation handle or press Alt + Right Arrow repeatedly to snap the rotation in 15-degree increments. I rotate so one flat edge sits at the top—this makes the slice cuts easier to align.
- Use Align > Align Center and Align Middle to perfectly center the hexagon on the slide.
3. Make the hexagon hollow (create the ring)
Duplicate the hexagon (Ctrl + D). Change the duplicated fill to a different color so you can see it easily. Then:
- Align duplicate to the original (Align Center, Align Middle).
- Hold Ctrl + Shift and drag the inner hexagon inward to create a smaller, concentric hexagon (this forms the “hole”).
- Select both shapes, Shape Format > Merge Shapes > Subtract to cut the smaller shape out of the larger, creating a hollow hexagon.

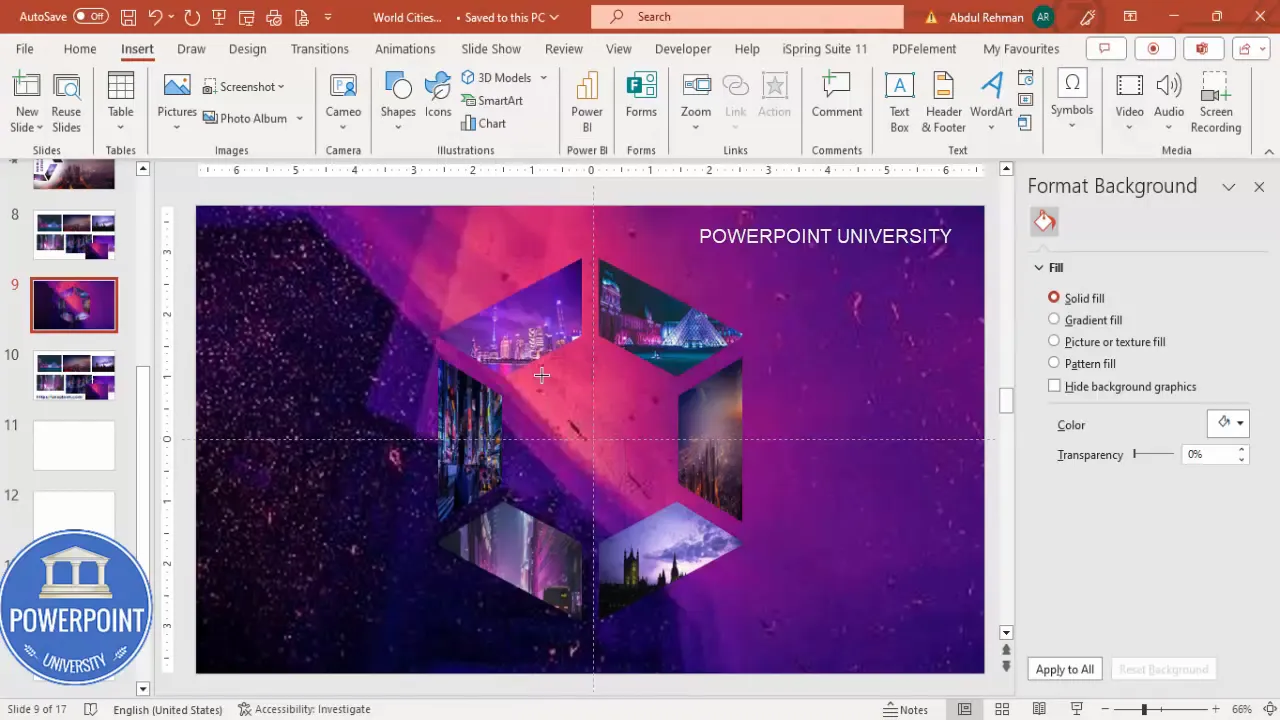
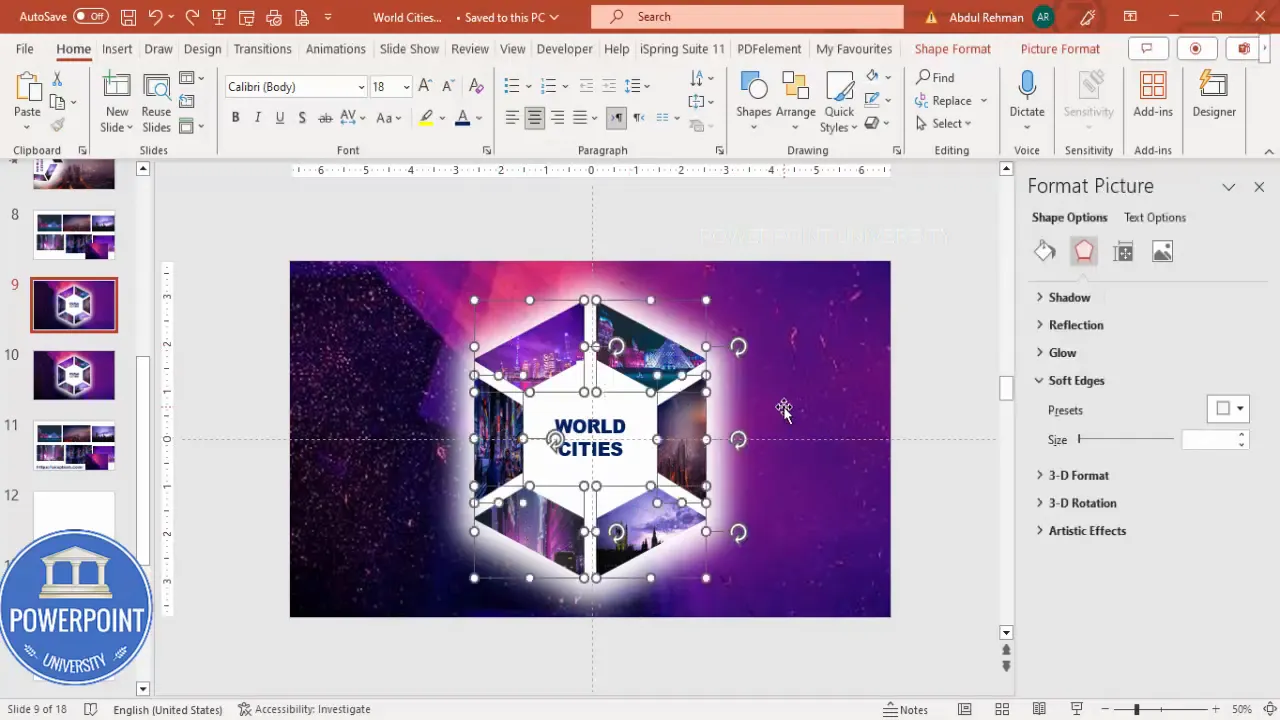
5. Fill each wedge with an image
Now that you have six shape fragments, it’s time to put your images in each one. Here’s a fast way:
- Open each image (or have them pasted onto the slide). Select an image and press Ctrl + C to copy.
- Select the target wedge shape. Right-click > Format Shape > Fill > Picture or texture fill > Clipboard. The image will be applied as the fill for that wedge.
- Important: untick Rotate with shape under the Picture settings if the image orientation is being rotated when you adjust the wedge. This keeps the photo aligned upright regardless of wedge rotation.
- Repeat for all six wedges (Paris, Dubai, London, New York, Tokyo, Hong Kong in my example).

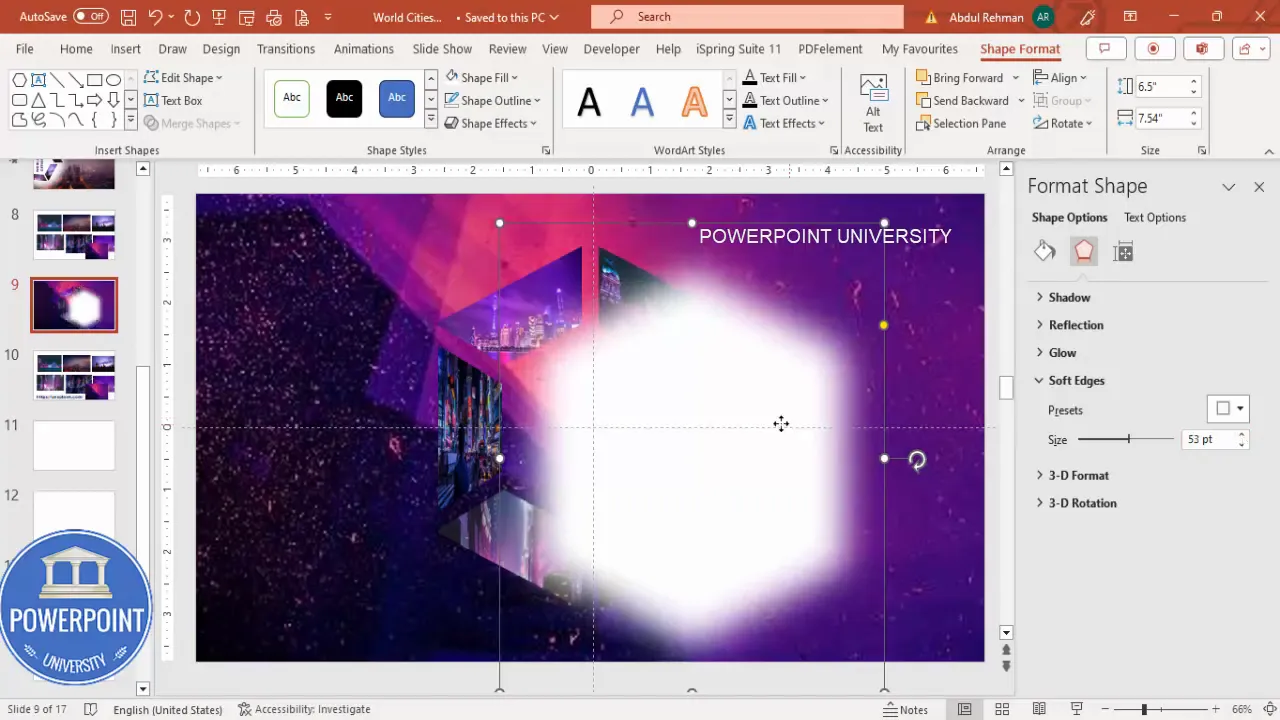
7. Add a soft-edge white hexagon behind to improve contrast
If your city images blend into the background, add a soft white hexagon or oval behind the ring to create contrast:
- Draw another hexagon (or oval), fill it with white, remove outline.
- Format Shape > Effects > Soft Edges — increase soft edges so the white blends softly into the background.
- Align and size it behind the ring and send it to back (but keep it above the full-slide background).
8. Add title text
Create a title for the slide — I used “World Cities” with Arial Black, centered and sized to taste. Align it so it’s visually balanced against the hexagon ring.
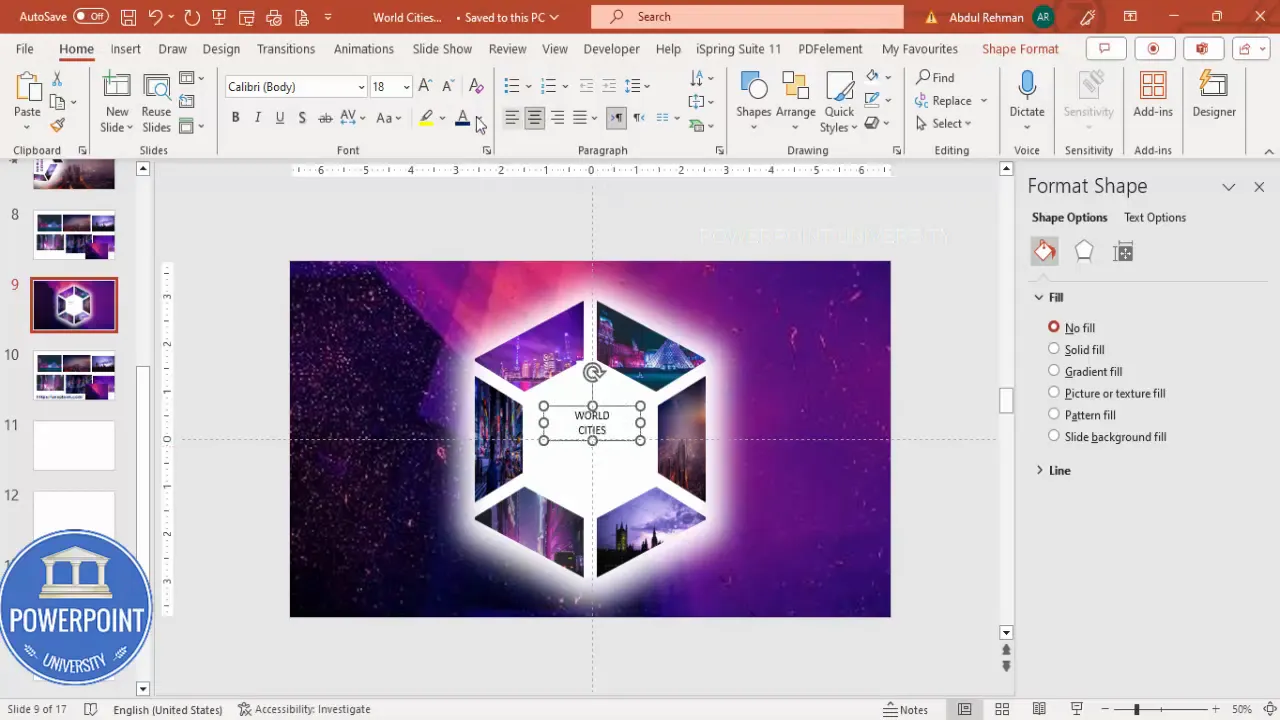
9. Group wedge pieces and prepare for Morph
Before applying Morph, make sure the objects that should animate together are grouped. Group the six wedges into a single object but keep any separate text or background image ungrouped.
- Select all six wedge shapes (hold Shift while clicking each) and press Ctrl + G to group.
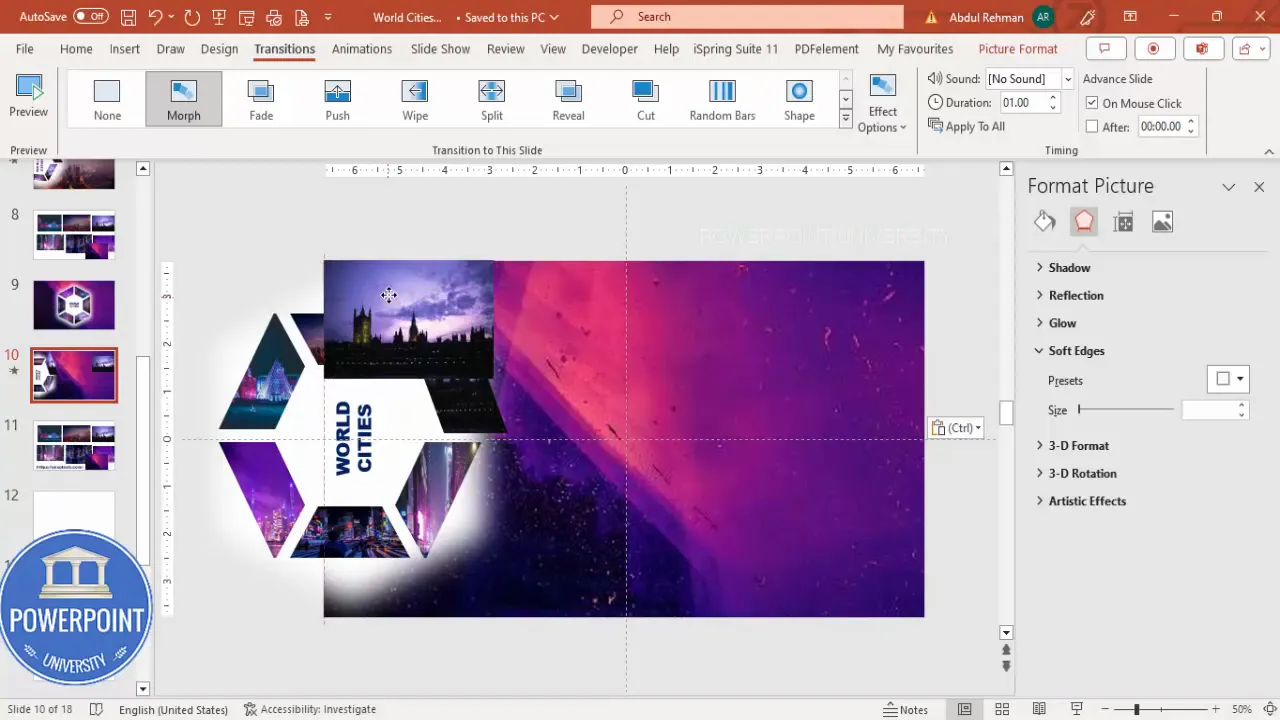
- Make a duplicate of the entire slide (right-click slide thumbnail > Duplicate Slide).
- On the duplicate, move or rotate the group and the white soft-edge hexagon to simulate the rotation step. For the rotation look, simply rotate the grouped wedge object by dragging or using rotate keyboard shortcuts.
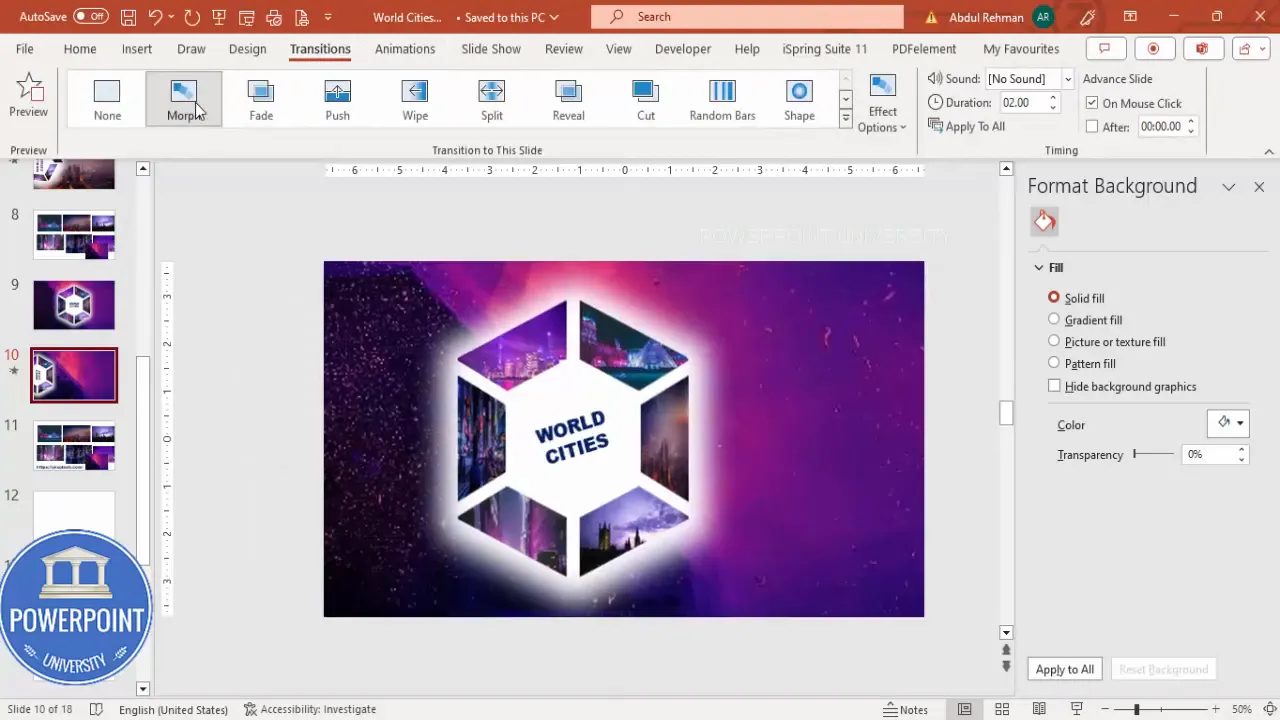
10. Apply Morph transition
With the duplicate slide selected, go to the Transitions tab and select Morph. In the Transitions pane, reduce the Duration to a lower value — I use 1.0 seconds for a snappy rotation.
- Morph will smoothly animate changes in position, size, and rotation between slides.
- Important: Morph matches objects by name. To ensure consistent transitions, leave grouped objects with identical names across slides (grouping preserves the same object identity).
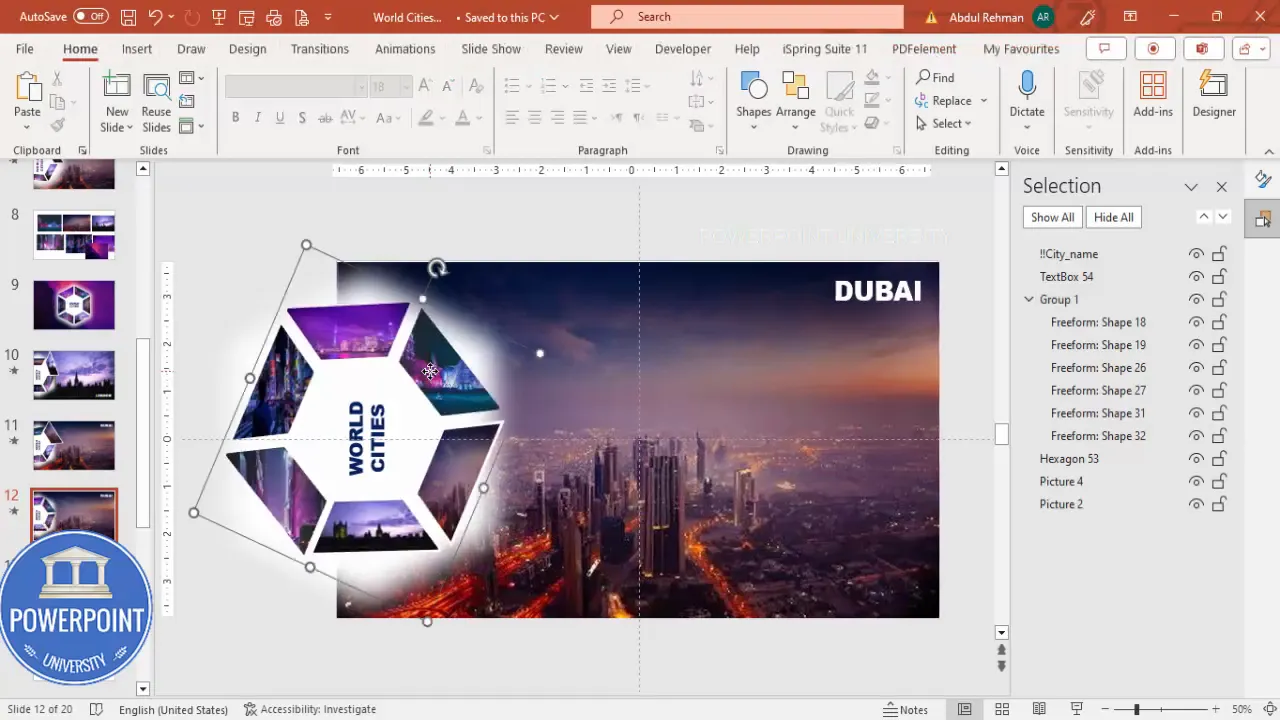
11. Highlight the first city (example: London)
To make a city wedge expand and become the focus on a particular slide:
- On the duplicated slide, select the wedge that corresponds to the city you want to highlight (e.g., London).
- Hold Shift and scale it up slightly so it appears to pop forward. Reposition the enlarged wedge to a focal area inside the ring.
- Copy the full background image for that city and paste it as a full-slide image behind everything (Crop to 16:9 if necessary and Send to Back).
- Add a text label for the city. Make sure the label has a consistent name in the Selection Pane (see next step) so Morph knows it’s the same text object across slides.
12. Use the Selection Pane and name text objects
PowerPoint’s Selection Pane (Home > Arrange > Selection Pane) is essential for Morph control. Name the city label object with a special prefix to prevent Morph from treating the text content change as a shape movement. I use this trick:
- Open the Selection Pane and rename the text object to start with two exclamation marks, for example: !!city_name. Using exclamation marks prevents text content changes from breaking the object’s identity between slides.
- Doing this ensures that updating the text on successive slides (changing the city name) won’t confuse Morph.

13. Duplicate slide sequence for all cities
Continue duplicating slides and repeating the highlight process for each city wedge (Dubai, Paris, Hong Kong, Tokyo, New York):
- Duplicate the previous slide (Ctrl + D).
- Reset the enlarged wedge back to normal for the next slide, then increase the size of the target wedge for the next city.
- Replace or paste the full-slide background image for the new city, crop to 16:9, and Send to Back.
- Change the city label text (ensuring the object name in the Selection Pane remains the same, e.g., !!city_name).
- Repeat Morph on the duplicate slide; the transition between each pair of slides will produce the rotation and focus effect.
14. Fine-tune outlines and text styling
To emphasize the highlighted wedge:
- Give the enlarged wedge a light outline (Shape Format > Shape Outline) — white works well for darker image regions. Increase the weight for visibility.
- Format the city name with a bold font (I use Arial Black) and white text color. Place the label so it won’t overlap the wedge during rotation.
- Consider adding brief descriptive text or a short caption below the name. Keep it short — the slide is visual.
15. Final adjustments and play-through
Once all city slides are created (one slide per highlighted city plus the initial master slide), test playback:
- Go to Slide Show > From Current Slide (or Play from Start) and click to advance.
- Adjust Morph Duration to taste — 0.8–1.2 seconds looks snappy. Anything above 2 seconds will feel slow for a carousel effect.
- If rotation direction needs reversing, rotate the grouped ring in the opposite direction on the duplicate slides.
Design and alignment tips
Good design makes the animation feel professional rather than gimmicky. Here are practical tips I follow:
Alignment & consistency
- Use guides and Align (Align Center / Align Middle) often. Small misalignments become very visible during Morph animations.
- Keep typography consistent — same font family, sizes, and alignment for all label slides.
- Name grouped shapes consistently across slides. Morph uses object names to match objects between slides. If you duplicate a slide and keep the group intact, you’re preserving the identity automatically.
Image crop and orientation
- Crop images to 16:9 before sending them to back to prevent overflow and unexpected behavior (Picture Format > Crop > Aspect Ratio > 16:9).
- If photos appear rotated inside the wedge, make sure you untick Rotate with shape in Format Shape > Fill options.
- Keep important visual elements (faces, skyline focal points) centered within wedges when possible — use the offset tools under Picture Fill if needed.
Spacing & padding
- Leave breathing space around the hexagon ring. Elements too close to the edges may be cropped on different displays.
- If you plan to export to video, consider leaving even more margin because some players may crop slightly.
Performance & file size tips
Large image-heavy presentations can grow quickly in file size and become sluggish. Here are steps to keep the file efficient:
Create Slides in Seconds with ExpertSlides AI |
|
Generate AI Presentations today: |
| TRY NOW! |
- Where possible, crop images to the final size before pasting into PowerPoint or use an external image editor to reduce pixel dimensions.
- Don’t keep multiple copies of the same large background photo on different slides. Instead, paste the background once and reuse it across slides — when duplicating the slide, remove the extra pasted copy if not needed.
- Compress images in PowerPoint: File > Info > Compress Pictures — choose a sensible resolution like 150 ppi for on-screen presentation.
- Delete unused images from the slide (select and press Delete) to avoid bloating the file with hidden resources.
Advanced variations you can try
Once you have the basic carousel working, it’s easy to adapt it into different styles and use cases.
Change the base shape
- Instead of a hexagon, try a circle split into radial wedges, a star, or a custom polygon. The Fragment and Merge Shapes approach works the same.
Use more or fewer wedges
- Create 4, 5, 8, or any number of slices by adjusting the number of rotated rectangles you use to fragment the ring.
Auto-play the carousel
- Use the Transitions > Advance Slide > After X seconds to advance automatically and create an auto-rotating carousel. Be sure to set Duration so each Morph animation completes before the next advance.
Reverse the rotation direction
- On duplicate slides, rotate the grouped wedges the other way. This creates a subtle difference and can produce an alternate motion path.
Combine with other animations
- Try adding entrance animations for the city labels or fade-in copy. Use subtle effects to avoid overwhelming the Morph motion.
Troubleshooting common issues
Below are problems you may encounter and how to fix them quickly.
Images rotate inside the wedge
Solution: Select the wedge > Format Shape > Fill > Picture or texture fill and untick Rotate with shape. That keeps the photo from rotating when you rotate the wedge shape.
Morph produces unexpected jumps
Solution:
- Make sure the same object exists on both slides. If you deleted or recreated shapes instead of duplicating slides, Morph may not match objects correctly.
- Object naming matters. Use the Selection Pane to confirm objects have consistent names where necessary.
Background overflowing slide bounds
Solution: Crop the background image to 16:9 using Picture Format > Crop > Aspect Ratio > 16:9 and then reposition. This ensures the background fits neatly inside the slide area.
Presentation file is huge
Solution: Compress images, delete unused images, and avoid keeping high-resolution copies in every slide. Use a single background image repeated across slides by duplicating slides rather than re-pasting the image each time.
Practical checklist before presenting
- Check Morph transitions on each slide pair — preview in Slide Show mode.
- Confirm object alignment and consistent naming in the Selection Pane.
- Decide whether to auto-advance slides or click to advance manually.
- Compress images and remove unnecessary assets to reduce file size.
- Test the presentation on the actual display you’ll use (projector/TV) to make sure colors and cropping look right.
FAQ
Q: Which versions of PowerPoint support Morph?
A: Morph is supported in Microsoft 365 (formerly Office 365) and PowerPoint 2019 (and later). If you don’t see Morph under the Transitions tab, update PowerPoint or check your Office plan.
Q: Will Morph work if I move objects between slides manually?
A: Yes. Morph calculates differences between two successive slides and animates changes in position, size, rotation, and formatting. The safest approach is to duplicate the slide and modify the duplicate, as this preserves object identity.
Q: Does Morph preserve object names automatically?
A: When you duplicate a slide, object identity is preserved. If you create new shapes or text boxes, they will have different names and Morph may not match them. Use the Selection Pane to name objects consistently (particularly text objects) if you rely on matching across slides.
Q: How do I avoid image rotation inside shape fills?
A: In Format Shape > Fill > Picture or texture fill, untick Rotate with shape. This keeps the picture upright even if you rotate the shape itself.
Q: Can I export this animated slide to video?
A: Yes. PowerPoint lets you export a presentation to MP4 or WMV (File > Export > Create a Video). Since Morph is a transition, it exports properly to video. Keep an eye on timing and resolution settings when exporting.
Q: How can I make the carousel loop automatically?
A: Add an auto-advance delay to the last city slide and set it to jump back to the first slide. Alternatively, export to video and loop the video in your player. For interactive PowerPoint presentations, use the Slide Show settings with custom slideshow options to set up a loop.
Q: What if my audience’s PowerPoint version doesn’t support Morph?
A: If you need compatibility, consider exporting the animated sequence to video (MP4) so any device can play it. Another option is to create a simpler animation using standard animations (Spin/Appear) but it won’t be as smooth as Morph.
Final words & download
Creating a rotating Morph transition slide in PowerPoint is a powerful way to present multiple images in a compact, engaging format. The method I use — a hollow hexagon split into wedges, image fills, duplicated slides, and Morph — is robust and easy to adapt for many use cases.
Tips recap:
- Always duplicate slides rather than starting new ones from scratch for the same animation group.
- Name text objects in the Selection Pane (I use a leading “!!” to ensure consistency).
- Crop background images to 16:9 to prevent overflow issues.
- Untick “Rotate with shape” when using images as fills to keep them upright.
- Compress images and delete unused media to keep file size reasonable.
If you want to skip building everything from scratch, you can download a ready-made PowerPoint template that uses this exact technique. Use it as a starting point and replace images and labels with your content.

Now it’s your turn — pick six photos (or any number of slices you prefer) and try the steps above. If you run into a specific problem, check the troubleshooting section or the FAQ. Enjoy building your Morph carousel, and remember: small design decisions (alignment, cropping, naming) make a big difference in how professional your final animation looks.
Happy presenting!
Check out the full video: Best use of Morph Transition in PowerPoint | Tutorial 1032 | #morphtransition


