Hello, my dear friends! Today, I’m thrilled to share a creative and practical tutorial on how to work with 3D models in PowerPoint, specifically focusing on how to insert a 3D laptop model and customize its screen with your own image. Whether you’re designing a presentation, creating a template, or just want to add some flair with animated 3D devices, this guide has got you covered.
In this comprehensive tutorial, we’ll start by refreshing the basics of inserting a custom screen into a simple photo of a laptop. Then, we’ll dive deep into the exciting world of 3D models—how to edit them, how to replace their screens with custom images using a free online tool, and how to add animations while adjusting lighting for the perfect look. So, let’s get started and turn your PowerPoint presentations into dynamic, eye-catching projects!
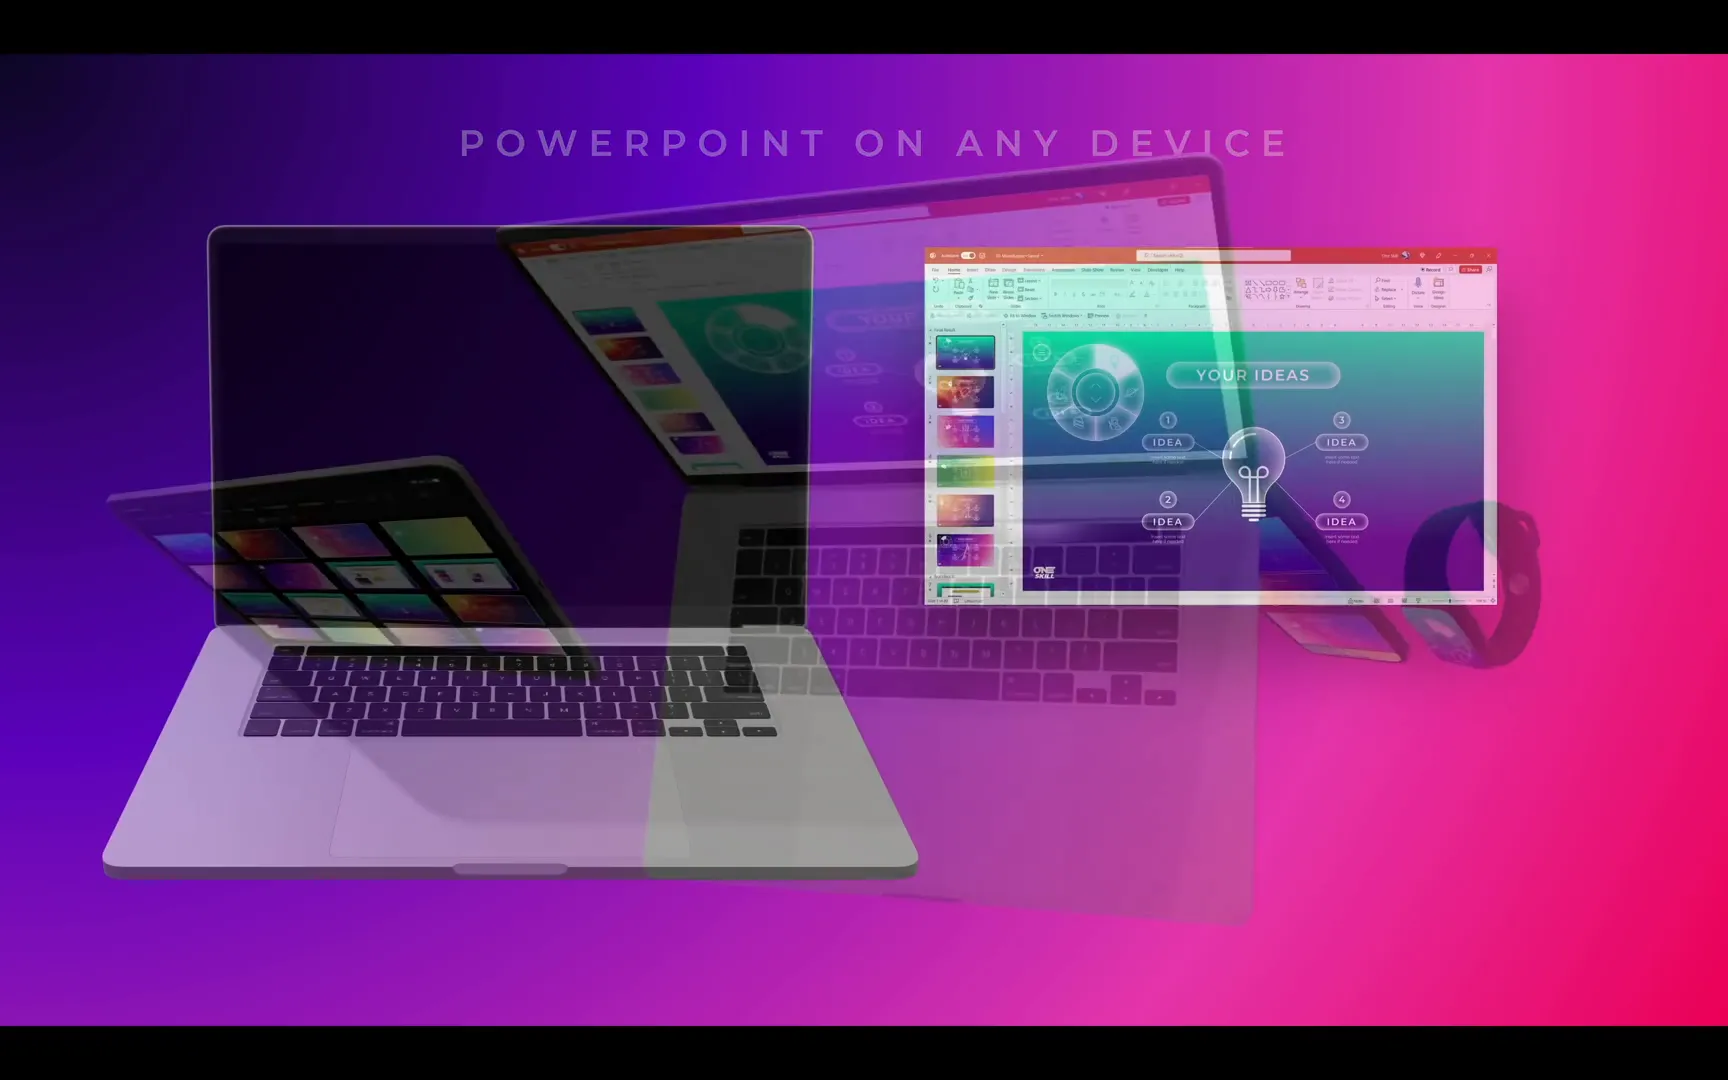
Table of Contents
- Inserting a Custom Screen into a Laptop Photo
- Challenges with 3D Models in PowerPoint
- How to Replace the Screen on a 3D Laptop Model
- Adjusting 3D Model Lighting in PowerPoint
- Animating the 3D Laptop Model
- Advanced Tips and Resources
- Frequently Asked Questions (FAQ)
- Conclusion
Inserting a Custom Screen into a Laptop Photo
Before jumping into 3D models, let’s revisit the straightforward method of replacing a laptop screen in a regular photo. This technique is perfect if you’re working on a one-time presentation and want a quick, effective solution.
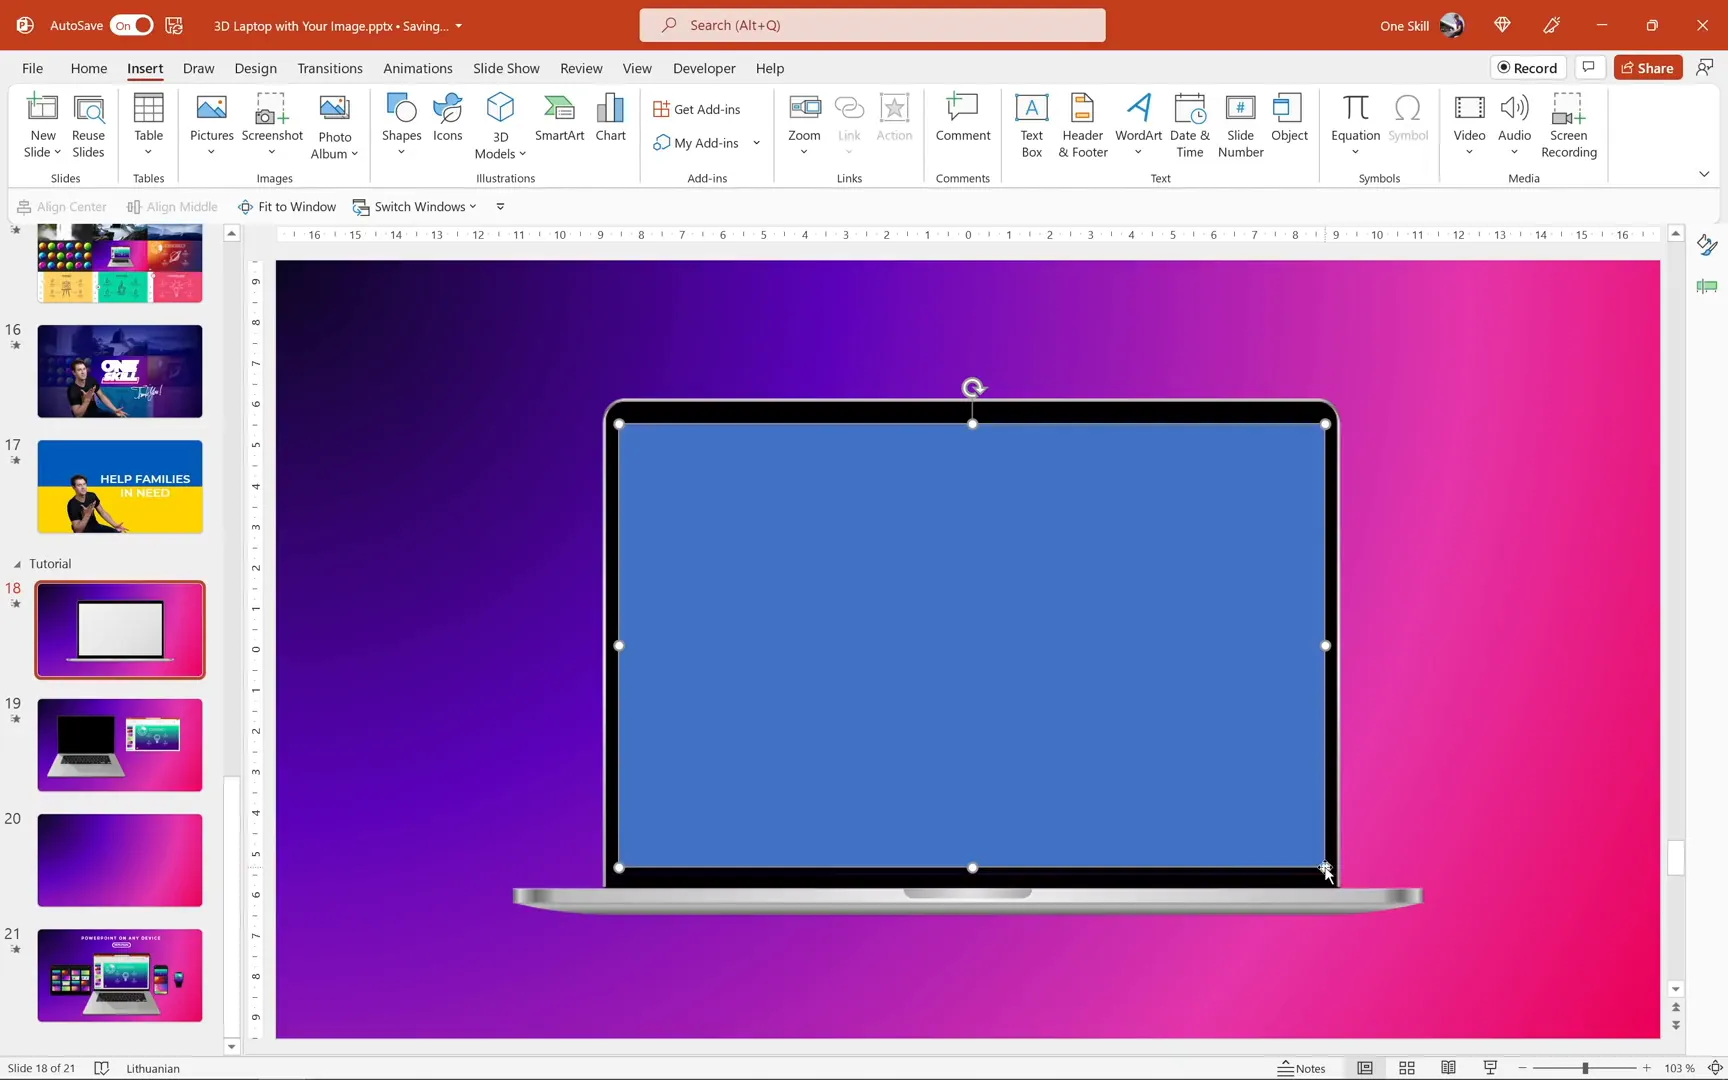
Step 1: Draw a Rectangle Over the Laptop Screen
Start by inserting a simple photo of a laptop into your slide. Then, go to the Insert tab and select Shapes. Choose the rectangle shape and draw it so that it covers the entire screen area of the laptop in the photo.
Step 2: Insert Your Desired Image
If you have Office 365, you can take advantage of PowerPoint’s stock images. Search for an image that suits your presentation theme—let’s say “mountains”—and insert it into your slide.
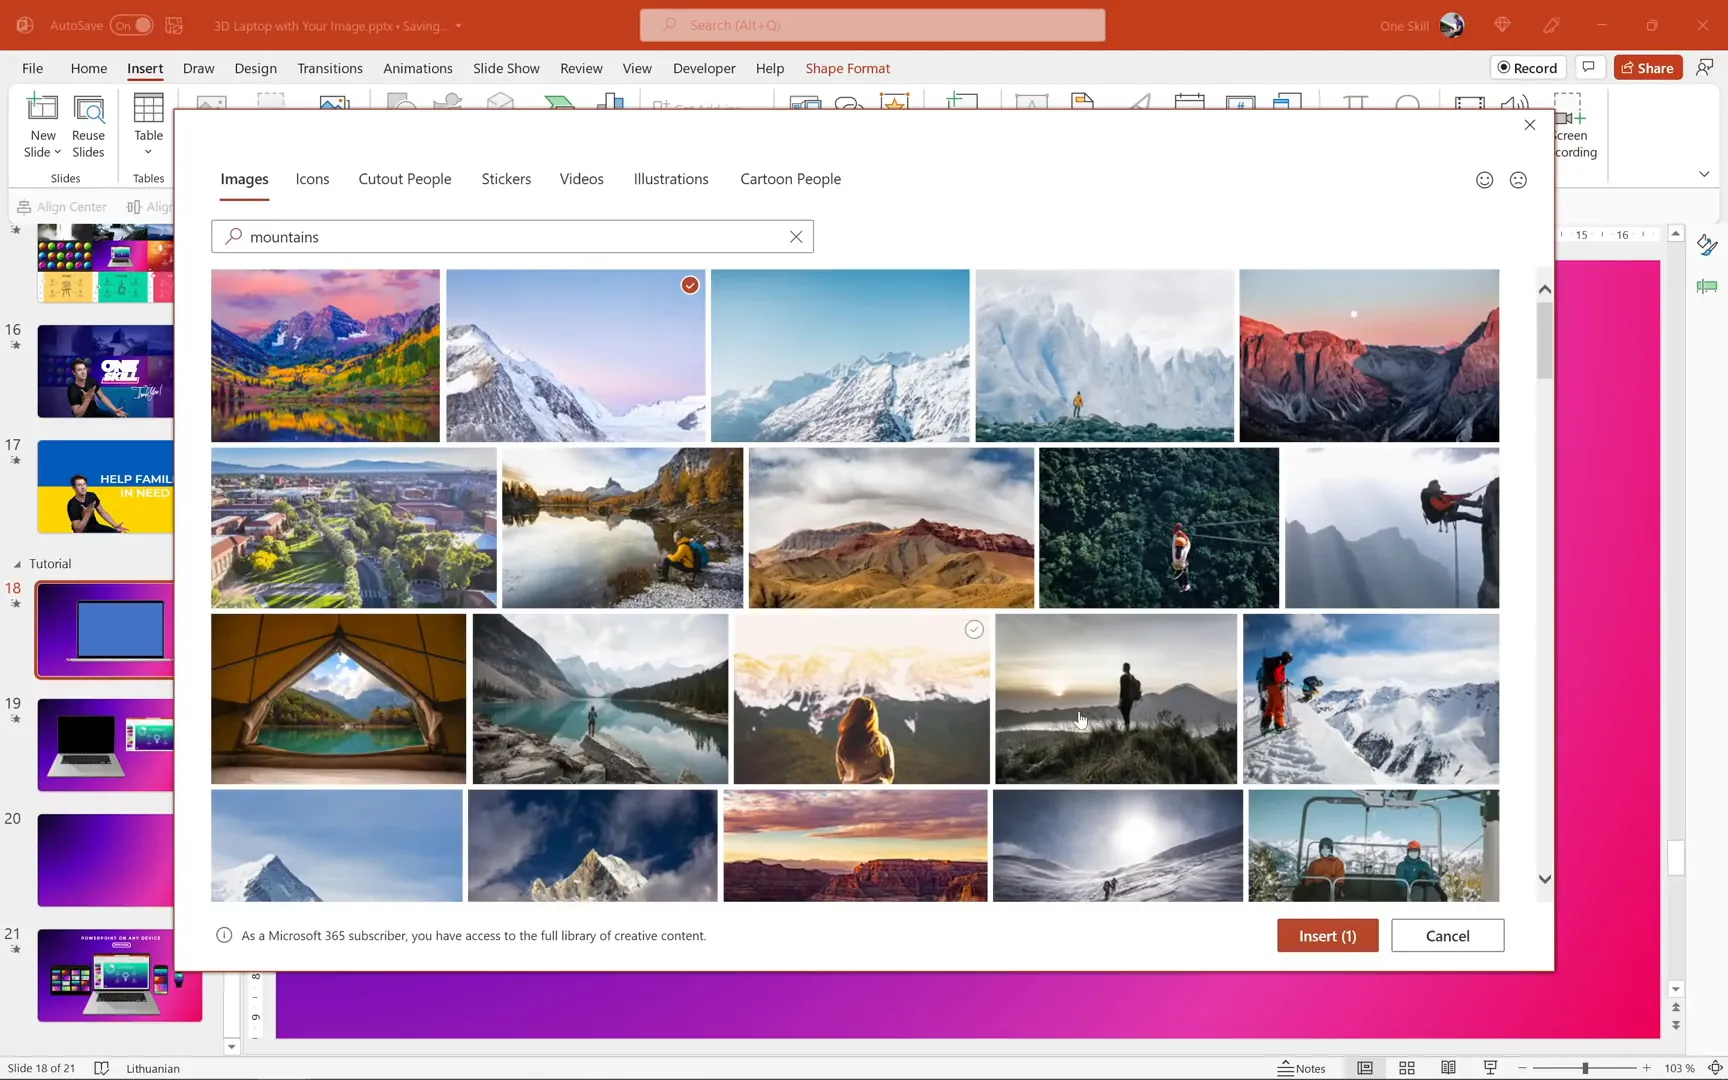
Resize the image while holding down Ctrl + Shift to maintain proportions. Then, send the image one step backward so it sits behind the rectangle you just drew.
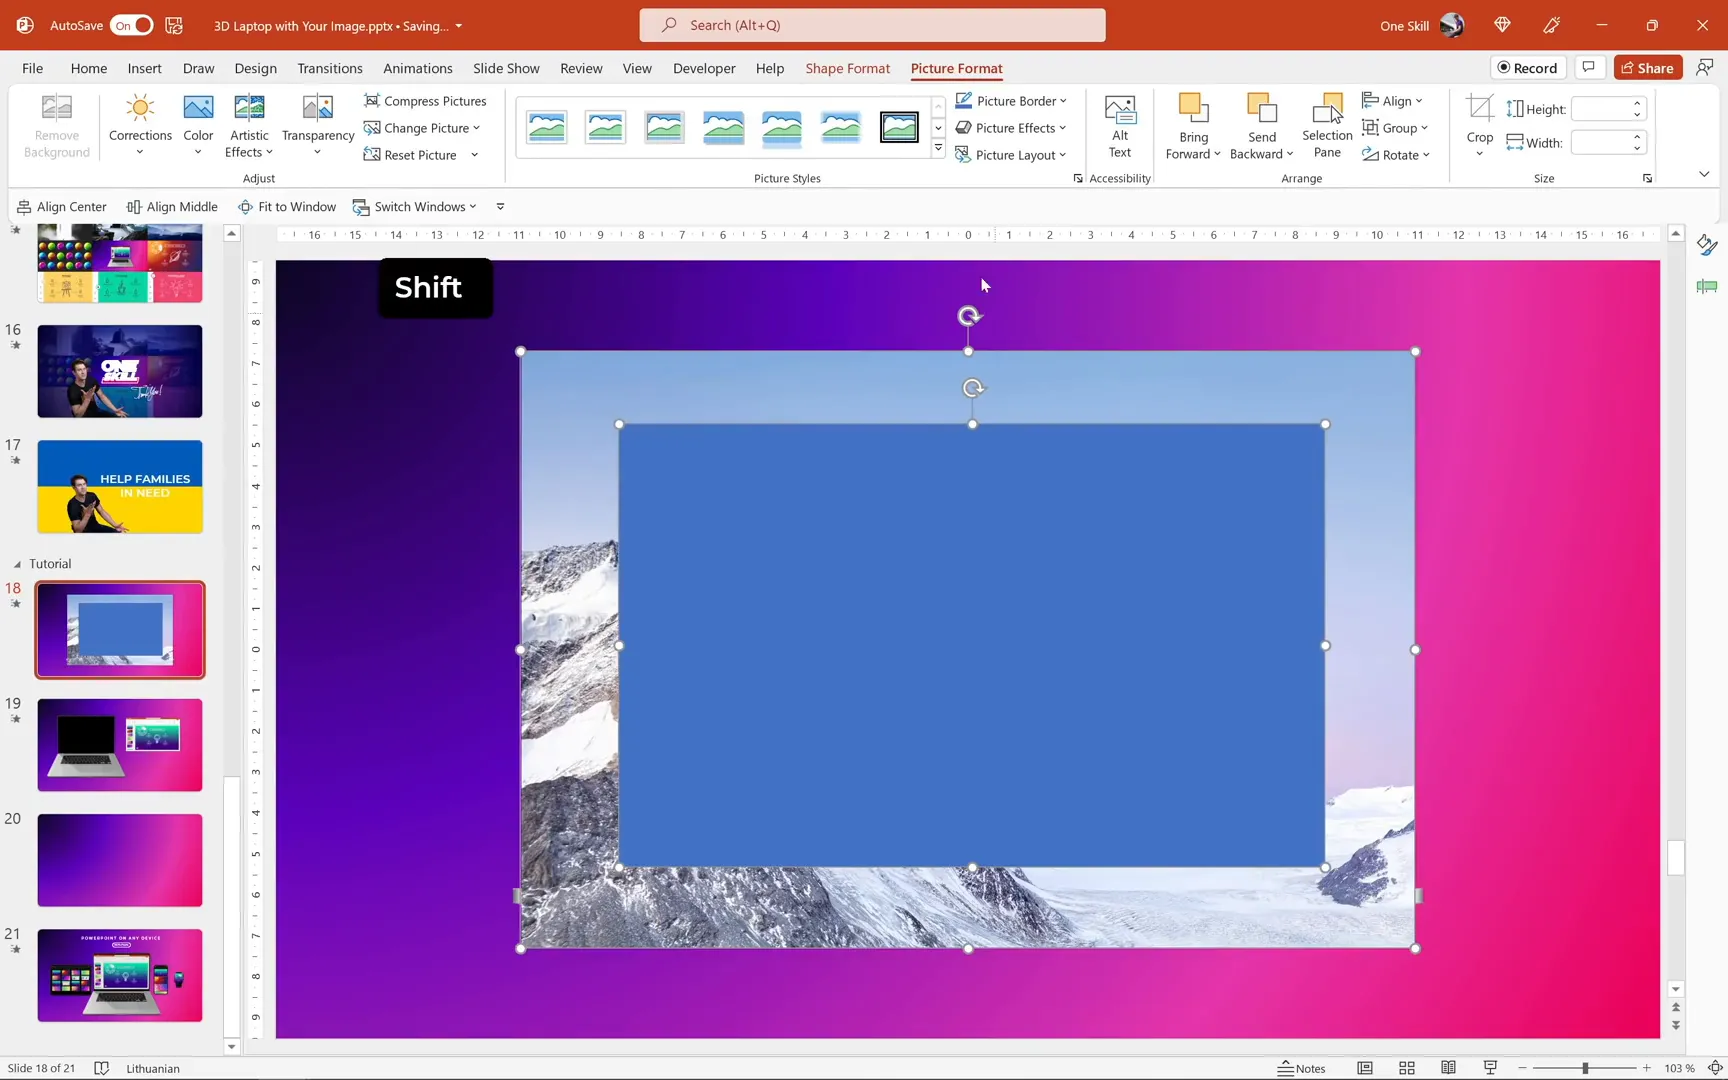
Step 3: Merge Shapes to Create a Custom Screen
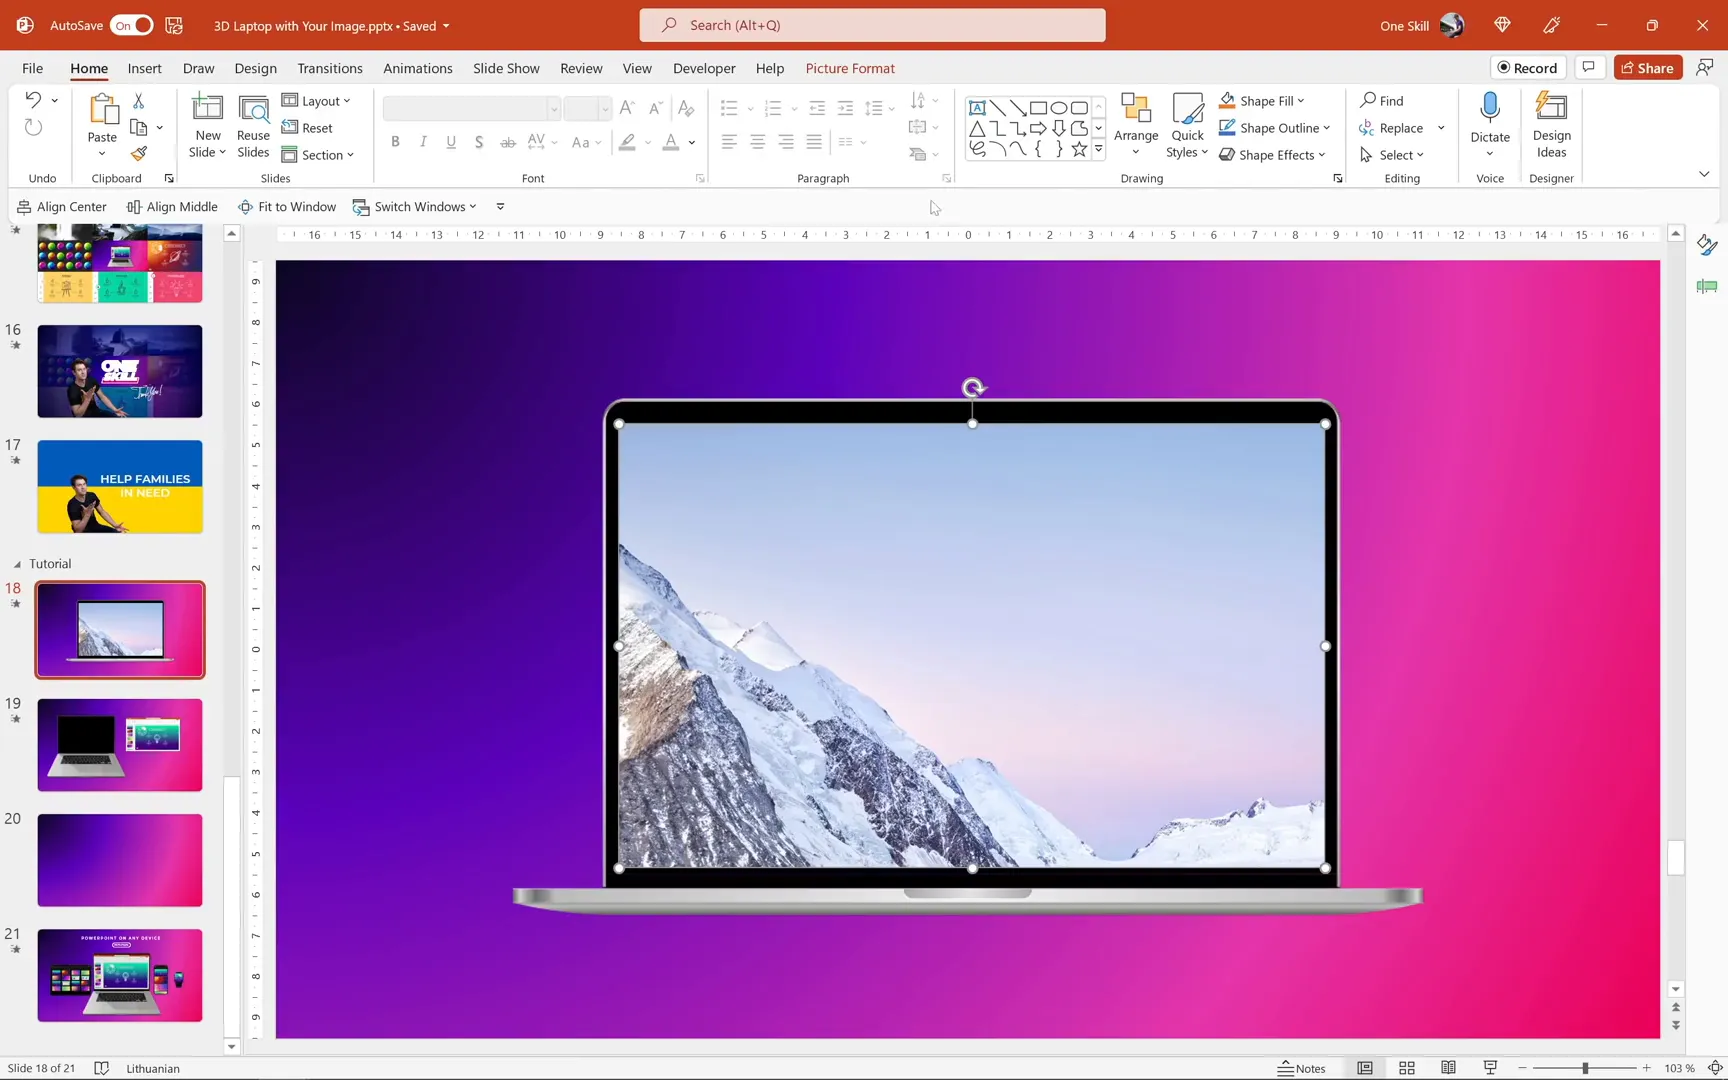
Next, select both the rectangle and the image while holding down the Shift key. Go to the Shape Format tab, find the Merge Shapes dropdown, and choose Intersect. This action crops the image precisely to the shape of the rectangle, creating a perfect custom screen for your laptop photo.
You can further refine the image by selecting it and using the Crop tool under the Picture Format tab. Zoom in or out and reposition the image until you’re happy with the result. Click Crop again to finalize.
Step 4: Using Templates for Multiple Presentations
If you plan to reuse this screen setup multiple times, it’s better to create a template. Here’s how:
- Cut the rectangle you created.
- Go to View > Slide Master.
- Duplicate the layout you are currently using.
- Paste the rectangle onto the duplicate layout.
- Insert a Picture Placeholder and size it to cover the rectangle.
- Send the placeholder to the back.
- Select both the placeholder and the rectangle, then go to Shape Format > Merge Shapes > Intersect to create an image placeholder cropped to the rectangle’s shape.
- Rename this layout, for example, “Laptop 2”.
Now, when you apply this layout to a slide, you will see an image icon on the placeholder that allows you to insert any custom image easily.

Tips for Tilted Device Screens
If your laptop photo or device mockup is tilted or has perspective distortion, this method might not work perfectly. In that case, I highly recommend checking out a tutorial by Andrew Pach, which focuses on replacing screens on tilted devices. The link is available in the resources section below.
Challenges with 3D Models in PowerPoint
Now, let’s move on to the exciting part: working with 3D models. PowerPoint supports 3D models, allowing you to insert, rotate, and animate them. But there’s a catch when it comes to customizing parts of a 3D model, like the screen of a laptop.
Simply placing a photo on top of a 3D laptop model and grouping them won’t work. Why? Because:
- The perspective of the photo won’t match the 3D model’s screen.
- Grouping the photo and 3D model converts the entire group into a flat image, losing all 3D animation capabilities.
3D models have special animations and a white handle in the middle for rotation, which are lost when grouped with other objects.
Additionally, PowerPoint‘s 3D model options do not provide native tools to edit the model’s parts, such as replacing the screen image.
How to Replace the Screen on a 3D Laptop Model
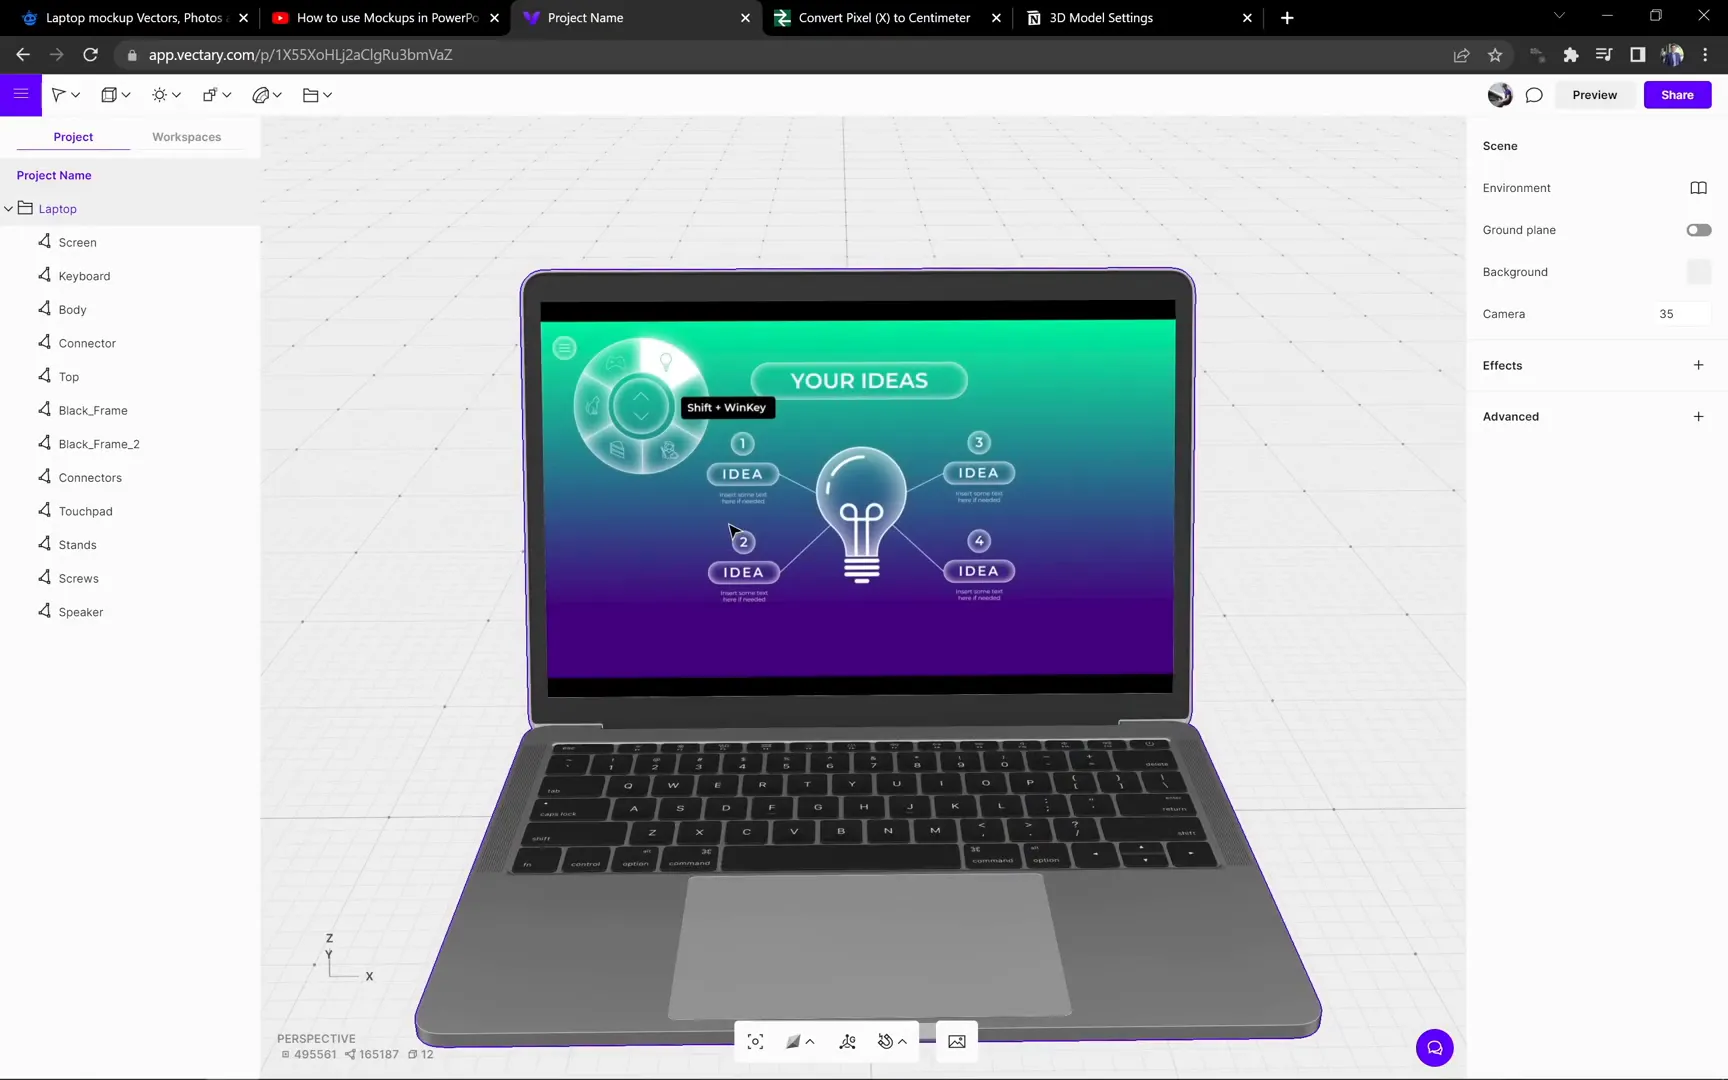
Luckily, there is a free online tool called Vectoree that lets you edit 3D models directly in your browser and customize parts like the laptop screen. Here’s how you can use it:
Step 1: Access Vectoree and Insert the Laptop Model
Go to vectoree.com. After logging in, deselect any starting projects by clicking on the canvas. Then, navigate to the Workspaces section, where you can find a variety of 3D models.
Select the laptop model, which will be loaded into the canvas. You can rotate the model using your left mouse button and pan with the right mouse button, similar to PowerPoint’s 3D model interface.
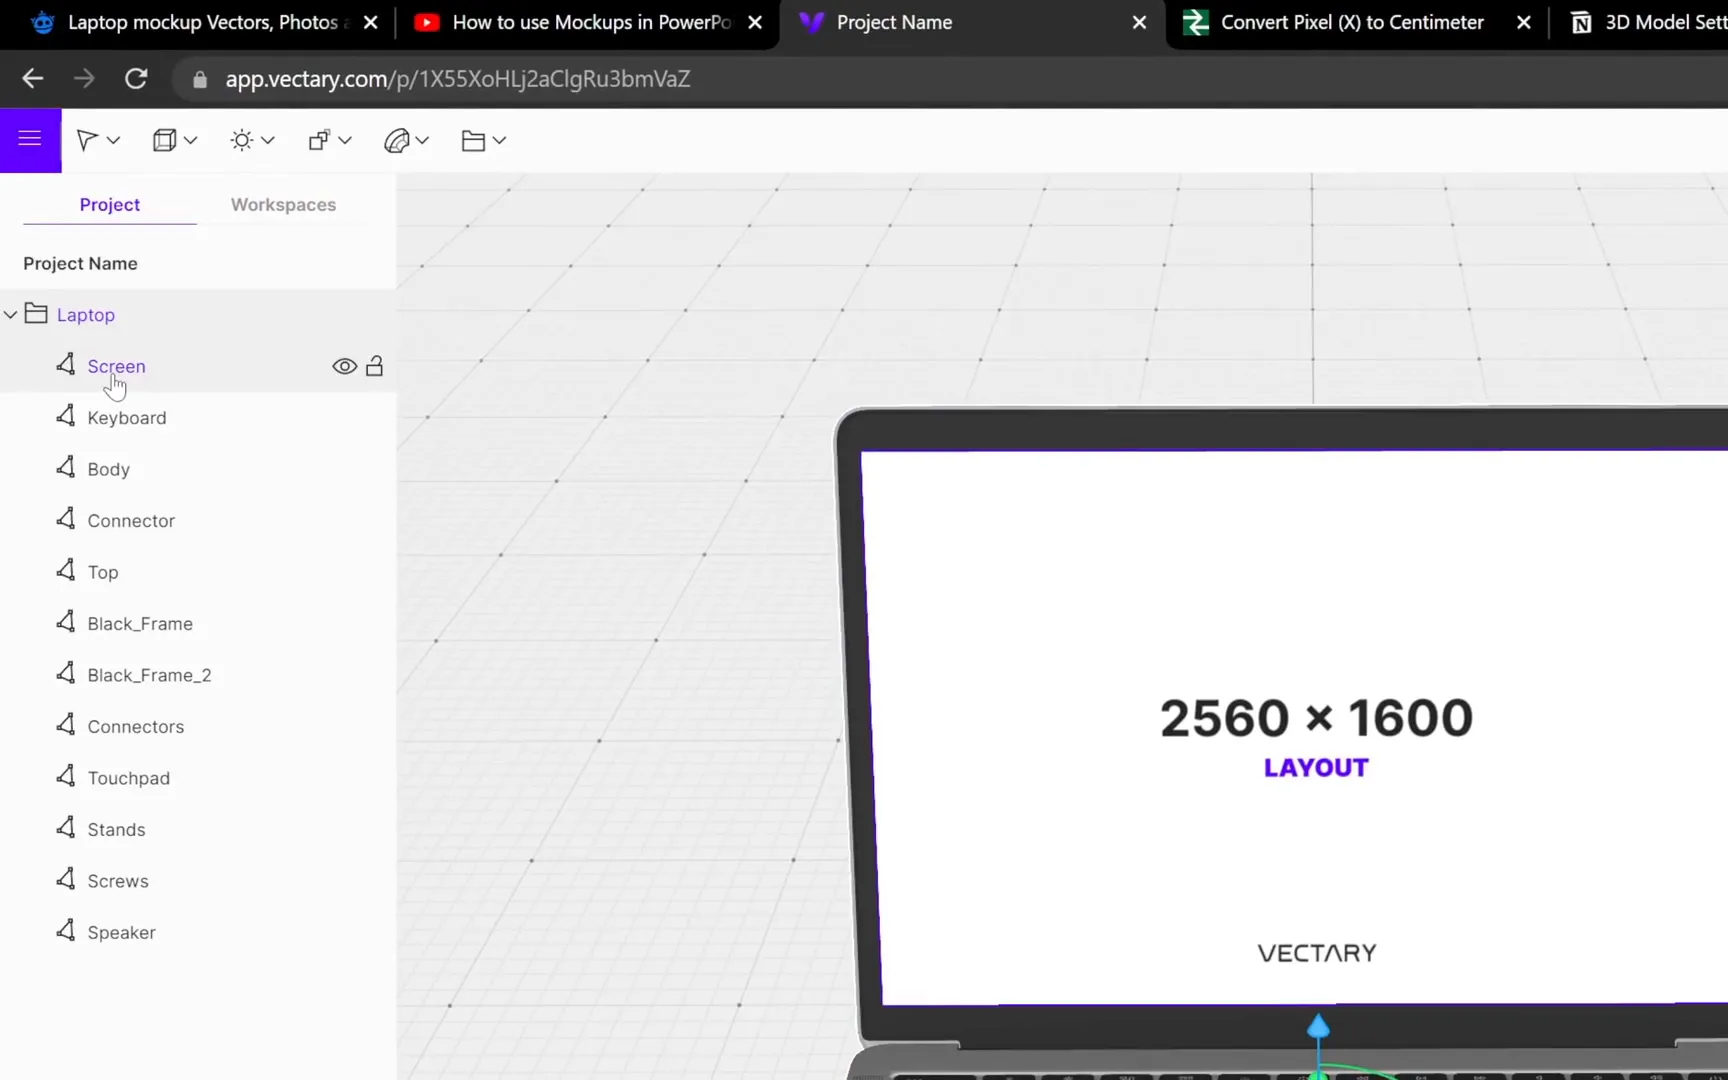
Step 2: Select the Screen and Upload Your Custom Image
In the Project pane (similar to a selection pane), select the laptop’s screen part. On the right, find the Emission option and click the small window icon to upload a new image for the screen.
Important: The image you upload must have precise dimensions of 2560 pixels width by 1600 pixels height to fit perfectly on the screen.
Step 3: Create the Custom Image in PowerPoint
If you don’t have an image ready, you can create one in PowerPoint with the exact dimensions:
- Open a new blank presentation and select a blank slide layout.
- Go to Design > Slide Size > Custom Slide Size.
- Set the width to 67.73 cm (converted from 2560 pixels) and height to 42.33 cm (converted from 1600 pixels).
- Set the slide background to black or any color you prefer.
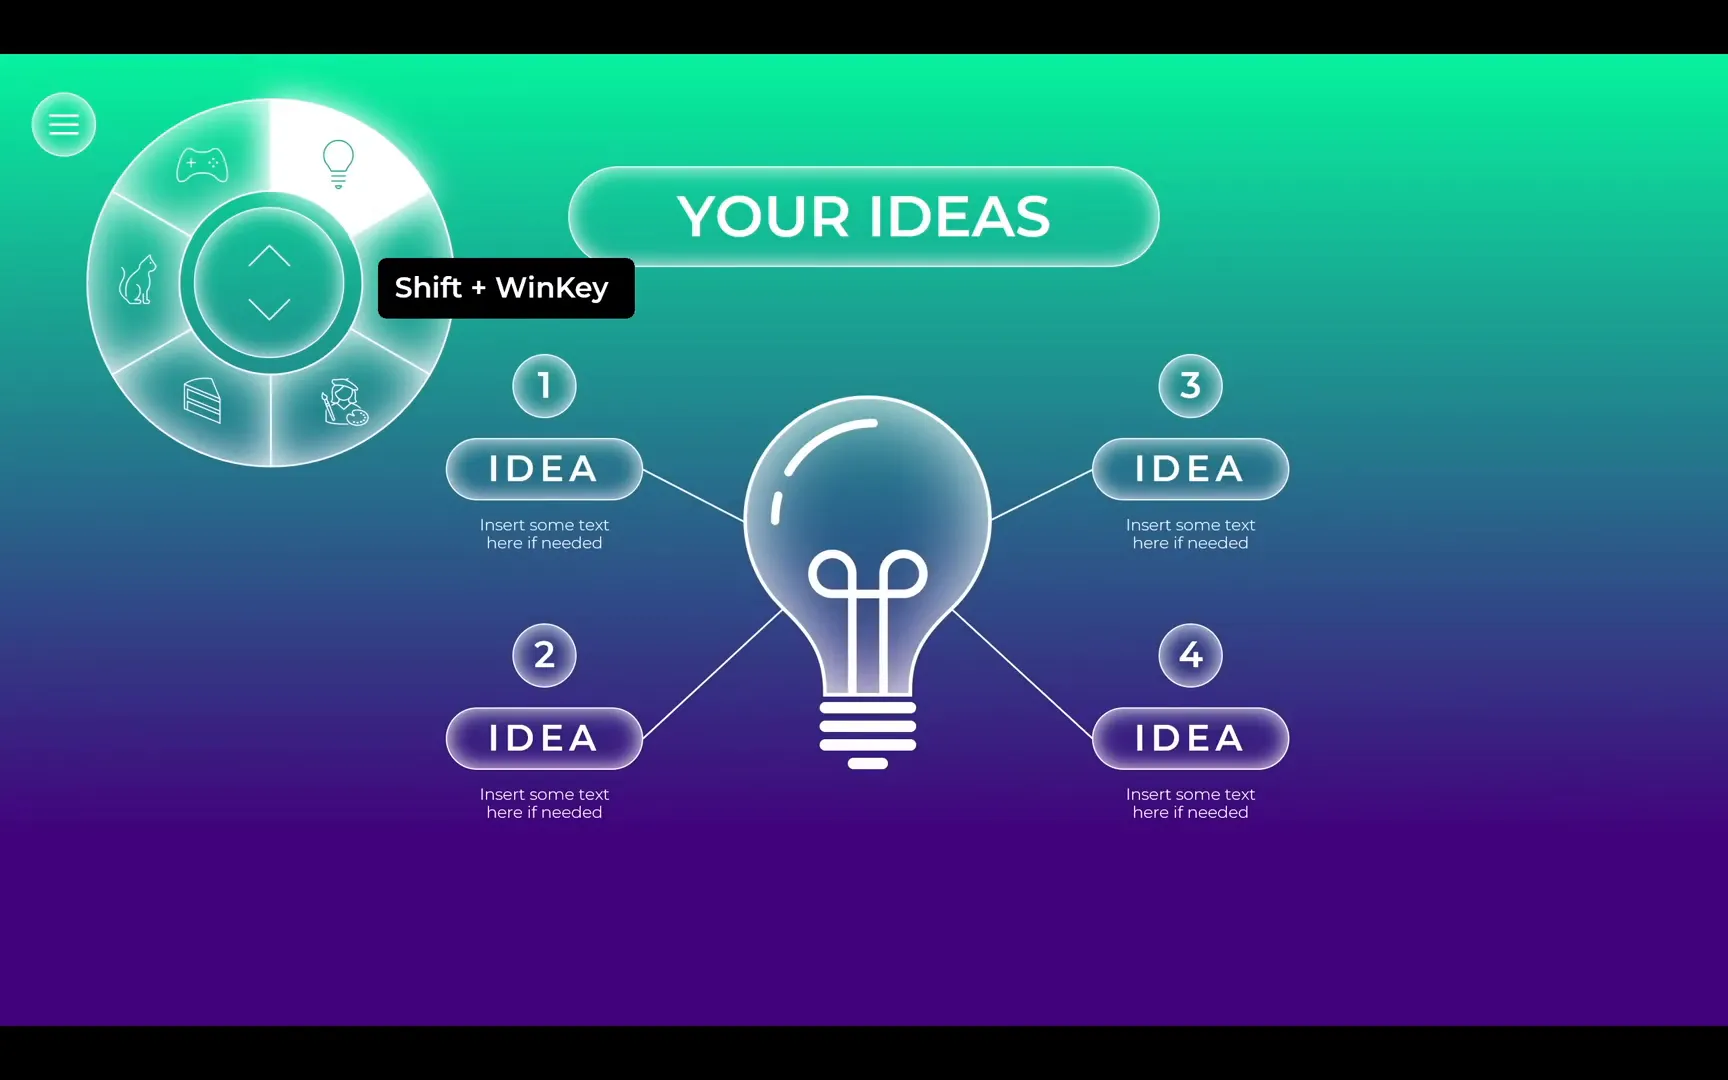
- Add any content you want on this slide to appear on the laptop screen.
Once ready, play the slide in full screen and take a screenshot using Shift + Windows key + S on Windows. Paste the screenshot back into PowerPoint, crop it to a 16:9 aspect ratio to remove any black bars, and resize it to fill the slide completely.
Save this slide as an image (PNG format) by going to File > Save As and selecting the desired location. Make sure to export only this slide.
Step 4: Upload the Custom Image into Vectoree
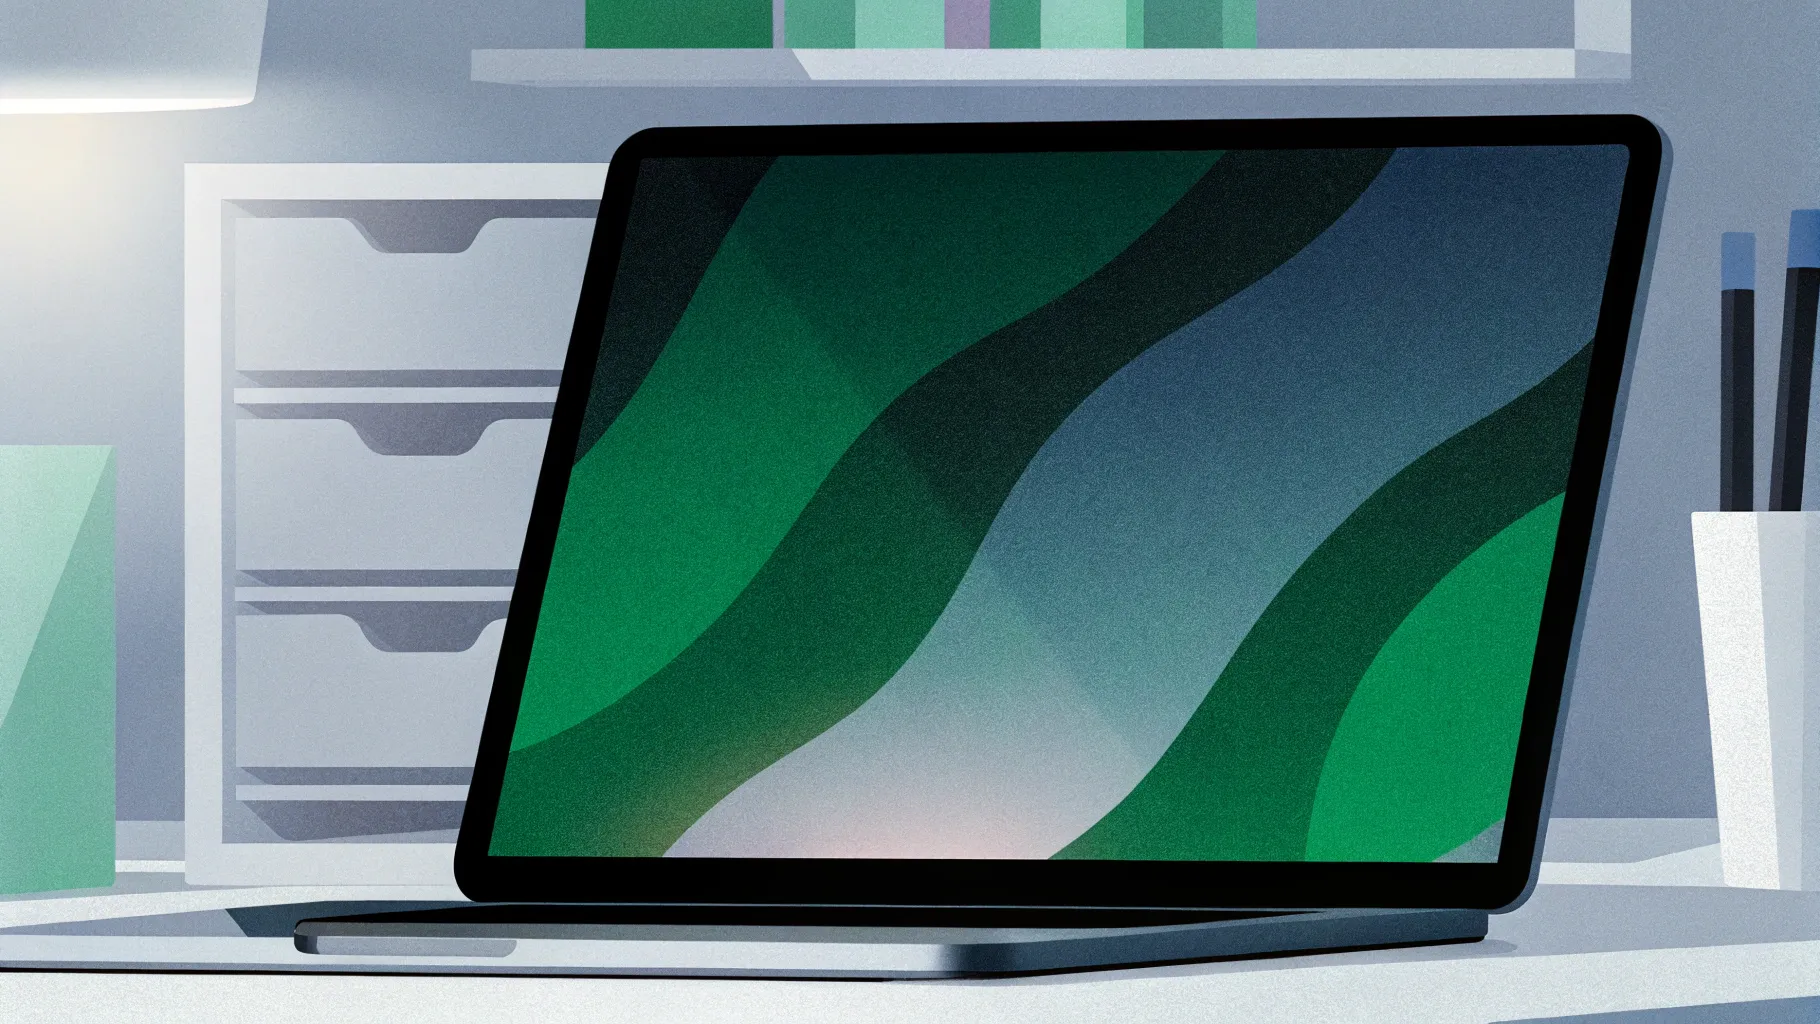
Return to Vectoree, select the laptop screen part again, and upload the image you just saved. Instantly, your 3D laptop model will display your custom screen image!
Step 5: Export the Customized 3D Model
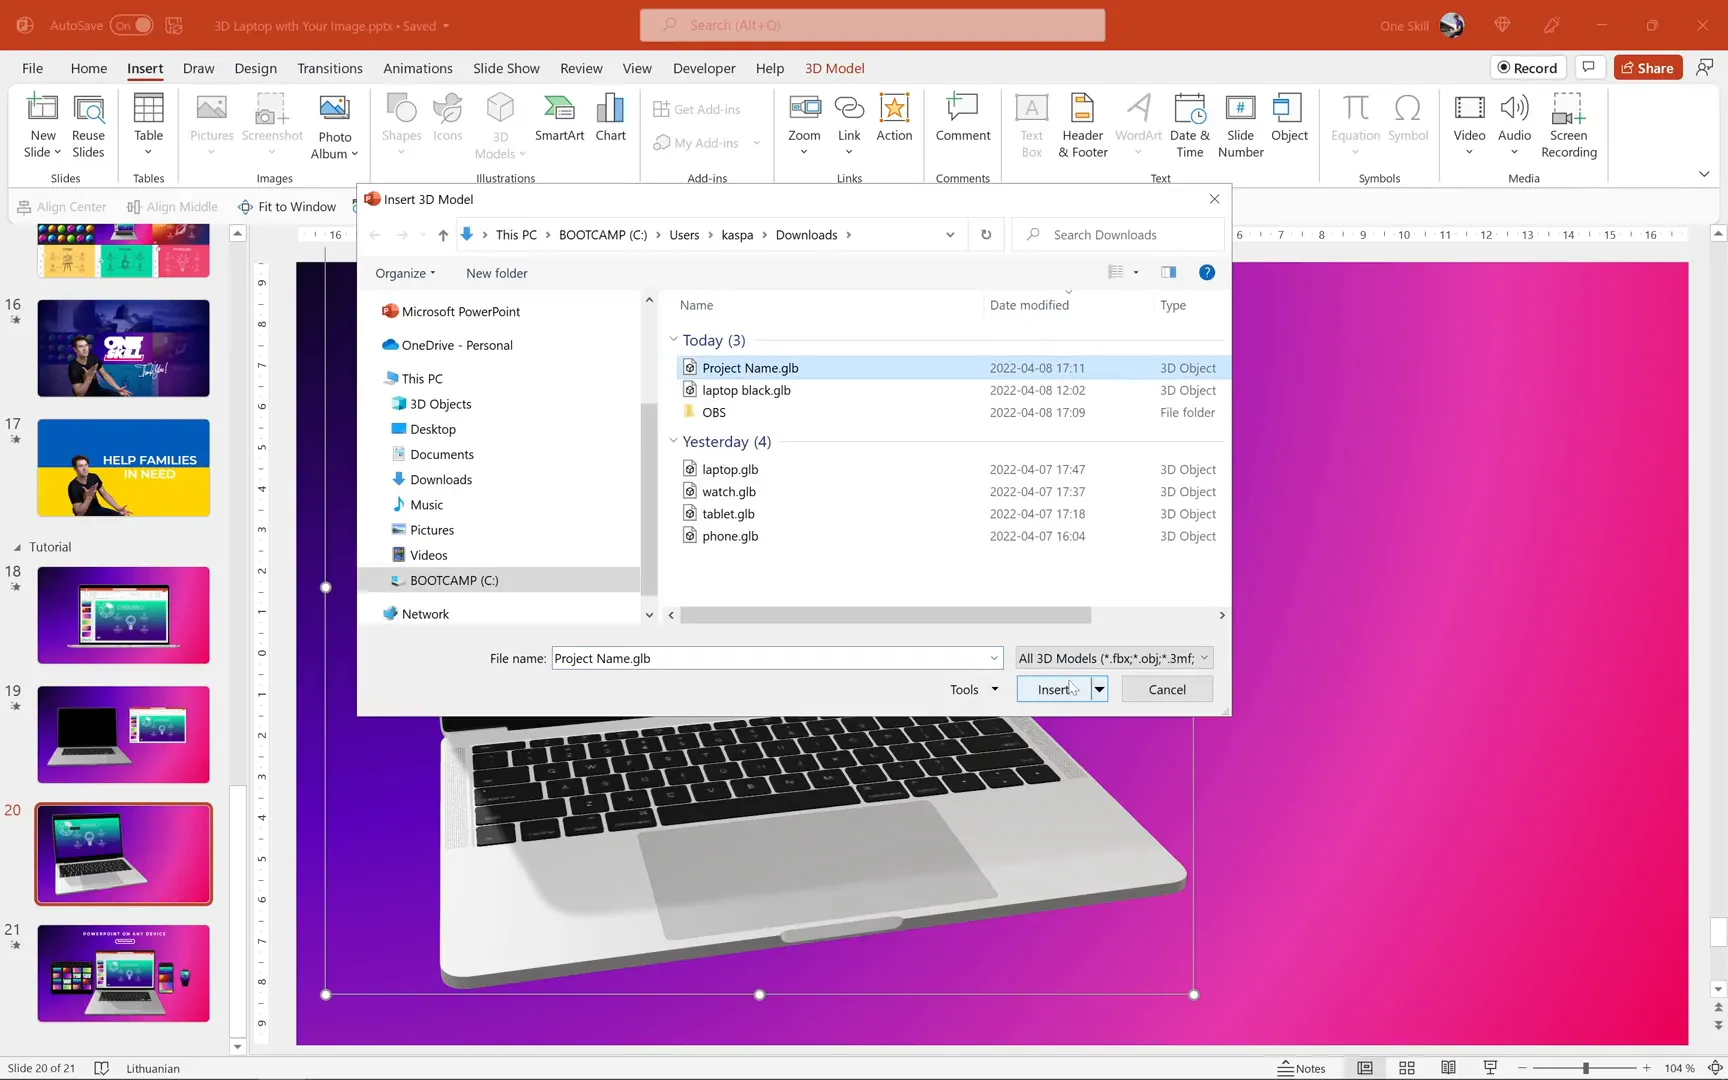
After customizing your 3D laptop, export it as a .glb file (a common 3D model format) from Vectoree. This file can be imported into PowerPoint.
Go to Export, select the GLB file format, and download it to your computer.
Step 6: Insert the Customized 3D Model into PowerPoint
Back in PowerPoint, go to Insert > 3D Models > From This Device, navigate to your downloaded GLB file, and insert it.
Now you have a 3D laptop with a custom screen that you can rotate and animate within PowerPoint!
Adjusting 3D Model Lighting in PowerPoint
One common issue you might notice is that the 3D laptop model looks much brighter or whiter in PowerPoint than it did in Vectoree. This happens because PowerPoint automatically adds four additional lights to every 3D model you insert, which can sometimes wash out the colors and details.

Unfortunately, PowerPoint doesn’t offer an easy interface to customize these lighting settings. But there’s a clever workaround by editing the PowerPoint file itself, which is actually a compressed archive with XML and other files inside.
Step 1: Prepare to Edit the PowerPoint File
First, close your presentation. Then locate your PowerPoint file (.pptx) in your file explorer.
Right-click the file and open it with a free archive tool like 7-Zip. If you don’t have it, download and install it from the link.
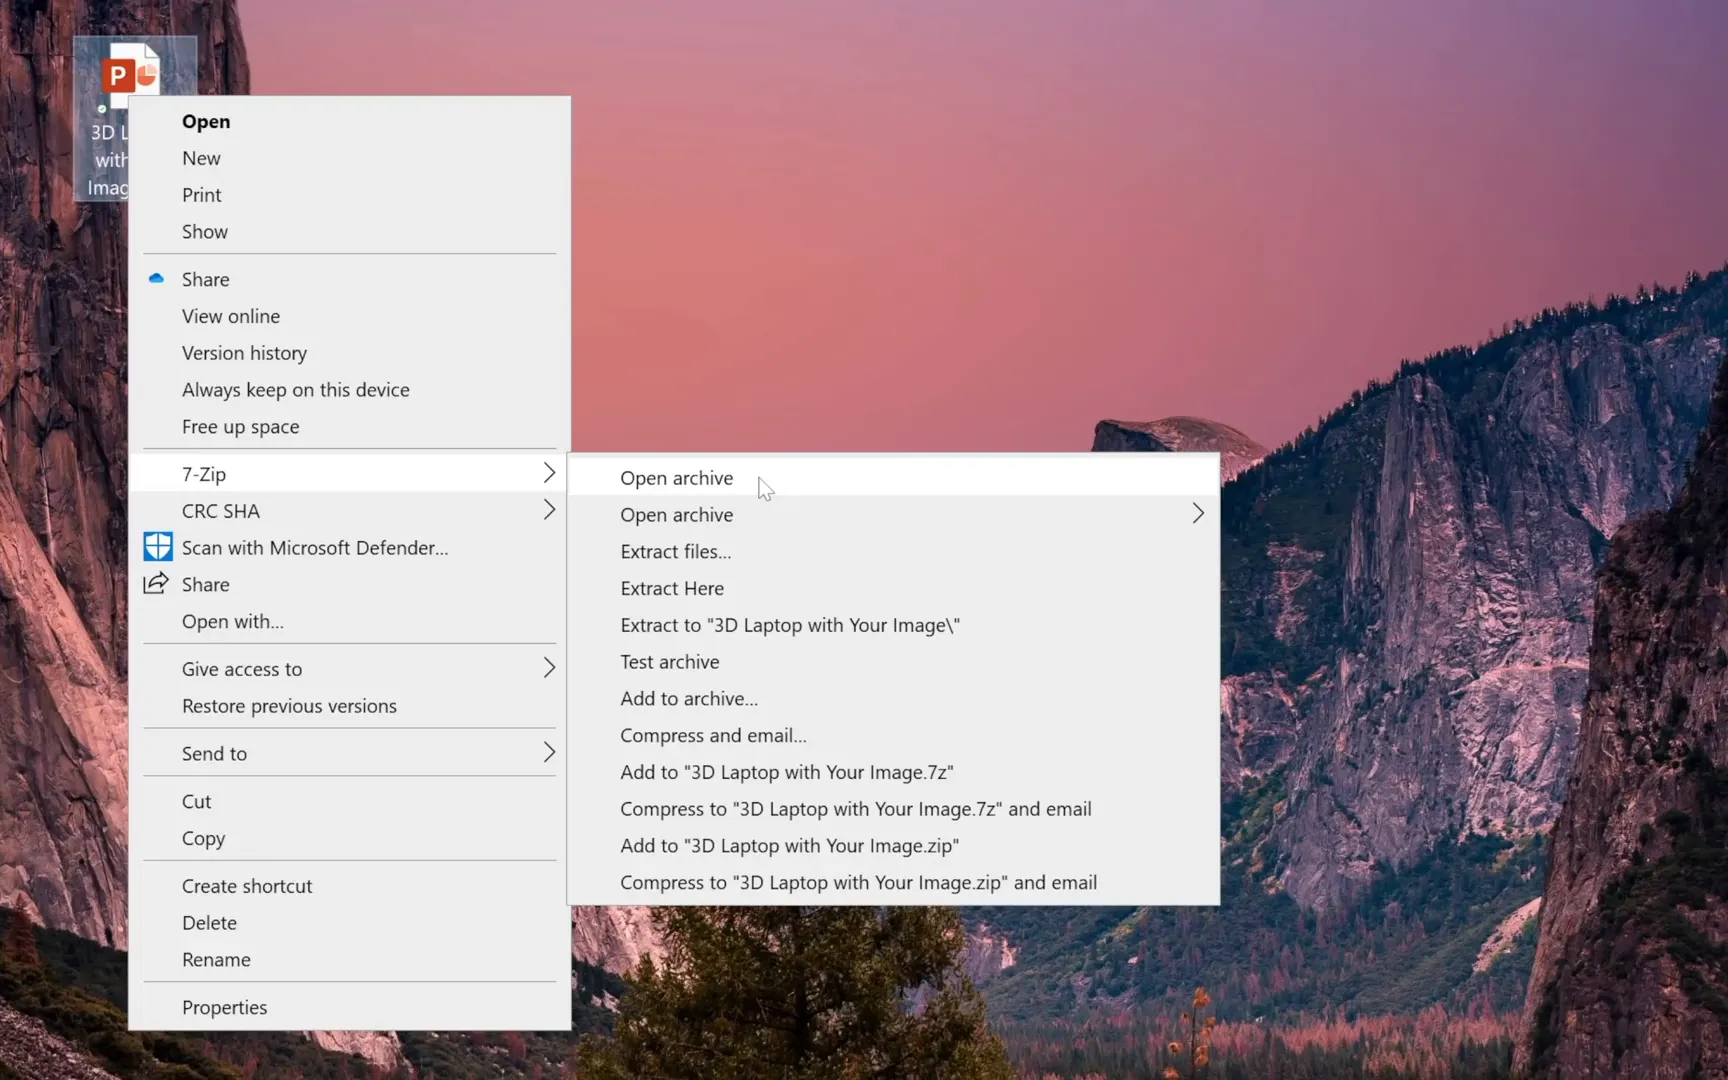
Step 2: Navigate to the Slide Folder
Within the archive, navigate to ppt > slides. Find the XML file corresponding to the slide with your 3D model (e.g., slide20.xml).
Right-click the slide XML file and open it with a text editor like Notepad.
Step 3: Find and Edit Lighting Settings
Search the XML for the keyword light. You should find several light-related tags that define the default lighting setup (one ambient light and three point lights).
You can either:
- Delete the three point lights to reduce brightness (though this might make the model look flat).
- Or adjust the RGB values of the lights to tone down the intensity.
I found some excellent lighting settings online that you can copy and replace the existing light settings with. The link to these settings is provided in the resources below.
After editing, save the XML file and confirm the update in the archive tool.
Step 4: Reopen PowerPoint and Check the Result
Open your presentation again and navigate to the slide with the 3D model. You should notice the laptop now appears less bright and more natural, closer to the original look in Vectoree.
For comparison, insert the original 3D model next to the edited one to see the difference in lighting.
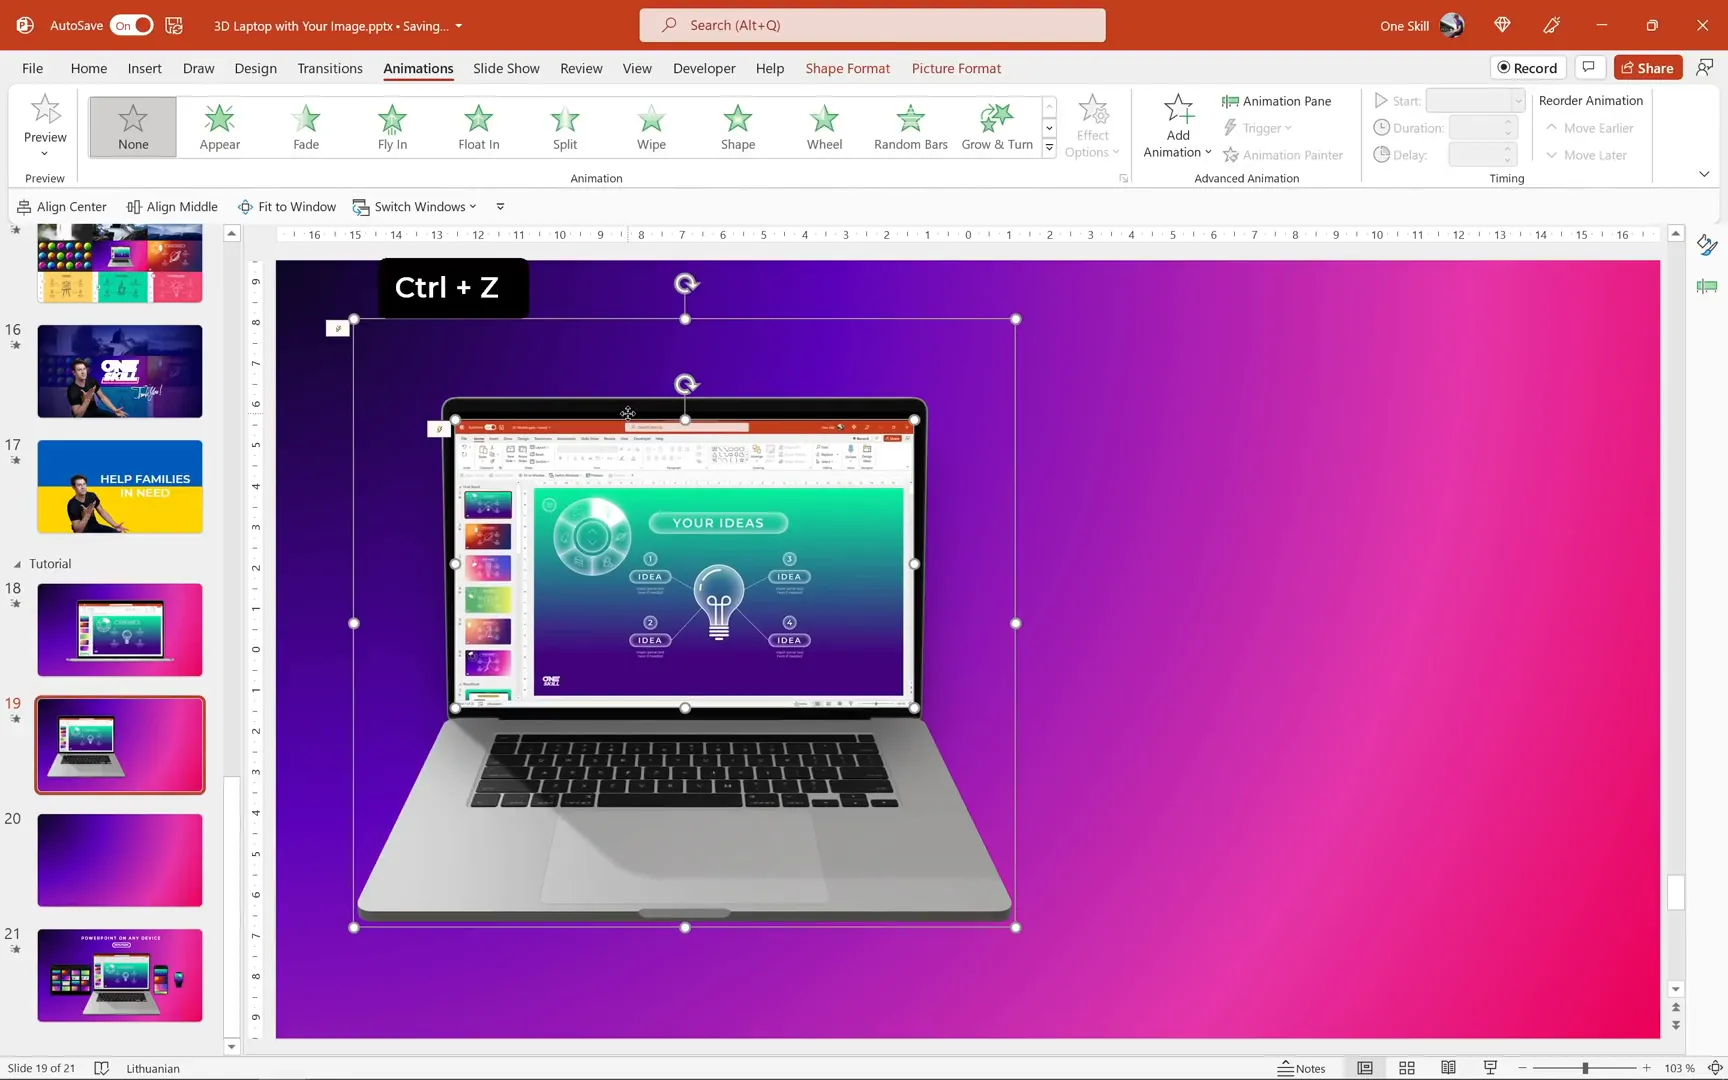
Animating the 3D Laptop Model
With your customized 3D laptop model ready and lighting adjusted, it’s time to add some animation to bring your presentation to life.
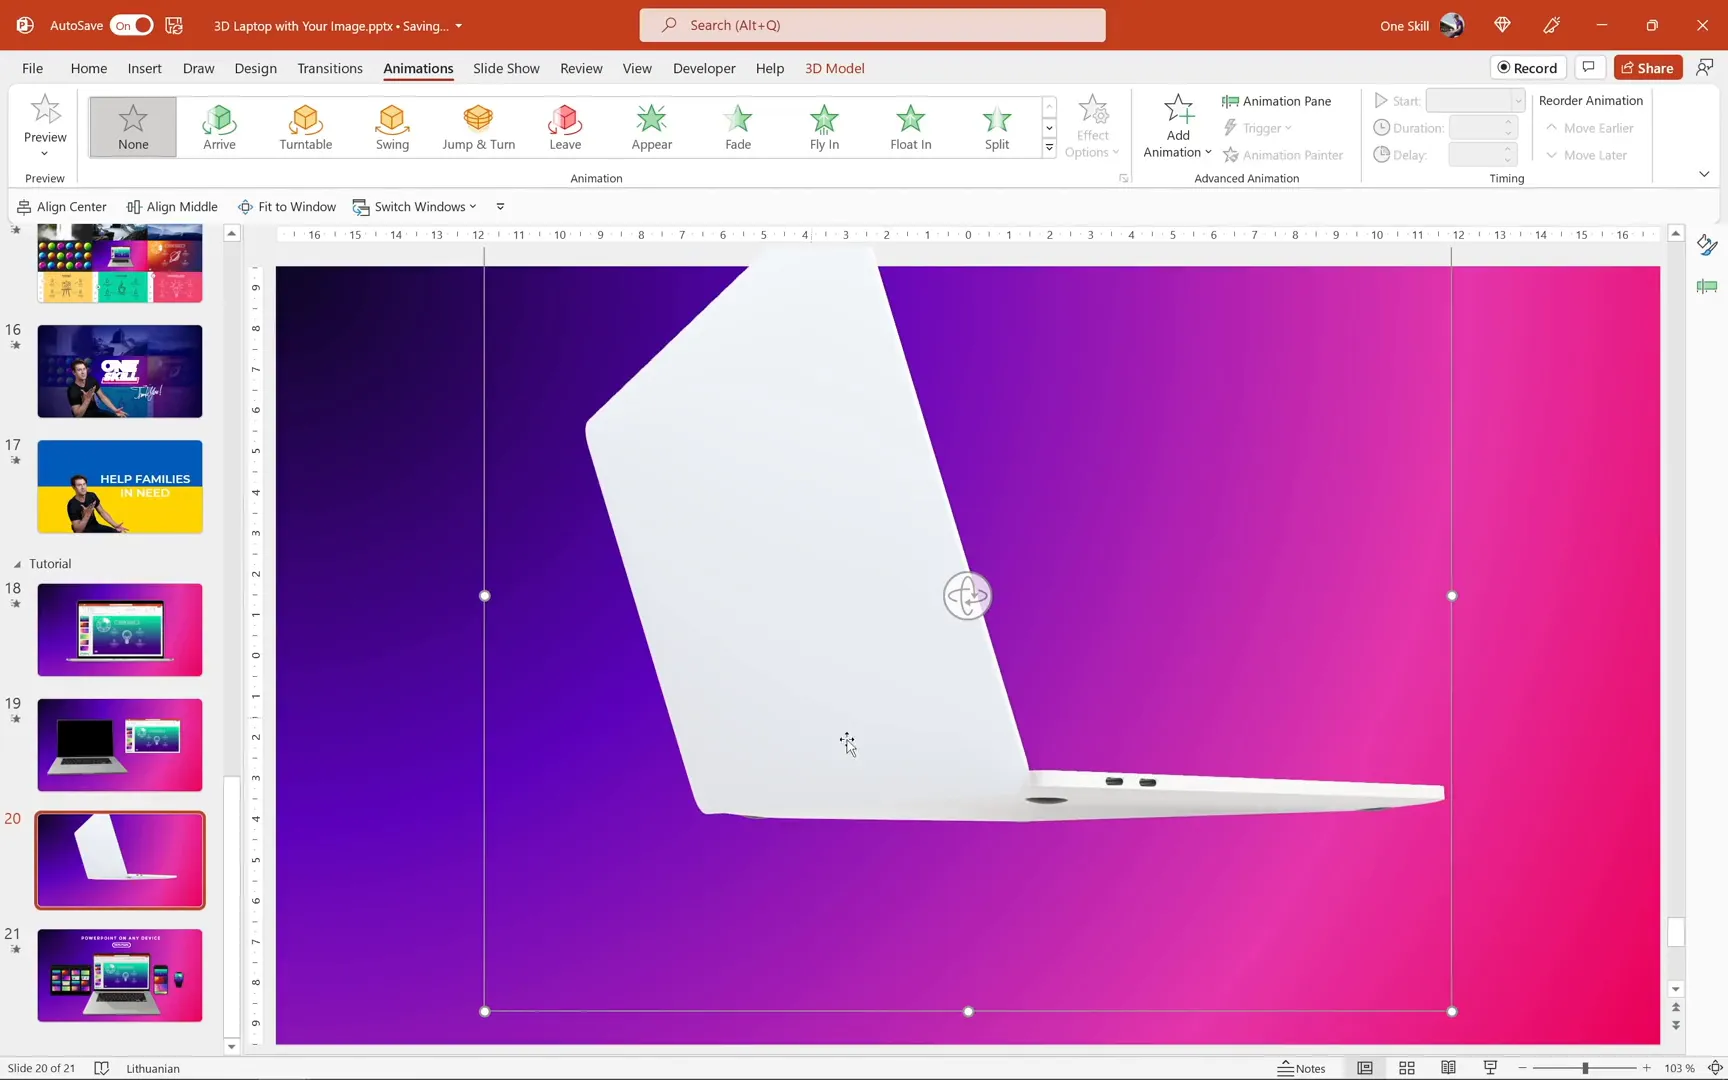
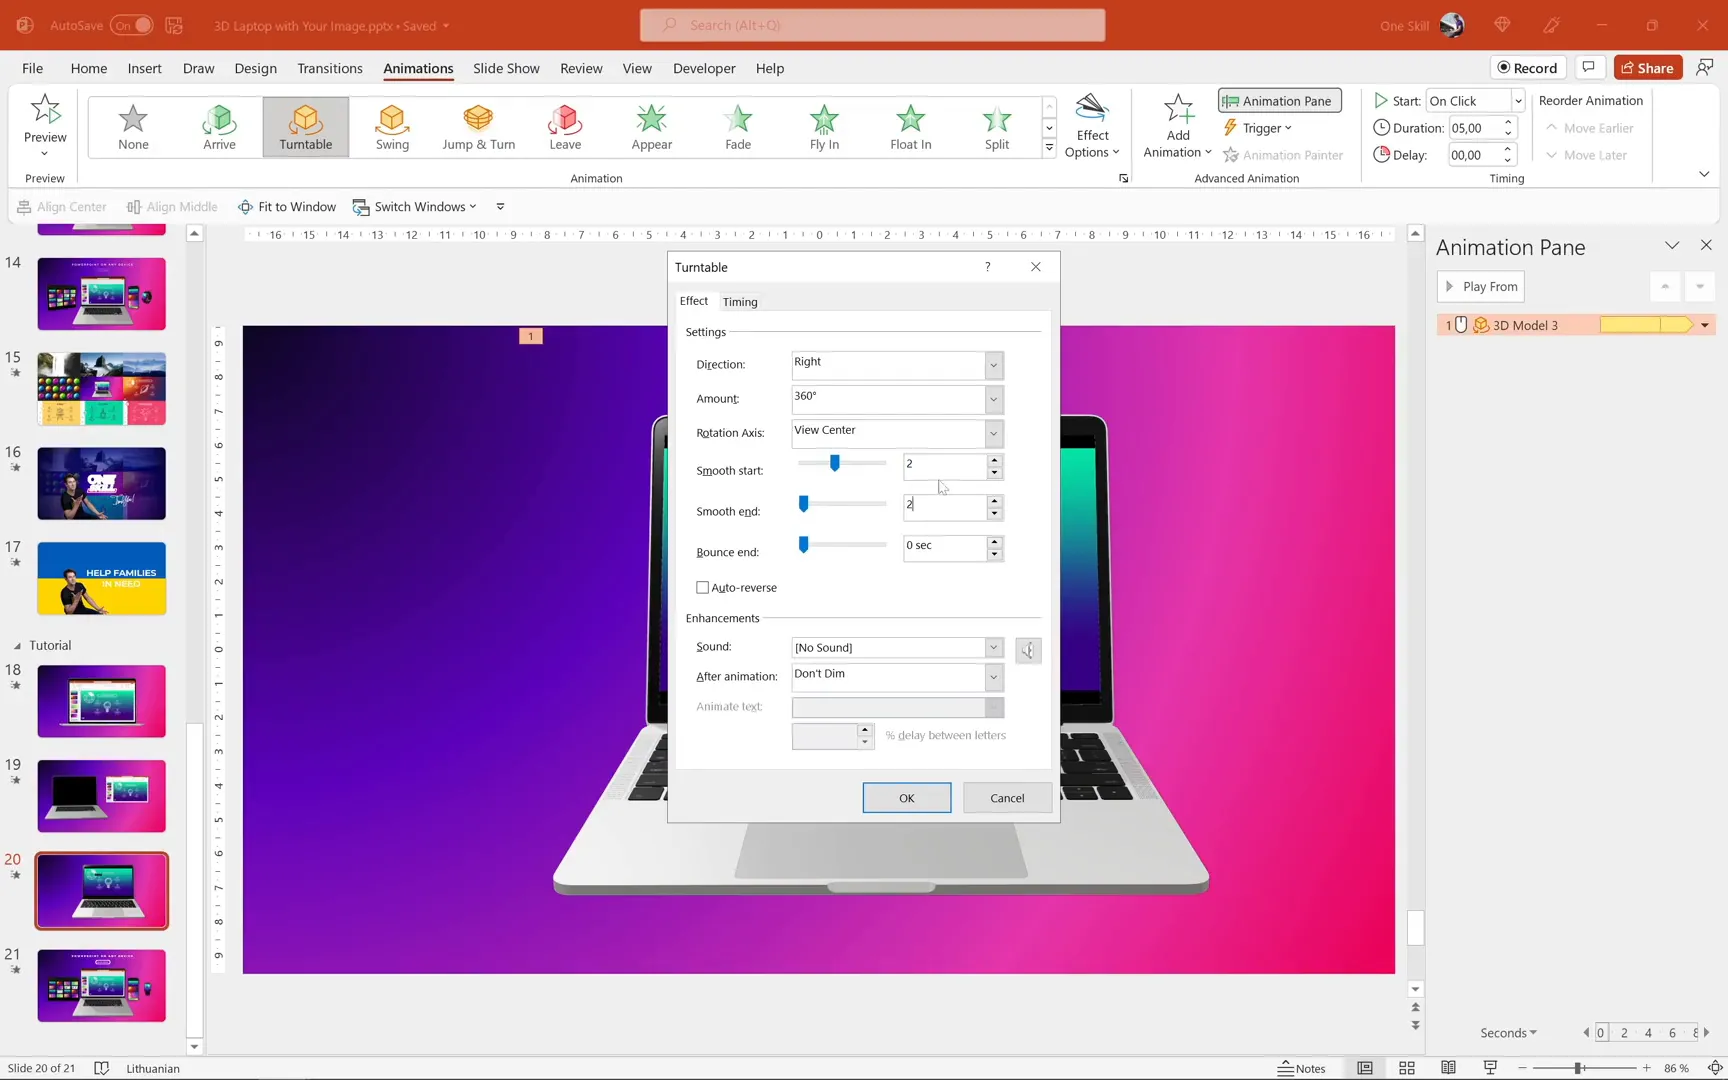
Step 1: Apply a Turntable Animation
Go to the Animations tab, select your 3D laptop model, and choose the Turntable animation. This effect spins your model around, creating a dynamic visual.
Open the Animation Pane to fine-tune the effect. Click on the animation, then select Effect Options.
Here, you can:
- Set the spin to be continuous.
- Choose the direction (clockwise or up and down).
- Adjust the duration (e.g., 5 seconds for a smooth spin).
- Add smooth start and end transitions (e.g., 2 seconds each) for polished motion.
Once set, preview your slide in full-screen mode to enjoy the animated 3D laptop with your custom screen!
Advanced Tips and Resources
- Device Mockups with Perspective: For tilted or perspective-distorted devices, watch Andrew Pach’s tutorial on replacing screens in tilted devices.
- 7-Zip Tool: Use 7-Zip to access and edit PowerPoint archives for advanced tweaks like lighting adjustments.
- Lighting Settings: Find recommended 3D model lighting settings at Microsoft Answers.
- 3D Models: Explore and download more 3D models from Vectoree to enhance your presentations.
Frequently Asked Questions (FAQ)
Can I replace screens on any 3D device model in PowerPoint?
Yes! Using tools like Vectoree, you can replace screens on various 3D device models, including laptops, tablets, and phones. Just ensure your custom image matches the required dimensions for the screen part.
Is it possible to edit 3D models directly inside PowerPoint?
PowerPoint allows you to insert, rotate, and animate 3D models but does not provide built-in tools to edit the model’s components, such as changing textures or images on parts of the model. For that, external tools like Vectoree are necessary.
How do I ensure my custom screen image fits perfectly on the 3D model?
Each 3D model has specific texture dimensions. For the laptop model discussed here, the image must be exactly 2560 pixels wide and 1600 pixels tall. Creating your image at these dimensions in PowerPoint or another design tool ensures a perfect fit.
Why does the 3D model appear brighter in PowerPoint than in the editing tool?
PowerPoint adds additional lighting automatically to all 3D models, which can brighten or wash out the appearance. You can adjust this by editing the presentation file’s XML to customize or remove these lights.
Can I animate 3D models in PowerPoint?
Absolutely! PowerPoint includes several animations designed for 3D models, such as Turntable and Swing. You can customize duration, direction, and smoothness to create engaging effects.
Do I need any special software to edit PowerPoint files for lighting adjustments?
You only need a free archive tool like 7-Zip to open and edit the PowerPoint file’s internal XML files. No expensive or complicated software is required.
Is this method compatible with all versions of PowerPoint?
This tutorial uses PowerPoint Microsoft 365 on Windows. Some features like 3D model insertion and animation may not be available in older versions or on other platforms.
Conclusion
Working with 3D models in PowerPoint opens up amazing possibilities for creating dynamic, professional presentations. By following this tutorial, you’ve learned how to:
- Replace the screen on a simple laptop photo using shape merging.
- Customize a 3D laptop model’s screen using the free online tool Vectoree.
- Export and import your customized 3D model back into PowerPoint.
- Adjust the lighting of your 3D model by editing the PowerPoint file’s XML content.
- Add smooth, continuous animations like Turntable to bring your 3D models to life.
With these skills, you can create engaging device mockups and templates that stand out in any presentation. Remember, practice makes perfect, so experiment with different images, lighting settings, and animations to find your unique style.
Stay happy, stay healthy, and keep creating! I look forward to seeing what you build next.
Check out the full video: 3D Laptop With Your Image 🔥PowerPoint Tutorial🔥


