
If you’re looking to elevate your PowerPoint presentations with engaging visuals and interactive elements, mastering the art of PowerPoint animated slide design is essential. In this detailed guide, I’ll walk you through creating a sleek, four-step animated tab infographic slide using PowerPoint. This slide design not only looks professional but also helps communicate complex information clearly and dynamically, making it perfect for business presentations, project updates, and educational content.
Throughout this tutorial, you’ll learn how to build the slide from scratch, customize colors, add icons, and apply animations that make each step appear on click. Whether you’re a PowerPoint beginner or looking to enhance your slide design skills, this step-by-step guide will provide you with the tools and techniques to create a compelling animated slide that captivates your audience.
Table of Contents
- Overview of the 4-Step Animated Tab Design Slide
- Setting Up Your PowerPoint Slide
- Creating the Tab Shapes and Color Coding
- Adding Text, Titles, and Icons
- Grouping and Arranging Objects
- Applying Animation for Interactive Tabs
- Customization Tips and Best Practices
- Frequently Asked Questions (FAQ)
- Conclusion
Overview of the 4-Step Animated Tab Design Slide
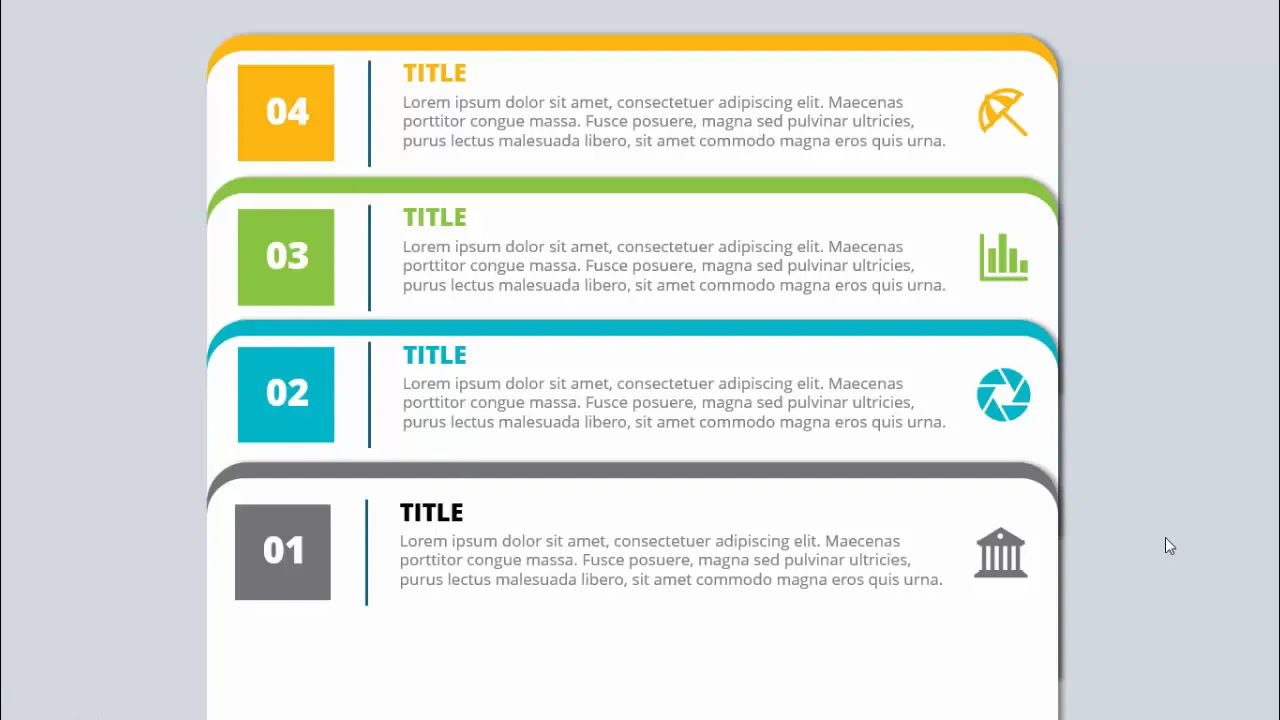
The 4-step animated tab infographic slide is designed to visually break down information into four distinct sections or options. Each tab represents a step or option, with a title, detailed text, and an icon to illustrate the concept. The key feature is the animation that reveals each tab sequentially when clicked, helping to maintain audience focus and enhance clarity.
Here’s how the slide functions in a presentation:
- Clicking triggers the appearance of the first tab with its title, description, and icon.
- Subsequent clicks reveal the second, third, and fourth tabs, each with a unique color scheme and icon.
- The tabs are evenly spaced and aligned vertically to maintain a clean, organized look.
- Optionally, the width of the tabs can be adjusted to fit your content or style preferences.
This design is highly versatile and can be adapted to different presentation needs by adding or reducing the number of tabs and customizing colors, fonts, and icons.
Setting Up Your PowerPoint Slide
Before diving into shape creation and animation, it’s important to prepare your PowerPoint slide properly. This ensures your design process is smooth and your slide looks polished.
Step 1: Add a New Slide and Choose a Background
Start by inserting a new blank slide in your presentation. To keep your content readable and visually appealing, select a light background color. This helps your colored tabs and icons stand out clearly.
- Go to the Home tab and click New Slide.
- Right-click the slide and select Format Background.
- Choose a solid fill with a light color (e.g., light gray or white).
Why a Light Background?
A light background minimizes distraction and enhances contrast, making vibrant tab colors and icons more visible. It also gives your slide a clean, modern look.
Creating the Tab Shapes and Color Coding
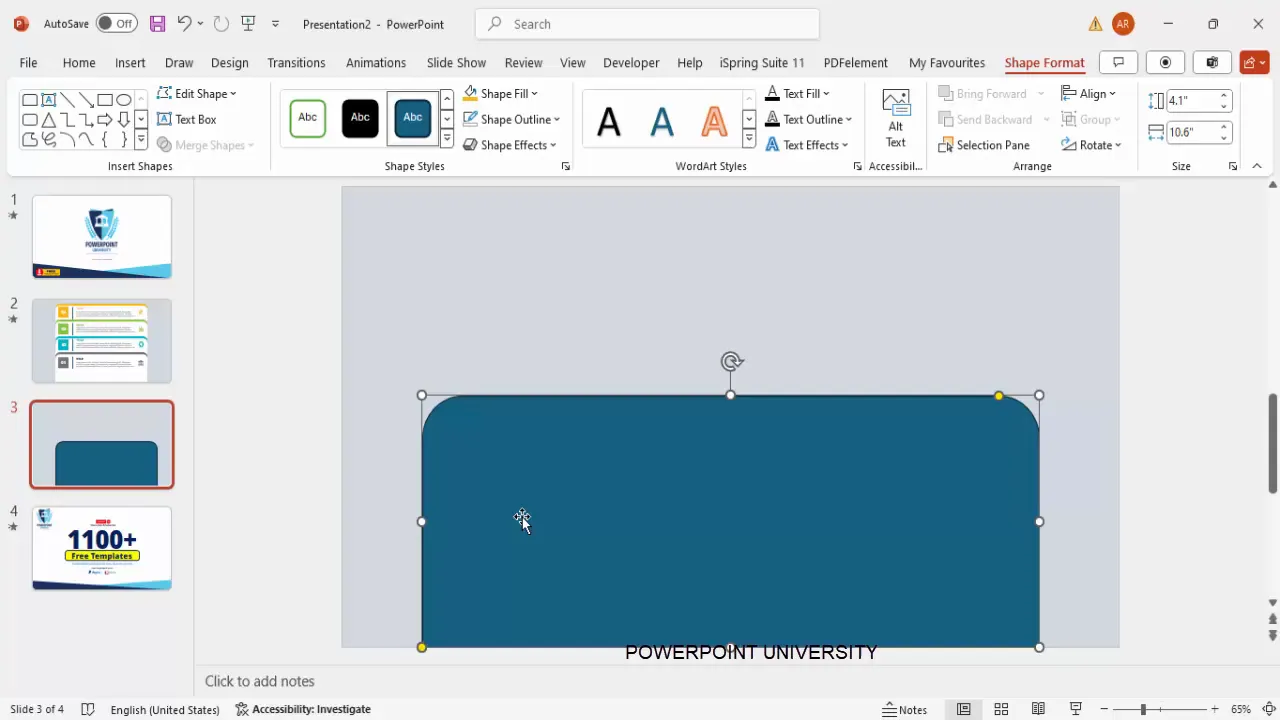
The core element of this infographic slide is the tab shapes. In this tutorial, we use rounded rectangles with a slight curve at the top corners to create a modern tab look.
Step 2: Insert the Rounded Rectangle Shape
- Go to the Insert tab and select Shapes.
- Choose the Rounded Rectangle (Top Corner Rounded) shape.
- Draw the shape vertically, then reduce the height to create a slim tab.
- Remove the shape outline by setting Shape Outline to No Outline.
- Fill the shape with white color.
- Adjust the corner curvature by dragging the small yellow handle outward to reduce the curve.
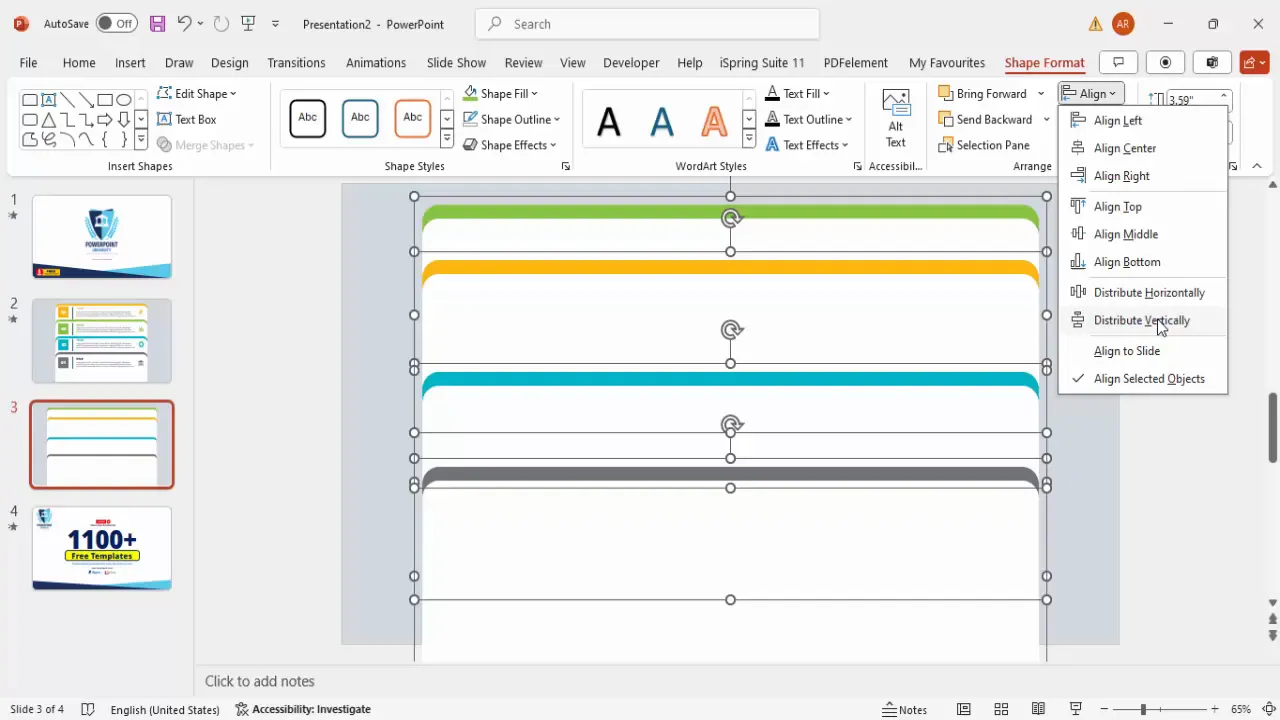
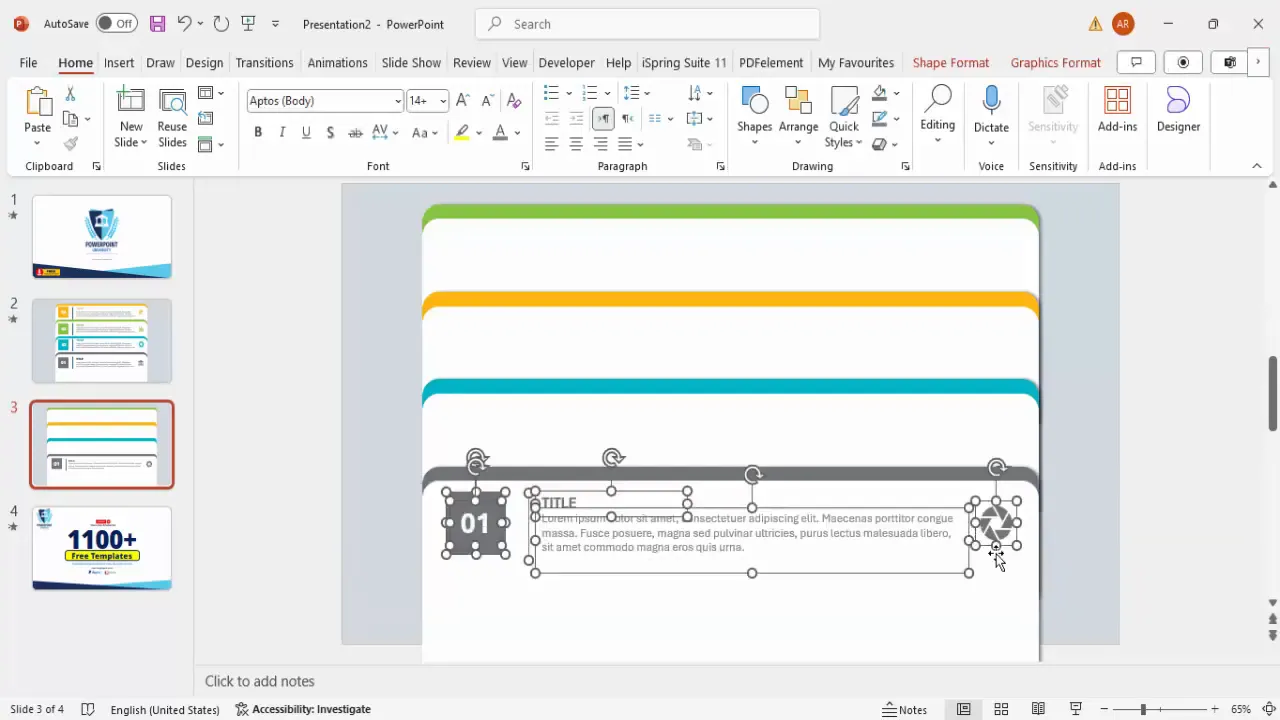
Step 3: Duplicate and Color the Tabs
After creating the first tab, duplicate it three times to create four tabs total. Then, apply different colors to the duplicate shapes to visually differentiate each option.
- Select the shape and press Ctrl + D to duplicate.
- Change the fill color of the duplicates to your chosen palette, such as gray, blue, orange, and green.
- Send the colored shapes behind the white shape to create a layered effect that resembles a tab with a shadow or outline.
- Align the tabs vertically with equal spacing using the Align and Distribute Vertically tools under the Format tab.
Step 4: Adjust Size and Position
You can resize the tabs or move them slightly beyond the slide boundaries if needed to achieve your desired look. The key is to maintain consistent spacing and alignment for a professional finish.
Adding Text, Titles, and Icons
With the tabs in place, the next step is to add labels, detailed text, and icons to each tab to communicate your message clearly.
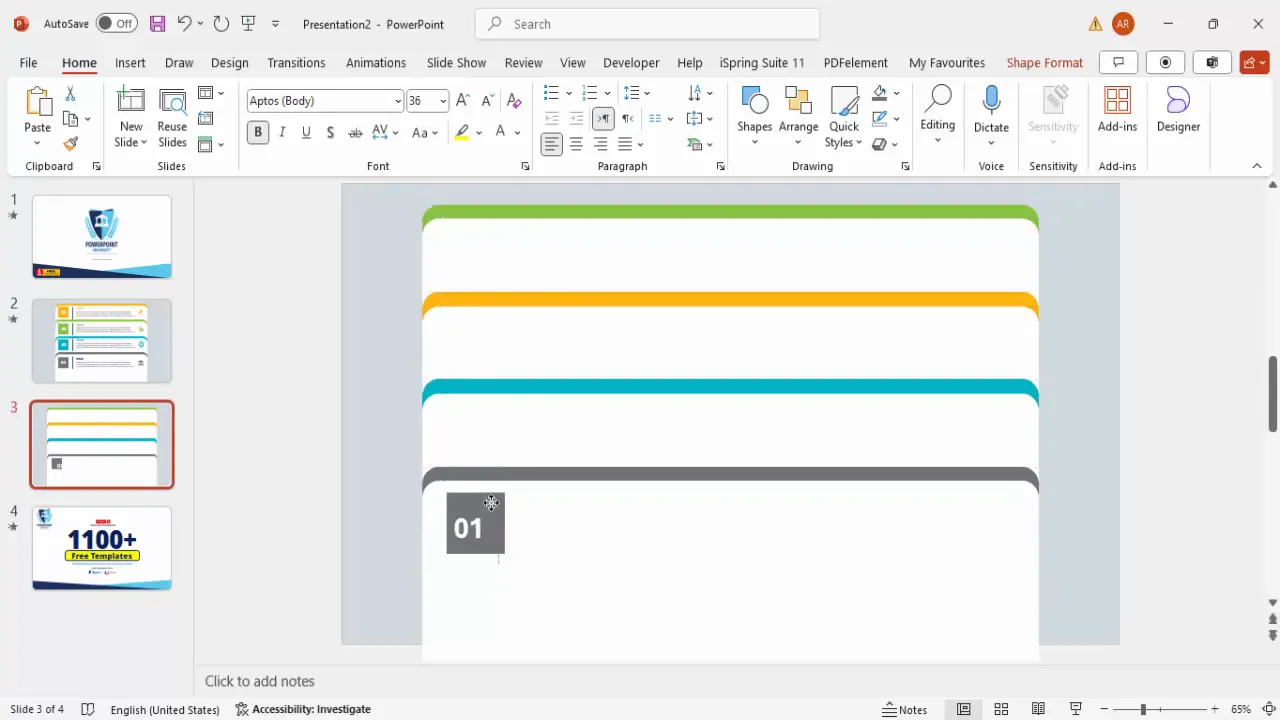
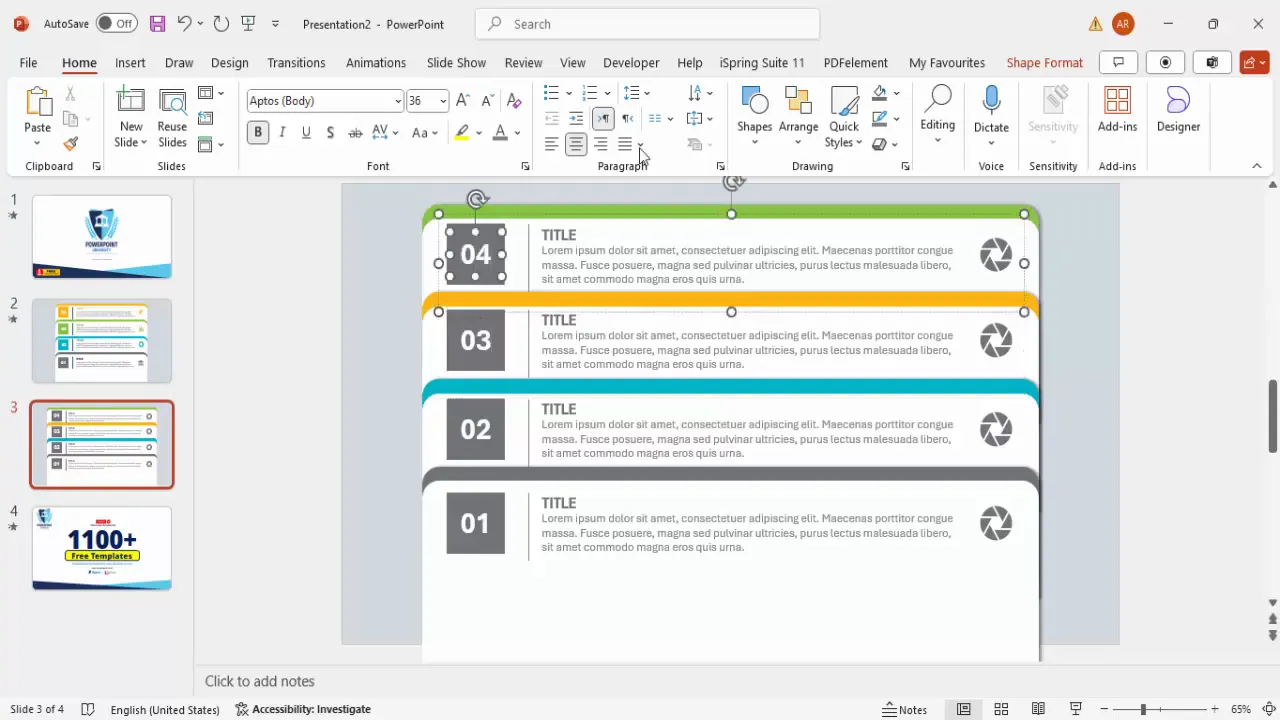
Step 5: Add Numbered Labels
- Insert a small rectangle shape on the colored tab area for the number label.
- Remove the outline and fill it with the same color as the tab.
- Add a text box with the step number (e.g., “01”, “02”).
- Set the font color to white, make it bold, and increase the font size for visibility.
- Center-align the number within the rectangle.
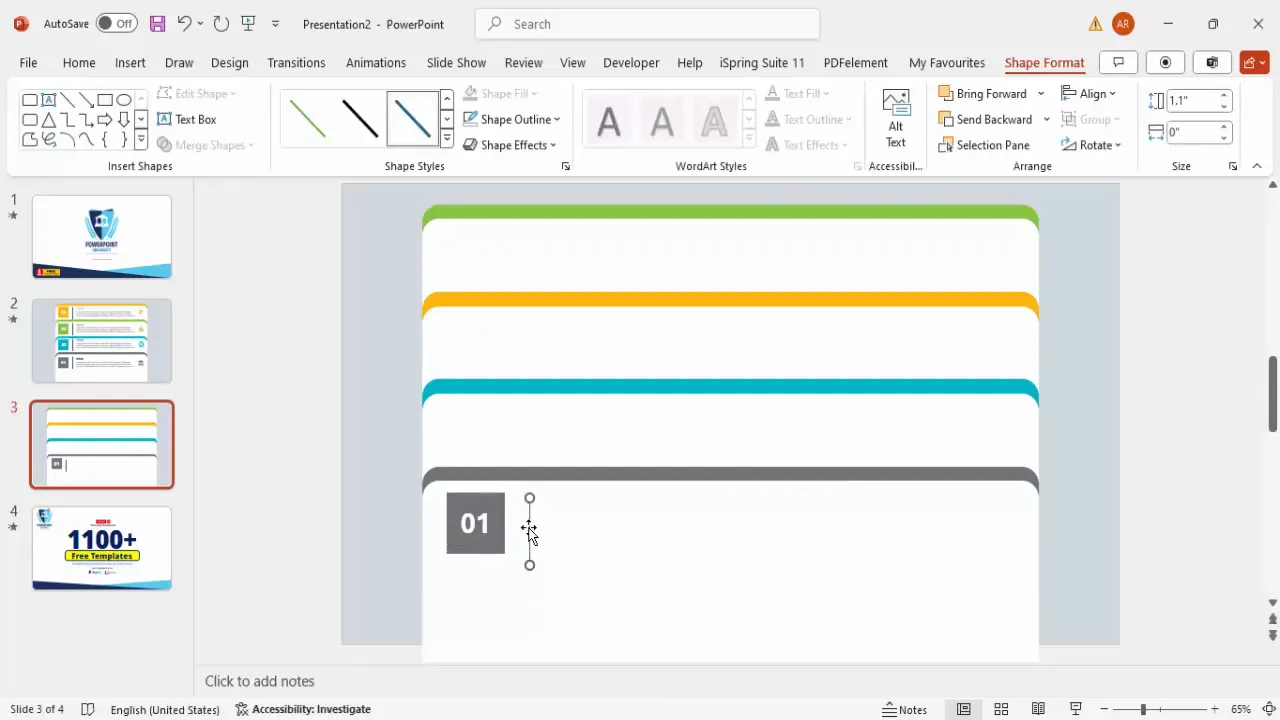
Step 6: Draw Separator Lines
To visually separate the number from the text, insert a vertical line next to the number label:
- Go to Insert > Shapes and select the Line tool.
- Hold the Shift key while drawing to keep the line straight.
- Set the line color to gray and increase the line weight for better visibility.
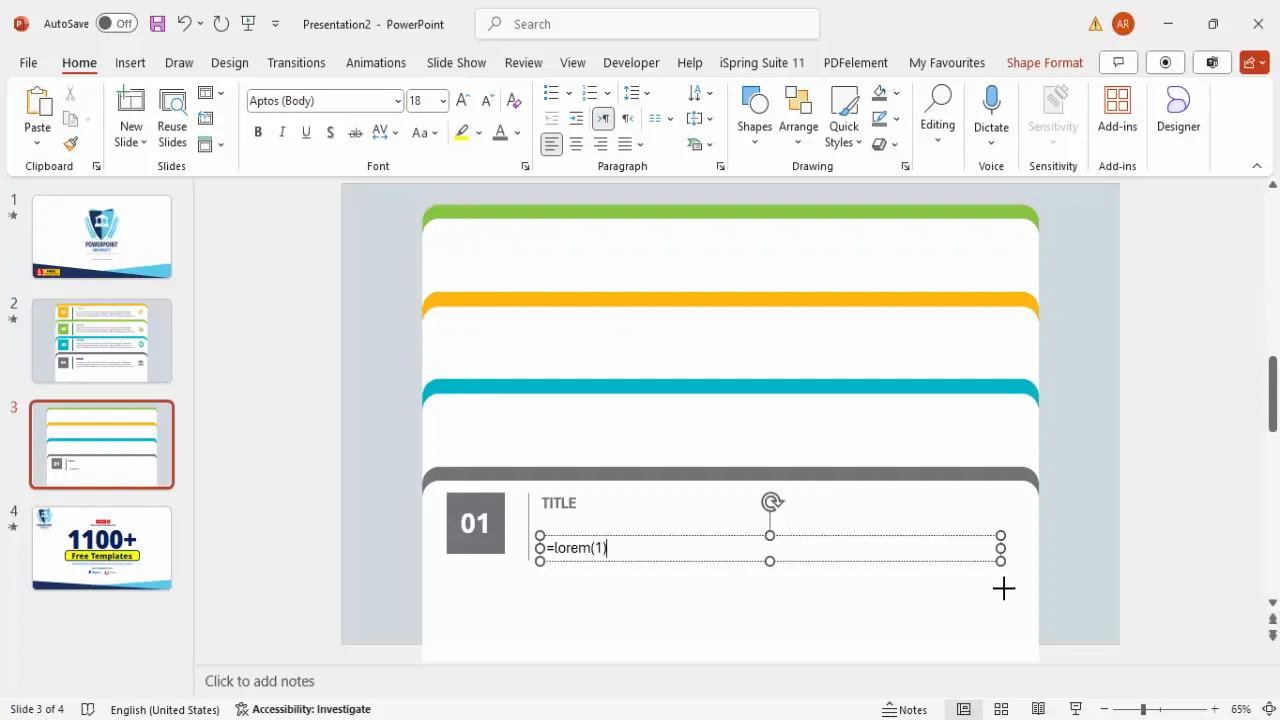
Step 7: Add Titles and Detailed Text
- Insert a text box next to the separator line for your title.
- Make the title bold and use the same color as the tab for consistency.
- Below the title, add another text box for detailed description or supporting text.
- Use a lighter gray color for the detailed text and reduce the font size to 14-16 points for readability.
- Use placeholder text such as “Lorem ipsum” if you want to focus on layout first.
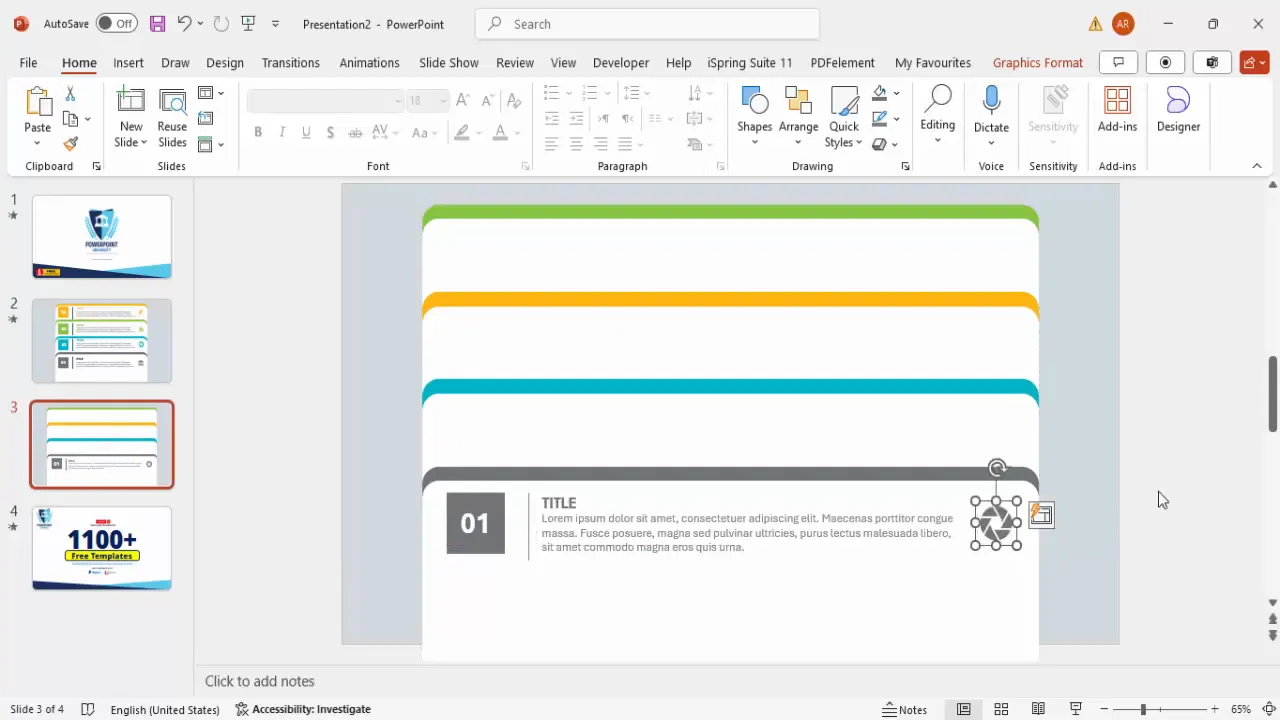
Step 8: Add Icons to Enhance Visual Appeal
Icons are a simple way to visually reinforce the message of each tab. PowerPoint’s built-in icon library allows you to insert relevant icons quickly.
- Go to Insert > Icons.
- Search for an icon that fits your tab’s theme (e.g., clock, apple, house).
- Insert the icon and resize it to approximately 0.7 inches in height or width.
- Color the icon to match the tab’s color scheme for a cohesive look.
- Position the icon on the right side of the tab content.
Grouping and Arranging Objects
Grouping related elements makes it easier to manage your slide and apply animations efficiently.
Step 9: Apply Shadow Effects
Before grouping, apply a subtle shadow effect to the grouped objects to add depth:

- Select the shapes and text boxes within one tab.
- Go to Shape Format > Shape Effects > Shadow.
- Choose “Offset Right” shadow for a natural light effect.
Step 10: Group Tab Components
- Select all elements of one tab (number label, separator line, title, text, and icon).
- Press Ctrl + G to group them.
- Repeat for all four tabs.
Grouping simplifies moving tabs around and applying animations to the entire tab at once.
Step 11: Arrange Grouped Tabs
- Use Ctrl + Shift to select multiple grouped tabs and move them as needed.
- Ensure consistent spacing and alignment using the Align tools.
- Double-check that the color scheme and icons match each tab’s theme.
Proper arrangement ensures your slide looks professional and polished.
Applying Animation for Interactive Tabs
Animation brings your infographic slide to life, allowing each tab to appear on click, helping maintain audience focus and engagement.
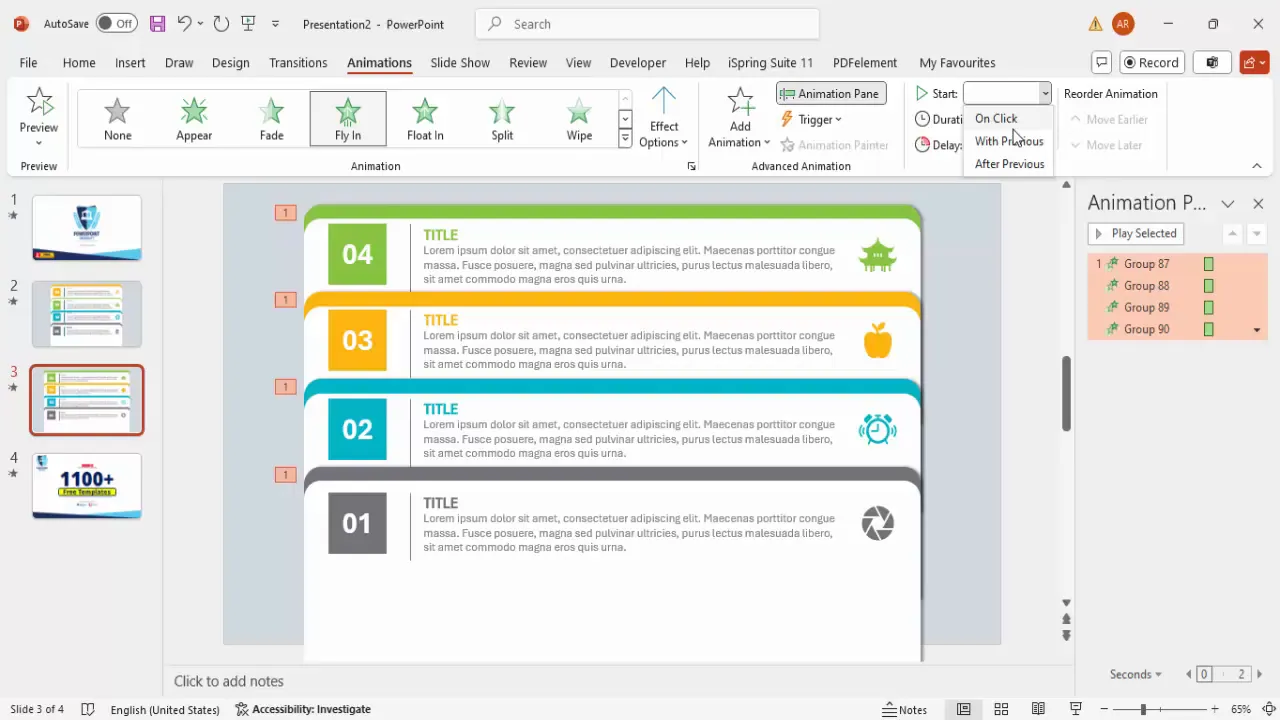
Step 12: Open the Animation Pane
- Go to the Animations tab in PowerPoint.
- Click Animation Pane to open the sidebar that manages animations.
Step 13: Apply Fly-In Animation
- Select all grouped tab objects by holding the Shift key.
- Choose the Fly In animation from the animation gallery.
- Set the animation trigger to On Click for each tab.
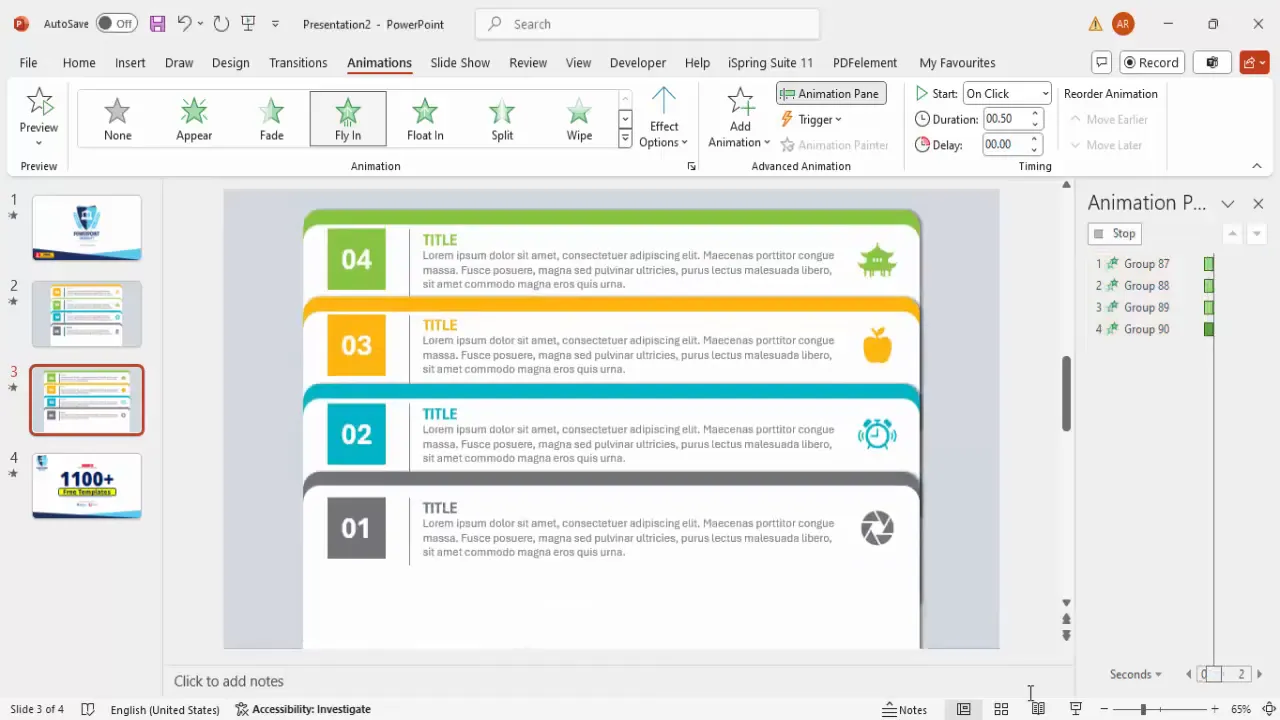
Step 14: Customize Animation Effects
- Right-click on each animation in the animation pane and select Effect Options.
- Under the Effect tab, increase the Bounce amount to add a dynamic entrance effect.
- Click OK to apply changes.
Step 15: Test Your Animated Slide
Run your slideshow and click through each tab to ensure animations trigger correctly and the tabs appear in sequence.
- Verify that each tab’s color, text, and icon display as intended.
- Adjust timing or animation effects if needed for smoother transitions.
Customization Tips and Best Practices
The beauty of this PowerPoint animated slide design lies in its flexibility. Here are some tips to customize the slide to your unique needs:
| Customization Aspect | Tips & Recommendations |
|---|---|
| Number of Tabs | Increase or decrease the number of tabs depending on your content. Use the same duplication and alignment techniques for consistency. |
| Color Scheme | Choose colors that match your brand or presentation theme. Use contrasting colors for tabs and text to ensure readability. |
| Icons | Select icons that clearly represent the content of each tab. Avoid repeating the same icon; variety helps visual differentiation. |
| Text Length | Keep titles concise and detailed text brief to avoid clutter. Use bullet points if necessary for clarity. |
| Animations | Experiment with different entrance effects like fade or zoom, but keep animations subtle to maintain professionalism. |
| Slide Size | Adjust the width of the tabs or overall slide size to accommodate longer text or larger icons. |
Additional Design Tips
- Use consistent fonts and sizes across all tabs for a unified look.
- Maintain sufficient white space around tabs for better readability.
- Use the Align and Distribute tools frequently to keep elements tidy.
- Test your slide in slideshow mode to check visibility and animation flow.
Frequently Asked Questions (FAQ)
Q1: Can I create more than four tabs using this design?
Absolutely. The method described is scalable. Just duplicate the tab group more times and align them vertically with equal spacing. Adjust slide height if needed.
Q2: What if I want the tabs to appear automatically instead of on click?
You can change the animation trigger from “On Click” to “After Previous” or set specific timings in the Animation Pane. This will automate the tab appearances.
Q3: How do I change the font style and size for the tabs?
Select the text boxes for the titles and details, then use the Home tab to choose your preferred font, size, and color. Consistency is key for a polished look.
Q4: Can I use custom icons instead of PowerPoint’s built-in icons?
Yes, you can insert any image or icon by going to Insert > Pictures. Just ensure your icons are high quality and match your slide’s style and color scheme.
Q5: How do I ensure my slide looks good on different screen sizes?
Set your slide size appropriately under Design > Slide Size. Check your slide on various devices and adjust font sizes, tab widths, and spacing as needed for readability.
Conclusion
Mastering PowerPoint animated slide design opens up new possibilities for creating presentations that are both visually appealing and highly effective in communicating your message. The 4-step animated tab infographic slide is a versatile tool that can be adapted for many purposes, from business proposals to educational content.
By following this comprehensive guide, you’ll be able to build your own animated tab slide—from designing rounded rectangle tabs, applying colors, adding text and icons, to grouping elements and adding animations for an interactive experience. Remember to customize the design to fit your brand and presentation style, and test your animations thoroughly before presenting.
With practice, these techniques will become second nature, allowing you to create engaging PowerPoint slides that keep your audience focused and impressed.
Happy presenting!
Check out the full video: 4 Animated tab design slide in PowerPoint


