
Creating engaging and visually appealing slides is essential for effective presentations. If you want to elevate your PowerPoint skills and create professional infographic slides that capture attention, this guide is for you. In this comprehensive tutorial, we will walk through the process of designing a polished 4-step infographic slide in PowerPoint using a combination of shapes, colors, text formatting, and icons. This approach is perfect for business presentations, corporate slides, or any scenario where you want to communicate a process or sequence clearly and elegantly.
This guide is inspired by the expertise of POWERPOINT UNIVERSITY, a renowned source for free PowerPoint templates and tutorials. By following these instructions, you will learn how to create a slide that not only looks great but also incorporates subtle animations and design elements to make your presentation stand out.
Table of Contents
- Overview of the 4-Step Infographic Slide
- Preparing the Slide Background and Guides
- Creating the Rounded Rectangle Steps
- Applying Gradient Outlines and Shadow Effects
- Adding Step Numbers with Gold Accents
- Duplicating and Aligning Multiple Steps
- Enhancing Steps with Icons
- Adding Titles and Descriptive Text
- Customizing for More or Fewer Steps
- Frequently Asked Questions (FAQ)
- Conclusion
Overview of the 4-Step Infographic Slide
The infographic slide we are going to create features four horizontally aligned rounded rectangles, each representing a step in a process. Each step contains:
- A large gold-colored step number positioned prominently on the left
- A gold color stripe behind the step number for emphasis
- An icon centered within the step to visually symbolize the step’s purpose
- A concise title and detailed text description below the icon
The slide background is a light color to ensure readability and contrast, while the steps have a subtle gray tone with white gradient outlines to create depth. A shadow effect beneath each step adds a polished 3D feel.
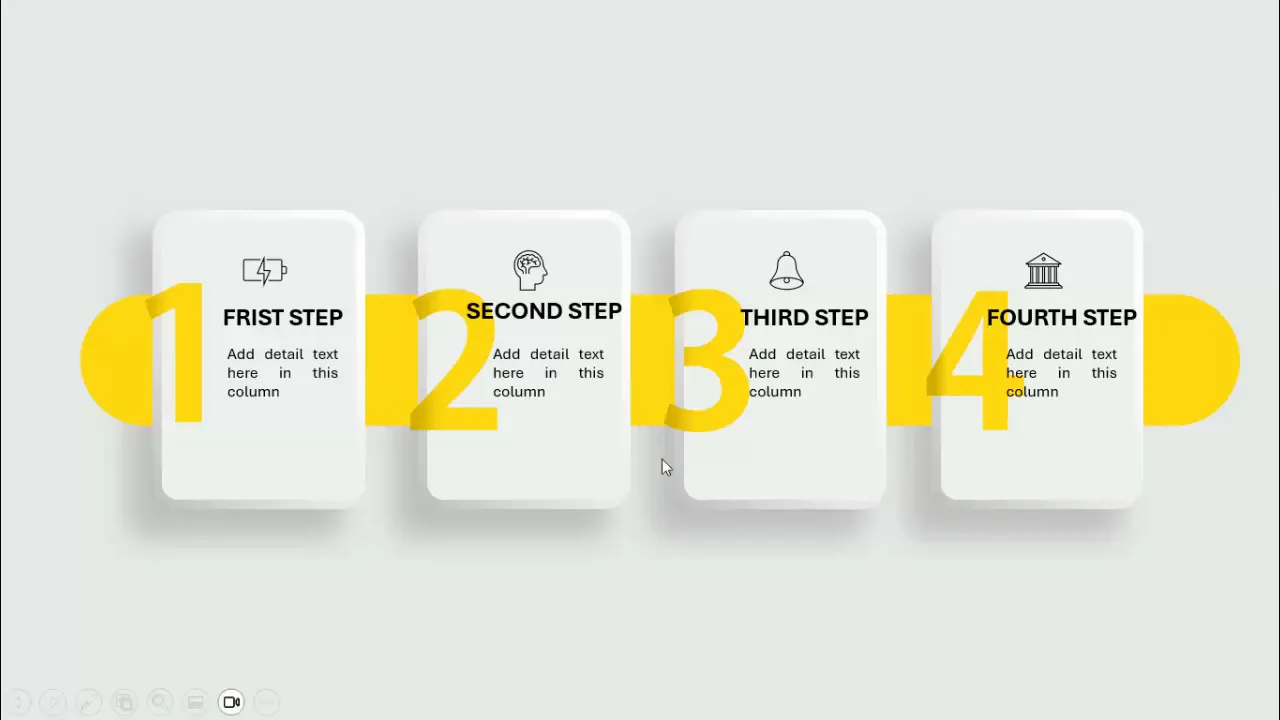
This infographic design is flexible — you can increase or decrease the number of steps depending on your presentation needs.
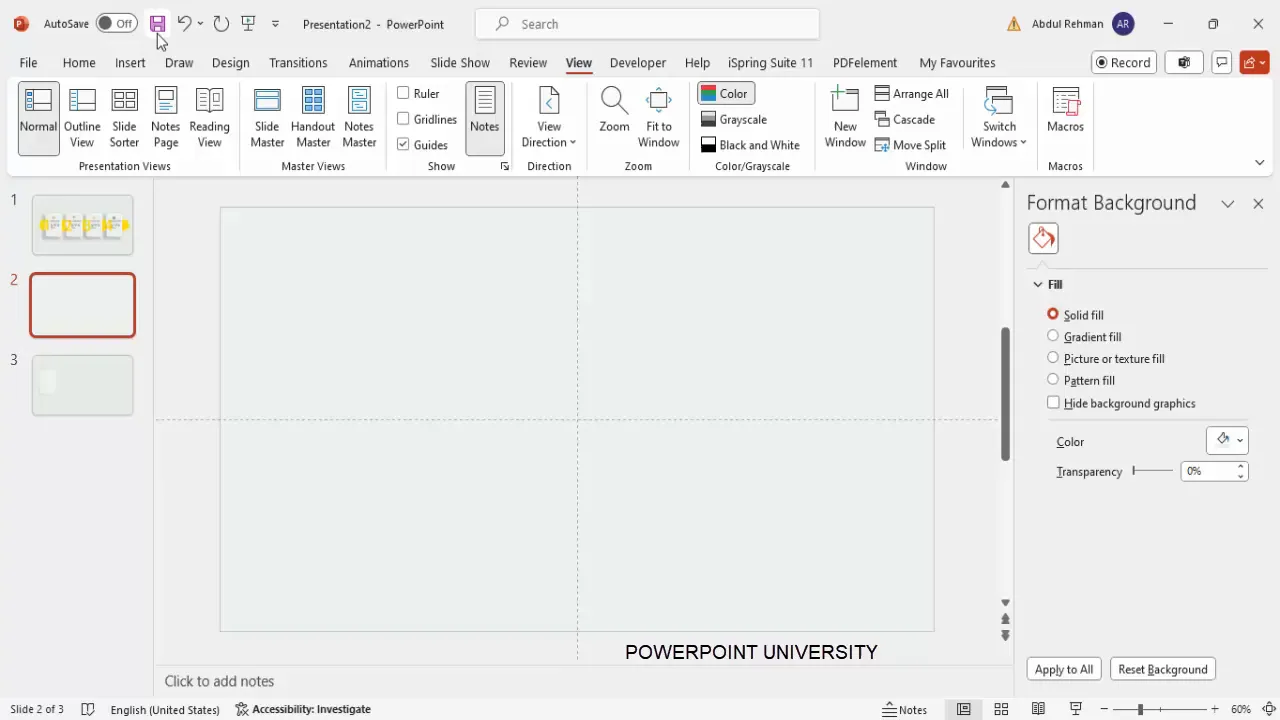
Preparing the Slide Background and Guides
Start by adding a new blank slide in PowerPoint. To ensure precise alignment of the infographic elements, enable guides:
- Go to the View tab.
- Check the Guides option to display vertical and horizontal guide lines.
Next, customize the slide background:
- Right-click anywhere on the slide and select Format Background.
- Choose a light color for the background to maintain a clean and professional look. For this tutorial, a very light gray or off-white color works best.
This neutral background provides the perfect canvas for your infographic steps to stand out.
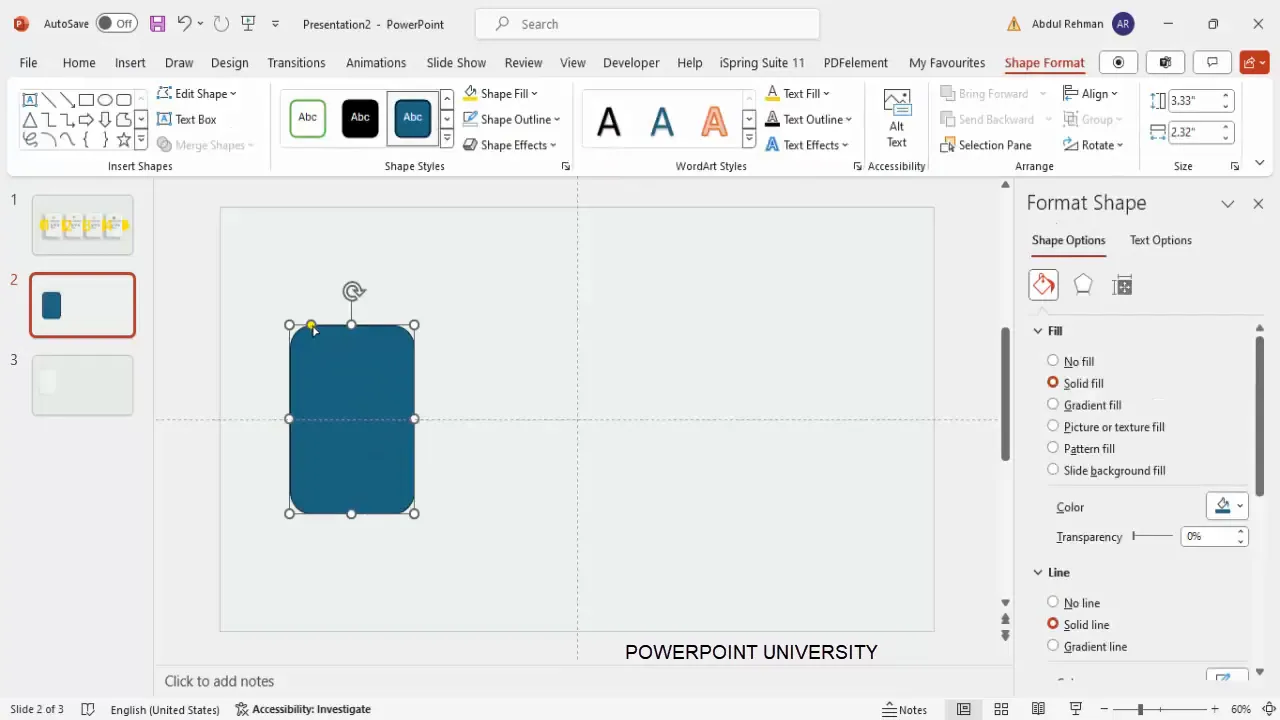
Creating the Rounded Rectangle Steps
The core of the infographic is the rounded rectangles representing each step. Follow these steps to create a single rounded rectangle:
- Go to the Insert tab and select Shapes.
- Choose the Rounded Rectangle shape from the rectangles section.
- Draw the rounded rectangle on the slide according to your desired size.
- Adjust the corner curvature by dragging the small yellow adjustment handle. Drag it outward to reduce the curve and make the corners less rounded.
Once the shape is drawn, customize the outline and fill:
- Set the Shape Outline color to white.
- Increase the outline thickness to about 6 points for a bold border.
- Fill the shape with a medium gray color, darker than the background but subtle enough to keep the slide light and airy.
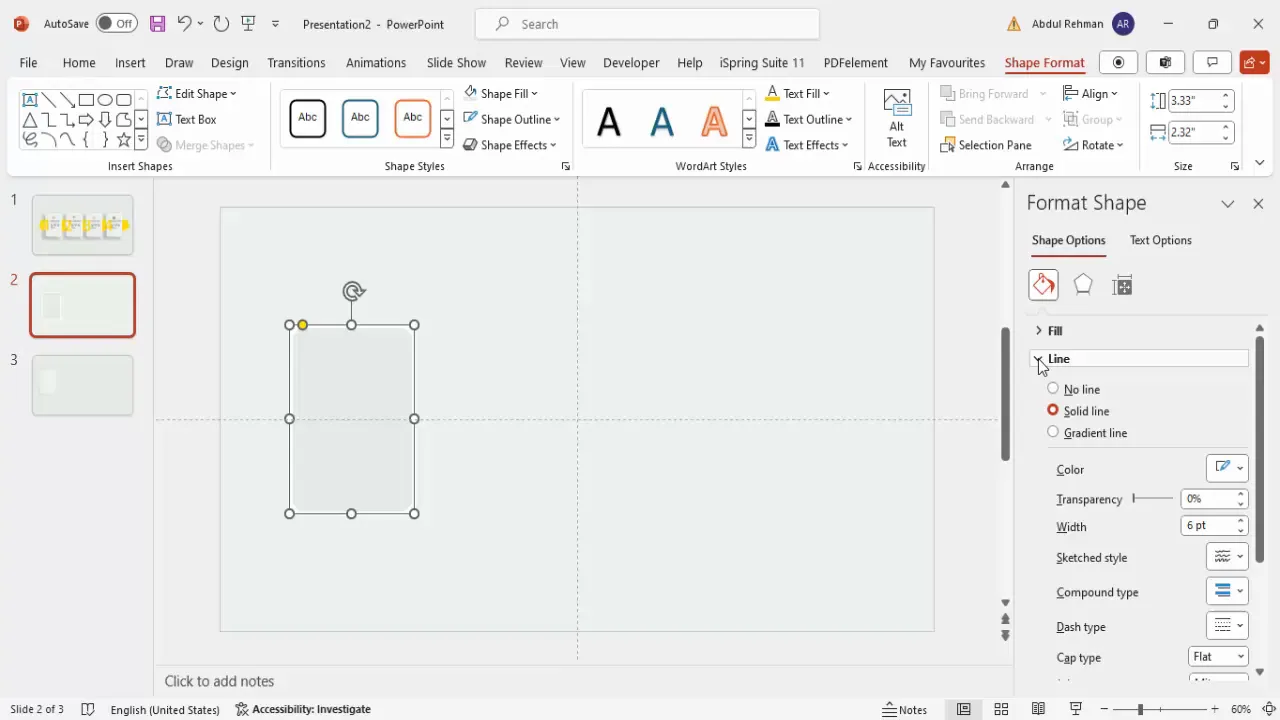
Applying Gradient Outlines and Shadow Effects
To add visual interest, apply a gradient to the outline of the rounded rectangle:
- Select the rounded rectangle.
- In the Format Shape pane, navigate to the Line options (not the fill).
- Choose Gradient line.
- Delete two of the four gradient stops, leaving two stops.
- Set one stop to a gray color and the other to white.
- Adjust the gradient direction to create a subtle highlight effect along the outline.
Next, add a shadow effect to give the step shape depth:
- Insert another rectangle shape larger than the rounded rectangle.
- Remove the outline by selecting No Outline.
- Fill the shape with a dark gray color (avoid pure black for a softer look).
- Go to Effects and apply Soft Edges, increasing the softness to create a blurred shadow effect.
- Position this shadow shape behind the rounded rectangle by right-clicking and selecting Send to Back.
- Adjust the position and size of the shadow to align perfectly with the rounded rectangle.
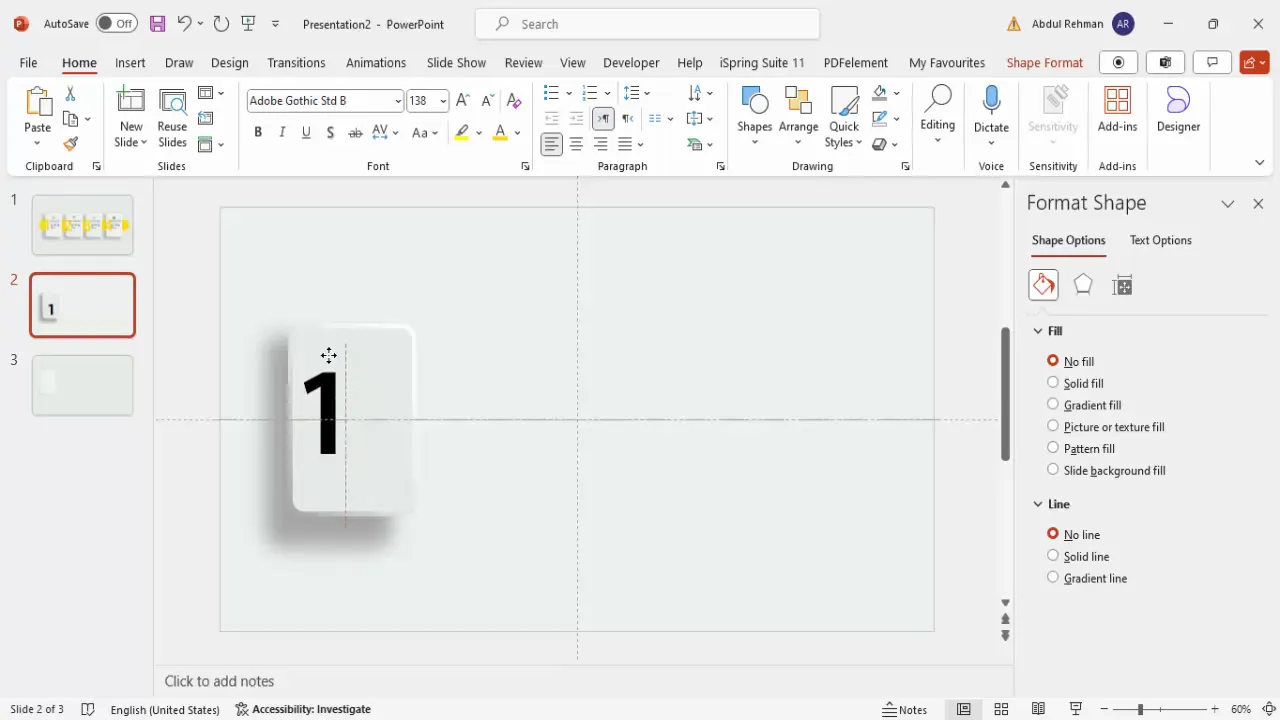
Adding Step Numbers with Gold Accents
Step numbers are crucial for guiding your audience through the process. Here’s how to add a stylish gold step number:
- Insert a text box and type the step number (e.g., “1”).
- Use the Adobe Gothic Standard font or a similar sans-serif font for a clean look.
- Set the font size to a large value, around 138 pt, to make the number prominent.
- Apply a gold color to the text. Use a rich gold tone that contrasts well with the gray background.
- Position the number near the left edge of the rounded rectangle step.
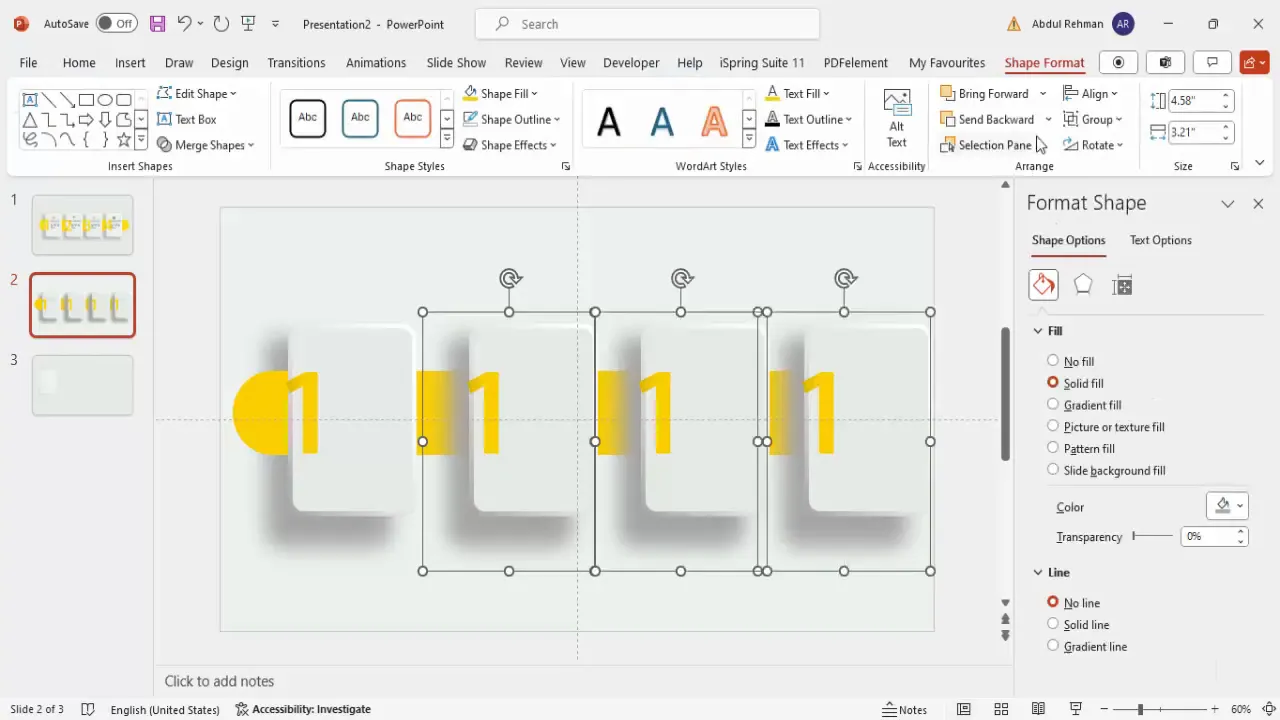
To enhance the gold effect, add a gold color stripe behind the number:
- Insert another rounded rectangle shape.
- Make the corners fully curved by dragging the yellow adjustment handle all the way.
- Remove the outline.
- Fill the shape with the same gold color used for the step number.
- Send this shape behind the step number but above the shadow layer.
- Resize and position the gold strip so it frames the step number nicely.
To give the step number text more depth, apply a gradient fill:
- Select the step number text box.
- Go to Format Shape > Text Options.
- Choose a two-color gradient fill.
- Set one color to a dark gold and the other to a lighter, normal gold.
- Adjust the gradient direction to create a subtle shadow effect on the text, making it look like it’s emerging from the corner.
Duplicating and Aligning Multiple Steps
To create the full 4-step infographic, duplicate the first step along with its shadow and gold stripe:
- Select the shadow, gold stripe, and step number shapes together by holding Shift.
- Press Ctrl+Shift (Cmd+Shift on Mac) and drag the group to the right to create the second step.
- Repeat this process two more times to create the third and fourth steps.
- Update the step numbers to “2,” “3,” and “4” respectively, changing the gold text color if desired for consistency.
- Make sure the spacing between each step is equal for a balanced look.
If you find the spacing uneven, adjust the positions slightly to maintain symmetry across the slide.

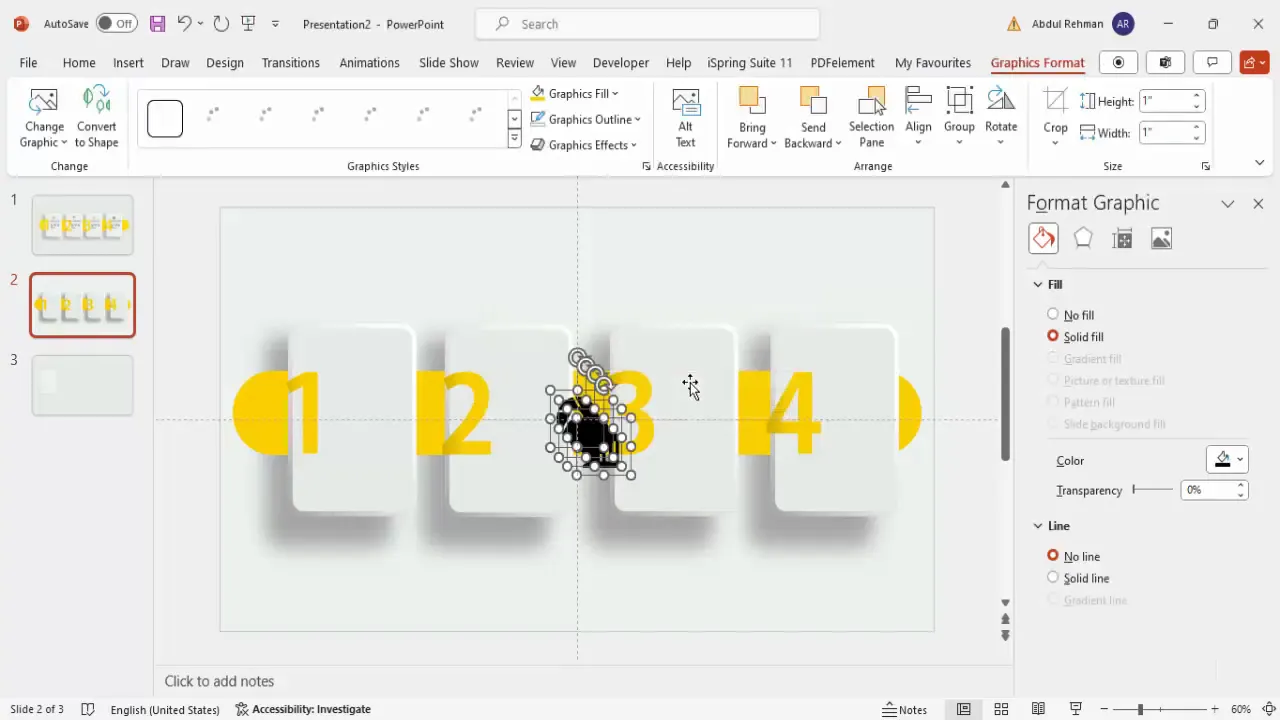
Enhancing Steps with Icons
Icons add visual cues that help communicate the meaning of each step quickly. To add icons:
- Go to Insert > Icons.
- Choose icons that fit the theme or concept of each step. For example, use a gear icon for process, a lightbulb for ideas, or a checklist for completion.
- Select four icons (one for each step) and click Insert.
- Resize each icon to a height of about 0.5 inches for consistency.
- Center each icon horizontally and vertically inside its respective rounded rectangle step.
Icons should complement the text without overwhelming the slide. Keep them simple and consistent in style.
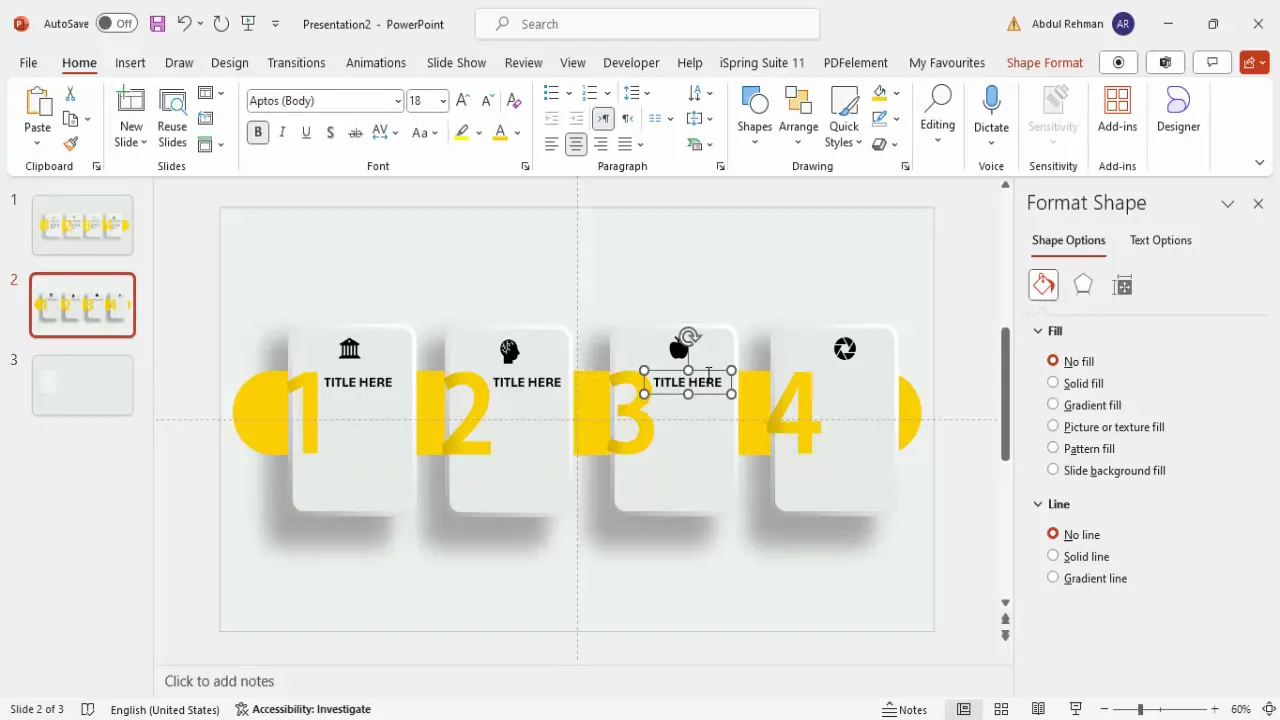
Adding Titles and Descriptive Text
Each step requires a clear title and a brief description to explain the process or concept:
- Insert a text box above or below the icon within each step.
- Type a concise title for the step. Make the title bold and center-aligned.
- Duplicate the title text box across the other steps by holding Ctrl+Shift and dragging it horizontally.
- Below each title, add another text box for detailed descriptive text. Keep the font size smaller than the title for hierarchy.
- Center-align the descriptive text and ensure it fits neatly within the step boundaries.
- Duplicate the detailed text boxes across all steps and update the content accordingly.
Use clear, easy-to-read fonts and keep the text minimal to maintain slide clarity and focus.
Customizing for More or Fewer Steps
This infographic slide is adaptable. If your process requires fewer or more steps, you can modify the design accordingly:
- Fewer Steps: Delete unnecessary step groups and redistribute the remaining steps evenly across the slide.
- More Steps: Reduce the width of each rounded rectangle and adjust font sizes to fit additional steps horizontally.
Remember to maintain equal spacing and consistent sizing for a professional appearance.
Frequently Asked Questions (FAQ)
Can I use different colors instead of gold?
Absolutely! While gold provides a luxurious and elegant look, you can customize the color scheme to match your brand or presentation theme. Choose colors that contrast well with the background and maintain readability.
How do I ensure the infographic is accessible to all viewers?
Use high-contrast colors between text and background, choose readable font sizes (at least 24 pt for body text), and avoid overly complex icons. Adding alt text to images and icons can also improve accessibility.
Can I animate the infographic steps?
Yes, PowerPoint allows you to add entrance, emphasis, and exit animations to shapes and text. Animating each step sequentially can help guide your audience through the process effectively.
What if I want to create a vertical infographic instead of horizontal?
The same principles apply. Create rounded rectangles stacked vertically, adjust the layout accordingly, and align the step numbers, icons, and text within each step.
Are the fonts used in this design free?
Adobe Gothic Standard is a common font but may not be installed on all systems. You can substitute it with other clean sans-serif fonts like Arial, Calibri, or Montserrat that are widely available and free to use.
Conclusion
Designing a professional and eye-catching 4-step infographic slide in PowerPoint is easier than you might think. By combining rounded rectangles with gradient outlines, shadow effects, gold accents, and icons, you can create a slide that clearly communicates your process while impressing your audience.
Remember to keep your slide balanced by evenly spacing the steps, using consistent font styles and sizes, and selecting colors that enhance readability. This method is highly adaptable, allowing you to increase or decrease the number of steps to fit your specific needs.
With these techniques, your PowerPoint animated slide design will look polished, professional, and engaging every time.
For more free templates and detailed tutorials, explore resources from POWERPOINT UNIVERSITY, where you can find over 1000 free templates and expert guidance to enhance your PowerPoint skills.
Check out the full video: Create 4-Step Infographic Slide in PowerPoint


