Creating engaging and visually appealing presentations is a skill that can significantly enhance how information is communicated, especially in educational or professional settings. One of the most effective ways to capture attention and improve understanding is by incorporating animations and custom designs directly into your slides. This article will walk you through a comprehensive guide on how to design an animated dental anatomy slide completely within PowerPoint. By the end, you’ll be equipped with the knowledge to build interactive, animated slides that not only look professional but also help convey complex information clearly.
Whether you’re a dental educator, a student, or a presentation enthusiast, this tutorial will provide you with practical techniques to create a dynamic presentation focused on tooth anatomy. The design features a detailed tooth illustration with interactive parts and color-coded options, all done with PowerPoint’s native tools. Let’s dive into how you can achieve a similar effect by leveraging PowerPoint’s shapes, grouping, formatting, and animation features.
Table of Contents
- Understanding Tooth Anatomy in PowerPoint
- Designing the Tooth Slide: Step-by-Step
- Creating Color-Coded Infographic Options
- Adding Text Descriptions and Details
- Animating Your Slide for Engagement
- Best Practices for PowerPoint Animated Slide Design
- Frequently Asked Questions
- Conclusion
Understanding Tooth Anatomy in PowerPoint
Before we jump into the design process, it’s essential to understand the anatomy of a tooth as it will guide how you build the slide and what parts to highlight. The tooth anatomy slide includes both the external and internal parts of a tooth, coupled with supporting structures like gums and nerves.
The primary parts of the tooth featured in the design include:
- Crown: The visible part of the tooth above the gum line.
- Neck: The section where the crown meets the root, near the gum line.
- Root: The part embedded in the jawbone, anchoring the tooth.
- Enamel: The hard, protective outer layer covering the crown.
- Dentin: The layer beneath the enamel, providing support.
- Pulp: The innermost part containing nerves and blood vessels.
- Gums: The soft tissue surrounding the teeth that provides protection and support.
- Cone and Cement: Structures supporting the tooth root.
- Nerves and Blood Vessels: Vital for tooth health and sensation.
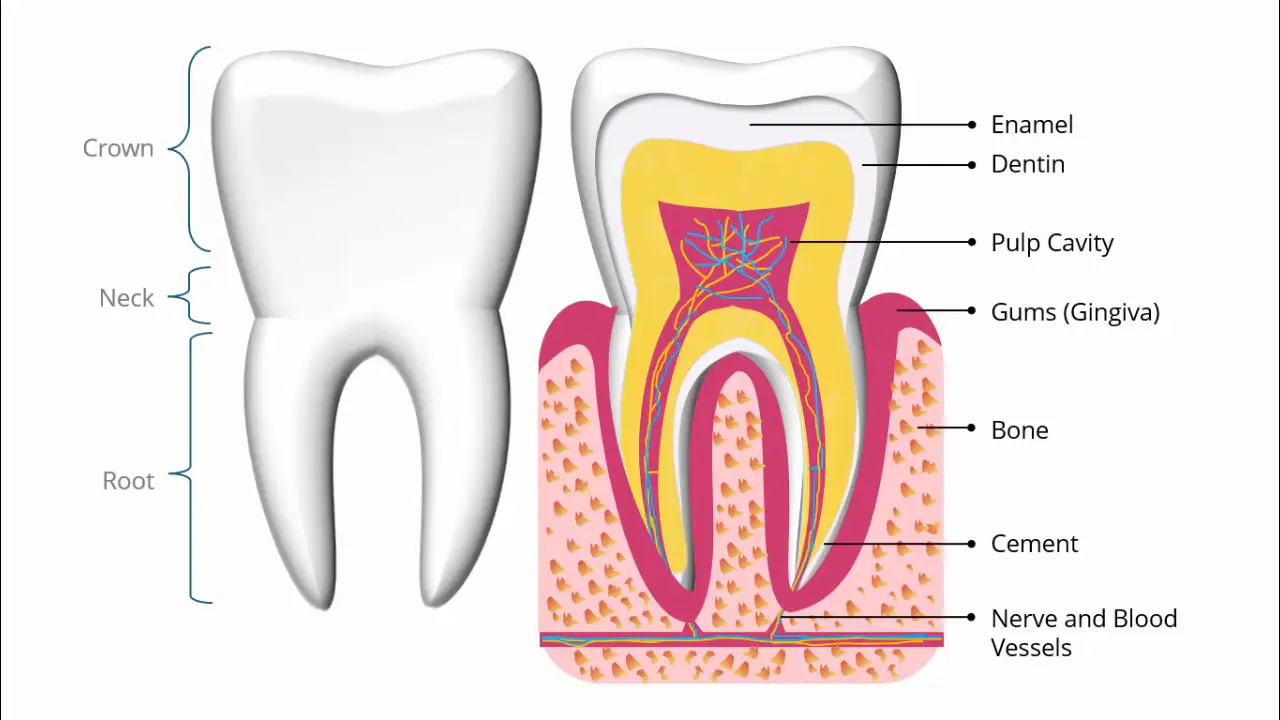
This detailed anatomy is illustrated in the slide, and clicking on the tooth triggers an animation that moves aside the external layers, revealing the internal components. This interactive approach not only makes the slide visually appealing but also aids in better understanding of the tooth’s complex structure.
Designing the Tooth Slide: Step-by-Step
Now that you have an understanding of the tooth’s anatomy, let’s explore how to design the foundational slide in PowerPoint. The tutorial focuses on creating a slide that shows the tooth and its parts, with added animation to reveal more detailed internal structures.
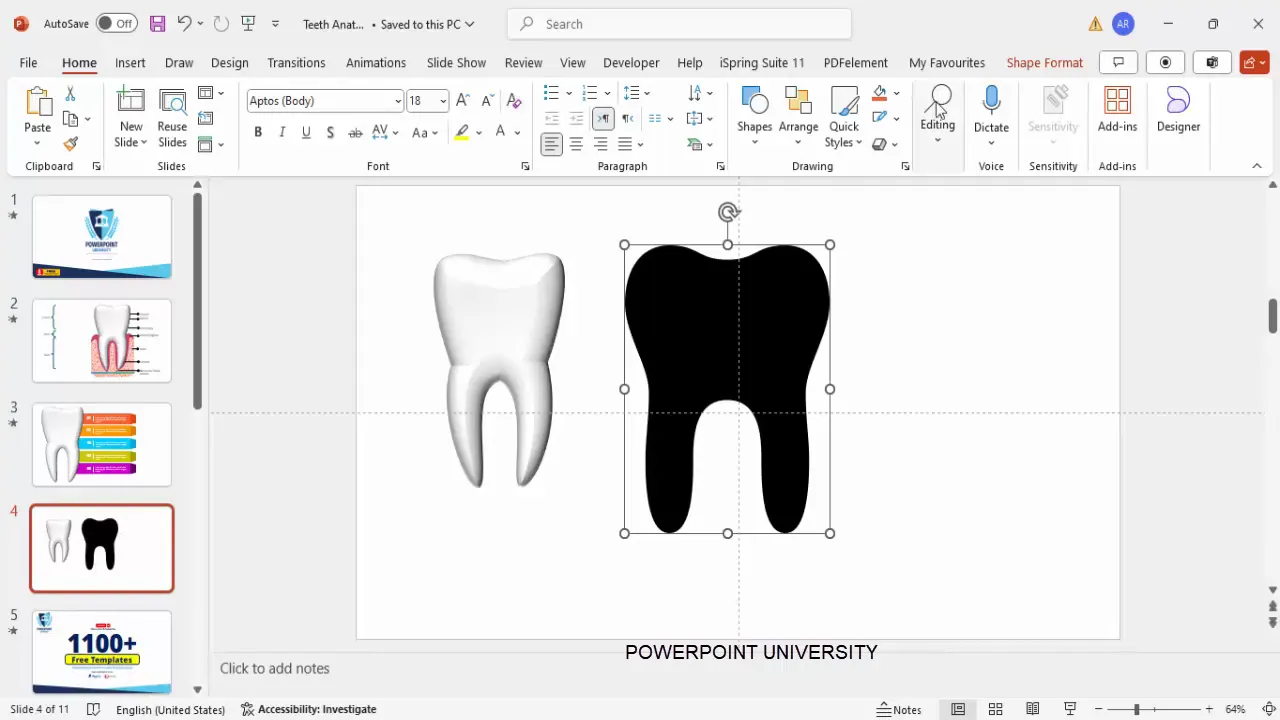
Step 1: Creating or Importing the Tooth Shape
Designing the tooth shape from scratch using PowerPoint’s freeform shape tool is possible but can be time-consuming. Instead, you can use a pre-existing tooth shape available in PowerPoint’s icon library or from free resources, then convert it to a shape for further customization.
To do this:
- Insert the tooth icon or image into your slide.
- Right-click the image and choose Convert to Shape. This allows you to manipulate the tooth as a vector graphic.
- Resize the tooth by holding the Shift key while dragging a corner to maintain proportions.
- Adjust the fill color to white or another suitable shade for better visibility.
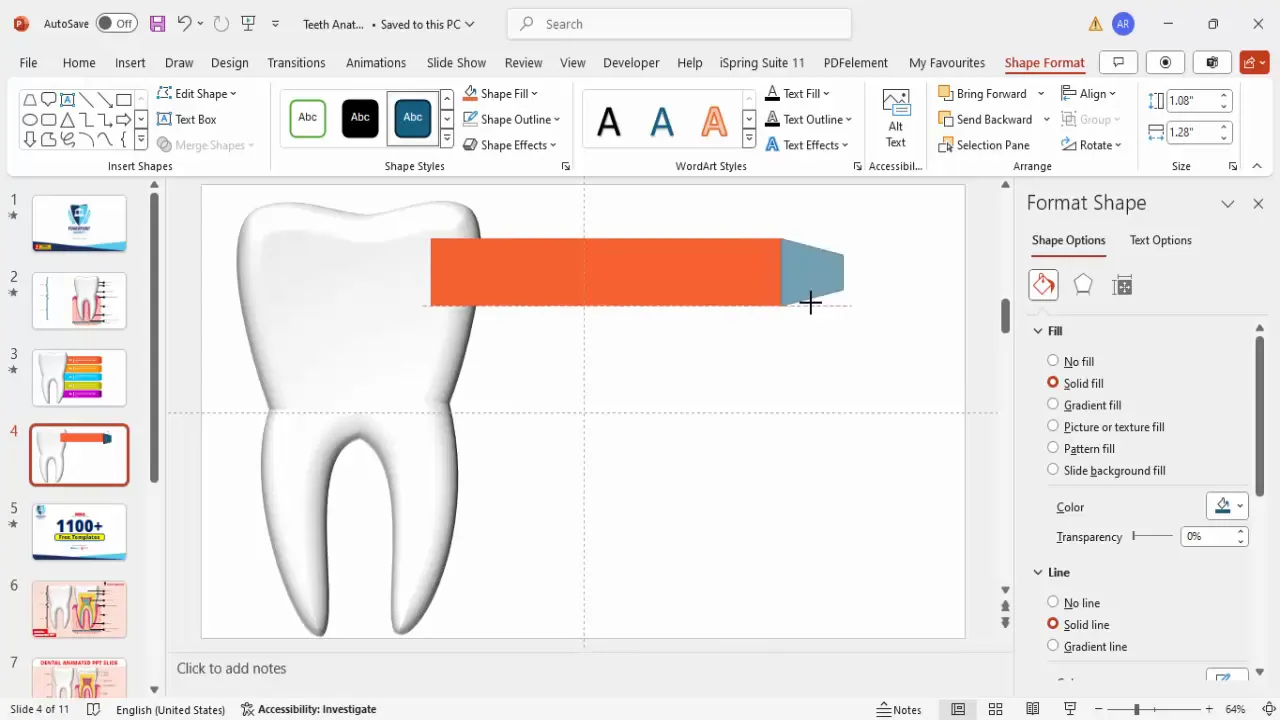
Step 2: Adding Depth with 3D Effects
To give the tooth a more realistic and visually appealing look, you can apply 3D formatting:
- Right-click the tooth shape and select Format Shape.
- Go to the Effects tab.
- Under 3-D Format, apply a bevel effect to add depth.
- Adjust the height and width of the bevel to your preference.
This step adds a subtle 3D effect that makes the tooth stand out without complex graphic software.
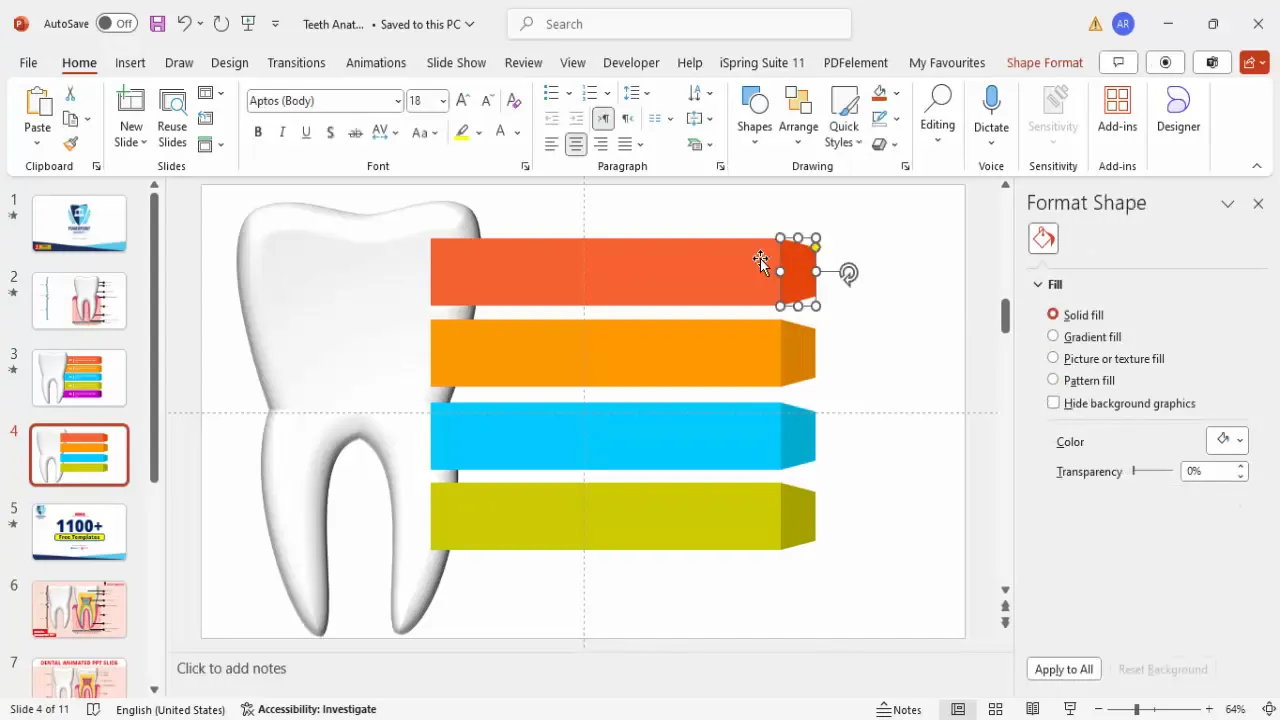
Step 3: Preparing the Slide Layout for Infographic Options
Once the tooth shape is ready, the next step involves preparing space for infographic options. These options will act as visual elements that can highlight different parts or concepts related to the tooth anatomy.
Here’s how to set up the infographic base:
- Insert rectangles to serve as the background for each option.
- Adjust the size and position of these rectangles to fit neatly beside or below the tooth shape.
- Remove the outlines for a clean look and fill the shapes with light colors (e.g., light orange).
- Insert trapezoids to add decorative arrows or pointers attached to each rectangle.
- Rotate and resize the trapezoids to match the rectangles’ height and width.
- Fill the trapezoids with a darker shade of the rectangle’s color to create contrast.
Creating Color-Coded Infographic Options
Color coding helps viewers distinguish between different options or categories quickly. In this slide, four color-coded options are created, each consisting of a rectangle and a trapezoid, representing different parts or aspects of the tooth anatomy.
Step 1: Duplicating and Aligning Shapes
To maintain consistency, create one set of rectangle and trapezoid, then duplicate it:
- Select both shapes.
- Hold Ctrl + Shift and drag downwards to duplicate and align the copies.
- Create four total sets, adjusting spacing as needed.
Step 2: Applying Color Variations
Assign colors to each set to differentiate them:
| Option | Light Color | Dark Color (Trapezoid) |
|---|---|---|
| Option 1 | Light Orange | Dark Orange |
| Option 2 | Light Blue | Dark Blue |
| Option 3 | Light Green | Dark Green |
| Option 4 | Light Purple | Dark Purple |
Grouping each option set after coloring is important to ensure easy management and alignment.
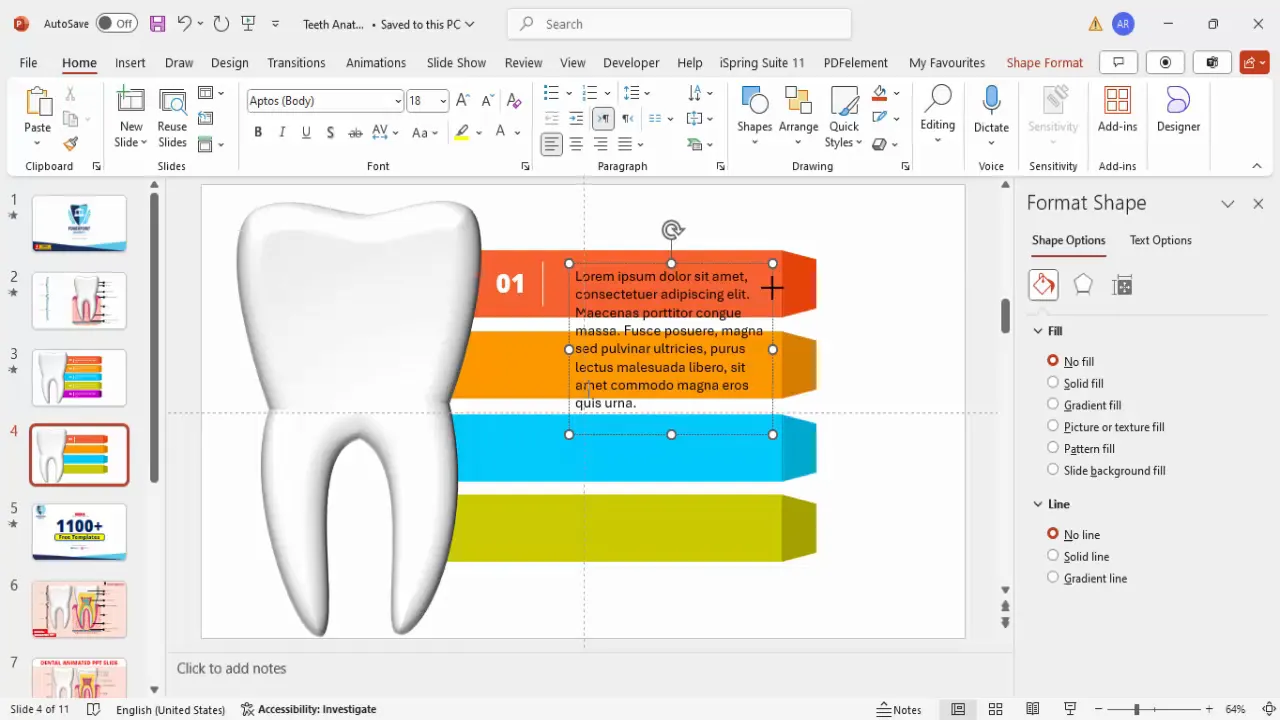
Adding Text Descriptions and Details
With the infographic shapes ready, adding descriptive text enhances the slide’s educational value. This step involves labeling each option and providing additional information.

Step 1: Adding Option Titles
- Insert a text box on each rectangle.
- Type “Option 1,” “Option 2,” and so forth.
- Choose a clear, bold font like Open Sans Extra Bold for visibility.
- Set the font size to around 32 points and align the text to the center.
- Use white or contrasting font colors depending on the background color.
Step 2: Adding Dividers and Detailed Text
- Insert a line shape under the option title as a visual divider.
- Hold the Shift key while drawing the line to keep it straight.
- Set the line color to white or a color that contrasts well with the background.
- Below the line, insert a smaller text box for detailed descriptions.
- Use a smaller font size for details (e.g., 14-18 points) and keep the text concise.
Once the first option is completed, duplicate the entire set (title, divider, and detail text) to create the other options. This ensures uniformity and speeds up the design process.
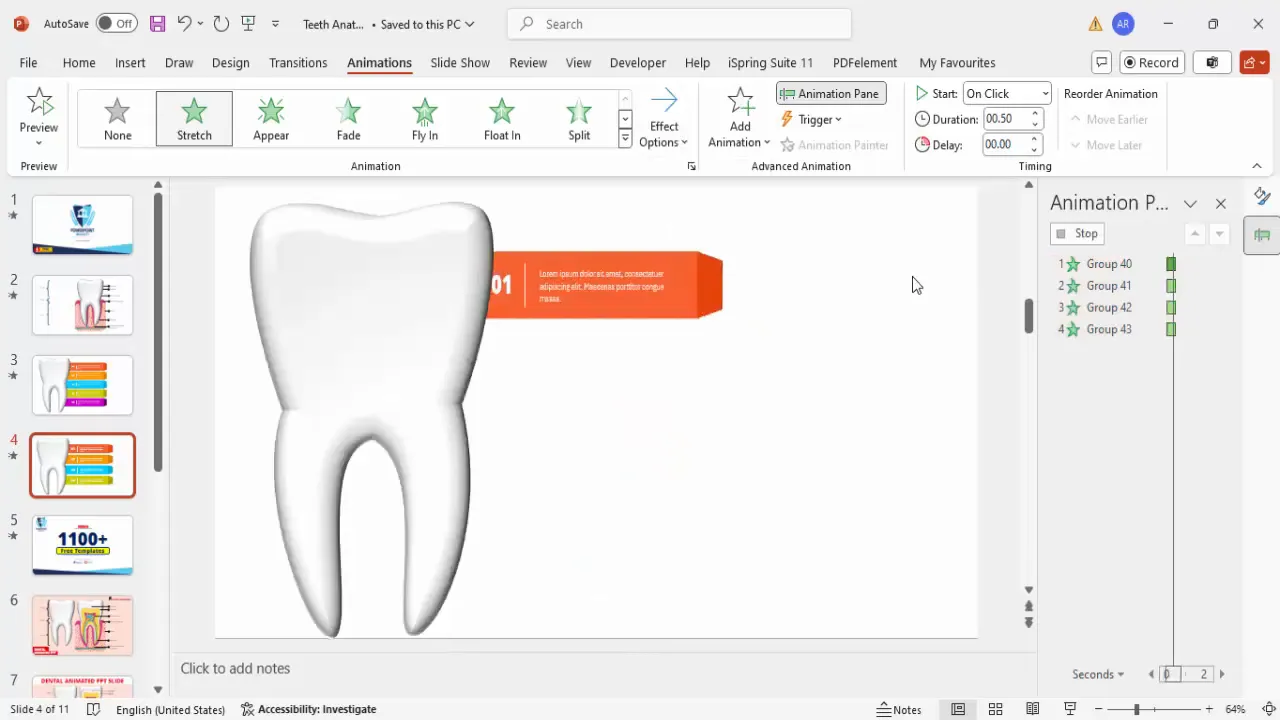
Animating Your Slide for Engagement
Animation transforms a static slide into an interactive and engaging experience. In this design, animations are used to reveal the infographic options dynamically when the tooth enlarges.
Step 1: Grouping Elements for Animation
Before applying animations, group related elements:
- Group each option’s rectangle, trapezoid, and text elements.
- Group all the options together if you want to animate them as a single unit or separately for staggered animation.
Step 2: Adding Animation Effects
- Open the Animations tab and enable the Animation Pane for better control.
- Select the grouped options.
- Choose More Entrance Effects and select Stretch.
- Set the animation to start On Click.
- Adjust the direction of the animation to start from the left for a smooth reveal.
This animation setup allows the infographic options to slide in from the left, complementing the tooth enlargement and delivering a polished presentation feel.
Best Practices for PowerPoint Animated Slide Design
Creating animated slides that are both visually appealing and effective requires a balance between design and usability. Here are some best practices to keep in mind when designing PowerPoint animated slides:
- Keep it Simple: Avoid overloading slides with too many animations or cluttered content.
- Consistent Color Schemes: Use a coherent color palette to maintain professionalism and visual harmony.
- Readable Text: Use clear fonts and adequate sizes to ensure text is legible from a distance.
- Use Grouping: Group related elements to manage animations and movements efficiently.
- Test Animations: Preview your animations multiple times to ensure smooth transitions and timing.
- Use Native PowerPoint Tools: Whenever possible, use PowerPoint’s built-in shapes and effects to maintain compatibility and ease of editing.
- Balance Visuals and Information: Make sure the animations support the information rather than distract from it.
Following these guidelines will help you create professional and engaging presentations that leave a lasting impression.
Frequently Asked Questions
What is the easiest way to create a tooth shape in PowerPoint?
The easiest way is to insert a tooth icon or image from PowerPoint’s built-in icon library or external free resources, then convert it to a shape for customization. Designing a tooth from scratch using freeform shapes is possible but time-consuming.
Can I customize the number of infographic options?
Yes, you can increase or decrease the number of infographic options according to your presentation needs. Simply duplicate or delete the shape groups as required.
How do I ensure my animations work smoothly during the presentation?
Use the Animation Pane to manage timing and order of animations. Preview your slide multiple times and adjust the start options (e.g., On Click, With Previous) for smooth transitions.
Is it possible to use this animated slide design for other topics?
Absolutely! The techniques demonstrated here can be adapted to various subjects by changing the shapes, colors, and text to suit different content.
Can I download pre-made animated PowerPoint templates?
Many creators offer free and paid animated PowerPoint templates online. Using these can save time and provide inspiration for your own designs.
Conclusion
PowerPoint Animated Slide Design is a powerful tool to elevate your presentations by making them more interactive, engaging, and visually informative. By following the steps outlined in this article, you can create a detailed dental anatomy slide that animates seamlessly to reveal complex information in an easy-to-understand format.
From designing the tooth shape and adding 3D effects to creating color-coded infographic options and applying animations, each stage contributes to a polished, professional slide. These skills are transferable to many other types of presentations, enabling you to capture your audience’s attention effectively.
Remember, the key to successful animated slides lies in balancing creativity with clarity. Use PowerPoint’s native tools to their fullest, keep your design consistent, and always test your animations before presenting. With practice, you’ll be able to produce slides that not only inform but also inspire.
If you want to explore more PowerPoint techniques and free templates, consider visiting dedicated resources and channels that specialize in PowerPoint tutorials. Enhancing your skills will make every presentation an opportunity to impress and educate.
Check out the full video: Dental Animated PPT Slides


