Welcome, dear readers! If you want to make your PowerPoint presentations truly stand out, mastering Powerpoint Animation effects is an essential skill. Looping animations, in particular, can add dynamic flair to your slides, enliven your illustrations, highlight key elements, and even create captivating animated backgrounds. In this comprehensive guide, I’ll walk you through the five best ways to create looping animations in PowerPoint—step-by-step—with practical examples and tips to help you elevate your presentations.
Whether you’re a beginner or an experienced PowerPoint user, these techniques will enable you to harness the full power of animations, making your slides not just informative but also visually captivating. Let’s dive right in!
Table of Contents
- Simple Looping Animations
- Auto-Reverse Looping Animations
- Seamless Looping Animations
- Pause Looping Animations
- Sequence Looping Animations
- Bonus: Creating GIFs from PowerPoint Animations
- Frequently Asked Questions (FAQs)
- Conclusion
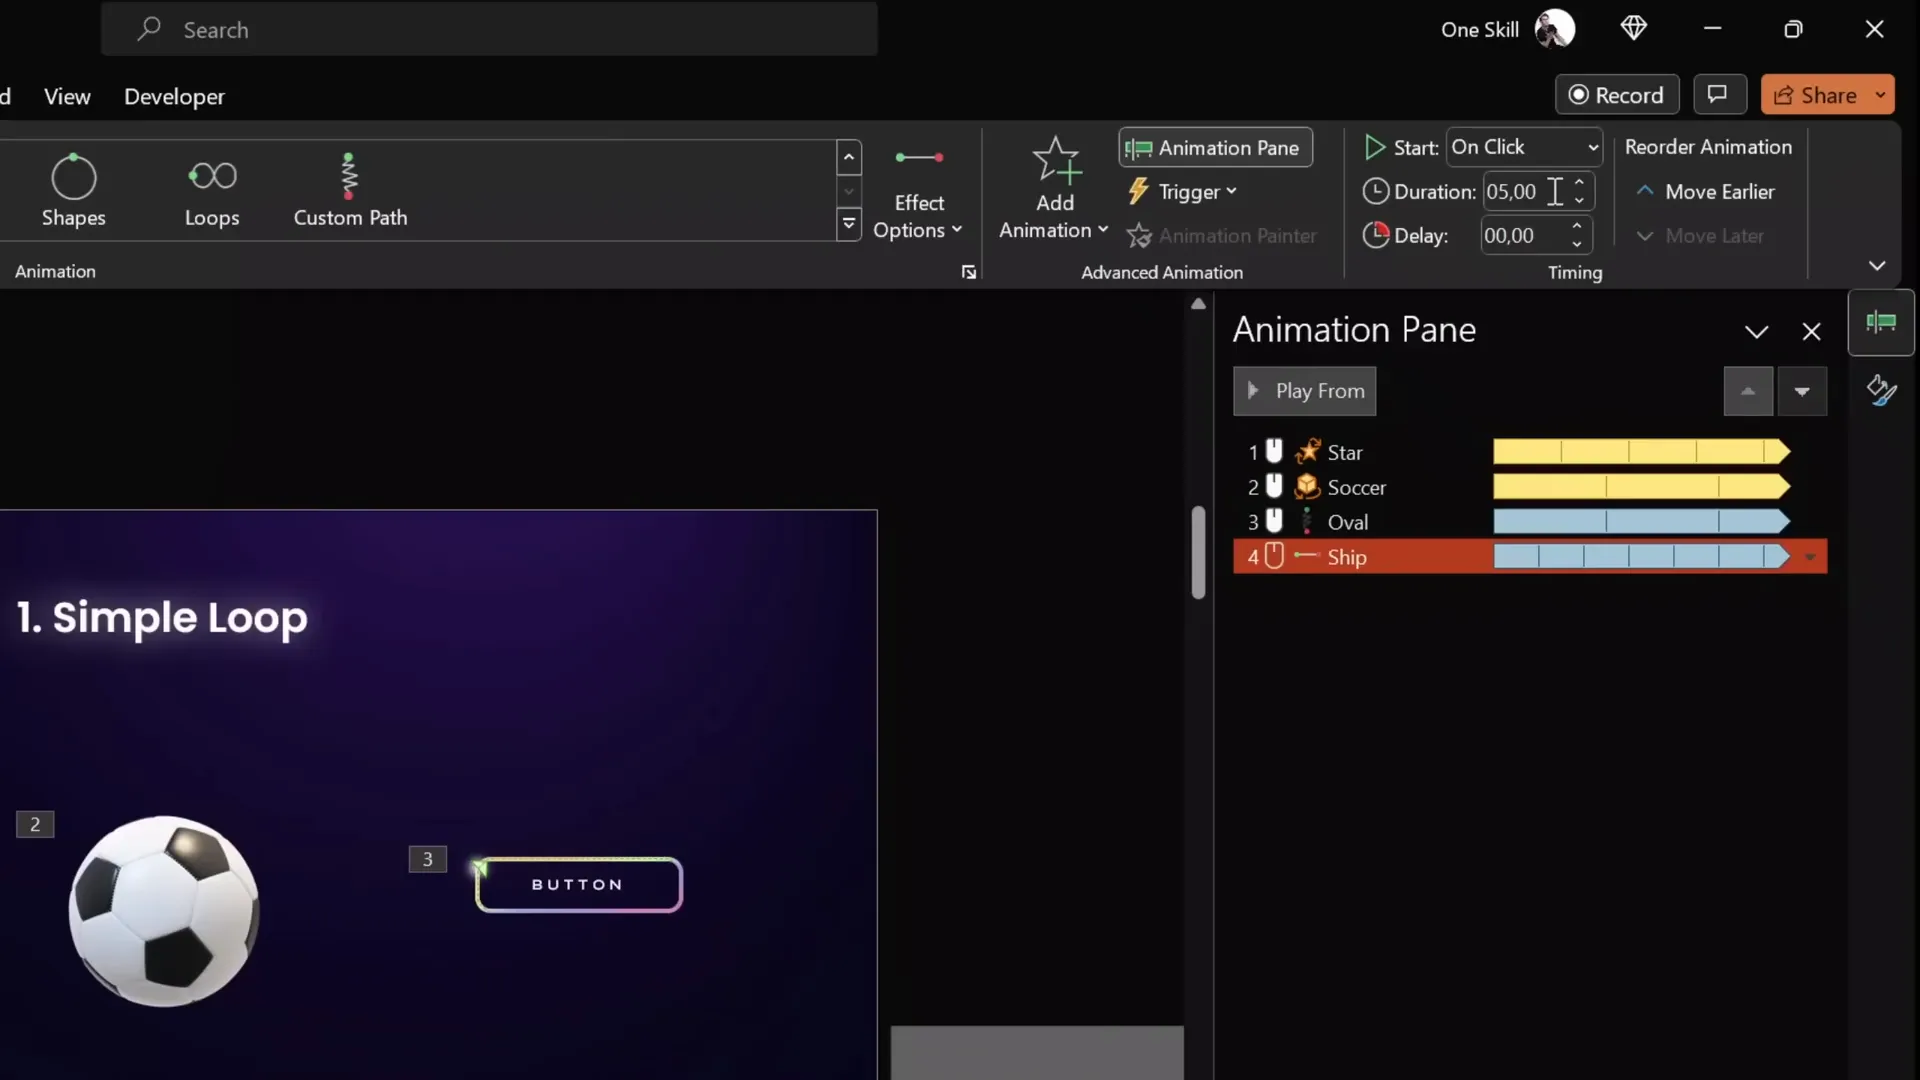
1. Simple Looping Animations
Simple looping animations are the foundation of many dynamic PowerPoint effects. With these, you can make an object spin, move, or wave repeatedly, creating an engaging visual without complex setups.
Examples of Simple Looping Animations
- Spinning Star: Imagine a small star continuously spinning clockwise.
- 3D Soccer Ball Turntable: A 3D soccer ball model rotating endlessly.
- Highlight Around a Shape: A soft highlight moving around the edges of a rounded rectangle.
- Ship Moving Across Slide: A 3D ship model moving from the left to the right side of the slide in a loop.
- Wavy Text Title: The slide title animates with a smooth wave effect that repeats indefinitely.
How to Create a Simple Looping Spin Animation
- Select your object: For example, a star shape on your slide.
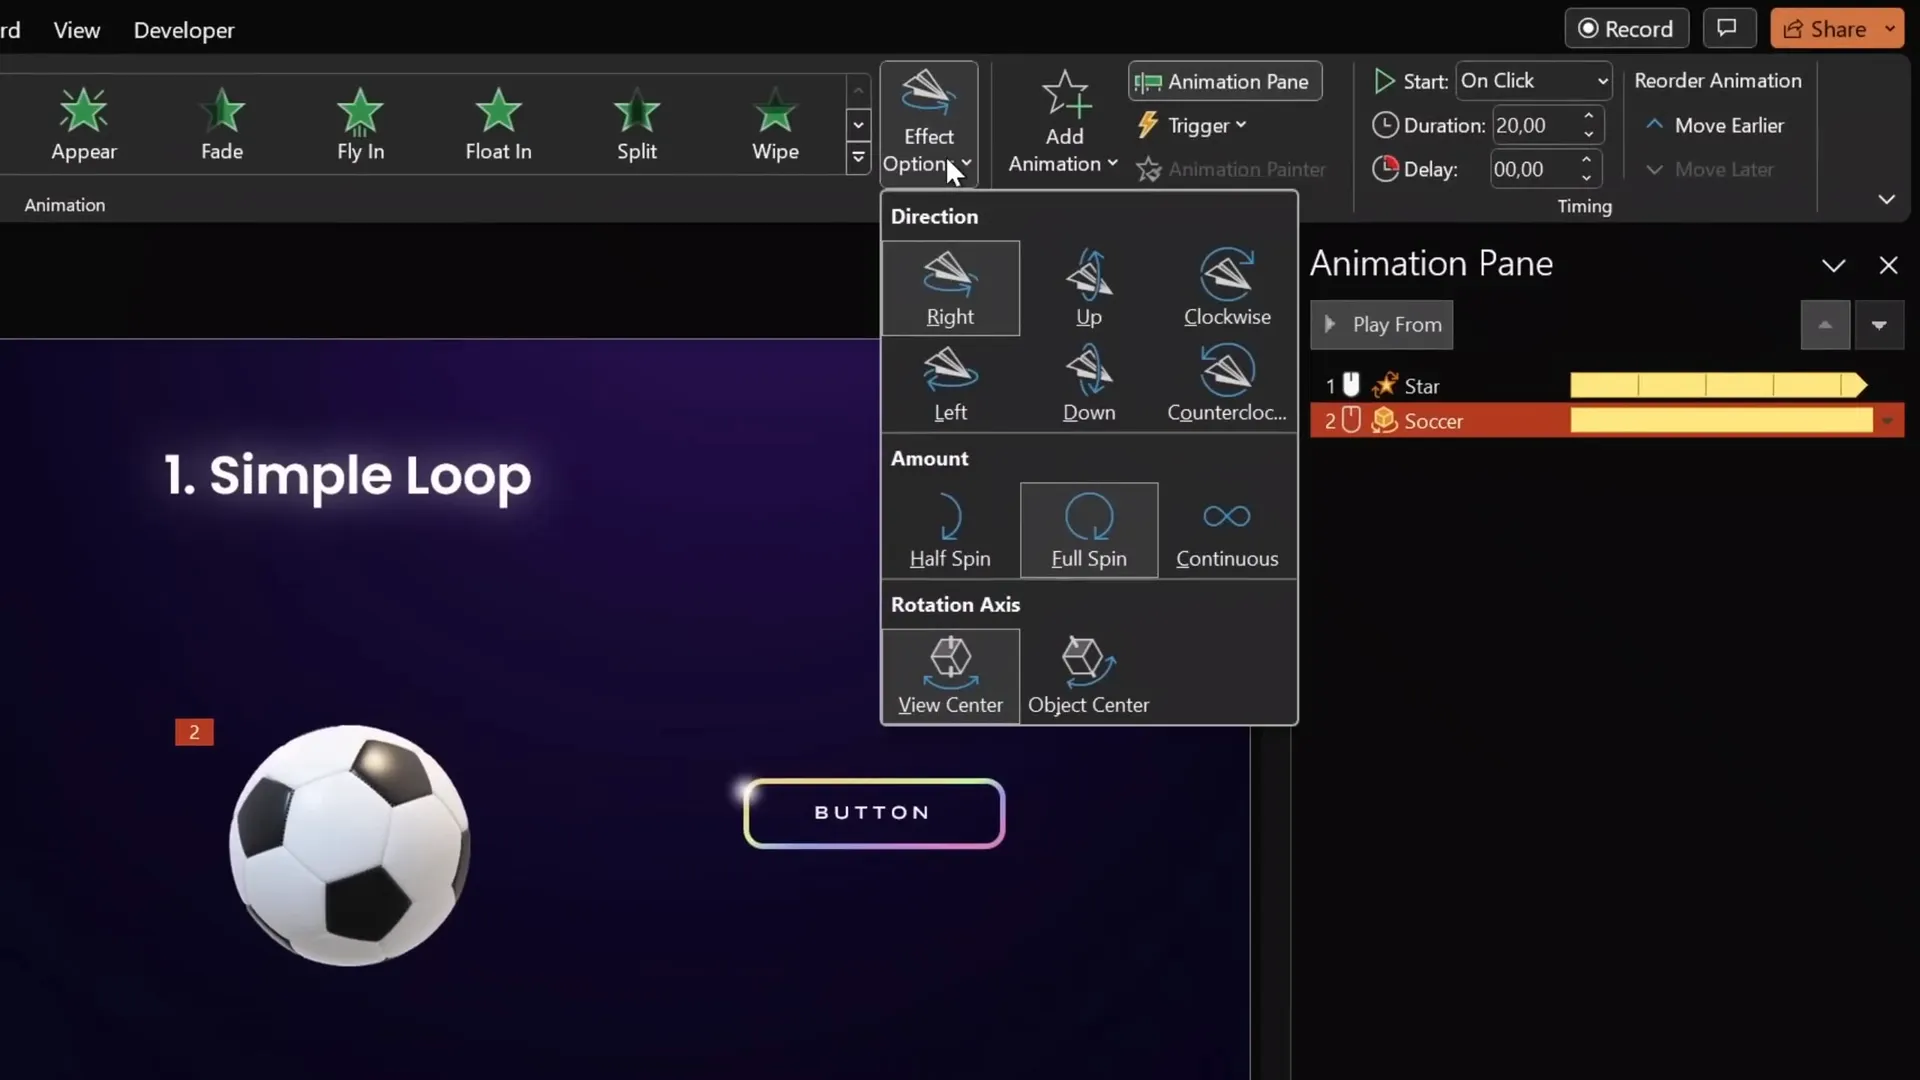
- Add Spin Animation: Go to the Animations tab, click Add Animation, and select Spin.
- Set Duration: Choose a duration that fits your pace, such as 3 seconds.
- Adjust Effect Options: Set the spin direction (clockwise or counterclockwise) and amount (full spin is common).
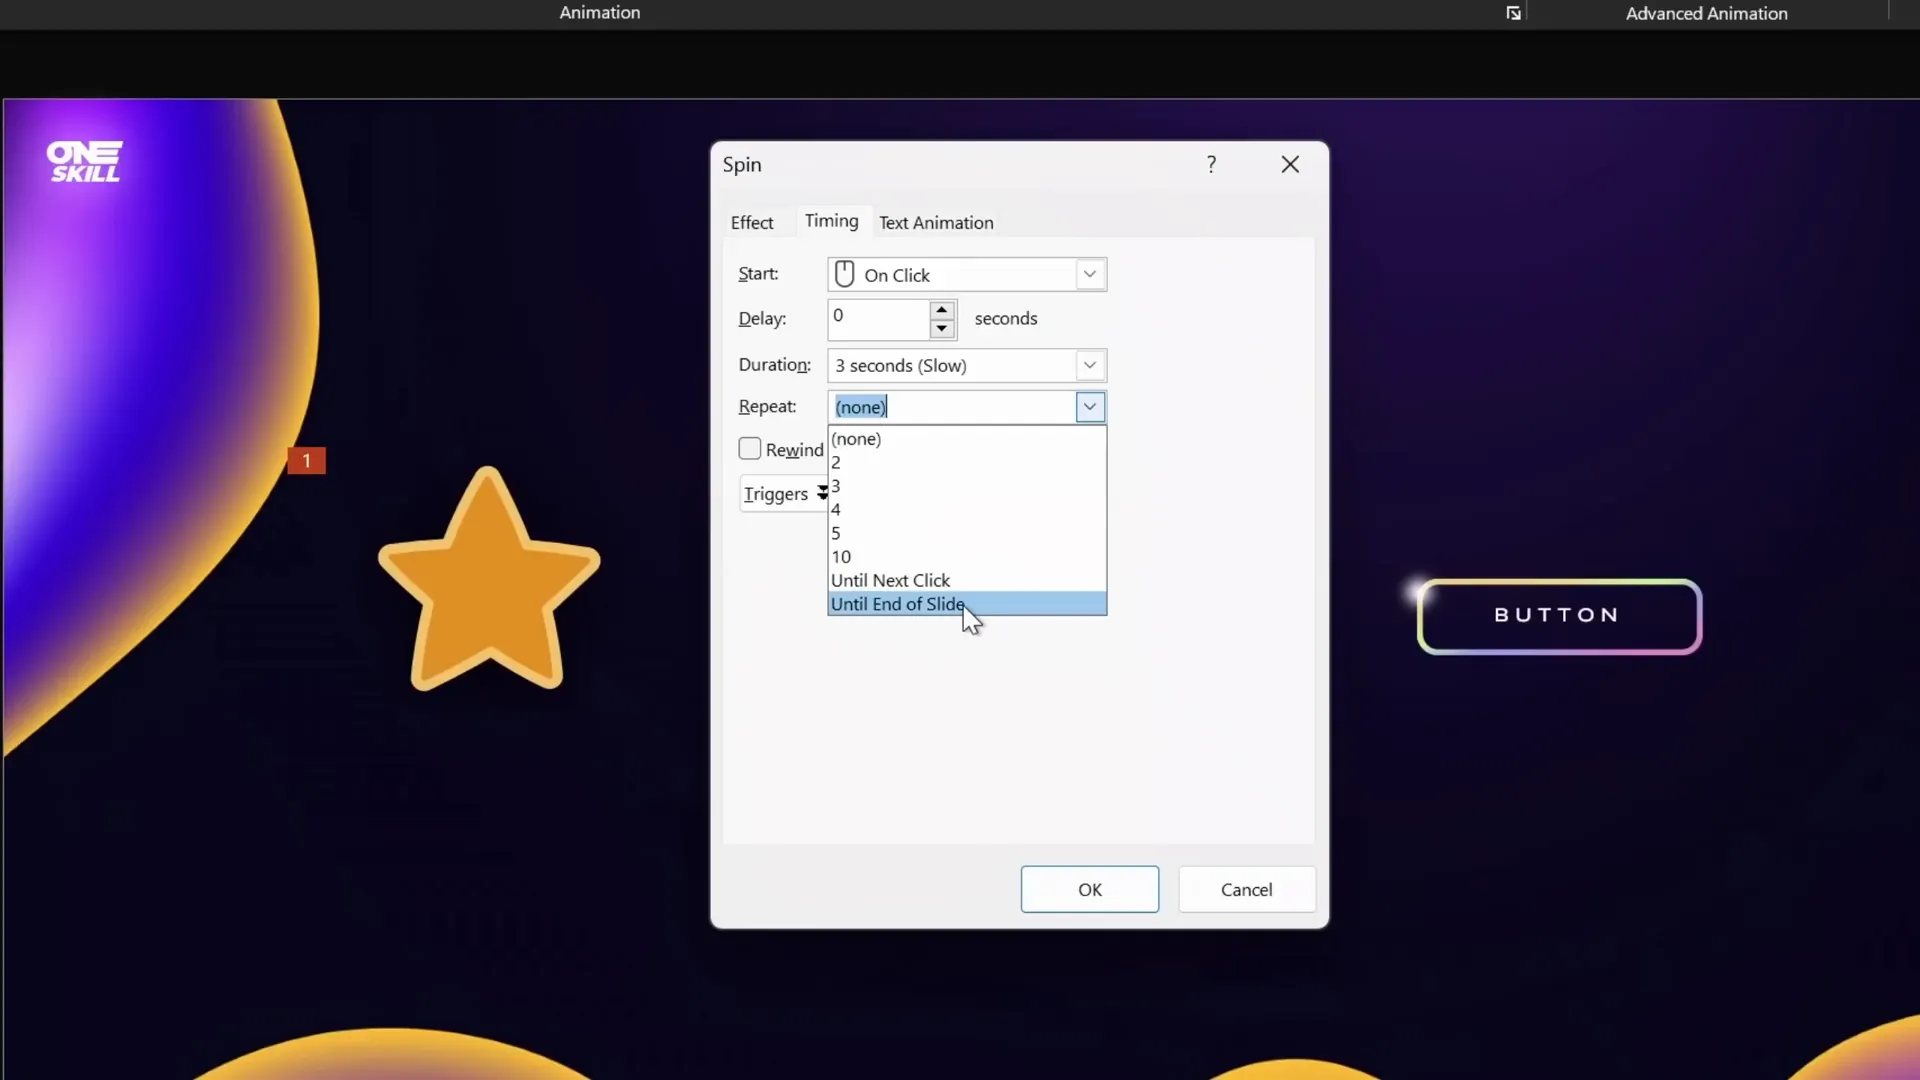
- Enable Looping: Open the animation pane, double-click your animation, go to the Timing tab, and under Repeat, select Until End of Slide.
Once you run your slideshow and click to start the animation, the star will spin endlessly, creating an eye-catching effect.
Looping 3D Model Animations
PowerPoint supports 3D models, which can be animated with built-in 3D animations such as the Turntable. To create a looping 3D rotation:
- Select your 3D model (e.g., soccer ball).
- Go to Animations and choose a 3D animation like Turntable.
- In Effect Options, set the amount to Continuous for an infinite loop.
- Set the duration (e.g., 5 seconds for a smooth but fast rotation).
- Confirm in the animation pane that the repeat setting is Until End of Slide.
Looping Until Next Click
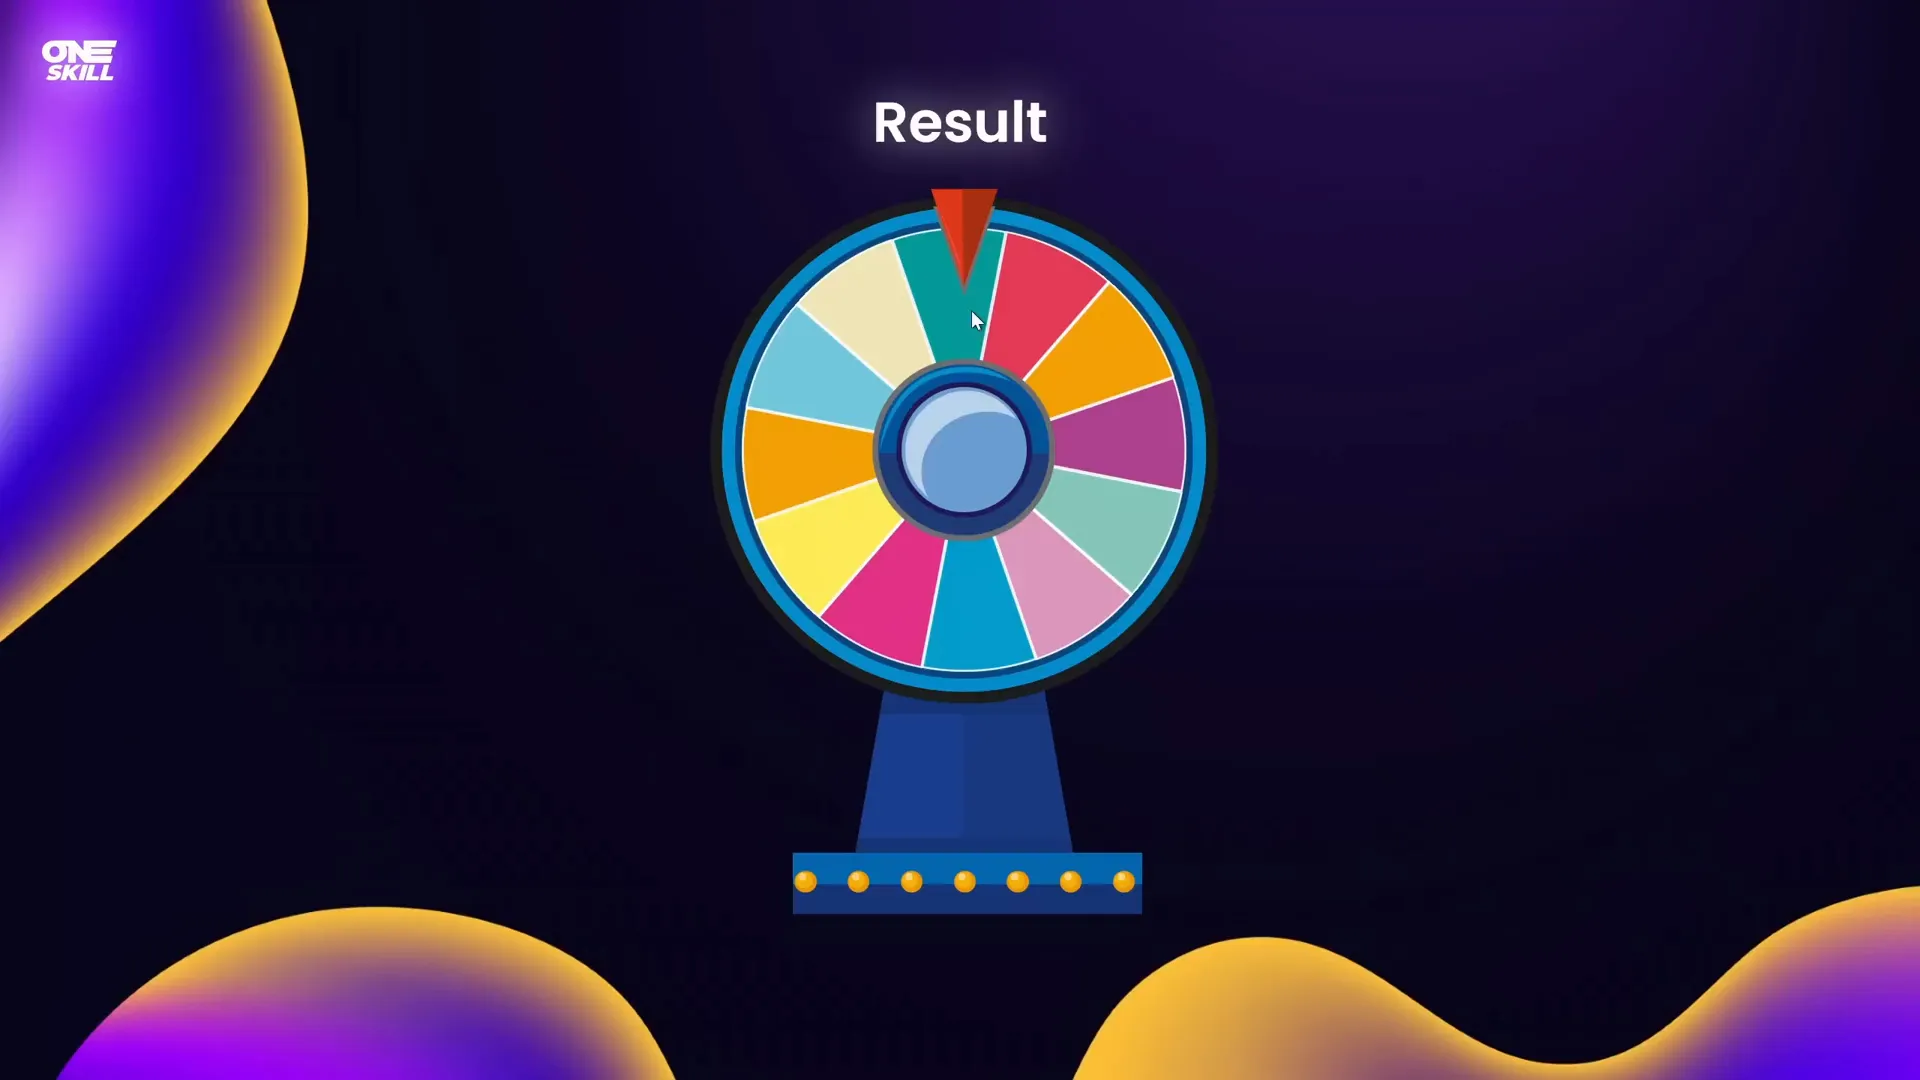
Sometimes you want your animation to loop only until the next click, then stop and trigger another animation. For example, a spinning wheel of fortune that spins until you click to stop it.
To achieve this:
- Set the first animation (e.g., wheel spin) to Repeat Until Next Click.
- Add a second animation (e.g., a fade-in result box) that starts on the next click.
This way, the wheel spins until you decide to stop it, at which point the animation halts and the result appears.
Custom Motion Path Looping
For more control, you can create looping animations using custom motion paths. For example, making a highlight circle move smoothly around the edges of a shape:
- Create a soft highlight shape (e.g., circle with radial gradient and soft edges).
- Select the highlight and add a Custom Motion Path animation tracing the edges of your shape.
- Ensure the path loops by connecting the last point to the start.
- Remove smooth start and end for consistent speed.
- Set the animation to repeat Until End of Slide with an appropriate duration (e.g., 5 seconds).

Looping Motion Path with 3D Models
Applying motion path animations to 3D models can create dynamic scenes, such as a ship sailing across the slide:
- Position the 3D ship model off the slide on the left.
- Add a Motion Path Line animation moving it rightwards across the slide.
- Extend the end point beyond the right edge of the slide for smooth exit.
- Remove smooth start/end and enable Repeat Until End of Slide.
- Adjust duration to control speed (e.g., 10 seconds for slow sailing).
2. Auto-Reverse Looping Animations
Auto-reverse looping animations allow objects to animate back and forth automatically, such as a diver moving up and down or fish swimming horizontally. This creates natural, rhythmic motions without manual setup for reversing paths.
Creating an Auto-Reverse Motion Path Animation
- Select your object (e.g., diver).
- Add a Motion Path Line animation (direction: up, down, left, or right).
- Adjust the end point for desired travel distance.
- Open animation options and enable the Auto Reverse checkbox.
- Set the animation to Repeat Until End of Slide.
- Adjust duration to control speed of up-and-down or side-to-side movement.
Using Animation Painter for Efficiency
You can save time by copying animations to other objects using the Animation Painter. For example, copying the diver’s animation to a fish and then adjusting the motion path end point to move horizontally.
Creating a Pulsing Button with Auto-Reverse
- Select the button shape.
- Add a Grow/Shrink emphasis animation.
- Set duration short (e.g., 0.5 seconds).
- Set growth percentage subtle (e.g., 110%).
- Enable Auto Reverse and Repeat Until End of Slide.
- Adjust duration to speed up or slow down pulsing.
3. Seamless Looping Animations
Seamless looping animations create the illusion of continuous movement without abrupt resets. This technique is perfect for backgrounds or elements like swimming fish, drifting clouds, or scrolling lines.
Creating Seamless Looping with Duplicate Groups
| Step | Description |
|---|---|
| 1 | Group your objects (e.g., colorful fishes) with a background rectangle. |
| 2 | Duplicate the group and place it to the left, adjacent to the original group. |
| 3 | Change the duplicate’s background color for easy differentiation (temporary step). |
| 4 | Group both groups into one larger group. |
| 5 | Add a rightward motion path animation to the large group, moving by the width of one group. |
| 6 | Remove smooth start/end, set repeat to Until End of Slide, and set a long duration (e.g., 10 seconds). |
| 7 | Make the background rectangles invisible by setting fill to No Fill. |
| 8 | Run the slideshow to see seamless looping movement. |
Seamless Looping for Scrolling Dotted Lines
You can apply the same technique to create endlessly scrolling dotted lines between two boxes.
- Create two dotted lines in slightly offset positions.
- Align and group them carefully so they connect seamlessly.
- Mask the edges with rectangles filled using the slide background fill to hide the ends.
- Add a motion path animation moving the group to the right, repeating Until End of Slide.
Seamless Looping with Multiple Objects
Another example is a dotted background made of many small circles moving upwards continuously:
- Fill the slide with dots grouped together.
- Duplicate the group below the slide.
- Group all dots and apply an upward motion path animation.
- Set duration (e.g., 17 seconds) and repetition Until End of Slide.
4. Pause Looping Animations
Pause looping animations allow you to create a loop with a built-in pause or hold at the end of the animation cycle. This is useful when you want to showcase a final state before the animation repeats.
Example: Replay Animation of Hand-Drawn Lines
You can animate ink or drawn lines to replay multiple times with pauses in between.
- Draw lines using the Draw tab’s pen tool to illustrate movement (e.g., passing a ball).
- PowerPoint groups the ink strokes automatically.
- Select the group and apply the Replay animation from the Ink category.
- Set duration (e.g., 5 seconds) and initially no repetition.
Adding a Pause Using Audio Bookmarks
To add a pause at the end of the animation, we use a clever trick involving an empty looping audio clip and bookmarks:

| Step | Action |
|---|---|
| 1 | Remove any repetition on the replay animation. |
| 2 | Record an empty audio clip slightly longer than your animation duration (e.g., 7 seconds for a 5-second animation). |
| 3 | Set the audio clip to loop until stopped. |
| 4 | Add a bookmark at the start of the audio clip. |
| 5 | Trigger the replay animation using the bookmark as a trigger. |
| 6 | Hide the audio icon during the slideshow by moving it off-slide or setting playback options. |
This setup causes the animation to replay on each loop of the audio bookmark, with a natural pause between loops matching the extra audio length.
5. Sequence Looping Animations
Sequence looping animations involve looping a chain of animations that play in order, such as a camera flash sequence followed by a photo flying out. These are more complex than simple loops and require precise timing.
Challenges with Direct Looping
Simply setting each animation in a sequence to repeat until the end of slide often leads to overlapping and messy playback.
Using Audio Bookmarks for Sequence Looping
The solution is similar to pause looping: use an empty audio clip with a bookmark to trigger the entire sequence as a group.
- Identify the total duration of your animation sequence.
- Record an empty audio clip slightly longer than this total duration.
- Set the audio clip to loop.
- Add a bookmark at the beginning of the audio clip.
- Set all animations in the sequence to trigger on this bookmark.
- Hide the audio icon during slideshow.
This approach ensures the sequence plays smoothly and loops cleanly with optional pauses.
Bonus: Creating GIFs from PowerPoint Animations
Did you know you can export your animated slides as GIFs? This allows you to use looping animations outside PowerPoint or embed them as lightweight animations in other platforms.
Steps to Create a GIF from PowerPoint Animations
- Prepare your slide with the animation you want to export (e.g., a spinning sticker icon).
- Adjust the rotation center if needed by grouping with a transparent shape.
- Ensure no slide transitions are applied, as they interfere with GIF export quality.
- Go to File > Export > Create an Animated GIF.
- Select the quality (e.g., Extra Large) and enable transparent background if desired.
- Set the slide range to include only the animated slide.
- Click Create GIF and save it to your device.
- Insert the GIF back into your presentation or use it elsewhere.
Frequently Asked Questions (FAQs)
Q1: How do I make an animation loop indefinitely in PowerPoint?
A: In the animation pane, double-click the animation, go to the Timing tab, and under Repeat, select Until End of Slide. This will make the animation loop until you advance the slide.
Q2: Can I loop 3D model animations in PowerPoint?
A: Yes! PowerPoint offers special 3D animations like Turntable. Setting the amount to Continuous and choosing Until End of Slide repeat will create a seamless 3D loop.
Q3: How do I create a smooth looping background animation?
A: Use the seamless looping technique by duplicating and grouping your objects side-by-side, then animate the group moving in one direction with repeating motion paths. Mask the edges with rectangles filled with slide background fill for a perfect loop.
Q4: What is an auto-reverse animation, and how do I enable it?
A: Auto-reverse makes an animation move back to its start point automatically after finishing. To enable it, add a motion path animation, open effect options, and check the Auto Reverse box. Set repeat to Until End of Slide for continuous back-and-forth motion.
Q5: How can I add a pause between animation loops?
A: Record an empty audio clip longer than your animation and set it to loop. Add a bookmark at the start of the audio and trigger your animation using this bookmark. The extra audio length creates a natural pause between loops.
Q6: Can I export PowerPoint animations as GIFs?
A: Absolutely! PowerPoint allows you to export slides as animated GIFs under File > Export > Create an Animated GIF. This is great for sharing animations outside PowerPoint or embedding lightweight animations.
Conclusion
Looping animations open up a world of creative possibilities in your PowerPoint presentations. From simple spinning stars to complex seamless background loops, auto-reversing motions, pause loops, and sequence loops, mastering these techniques will help you deliver more engaging, professional, and dynamic slides.
Remember, the key to great animations is not just complexity but thoughtful use—choose effects that enhance your message and captivate your audience without overwhelming them.
As you experiment with Powerpoint Animation effects, keep these tips and step-by-step methods handy. And don’t forget: you can even export your animations as GIFs, extending their use beyond PowerPoint itself.
Happy animating, and may your presentations shine with the magic of movement!
Check out the full video: BEST Ways to Create Looping Animations in PowerPoint! ✨ Step-by-Step


