PowerPoint animation effects have evolved far beyond simple fades and wipes. Today, you can create breathtaking, professional-quality animations that captivate your audience and elevate your presentations to new heights. One such effect is the parallax animation — a dynamic technique that creates an illusion of depth by animating multiple layers moving at different speeds.
In this comprehensive tutorial, we’ll guide you step-by-step on how to create a stunning power plant parallax animation using Microsoft PowerPoint. Inspired by the creative work of Dennis Snellenberg and expertly demonstrated by One Skill PPT, this tutorial will empower you to bring your slides alive with layered, smooth animations using PowerPoint’s morph transition and layering techniques.
Whether you are a beginner or an experienced PowerPoint user, this detailed guide will unlock the secrets to mastering parallax animations and enhance your presentation skills with creative PowerPoint animation effects.
Table of Contents
- Introduction to Parallax Animation
- Choosing the Right Image for Parallax
- Separating Your Image into Layers
- Importing Layers into PowerPoint
- Setting Up the Parallax Animation
- Using Morph Transition for Animation
- Hiding Layer Edges with Rectangles
- Blending Layers for Smooth Transitions
- Adding Text and Extra Elements
- Adding Zoom Effect to Photo
- Final Tips and Conclusion
- Frequently Asked Questions
Introduction to Parallax Animation
Parallax animation is a visual effect that creates a sense of depth by moving different layers of an image at varying speeds. This technique simulates the way objects appear to move relative to each other based on their distance from the viewer, enhancing the perception of three-dimensional space.
In PowerPoint, parallax animations can be created by separating a photo into multiple layers and animating each layer individually. This tutorial focuses on using the morph transition — a powerful feature in PowerPoint 365 — to seamlessly animate these layers, achieving a professional and captivating effect.
Before diving in, a special thanks goes to Dennis Snellenberg for inspiring this tutorial with his amazing parallax animations. Be sure to check out his work for more creative ideas.

Choosing the Right Image for Parallax
The foundation of a great parallax animation is a carefully chosen image. For the effect to be visually effective and easy to create, your image should have distinct layers that can be separated, such as:
- A clear foreground (e.g., a person, object, or structure)
- Midground elements (e.g., trees, hills, or mountains)
- Background elements (e.g., sky, distant mountains, or clouds)
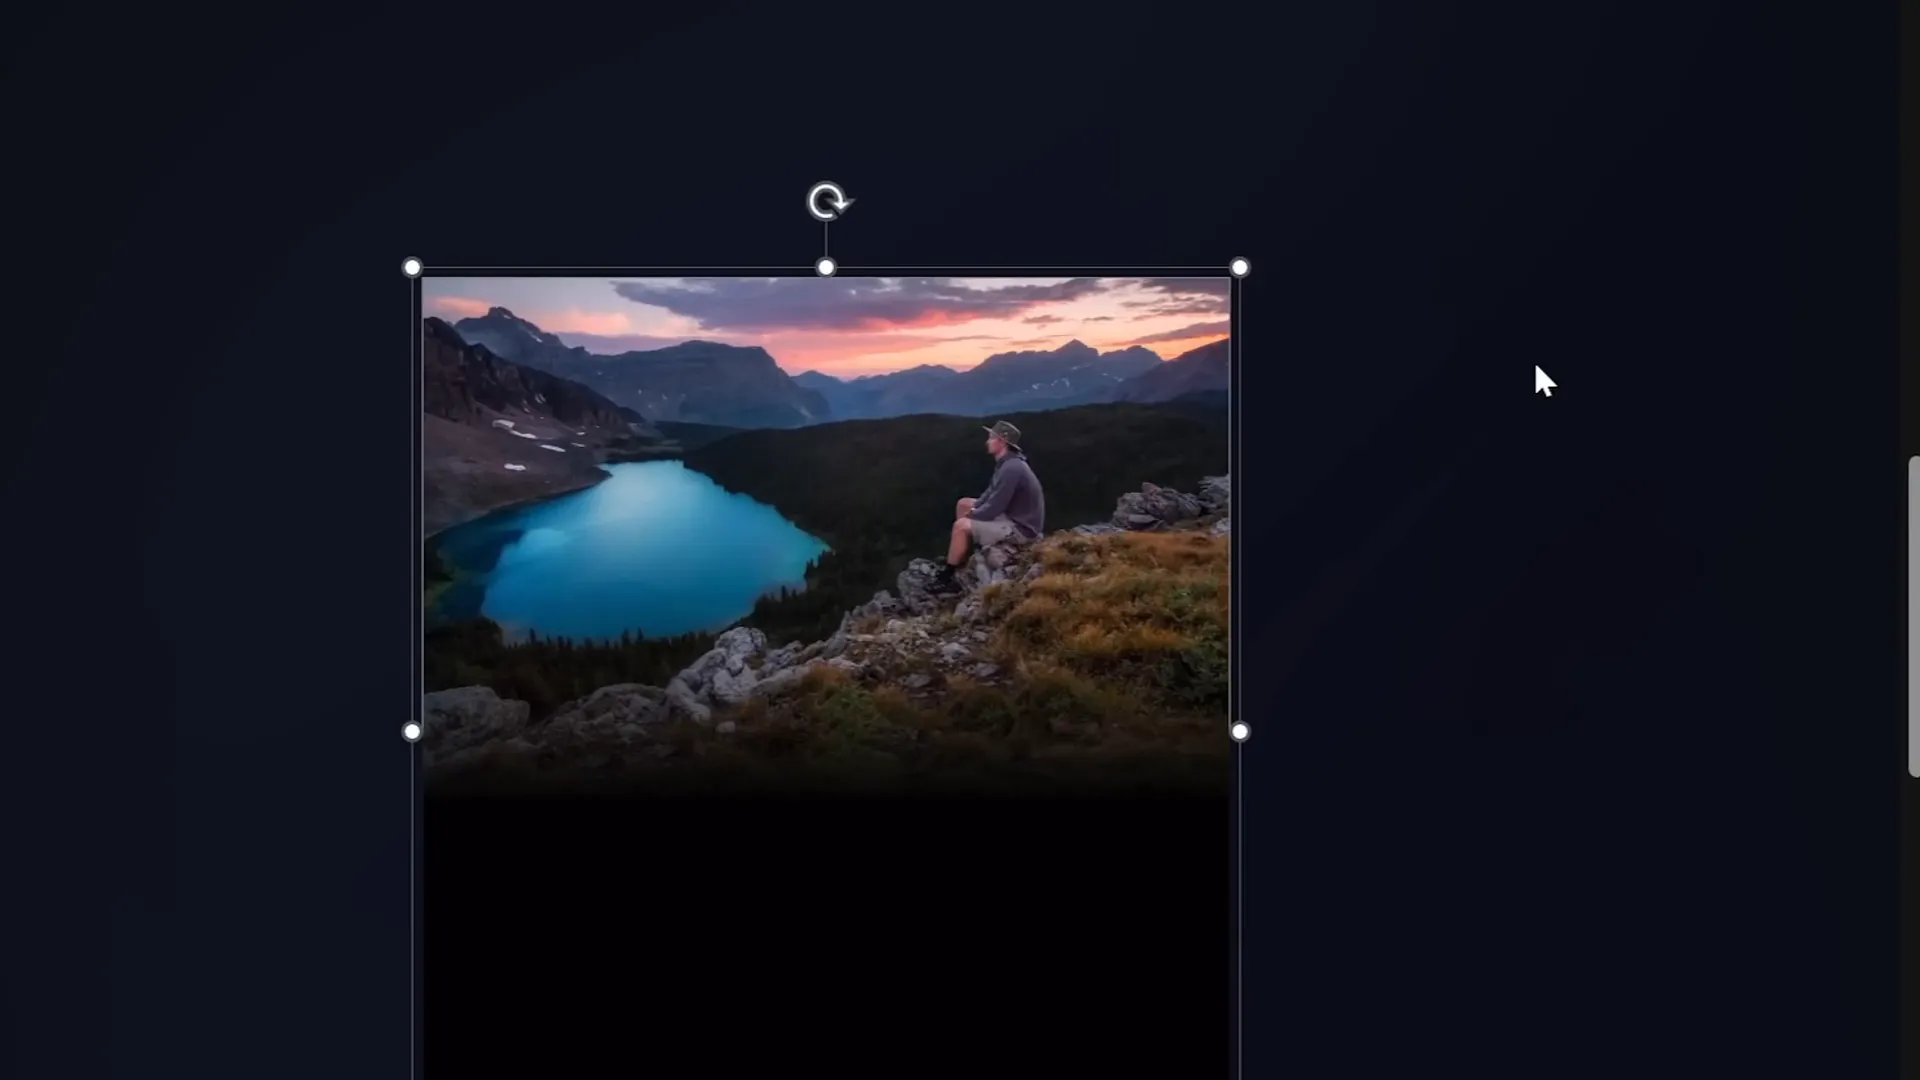
In this tutorial, we’ll use a photo featuring a hiker sitting on a rock in the foreground, a forest with a lake, mountain layers, and a beautiful sky. This image works well because the layers are visually distinct and lend themselves easily to separation.
When searching for your own photos, look for images with clear, separable layers. Here are some recommended resources for free high-quality photos:

Separating Your Image into Layers
Once you have your image, the next step is to separate it into layers for animation. This process involves isolating each visual element so it can be moved independently in PowerPoint.
There are various tools you can use for this task, including:
- Adobe Photoshop – Industry standard for photo editing with advanced layer manipulation.
- Affinity Photo – A cost-effective alternative to Photoshop with similar features.
- Photopea – A free, web-based photo editor that supports layer separation.
If you prefer free tools, Photopea is highly recommended and accessible online. You can learn how to separate photos into layers using Photopea through tutorials available on YouTube and other platforms.
Tips for separating layers:
- Use the lasso or pen tool to carefully outline each layer.
- Remove the background or unwanted parts for each layer.
- Export each layer as a separate PNG file with transparent backgrounds.
Importing Layers into PowerPoint
After exporting your layers as separate image files, it’s time to import them into PowerPoint.
Steps to import and organize layers:
- Open PowerPoint and create a new blank slide.
- Insert each layer image onto the slide using Insert > Pictures.
- Arrange the images in the correct order from background to foreground.
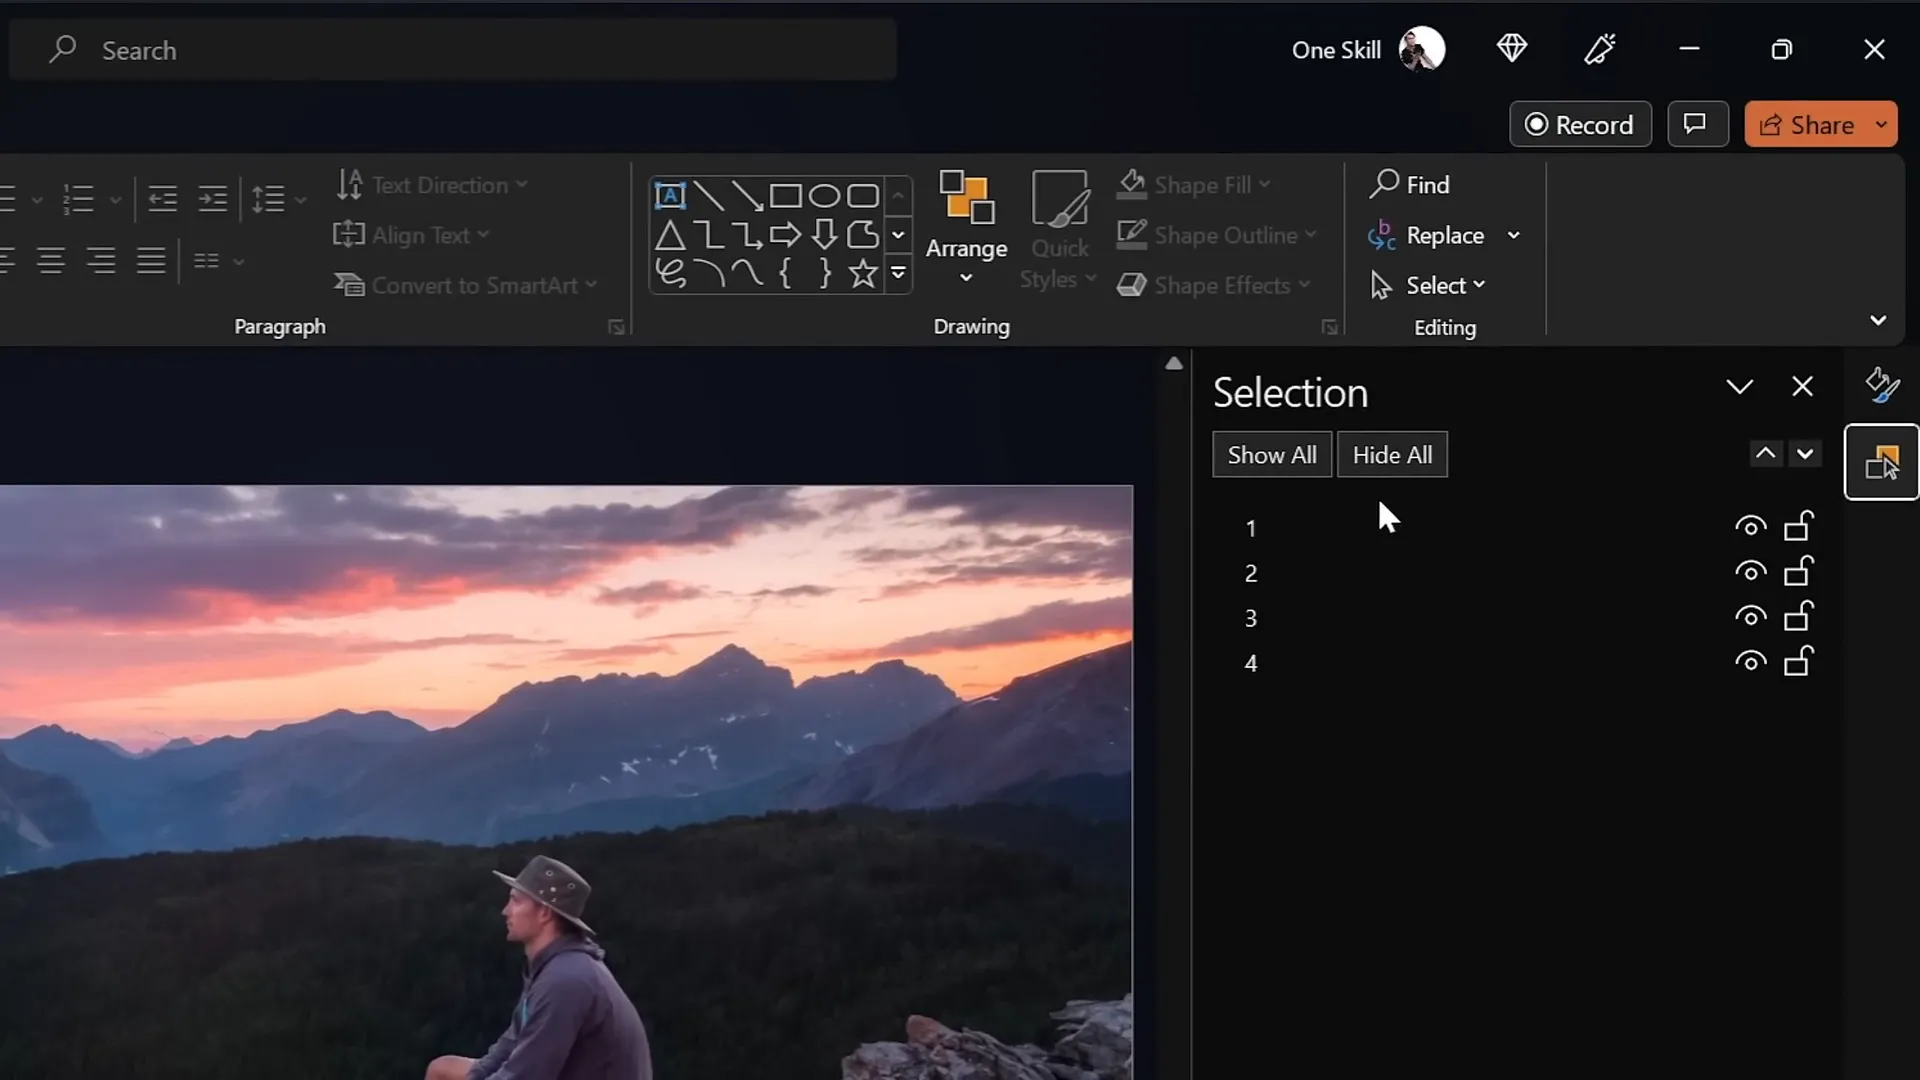
- Use the Selection Pane (found under Home > Arrange > Selection Pane) to name and manage each layer for easier editing.
For example, you can name the layers as follows:
| Layer Number | Description |
|---|---|
| 1 | Hiker sitting on the rock (foreground) |
| 2 | Forest with lake (midground) |
| 3 | Second line of mountains (background) |
| 4 | Sky (background) |
Setting Up the Parallax Animation
With your layers imported and organized, the next step is to prepare the slides for animation.
We will create a two-slide setup where the layers shift positions slightly on the second slide to create the parallax effect during the transition.
How to set up layers for animation:
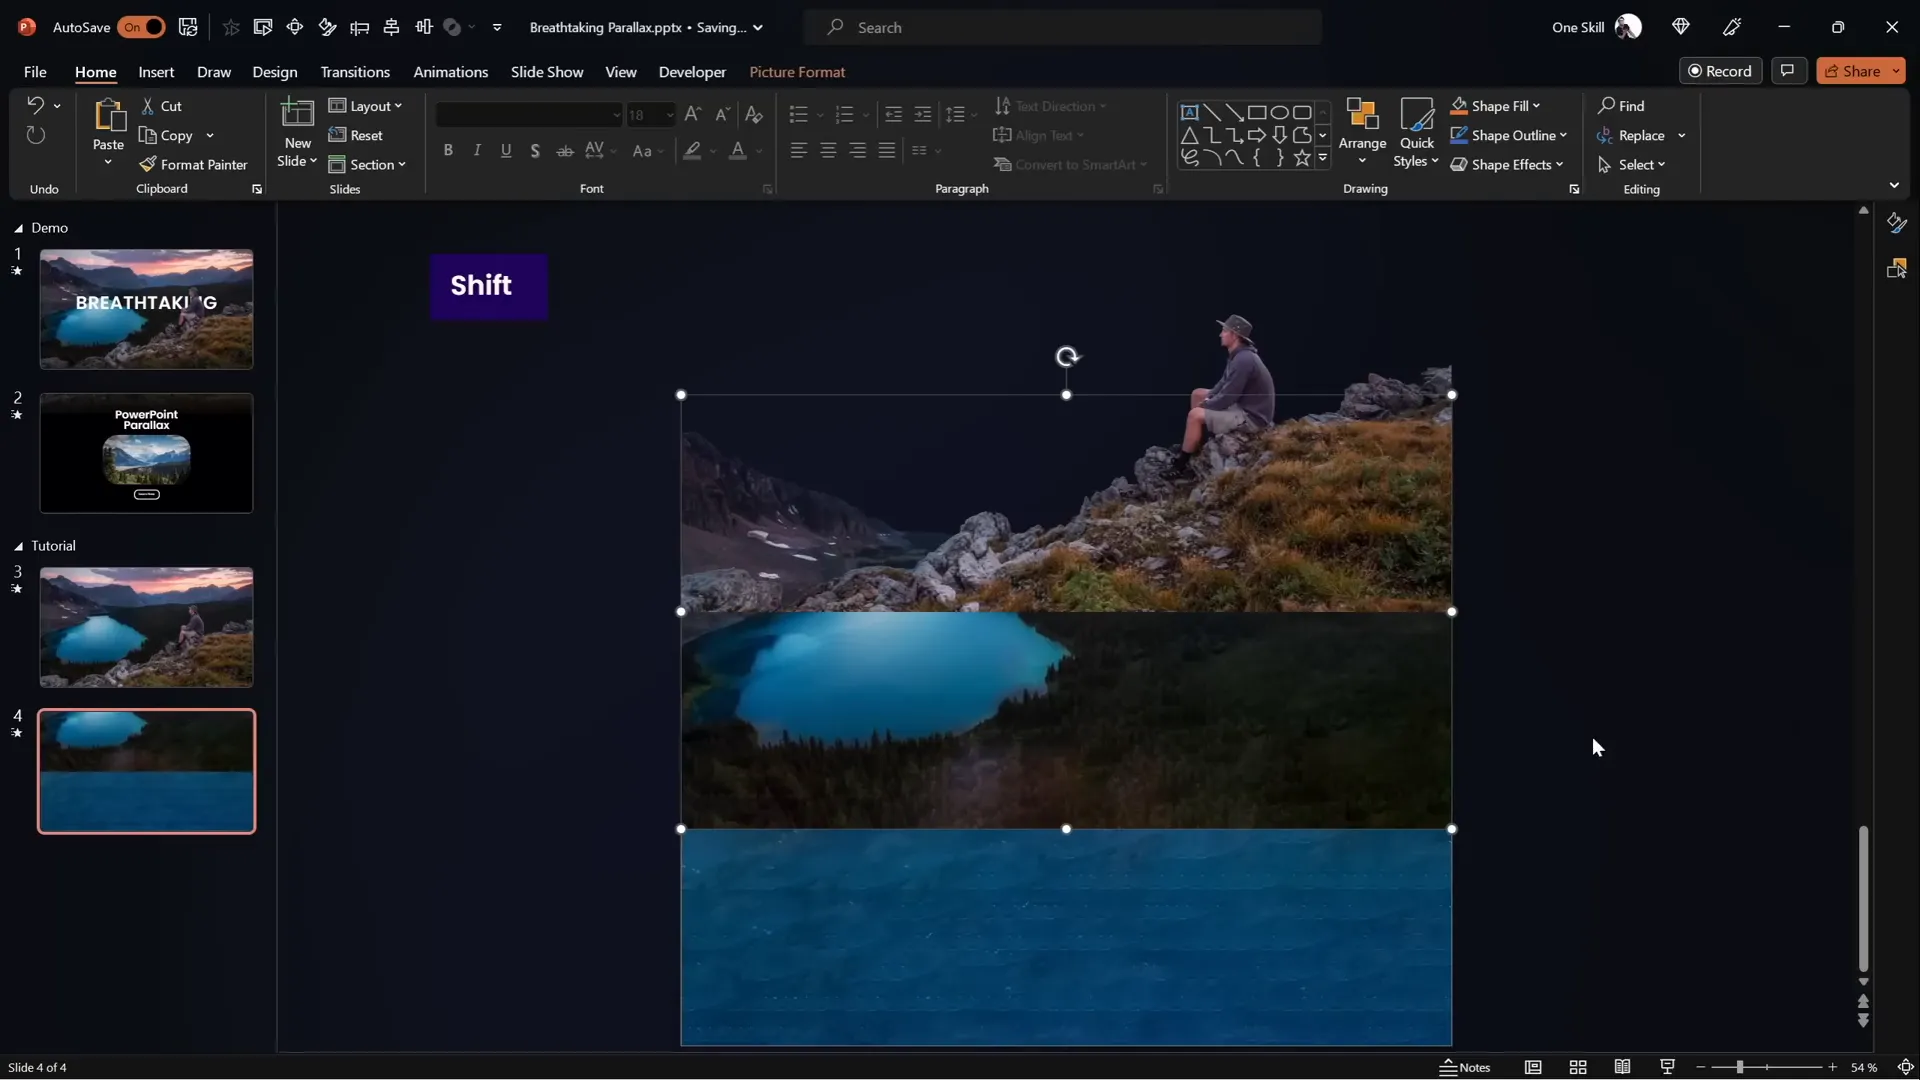
- Duplicate the slide: Right-click the slide thumbnail and select Duplicate Slide.
- Adjust the layers on the second slide: Move each layer upwards by different amounts to simulate depth movement.
- Layer 1 (foreground): Move all the way to the top so the bottom touches the top of the slide window.
- Layer 2: Move halfway up the slide height.
- Layer 3: Move up about 25% of the slide height.
- Layer 4 (sky): Remains mostly static or slightly adjusted.
- Set the transition: Select the second slide and apply the Morph transition with a duration of 3 seconds.
Note: If your PowerPoint version does not support the Morph transition, you can achieve a similar effect using motion path animations. Tutorials for motion path animations are available online for free.
Using Morph Transition for Animation
The Morph transition in PowerPoint is a powerful tool that automatically animates smooth movement between two slides with similar objects. It’s perfect for creating parallax animations without the need for complex keyframe animations or coding.
How Morph transition works for parallax:
- PowerPoint detects objects that exist on both slides.
- It animates the position, size, and rotation changes between slides.
- By moving layers at different rates on the duplicated slide, Morph creates the illusion of depth and movement.
Play your presentation to preview the animation. Initially, you’ll notice the layers moving, but you might see the edges of the layers during the transition, which can look awkward.

Hiding Layer Edges with Rectangles
To improve the animation’s appearance and hide the edges of the moving layers, we will add a full-screen rectangle that acts as a mask.
Steps to add masking rectangles:
- On the first slide, insert a rectangle that covers the entire slide.
- Set the fill color to solid black.
- Remove any outline.
- Position the rectangle so its top edge touches the bottom edge of the slide window.
- Copy the rectangle and paste it onto the second slide.
- On the second slide, move the rectangle to cover the entire slide window fully.
This technique hides the visible edges of layers on the second slide during the Morph transition, resulting in a cleaner animation.

Blending Layers for Smooth Transitions
To further enhance the visual quality, you can blend the foreground layer with the black rectangle for a seamless transition.
How to blend the foreground layer with the rectangle:
- On the first slide, select the foreground layer.
- Use the Picture Format > Crop tool to extend the bottom of the image slightly, revealing some hidden photo content.
- Select the black rectangle and apply a Gradient Fill with the following settings:
- Two color stops, both black.
- One stop fully transparent (100% transparency).
- Position the opaque black stop at 30% to create a smooth fade effect.
- Adjust the rectangle’s height to improve the gradient blending.
- Select the foreground layer and the gradient rectangle, then group them together.
- Rename the group to “Layer 1” for consistency.
- On the second slide, delete the old foreground layer and rectangle, paste the new group, and position it correctly.
This blending technique creates a smooth transition from the first layer to the background, enhancing the parallax effect.
Adding Text and Extra Elements
To make your animation more engaging, you can add slide titles and informational text that animate along with the parallax effect.
Steps to add animated text elements:
- Insert your slide title and position it below the foreground layer so it appears behind key elements.
- Duplicate the title on the second slide and move it outside the slide window to the left and top positions.
- Ensure the title remains below the foreground layer on both slides.
- Copy any additional text boxes or photos you want to animate and paste them on both slides.
- Position these elements on the second slide where you want them to appear during the transition.
Thanks to the Morph transition, these text elements will smoothly animate into view, complementing the parallax effect.

Adding Zoom Effect to Photo
To spice up your parallax animation, you can add a subtle zoom effect on a photo or element within the slide.
How to add a zoom effect:
- On the second slide, select the photo you want to animate.
- Go to Picture Format > Crop and zoom out slightly to reveal the edges of the photo.
- Hold down Ctrl + Shift while resizing to maintain the photo’s center alignment.
- Click Crop to apply the changes.
- On the first slide, keep the photo zoomed in as the starting point.
- During the Morph transition, the photo will animate smoothly from zoomed in to zoomed out, adding depth to your animation.

Final Tips and Conclusion
Congratulations! You now know how to create stunning parallax animations in PowerPoint using layering, morph transitions, and clever masking techniques.
This approach is:
- Accessible: Works in PowerPoint 365 and later versions.
- Customizable: You can use your own images and layers to create unique animations.
- Effective: Adds professional polish and depth to your presentations.
Remember, if you don’t have access to the Morph transition, motion path animations can achieve similar results, though with more manual effort.
For more inspiration and advanced PowerPoint tutorials, check out the One Skill PPT YouTube channel and consider supporting creators like Dennis Snellenberg.
Feel free to experiment with different images, layer arrangements, and animation durations to suit your presentation style.
Happy animating!
Frequently Asked Questions (FAQ)
What is a parallax animation in PowerPoint?
Parallax animation is a visual effect where multiple layers of an image move at different speeds to simulate depth and three-dimensional movement. In PowerPoint, this is achieved by separating an image into layers and animating them individually during slide transitions.
Do I need Photoshop to create parallax animations?
No, while Photoshop is a powerful tool for separating image layers, free online editors like Photopea can also do the job effectively. The key is to export your image layers with transparent backgrounds for use in PowerPoint.
What versions of PowerPoint support the Morph transition?
The Morph transition is available in Microsoft PowerPoint 365 and PowerPoint 2019 or later. If you have an older version, you can use motion path animations to mimic the effect.
Can I use any image for the parallax effect?
Images with clear separable layers work best for parallax animations. Photos with distinct foreground, midground, and background elements allow you to create a more convincing depth effect.
How long should the Morph transition duration be?
A duration of around 3 seconds works well for smooth and noticeable parallax animations. However, you can adjust this based on your presentation pacing and style.
Can I add text and other elements to parallax animations?
Yes! Adding titles, captions, and other design elements enhances your animation. Be sure to position these elements carefully in the layering order to maintain visual clarity.
Is it possible to add zoom effects along with parallax?
Absolutely. You can crop and resize elements between slides to create zoom animations that complement the parallax movement, adding more dynamic visual interest.
Where can I find tutorial slides or templates for this animation?
Tutorial slides and templates are often available on creators’ Patreon pages or YouTube descriptions. For example, One Skill PPT offers tutorial slides on Patreon for these types of animations.
What if I want to create parallax animations without Morph?
You can use motion path animations to move layers independently. This requires manually setting paths and timings but achieves a similar effect. Search for motion path parallax tutorials for step-by-step guides.
How can I hide the edges of moving layers during animation?
Use full-screen rectangles or masks with solid or gradient fills to cover the edges of layers. This technique prevents awkward gaps or visible edges when layers move during transitions.
Can parallax animations be used for business presentations?
Yes, parallax animations add a modern and professional touch to business presentations, making them more engaging and visually interesting when used appropriately.
Are parallax animations compatible with all devices?
Animations may behave differently depending on PowerPoint version and device. Always test your presentation on the target device before delivering to ensure smooth playback.
Can I combine parallax animation with other PowerPoint animation effects?
Yes, combining parallax with fade-ins, zooms, or text animations can create compelling storytelling slides. Just be careful not to overuse effects which can distract your audience.
How do I optimize performance when using multiple layers?
Keep images optimized for size and resolution. Avoid overly large or complex files to prevent lag during transitions. Group layers where possible to simplify management.
Where can I learn more about PowerPoint animation effects?
YouTube channels like One Skill PPT, tutorials on Microsoft support sites, and online courses on platforms like LinkedIn Learning or Skillshare offer in-depth lessons on advanced PowerPoint animation techniques.


