
When it comes to creating engaging and visually appealing presentations, mastering PowerPoint slide design is essential. Whether you are preparing for a business pitch, educational lecture, or creative showcase, the ability to design slides that captivate and clearly communicate your message will set you apart. In this comprehensive guide, you’ll learn how to craft a stunning six-option geometric design slide in PowerPoint, complete with animations and customizable themes. This tutorial breaks down every step of the process, empowering you to create professional slides with ease.
This article draws inspiration from expert techniques shared by POWERPOINT UNIVERSITY, a leading resource offering over 1,000 free PowerPoint templates and tutorials. Let’s dive into the detailed process of building this versatile geometric slide that can be adapted to light or dark themes and customized with icons, text, and animations.
Table of Contents
- Overview of the 6-Option Geometric Design Slide
- Getting Started: Setting Up Your PowerPoint Slide
- Building the Geometric Shapes
- Customizing Colors and Grouping Shapes
- Adding Icons and Text Elements
- Applying Animations for Dynamic Effects
- Light vs. Dark Theme: Choosing Your Style
- Frequently Asked Questions
- Conclusion
Overview of the 6-Option Geometric Design Slide
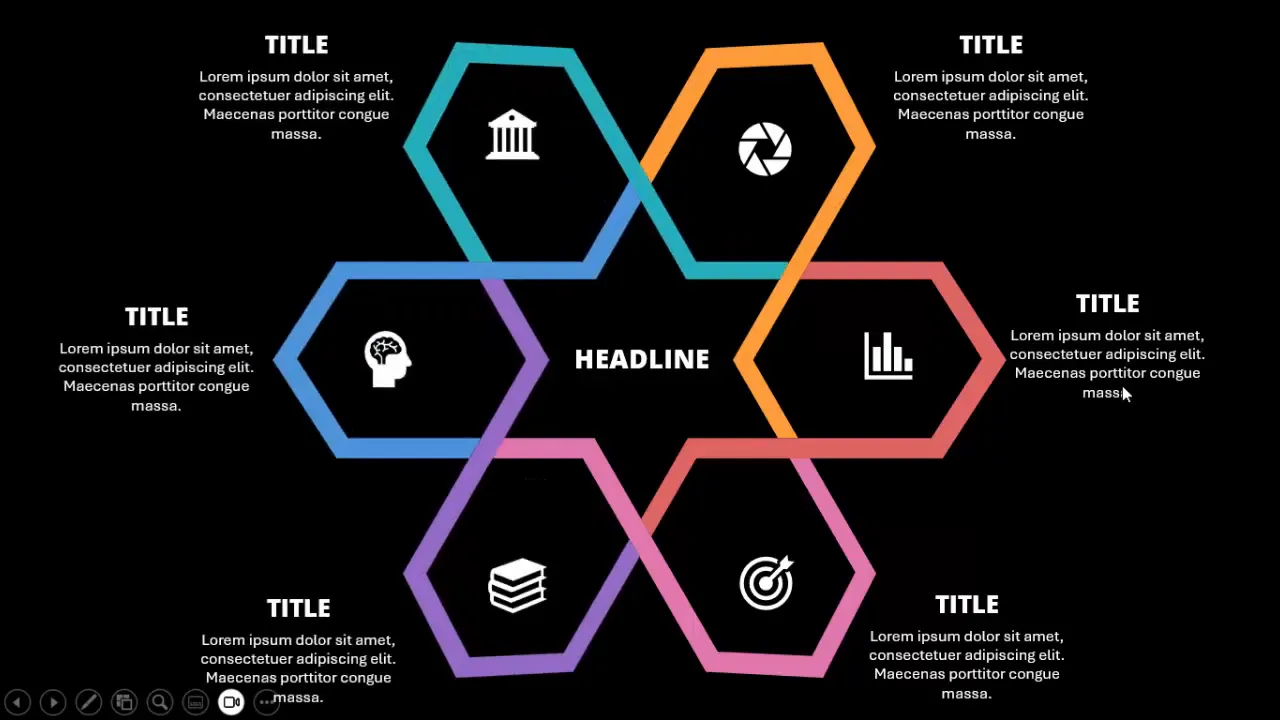
The six-option geometric design slide is a creative presentation tool that allows you to showcase six distinct options or points in a visually appealing, geometric layout. The slide features a central headline, surrounded by six sections that reveal content one by one upon clicks. Each option includes:
- An icon representing the option
- A title for the option
- Detailed descriptive text
The design is characterized by a modern geometric pattern formed from arrow pentagon shapes merged and arranged symmetrically. This layout not only looks professional but also helps in guiding your audience’s attention sequentially through the options.
Two versions of the slide are created:
- Light theme: White background with colored geometric shapes and black text
- Dark theme: Black background with white text and corresponding colors for shapes
The slide’s interactive nature, combined with clean typography and iconography, makes it ideal for business presentations, project proposals, or educational content.
Getting Started: Setting Up Your PowerPoint Slide
Before you begin designing your geometric option slide, make sure your PowerPoint environment is set up for precision and ease of use. Follow these initial steps:
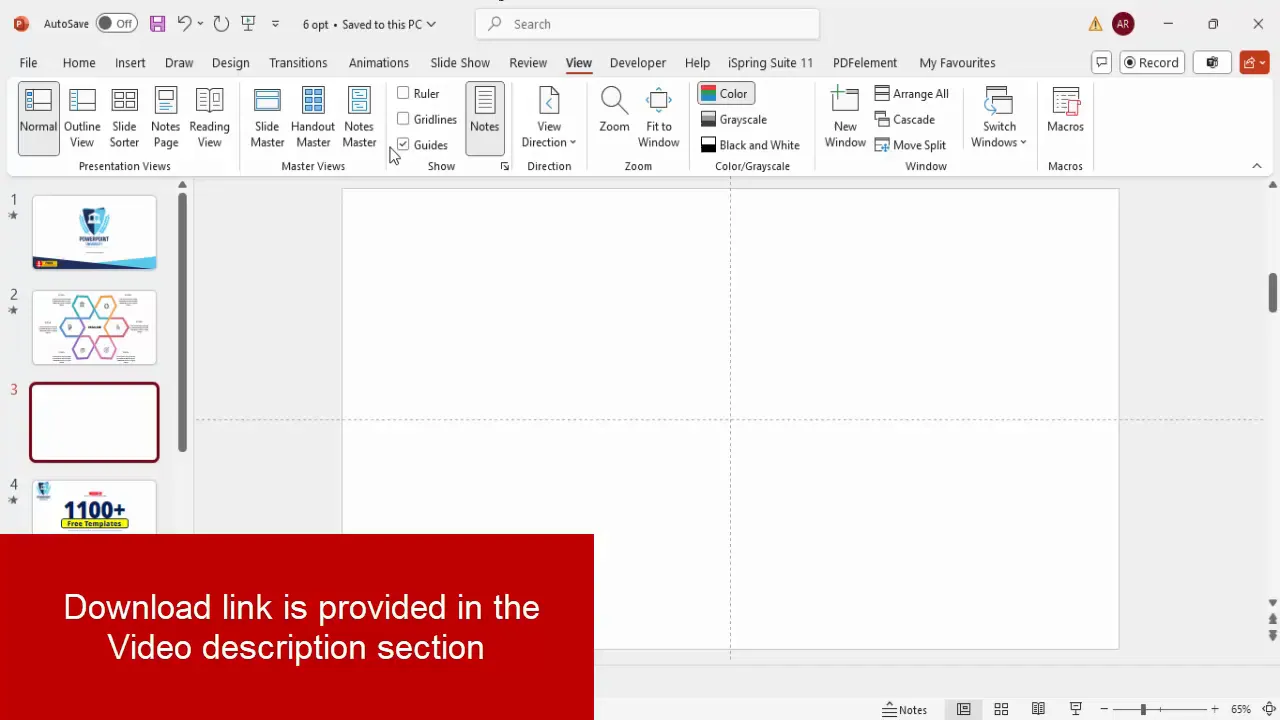
- Add a new slide: Start with a blank slide to give yourself a clean canvas.
- Enable guides: Go to the View tab and turn on Guides. These help with alignment and positioning of shapes.
Using guides is a crucial step to ensure your geometric shapes and text elements are perfectly centered and symmetrically arranged, which is essential for a polished look.
Building the Geometric Shapes
The core of the slide’s design lies in the carefully constructed geometric shapes. Here’s how to build them:
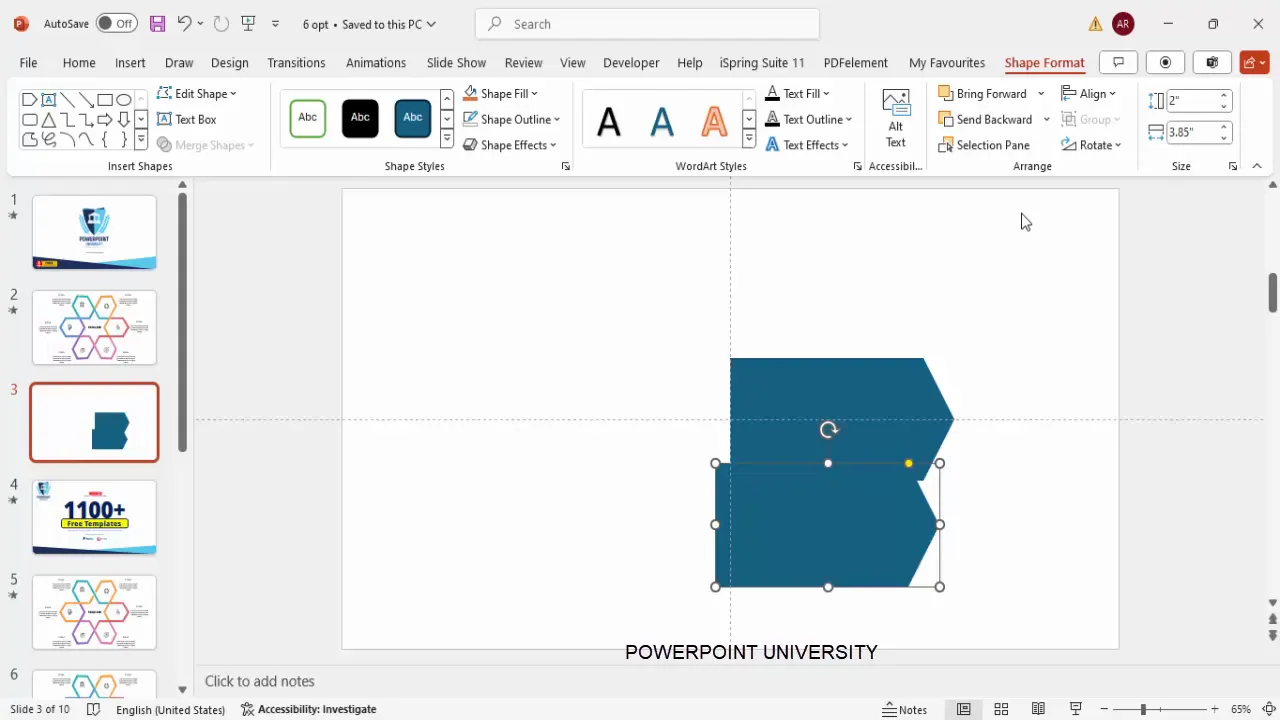
- Insert the base shape: Go to Insert > Shapes and select the Arrow Pentagon shape from the Block Arrows category.
- Customize dimensions: Place the shape on the slide and set the height to 2 inches and the width to 3.85 inches.
- Adjust curvature: Drag the small orange adjustment handle to curve the shape slightly outward, giving it a dynamic look.
- Alignment: Align the shape centrally and vertically using the Align Center and Align Middle options.
- Remove outlines: Set the shape outline to No Outline for a cleaner design.
- Duplicate and flip: Press Ctrl + D to duplicate the shape, then flip it horizontally and position it adjacent to the original.
- Create unions: Select both shapes, go to Shape Format > Merge Shapes > Union to combine them into one cohesive shape.
- Resize duplicates: Duplicate the unioned shape again, reduce its size while holding the Alt key for proportional scaling, and flip it horizontally to form mirrored elements.
- Repeat merging: Merge duplicated shapes again using the union option to create consistent geometric parts.
This process forms the geometric building blocks of the slide’s option areas. Creating these shapes with precision ensures the final design is balanced and visually appealing.
Customizing Colors and Grouping Shapes
Color customization brings life and clarity to the geometric design. Here’s how to manage colors and group shapes effectively:
- Outline vs. Fill: Keep only the light blue color as an outline for one set of shapes while deleting the fill colors from duplicates to maintain clarity.
- Duplicate slide for backup: Duplicate your slide before making major changes, so you have a fallback if needed.
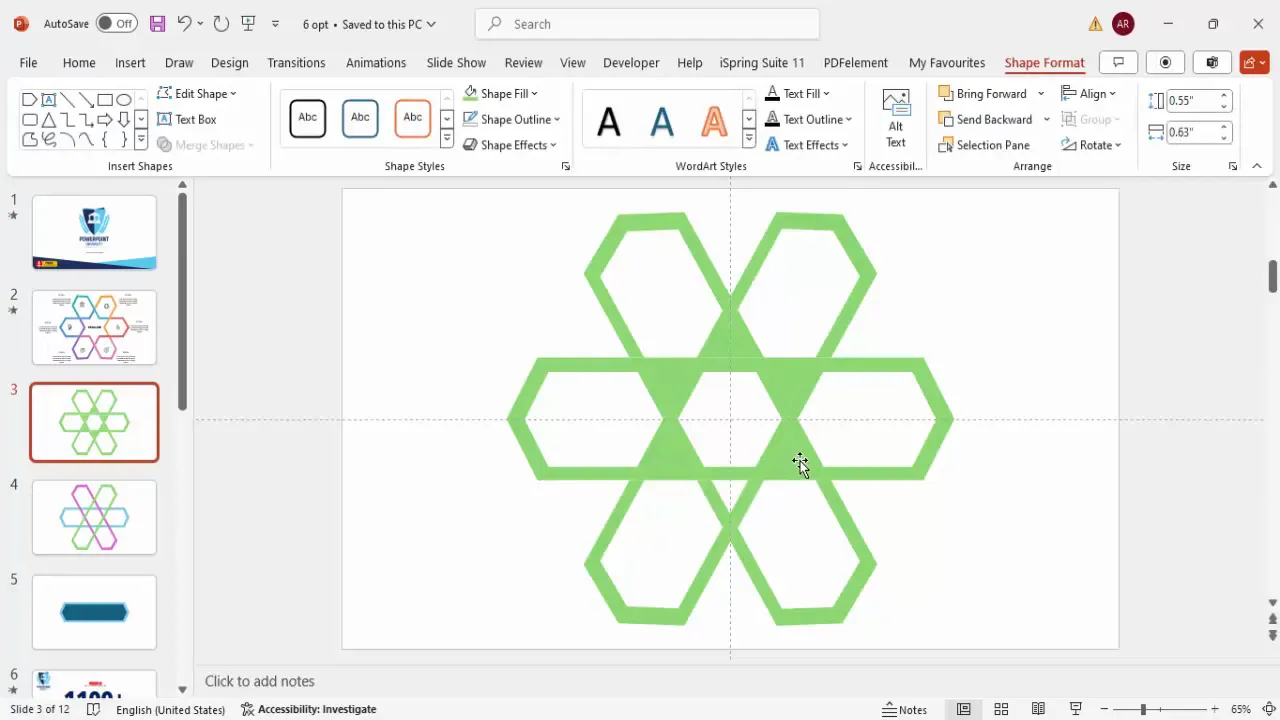
- Subtract shapes: Select two overlapping shapes, use Merge Shapes > Subtract to create cut-out effects that add to the geometric complexity.
- Duplicate and rotate: Use Ctrl + D to duplicate shapes and rotate them using Alt + arrow keys to position all six geometric sections evenly around the center.
- Fragment shapes: Select all shapes and apply Merge Shapes > Fragment to break the design into smaller, editable parts.
- Delete unwanted pieces: Remove small or unnecessary fragments to avoid clutter.
- Group related shapes: Carefully select related fragments and merge them back into unified shapes using the Union function. Use different colors to distinguish each group for easy editing.
- Align groups: Ensure all grouped shapes are perfectly aligned for a harmonious overall design.
Through this meticulous process of merging, subtracting, fragmenting, and regrouping, your slide transforms into a clean, colorful geometric masterpiece with six distinct option areas.
Adding Icons and Text Elements
With the geometric structure in place, it’s time to add meaningful content that communicates your message effectively. Here’s how to incorporate icons and text:
- Insert icons: Go to Insert > Icons and choose six icons that represent each option. These can be thematic or generic based on your presentation’s needs.
- Resize and color icons: Set the height and width of each icon to 0.7 inches for consistency, and color them in gray or a color that complements your slide’s palette.
- Position icons: Place each icon centrally within its corresponding geometric section.
- Add titles: Insert text boxes for each option’s title. Use a clean, modern font like Open Sans Extra Bold, center-aligned for balance.
- Add detailed text: Insert another text box with descriptive content. Use placeholder text like “Lorem Ipsum” initially, reduce the font size to around 14 pt for readability, and center-align the text.
- Group icon and text: Select the icon, title, and description for each option and group them (Ctrl + G) so they move as one unit.
- Duplicate groups: Duplicate the grouped elements five times (Ctrl + D) and position them in the six geometric sections.
- Add headline: Insert a central headline with the same font style, increasing the font size for emphasis and centering it on the slide.
This structured approach ensures your slide communicates each option clearly with visual and textual elements that are easy to digest.

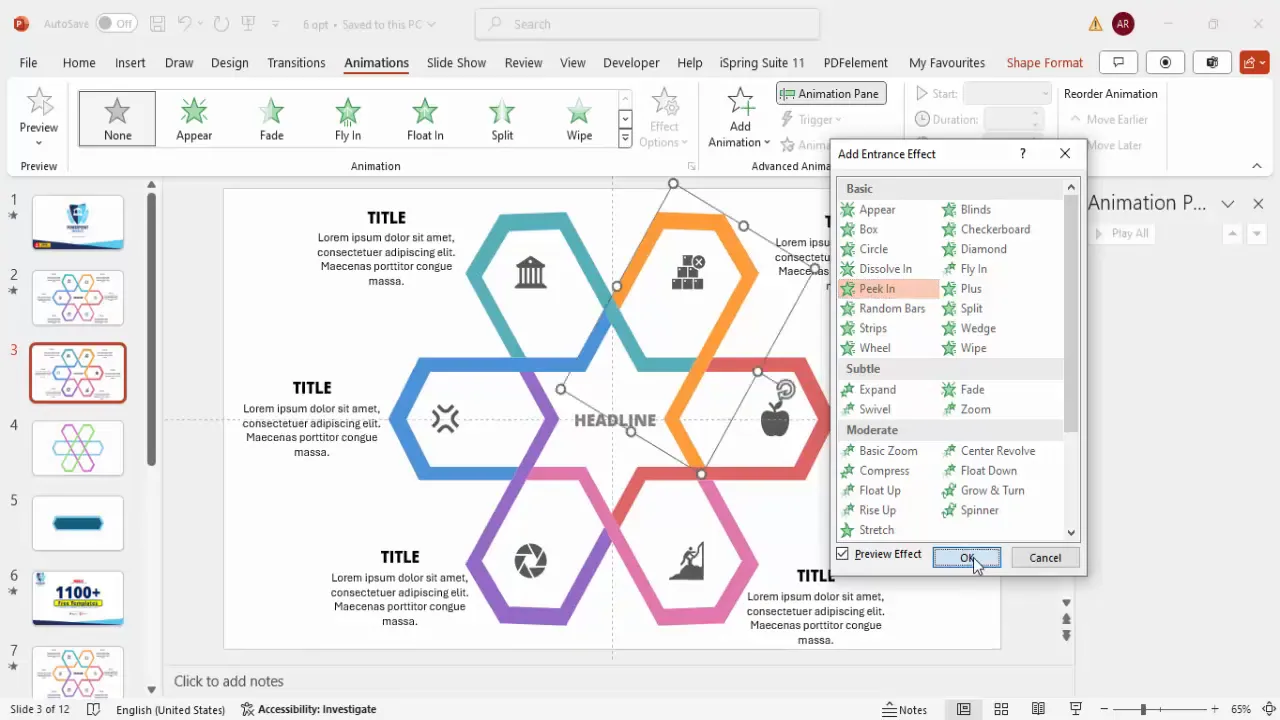
Applying Animations for Dynamic Effects
Animations add a dynamic layer to your slide, helping to guide your audience’s attention and make the presentation engaging. Here’s how to apply animations effectively:

- Open animation pane: Go to the Animations tab and enable the Animation Pane for detailed control.
- Select first option group: Click on the first option’s grouped elements.
- Add entrance animation:
- Click Add Animation > More Entrance Effects.
- Choose an animation like Peek In from the left.
- Set the direction (e.g., from left) and click OK.
- Add secondary animation: Add a Basic Zoom animation to the icon or text to create a subtle zoom effect that happens with the previous animation.
- Apply stretch animation: For additional effects, add a Stretch animation from the left, set to occur with the previous animation.
- Use Animation Painter: Select the first option’s animations, then use the Animation Painter tool to copy and apply the same animation effects to the remaining five option groups quickly and consistently.
- Test animations: Play the slide to ensure the animations flow smoothly and sequentially as intended.
Animations, when used thoughtfully, can significantly enhance the professionalism and impact of your PowerPoint slide design.
Light vs. Dark Theme: Choosing Your Style
Depending on your presentation’s context and branding, you might prefer a light or dark theme for your geometric design slide. Here’s a quick comparison and tips for each:
| Aspect | Light Theme | Dark Theme |
|---|---|---|
| Background Color | White or very light shades | Black or very dark shades |
| Font Color | Black or dark gray for readability | White or light gray for contrast |
| Shape Colors | Bright, light colors with outlines | Bold, saturated colors that pop on dark background |
| Icon Colors | Gray or colors matching the shapes | White or light colors for visibility |
| Best For | Daytime presentations, professional settings, print | Evening or digital presentations, modern tech themes |
Both themes are fully customizable and can be switched depending on your audience’s preferences and the presentation environment.

Frequently Asked Questions
Can I customize the icons in the geometric design slide?
Yes! You can insert any icons from PowerPoint’s built-in icon library or import your own SVG or PNG icons. Adjust their size and color to match your slide’s design.
Is this slide design suitable for all types of presentations?
While the geometric design is versatile, it works best for presentations that require showcasing multiple options or features clearly and attractively. It’s ideal for business proposals, marketing plans, and educational content.
Can I change the number of options from six to a different number?
This specific design is optimized for six options to maintain symmetry and balance. However, by adjusting the shapes and layout, you can create similar slides with fewer or more options, though it will require manual design adjustments.
How do I ensure the animations work on all devices?
Animations created in PowerPoint generally work across devices running the software. To avoid issues, use standard animation types and test your presentation on the target device beforehand.
Are the fonts used in this design free to use?
The tutorial uses Open Sans Extra Bold, which is a free and widely available font. You can download it from Google Fonts or use similar sans-serif fonts available on your system.
Can I download ready-made templates of this slide?
Yes! Many creators, including POWERPOINT UNIVERSITY, offer free downloads of such templates. You can customize these templates directly without building the slide from scratch.
Conclusion
Creating a professional and visually dynamic six-option geometric design slide in PowerPoint is a powerful way to enhance your presentations. By following this step-by-step guide, you can build a slide that combines precision-crafted geometric shapes, clear iconography, concise text, and smooth animations to engage your audience effectively.
Remember to leverage PowerPoint’s guides and shape merge tools to construct clean designs, choose colors that complement your theme, and apply consistent animations for a polished finish. Whether you opt for the light or dark theme, this slide design is adaptable to various presentation contexts, helping you communicate your message with clarity and style.
For further inspiration and free resources, consider exploring PowerPoint template collections and tutorials from expert channels like POWERPOINT UNIVERSITY. With practice and creativity, your PowerPoint slide design skills will elevate your presentations to the next level.
Check out the full video: 6 Option Geometric Design Slide


