
PowerPoint slides are essential tools for effective presentations, whether at work, school, or for creative projects. Creating visually appealing and interactive slides can seem daunting at first, especially if you’re new to PowerPoint or want to make your presentations stand out. Fortunately, with the right techniques, you can design professional-looking slides quickly and easily. In this comprehensive guide, I’ll walk you through how to create a dynamic photographic slide with five interactive options using PowerPoint. This tutorial is perfect for beginners and anyone looking to elevate their presentation game with engaging visuals and animations.
Let’s dive into the step-by-step process to build this stunning slide, complete with colored boxes, icons, titles, detailed text, and smooth animations. By the end of this article, you’ll have a customizable slide template that you can reuse for multiple presentation scenarios.
Table of Contents
- Preparing the Slide and Basic Shapes
- Creating 3D Effect Colored Boxes
- Adding Option Numbers with 3D Rotation
- Designing Titles and Detailed Text
- Inserting and Styling Icons
- Applying Animations for Interactivity
- Final Tips and Best Practices
- Frequently Asked Questions
Preparing the Slide and Basic Shapes
To start, add a new blank slide in your PowerPoint presentation. We’ll build the design from scratch using PowerPoint’s shape tools, so it’s essential to have a clean canvas.
Follow these steps to insert and format the basic rectangle shape that forms the foundation of the options boxes:
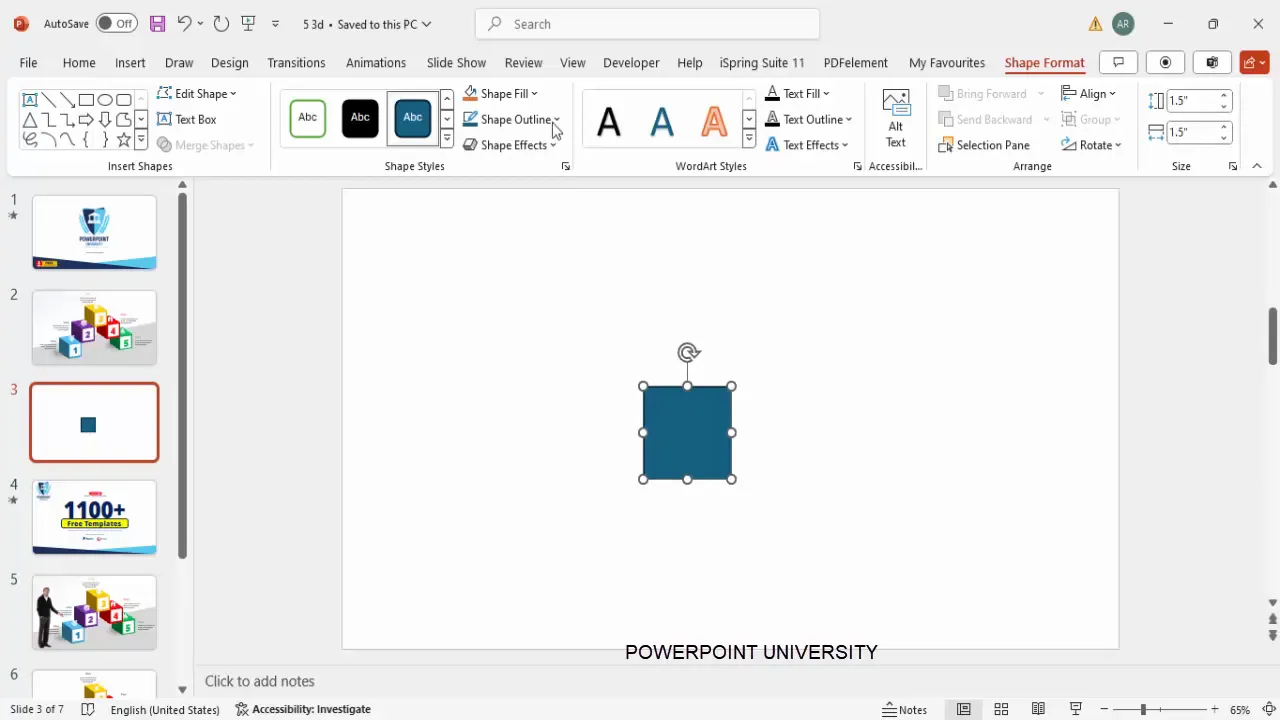
- Go to the Insert tab, then click Shapes. From the dropdown, choose the first rectangle option.
- Click anywhere on the slide to place the rectangle. Adjust the size by setting both the height and width to 1.5 inches (or equivalent units).
- Remove the shape outline by selecting No Outline in the shape format options.
- Fill the rectangle with a color of your choice. For this tutorial, start with a blue fill color.
- Duplicate this rectangle by pressing Ctrl + D and keep the copy aside for later use.
This basic rectangle will serve as the base for our 3D boxes with color variations.
Creating 3D Effect Colored Boxes
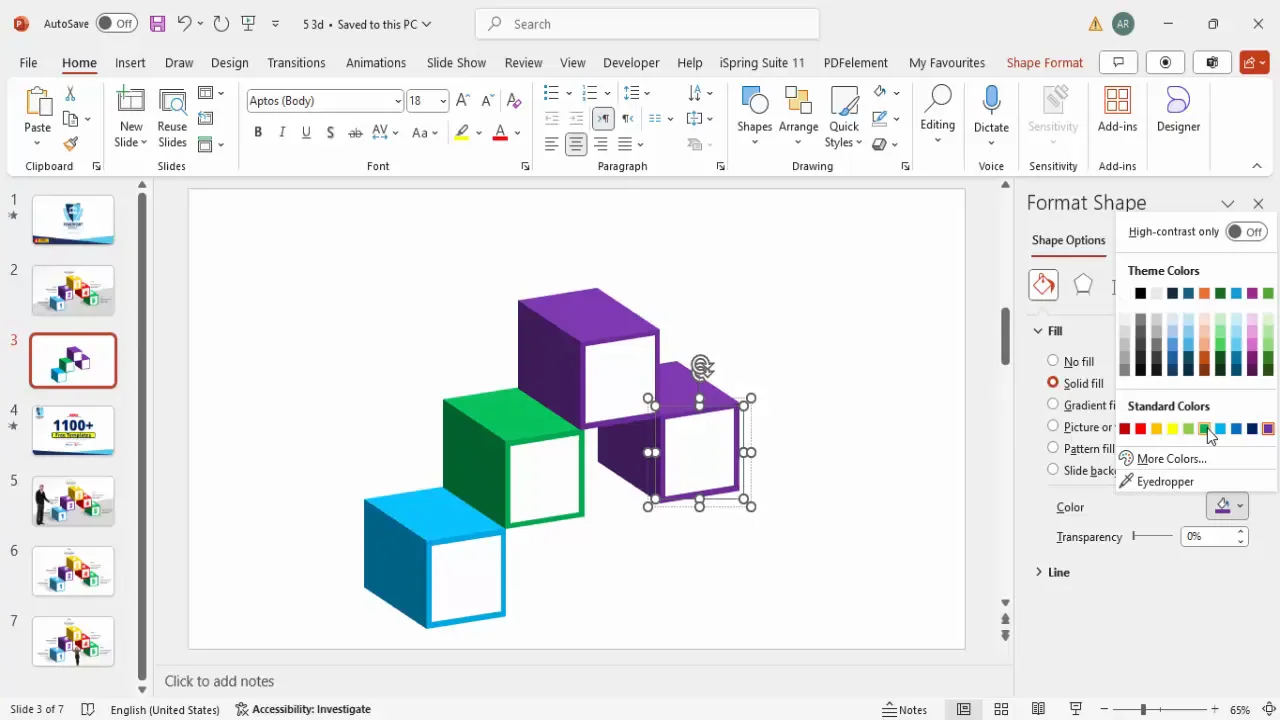
One of the powerful features in PowerPoint is the ability to apply 3D formatting to shapes, giving depth and perspective to otherwise flat objects. Here’s how to create a 3D rotated box that looks professional and eye-catching:
- Select the blue rectangle you created.
- Right-click on it and choose Format Shape from the context menu.
- In the Format Shape pane, navigate to the Effects section and then to 3-D Rotation.
- From the preset options, choose Off Axis 1 Right. This gives the rectangle a slight angled perspective.
- Next, go to the 3-D Format tab.
- Increase the Depth value from 0 to 175 pt. This adds thickness to the rectangle, creating the 3D box look.
- Adjust the Lighting settings to your preference. The default works well for a subtle shadow and highlight effect.
You should now have a 3D blue box that looks like a solid object rather than a flat shape.
Repeat the following steps to create additional boxes with different colors and positions:
- Duplicate the grouped 3D blue box by pressing Ctrl + D.
- Move the duplicate exactly on top of the original or slightly offset depending on your design.
- Change the fill color to a different color for each option. For example: green, purple, orange, and red.
- For some boxes, use the Send to Back option to layer them behind others, creating a stacked effect.
- Align all boxes precisely to maintain a clean, organized look.
Adding Option Numbers with 3D Rotation
With the colored boxes ready, it’s time to add option numbers to each box. These numbers will be styled with the same 3D rotation effect to match the boxes and create a cohesive design.
Here’s how to add and format the option numbers:
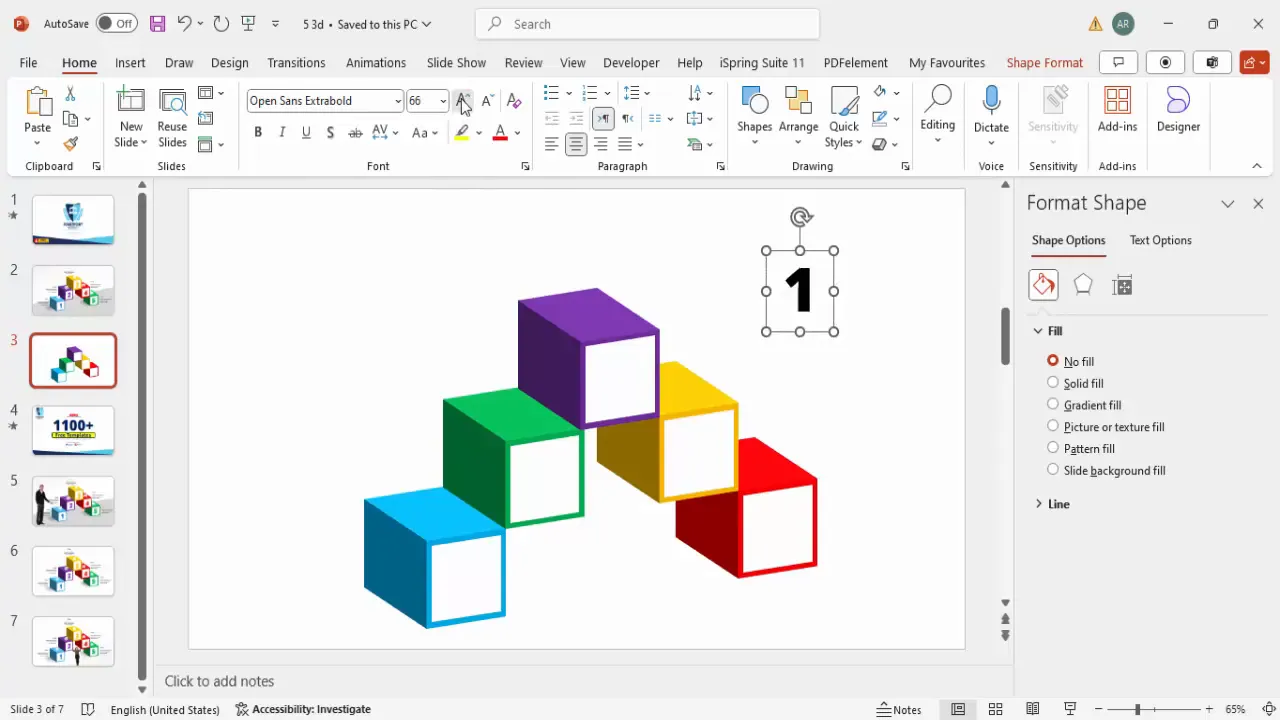
- Go to the Insert tab and choose Text Box.
- Click on the slide and type the number “1”.
- Center-align the text and use a bold font such as Open Sans Extra Bold or any other strong font.
- Increase the font size significantly; around 80 pt works well for visibility.
- With the text box selected, open the Format Text Effects pane.
- Under 3-D Rotation, select the same preset as the boxes: Off Axis 1 Right.
- Position the number on top of the corresponding colored box.
- Duplicate the text box for the remaining options by pressing Ctrl + D, then change the numbers to “2”, “3”, “4”, and “5”.
- Match the font color of each number to the color of its corresponding box for consistency.
Grouping the numbers with their boxes can help you keep the layout organized and move elements easily.
Designing Titles and Detailed Text
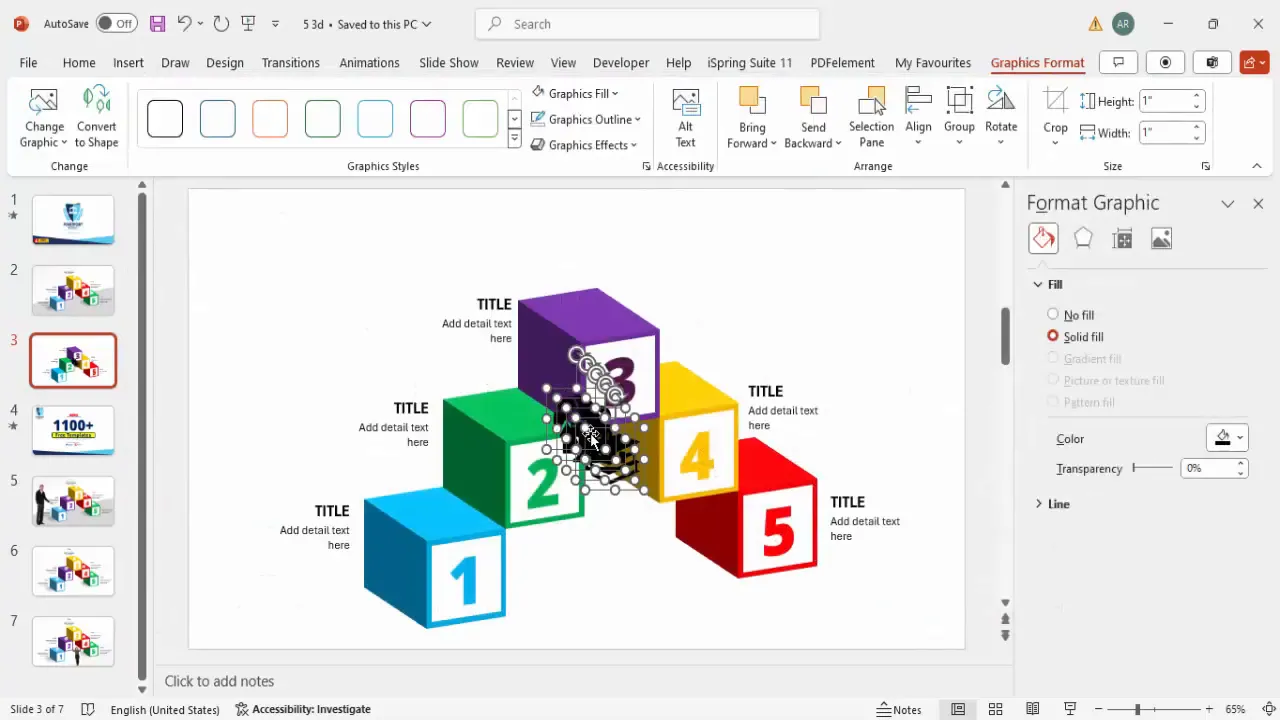
Next, add descriptive titles and detailed text for each option to provide context and information. Aligning these text elements properly with the boxes enhances readability and aesthetics.
Follow these steps:
- Insert a new text box for the title near the option number.
- Type your title, make it bold, and right-align the text if placing it on the right side of the box.
- Insert another text box below the title for the detailed description.
- Reduce the font size for the description to differentiate it from the title, and align it right as well.
- Group the title and description text boxes together for easy positioning.
- Duplicate this grouped text box for each option and update the content accordingly.
- For options on the left side, use left-aligned text boxes to maintain balance.
Here’s a quick table summarizing the alignment and grouping strategy:
| Option | Text Alignment | Grouping |
|---|---|---|
| Option 1, 2, 3 | Right Align | Group title + description |
| Option 4, 5 | Left Align | Group title + description |

Inserting and Styling Icons
Icons are a great way to visually support your options and make slides more engaging. PowerPoint’s built-in icon library gives you access to a wide range of symbols for different themes.
Here’s how to insert and style icons for your options:
- Go to the Insert tab and click Icons.
- Search for icons relevant to your options, such as “book” or “chart”.
- Select the desired icons and click Insert.
- Resize the icons to a uniform size, such as 0.7 inches height and width.
- Change the icon color to white to contrast well with the colored boxes.
- Position the icons on top of or near the corresponding option box.
- To enhance the icons’ visibility, add shadow effects:
- Go to Format Shape > Effects > Shadow.
- Choose a preset like “Perspective” and adjust the distance and transparency to your liking.
Adding shadows creates depth and ensures the icons stand out against the background colors.

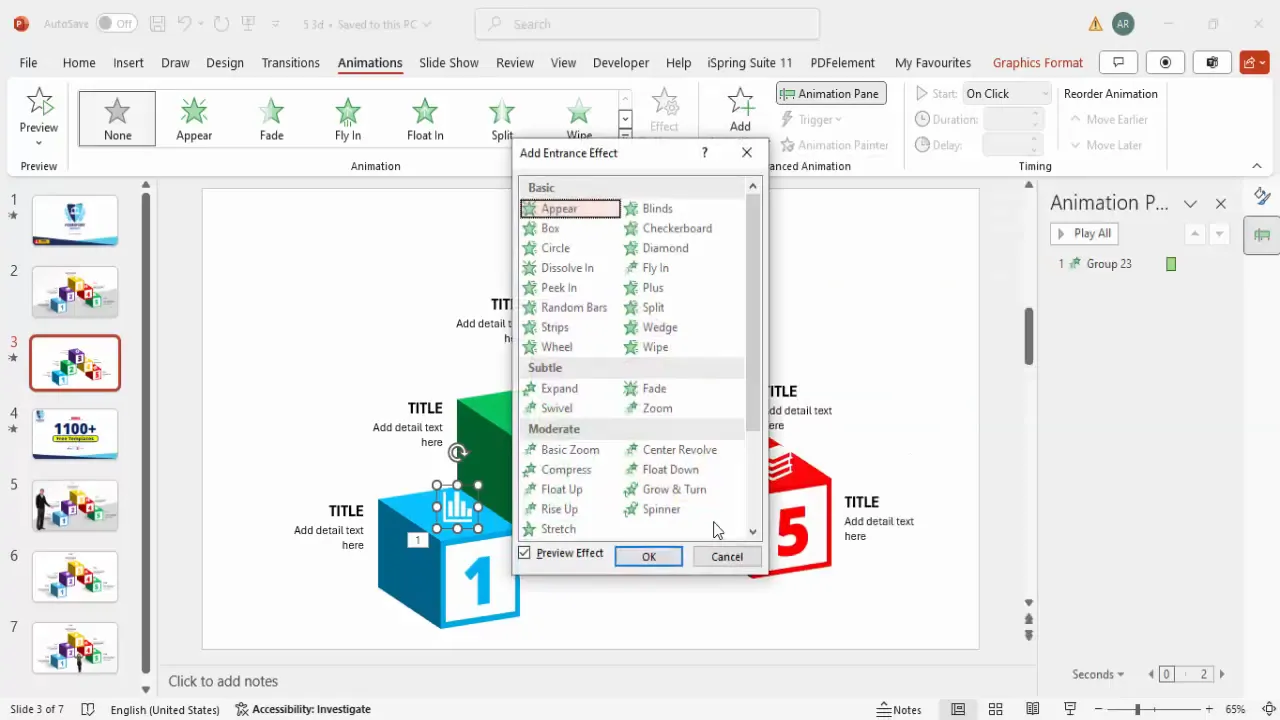
Applying Animations for Interactivity
Animations bring your slide to life and can help focus your audience’s attention on key points. We’ll apply simple entrance animations to the boxes, option numbers, titles, and detailed text.
Use this step-by-step guide to animate your slide objects:
- Go to the Animations tab and enable the Animation Pane for better control.
- Select the colored box and apply the Fly In animation.
- Apply the Peek In animation to the option number, setting it to start After Previous for smooth sequencing.
- Select the title and detailed text group, then add the Stretch entrance effect.
- In the animation settings, configure the stretch to come from the right and start With Previous.
- Use the Animation Painter tool to copy animation settings from one group to others, saving time and ensuring consistency.
Preview your slide by playing the animations to confirm the timing and flow look natural and engaging.
Final Tips and Best Practices for PowerPoint Slides
Creating stunning PowerPoint slides is a blend of good design, clear communication, and technical skills. Here are some additional suggestions to help you refine your slides and presentations:
- Consistency is key: Use a consistent color palette, font style, and size throughout your presentation to maintain a professional look.
- Keep it simple: Avoid clutter by limiting the amount of text and visual elements on each slide.
- Use high-quality icons and images: Visuals should be clear and relevant to your content.
- Test animations: Run through your slide animations beforehand to ensure smooth transitions and no distractions.
- Group related elements: Grouping text, shapes, and icons makes it easier to move or adjust them simultaneously.
- Align objects precisely: Use PowerPoint’s alignment guides and zoom features to ensure perfect positioning.
- Use the duplicate feature: Duplicate slides or grouped objects to save time and maintain uniformity across similar slides.
- Customize slide size and layout: Adjust slide dimensions as needed before adding objects to avoid distortion.
Frequently Asked Questions
How do I create interactive options in PowerPoint slides?
You can create interactive options by designing separate boxes or buttons with unique colors, icons, and text. Adding entrance animations and hyperlinks or triggers allows users to click and reveal different content dynamically.
What is the best way to add 3D effects to shapes in PowerPoint?
Use the Format Shape pane to access 3-D Rotation presets and 3-D Format options. Increase the depth and apply rotation presets like “Off Axis 1 Right” to give a realistic 3D look to your shapes.
Can I use free icons in PowerPoint?
Yes, PowerPoint offers a built-in icon library accessible via the Insert tab. These icons are free to use and customizable in size and color to fit your design needs.
How do I ensure my animations run smoothly during a presentation?
Enable the Animation Pane to manage the sequence and timing of animations. Use consistent entrance effects, set proper start options (On Click, With Previous, After Previous), and preview the slide multiple times before presenting.
Where can I find free PowerPoint templates and resources?
Many online platforms, including the creator of this tutorial, offer free PowerPoint templates. These can be downloaded and customized to fit your presentation style, saving you time and effort.
What fonts and colors work best for PowerPoint slides?
Choose clean, professional fonts like Open Sans, Calibri, or Arial. Use contrasting colors for backgrounds and text to ensure readability. Avoid using too many colors; stick to a palette of 3-5 complementary colors.
How do I keep my slides visually balanced?
Use alignment tools and guides in PowerPoint to evenly space and align objects. Balance text and visuals by distributing elements symmetrically or asymmetrically, depending on your design preference.
Conclusion
Creating visually stunning and interactive PowerPoint slides is achievable with a few simple techniques. By combining 3D formatting, consistent colors, well-aligned text, meaningful icons, and smooth animations, you can transform ordinary slides into engaging storytelling tools. This tutorial showed you how to create a five-option photographic slide that you can customize for your unique presentation needs.
Remember, the key to great PowerPoint slides is practice and experimentation. Don’t be afraid to try different colors, fonts, and layouts until you find the perfect combination that resonates with your audience. Use the grouping, duplicating, and animation features to save time and maintain consistency across your presentation.
With these skills, you’ll be able to create professional slides quickly, impress your audience, and communicate your message effectively. Happy designing!
Check out the full video: Create Stunning PowerPoint Slides in Minutes | Easy & Quick Tutorial for Beginners!


