

Hi, I’m from POWERPOINT UNIVERSITY. In this guide I’ll walk you through how I build a Simple morph Transition Effect in powerpoint using a PDCA (Plan → Do → Check → Act) visual. This article mirrors the same step-by-step approach I use in my demonstrations and goes deeper with practical tips, production shortcuts, troubleshooting advice, and design best practices so you can reproduce the effect quickly and confidently.
Whether you’re a trainer, manager, or presentation designer, the Simple morph Transition Effect in powerpoint is one of the most powerful ways to create smooth object animations without complex timelines. Below you’ll find a complete Table of Contents, plenty of screenshots (with timestamps tied to the walkthrough), and a long FAQ to answer common questions.
Key takeaway: By the end of this tutorial you’ll be able to build a PDCA slide deck that morphs through each stage with smooth transitions, responsive spacing, and a professional look — all while using only native PowerPoint tools: shapes, grouping, merge/subtract, align/distribute, and the Morph transition.
Table of contents
- Introduction: Why the Simple morph Transition Effect in powerpoint matters
- What you’ll need (version and assets)
- Quick overview of the PDCA morph effect
- Step-by-step build: base shapes and 3D style
- Step-by-step build: creating the circular markers
- Step-by-step build: creating the detail panel and icons
- Grouping, duplicating, and using Merge/Subtract
- Applying the Morph transition (duration, slide selection)
- Fine-tuning: align, distribute, and Selection Pane naming trick
- Design tips and alternatives
- Common problems and fixes
- Checklist: a quick action list
- FAQ
- Conclusion and next steps
Introduction: Why the Simple morph Transition Effect in powerpoint matters
PowerPoint’s Morph transition is one of the simplest ways to produce polished animations that often look like they took far more time to create. The Simple morph Transition Effect in powerpoint lets you visually shift objects, reveal content, and transform shapes between slides without keyframe-based animation. It’s an ideal technique for process diagrams like PDCA, where you want attention to move sequentially between steps.
When used correctly, the Simple morph Transition Effect in powerpoint saves time, keeps slide sizes manageable, and maintains full editability. You’re not embedding videos or exporting frame-by-frame; you’re using PowerPoint’s native intelligence to interpolate object positions, sizes, and rotations across slides.

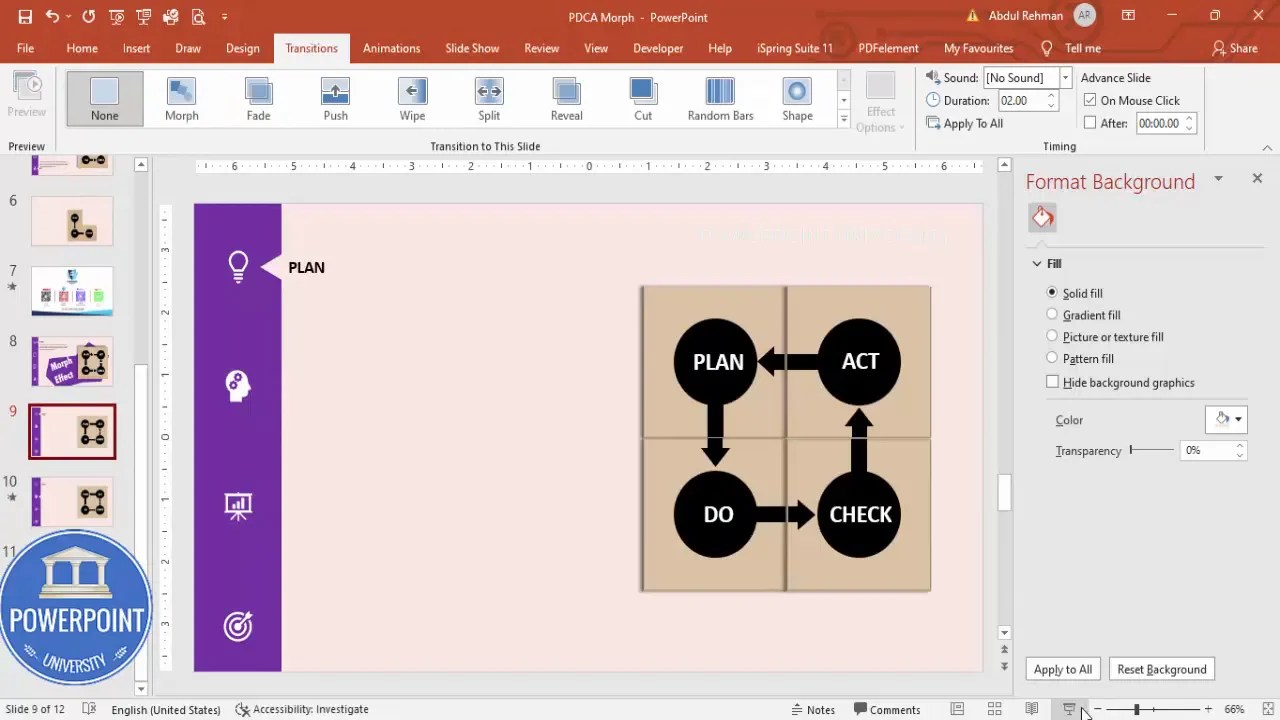
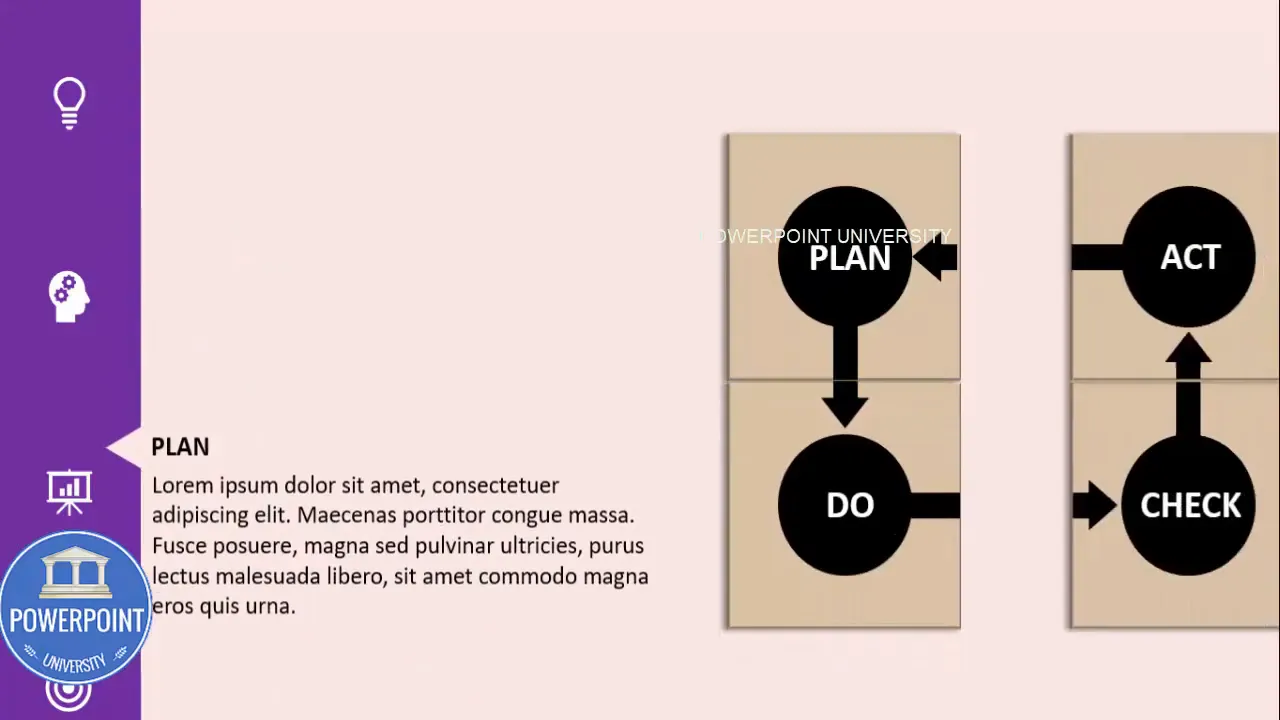
Step-by-step build: creating the circular markers
The circular markers indicate the steps (Plan, Do, Check, Act). Here’s how to create one and then duplicate it with the right spacing using align/distribute tools.
1. Draw a perfect circle
- Insert → Shapes → Oval. Hold the Shift key while dragging so you get a perfect circle.
- Use Shape Outline → No Outline and set the Fill color to black for the marker background (we’ll reverse the label color to white).
- Insert a small rounded rectangle on top or a small accent rectangle for a more unique marker, then set its outline to No Outline and color as required.
2. Add the step label
- Insert a text box or use text within a shape and type “Plan.”
- Center-align the text, set color to white, make bold, and increase size to fit comfortably within the circle.
3. Duplicate and position
- Select the circle and the label, then hold Ctrl+Shift and drag down (or across) to create a copy locked in alignment.
- Adjust the second marker’s label to “Do.”
- Repeat to create all four markers labeled Plan, Do, Check, Act.
- Select all the markers and use Graphics Format → Align → Distribute Horizontally (or Vertically in my example’s layout) to evenly space them.
Step-by-step build: creating the detail panel and icons
The detail panel sits to the right of the markers and updates per step. It contains icons and explanatory text. Here’s how I build that panel and make it morph-ready.
1. Create the details rectangle
- Insert → Shapes → Rectangle (this rectangle will be the panel background for details).
- Shape Outline → No Outline; choose a muted purple or color that complements your slide palette.
2. Add icons
- Insert → Icons (or Insert → Pictures if you have custom icons). Choose an icon for Plan, Do, Check, Act.
- Set each icon’s size to 0.6 for consistent proportions (as I do in the video example).
- Set icons to white color if on a colored panel.
- Select all icons → Graphics Format → Align → Distribute Vertically to make equal spacing.
3. Add titles and body text
- Next to each icon, add a bold title like “Plan” and a short paragraph or Lorem text beneath it. Keep the copy concise (6–8 lines max work well).
- Duplicate the detail panel for each step because Morph transitions animate object changes between slides not within a single slide.
Grouping, duplicating, and using Merge/Subtract
Preparing objects for Morph requires consistent object names and shapes aligned across slides. Two important operations are grouping and using Shape Format → Merge Shapes → Subtract to create custom cutouts or directional shapes (e.g., a little trapezoid accent pointing at the active marker).
Group objects
- Select multiple elements of a compound object and press Ctrl+G to group them. This preserves relative positions when you duplicate or move them across slides.
- Group the marker components (background circle + icon + label) so they behave like a single object in Morph.
Duplicate quickly
- With the grouped object selected, press Ctrl+D to duplicate. This keeps styling consistent and is quicker than copy/paste.
Merge and Subtract
- To make a marker with a directional notch or a cutaway, draw a small triangle and position it where you want to cut.
- Select the primary shape and the triangle, then Shape Format → Merge Shapes → Subtract. This removes the triangle area from the primary shape, creating a notch.
- Use Subtract to create the visual differences between the marker “states” (active vs inactive).
I use merge/subtract to prepare four visual states: full marker visible, partial cut (used when part of the marker slides out), hidden, and active. These subtle differences help the viewer track progress during Morph transitions.
Applying the Morph transition (duration, slide selection)
Now that the elements are set across multiple slides, apply the Morph transition to animate them. This is where the Simple morph Transition Effect in powerpoint is created with minimal effort.
What slides to apply Morph to
- Decide on the slide flow: typically each major state gets its own slide (Plan slide, Do slide, Check slide, Act slide).
- Select the slides you want to morph between — in my examples they were slides 2–4 or slides 10–12 depending on the deck. The numbering depends on how many starter slides you have.
Apply Morph and tweak duration
- Select the slide where the first transition should occur (e.g., Slide 2) then go to Transitions → Morph.
- By default Morph uses a standard duration. If you want the Simple morph Transition Effect in powerpoint to feel snappy, set Duration to 1.0 seconds or experiment between 0.5–1.5s depending on your content density.
- Click Apply To All if your sequence uses the same transition timing for all slides (optional).
Play the slide show and watch how PowerPoint animates position, size, rotation, and color changes between slides — that’s the Morph interpolation doing its job.
Fine-tuning: align, distribute, and Selection Pane naming trick
A couple of finishing steps make the Simple morph Transition Effect in powerpoint feel ultra-smooth:
1. Move off-screen instead of deleting
- When you want an object to disappear from the next slide, don’t delete it — move it off the slide canvas (far enough that it’s not seen). Morph will animate it moving out of view.
- This technique keeps object identity stable across slides so the transition is consistent.
2. Use Align & Distribute
- Select multiple items and use Align → Align Center/Top and then Distribute Horizontally or Vertically to ensure even spacing. This helps Morph interpolate movement cleanly.
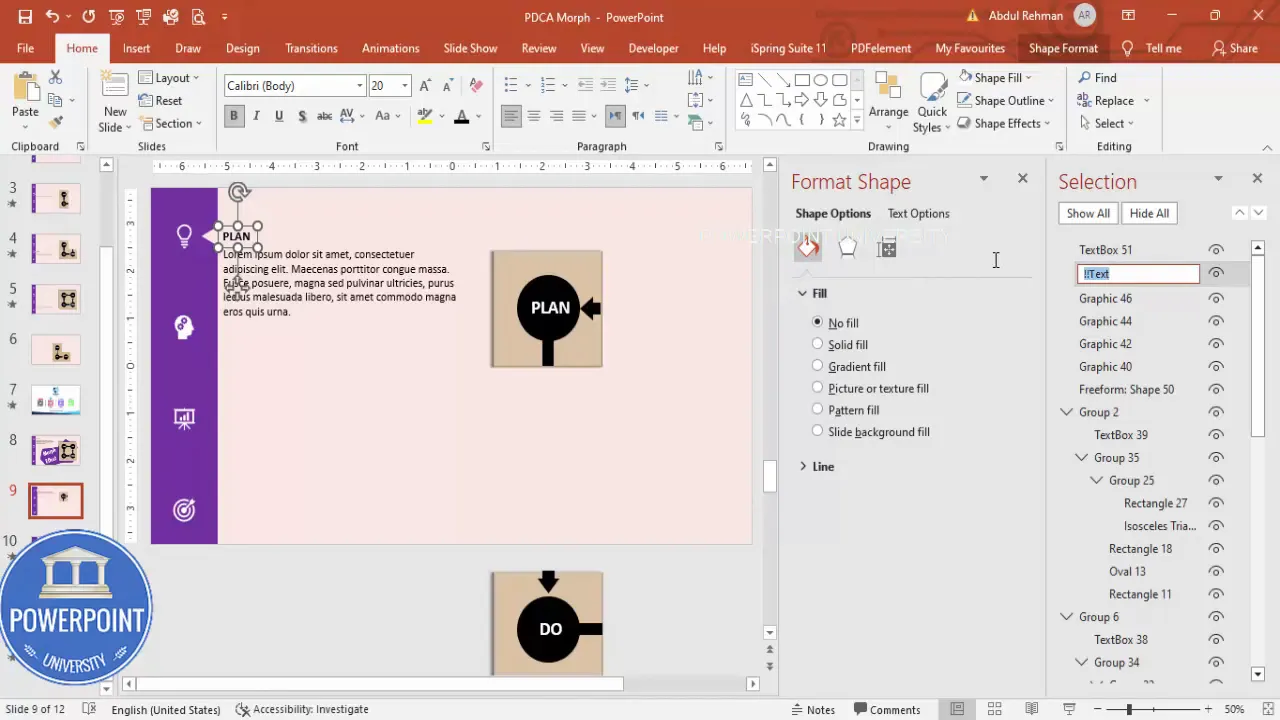
3. Selection Pane naming trick (essential for consistent Morph)
- Open Home → Select → Selection Pane. You’ll see object names like Rectangle 1, TextBox 3, etc.
- Rename the object on each slide you want PowerPoint to treat as the same object across slides. For example, rename the Plan text object on slide 2 and slide 3 both to: !!text (or any unique identical name).
- Why? Morph matches objects by name first (then shape properties); consistent names ensure it links the correct items and produces smoother transitions.
- Repeat for the detail panel texts and icons across slides so PowerPoint recognizes them as the same object changing position/visibility rather than as new/unrelated objects.
Using the Selection Pane for consistent naming is one of the simplest but most underrated ways to improve the Simple morph Transition Effect in powerpoint. It reduces jitter and accidental fades caused by PowerPoint not recognizing objects as the same element between slides.
Design tips and alternatives
While the above walkthrough uses PDCA as the example, you can repurpose the Simple morph Transition Effect in powerpoint for many scenarios. Below are design tips and alternative variations to try.
Create Slides in Seconds with ExpertSlides AI |
|
Generate AI Presentations today: |
| TRY NOW! |
Visual polish tips
- Keep typography consistent: use a single font family with bold weights for titles and a regular weight for body text.
- Limit palette to 2–3 colors: background, primary accent, and a contrast color for active states.
- Use drop shadows sparingly; a subtle shadow under the detail panel adds depth without distraction.
- Ensure icon strokes/thickness are similar across icons so they look cohesive.
Animation variations
- Slide-in panels — instead of moving markers, move the details panel in from the side and highlight a marker.
- Scale transitions — make the active marker slightly larger on its slide so Morph interpolates scaling.
- Color transitions — change the fill color of the active marker and rename objects consistently so Morph animates the color change.
Use cases
- Training modules where you want to step through process stages.
- Executive summary slides where you reveal one KPI area at a time.
- Sales decks to highlight product features sequentially.
Common problems and fixes
Here are issues you might encounter when building the Simple morph Transition Effect in powerpoint along with fast fixes.
Problem: Objects flash or jump instead of animating smoothly
- Fix: Ensure object names are identical in the Selection Pane across slides. Rename any mismatched objects.
- Fix: Group related items so Morph treats them as a single object.
Problem: An object disappears abruptly
- Fix: Don’t delete the object — move it off-slide. Morph prefers moving positions instead of appearing/disappearing as new objects.
- Fix: Verify the object isn’t converted to a picture or SVG between slides (that can change the object identity).
Problem: Morph is too slow or too fast
- Fix: Adjust Transition Duration between 0.5–1.5 seconds depending on content.
- Fix: If the sequence feels slow, reduce to 1 second or 0.75s for snappier flow.
Problem: Text layout changes unexpectedly
- Fix: Keep text boxes the same size and name them the same across slides. If the text box resizes because of different content, Morph can produce inconsistent behavior.
Checklist: Quick action list for building your Simple morph Transition Effect in powerpoint
- Create base slide with light background and set slide size.
- Insert main card and apply slight 3D rotation (oblique preset).
- Make circular markers (use Shift for perfect circles) and add white labels.
- Group markers and use Ctrl+D to duplicate for consistent spacing.
- Create detail panel with icons (size 0.6) and distribute vertically.
- Duplicate slides for each PDCA state and move / subtract shapes to show/hide elements.
- Use Merge Shapes → Subtract to create directional notches or accents.
- Open Selection Pane and rename identical objects across slides to the same name (e.g., !!text) to ensure smooth Morph matching.
- Apply Transitions → Morph to the slides and set Duration to 1 second (or preferred value).
- Play the slide show and tweak alignments and off-screen positions for perfect flow.

Full walkthrough example: step-by-step recap (with actions and keyboard shortcuts)
Below is a condensed sequence you can follow in real time to produce the exact PDCA morph effect I showed:
- Insert a new blank slide and pick a light background.
- Insert → Shapes → Rectangle; set Height & Width to 2.4; No Outline; Fill with tan color; Format Shape → 3-D Rotation → Oblique preset.
- Insert → Shapes → Oval; hold Shift while dragging; set No Outline; Fill with black; add text “Plan” (white, bold, centered).
- Select the marker components → Ctrl+G to group → Ctrl+D to duplicate three times → change labels to Do, Check, Act.
- Align → Distribute Horizontally so spacing is equal.
- Insert the details panel rectangle → No Outline → Fill purple. Insert four icons and set icon size to 0.6. Distribute vertically and add text.
- Duplicate the slide three times so you have one slide per PDCA stage.
- On Slide 2: move Do/Check/Act markers off-screen; leave Plan visible; adjust the detail panel to show Plan content.
- On Slide 3: move Plan off-screen; bring Do into place and make Do visually active (slightly larger/fill change); update detail content.
- Repeat for Check and Act slides.
- Open Selection Pane and rename identical objects (e.g., set the Plan text object name on each slide to the same name like !!text to guarantee Morph matches).
- Transitions → Morph on slides 2–4; set Duration to 1s; run the slide show.
If you follow these actions in order, you’ll build the same Simple morph Transition Effect in powerpoint I use for PDCA—and be able to adapt the technique to any sequence-based visual.
Troubleshooting deep dive
Sometimes Morph behavior seems unpredictable. Here is a deeper troubleshooting guide to common, tricky issues.
Why does Morph not animate color changes?
- PowerPoint will animate color changes only when the object is recognized as the same object across slides. Confirm that the object name in the Selection Pane is identical on both slides.
- If you copied an object from one slide to another using Copy/Paste, PowerPoint usually retains the identity—but if you imported a new shape or re-created it, rename it to match.
Why do icons resize or shift unexpectedly?
- Icons are often SVGs; editing their group contents or ungrouping them can change their properties. Keep them grouped and keep the same group name in the Selection Pane.
- If you resize icons on one slide but not on the next, Morph may animate the size difference — which can be desirable; otherwise match sizes exactly for consistency.
Why does Morph not animate an object at all?
- Check that the object appears on both slides; if it only appears on the destination or source slide, the effect will be a simple appear/disappear rather than a morph.
- Use off-canvas movement instead of deleting to preserve identity.
FAQ
Q: Which versions of PowerPoint support Morph?
A: The Simple morph Transition Effect in powerpoint is supported in PowerPoint for Office 365 and PowerPoint 2019 and later. If you’re using an older perpetual version (PowerPoint 2016 or earlier), Morph may not be available.
Q: Do I need to group everything for Morph to work?
A: Not necessarily. Grouping makes it easier to move related elements together (so text and icon move in sync). But you can also rely on Selection Pane naming for individual object matching. Group objects if you want them to behave as a single unit during transitions.
Q: How do I make a marker “stand out” on its slide?
A: Increase the marker scale slightly (e.g., 110%), change its fill color to the accent color, or add a thin glow/shadow. Ensure the objects have the same name across slides so Morph animates the change smoothly. The Simple morph Transition Effect in powerpoint shines when visual changes are subtle and consistent.
Q: Why is the transition slow and how can I speed it up?
A: Adjust the transition Duration in the Transitions panel. I recommend 1 second as a starting point for a Simple morph Transition Effect in powerpoint. For very brief sequences lower to 0.5s; for more dramatic shifts use 1.25–1.5s.
Q: Can I use Morph with pictures and charts?
A: Yes. Morph will animate pictures, charts, shapes, and text boxes. If you want a chart to animate its data change, though, consider animations inside the chart or recreate chart states across slides and then morph between them. Keep object names consistent for best results.
Q: What about exporting to video — will Morph survive?
A: Yes. When you Export → Create a Video from PowerPoint, Morph transitions and their durations are baked into the video. The resulting MP4 will show the exact Simple morph Transition Effect in powerpoint you designed.
Q: Is there a limit to how many objects Morph can handle?
A: Morph is powerful but performance depends on slide complexity and your machine. Hundreds of objects may slow down previews. If performance becomes an issue, pre-group elements into a single grouped object or reduce bitmap usage.
Q: How can I share the editable template with colleagues?
A: Save the file as a .pptx and share via a cloud link (OneDrive, Dropbox). If they don’t have Morph (older PowerPoint), consider exporting key slides as images or a video. Also include a short note about the Selection Pane naming convention you used to help them edit the deck.
Conclusion and next steps
That’s the complete walkthrough for the Simple morph Transition Effect in powerpoint using a PDCA example. Morph lets you create refined animations without complex timelines, and with a few best practices — consistent object naming, grouping, and off-canvas movement — you can achieve smooth, professional results quickly.
Next steps I recommend:
- Recreate this PDCA sequence from scratch and time yourself — you’ll be faster the second time.
- Experiment with color and scale changes for the active marker to find what your audience responds to best.
- Use the Selection Pane naming trick as standard practice for any Morph-based sequence.
If you want, try converting another sequence (like a four-step sales funnel or onboarding flow) into a morph sequence using the same workflow: build base objects, copy across slides, change only what needs to change, give consistent names, and apply Morph.
Thanks for following along. I hope this guide makes it easy for you to produce engaging presentations with the Simple morph Transition Effect in powerpoint — and to do it faster than ever. Happy designing!
Check out the full video: Create Simple Morph Transition Effect in PowerPoint. Tutorial No.: 979


