

Creating engaging and interactive online courses doesn’t have to be complicated or expensive. If you’re a teacher with a ready PowerPoint presentation, you already have a powerful foundation to build an online course — and the best part? You can do it absolutely for free! In this comprehensive guide, I’ll walk you through how I transformed a PowerPoint presentation on artificial intelligence into a fully functional online course, complete with interactive navigation, embedded videos, live websites, quizzes, and smooth animations.
This step-by-step tutorial will empower you to take your existing slides and convert them into an immersive learning experience for your students using free tools and clever PowerPoint features. Let’s dive in!

Table of Contents
- Exploring the AI Presentation: An Overview
- Creating a Clickable Sidebar Navigation
- Animating the Sidebar for a Dynamic Experience
- Leveraging Slide Zooms for Interactive Content Exploration
- Embedding Multimedia to Enhance Learning
- Creating Quizzes to Test Knowledge
- Publishing Your Course for Maximum Reach
- Conclusion: Empower Your Teaching with Free Tools
- Frequently Asked Questions (FAQ)
Exploring the AI Presentation: An Overview
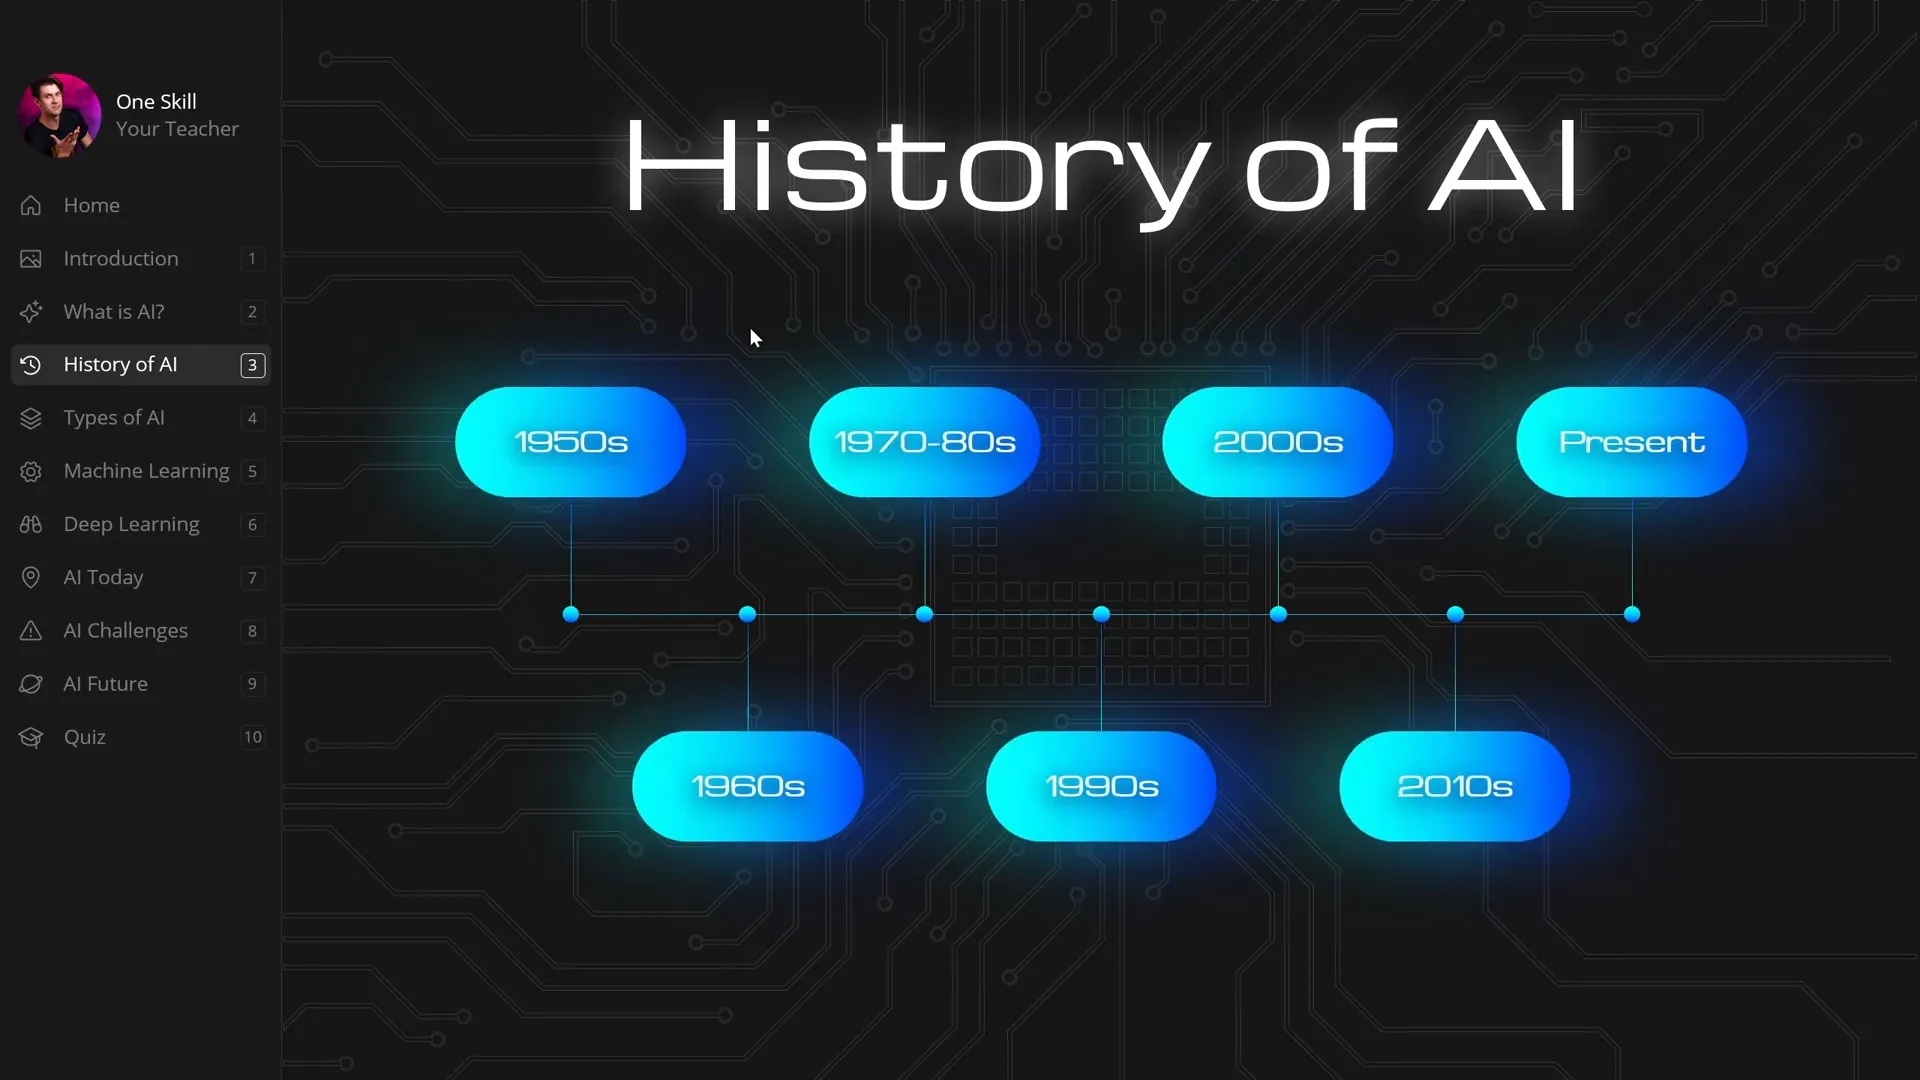
Imagine you’re teaching a course on artificial intelligence. You’ve prepared a beautiful PowerPoint presentation, and you want your students to explore it easily and interactively. Here’s what my AI presentation looks like:
- It starts with an inviting introduction slide that sets the stage.
- Next, it explains what artificial intelligence is.
- Then, it dives into the history of AI, showcasing key milestones with the ability to zoom into specific years for detailed information.
- There’s a section on the different types of AI, where clicking on numbers reveals deeper insights about each type.
- The presentation also covers machine learning, deep learning, AI applications, and the challenges AI faces in today’s world.
- It looks ahead with a future perspective on AI.
- Finally, there’s a quiz to test your knowledge on the topic.
What makes this presentation truly interactive is the sidebar on the left, which allows easy navigation between sections, and the use of slide zooms that let learners dive deeper into specific topics without losing their place. This setup creates a seamless and engaging learning journey.
Creating a Clickable Sidebar Navigation
One of the standout features in my presentation is the sidebar navigation. It stays visible on the left, letting students jump to any section instantly. Here’s how you can create your own clickable sidebar in PowerPoint:
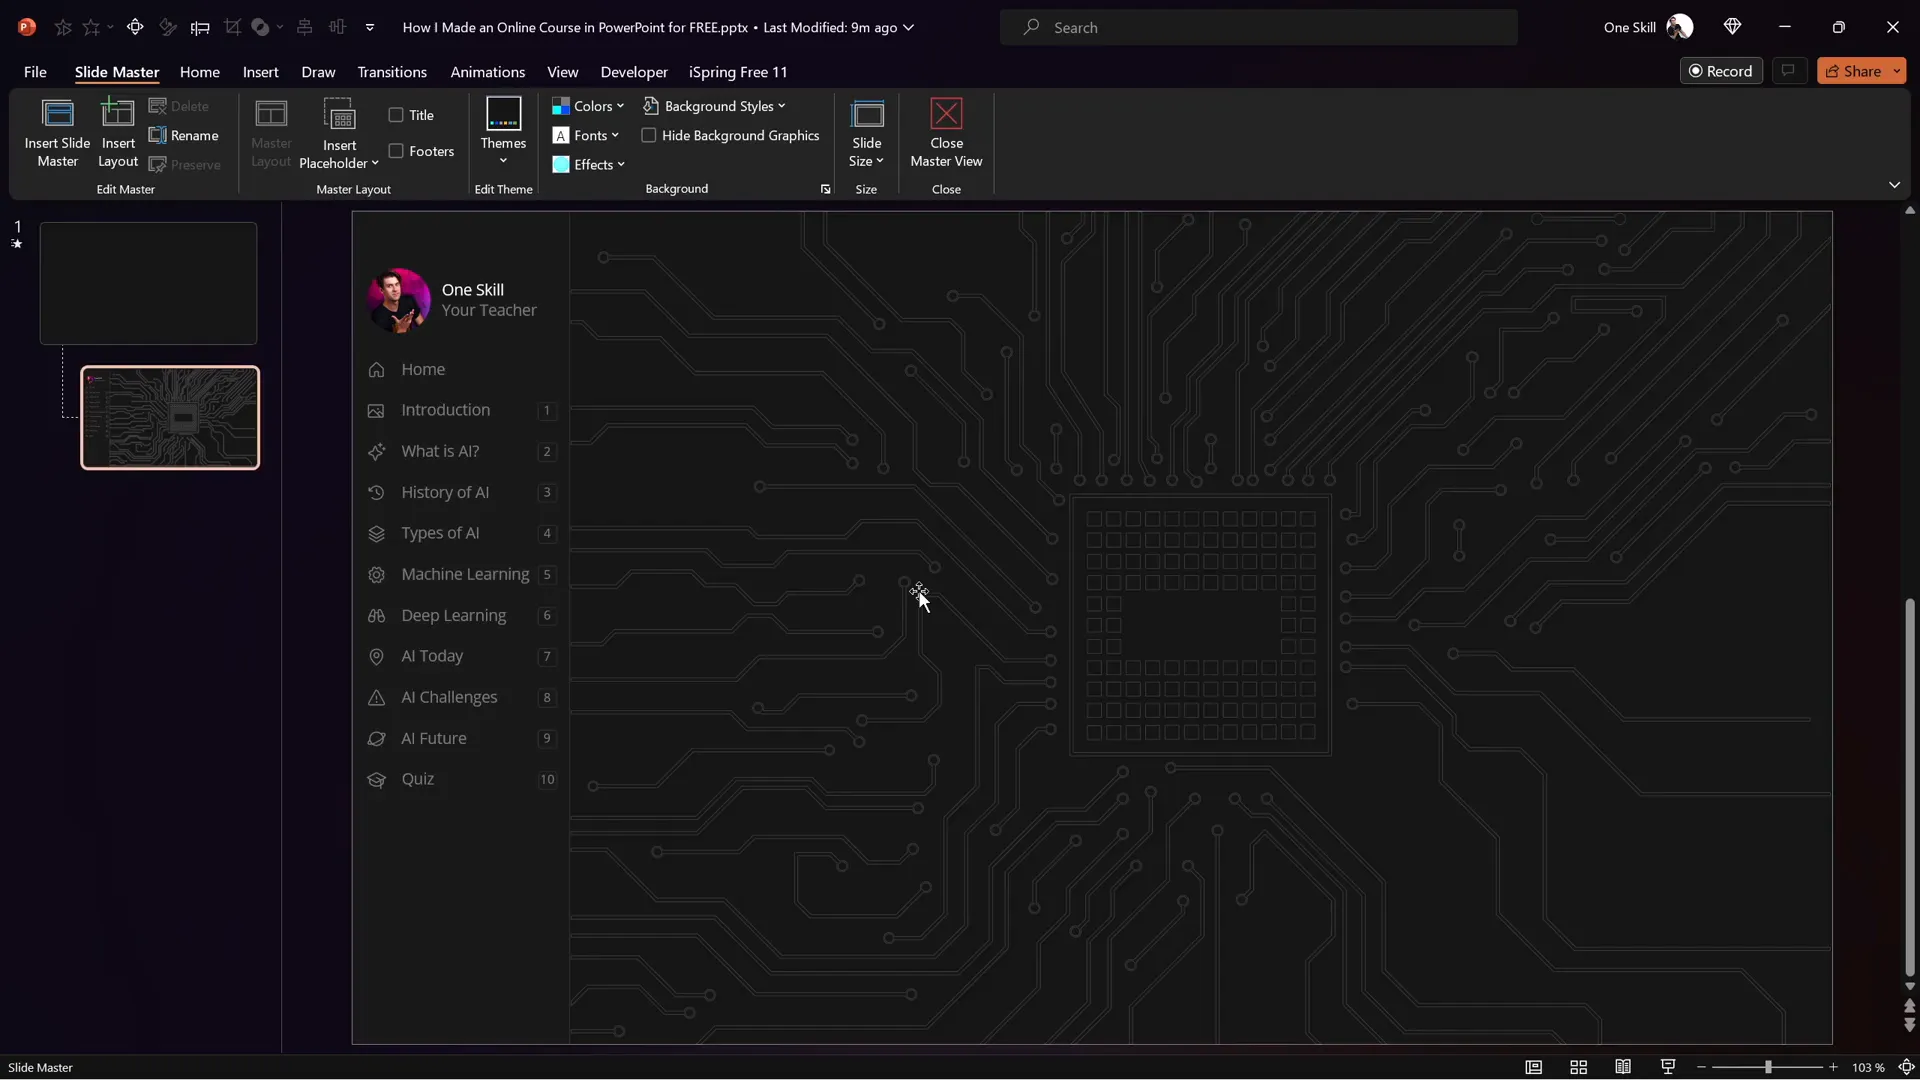
Step 1: Use Slide Master View
The secret to a consistent sidebar across all slides is to create it in the Slide Master View. This way, any element you add there is automatically applied to all slides using that layout. This approach saves you from having to manually duplicate your sidebar on every slide.
Besides the sidebar, I also placed other repeatable design elements, like a microchip background pattern, in the slide master for consistency and efficiency.
Step 2: Constructing the Sidebar
The sidebar consists of several components:
- Text boxes for section titles.
- Icons on the left to visually represent each section.
- Section numbers on the right to guide navigation.
- A profile picture or any image you want to personalize the sidebar.
You can customize all of these elements to match your branding or course theme by editing the slide master.
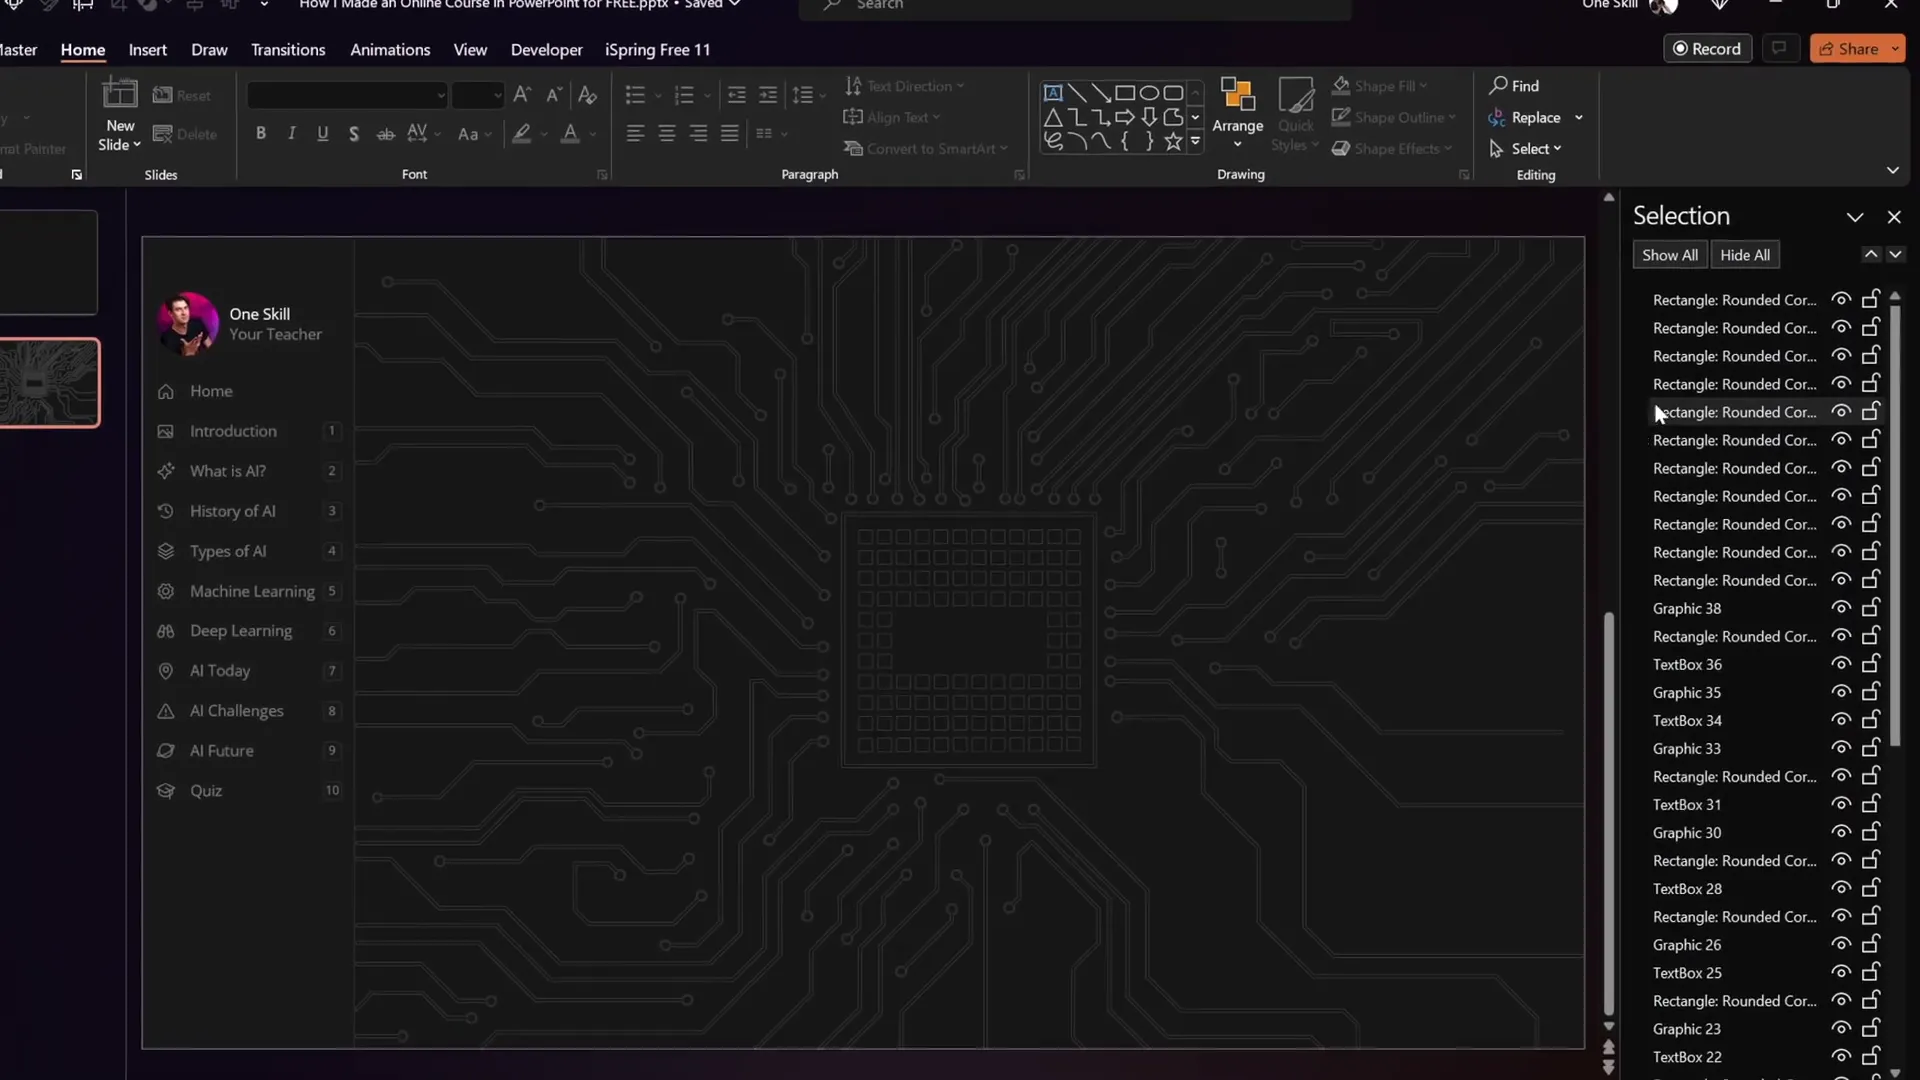
Step 3: Making the Sidebar Clickable with Invisible Hyperlinks
To make the sidebar interactive, I inserted multiple invisible rounded rectangles over the text and icons. These shapes act as clickable hotspots linked to specific slides.
Here’s the process:
- Insert rounded rectangles over each sidebar item.
- Set their fill transparency to 100% so they become invisible.
- Use the Selection Pane to manage and select these shapes easily.
- Right-click each shape, select Insert Hyperlink, and link it to the corresponding slide in your presentation.
For example, the “Introduction” shape links to slide 2, “What is AI?” links to slide 3, and so on. This setup allows students to click anywhere on the sidebar to jump to the relevant content instantly.
Remember to bring these invisible shapes to the front and keep them fully transparent after linking. This ensures they don’t interfere visually but remain clickable.
Animating the Sidebar for a Dynamic Experience
Static navigation is helpful, but adding animation brings your course to life. I wanted the sidebar to highlight the active section dynamically as students move through the slides.
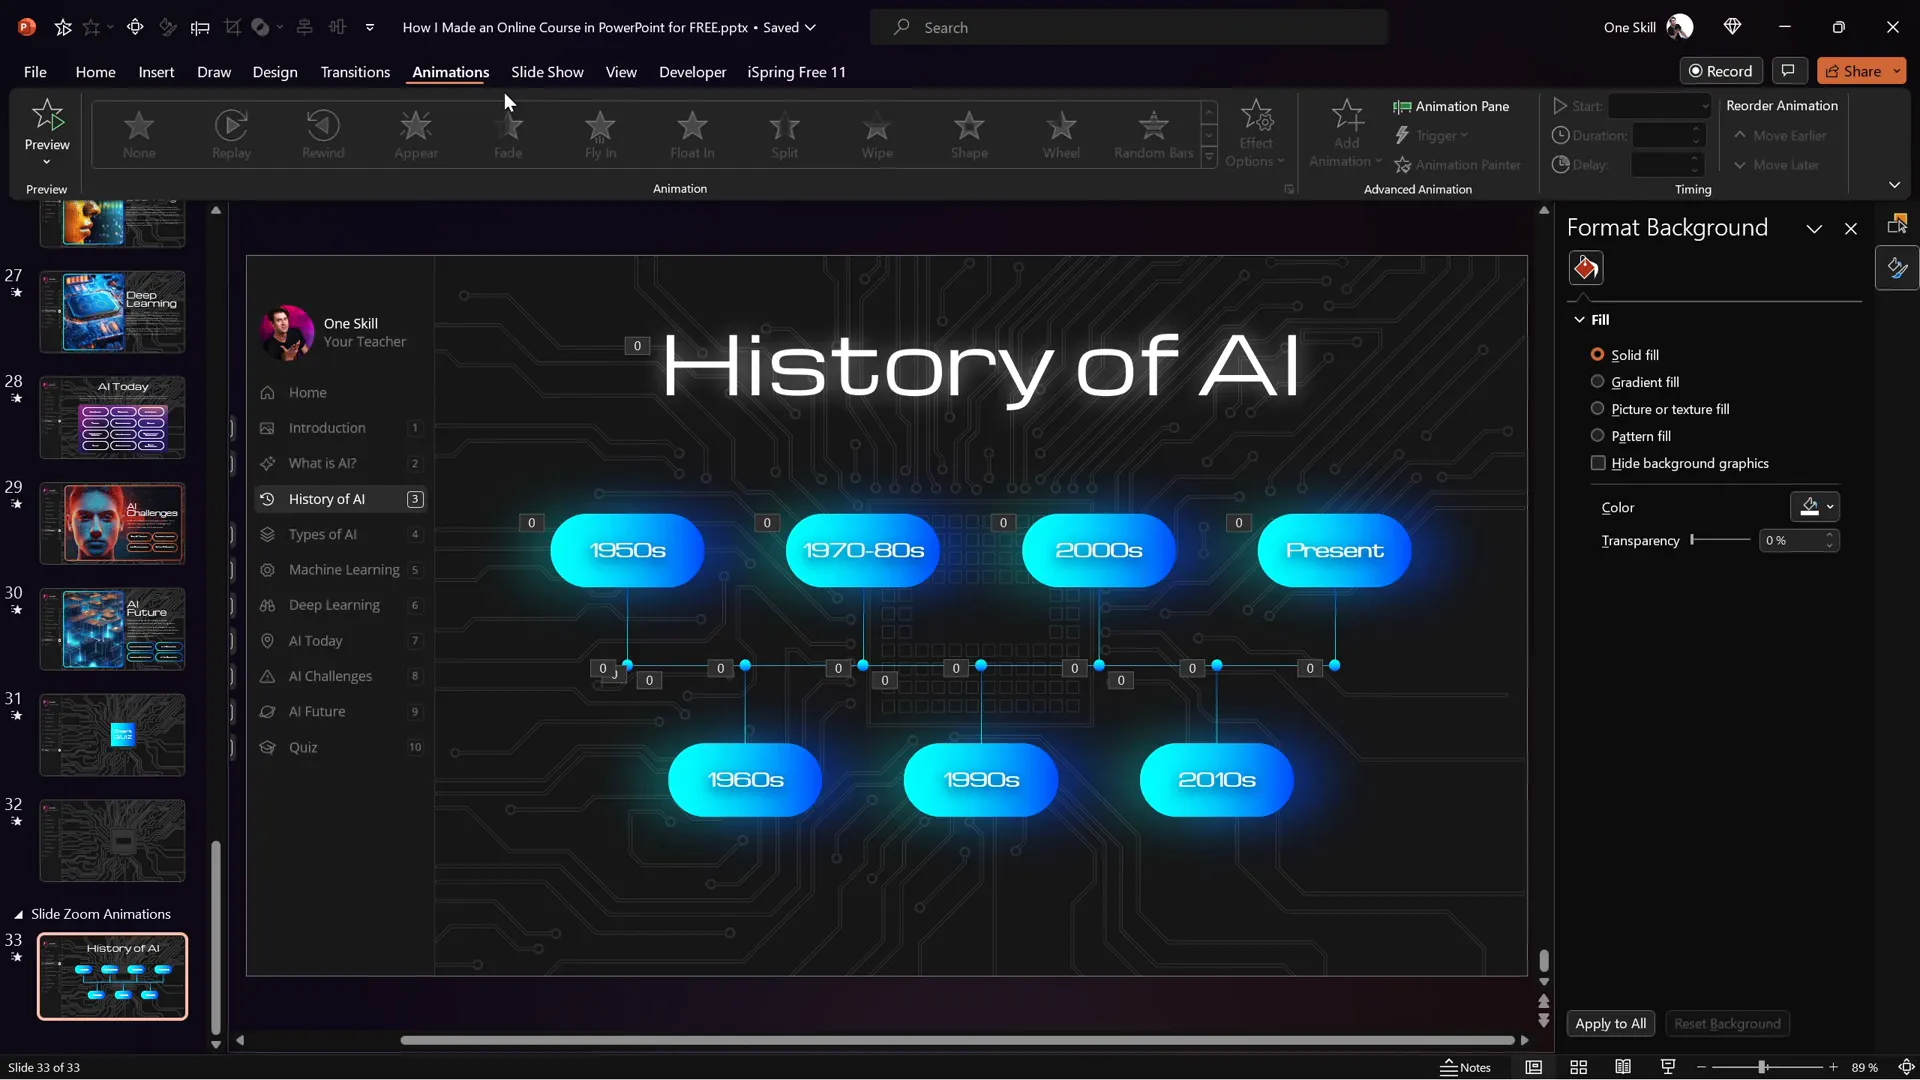
Step 1: Create Active State Cards
Since adding animations within the slide master view was limited, I duplicated the entire sidebar in normal view and created an active state card for each section. These cards visually highlight the current section by changing the background or text style.
Step 2: Position Active Cards Per Slide
On each slide, I pasted the active cards and positioned the one matching the current section into view, while moving others out of the slide area. This way, only one section is highlighted at a time.
Step 3: Use the Morph Transition
The magic happens with the Morph slide transition. Set the transition duration to about half a second. When you navigate between slides, Morph smoothly animates the active card moving from one section to another, creating a slick and professional effect.

This technique adds polish and helps learners easily identify their current location within the course.
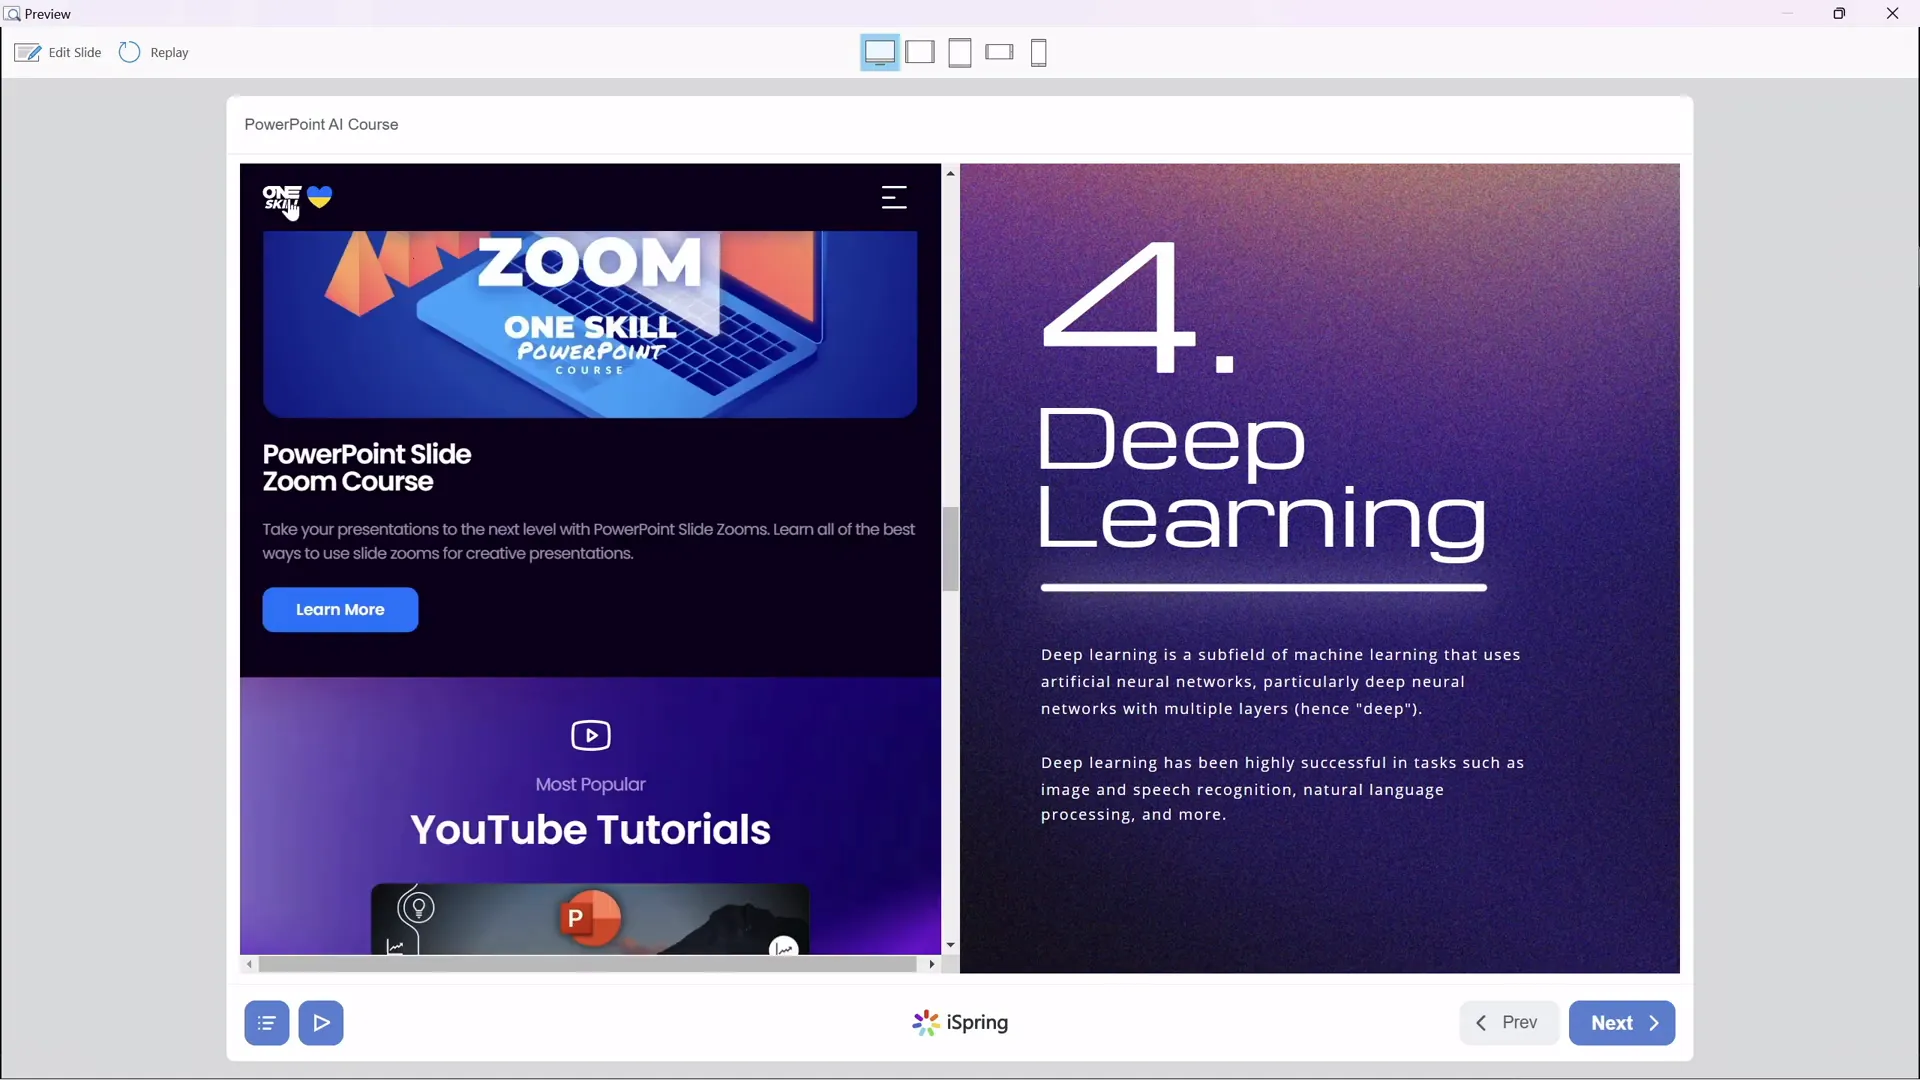
Leveraging Slide Zooms for Interactive Content Exploration
Slide zooms are a fantastic PowerPoint feature that allows learners to click on parts of a slide and zoom into detailed sub-slides. I used slide zooms extensively to make complex content more accessible.
Step 1: Adding Slide Zooms
For example, in the AI history section, clicking on any year zooms into a slide with more information about that specific period.
Similarly, in the types of artificial intelligence slide, clicking on numbered areas reveals detailed explanations of each AI category.
Step 2: Creating Invisible Slide Zooms
To keep the design clean, I made the slide zoom buttons invisible by using transparent cover images. This means the clickable areas are there, but they don’t clutter the visual design.
If you want to learn more about invisible slide zooms, check out tutorials focused on this feature—they’re a game-changer for interactivity.
Step 3: Controlling Slide Zoom Animations
One common issue is that slide zoom animations replay every time you zoom in and out, which can be distracting. To fix this, I used a clever workaround:
- Duplicate the slide with animations.
- On the first slide, remove all slide zooms but keep animations intact.
- Set the transition of this first slide to auto-advance immediately (0 seconds).
- On the second slide, remove all animations but keep slide zooms.
This setup means the animations play only once on the first slide, then the course automatically transitions to the second slide where the learner can interact with the zooms without triggering animations repeatedly.
Embedding Multimedia to Enhance Learning
Multimedia content such as videos and live websites can dramatically enrich your course. Using the free iSpring 3.11 plugin, I added these elements seamlessly into my PowerPoint presentation.
Inserting YouTube Videos
Instead of static images, you can embed YouTube videos directly into your slides:
- Delete the placeholder image on your slide.
- Go to the iSpring 3.11 tab and click the YouTube button.
- Paste the URL of your YouTube video.
- Preview the video to ensure it works.
- Resize and position the video frame as desired.
This allows your learners to watch videos without leaving the course environment, creating a smooth and engaging experience.
Embedding Live Websites
Want to show a live website within your slide? The iSpring plugin makes this easy:

- Delete any existing image on the slide.
- Use the Web Object feature in iSpring 3.11.
- Paste the URL of the website you want to embed.
- Resize the embedded web object frame.
- Preview to confirm the website loads and is interactive.
Embedding live websites opens up new interactivity levels. Learners can scroll, click links, and interact with web content without leaving your course.
Creating Quizzes to Test Knowledge
Quizzes are essential for reinforcing learning and assessing comprehension. With the iSpring 3.11 free plugin, you can create various types of quizzes directly within PowerPoint.
Quiz Types and Features
You can create:
- Multiple Choice Questions with a single correct answer.
- Multiple Response Questions where learners select multiple correct answers.
- Short Answer Questions where learners type in their answer.
Other advanced question types like matching, drag-and-drop, and hotspots are available with the full iSpring Suite.
Building a Quiz
- Go to the iSpring 3.11 tab and click the Quiz button.
- Choose between a graded quiz and a survey.
- Add questions by selecting the desired type.
- Enter your question text and answer options.
- Mark the correct answer(s).
- Customize feedback messages for correct and incorrect responses.
- Optionally, add photos to questions or answers to enhance engagement.
- Set quiz options such as passing score, scoring points, answer shuffling, and reporting preferences.
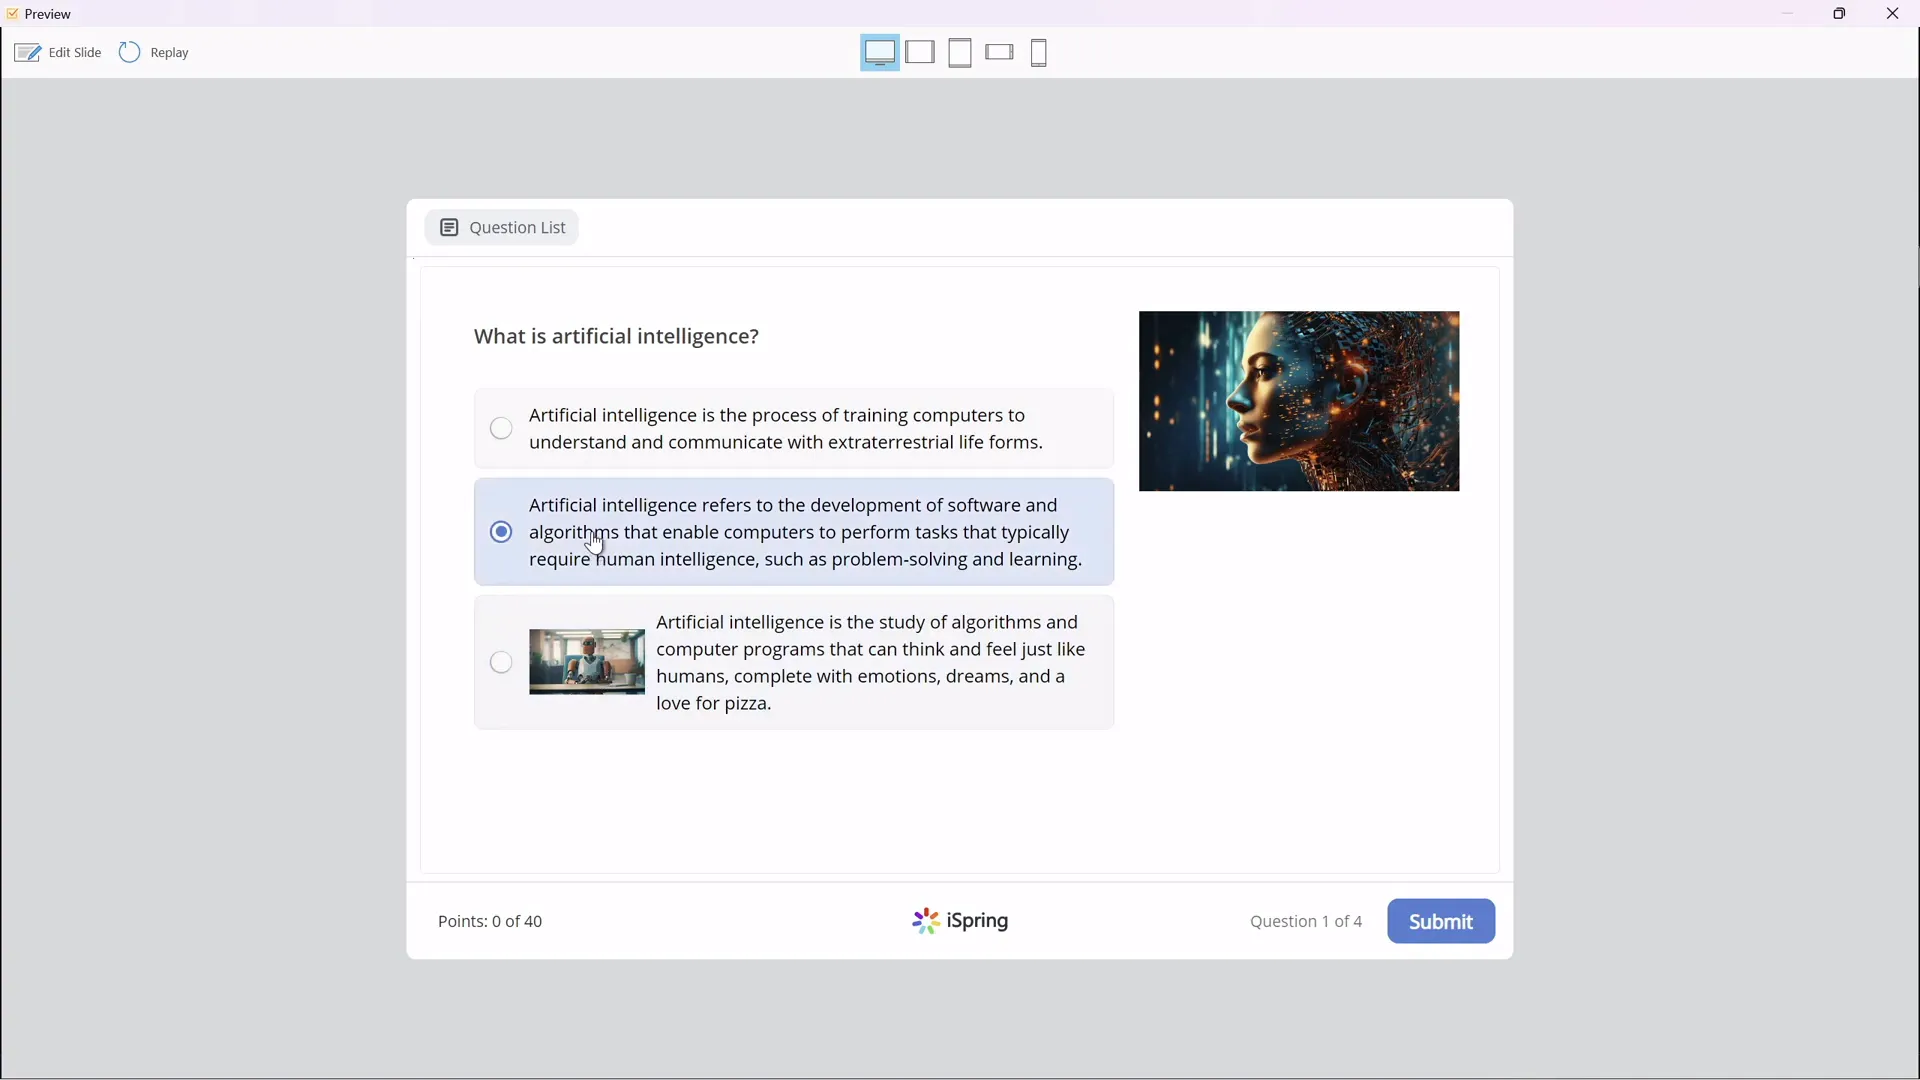
For example, in my artificial intelligence quiz:
- One multiple choice question asked, “What is artificial intelligence?” with four options.
- A multiple response question required selecting all false statements about AI.
- A short answer question asked for the abbreviation of natural language processing (NLP).
The quiz includes a welcome slide and clear navigation buttons to guide learners through the questions.
Taking and Reviewing the Quiz
Once inserted, learners can take the quiz directly within the course. After submission, they receive immediate feedback and can view their results, including pass/fail status based on the passing percentage you set.
This interactive quiz experience helps reinforce learning and gives you insight into your students’ understanding.
Publishing Your Course for Maximum Reach
After creating your polished, interactive presentation, the final step is publishing it as an online course. The iSpring 3.11 plugin offers multiple publishing options:
Publishing to Your Computer
Export the course as a package you can upload anywhere. You can:
- Name your course and choose a save location.
- Select whether to publish all slides or just selected ones.
- Adjust the course size and choose to fit it to the browser window.
Publishing for Learning Management Systems (LMS)
If your institution uses an LMS like Moodle, you can publish your course in SCORM format, which is compatible with most LMS platforms. This allows you to track learner progress and scores.
Publishing to iSpring Learn or Online Platforms
iSpring offers its own LMS called iSpring Learn for easy hosting and management. You can also publish to YouTube, iSpring Page, or iSpring Market depending on your distribution goals.
Previewing Your Published Course
After publishing, preview your course to ensure everything works smoothly:
- Check sidebar navigation and animations.
- Test slide zooms and interactive elements.
- Play embedded YouTube videos.
- Verify embedded websites are functional.
- Take the quiz to confirm correct setup.

Conclusion: Empower Your Teaching with Free Tools
Transforming your PowerPoint presentations into dynamic, interactive online courses is easier than ever — and you don’t need expensive software to do it. By leveraging PowerPoint’s slide master for consistent design, slide zooms for interactivity, the free iSpring 3.11 plugin for multimedia and quizzes, and smart publishing options, you can create engaging learning experiences that captivate your students.
Whether you’re teaching artificial intelligence or any other subject, these techniques will help you:
- Enhance student engagement with interactive navigation and content exploration.
- Embed multimedia such as videos and live websites to enrich learning.
- Assess knowledge through customizable quizzes.
- Publish your course for easy access on any device.
Don’t let your existing PowerPoint slides gather dust — turn them into valuable online courses that inspire and educate!
Frequently Asked Questions (FAQ)
Can I create an online course from any PowerPoint presentation?
Yes! As long as you have a PowerPoint presentation ready, you can convert it into an online course using slide master layouts, slide zooms, and the free iSpring 3.11 plugin to add interactivity, multimedia, and quizzes.
Do I need to pay for iSpring 3.11 to use these features?
No, the iSpring 3.11 plugin is free and provides essential features such as embedding YouTube videos, live websites, and creating quizzes. There is a premium iSpring Suite with additional advanced features, but the free tool is powerful enough for most course creation needs.
How do slide zooms improve my presentation?
Slide zooms allow learners to click on specific parts of a slide to zoom into detailed sub-slides without losing their place. This creates a non-linear, interactive learning path that makes complex information easier to digest.
What is the benefit of using the slide master for my sidebar?
Using the slide master ensures that your sidebar appears consistently on all slides without needing to duplicate it. Any design changes you make in the slide master automatically apply to all slides using that layout, saving time and effort.
Can I embed videos from platforms other than YouTube?
The iSpring 3.11 plugin primarily supports embedding YouTube videos easily. For other platforms, you may need to convert videos to supported formats or use other multimedia embedding methods, depending on your course hosting platform.
Is it possible to publish my course to popular LMS platforms?
Absolutely. iSpring 3.11 allows you to export your course in SCORM format, which is compatible with most LMS platforms like Moodle, Blackboard, and Canvas. This enables tracking learner progress and quiz results.
How can I make sure my animations don’t replay every time I use slide zooms?
You can duplicate your slide into two versions: one with animations and no zooms that auto-advances, and another with zooms and no animations. This setup ensures animations play only once, providing a smoother experience.
Can I customize quiz feedback and scoring?
Yes, you can customize feedback messages for correct and incorrect answers, set passing percentages, assign point values, shuffle answers, and even send quiz reports to yourself or your learners.
What devices and browsers support courses published with iSpring?
Courses published with iSpring are compatible with all modern browsers and devices, including desktops, tablets, and smartphones. The course player adapts responsively for an optimal viewing experience.
Where can I download the tools and resources mentioned?
You can download the free iSpring 3.11 plugin from the official iSpring website. Additionally, many design assets like fonts, icons, and vector graphics are available from free resources such as Google Fonts, Phosphor Icons, and Freepik.
Check out the full video: How I Made an Online Course in PowerPoint for FREE! 😁


